development environment
Ubuntu 14.04 server
nginx-1.8.1
nginx-rtmp-module
Setup of Nginx Server
Install dependency libraries for nginx
sudo apt-get update
sudo apt-get install libpcre3 libpcre3-dev
sudo apt-get install openssl libssl-dev
Configure and compile nginx
Add the rtmp module of nginx using the default configuration of nginx.
./configure --add-module=../nginx-rtmp-module-master
make
sudo make install
Run Test nginx
Go to the installation directory/usr/local/nginx and run the command. /sbin/nginx
Note: All future commands run in the / usr/local/nginx directory, which is the relative directory of the Nginx configuration file.
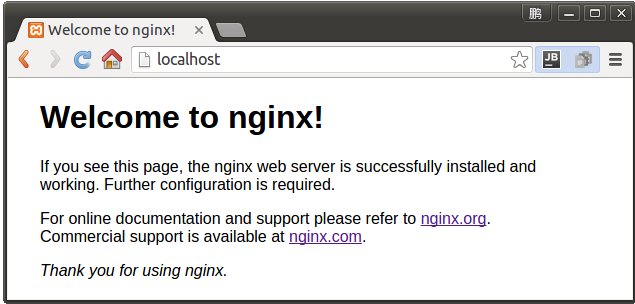
Open the browser and enter: localhost in the address bar.If, as shown in the figure below, your nginx server is successfully set up.
Configuration of an on-demand video server
With the nginx server set up in the last step, we can start a Video On Demand service.Open the configuration file nginx.conf to add the RTMP configuration.
worker_processes 1;
events {
worker_connections 1024;
}
rtmp { #RTMP Service
server {
listen 1935; #//Service Port
chunk_size 4096; #//Size of data transfer block
application vod {
play /opt/vide/vod; #//Video file storage location.
}
}
}
http {
include mime.types;
default_type application/octet-stream;
sendfile on;
keepalive_timeout 65;
server {
listen 80;
server_name localhost;
location / {
root html;
index index.html index.htm;
}
error_page 500 502 503 504 /50x.html;
location = /50x.html {
root html;
}
}
}
The configuration directory */opt/video/vod* is where the video files are stored. Let's put a file in it.I put in a qq.mp4 file.

When the files are ready, let's restart Nginx
sudo ./sbin/nginx -s reload
Open the video playback software with VLC media-> open network stream...
Fill in the program address rtmp://localhost/vod/qq.mp4 that we want to order as shown in Fig.
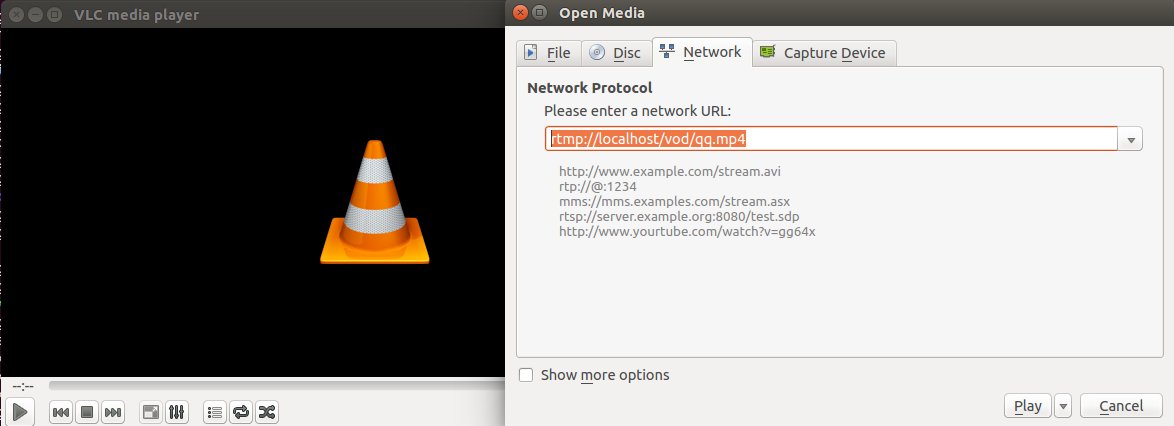
Click play to play.
Of course, on-demand services can also be implemented without using the RTMP plug-in nginx.That's the configuration location section, which uses the RTMP service because we're configuring live and lookup capabilities below.
Configuration of Live Video Server
Next, we add the live server configuration on top of the on-demand server configuration file.There are two places in total. The first place is to add an application name to RTMP service. It can be any name or any name. I call it live because it's live. If you plan to make live broadcasts on multiple channels, you can have any name of live_cctv1 or live_cctv2.The second is to add two location fields, the contents of which should be viewed directly from the file.
worker_processes 1;
events {
worker_connections 1024;
}rtmp {
server {
listen 1935;
chunk_size 4096;
application vod {
play /opt/video/vod;
}application live{ #First added live field
live on;
}
}}
http {
include mime.types;
default_type application/octet-stream;
sendfile on;
keepalive_timeout 65;
server {
listen 80;
server_name localhost;
location /stat { #The location field added at the second place.
rtmp_stat all;
rtmp_stat_stylesheet stat.xsl;
}location /stat.xsl { #The location field added at the second place.
root /usr/local/nginx/nginx-rtmp-module/;
}location / {
root html;
index index.html index.htm;
}error_page 500 502 503 504 /50x.html;
location = /50x.html {
root html;
}
}
}
After adding these two places, restart nginx to open the browser and see if it has the following image:
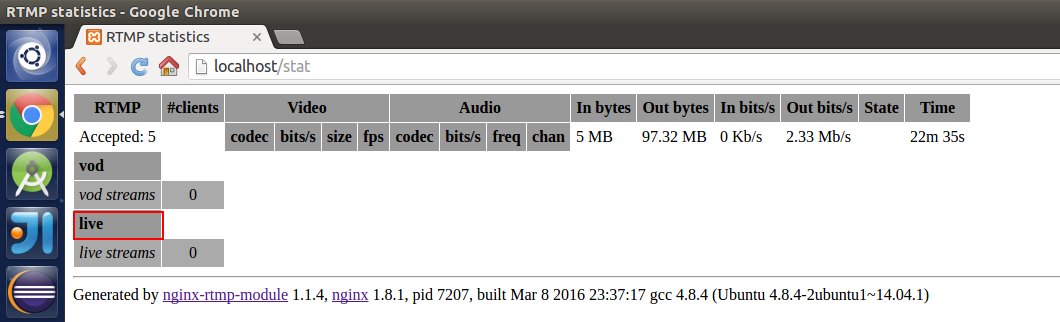
Do you see the word live in the red box? If it can be displayed, it will show that your configuration is working.
Let's push a show to see what else we can do. (Actually, the term professional is recording, which will be used later.)Come on.
I'm using OBS (Open Broadcaster Software) for this push. Refer to the blog after the Ubuntu installation of OBS (Open Broadcaster Software) I wrote earlier to show you how to use your mobile phone to collect videos and push them to your server.
Configure OBS as shown in Figure:
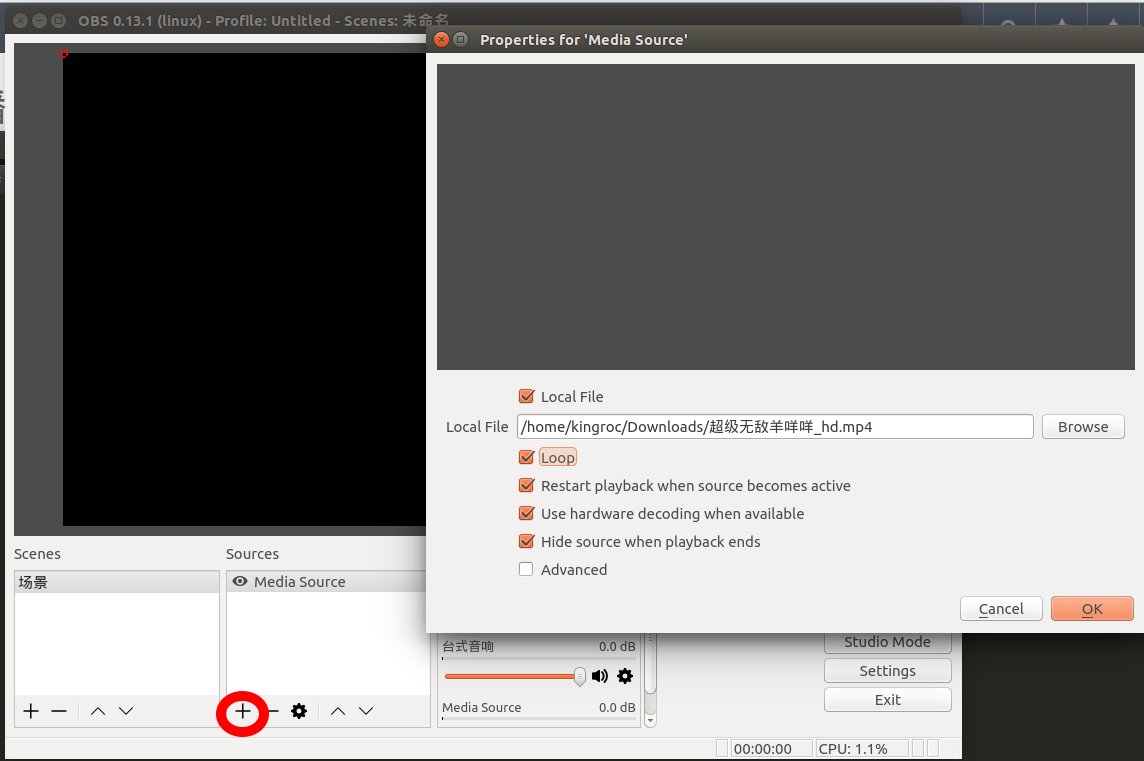
1. Click on the red circle to add Media Source, and a box will pop up. The contents will be configured according to the picture display.Click OK to play it on your screen.
2. Configure the output stream of the program as shown in the figure:
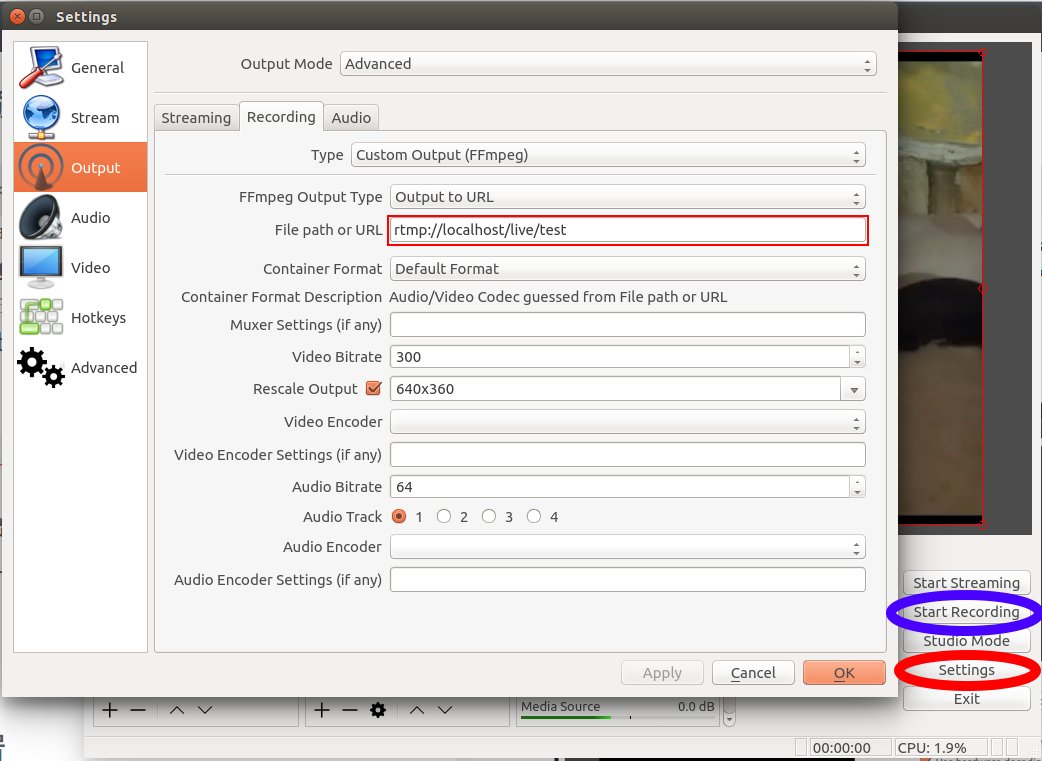
First click on the red circle "setting" to enter the setup interface.Remember to fill in the server path to record correctly.Once configured, you can click OK.After exit, click on the blue circle to start recording.
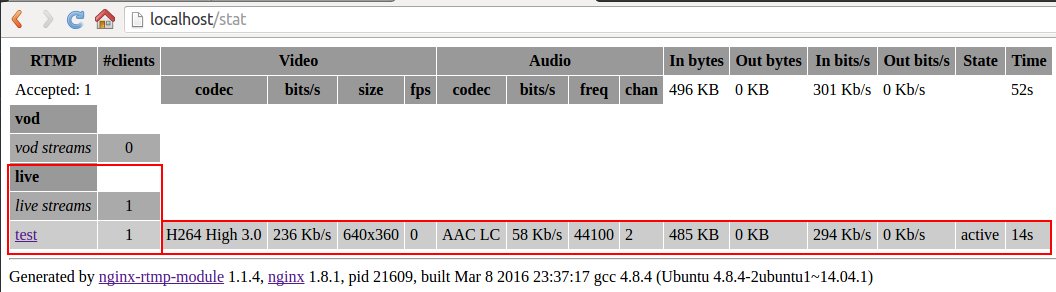
3. See our recorded programs, did the server receive them?Open my server address "http://localhost/stat" to see if your display is the same as mine?If the same proof is that the server has received the recorded program, the client can play it.
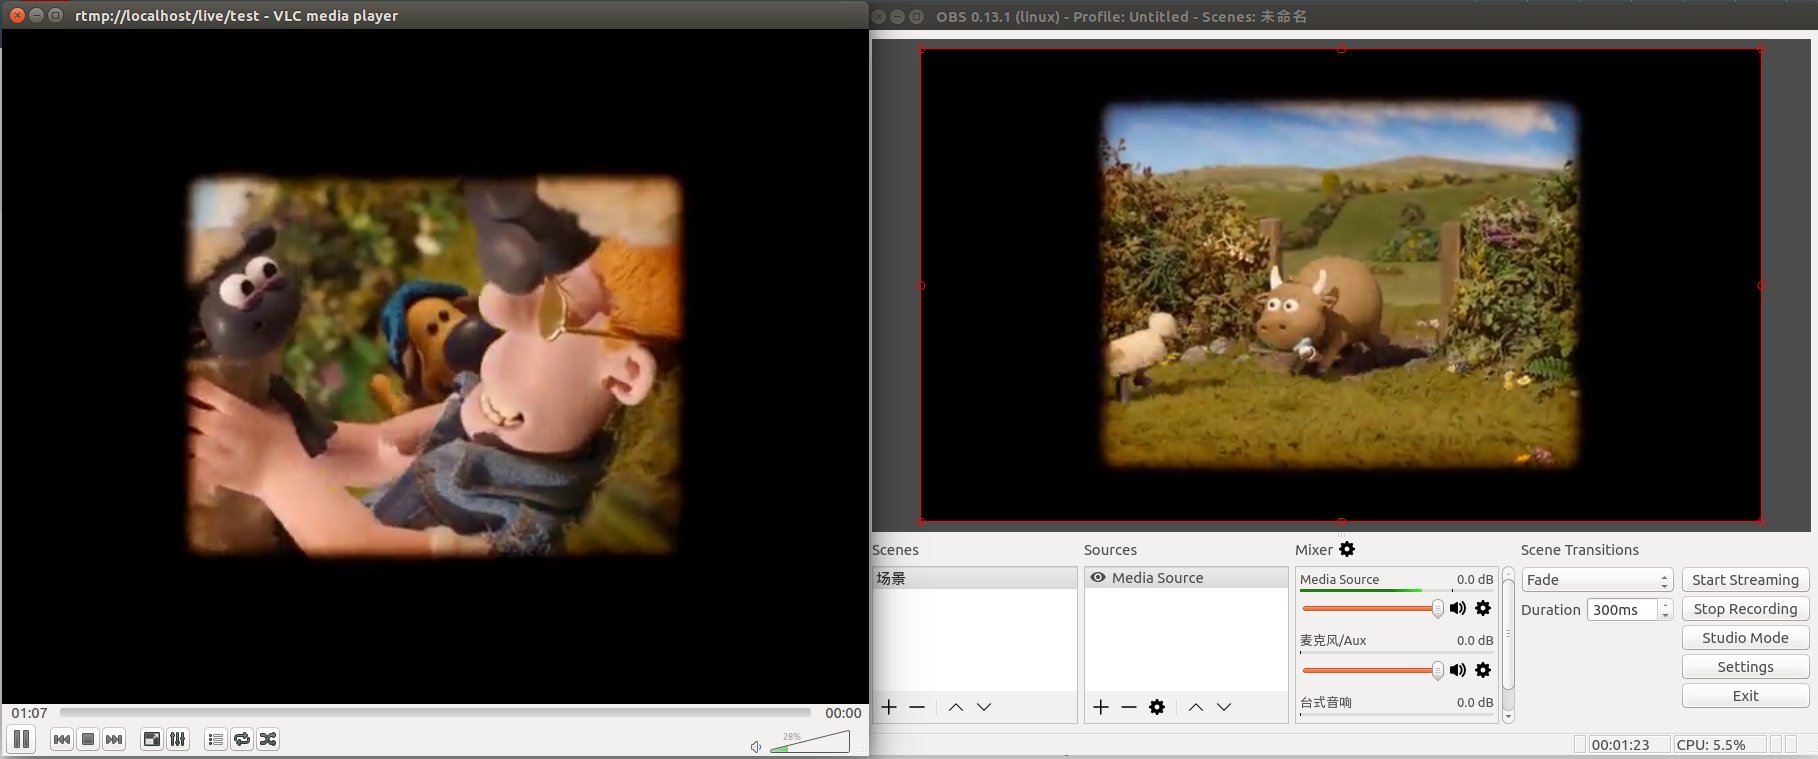
The address to play is "rtmp://localhost/live/test". If you have a local player that supports the RTMP protocol, you can try it.Finally, we present a screen shot of watching live broadcasts.
Real-time Lookback Video Server Configuration
Let's think if the live service can record the program locally, can't we go back and see the previous program directly?Look back at a minute, an hour, or even a day.Just think about it and get excited that there's something ready to use without writing code.How to use it?Continue to look at the configuration of nginx.
worker_processes 1;
events {
worker_connections 1024;
}rtmp {
server {
listen 1935;
chunk_size 4096;
application vod {
play /opt/video/vod;
}application live {
live on;
hls on; #This parameter transforms the live broadcast server into a real-time playback server.
wait_key on; #Protect the video slices so that no mosaics are produced.
hls_path /opt/video/hls; #Slice video file storage location.
hls_fragment 10s; #The duration of each video slice.
hls_playlist_length 60s; #The total number of events you can look back on is set to 1 minute.
hls_continuous on; #Continuous mode.
hls_cleanup on; #Delete the extra slices.
hls_nested on; #Nested mode.
}
}
}http {
include mime.types;
default_type application/octet-stream;
sendfile on;
keepalive_timeout 65;
server {
listen 80;
server_name localhost;
location /stat {
rtmp_stat all;
rtmp_stat_stylesheet stat.xsl;
}location /stat.xsl {
root /usr/local/nginx/nginx-rtmp-module/;
}
location /live { #This is also the field you need to add.
types {
application/vnd.apple.mpegurl m3u8;
video/mp2t ts;
}
alias /opt/video/hls;
expires -1;
add_header Cache-Control no-cache;
}location / {
root html;
index index.html index.htm;
}error_page 500 502 503 504 /50x.html;
location = /50x.html {
root html;
}
}
}
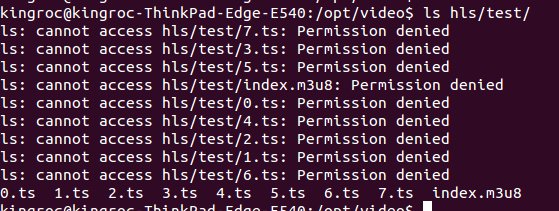
1. You need to restart nginx after adding. Because nginx needs to write a slice video file to the server this time, but nginx I did not specify a user name for nginx and can only follow the default nobody and nogroup user groups, there are no groups.So I've made changes to the directory that I need to write to with increased permissions.
As shown below, this is done to avoid being unable to write files due to permissions issues.

2. How to record videos to the server, as mentioned in the previous section, is no longer mentioned here.
3. Check if the video file is actually not recorded, and continue to view the picture:
A slice video file has been generated.There is also an index.m3u8.
4. Play the video, but this time it starts with http, "http://localhost/live/test/index.m3u8".
5. It is ready to play. How can I look back?Actually, this index.m3u8 file is just a directory.Just play that.ts file if you want to look back at that one.

