Blog Outline:
- I. optimization before compilation and installation
- II. Nginx configuration item optimization
- 1. Adjust the number of Nginx running processes
- 2. CPU affinity of Nginx
- 3. Nginx event processing model
- 4. Enable efficient transmission mode
- 5. Connection timeout
- 6. fastcgi optimization
- 7. gzip tuning
- 8. Tuning of expires cache
- 9. Configure anti-theft chain
- 10. Kernel parameter optimization
- 11. Optimization of the number of system connections
- III. verify the above optimization and Nginx server stress test
- 1. Test the function of anti-theft chain
- 2. Pressure test
I. optimization before compilation and installation
The optimization before compilation and installation is mainly used to modify the program name and so on, so as to hide the software name and version number by changing the source code.
First, please. download I provide the required source package.
1. Start installation:
[root@nginx ~]# yum -y erase httpd        #Uninstall the system's default httpd service to prevent port conflicts
[root@nginx ~]# yum -y install openssl-devel pcre-devel    #Installation dependency
[root@nginx src]# rz          #rz command to upload the required source package
[root@nginx src]# ls          #Confirm the uploaded source package
nginx-sticky-module.zip    nginx-1.14.0.tar.gz    ngx_cache_purge-2.3.tar.gz
#Decompress the uploaded source package
[root@nginx src]# tar zxf nginx-1.14.0.tar.gz
[root@nginx src]# unzip nginx-sticky-module.zip
[root@nginx src]# tar zxf ngx_cache_purge-2.3.tar.gz
[root@nginx src]# cd nginx-1.14.0/        #Switch to nginx directory
[root@nginx nginx-1.14.0]# vim src/core/nginx.h    #Modify the following two lines of configuration
#define NGINX_VERSION      "6.6"       #Here is the revision number of nginx
#define NGINX_VER          "IIS/" NGINX_VERSION    #The name of the software is changed here. I changed the original nginx to IIS.
#After modification, save to exit
[root@nginx nginx-1.14.0]# vim src/http/ngx_http_header_filter_module.c   #Edit the file
#Before modification, it is as follows:
static u_char ngx_http_server_string[] = "Server: nginx" CRLF;     #Forty-ninth elements
#Revised as follows:
static u_char ngx_http_server_string[] = "Server: IIS" CRLF;   #This IIS is best aligned with the previous file change.
#After the change is completed, save to exit.
[root@nginx nginx-1.14.0]# vim src/http/ngx_http_special_response.c   #Modify this configuration file to prevent the page from displaying errors with nginx and version number.
#Before modification, it is as follows:
static u_char ngx_http_error_tail[] =     #Before that, there was a line very similar to this one. Note that there is no word build after the error in this line.
"<hr><center>nginx</center>" CRLF           #Thirty-sixth elements
"</body>" CRLF
"</html>" CRLF
#The changes are as follows:
static u_char ngx_http_error_tail[] =
"<hr><center>IIS</center>" CRLF       #Change the original nginx to IIS
"</body>" CRLF
"</html>" CRLF
#After the change is completed, save to exit
[root@nginx nginx-1.14.0]# useradd -M -s /sbin/nologin www   #Create nginx run user
[root@nginx nginx-1.14.0]# ./configure --prefix=/usr/local/nginx1.14 --user=www --group=www --with-http_stub_status_module  --with-http_realip_module  --with-http_ssl_module --with-http_gzip_static_module  --http-client-body-temp-path=/var/tmp/nginx/client --http-proxy-temp-path=/var/tmp/nginx/proxy  --http-fastcgi-temp-path=/var/tmp/nginx/fcgi --with-pcre  --add-module=/usr/src/ngx_cache_purge-2.3  --with-http_flv_module --add-module=/usr/src/nginx-sticky-module --with-http_dav_module --with-http_addition_module --with-http_sub_module --with-http_mp4_module && make && make install
#Compilation and installation
[root@nginx nginx-1.14.0]# ln -sf /usr/local/nginx1.14/sbin/nginx /usr/local/sbin/  #Create nginx command soft connection
[root@nginx nginx-1.14.0]# mkdir -p /var/tmp/nginx/client      #Create directory for temporary files
[root@nginx nginx-1.14.0]# nginx -t       #Check profile
[root@nginx nginx-1.14.0]# nginx       #Start nginx when there are no errors
[root@nginx nginx-1.14.0]# netstat -anput | grep 80      #Make sure port 80 is listening
The command line verifies that the software name and version number of the http header have changed:
[root@nginx conf]# curl -I 127.0.0.1     #Visit this machine
HTTP/1.1 200 OK
Server: IIS/6.6             #OK, let's change the name and version
Date: Fri, 25 Oct 2019 00:10:17 GMT
Content-Type: text/html
Content-Length: 612
Last-Modified: Fri, 25 Oct 2019 00:03:52 GMT
Connection: keep-alive
ETag: "5db23be8-264"
Accept-Ranges: bytes
[root@nginx conf]# curl -I 127.0.0.1/a.html       #Visit a page that does not exist
HTTP/1.1 404 Not Found
Server: IIS/6.6           #The information echoed by the error page is also changed by us, OK
Date: Fri, 25 Oct 2019 00:11:07 GMT
Content-Type: text/html
Content-Length: 164
Connection: keep-alive
II. Nginx configuration item optimization
Nginx is a master/worker structure: a master process that generates one or more worker processes. The schematic diagram is as follows: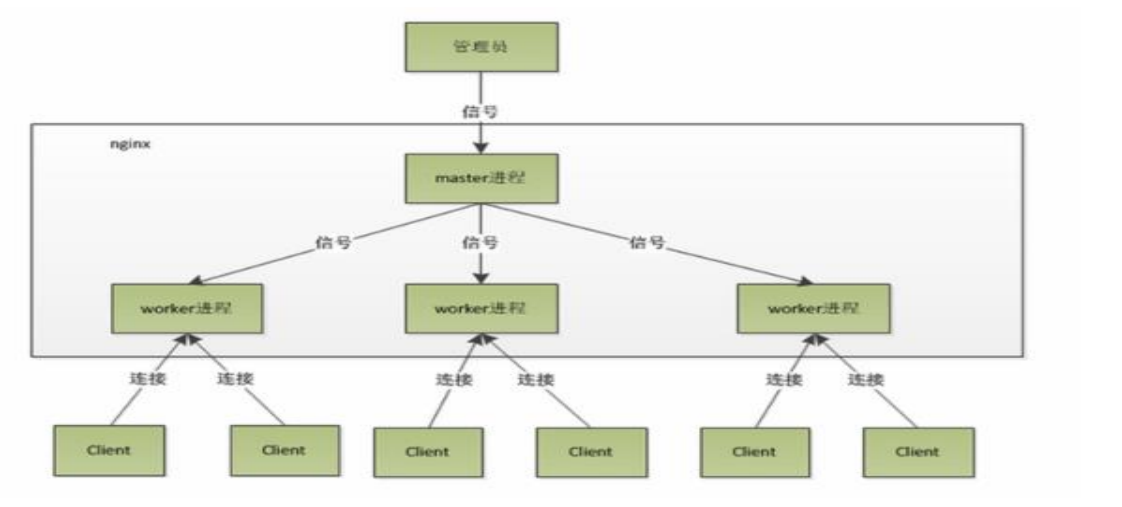
The master worker design pattern mainly includes two main components: master and worker. Master maintains the worker queue, distributes requests to multiple workers and executes them. Worker mainly performs actual logic calculation and returns the results to master.
The advantage of Nginx's adoption of this process model is that it adopts independent processes, so that they will not affect each other. After one process exits, other processes are still working, and the service will not be interrupted. The master process will restart the new worker process soon. When an exception occurs to the worker, all requests on the current worker will fail without affecting other worker processes.
All the next configuration parameters are written in the global of the Nginx configuration file
1. Adjust the number of Nginx running processes
[root@nginx ~]# vim /usr/local/nginx1.14/conf/nginx.conf    #Edit Master profile
 worker_processes  4;    #Generally set as the core or core number of CPU x2
  [root@nginx ~]# nginx -s reload          #Restart Nginx service
  [root@nginx ~]# ps -ef | grep nginx | grep worker    #View open worker processes
  www      128282   6761  0 11:41 ?        00:00:00 nginx: worker process
  www      128283   6761  0 11:41 ?        00:00:00 nginx: worker process
  www      128284   6761  0 11:41 ?        00:00:00 nginx: worker process
  www      128285   6761  0 11:41 ?        00:00:00 nginx: worker process
2. CPU affinity of Nginx
[root@nginx ~]# VIM / usr / local / nginx1.14/conf/nginx.conf <! -- edit the main configuration file -- >
<!--If it is a four core configuration, it should be configured as follows:-->
worker_processes 4;
worker_cpu_affinity 0001 0010 0100 1000;
       <!--
//Above is to open a worker for each core. If you want each core to correspond to two workers,
//It needs to be written: worker CPU affinity 0001 0010 0100 1000 0001 0010 0100 1000;
                                 -->
<!--  If it is an eight core configuration, it should be configured as follows:  -->
worker_processes 8;
worker_cpu_affinity 00000001 00000010 00000100 00001000 00010000 00100000 01000000
10000000;
worker_rlimit_nofile 65535;      <!--modify nginx Maximum number of files that can be opened-->
         <!--
        //This configuration refers to the maximum number of file descriptions opened by a nginx process. The theoretical value should be the maximum number of files opened by the system (view with ulimit-n command) divided by the nginx process. However, the allocation request of nginx is not so uniform, so it is better to keep consistent with the value obtained by ulimit-n command.
//The value specified above is "65535", but the system default is 1024. What should I do?
                               -->
[root@docker ~]# Ulimit - N <! -- determine the system's most open files -- >
1024
<!--If it starts at this time nginx Service, there will be exceptions.-->
[root@docker ~]# VIM / etc / security / limits.conf <! -- edit this file to modify the default number of files on the system -- >
<!--Add the following fields at the end of the configuration file -->
*       soft    nofile  65535
*       hard    nofile  65535
<!--Save exit when changes are complete-->
[root@nginx conf]# Su - <! -- log in again for effect -- >
[root@nginx ~]# Ulimit - N <! -- check again to confirm whether the modification is successful -- >
65535
[root@nginx ~]# Nginx - s reload <! -- restart nginx service for configuration to take effect -- >
At most, 8 processes can be opened. If there are more than 8 processes, the performance will not be improved, and the stability will be lower, so 8 processes are enough.
Since the next step is to add some configuration items to the configuration file, write the configuration items and explain them directly.
3. Nginx event processing model
#The configuration file is modified as follows:
events {
    use epoll;
    worker_connections  65535;
    multi_accept on;
}
Nginx adopts epoll event model, which has high processing efficiency. Work ﺾ connections is the maximum number of connections allowed to clients for a single worker process. This number is generally determined according to server performance and memory. The actual concurrent amount of nginx server is the number of worker processes multiplied by work ﺾ connections, and a 65535 is filled in, which means that the concurrent amount can reach 65535 x 4 = 262140. Concurrency, concurrency of a website to such a large number, is also a big station!
Multi accept tells nginx to accept as many connections as possible after receiving a new connection notification.
Note: all the following configurations will be written in the http {} module.
4. Enable efficient transmission mode
http {
    include       mime.types;
    default_type  application/octet-stream;
         ........................#Omit part of the content
    sendfile        on;        #This line is on by default
    tcp_nopush     on;     #Remove the comment at the beginning of this line
The explanation of the above configuration is as follows:
- Include mime.types: media type. include is just an instruction that contains the contents of another file in the current file.
- Default? Type application / octet stream: the default media type is sufficient.
- sendfile on: enable efficient file transfer mode. The sendfile instruction specifies whether nginx calls the sendfile function.
The output file is set to on for common applications. If it is used for heavy load applications such as downloading disk IO, it can be set to off to balance the processing speed of disk and network I/O and reduce the load of the system. Note: if the image display is abnormal, change this to off. - TCP ﹣ no push on; must be enabled in sendfile mode to effectively prevent network blocking and actively reduce the number of network message segments (tell nginx to send all header files in one packet instead of one after another).
5. Connection timeout
The main purpose of modifying and adding the following content is to protect server resources, CPU, memory, and control the number of connections, because establishing connections also consumes resources.
#Add the following to the http {} field:
    keepalive_timeout  65;
    tcp_nodelay on;
    client_header_buffer_size 4k;
    open_file_cache max=102400 inactive=20s;
    open_file_cache_valid 30s;
    open_file_cache_min_uses 1;
    client_header_timeout 15;
    client_body_timeout 15;
    reset_timedout_connection on;
    send_timeout 15;
    server_tokens off;
client_max_body_size 10m;- Maintained_timeout: the timeout for the client connection to keep the session. After this time, the server disconnects the link;
- tcp_nodelay: it is also to prevent network blocking, but it should be included in the keepalived parameter to be effective;
- Client header buffer size 4K: the buffer size of the client request header. This can be set according to the paging size of your system. Generally, the size of a request header will not exceed 1k, but because the paging size of the general system is greater than 1k, it is set as paging size here. The page size can be obtained by getconf PAGESIZE.
- Open file cache max = 102400 inactive = 20s: this will specify the cache for the open file. It is not enabled by default. Max specifies the number of cache. It is recommended to be consistent with the number of open files. Inactive refers to how long the file has not been requested before the cache is deleted.
- Open file cache valid 30s: This refers to how often to check the effective information of the cache;
- Open file cache min uses 1: the minimum number of times a file is used within the time of the inactive parameter in the open file cache instruction. If it exceeds this number, the file descriptor is always opened in the cache. For example, if a file is not used once within the inactive time, it will be removed.
- Client header timeout sets the timeout for the request header. We can also lower this setting. If no data is sent after this time, nginx will return the error of request time out.
- Client body timeout: sets the timeout of the request body. We can also set this lower. No data is sent after this time, which is the same as the error prompt above.
- Reset > timeout > connection: tells nginx to close unresponsive client connections. This will free up the memory space occupied by that client;
- send_timeout: response client timeout, which is only limited to the time between two activities. If the timeout exceeds this time, the client has no activity, nginx closes the connection;
- server_tokens: it will not make nginx execute faster, but it can close the nginx version number in the error page, which is good for security.
- Client ABCD Max ABCD body ABCD size upload file size limit.
6. fastcgi optimization
Fastcgi (fast universal Gateway Interface) is an interface between static service and dynamic service. Cache represents write cache and Buffer represents read cache.
In the production environment, we also need to decide whether we need to enable the caching function of dynamic pages according to our company's website. After all, dynamic pages change rapidly. In most cases, we will not enable the caching of dynamic pages.
#The following configuration is written in the http {} field
    fastcgi_connect_timeout 600;
    fastcgi_send_timeout 600;
    fastcgi_read_timeout 600;
    fastcgi_buffer_size 64k;
    fastcgi_buffers 4 64k;
    fastcgi_busy_buffers_size 128k;
    fastcgi_temp_file_write_size 128k;
    fastcgi_temp_path /usr/local/nginx1.10/nginx_tmp;
    fastcgi_intercept_errors on;
    fastcgi_cache_path /usr/local/nginx1.10/fastcgi_cache levels=1:2 keys_zone=cache_fastcgi:128m inactive=1d max_size=10g;
The above configuration items are explained as follows:
- FastCGI "connect" timeout 600: Specifies the timeout for connecting to the back-end FastCGI;
- FastCGI [send] timeout 600: the timeout for sending requests to FastCGI;
- FastCGI ﹣ read ﹣ timeout 600: Specifies the timeout for receiving FastCGI response;
- fastcgi_buffer_size 64k: Specifies the size of buffer needed to read the first part of FastCGI response. The default buffer size is the size of each block in the fastcgi_buffers instruction, which can be set smaller.
- FastCGI buffers 4 64k: specifies how many buffers are needed locally to buffer FastCGI's response requests. If a php script produces a page size of 256KB, four 64KB buffers will be allocated for caching. If the page size is larger than 256KB, the part larger than 256KB will be cached in the path specified by FastCGI temp path, but this is not the case. Good, because the data in memory is processed faster than the disk. Generally, this value should be the middle value of the page size generated by the php script in the site. If the page size generated by most scripts in the site is 256KB, you can set this value to "832k", "464k", etc.
- Fastcgi ﹣ busy ﹣ buffers ﹣ size 128K: it is recommended to set it to twice the size of fastcgi ﹣ buffers, which represents the buffer in busy time;
- Fastcgi temp file write size 128K: how large data block will be used when writing fastcgi temp path? The default value is twice that of fastcgi buffers. This value may be set to 502 Bad Gateway when the load comes up.
- Fastcgi temp path: cache temporary directory;
- fastcgi_intercept_errors on: this instruction specifies whether to pass 4xx and 5xx error information to the client or allow nginx to use error_page to process error information. Note: if the static file does not exist, the 404 page will be returned, but the php page will return a blank page.
- Fastcgi ﹐ cache ﹐ path / usr / local / nginx1.10/fastcgi ﹐ cache levels = 1:2 keys ﹐ zone = cache ﹐ fastcgi: 128M inactive = 1D Max ﹐ size = 10g: fastcgi ﹐ cache directory. You can set the directory level. For example, 1:2 will generate 16 * 256 subdirectories. Cache ﹐ fastcgi is the name of this cache space. How much memory does the cache use (such popular content nginx directly stores memory to improve access to the cache Ask speed), inactive indicates the default failure time. If the cache data is not accessed within the failure time, it will be deleted. max_size indicates the maximum hard disk space used.
#Note: the following configuration items are not written in the above configuration items, optional: - FastCGI cache: indicates that FastCGI cache is enabled and a name is specified. Turning on the cache can effectively reduce the CPU load and prevent 502 error free. Cache? FastCGI is the name of the cache created by the proxy? Cache? Path instruction.
- Fastcgi cache valid 200 302 1H: used to specify the cache time of reply code. The value in the instance indicates that 200 and 302 replies are cached for one hour, which should be used together with fastcgi cache;
- Fastcgi cache valid 301 1D: cache 301 responses for one day;
- Fastcgi cache valid any 1m: cache other replies for 1 minute;
- Fastcgi cache min uses 1: this instruction is used to set how many requests the same URL will be cached.
- fastcgi_cache_key http://$host$request_uri : this instruction is used to set the Key value of web cache. nginx stores hash according to the Key value md5. Generally, it combines the variables such as $host (domain name), $request_uri (request path) into proxy_cache_key.
- fastcgi_pass: Specifies the listening port and address of FastCGI server, which can be local or other.
Conclusion:
- The caching functions of nginx are: proxy cache / fastcgi cache
- The function of proxy cache is to cache the content of back-end server, which may be anything, including static and dynamic.
- fastcgi_cache is used to cache the content generated by fastcgi. In many cases, it is the dynamic content generated by php.
- Proxy cache reduces the times of communication between nginx and back-end, and saves the transmission time and back-end broadband.
- Fastcgi cache reduces the number of communication between nginx and php, and also reduces the pressure of php and mysql.
7. gzip tuning
#The following configuration items are written in the http {} field:
gzip on;
gzip_min_length 2k;
gzip_buffers 4 32k;
gzip_http_version 1.1;
gzip_comp_level 6;
gzip_types  text/plain  text/css  text/javascript  application/json  application/javascript application/x-javascript application/xml;
gzip_vary on;
gzip_proxied any;- gzip on: enable compression;
- gzip_min_length 1k: set the minimum number of bytes allowed to be compressed on the page. The number of bytes on the page is obtained from the content length of the header. The default value is 0. No matter how many pages are compressed, it is recommended to set it to be greater than 1K. If it is smaller or 1K, the compression may be greater.
- gzip_buffers 4 32k: the size of the compressed buffer, which means that 4 units of memory are applied as the compressed result stream cache. The default value is to apply for the same memory space as the original data to store the gzip compressed results.
- GZIP HTTP version 1.1: the compressed version, which is used to set and identify the HTTP protocol version. The default is 1.1. At present, most browsers support GZIP decompression, which can be used by default.
- GZIP ﹣ comp ﹣ level 6: compression ratio, used to specify GZIP compression ratio. 1 compression ratio is the smallest, processing speed is the fastest, 9 compression ratio is the largest, transmission speed is fast, but processing speed is slow, and CPU resources are consumed.
- gzip_types text/css text/xml application/javascript: used to specify the compression type, 'text/html' type will always be compressed.
Default value: gzip_types text/html (js/css files are not compressed by default)
#Compression type, matching MIME type for compression
#Cannot use wildcard text/*
#(specified or not) text/html is compressed by default
#Please refer to conf/mime.types for setting the compression type of text file. - gzip_vary on: vary header support, which enables the front-end cache server to cache GZIP compressed pages, such as nginx compressed data with Squid
8. Tuning of expires cache
Cache is mainly used when there is little chance to change the elements such as picture, css, js, etc., especially when the picture takes up a large bandwidth. We can completely set the picture to be cached in the browser for 365d. css, js, html can be cached for more than 10 days. In this way, the first time the user opens the cache, the second time, it is very fast! When caching, we need to list the extensions that need to be cached, and the Expires cache is configured in the server field.
    server {
        listen       80;
        server_name  localhost;
                ................#Omit part of the content
        location ~* \.(ico|jpe?g|gif|png|bmp|swf|flv)$ {
            expires 30d;
            log_not_found off;
            access_log off;
        }
        location ~* \.(js|css)$ {
            expires 7d;
            log_not_found off;
            access_log off;
        }
                ..........#Omit part of the content
}
#Note: log not found off: indicates whether to record non-existent errors in the error log. It is on by default.
The advantages of the expire function are as follows:
(1) expires can reduce the bandwidth purchased by the website, save costs, and improve the user experience at the same time;
(2) reducing the pressure of service and saving the cost of server is a very important function of web service.
The disadvantages of the expire function are as follows:
(1) if the cached page or data is updated, what the user sees may be the old content, but it will affect the user experience. Solution: the first is to shorten the cache time, for example: 1 day, but not completely, unless the update frequency is more than 1 day; the second is to rename the cached object;
(2) content that the website does not want to be cached: website traffic statistics tools, frequently updated files (logo of webpage).
9. Configure anti-theft chain
The function of the anti-theft chain is to prevent other people from quoting pictures and other links directly from your website, which consumes our resources and network traffic, and we have not got any benefits, and we have to work hard not to please.
The solutions are as follows:
1: watermark, brand promotion, your bandwidth, enough servers;
2: firewall, direct control, if you know the IP source;
3. Anti theft chain strategy.
The following method is to give 404 error prompt directly or jump to the specified prompt page.
#The following configuration is written in the server {} field:
        location ~* ^.+\.(jpg|gif|swf|flv|wma|wmv|asf|mp3|mmf|zip|rar)$ {
            valid_referers none blocked www.test.com test.com;    #This field specifies the domain name that allows jump access.
            if ($invalid_referer) {
            #return 302 http://www.test.com/img/nolink.png; ා the configuration item of the comment indicates that it can be redirected to the specified file
            return 404;          #Here is the status code 404 directly returned to the client.
            break;
            }
            access_log off;         #Close access log
          }
        location / {            #The configuration of the anti-theft chain must be written before all the location fields
            root   html;
            index  index.html index.htm;
        }
#When redirecting to another file, you need to pay special attention that its suffix cannot match the anti-theft chain rule, or the client will get the prompt "too many times of redirection".
#I will select the return status code 404 first.
The complete configuration file after the above modification is as follows:
#user  nobody;
worker_processes  4;
worker_cpu_affinity 0001 0010 0100 1000;
worker_rlimit_nofile 65535;

#error_log  logs/error.log;
#error_log  logs/error.log  notice;
#error_log  logs/error.log  info;

#pid        logs/nginx.pid;

events {
    use epoll;
    worker_connections  65535;
    multi_accept on;
}

http {
    include       mime.types;
    default_type  application/octet-stream;
    #log_format  main  '$remote_addr - $remote_user [$time_local] "$request" '
    #                  '$status $body_bytes_sent "$http_referer" '
    #                  '"$http_user_agent" "$http_x_forwarded_for"';

    #access_log  logs/access.log  main;

    sendfile        on;
    tcp_nopush     on;

    #keepalive_timeout  0;
    keepalive_timeout  65;
    tcp_nodelay on;
    client_header_buffer_size 4k;
    open_file_cache max=102400 inactive=20s;
    open_file_cache_valid 30s;
    open_file_cache_min_uses 1;
    client_header_timeout 15;
    client_body_timeout 15;
    reset_timedout_connection on;
    send_timeout 15;
    server_tokens off;
    client_max_body_size 10m;

    fastcgi_connect_timeout 600;
    fastcgi_send_timeout 600;
    fastcgi_read_timeout 600;
    fastcgi_buffer_size 64k;
    fastcgi_buffers 4 64k;
    fastcgi_busy_buffers_size 128k;
    fastcgi_temp_file_write_size 128k;
    fastcgi_temp_path /usr/local/nginx1.10/nginx_tmp;
    fastcgi_intercept_errors on;
    fastcgi_cache_path /usr/local/nginx1.10/fastcgi_cache levels=1:2 keys_zone=cache_fastcgi:128m inactive=1d max_size=10g;
    gzip  on;
    gzip_min_length 2k;
    gzip_buffers 4 32k;
    gzip_http_version 1.1;
    gzip_comp_level 6;
    gzip_types  text/plain  text/css  text/javascript  application/json  application/javascript application/x-javascript application/xml;
    gzip_vary on;
    gzip_proxied any;

    server {
        listen       80;
        server_name  localhost;

        #charset koi8-r;

        #access_log  logs/host.access.log  main;
        location ~* ^.+\.(jpg|gif|png|swf|flv|wma|wmv|asf|mp3|mmf|zip|rar)$ {
            valid_referers none blocked 192.168.20.5 www.test.com;
            if ($invalid_referer) {
            return 302 http://192.168.20.5/img/nolink.png;
            #return 404;
            break;
            }
            access_log off;
          }
        location / {
            root   html;
            index  index.html index.htm;
        }
        location ~* \.(ico|jpe?g|gif|png|bmp|swf|flv)$ {
            expires 30d;
            log_not_found off;
            access_log off;
        }
        location ~* \.(js|css)$ {
            expires 7d;
            log_not_found off;
            access_log off;
        }
        ......................#Omit the following notes
10. Kernel parameter optimization
[root@nginx conf]# vim /etc/sysctl.conf       #This profile needs to be edited
#Write the following configuration items at the end:
fs.file-max = 999999
net.ipv4.ip_forward = 0
net.ipv4.conf.default.rp_filter = 1
net.ipv4.conf.default.accept_source_route = 0
kernel.sysrq = 0
kernel.core_uses_pid = 1
net.ipv4.tcp_syncookies = 1
kernel.msgmnb = 65536
kernel.msgmax = 65536
kernel.shmmax = 68719476736
kernel.shmall = 4294967296
net.ipv4.tcp_max_tw_buckets = 6000
net.ipv4.tcp_sack = 1
net.ipv4.tcp_window_scaling = 1
net.ipv4.tcp_rmem = 10240 87380 12582912
net.ipv4.tcp_wmem = 10240 87380 12582912
net.core.wmem_default = 8388608
net.core.rmem_default = 8388608
net.core.rmem_max = 16777216
net.core.wmem_max = 16777216
net.core.netdev_max_backlog = 262144
net.core.somaxconn = 40960
net.ipv4.tcp_max_orphans = 3276800
net.ipv4.tcp_max_syn_backlog = 262144
net.ipv4.tcp_timestamps = 0
net.ipv4.tcp_synack_retries = 1
net.ipv4.tcp_syn_retries = 1
net.ipv4.tcp_tw_recycle = 1
net.ipv4.tcp_tw_reuse = 1
net.ipv4.tcp_mem = 94500000 915000000 927000000
net.ipv4.tcp_fin_timeout = 1
net.ipv4.tcp_keepalive_time = 30
net.ipv4.ip_local_port_range = 1024 65000
[root@nginx conf]# sysctl -p       #Refresh to make kernel modification effective. Normally, all configuration items will be returned.
#After refreshing, all configuration items will be written to a directory in the form of a file. You can specify the find command to find and verify.
#To find the file corresponding to "net.core.netdev_max_backlog", you can execute the command "find / -name netdev_max_backlog" to find it.
- fs.file-max = 999999: this parameter indicates the maximum number of handles that a process (such as a worker process) can open at the same time. This parameter limits the maximum number of concurrent connections in a straight line and needs to be configured according to the actual situation.
- net.ipv4.tcp_max_tw_buckets = 6000: this parameter indicates the maximum number of TIME_WAIT sockets allowed by the operating system. If this number is exceeded, the TIME_WAIT socket will be cleared immediately and a warning message will be printed. This parameter defaults to 180000, too many time ﹣ wait sockets will slow down the Web server.
Note: the server that actively closes the connection will generate the connection in time ﹣ wait status. - Net.ipv4.ip > local > port > range = 1024 65000: the range of ports that the system is allowed to open.
- Net. IPv4. TCP two recycle = 1: enable timewait fast recycle.
- Net. IPv4. TCP? TW? Reuse = 1: enable reuse. Allows TIME-WAIT sockets to be reused for new TCP connections. This makes sense for the server, because there will always be a large number of TIME-WAIT state connections on the server.
- net.ipv4.tcp_keepalive_time = 30: this parameter indicates how often TCP sends keepalive messages when keepalive is enabled. The default is 2 hours. If you set it smaller, you can clean up invalid connections faster.
- net.ipv4.tcp_syncookies = 1: enable SYN Cookies. When SYN waiting queue overflows, enable Cookies to process.
- net.core.somaxconn = 40960: the backlog of the listen function in web applications will give us the kernel parameters by default.
- net.core.somaxconn: it is limited to 128, and the default value of NGX ﹣ listen ﹣ backlog defined by nginx is 511, so it is necessary to adjust this value.
Note: for a TCP connection, the Server and Client need to establish a network connection through three handshakes. When the three handshakes are successful, we can see that the port status changes from LISTEN to ESTABLISHED, and then data can be transmitted on this link. Each port in LISTEN status has its own listening queue. The length of the listening queue is the same as
The somaxconn parameter is related to the listen() function in the program using the port. - somaxconn parameter: defines the maximum listening queue length of each port in the system. This is a global parameter. The default value is 128. For a high load web service environment that often processes new connections, the default value is too small. Most environments are recommended to increase this value to 1024 or more. Large listening queues will also be used to prevent DoS from denial of service.
Help. - net.core.netdev_max_backlog = 262144: the maximum number of packets allowed to be sent to the queue when each network interface receives packets faster than the kernel processes them.
- Net.ipv4.tcp ﹣ Max ﹣ SYN ﹣ backlog = 262144: this parameter indicates the maximum length of the accept SYN request queue in the TCP triple handshake establishment stage. By default, it is 1024. If it is set larger, Linux will not lose the connection request initiated by the client when Nginx is too busy to accept the new connection.
- Net.ipv4.tcp rmem = 10240 87380 12582912: this parameter defines the minimum value, default value and maximum value of TCP accept cache (for TCP accept sliding window).
- Net. IPv4. TCP? Wmem = 10240 87380 12582912: this parameter defines the minimum value, default value and maximum value of TCP send cache (used for TCP send sliding window).
- net.core.rmem_default = 6291456: this parameter indicates that the kernel socket accepts the default size of the cache.
- Net. Core. Wmem? Default = 6291456: this parameter indicates the default size of the kernel socket send buffer.
- net.core.rmem_max = 12582912: this parameter indicates the maximum size of the cache accepted by the kernel socket.
- net.core.wmem_max = 12582912: this parameter indicates the maximum size of the kernel socket send buffer.
- net.ipv4.tcp_syncookies = 1: this parameter is independent of performance and is used to solve the SYN "gong attack" of TCP.
11. Optimization of the number of system connections
In linux system, the default value of open files is 1024, which means that the server can only open 1024 files at the same time. You can use the command ulimit-a to view all the limit values of the current system, and use the command ulimit-n to view the current maximum number of open files.
By default, the newly installed linux is only 1024. It is easy to encounter error: too many open files on servers with large load. Therefore, it needs to be enlarged.
[root@nginx core]# vim /etc/security/limits.conf     #Modify this profile
#Add the following fields at the end of the file:
*       soft    nofile  65535
*       hard    nofile  65535
*       soft    noproc  65535
*       hard    noproc  65535
#After adding, users need to log in again for the changes to take effect.
[root@nginx ~]# bash
[root@nginx ~]# ulimit -a     #Check whether it is effective
III. verify the above optimization and Nginx server stress test
1. Test the function of anti-theft chain:
Prepare two servers, one is the Nginx server just optimized, and the other is free to provide web functions.
The IP address of the Nginx server just optimized is 192.168.20.5, and that of the other server is 192.168.20.2.
1) the configuration of Nginx server is as follows:
[root@nginx html]# Ls <! -- the web root directory of nginx server is as follows -- >
50x.html  index.html  test.png
[root@nginx html]# VIM.. / conf / nginx. Conf <! -- its anti-theft chain configuration is as follows -- >
    ......................#Omit part of the content
location ~* ^.+\.(jpg|gif|png|swf|flv|wma|wmv|asf|mp3|mmf|zip|rar)$ {
            valid_referers none blocked 192.168.20.5 www.test.com;
            if ($invalid_referer) {
            #return 302 http://192.168.20.5/img/nolink.png;
            return 404;
            break;
            }
            access_log off;
          }
    ......................#Omit part of the content
<!--According to its anti-theft chain configuration, if the client accesses the resources of the server through the link provided by another server, it will get 404 status code.-->
[root@nginx html]# nginx -s reload      #Restart the Nginx server to make the anti-theft chain configuration effective
2) the web page file of the second server is as follows:
[root@daolian html]# cat index.html      #Its hyperlink address points to the test.png image of the first Nginx server.
<a href="http://192.168.20.5/test.png">lianjie</a>
3) if the client directly accesses the Nginx server, it will see the page of test.png as follows:

4) test of client accessing the second server: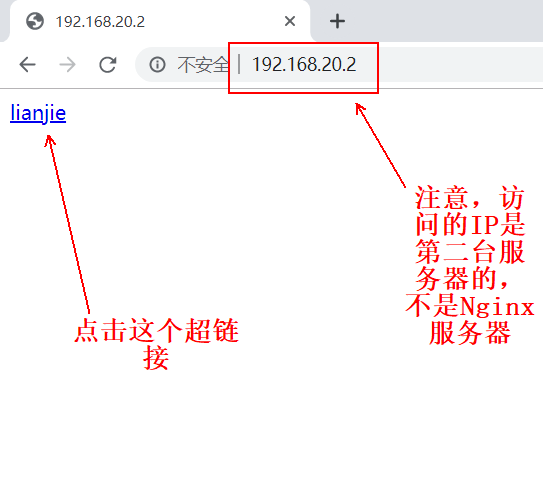
After clicking the hyperlink, you will see the following pages:
5) now change another anti-theft chain rule and test again:
[root@nginx html]# vim ../conf/nginx.conf        #Edit its profile
        location ~* ^.+\.(jpg|gif|png|swf|flv|wma|wmv|asf|mp3|mmf|zip|rar)$ {
            valid_referers none blocked 192.168.20.5 www.test.com;
            if ($invalid_referer) {
            return 302 http://192.168.20.5/img/nolink.png; ා redirect it to nolink.png picture in img directory
            #return 404;     #Comment out the 404 status code returned
            break;
            }
            access_log off;
          }
[root@nginx html]# nginx -s reload      #Restart for configuration to take effect
[root@nginx img]# ls /usr/local/nginx1.14/html/img     #The redirected files are as follows:
nolink.png
6) when the client clicks the hyperlink again for testing, it will see the following page: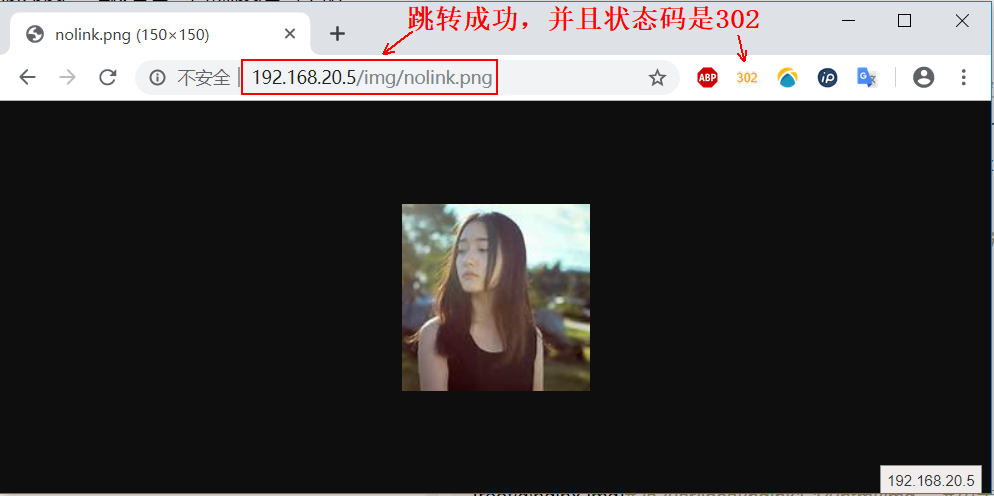
2. Pressure test
If the static page and php dynamic page of the web page are stress tested, the LNMP architecture needs to be installed and deployed. Here, a single deployment is used. Please refer to the document for the deployment process: LNMP architecture based on centos 7
, if it is only used for stress testing, MySQL database can not be installed.
Deployment LNMP schema process omitted...
After deployment, you need to change the configuration file:
[root@nginx html]# vim ../conf/nginx.conf #Edit Master profile
#Add the following to the server {} field
location ~ \.php$ {
root html;
fastcgi_pass 127.0.0.1:9000;
fastcgi_index index.php;
fastcgi_param SCRIPT_FILENAME /scripts$fastcgi_script_name;
include fastcgi.conf;
}
[root@nginx html]# pwd
/usr/local/nginx1.14/html
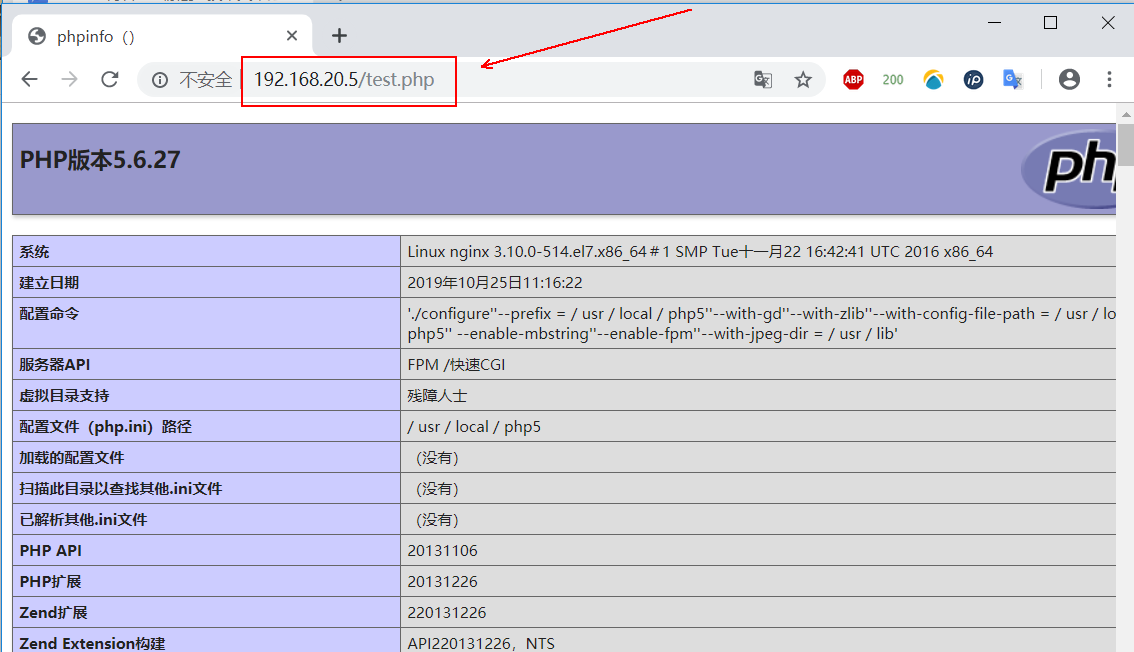
[root@nginx html]# cat test.php #The contents of the test.php file in the root directory of the web page are as follows:
<?php
phpinfo();
?>
When you are finished, you need to make sure that you can see the following pages when you visit 192.168.20.5/test.php:
1) start the test:
[root@nginx ~]# ab -c 500 -n 50000 127.0.0.1/index.html
#Test the performance of static pages, 500 requests at a time, a total of 50000 requests.
Requests per second:    2407.58 [#/sec] (mean)     #Throughput of Nginx server
#We mainly focus on the above return information, that is, the throughput of Nginx server.
#Better server performance, higher throughput
[root@nginx html]# ab -c 100 -n 1000 127.0.0.1/test.php    #Select the corresponding value according to the server performance
For the explanation of other information returned by ab, please refer to the blog: Centos 7.3 deployment LAMP architecture dynamic static separation.
————————Thank you for reading————————