I Modify users and groups
● Nginx runtime process needs the support of users and groups to realize access control when reading website files
● Nginx uses nobody user account and group account by default
● method of modification
① Specify user and group repair during compilation and installation
② Change the profile to specify users and groups
vim /usr/local/nginx/conf/nginx.conf

If users and groups are not created, you can change the configuration file
If the owner and group are not configured as nginx, you also need to use chown to specify the owner and group
ps aux | grep nginx Check whether the user and group have been modified successfully

II Configure Nginx web page cache time
When Nginx returns the web page data to the client, the cache time can be set to facilitate the direct return of requests for the same content in the future, so as to avoid repeated requests and speed up the access speed
It is generally set for static web pages, and the cache time is not set for dynamic web pages
3.1 setting method
Modify the configuration file and add expiration parameters for specific content in the http section, or server section, or location section
Example
Modify the configuration file of Nginx and add the expires parameter in the location section
3.2 modifying configuration files
vim /usr/local/nginx/conf/nginx.conf
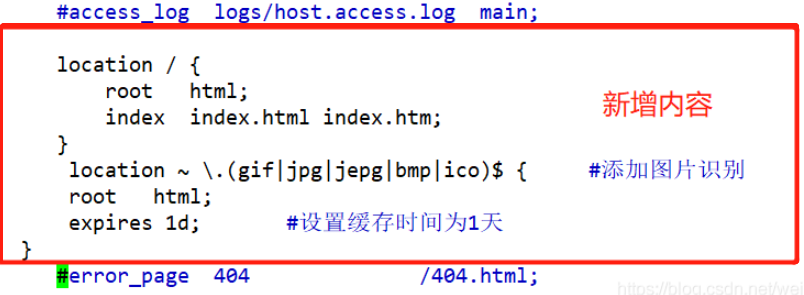
    server {
         listen       80;
          server_name  localhost;

         #charset koi8-r;

         #access_log  logs/host.access.log  main;
① Insert the following below
  location ~ \.(gif|jpg|jepg|bmp|ico)$ {     #Add picture recognition
         root   html;
         expires 1d;       #Set the cache time to 1 day
     }
② Increase the configuration of image recognition and image cache
③ Upload pictures
cd /usr/local/nginx/html Upload pictures

④ Edit html
vim index.html
14 <h1>Welcome to nginx!</h1>
15 <img src="111.jpg"/>		15 Line insert recognition picture
⑤ Visit
curl -I http://192.168.80.2/111.jpg

III Log cutting of Nginx
● as the running time of Nginx increases, the log will also increase. In order to easily grasp the running status of Nginx, you need to pay attention to Nginx log files at all times. Too large log files are difficult to manage for monitoring.
Therefore, it is necessary to cut the log file regularly (define the log in the form of fixed point and timestamp).
Nginx itself does not have the function of log segmentation, but it can automatically cut logs through the script of nginx signal control function, and periodically cut logs through the planned tasks of Linux.
4.1 idea of writing script for log separation
Set time variable
Set save log path
Rename the current log file and rebuild a new log file
Delete log files that take too long
Set cron tasks, execute scripts regularly, and automatically split logs
4.2 create log separation script
vim fenge.sh
#!/bin/bash
#Filename:fenge.sh``
d=$(date -d "-1 day" "+%Y%m%d")
logs_path="/var/log/nginx"
pid_path="/usr/local/nginx/logs/nginx.pid"
[ -d $logs_path ] || mkdir -p $logs_path
mv /usr/local/nginx/logs/access.log ${logs_path}/test.com-access.log-$d
kill -HUP $(cat $pid_path)
find $logs_path -mtime +30 | xargs rm -rf
★ add executable permissions to scripts
chmod +x fenge.sh
1
4.3 periodic tasks are executed regularly
crontab -e
0 1 * * * /opt/fenge.sh
#!/bin/bash
#Filename:fenge.sh                 #Identify script name
d=$(date -d "-1 day" "+%Y%m%d")    #Display the time one day ago "+" represents the connector
logs_path="/var/log/nginx"
pid_path="/usr/local/nginx/logs/nginx.pid"
[ -d $logs_path ] || mkdir -p $logs_path
mv /usr/local/nginx/logs/access.log ${logs_path}/test.com-access.log-$d  #Move logs and rename them (Mark uniqueness by timestamp)
kill -HUP $(cat $pid_path)         #Overload generates a new access log
find $logs_path -mtime +30 | xargs rm -rf

⭐ date -d "-1 day" "+%Y%m%d" : Uniqueness distinction
---date -d "+1 (second minute hour day month year)---
-------kill -QUIT 5410 End process -HUP Smooth restart similar reload -USR1 Log separation -USR2 Smooth upgrade-----
★★ expand small knowledge ★★
In the linux operating system, each file has many time parameters, including three main ones: CTime, atime and mtime. In windows, the next file has three time attributes:
1> Creation time
2> Modification time
3> Visit time
Similarly, under Linux, the next file has three time attributes:
(unlike wincdows, 1inux has no creation time, but multiple access times)
1> access time (atime for short)
2> Modify time (mtime for short)
. 3 > change time (abbreviated as ctime)
Brief introduction to three kinds of time in Linux:
atimc: (acccss timc) displays the data in the file [last accessed time], such as the process of the system directly or indirectly through some commands and scripts. (execute some executable documents or official copies)
mtime: (modify time) displays the last time when the file content is modified. For example, it will be changed when editing with vi, echo > >, sed -i. (that is, the content of Block >
ctime: (change time) displays the time when the permission, owner, group and number of links of the file change. Of course, when the content changes, it will also change (that is, when the inode content changes and the Block content changes)
IV Configure Nginx to achieve connection timeout
In order to prevent the same client from occupying the connection for a long time and causing waste of resources, the corresponding connection timeout parameters can be set to control the connection access time
5.1 timeout parameters
Keepalive_timeout
Set connection hold timeout
Client_header_timeout
Specifies the timeout for waiting for the client to send the request header
Client_body_timeout
Set request body read timeout
Nginx uses keepalive_timeout to specify the timeout of KeepAlive.
Specify how long each TCP connection can last. The default value of Nginx is 65 seconds. Some browsers only hold it for 60 seconds at most. If it is set to 0, keepalive connection is prohibited.
5.2 configure Nginx to realize connection timeout
Edit profile
vim /usr/local/nginx/conf/nginx.conf
1
http {
    ...
    keepalive_timeout  100;
    client_header_timeout 80;  #Timeout waiting for the client to send the request header. Timeout will send 408 error
    client_body_timeout 80;    #Set the timeout for the client to send the request body

    ...
     }
5, Modify the number of Nginx running processes
In the high concurrency scenario, more Nginx processes need to be started to ensure fast response, to process user requests and avoid blocking
6.1 configuration method for changing the number of processes
① Modify the configuration file,
② Modify process configuration parameters
6.2 modify the worker of the configuration file_ Processes parameter
● it is generally set as the number of CPU s or cores
● in case of high concurrency, it can be set to twice the number of CPU s or cores
● increasing the number of processes can reduce the overhead of the system and improve the service speed
● use ps aux to check the change of the number of running processes
★ by default, multiple processes of Nginx may run on one CPU, and different processes can be allocated to different CPUs for processing, making full use of hardware multi-core and multi CPU
6.3 viewing CPU core count and process information
cat /proc/cpuinfo | grep -c "physical"  Filter out CPU Number of cores, proc Store some device information in the directory
ps aux | grep nginx                     Using this command, you can see that a main process contains a child process
6.4CPU and process matching relationship
###2-core cpu, start 2 processes
worker_processes  2;   //Change to the same or twice the number of cores
worker_cpu_affinity 01 10;1000
//Set each process to be processed by different CPUs. When the number of processes is set to 2, it is 0001, 0010, 0100
PS:
01 Indicates that the first is enabled CPU Kernel, 10 means to enable the second CPU kernel
worker_cpu_affinity 01 10;Indicates that two processes are started. The first process corresponds to the first process CPU Kernel, the second process corresponds to the second CPU Kernel.
###2-core cpu, starting 4 processes
worker_processes     4;
worker_cpu_affinity 01 10 01 10;
PS: Four processes are started, which correspond to two CPU kernel
###4 CPUs, start 4 processes
worker_processes     4;
worker_cpu_affinity 0001 0010 0100 1000;
ps:0001 means to enable the first CPU core, 0010 means to enable the second CPU core, and so on
The matching relationship between CPU and process can be modified in the configuration file
vim /usr/local/nginx/conf/nginx.conf
6, Configure Nginx web compression
● NGX of Nginx_ http_ gzip_ Module compression module provides the function of compressing file content
● allow the Nginx server to compress the output content before sending it to the client, so as to save the website bandwidth and improve the user's access experience. It is installed by default
● corresponding compression function parameters can be added to the configuration file to optimize the compression performance
6.1 compression function parameters
gzip on: enable gzip compressed output
gzip_min_length 1k: sets the minimum number of bytes allowed to compress the page
gzip_buffers 4 16k: apply for 4 memory units of 16k as the compression result stream cache. The default value is to apply for memory space with the same size as the original data to store gzip compression results
gzip_http_version 1.0: set to identify the HTTP protocol version. The default is 1.1. At present, most browsers support gzip decompression, but the processing is slow and consumes server CPU resources
gzip_comp_level 2: specify gzip compression ratio. 1 has the smallest compression ratio and the fastest processing speed; 9 the compression ratio is the largest, the transmission speed is fast, but the processing speed is the slowest
gzip_types text/plain: compression type, which web page documents can be compressed
function
gzip_ Variable on: let the front-end cache server cache the disaster surface compressed by gzip
6.2 configure Nginx to realize web page compression
vim /usr/local/nginx/conf/nginx.conf
① Add the following
  gzip on;
     gzip_min_length 1k;
     gzip_buffers 4 16k;
     gzip_http_version 1.1;
     gzip_comp_level 6;
     gzip_types text/plain application/x-javascript text/css image/jpg image/jpeg image/png image/gif application/xml text/javascript application/x-httpd-php application/javascript application/json;
     gzip_disable "MSIE [1-6]\.";
     gzip_vary on;
② Detailed content
 gzip on;                  #Enable gzip compression
   gzip_min_length 1k;       #Compression threshold
   gzip_buffers 4 16k;       #The buffer size is 4 16k buffers
   gzip_http_version 1.1;    #Compressed version (not set by default)
   gzip_comp_level 6;        #Compression ratio, minimum 1, fast processing speed and slow transmission speed, maximum 9 compression ratio, slow processing speed and fast transmission speed (recommended 5-6)
   gzip_types text/plain application/x-javascript text/css image/jpg image/jpeg image/png image/gif application/xml text/javascript application/x-httpd-php application/javascript application/json;
   gzip_disable "MSIE [1-6]\.";  #Configure the gzip disabling condition and support regular, which means that gzip is not enabled below ie6
   gzip_vary on;  #Support the front-end cache server to store compressed pages
③ Insert 111 in the first page Jpg pictures for testing
cd /usr/local/nginx/html/
vim index.html
④ Insert pictures in html directory
<h1>Welcome to nginx!</h1>
<img src="cat.jpg"/>			#insert
④ Restart the service and clean up the cache access of the browser
systemctl restart nginx
VII Optimize FPM module
If the PHP parsing function of Nginx is handled by FPM, in order to improve the processing speed of PHP, the parameters of FPM module can be adjusted according to the memory and service load of the server,
7.1 adjusting FPM module parameters
Start fpm process mode, specified by pm parameter
static: a fixed number of fpm processes will be generated
dynamic: fpm process will be generated dynamically
7.2FPM optimization parameters
① Parameters of Static mode
pm.max_children:Specifies the number of processes to start
② Parameters of Dynamic mode
pm.max_children:Specifies the maximum number of startup processes
pm.start_servers:Initial in dynamic mode fpm Number of processes
pm.min_spare_servers:Minimum in dynamic mode fpm Number of empty closed processes
pm.max_spare_servers:Maximum in dynamic mode fpm Number of idle processes
7.3 example of FPM optimization parameter adjustment
● optimization reason: the server is a cloud server, running a personal forum, with 1.5g memory, 20 FPM processes, nearly 1G memory consumption and slow processing
● optimize parameter adjustment
When FPM is started, there are 5 processes, with a minimum of 2 idle processes and a maximum of 8 idle processes,
Up to 20 processes can exist
vi php-fpm.conf
pid = run/php-fpm.pid
pm = dynamic
pm.max_children=20     #The maximum number of idle processes in static mode is greater than the following value
pm.start_servers = 5   #The number of processes opened by default in dynamic mode is between the minimum and maximum
pm.min_spare_servers = 2  #Minimum number of idle processes in dynamic mode
pm.max_spare_servers = 8  #Maximum number of idle processes in dynamic mode
VIII nginx anti-theft chain
Stealing end: 192.168.80.1 nginx service
Server: 192.168.80.2 nginx service
Win10: 192.168.80.60 # points to DNS /hosts on the server
Host add mapping
Add mapping on the server
echo "192.168.80.2 www.my.com" >> /etc/hosts
Add mapping at the chain end
echo "192.168.80.2 www.host.com" >> /etc/hosts
win10 add mapping
Location:
C:\WINDOWS\System32\drivers\etc
PS: you need to modify permissions for the first time
Property - Security - Advanced - change to all permissions
win10hosts management user authorization
Add the mapping relationship between IP and domain name to the hosts file
win10 access server to get URL
Install nginx at the stealing end, modify html files, upload files, and open services,
vim /usr/local/nginx/html/index.html
At this time, you can access the stolen chain end in win10 to obtain the image of the server end
Anti theft chain
Modify the nginx configuration file of the server host and upload the error picture
 location ~*\.(jpg|gif|swf)$ {
            valid_referers none blocked *.my.com my.com;			#Only access sources with local sources are allowed
            if ( $invalid_referer ) {
               rewrite ^/ http://www.my.com/error.png;
            }
        }
Verify that win10 accesses the stolen chain end, and the access is unsuccessful
Detailed description of anti-theft chain setting parameters:
valid_referers: Set up trusted websites, that is, websites that can reference corresponding pictures(White list)

none: In browser Referer If it is empty, you can access the picture directly in the browser

blocked: referer If it is not empty, but the values are deleted by the proxy or firewall, these values are not http://Or https: / /

The following web address or domain name: referer The URL containing the relevant string in
If statement: if the source domain name of the link is not valid_ In the list listed by referers, $invalid_ If the referer is 1, perform the following operations, that is, rewrite or return to page 403