Notes of the third lecture in class NSD2005
- 1, KVM construction and management
- 10.1 KVM components
- 10.2 KVM management command
- 10.3 composition of KVM virtual machine
- 10.4 manually clone KVM virtual machine
- 10.5 manually clone kvm virtual machine (virsh edit virtual machine name)
- 10.6. Delete KVM virtual machine manually
- 10.7. COW Technology
- 10.8 offline access to virtual machine
- 2, Web services (httpd)
- 3, NFS shared services
- 4, Trigger mount
- 5, DNS
- 5.1. Build basic DNS services
- 5.2. Multi zone DNS server
- 5.3 special analysis record
- 5.4 DNS sub domain authorization
- 5.5 DNS master-slave architecture
- 5.6 synchronization of DNS master-slave data
- 5.7 cache DNS server
- 5.8 DNS server separation resolution
- 6, Mail server
- 7, WEB service project practice
- 7.1 experiment topology
- 7.2 requirements
- 7.3 experiment planning
- 7.4. WEB service configuration
- 7.5 DNS service configuration
- 7.6 client test
- 7, NTP time synchronization
- 8, PXE installation
- 8.1 DHCP server
- 8.2 TFTP server
- 8.3 FTP server
- 8.4 generate response file
- 8.5 PXE boot install virtual machine
- 9, rsync synchronization operation
1, KVM construction and management
10.1 KVM components
]# yum -y install qemu-kvm						#Provide underlying simulation support
]# yum -y install libvirt-daemon				#Daemons, managing virtual machines
]# yum -y install libvirt-client				#Client software, providing client management commands
]# yum -y install libvirt-daemon-driver-qemu	#Connecting qemu drivers
]# yum -y install virt-manager					#Drawing management tools
10.2 KVM management command
- Open the virtual machine graphics management tool
]# virt-manager #Open the virtual machine graphics management tool
- View KVM node (server) information
]# virsh  nodeinfo
 CPU model: x86_ Sixty-four
CPU:                4
 CPU frequency: 2591 MHz
CPU socket:         4
 Number of cores per socket: 1
 Threads per kernel: 1
 NUMA unit: 1
 Memory size: 8388020 KiB
- List virtual machines
]# virsh  list  [--all]
[root@svr7 ~]# virsh list
 Id    name                         state
----------------------------------------------------
 2     centos7.0                      running
- View information for the specified virtual machine
]#Virsh dominfo virtual machine name
- Run | restart | shut down the specified virtual machine
]#Virsh start or reboot or shutdown virtual machine name
- Force shutdown of the specified virtual machine
]#Virsh destroy virtual machine name
- Set the specified virtual machine to run automatically after power on
]#Virsh autostart [-- Disable] virtual machine name
10.3 composition of KVM virtual machine
-
xml configuration file:
- Define the name, UUID, CPU, memory, virtual disk, network card and other parameter settings of the virtual machine
- Default storage path / etc/libvirt/qemu/
- Files ending with ". xml"
-
Disk image file:
- Save the operating system and document data of the virtual machine. The image path depends on the definition in the xml configuration file
- Default storage path: / var/lib/libvirt/images/
- Files ending with ". qcow2"
10.4 manually clone KVM virtual machine
- Create a new disk image file
[root@svr7 ~]# virsh destroy centos7.0
[root@svr7 ~]# cd /var/lib/libvirt/images/
[root@svr7 images]# cp centos7.0.qcow2  nsd01.qcow2
[root@svr7 images]# ls
centos7.0.qcow2  nsd01.qcow2
- Create a new xml configuration file
[root@svr7 images]# cd /etc/libvirt/qemu/
[root@svr7 qemu]# cp centos7.0.xml nsd01.xml
[root@svr7 qemu]# ls
centos7.0.xml  networks  nsd01.xml
[root@svr7 qemu]# vim nsd01.xml
<name>nsd01</name>				#Modify the line defining the virtual machine name in the xml file
<source file='/var/lib/libvirt/images/nsd01.qcow2'/>#Modify the line of the virtual machine disk image file defined in the xml file
<uuid>6516.......</uuid>    #Delete all rows defining UUID
<mac address='5......:cf'/>   #Delete all lines defining Mac address
- Import virtual machine xml profile information
[root@svr7 ~]# virsh define /etc/libvirt/qemu/nsd01.xml
//Define domain nsd01 (from / etc/libvirt/qemu/nsd01.xml)
[root@svr7 ~]# virsh list --all
 Id    name                         state
----------------------------------------------------
 -     centos7.0                      close
 -     nsd01                          close
[root@svr7 ~]# virsh start nsd01
//Domain nsd01 started
[root@svr7 ~]# virsh list
 Id    name                         state
----------------------------------------------------
 3     nsd01                          running
10.5 manually clone kvm virtual machine (virsh edit virtual machine name)
- Create a new disk image file
[root@svr7 ~]#  virsh destroy nsd01   #Shut down virtual machine nsd01
[root@svr7 ~]# cd  /var/lib/libvirt/images/     #Switch to disk file path
[root@svr7 images]# cp  nsd01.qcow2    stu05.qcow2
[root@svr7 images]# ls
- Create a new xml configuration file
[ root@svr7  /]#Virsh edit nsd01 edit and import
 Edited the domain stu05 XML configuration.

1) Name of virtual machine: < name > stu05 < / name >

2) UUID of virtual machine: < UUID > 6516........ < UUID > delete entire line

3) Modify the disk image file of the virtual machine:
<source file='/var/lib/libvirt/images/stu05.qcow2'/>

4) MAC address of network card of virtual machine: < MAC address ='5...: CF '/ > delete the whole line

[root@svr7 /]# virsh list --all
10.6. Delete KVM virtual machine manually
[root@svr7 ~]# virsh shutdown nsd01
//Domain nsd01 is closed
[root@svr7 ~]# virsh undefine nsd01
//Domain nsd01 has been undefined
[root@svr7 ~]# virsh list --all
[root@svr7 ~]# rm -rf /var/lib/libvirt/images/nsd01.qcow2
10.7. COW Technology
-
Copy on write
- Front end disk directly maps the data content of the original disk (back end disk)
- The contents of the original disk (back-end disk) remain unchanged, and the contents of the original disk cannot be modified, otherwise all front-end disks cannot be used
- Changes to the front-end disk are not written back to the original disk (back-end disk)
-
Quickly generate disk image file
-
Command format:
- QEMU img create - F qcow2 - B front end disk of back end disk
- -The b option is used to specify the back-end disk
- QEMU img create - F qcow2 - B front end disk of back end disk
[root@svr7 ~]# cd /var/lib/libvirt/images/
[root@svr7 images]# ls
centos7.0.qcow2
[root@svr7 images]# qemu-img create -f qcow2 -b centos7.0.qcow2  nsd01.qcow2
Formatting 'nsd01.qcow2', fmt=qcow2 size=21474836480 backing_file='centos7.0.qcow2' encryption=off cluster_size=65536 lazy_refcounts=off

[root@svr7 images]# du -sh nsd01.qcow2
196K	nsd01.qcow2
- View front end disk
[root@svr7 images]# qemu-img info nsd01.qcow2
image: nsd01.qcow2
file format: qcow2
virtual size: 20G (21474836480 bytes)	#Virtual Size
disk size: 196K							#Actual disk space
cluster_size: 65536
backing file: centos7.0.qcow2			#Back end disk
Format specific information:
    compat: 1.1
    lazy refcounts: false
- Create a new xml configuration file
[root@svr7 qemu]# pwd
/etc/libvirt/qemu
[root@svr7 qemu]# ls
centos7.0.xml  networks
[root@svr7 qemu]# cp centos7.0.xml nsd01.xml
[root@svr7 qemu]# vim nsd01.xml
<name>nsd01</name>				#Modify the line defining the virtual machine name in the xml file
<source file='/var/lib/libvirt/images/nsd01.qcow2'/>	#Modify the line of the virtual machine disk image file defined in the xml file
<uuid>6516.......</uuid>    #Delete all rows defining UUID
<mac address='5......:cf'/>   #Delete all lines defining Mac address
- Import virtual machine xml profile information
[root@svr7 ~]# virsh list --all
 Id    name                         state
----------------------------------------------------
 -     centos7.0                      close

[root@svr7 ~]# virsh define /etc/libvirt/qemu/nsd01.xml
//Define domain nsd01 (from / etc/libvirt/qemu/nsd01.xml)

[root@svr7 ~]# virsh list --all
 Id    name                         state
----------------------------------------------------
 -     centos7.0                      close
 -     nsd01                          close
10.8 offline access to virtual machine
-
Using the guestmount tool
-
Support offline mount of raw and qcow2 virtual machine disks
-
You can directly modify the documents in the disk when the virtual machine is shut down
-
Convenient for customization, repair and script maintenance of virtual machine
-
Command format:
-
Guestmount - a virtual machine disk path - i / mount point
- -a detect client disk files
- -i automatically detect and mount client disk files
- -o nonempty mount point is not empty (there is something in it)
-
-
[root@svr7 ~]# yum -y install libguestfs-tools-c

[root@svr7 ~]# guestmount -a /var/lib/libvirt/images/nsd01.qcow2  -i /mnt/
[root@svr7 ~]# guestmount -o nonempty -a /var/lib/libvirt/images/nsd01.qcow2  -i  /mnt

[root@svr7 ~]# ls /mnt/
bin   dev  home  lib64  mnt  proc  run   srv  tmp  var
boot  etc  lib   media  opt  root  sbin  sys  usr
2, Web services (httpd)
-
Web Services: providing page content
-
Web server: a machine that provides page content
-
HTML: hypertext markup language (language for writing web pages)
-
http protocol: Hypertext Transfer Protocol
- http protocol default port: 80
-
https protocol: Secure Hypertext Transfer Protocol
-
Software that can provide Web services (httpd, Nginx, Tomcat)
-
Default web root directory / var/www/html
-
First page file name: index.html
-
Default listening port: 80
-
URL uniform resource locator
- Uniform Resource Locator
2.1. Build an independent WEB host
- Virtual machine A: Server
- Firewall default area changed to trusted
- selinux changed to loose mode
[root@svr7 ~]# yum -y install httpd		#Install the service providing software
[root@svr7 ~]# systemctl start httpd	#Start hhtpd service
[root@svr7 ~]# systemctl enable httpd	#Set power on self start
[root@svr7 ~]# vim /var/www/html/index.html		#Default path to store web page files
[root@svr7 ~]# cat /var/www/html/index.html
//People in the tower

[root@pc207 ~]# curl   http://192.168.4.7 "curl is a non graphical browser
//People in the tower
- Modify the root directory of the web page (to store the path of the web page file)
[root@svr7 ~]# mkdir /var/www/myweb			#Create a new page root
[root@svr7 ~]# echo "wo shi myweb" > /var/www/myweb/index.html
[root@svr7 ~]# vim /etc/httpd/conf/httpd.conf	#Modify httpd master profile
119 DocumentRoot "/var/www/myweb"
[root@svr7 ~]# systemctl restart httpd

[root@pc207 ~]# curl   http://192.168.4.7 client test
wo shi myweb
- httpd service access control: for storing web file path
- The access control of the subdirectory will inherit the access control of the parent directory
- Unless there is separate access control for subdirectories
<Directory  Path to save web page file>
    Require all denied			#Deny all client access
</Directory>

<Directory  "/var/www">   #Access control for / var/www
    Require all granted     #Allow all clients access
</Directory>
- Specify a new web page file directory
[root@svr7 ~]# vim /etc/httpd/conf/httpd.conf
130 DocumentRoot "/webroot"		#Specify a new web page file directory
131
132 <Directory "/webroot">		#Access control for / webroot
133     Require all granted		#Allow all clients access
134 </Directory>

[root@svr7 ~]# mkdir /webroot
[root@svr7 ~]# echo wo shi webroot > /webroot/index.html
[root@svr7 ~]# systemctl restart httpd

[root@pc207 ~]# curl   http://192.168.4.7
wo shi webroot
- Modify the port number of httpd listening
- http protocol default port: 80
[root@svr7 ~]# vim /etc/httpd/conf/httpd.conf
42 Listen 8000
[root@svr7 ~]# systemctl restart httpd

[root@pc207 ~]# curl   http://192.168.4.7:8000
wo shi webroot
2.2. Virtual WEB host
-
Multiple different Web sites provided by the same server
-
Once the virtual Web host is enabled, all sites must be rendered with the virtual Web host feature
-
Profile path
- /etc/httpd/conf/httpd.conf #Master profile
- /etc/httpd/conf.d/*.conf calls the configuration file
2.2.1 create virtual host
- Create a new call profile
[root@svr7 ~]# vim /etc/httpd/conf.d/nsd01.conf
[root@svr7 ~]# cat /etc/httpd/conf.d/nsd01.conf
<VirtualHost    *:80>     #Listen for port 80 at all IP addresses on the machine
  ServerName   www.qq.com    #Specify site name
  DocumentRoot   /var/www/qq   #Specify the path to store the web page
</VirtualHost>

<VirtualHost    *:80>
  ServerName   www.baidu.com
  DocumentRoot   /var/www/baidu
</VirtualHost>
- Create web page
[root@svr7 ~]# mkdir /var/www/qq  /var/www/baidu
[root@svr7 ~]# echo "wo shi qq" > /var/www/qq/index.html
[root@svr7 ~]# echo "wo shi baidu" > /var/www/baidu/index.html
[root@svr7 ~]# systemctl restart httpd
- Test access
[root@pc207 ~]# vim /etc/hosts
192.168.4.7 www.qq.com www.baidu.com		#Domain name resolution can only be provided for this computer
[root@pc207 ~]# curl http://www.baidu.com
wo shi baidu
[root@pc207 ~]# curl http://www.qq.com
wo shi QQ
2.2.2 port based virtual host
- Modify call profile
[root@svr7 ~]# vim /etc/httpd/conf.d/nsd01.conf
[root@svr7 ~]# cat /etc/httpd/conf.d/nsd01.conf
listen 8000
<VirtualHost    *:8000>
  ServerName   www.qq.com
  DocumentRoot   /var/www/qq
</VirtualHost>
listen 9000
<VirtualHost    *:9000>
  ServerName   www.baidu.com
  DocumentRoot   /var/www/baidu
</VirtualHost>
[root@svr7 ~]# systemctl restart httpd
- test
[root@pc207 ~]# curl http://www.baidu.com:9000
wo shi baidu
[root@pc207 ~]# curl http://www.qq.com:8000
wo shi QQ
3, NFS shared services
-
Network file system
-
Purpose: provide shared folders for clients
-
Protocol: NFS (TCP/UDP 2049), RPC (TCP/UDP 111)
-
Required package: NFS utils
-
System service: NFS server
-
-
Check if NFS utils is installed in the system
[root@svr7 ~]# yum -y install nfs-utils
[root@svr7 ~]# rpm -q nfs-utils
nfs-utils-1.3.0-0.54.el7.x86_64
- Create shared directory
[root@svr7 ~]# mkdir /public
[root@svr7 ~]# echo 123 > /public/1.txt
[root@svr7 ~]# ls /public
1.txt
- Modify profile
[root@svr7 ~]# vim /etc/exports
/public           *(ro)		 #Allow all clients to access as read-only
- Restart service
[root@svr7 ~]# systemctl restart rpcbind	#rpcbind service must be started first
[root@svr7 ~]# systemctl restart nfs-server
- Mount use
[root@pc207 ~]# mkdir /mnt/nfsmount
[root@pc207 ~]# mount 192.168.4.7:/public /mnt/nfsmount
[root@pc207 ~]# ls /mnt/nfsmount
1.txt

[root@pc207 ~]# vim /etc/fstab
192.168.4.7:/public     /mnt/nfsmount     nfs     defaults,_netdev    0   0
[root@pc207 ~]# mount -a
4, Trigger mount
-
On demand access mechanism provided by autofs service
- As long as the mount point is accessed, a response will be triggered to automatically mount the specified device
- When idle exceeds the time limit (default 5 minutes), it will be unloaded automatically
- Two levels of directories are required to trigger the mount:
- The first level directory is the monitoring directory, and the second level directory is the mount point
-
Main configuration file / etc/auto.master
- Path to mount configuration file in monitoring point directory
-
Default mount profile, / etc/auto.misc
- Trigger subdirectory - Mount parameter: device name
-
Package autofs for service
-
Install software
[root@pc207 ~]# yum -y install autofs
[root@pc207 ~]# systemctl restart autofs
- Trigger mount
[root@pc207 ~]# ls /misc/
[root@pc207 ~]# ls /misc/cd
CentOS_BuildTag  GPL       LiveOS    RPM-GPG-KEY-CentOS-7
EFI              images    Packages  RPM-GPG-KEY-CentOS-Testing-7
EULA             isolinux  repodata  TRANS.TBL

[root@pc207 ~]# cat /etc/auto.misc
#
# This is an automounter map and it has the following format
# key [ -mount-options-separated-by-comma ] location
# Details may be found in the autofs(5) manpage

cd		-fstype=iso9660,ro,nosuid,nodev	:/dev/cdrom

# the following entries are samples to pique your imagination
#linux		-ro,soft,intr		ftp.example.org:/pub/linux
#boot		-fstype=ext2		:/dev/hda1
#floppy		-fstype=auto		:/dev/fd0
#floppy		-fstype=ext2		:/dev/fd0
#e2floppy	-fstype=ext2		:/dev/fd0
#jaz		-fstype=ext2		:/dev/sdc1
#removable	-fstype=ext2		:/dev/hdd
- Create monitoring directory manually
[root@pc207 ~]# mkdir /nsd
- Modify master profile
[root@pc207 ~]# cat /etc/auto.master
/nsd /opt/nsd.txt
- Create mount profile
[root@pc207 ~]# cp /etc/auto.misc /opt/nsd.txt
[root@pc207 ~]# vim /opt/nsd.txt
[root@pc207 ~]# cat /opt/nsd.txt
dc      		-fstype=iso9660      :/dev/cdrom
tc				-fstyoe=nfs	     	 192.168.4.7:/public
//File system type of mount point directory device mount device
[root@pc207 ~]# systemctl restart autofs
- test
[root@pc207 ~]# ls /nsd/tc
1.txt
[root@pc207 ~]# ls /nsd/dc
CentOS_BuildTag  GPL       LiveOS    RPM-GPG-KEY-CentOS-7
EFI              images    Packages  RPM-GPG-KEY-CentOS-Testing-7
EULA             isolinux  repodata  TRANS.TBL
[root@pc207 ~]# ls /nsd/
dc  tc
5, DNS
-
Domain name system (service) agreement
-
Functions of DNS server (navigator in the Internet)
- Forward resolution: find the corresponding IP address according to the registered domain name
- Reverse resolution: find the corresponding registered domain name according to the IP address, not commonly used
-
Root domain name: (a point)
First level domain name:. CN. Us. HK. Tw. Kr. JP
Secondary domain name: com.cn .net.cn .org.cn ...
Third level domain name: dc.com.cn tc.com.cn nb.com.cn ...
-
Classification of DNS servers
- Root domain name server, primary DNS server, secondary DNS server, tertiary DNS server
-
Full Qualified Domain Name
- Fully qualified host name (FQDN): site name + registered domain name
- www.dc.com.cn vip.dc.com.cn ftp.dc.com.cn
-
Type of DNS server resource resolution record
-
NS resolution record: declare DNS server
-
A resolution record: forward resolution record
-
CNAME resolving records: resolving record aliases
-
5.1. Build basic DNS services
-
BIND(Berkeley Internet Name Daemon)
- Berkeley Internet domain name service
- Bind chroot (virtual root support, cage Policy)
- https://blog.csdn.net/zhu_tianwei/article/details/45049795
- bind (domain name service main package)
-
BIND server program
- Main executive program / usr/sbin/named
- System service: named
- Default port: Port 53 of DNS protocol
- Virtual root environment at run time: / var/named/chroot/
-
Main configuration file / etc/named.conf #Set domain name responsible for resolution
-
Address library file / var/named / ා correspondence between fully qualified host name and IP address
Virtual machine A
- Install package
[root@svr7 ~]# yum -y install bind-chroot bind
- Modify master profile
[root@svr7 ~]# cp   /etc/named.conf    /root
[root@svr7 ~]# vim   /etc/named.conf
options {
        directory       "/var/named";       #Specified address library file storage directory
};
zone "tedu.cn" IN {          				#Specify the domain name that the local machine is responsible for resolving
        type master;             			#Specify native as authoritative master server
        file "tedu.cn.zone";   				#Address library file name
};
- Create address library file
- Ensure that the named user has read permission to the address library file
- All domain names in the address library file should end with a dot
- If the address library file does not end with a dot, the domain name responsible for this address library file will be supplemented by default
[root@svr7 ~]# cd /var/named/
[root@svr7 named]# cp  -p   named.localhost      tedu.cn.zone   #-p leave permissions unchanged
[root@svr7 named]# ls -l tedu.cn.zone
[root@svr7 named]# vim   tedu.cn.zone
 .......Ten thousand words are omitted here
tedu.cn.    	NS     svr7    			#NAMESERVER declares DNS server
svr7          	A      192.168.4.7		#Represents a forward parsing record
www         	A      1.1.1.1
ftp             A      2.2.2.2
vip            	A      3.3.3.3
- Restart service
[root@svr7 named]# systemctl restart named
Virtual machine B
- Specify DNS address
[root@pc207 ~]# echo nameserver 192.168.4.7 > /etc/resolv.conf
- test result
[root@pc207 ~]# nslookup  www.tedu.cn
Server:		192.168.4.7
Address:	192.168.4.7#53

Name:	www.tedu.cn
Address: 1.1.1.1
[root@pc207 ~]# nslookup  ftp.tedu.cn
Server:		192.168.4.7
Address:	192.168.4.7#53

Name:	ftp.tedu.cn
Address: 2.2.2.2
[root@pc207 ~]# nslookup  vip.tedu.cn
Server:		192.168.4.7
Address:	192.168.4.7#53

Name:	vip.tedu.cn
Address: 3.3.3.3
5.2. Multi zone DNS server
Virtual machine A
- Modify master profile
[root@svr7 ~]# vim /etc/named.conf
[root@svr7 ~]# cat /etc/named.conf
options {
	directory 	"/var/named";
};
zone "tedu.cn" IN {
	type master;
	file "tedu.cn.zone";
};
zone "qq.com" IN {
        type master;
        file "qq.com.zone";
};
- Create address library file
[root@svr7 ~]# cd /var/named/
[root@svr7 named]# cp -p named.localhost qq.com.zone
[root@svr7 named]# vim qq.com.zone
[root@svr7 named]# cat qq.com.zone
.......Ten thousand words are omitted here
qq.com.    		NS     svr7
svr7          	A      192.168.4.7
www         	A      5.5.5.5
[root@svr7 named]# systemctl restart named
- test
[root@pc207 ~]# nslookup  www.qq.com
Server:		192.168.4.7
Address:	192.168.4.7#53

Name:	www.qq.com
Address: 5.5.5.5
5.3 special analysis record
5.3.1 DNS polling
-
**DNS * * polling: DNS based site load balancing
- One domain name - > multiple different IP addresses
- Each IP provides mirror service content
-
with www.qq.com take as an example
[root@svr7 /]# vim   /var/named/qq.com.zone
 .......Ten thousand words are omitted here

qq.com.  	NS       svr7
svr7        A        192.168.4.7
www       	A        192.168.4.10
www       	A        192.168.4.20
www       	A        192.168.4.30
[root@svr7 /]# systemctl  restart  named

[root@pc207 ~]# ping  www.qq.com   #test
5.3.2. Pan domain name resolution
[root@svr7 /]# vim   /var/named/qq.com.zone

 .......Ten thousand words are omitted here

qq.com.    	NS      svr7
svr7        A       192.168.4.7
www         A       192.168.4.10
www         A       192.168.4.20
www         A       192.168.4.30
\*                A       6.6.6.6
qq.com.    A        7.7.7.7

[root@svr7 /]# systemctl  restart  named

[root@pc207 ~]# nslookup wwww.qq.com      #test
[root@pc207 ~]# nslookup qq.com                  #test
5.3.2 resolving the alias of records
[root@svr7 /]# vim   /var/named/qq.com.zone
 .......Ten thousand words are omitted here
qq.com.   	NS            svr7
svr7        A             192.168.4.7
www         A             192.168.4.10
www         A             192.168.4.20
www         A             192.168.4.30
\*          A             6.6.6.6
qq.com.     A             7.7.7.7
vip         A             8.8.8.8
mail        CNAME    	  vip

[root@svr7 /]# systemctl  restart  named

[root@pc207 ~]# nslookup  mail.qq.com
Server:  192.168.4.7
Address: 192.168.4.7#53

mail.qq.com canonical name = vip.qq.com.	#mail.qq.com Specification name= vip.qq.com .
Name: vip.qq.com
Address: 8.8.8.8
5.4 DNS sub domain authorization
-
For the same DNS organization
- Different DNS servers are responsible for the resolution of parent / child domains
- The parent DNS server should have the ability to iterate for the child domain
-
Recursive resolution: the client sends a request to the preferred DNS server, and the preferred DNS server interacts with other DNS servers, and finally brings back the resolution results
-
Iterative resolution: the client sends the request to the preferred DNS server, and the preferred DNS server tells the next server's IP address
-
Virtual machine B: responsible for domain name bj.tedu.cn (subdomain)
- Install package
[root@pc207 ~]# yum -y install bind-chroot bind
- Modify master profile
[root@pc207 ~]# cp   /etc/named.conf    /root
[root@pc207 ~]# vim   /etc/named.conf
options {
        directory       "/var/named";
};

zone "bj.tedu.cn" IN {
        type master;
        file   "bj.tedu.cn.zone";
};
- Create address library file
[root@pc207 ~]# cd /var/named/
[root@pc207 named]# cp  -p   named.localhost      bj.tedu.cn.zone
[root@pc207 named]# vim   bj.tedu.cn.zone
[root@pc207 named]# cat bj.tedu.cn.zone
$TTL 1D
@	IN SOA	@ rname.invalid. (
					0	; serial
					1D	; refresh
					1H	; retry
					1W	; expire
					3H )	; minimum
bj.tedu.cn.    NS   pc207
pc207          A    192.168.4.207
www            A    9.9.9.9

[root@pc207 named]# systemctl restart named
- Virtual machine A: responsible for domain name tedu.cn (parent domain)
- Subdomain authorization. Inform virtual machine A that virtual machine B is specially maintained bj.tedu.cn DNS server for
[root@svr7 /]# vim   /var/named/tedu.cn.zone
 .......Ten thousand words are omitted here
tedu.cn.       NS    svr7
bj.tedu.cn.    NS    pc207
svr7           A     192.168.4.7
pc207          A     192.168.4.207
www            A     1.1.1.1
ftp            A     2.2.2.2
vip            A     3.3.3.3

[root@svr7 /]# systemctl restart named
- Virtual machine B: Test
[root@pc207 /]# nslookup www.bj.tedu.cn 192.168.4.7
Server:  192.168.4.7
Address:         192.168.4.7#53

Non-authoritative answer:     #Non authoritative answer
Name: www.bj.tedu.cn
Address: 9.9.9.9
- Virtual machine A: prohibit recursive query
[root@svr7 /]# vim  /etc/named.conf
options {
        directory       "/var/named";
        recursion no;       #Disable DNS recursive query
};
zone "tedu.cn" IN {
        type master;
        file "tedu.cn.zone";
};
zone "qq.com" IN {
        type master;
        file "qq.com.zone";
};

[root@svr7 /]# systemctl restart named
- Virtual machine B test
[root@pc207 /]# nslookup   www.bj.tedu.cn   192.168.4.7
Server:  192.168.4.7
Address: 192.168.4.7#53

Non-authoritative answer:
*** Can't find www.bj.tedu.cn: No answer

[root@pc207 /]# dig  www.bj.tedu.cn  192.168.4.7 #Special command dig for DNS query process
5.5 DNS master-slave architecture
- Function: improve reliability, backup from DNS server, master DNS server data
Virtual machine A: primary DNS server to tedu.cn Domain name as an example
Virtual machine B: from DNS server to tedu.cn Domain name as an example
- Virtual machine A: primary DNS server
- Authorize from server
[root@svr7 /]# man   named.conf      #Refer to man help
 /allow
[root@svr7 /]# vim   /etc/named.conf
options {
     directory       "/var/named";
     allow-transfer   {     192.168.4.207;    };    #Specify the slave server address
};
 .......Ten thousand words are omitted here
- Modify address library file
[root@svr7 /]# vim  /var/named/tedu.cn.zone
 .......Ten thousand words are omitted here
tedu.cn.      NS    svr7
tedu.cn.      NS    pc207
svr7          A     192.168.4.7
pc207         A     192.168.4.207
www           A     1.1.1.1
ftp           A     2.2.2.2
vip           A     3.3.3.3

[root@svr7 /]# systemctl  restart  named
- Virtual machine B: from DNS server
- Install the package
[root@pc207 /]# yum -y install bind bind-chroot
- Modify master profile
[root@pc207 /]# ls -ld /var/named/slaves/

[root@pc207 /]# vim   /etc/named.conf
options {
        directory       "/var/named";
};
zone "tedu.cn" IN {
        type slave;
        file  "/var/named/slaves/tedu.cn.slave";
        masters   {   192.168.4.7;    };      #Specify the primary DNS server IP address

          #Ensure that the named user has write permission to the directory
};


[root@pc207 /]# ls /var/named/slaves/
[root@pc207 /]# systemctl restart named
[root@pc207 /]# ls /var/named/slaves/
tedu.cn.slave
5.6 synchronization of DNS master-slave data
Version number of data: written by the administrator, composed of 10 numbers. The bigger the version, the newer
Virtual machine A:
1. Modify address library file
[root@svr7 /]# vim   /var/named/tedu.cn.zone

$TTL 1D
@      IN SOA  @ rname.invalid. (
                                2020061601     ; serial     #Version number of data
                                1D      ; refresh   #Every 1 day, master and slave automatically hand over
                                1H      ; retry          #Retry interval 1 hour
                                1W      ; expire       #Expiration time 1 week
                                3H )    ; minimum    #Memory time of failure record 3 hours
tedu.cn.     NS    svr7
tedu.cn.     NS    pc207
svr7         A     192.168.4.7
pc207        A     192.168.4.207
www          A     10.10.10.10
ftp          A     2.2.2.2
vip          A     3.3.3.3

[root@svr7 /]# systemctl restart named
- test
[root@pc207 /]# nslookup www.tedu.cn 192.168.4.7
[root@pc207 /]# nslookup www.tedu.cn 192.168.4.207
5.7 cache DNS server
-
Function: cache parsing results and speed up parsing efficiency
-
It is generally used in Intranet.
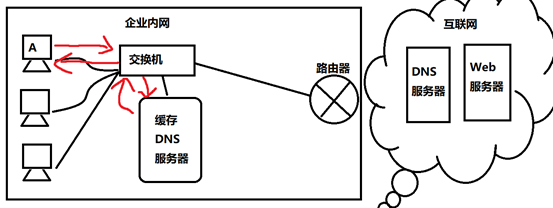
- Virtual machine A: real DNS server
[root@svr7 ~]#  vim  /etc/named.conf
options {
        directory       "/var/named";
};
zone "dc.com" IN {
        type master;
        file "dc.com.zone";
};

[root@svr7 named]# vim dc.com.zone
........Ten thousand words are omitted here
dc.com.  NS svr7
svr7   A 192.168.4.7
www        A       1.2.3.4
[root@svr7 named]# systemctl   restart   named
[root@svr7 named]# nslookup   www.dc.com   192.168.4.7
- Virtual machine B: cache DNS server
[root@pc207 ~]# vim /etc/named.conf
options {
        directory       "/var/named";
        forwarders  {  192.168.4.7;    };    #Forward to real DNS server
};
- test
[root@pc207 ~]# systemctl restart named
[root@pc207 ~]#  nslookup   www.dc.com   192.168.4.207
Server:  192.168.4.207
Address: 192.168.4.207#53

Non-authoritative answer:
Name: www.dc.com
Address: 1.2.3.4
5.8 DNS server separation resolution
-
When a DNS query request from a client is received
- Be able to distinguish the source address of the client
- Provide different resolution results (IP address) for different types of clients
- Provide the IP address of the nearest server for the client (proximity principle)
-
Classify clients by source address set
- Different clients get different results (different treatment)
- The classification should be reasonable, and all clients should find their own classification
- Match categories from top to bottom, matching stops
- So the zone must be written in view
-
Virtual machine A
[root@svr7 ~]# vim /etc/named.conf
options {
        directory       "/var/named";
};
view   "nsd"    {                                              #Name of classification
 match-clients   {   192.168.4.207;    };      #Match client source address
 zone  "tedu.cn"   IN   {
      type  master;
      file  "tedu.cn.zone";
   };
};
view   "other"   {
 match-clients {   any;    };
 zone  "tedu.cn"  IN  {
      type  master;
      file  "tedu.cn.other";
   };
};

[root@svr7 ~]# cd /var/named/
[root@svr7 named]#  cp -p named.localhost tedu.cn.zone
[root@svr7 named]# vim tedu.cn.zone
.......Ten thousand words are omitted here
tedu.cn.    NS     svr7
svr7        A      192.168.4.7
www       	A      192.168.4.100
[root@svr7 named]# cp -p tedu.cn.zone   tedu.cn.other
[root@svr7 named]# vim   tedu.cn.other
.......Ten thousand words are omitted here
tedu.cn.    NS     svr7
svr7        A      192.168.4.7
www       	A      1.2.3.4

[root@svr7 named]# systemctl  restart
- test
virtual machine A: test
[root@svr7 named]# nslookup www.tedu.cn 192.168.4.7
Server:  192.168.4.7
Address: 192.168.4.7#53

Name: www.tedu.cn
Address: 1.2.3.4

//Virtual machine B: testing
[root@pc207 ~]# nslookup www.tedu.cn 192.168.4.7
Server:  192.168.4.7
Address: 192.168.4.7#53

Name: www.tedu.cn
Address: 192.168.4.100
- **acl address list: * * create a list for a large number of client addresses (learn about it)
[root@svr7 /]# vim   /etc/named.conf
······························
acl test {  192.168.4.207;  192.168.4.1;  192.168.4.2; 192.168.4.3;   };
view "nsd" {
  match-clients  {   test;   };
································
6, Mail server
- Basic functions of e-mail server
- Provide e-mail storage space for users (user name @ mail domain name)
- Process mail sent by users -- deliver to the receiving server
- Process mail received by users - post to mailbox
6.1. Build DNS server to provide mail exchange resolution record
-
Virtual machine A: building DNS server
- Modify master profile
[root@svr7 /]# vim   /etc/named.conf
options {
        directory       "/var/named";
};

zone  "qq.com"  IN  {
      type  master;
      file  "qq.com.zone";
};
- Create address library file
[root@svr7 /]# cd /var/named/
[root@svr7 named]# cp  -p  named.localhost    qq.com.zone
[root@svr7 named]# vim   qq.com.zone
.......Ten thousand words are omitted here
qq.com.  	NS     	 svr7
svr7        A        192.168.4.7
www       	A        1.2.3.4
- Add message exchange resolution record
[root@svr7 /]# vim /var/named/qq.com.zone
.......Ten thousand words are omitted here
qq.com.   NS       svr7
qq.com.   MX  10   mail               #Declare mail resolution record with priority of 10. The smaller the number, the higher the priority
svr7      A        192.168.4.7
mail      A        192.168.4.7        #The address of the resolution mail server is 192.168.4.7
www       A        1.2.3.4

[root@svr7 /]# systemctl restart named
- Test mail exchange records
[root@svr7 /]# host -t MX qq.com           #Test mail exchange records, qq.com Mail server for domain name
qq.com mail is handled by 10 mail.qq.com.
[root@svr7 /]# nslookup mail.qq.com
6.2. Build mail server
- Virtual machine A:
- Install package
[root@svr7 /]# yum -y install postfix
- Modify master profile
 [root@svr7 /]# vim   /etc/postfix/main.cf
 In last line mode: set Nu enables line number function
 99  myorigin   =   qq.com         #Default domain suffix
 116 inet_interfaces = all ා provide mail function at IP address of all network cards of the machine
 164 mydestination = qq.com         #Basis for judging as local mail
- Restart service
[root@svr7 /]# systemctl restart postfix
6.3 test
-
- Mail sending operation: mail-s' mail title '- r sender to
[root@svr7 /]# useradd   yg
[root@svr7 /]# useradd   xln
[root@svr7 /]# mail -s  'test01'  -r  yg   xln         #Interactive email
hahaxixihehelele
.                    #There is only one point for sending
EOT
[root@svr7 /]# echo  hahaxixi    |   mail   -s    'The nine Yin manual'   -r   yg     xln       #Non interactive email
- Mail receiving operation: mail [- U user name]
[root@svr7 /]# mail -u xln           #View xln's mail as root
\>N  1 yg@qq.com             Wed Jun 17 16:44  18/508   "test01"
& 1   #Enter message number 1
& quit
7, WEB service project practice
7.1 experiment topology
7.2 requirements
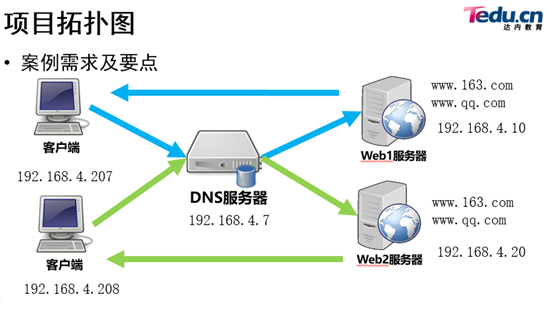
- Build Web service on Web1 machine, realize virtual Web host based on domain name, provide www.163.com And www.qq.com Two websites
- Build Web service on Web2 machine, realize virtual Web host based on domain name, provide www.163.com And www.qq.com Two websites
- Client 192.168.4.207 access www.163.com And www.qq.com Two websites, provided by Web1 server
- Client 192.168.4.208 access www.163.com And www.qq.com Two websites, provided by Web2 server
- Implement DNS server separation resolution on 192.168.4.7
7.3 experiment planning
| IP address | host name | role |
|---|---|---|
| 192.168.4.7 | dns1.tedu.cn | DNS server |
| 192.168.4.10 | web1.tedu.cn | Web server |
| 192.168.4.20 | web2.tedu.cn | Web server |
| 192.168.4.207 | client1.tedu.cn | Client 1 |
| 192.168.4.208 | client2.tedu.cn | Client 2 |
- DNS server
[root@dns1 ~]# hostname
dns1.tedu.cn
[root@dns1 ~]# ifconfig | head -2
eth0: flags=4163<UP,BROADCAST,RUNNING,MULTICAST>  mtu 1500
        inet 192.168.4.7  netmask 255.255.255.0  broadcast 192.168.4.255
[root@dns1 ~]# firewall-cmd --set-default-zone=trusted
success
[root@dns1 ~]# setenforce 0
- WEB1 server
[root@web1 ~]# hostname
web1.tedu.cn
[root@web1 ~]# ifconfig | head -2
eth0: flags=4163<UP,BROADCAST,RUNNING,MULTICAST>  mtu 1500
        inet 192.168.4.10  netmask 255.255.255.0  broadcast 192.168.4.255
[root@web1 ~]# firewall-cmd --set-default-zone=trusted
success
[root@web1 ~]# setenforce 0
[root@web1 ~]# getenforce
Permissive
- WEB2 server
[root@web2 ~]# hostname
web2.tedu.cn
[root@web2 ~]# ifconfig | head -2
eth0: flags=4163<UP,BROADCAST,RUNNING,MULTICAST>  mtu 1500
        inet 192.168.4.20  netmask 255.255.255.0  broadcast 192.168.4.255
[root@web2 ~]# firewall-cmd --set-default-zone=trusted
success
[root@web2 ~]# setenforce 0
- Client 1
[root@client1 ~]# hostname
client1.tedu.cn
[root@client1 ~]# ifconfig |head -2
eth0: flags=4163<UP,BROADCAST,RUNNING,MULTICAST>  mtu 1500
        inet 192.168.4.207  netmask 255.255.255.0  broadcast 192.168.4.255
[root@client1 ~]# firewall-cmd --set-default-zone=trusted
success
[root@client1 ~]# setenforce 0
- Client 2
[root@client2 ~]# hostname
client2.tedu.cn
[root@client2 ~]# ifconfig | head -2
eth0: flags=4163<UP,BROADCAST,RUNNING,MULTICAST>  mtu 1500
        inet 192.168.4.208  netmask 255.255.255.0  broadcast 192.168.4.255
[root@client2 ~]# firewall-cmd --set-default-zone=trusted
success
[root@client2 ~]# setenforce 0
7.4. WEB service configuration
7.4.1,web1
[root@web1 ~]# yum -y install httpd
[root@web1 ~]# vim /etc/httpd/conf.d/web1.conf
[root@web1 ~]# cat /etc/httpd/conf.d/web1.conf
<VirtualHost *:80>
  ServerName  www.163.com
  DocumentRoot  /var/www/163
</VirtualHost>

<VirtualHost *:80>
  ServerName  www.qq.com
  DocumentRoot  /var/www/qq
</VirtualHost>
[root@web1 ~]# mkdir /var/www/163 /var/www/qq
[root@web1 ~]# echo "wo shi web1 163" > /var/www/163/index.html
[root@web1 ~]# echo "wo shi web1 qq" > /var/www/qq/index.html
[root@web1 ~]# systemctl restart httpd
[root@web1 ~]# systemctl enable httpd
- Client client1 test
[root@client1 ~]# vim /etc/hosts		#Add temporarily, delete after testing
[root@client1 ~]# tail -1 /etc/hosts
192.168.4.10 www.163.com www.qq.com
[root@client1 ~]# curl http://www.163.com
wo shi web1 163
[root@client1 ~]# curl http://www.qq.com
wo shi web1 qq
7.4.2,web2
[root@web2 ~]# yum -y install httpd
[root@web2 ~]# vim /etc/httpd/conf.d/web2.conf
[root@web2 ~]# cat /etc/httpd/conf.d/web2.conf
<VirtualHost *:80>
  ServerName  www.163.com
  DocumentRoot  /var/www/163
</VirtualHost>

<VirtualHost *:80>
  ServerName  www.qq.com
  DocumentRoot  /var/www/qq
</VirtualHost>
[root@web2 ~]# mkdir /var/www/163 /var/www/qq
[root@web2 ~]# echo "wo shi web2 163" > /var/www/163/index.html
[root@web2 ~]# echo "wo shi web2 qq" > /var/www/qq/index.html
[root@web2 ~]# systemctl restart httpd
[root@web2 ~]# systemctl enable httpd
- Client 2 test
[root@client2 ~]# vim /etc/hosts		#Add temporarily, delete after testing
[root@client2 ~]# tail -1 /etc/hosts
192.168.4.20 www.163.com  www.qq.com

[root@client2 ~]# curl http://www.163.com
wo shi web2 163
[root@client2 ~]# curl http://www.qq.com
wo shi web2 qq
7.5 DNS service configuration
[root@dns1 ~]# yum -y install bind bind-chroot
[root@dns1 ~]# vim /etc/named.conf
[root@dns1 ~]# cat /etc/named.conf
options {
	directory 	"/var/named";
};
view "web1" {
 match-clients { 192.168.4.207; };
 zone "163.com" IN {
	type master;
	file "163.com.zone";
 };
 zone "qq.com" IN  {
	type master;
	file "qq.com.zone";
 };
};

view "web2" {
 match-clients { 192.168.4.208; };
 zone "163.com" IN {
	type master;
	file "163.com.other";
 };
 zone "qq.com" IN  {
	type master;
	file "qq.com.other";
 };
};


[root@dns1 ~]# cp /etc/named.conf /root/
[root@dns1 ~]# cd /var/named/
[root@dns1 named]# cp -p named.localhost 163.com.zone
[root@dns1 named]# vim 163.com.zone
[root@dns1 named]# cat 163.com.zone
···································Omit ten thousand words
163.com.	NS	dns1
dns1		A	192.168.4.7
www			A	192.168.4.10

[root@dns1 named]# cp -p named.localhost qq.com.zone
[root@dns1 named]# vim qq.com.zone
[root@dns1 named]# cat qq.com.zone
···································Omit ten thousand words
qq.com.		NS	dns1
dns1		A	192.168.4.7
www			A	192.168.4.10

[root@dns1 named]# cp -p 163.com.zone 163.com.other
[root@dns1 named]# vim 163.com.other
[root@dns1 named]# cat 163.com.other
163.com.	NS	dns1
dns1		A	192.168.4.7
www			A	192.168.4.20

[root@dns1 named]# cp -p qq.com.zone qq.com.other
[root@dns1 named]# vim qq.com.other
[root@dns1 named]# cat qq.com.other
qq.com.		NS	dns1
dns1		A	192.168.4.7
www			A	192.168.4.20

[root@dns1 named]# systemctl restart named
[root@dns1 ~]# systemctl enable named
- All hosts specify the DNS server address as 192.168.4.7
[root@dns1 ~]# echo nameserver 192.168.4.7 > /etc/resolv.conf
[root@web1 ~]# echo nameserver 192.168.4.7 > /etc/resolv.conf
[root@web2 ~]# echo nameserver 192.168.4.7 > /etc/resolv.conf
[root@client1 ~]# echo nameserver 192.168.4.7 > /etc/resolv.conf
[root@client2 ~]# echo nameserver 192.168.4.7 > /etc/resolv.conf
7.6 client test
- Client 1
[root@client1 ~]# nslookup www.qq.com
Server:		192.168.4.7
Address:	192.168.4.7#53

Name:	www.qq.com
Address: 192.168.4.10

[root@client1 ~]# nslookup www.163.com
Server:		192.168.4.7
Address:	192.168.4.7#53

Name:	www.163.com
Address: 192.168.4.10

[root@client1 ~]# curl http://www.163.com
wo shi web1 163
[root@client1 ~]# curl http://www.qq.com
wo shi web1 qq
- Client 2
[root@client2 ~]# nslookup www.163.com
Server:		192.168.4.7
Address:	192.168.4.7#53

Name:	www.163.com
Address: 192.168.4.20

[root@client2 ~]# nslookup www.qq.com
Server:		192.168.4.7
Address:	192.168.4.7#53

Name:	www.qq.com
Address: 192.168.4.20

[root@client2 ~]# curl http://www.163.com
wo shi web2 163
[root@client2 ~]# curl http://www.qq.com
wo shi web2 qq
7, NTP time synchronization
-
Network Time Protocol
-
A protocol for synchronizing the time of computers in a network
-
210.72.145.39 (national time service center server IP address)
-
Virtual machine A: build time server
[root@svr7 /]# yum -y install chrony

[root@svr7 /]# vim   /etc/chrony.conf
allow  all      	  #Allow all clients to synchronize time
local stratum 10      #This machine is the 10th layer of time server

[root@svr7 /]# systemctl restart chronyd
- Virtual machine B: NTP client
[root@pc207 ~]# yum -y install chrony
[root@pc207 ~]# vim /etc/chrony.conf
server   192.168.4.7   iburst            #Specify synchronization time with 192.168.4.7
[root@pc207 ~]# systemctl restart chronyd

[root@pc207 ~]#  chronyc  sources  -v    #Commands for viewing time synchronization information
8, PXE installation
-
Advantages of network installation
-
Large scale: assemble multiple hosts at the same time
-
Automation: install system and configure various services
-
Remote implementation: no physical installation media such as CD and U disk are needed
-
-
PXE,Pre-boot eXecution Environment
-
Pre boot execution environment, running before operating system
-
Available for remote installation
-
-
Working mode
-
PXE client integrated in boot chip of network card
-
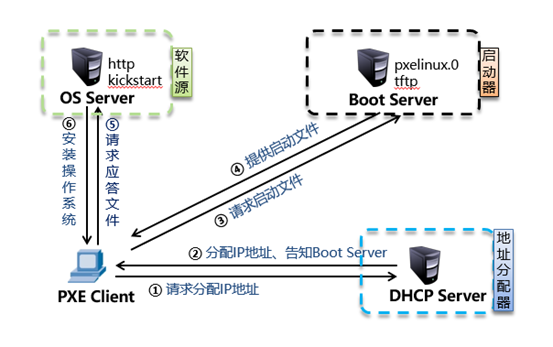
When the computer is booted, the PXE client is transferred into the memory from the network card chip for execution, and the PXE server configuration and display menu are obtained. According to the user's choice, the remote boot program is downloaded to the local computer for operation
-
-
What service components does PXE server need?
-
DHCP service, assign IP address, locate bootstrapper
- The dynamic host configuration protocol, developed by IETF (Internet Network Engineer task force), is used to simplify host address allocation management
-
TFTP service, providing bootstrapper Download
- (Trivial File Transfer Protocol) is a protocol used for simple file transfer between client and server in TCP/IP protocol family
-
HTTP service (or FTP/NFS), providing yum installation source
- HTTP: HyperText Transfer Protocol
- It is mainly used to transmit hypertext;
- Hypertext: refers to the text with hyperlink;
- Hyperlink: Based on this kind of link, you can jump between documents.
- FTP: (File Transfer Protocol)
- NFS: Network File System(NFS)
- HTTP: HyperText Transfer Protocol
-
8.1 DHCP server
-
Dynamic Host Configuration Protocol
- The dynamic host configuration protocol, developed by IETF (Internet Network Engineer task force), is used to simplify host address allocation management
-
The following access parameters are mainly allocated
-
IP address / subnet mask / broadcast address
-
Default gateway address, DNS server address
-
-
Four sessions assigned by DHCP address (broadcast, first come first served)
- DISCOVERY --> OFFER --> REQUEST -->ACK
- Discovery report request confirm
- There can only be one DHCP server in a network
-
Basic concept of server
-
Lease period: the period of time allowed for clients to lease IP addresses, in seconds
-
Scope: the network segment of the IP address assigned to the client
-
Address pool: range of IP addresses used for dynamic allocation
-
-
Build DHCP server
- DHCP service package: DHCP
- DHCP Service Name: dhcpd
- Configuration file of DHCP service / etc/dhcp/dhcpd.conf
[root@localhost ~]# yum  -y  install dhcp	#Install DHCP
[root@localhost ~]# vim   /etc/dhcp/dhcpd.conf			#Edit profile
:r  /usr/share/doc/dhcp*/dhcpd.conf.example 			#Last line mode read in template file
·································Omit ten thousand words

subnet 192.168.4.0 netmask 255.255.255.0 {		#Specify the network segment to assign the IP address to
  range 192.168.4.100 192.168.4.200;			#Assigned IP address range
  option domain-name-servers 192.168.4.7;		#Specify DNS server address
  option routers 192.168.4.254;					#Specify gateway address
  default-lease-time 600;						#Default lease time, 600 seconds
  max-lease-time 7200;							#Maximum lease time
  next-server   192.168.4.7;     				#Specify next server address
  filename   "pxelinux.0";         				#Specify the network card boot file name
}
[root@localhost ~]# systemctl restart dhcpd		#Restart DHCP service
8.2 TFTP server
-
TFTP: simple file transfer protocol default port: 69
- The default path of shared data for tftp service: var/lib/tftpboot
-
Install TFTP service
[root@localhost ~]#  yum -y install tftp-server
[root@localhost ~]#  systemctl restart tftp
- Deploy pxelinux.0 file
- pxelinux.0: network card boot file (installation manual), binary file
[root@localhost ~]# yum  provides  */pxelinux.0   #Query the package in the warehouse to generate the file
[root@localhost ~]# yum -y install syslinux
[root@localhost ~]#  rpm -ql syslinux   |   grep pxelinux.0
/usr/share/syslinux/gpxelinux.0
/usr/share/syslinux/pxelinux.0

[root@localhost ~]# cp /usr/share/syslinux/pxelinux.0   /var/lib/tftpboot/
[root@localhost ~]# ls /var/lib/tftpboot/
pxelinux.0
- Deploy the default menu file
[root@localhost ~]# mkdir   /var/lib/tftpboot/pxelinux.cfg
[root@localhost ~]# mount   /dev/cdrom   /mnt
mount: /dev/sr0 Write protected, will be mounted read-only
[root@localhost ~]#  ls  /mnt/isolinux
boot.cat  grub.conf   isolinux.bin  memtest     TRANS.TBL     vmlinuz
boot.msg  initrd.img  isolinux.cfg  splash.png  vesamenu.c32
[root@localhost ~]# cp /mnt/isolinux/isolinux.cfg  /var/lib/tftpboot/pxelinux.cfg/default
[root@localhost ~]# ls -R /var/lib/tftpboot/
/var/lib/tftpboot/:
pxelinux.0  pxelinux.cfg

/var/lib/tftpboot/pxelinux.cfg:
default
- Deploy graphics module and background picture
[root@localhost ~]# cp /mnt/isolinux/splash.png /mnt/isolinux/vesamenu.c32  /var/lib/tftpboot/
[root@localhost ~]# ls /var/lib/tftpboot/
pxelinux.0  pxelinux.cfg  splash.png  vesamenu.c32
- Deploy startup kernel and driver
[root@localhost ~]# cp  /mnt/isolinux/vmlinuz   /mnt/isolinux/initrd.img   /var/lib/tftpboot/
[root@localhost ~]# ls /var/lib/tftpboot/
initrd.img  pxelinux.0  pxelinux.cfg  splash.png  vesamenu.c32  vmlinuz
- Modify menu file
[root@localhost ~]# vim   /var/lib/tftpboot/pxelinux.cfg/default
  1 default vesamenu.c32					#Module that loads the drawing by default
  2 timeout 600								#Seconds, 60 seconds
 10 menu background splash.png				#Background picture
 11 menu title NSD2005 PXE Server			#Title of menu interface
 61 label linux								#Linux Tags
 62   menu label ^Install CentOS 7			#Contents of options
 63   menu default							#End of second reading default selection
 64   kernel vmlinuz 						#Running the kernel
 65   append initrd=initrd.img				#Run driver
#Delete all of the following 66 lines
8.3 FTP server
-
FTP: File Transfer Protocol default port 21
- Path of FTP default shared data / var/ftp
-
Set up FTP service
[root@localhost ~]# yum  -y install  vsftpd 	#Install vsftpd package
[root@localhost ~]# systemctl restart vsftpd
[root@localhost ~]# mkdir  /var/ftp/centos		#Create a directory
[root@localhost ~]# mount  /dev/cdrom  /var/ftp/centos
mount: /dev/sr0 Write protected, will be mounted read-only
[root@localhost ~]# curl  ftp://192.168.4.7/centos/
8.4 generate response file
- Using the graphics software system config kickstart to generate the answer file
[root@localhost ~]# vim /etc/yum.repos.d/mydvd.repo   	#The identity of the Yum warehouse must be [development]
[root@localhost ~]# cat /etc/yum.repos.d/mydvd.repo
[development]
name = mydvd
baseurl = file:///mydvd
enabled = 1
gpgcheck = 0
[root@localhost ~]# yum -y install system-config-kickstart
[root@localhost ~]# system-config-kickstart				#Run it
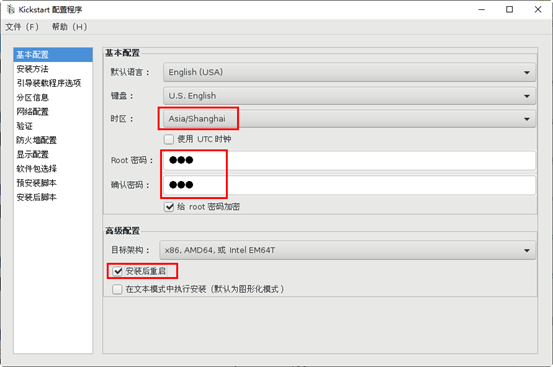
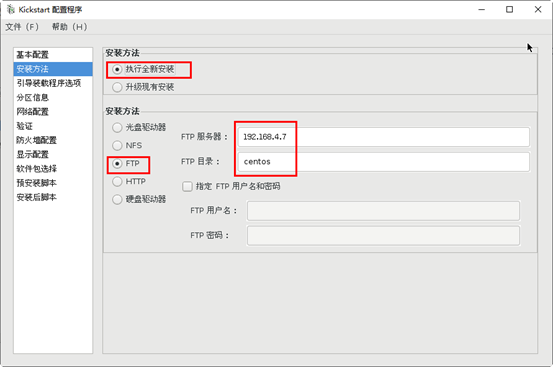
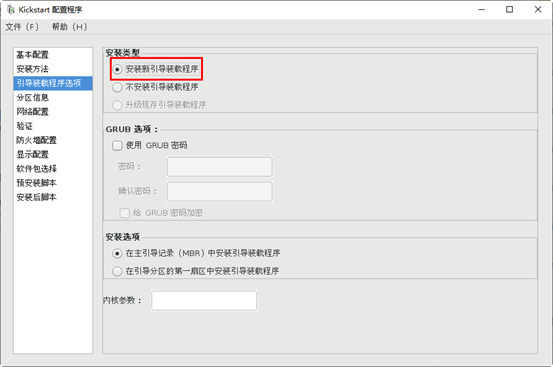
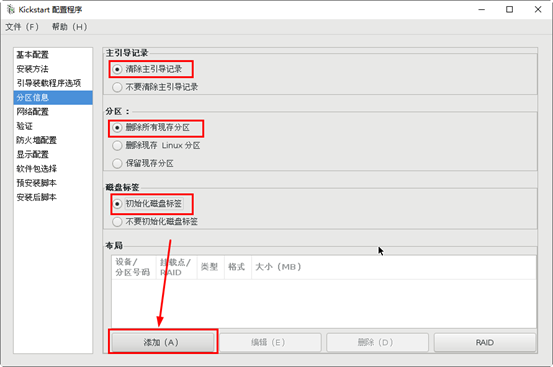
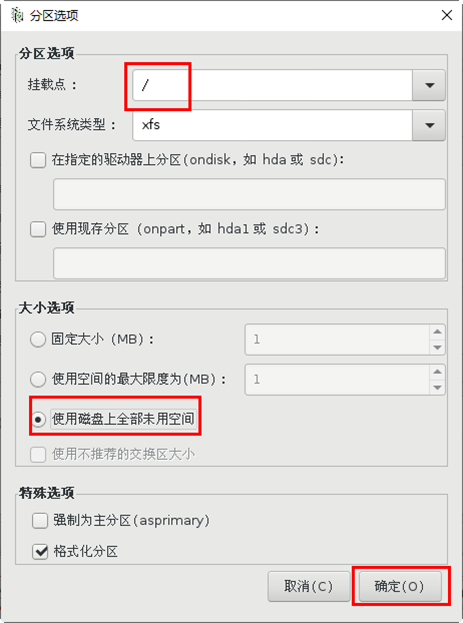
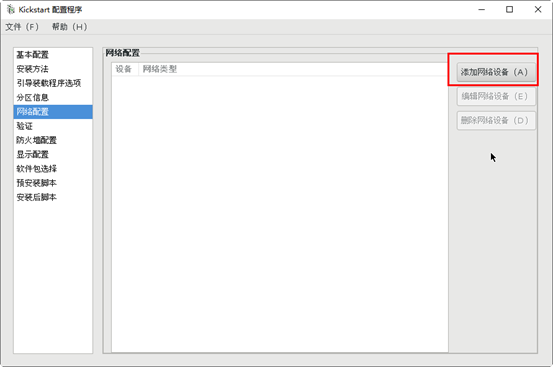
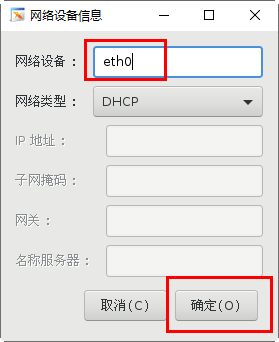
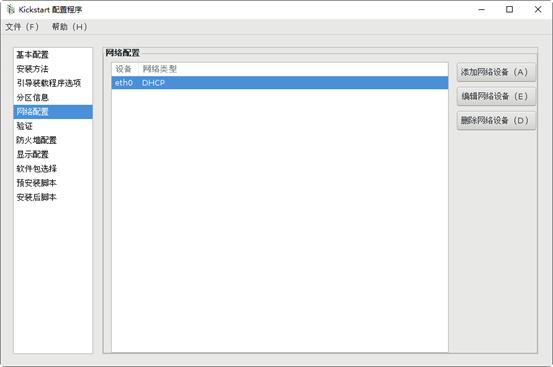
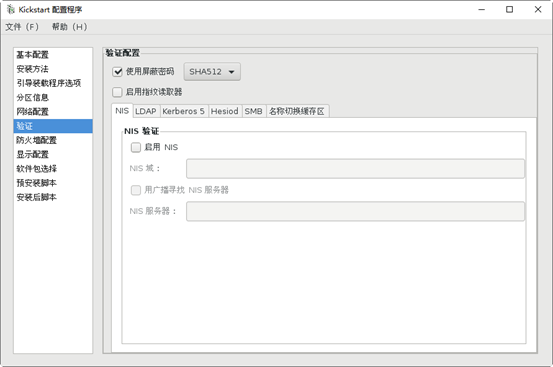
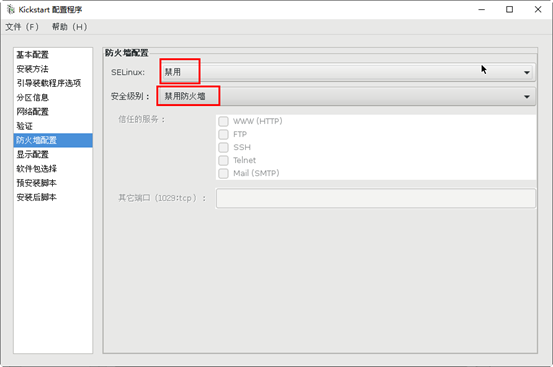
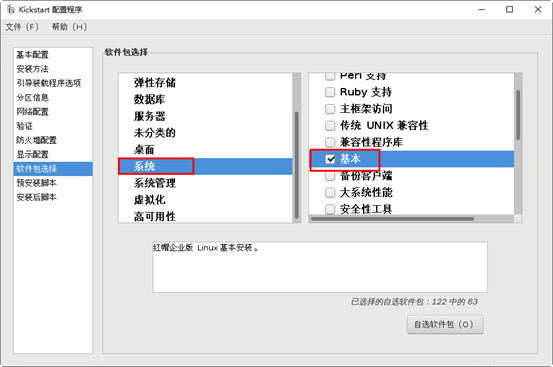
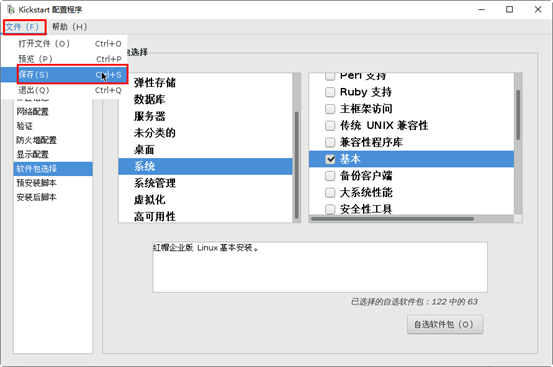
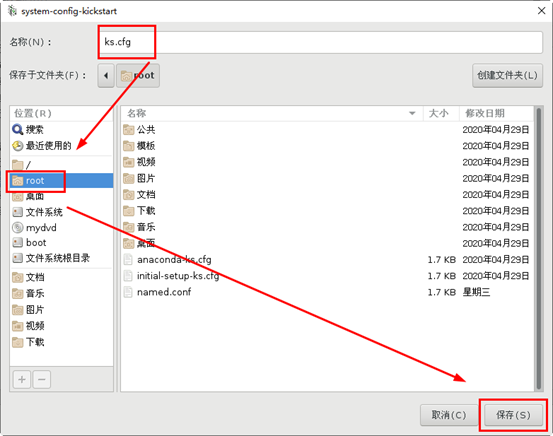
- Share to client by FTP
[root@localhost ~]# cp /root/ks.cfg /var/ftp/
[root@localhost ~]# ls /var/ftp/
centos  ks.cfg  pub
- Using menu file to specify how to get answer file
[root@localhost ~]#  vim /var/lib/tftpboot/pxelinux.cfg/default
[root@localhost ~]# tail -1 /var/lib/tftpboot/pxelinux.cfg/default
  append initrd=initrd.img ks=ftp://192.168.4.7/ks.cfg
8.5 PXE boot install virtual machine
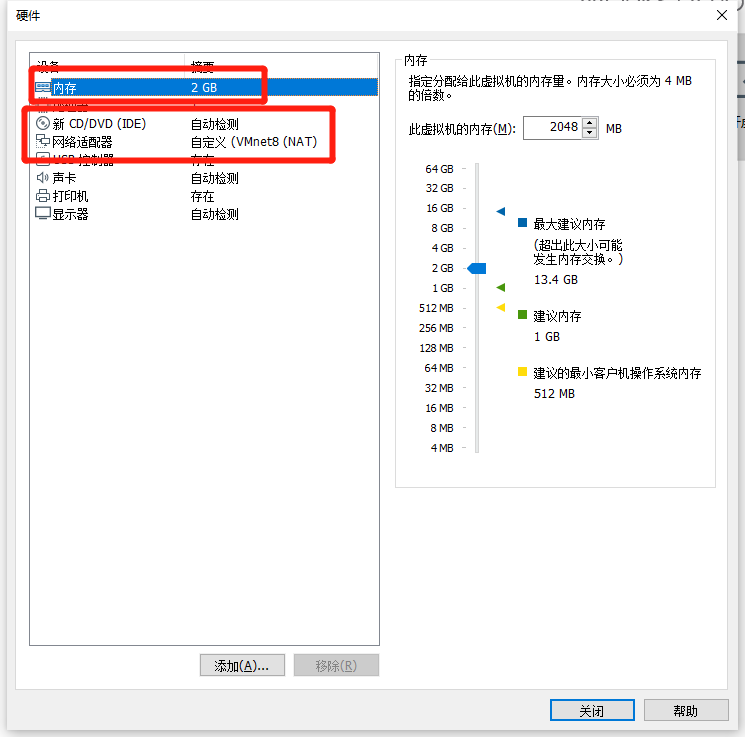
- Memory gives two G's all default
- Use the same network card as DHCP server to avoid the problem of communication failure between different networks
- Then turn it on
- There shouldn't be any problem with this operation
- Generally, the error warning is very intuitive
9, rsync synchronization operation
-
Command usage
- rsync [options ]Source directory target directory
- Common options
- -n: Test synchronization process without actual modification
- – delete: delete redundant documents in the target folder
- -a: Archive mode, equivalent to - rlptgoD
- -v: Display detailed operation information
- -z: Enable compression / decompression during transfer
-
Differences between synchronization and replication
- Copy: full copy source to target
- Synchronization: incremental copy, only transferring changed data
-
Data synchronization between local directories
[root@svr7 ~]# mkdir /mydir /todir
[root@svr7 ~]# cp /etc/passwd /etc/fstab /mydir/
[root@svr7 ~]# ls /mydir/
fstab  passwd
[root@svr7 ~]# rsync -av /mydir/ /todir/
sending incremental file list
./
fstab
passwd

sent 2,839 bytes  received 57 bytes  5,792.00 bytes/sec
total size is 2,669  speedup is 0.92
[root@svr7 ~]# ls /todir/
fstab  passwd

[root@svr7 ~]# ls -l /todir/
//Total consumption 8
-rw-r--r--. 1 root root  477 6 October 20:32 fstab
-rw-r--r--. 1 root root 2192 6 October 20:32 passwd
[root@svr7 ~]# touch /mydir/1.txt
[root@svr7 ~]# rsync -av /mydir/ /todir/
sending incremental file list
./
1.txt

sent 147 bytes  received 38 bytes  370.00 bytes/sec
total size is 2,669  speedup is 14.43
[root@svr7 ~]# ls -l /todir/
//Total consumption 8
-rw-r--r--. 1 root root    0 6 October 20:34 1.txt
-rw-r--r--. 1 root root  477 6 October 20:32 fstab
-rw-r--r--. 1 root root 2192 6 October 20:32 passwd
- Delete redundant data during synchronization
[root@svr7 ~]# touch /todir/2.txt
[root@svr7 ~]# ls /todir/
1.txt  2.txt  fstab  passwd
[root@svr7 ~]# ls /mydir
1.txt  fstab  passwd
[root@svr7 ~]# rsync -av --delete /mydir/ /todir/
sending incremental file list
deleting 2.txt
./

sent 108 bytes  received 28 bytes  272.00 bytes/sec
total size is 2,669  speedup is 19.62

[root@svr7 ~]# ls /todir/
1.txt  fstab  passwd
- Remote synchronization
- rsync+SSH synchronization
[root@svr7 ~]# rsync -av --delete   /mydir/   root@192.168.4.207:/opt
[root@pc207 ~]# ls /opt/
1.txt  fstab  passwd
- Real time synchronization