Basic configuration of console
The instructions of Tencent cloud are very detailed and popular. The link is attached below:
Tencent cloud official document platform
1. Select the installation system
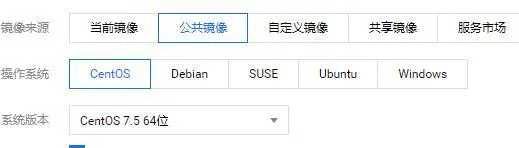
System installation
I chose the latest CentOS 7 5. Wait about 10 minutes for the system to be installed.
2. Change password & use SSH key
We first change the initial password, but in addition to the password login method, there is a more convenient and secure way to log in with SSH secret key.
Create SSH key
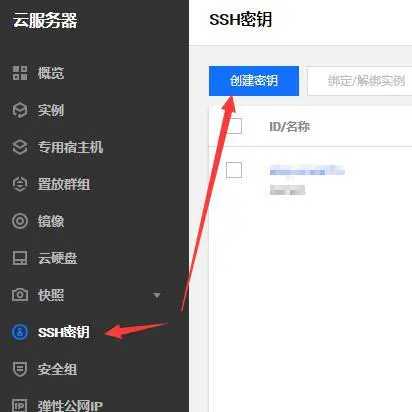
Create key
Create new key pair, and then select create new key pair here. Enter the key name and confirm. A download prompt will pop up. Please download it within 10 minutes (save it and use it later).
Key binding server
Select the key you just created, click bind instance, select your own server, and then click OK. Then follow the prompts.
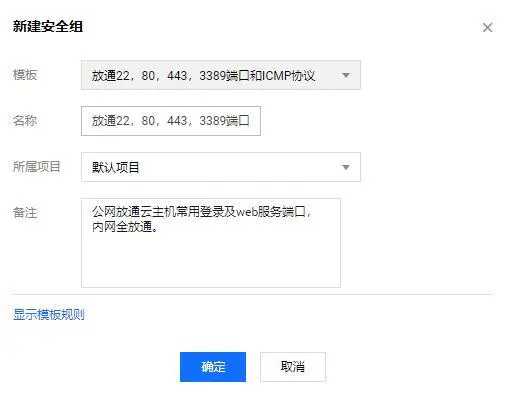
3. Create a security group
We can configure security groups to control which ports can be accessed from the Internet.
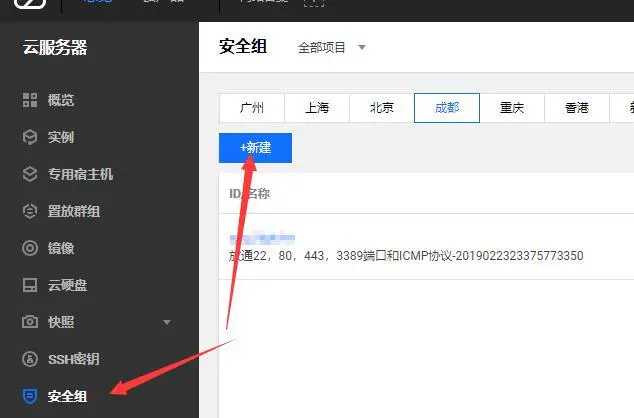
Create security group
New security group
I have selected the default template of the system here. If necessary, I can modify the rules.
After configuring the security group, click Manage instance on the right → add Association → select your own server to confirm the association.
Remote connection
We use PuTTY to connect to ECS:
1. Install PuTTY
After PuTTY is installed, you can see the two software:
screenshot
Next, we will use these two software.
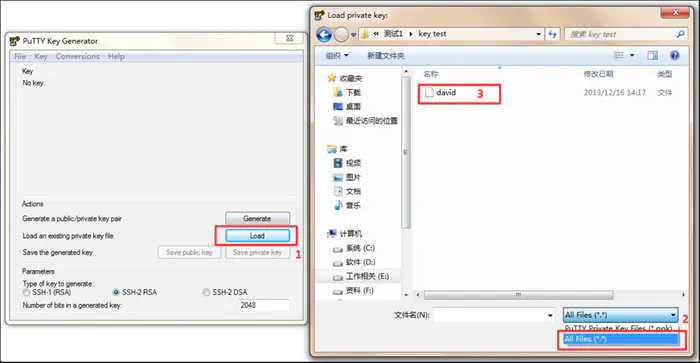
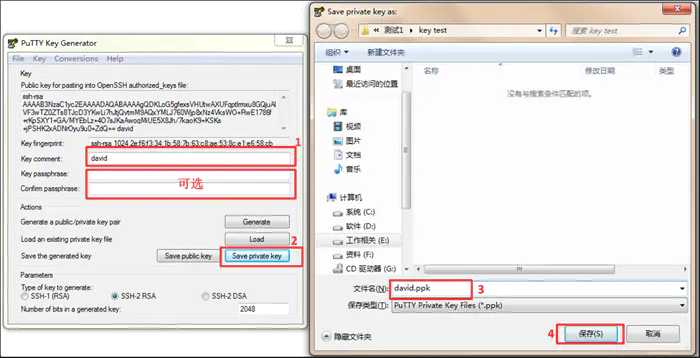
2. Key conversion
Open putty gen, load the key file we downloaded earlier, then enter the key name in the key comment column, enter the password for encrypting the private key, click Save private key, and select the place to save in the pop-up window.
screenshot
screenshot
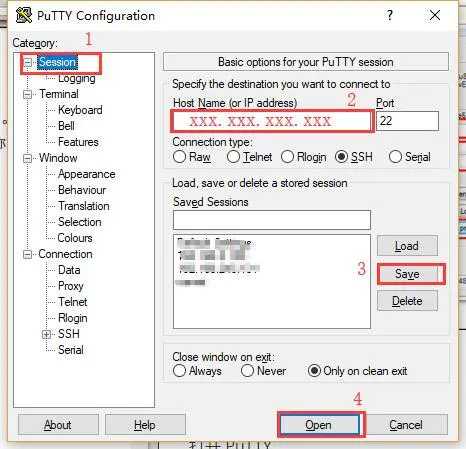
3. Connect to the server
Open PuTTY, and then operate as shown in the figure:

screenshot
As shown in the figure above, find the SSH → Auth option and load the key just converted with PuTTYgen
screenshot
Then click Seesion, enter the IP address of the ECS, click Save to save it for direct access next time, and finally click Open to Open it.
screenshot
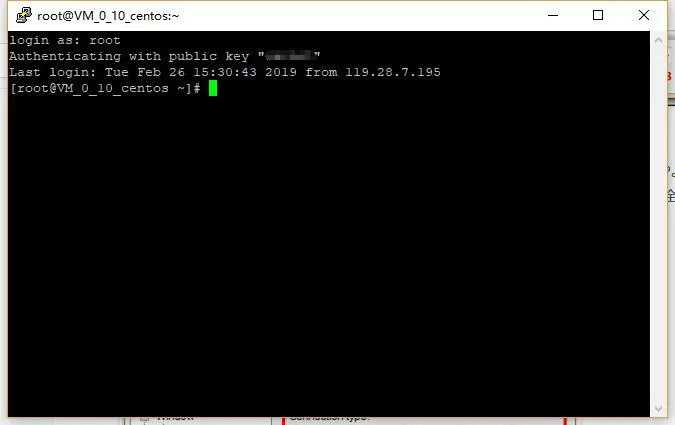
Directly enter: root to log in to the server remotely.
Update system and software
yum update -y
The system installed by Tencent cloud comes with software such as net tools and vim, which will not be installed here. If not, it is recommended to install it.
yum install vim
yum install net-tools
node installation
1. Add source
curl -sL https://rpm.nodesource.com/setup_10.x | bash -
2. Installation
yum install nodejs -y
3. Install cnpm
npm install -g cnpm --registry=https://registry.npm.taobao.org
reference resources: https://github.com/nodesource/distributions
nginx installation
1. Add source
Create file:
vim /etc/yum.repos.d/nginx.repo
Add the following:
[nginx-stable]
name=nginx stable repo
baseurl=http://nginx.org/packages/centos/$releasever/$basearch/
gpgcheck=1
enabled=1
gpgkey=https://nginx.org/keys/nginx_signing.key

[nginx-mainline]
name=nginx mainline repo
baseurl=http://nginx.org/packages/mainline/centos/$releasever/$basearch/
gpgcheck=1
enabled=0
gpgkey=https://nginx.org/keys/nginx_signing.key
reference resources: http://nginx.org/en/linux_packages.html
2. Installation
yum install nginx -y
3. Operation
nginx
At this point, you can enter your ECS ip address in the browser to see if there is a response. If there is a display, Congratulations, you can make the next configuration. If not, check whether nginx is successfully installed, whether the server firewall is closed, and whether the security group is configured.
4. Common commands
// start-up
nginx
systemctl start nginx.service

// stop it
nginx -s stop  // Stop immediately
nginx -s quit  // Stop calmly
killall nginx  // Kill process
systemctl stop nginx.service

// restart
systemctl restart nginx.service

// service crond reload
nginx -s reload

// View process
ps aux | grep nginx

// View open ports
netstat -tlnp
mongodb installation
1. Add source
New file:
vim /etc/yum.repos.d/mongodb-org-4.0.repo
Add the following:
[mongodb-org-4.0]
name=MongoDB Repository
baseurl=https://repo.mongodb.org/yum/redhat/$releasever/mongodb-org/4.0/x86_64/
gpgcheck=1
enabled=1
gpgkey=https://www.mongodb.org/static/pgp/server-4.0.asc
2. Installation
yum install -y mongodb-org
3. Common commands
service mongod start  // start-up
service mongod stop  // close
service mongod restart  // restart
chkconfig mongod on  // Verify start

// CentOS 7 recommends the following commands
systemctl start mongod.service  // start-up
cat /var/log/mongodb/mongod.log  // Verify successful startup
ystemctl enable mongod.service  // Set startup
systemctl stop mongod.service  // close
systemctl restart mongod.service  // restart
Server configuration
1. Create a new directory
/Create the following directory under the data directory:
- www/blog is used to store blog site files
- mongo/db is used to store database files
- mongo/log is used to store the database log file
Create a new mongod.log in the mongo/log directory Log file
2. nginx configuration
Create a new user www and let nginx also use the user:
groupadd www  // Create user

chown www:www /data  // Add user permissions
Open nginx master profile:
vim /etc/nginx/nginx.conf
Make the following modifications:
user  www;  // The default user is modified to www
worker_processes  1;

error_log  /var/log/nginx/error.log warn;
pid        /var/run/nginx.pid;

events {
    worker_connections  1024;
}

http {
    include       /etc/nginx/mime.types;
    default_type  application/octet-stream;

    log_format  main  '$remote_addr - $remote_user [$time_local] "$request" '
                      '$status $body_bytes_sent "$http_referer" '
                      '"$http_user_agent" "$http_x_forwarded_for"';

    access_log  /var/log/nginx/access.log  main;

    sendfile        on;
    #tcp_nopush     on;

    keepalive_timeout  65;

    #gzip  on;

    include /etc/nginx/conf.d/*.conf;
}
Open nginx server configuration file:
vim /etc/nginx/conf.d/default.conf
Make the following modifications:
server {
    listen       80;
    server_name  localhost;

    #charset koi8-r;
    #access_log  /var/log/nginx/host.access.log  main;

    location / {
        root   /data/www;  // Website file storage directory
        index  index.html index.htm;
        proxy_set_header host $host;  // Redefine the request header host as the forwarded host
        proxy_pass http://localhost:3000/;  //  Port forwarding
        proxy_cookie_domain localhost xxx.xxx.xxx.xxx;  // Make the forwarded cookie to the new domain name
    }

    #error_page  404              /404.html;

    # redirect server error pages to the static page /50x.html
    #
    error_page   500 502 503 504  /50x.html;
    location = /50x.html {
        root   /usr/share/nginx/html;
    }

    # proxy the PHP scripts to Apache listening on 127.0.0.1:80
    #
    #location ~ \.php$ {
    #    proxy_pass   http://127.0.0.1;
    #}

    # pass the PHP scripts to FastCGI server listening on 127.0.0.1:9000
    #
    #location ~ \.php$ {
    #    root           html;
    #    fastcgi_pass   127.0.0.1:9000;
    #    fastcgi_index  index.php;
    #    fastcgi_param  SCRIPT_FILENAME  /scripts$fastcgi_script_name;
    #    include        fastcgi_params;
    #}

    # deny access to .htaccess files, if Apache's document root
    # concurs with nginx's one
    #
    #location ~ /\.ht {
    #    deny  all;
    #}
}
Note the above three configurations:
proxy_set_header host $host;
proxy_pass http://localhost:3000/;
proxy_cookie_domain localhost xxx.xxx.xxx.xxx;
Because the blog project will take node as the server program, it will occupy 3000 port, and the client cannot access the 3000 port of the server, so it needs to be forwarded with nginx.
After nginx is forwarded, the request header will be localhost:3000, which we don't want customers to see, so we need to use proxy_set_header host $host; Convert the request header to our domain name.
Our website will store some cookies on the client, which also needs to be relocated, otherwise the client will not receive these cookies. Proxy is used here_ cookie_ domain localhost xxx.xxx.xxx.xxx; Relocate cookie, XXX xxx. xxx. XXX is our domain name.
After completing the above configuration, we enter the following command to reload the configuration item:
nginx -s reload
3. Database configuration
Open mongodb configuration file:
vim /etc/mongod.conf
Configure as follows:
# mongod.conf

# for documentation of all options, see:
#   http://docs.mongodb.org/manual/reference/configuration-options/

# where to write logging data.
systemLog:
  destination: file
  logAppend: true
  path: /data/mongo/log/mongod.log  // log file location

# Where and how to store data.
storage:
  dbPath: /data/mongo/db  // Data storage directory
  journal:
    enabled: true
#  engine:
#  mmapv1:
#  wiredTiger:

# how the process runs
processManagement:
  fork: true  # fork and run in background
  pidFilePath: /var/run/mongodb/mongod.pid  # location of pidfile
  timeZoneInfo: /usr/share/zoneinfo

# network interfaces
net:
  port: 27017
  bindIp: 0.0.0.0  # Enter 0.0.0.0,:: to bind to all IPv4 and IPv6 addresses or, alternatively, use the net.bindIpAll setting.

# security:

#operationProfiling:

#replication:

#sharding:

## Enterprise-Only Options

#auditLog:

#snmp:
After saving, add user: mongod to all files in / data/mongo and its subdirectories
chown -R mongod: mongod mongo
At this point, enter the command to run the database:
systemctl start mongod.service
If an error is prompted and the PID file is missing, enter the directory / var/run/mongodb to create a new file mongod pid
touch mongod.pid
Restart the database:
systemctl restart mongod.service
4. Add users to the database and enable authentication
Connect to database:
mongo
Add user:
// Super administrator
use admin

db.createUser({
  user: 'root',  // user name
  pwd: 'password',  // password
  roles:[{
    role: 'root',
    db: 'admin'
  }]
})

use blog  // Create a database blog and switch to the blog

// Blog administrator is used to create collections, manage databases, add and delete blog users, etc
db.createUser({
  user: 'blogadmin',
  pwd: 'password',
  roles:[{
    role: 'dbOwner',
    db: 'blog'
  }]
})


// blog user, the user used to connect to the database on the client side, has only read and write permission
db.createUser({
  user: 'blog',
  pwd: 'password',
  roles:[{
    role: 'readWrite',
    db: 'blog'
  }]
})
Open profile:
vim /etc/mongod.conf
Find the following statement and modify it:
# security:

// Amend to read:
security:
  authorization: enabled  // Turn on verification
Originally, I wanted to connect the database remotely with visualization software, but several online methods failed. However, several pieces of data can be solved through the command line. For multiple pieces of data, I use my stupid method: write js files locally, upload them to the server, and run node.
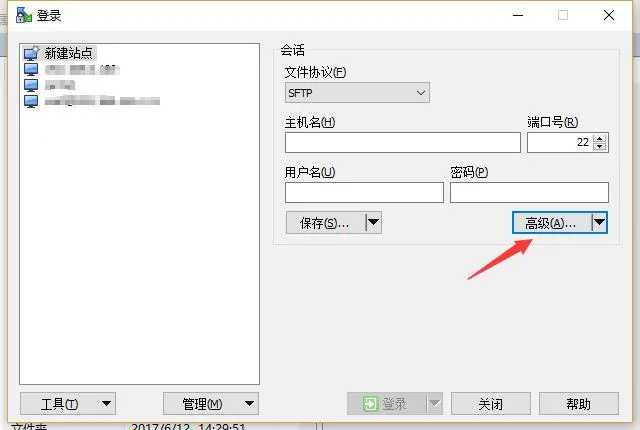
5. Upload files
Download and install WinSCP:
New site:
WinSCP
Select advanced, add our SSH key, fill in the server IP address and the server user name, and then save. Select the saved site in the left list and log in.
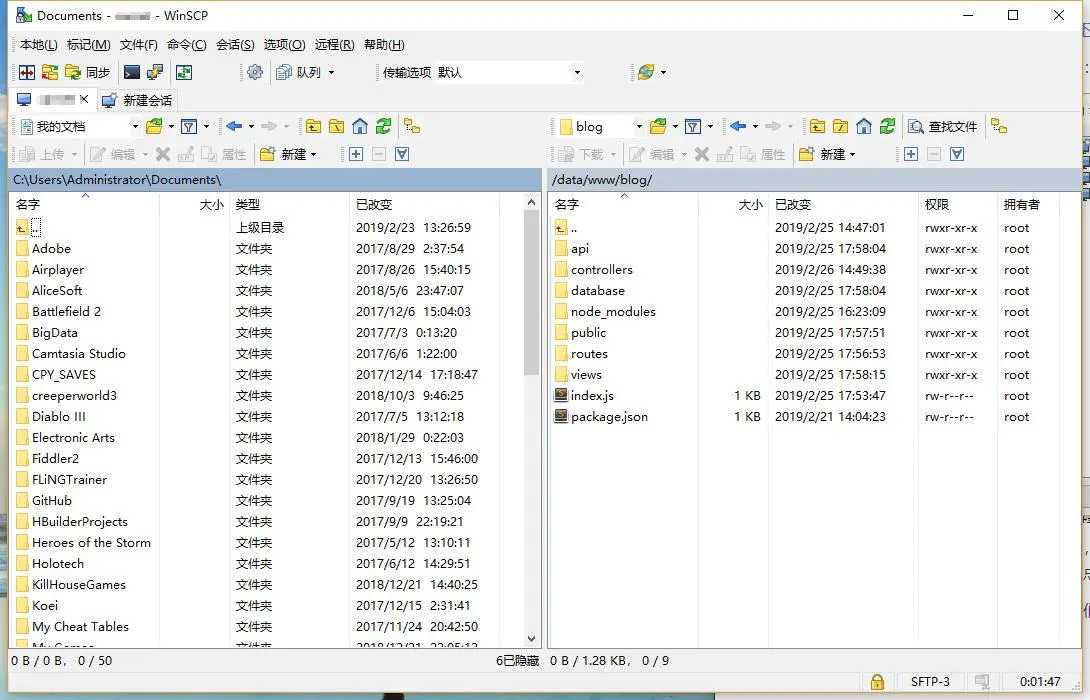
Directly drag our packaged files into the corresponding directory on the right: (note that some links should be changed to our current server ip or domain name when packaging)
screenshot
Enter the directory / data/www/blog in PuTTY and enter the command to install the dependencies of the project:
npm i // Or cnpm i
After installation, run:
node index.js
Then enter the server IP in the browser, and then you can normally access our website.
Original address: http://tencent.yundashi168.com/868.html