Write before
- Learn K8s, so organize your memory
- Most of the content comes from Chapter 1 of the Kubernetes Authoritative Guide: A Full Touch from Docker to Kubernetes Practice, where interested partners can support the author
It's hard to be happy with a person who doesn't appreciate himself. ----- Tritrichoma
1. Brief description
Most of the concepts in Kubernetes, such as Node, Pod,Replication Controller, Service, etc., can be considered as a kind of "resource object". Almost all resource objects can be added, deleted, altered, searched and stored in etcd persistently through the kubect tools (or API programming calls) provided by Kubernetes. From this point of view, Kubernetes is a highly automated resource control system that performs advanced functions of automatic control and error correction by `tracking and comparing the differences between the `resource expected state'stored in the etcd library and the `actual resource state' in the current environment.
Related Resources in K8s: Change with Version
┌──[root@vms81.liruilongs.github.io]-[~/ansible/k8s-pod-create]
└─$kubectl api-resources
| NAME (name) | SHORTNAMES | APIVERSION (Version) | NAMESPACED (Namespace Isolation) | KIND (Kind) |
|---|---|---|---|---|
| bindings | v1 | true | Binding | |
| componentstatuses | cs | v1 | false | ComponentStatus |
| configmaps | cm | v1 | true | ConfigMap |
| endpoints | ep | v1 | true | Endpoints |
| events | ev | v1 | true | Event |
| limitranges | limits | v1 | true | LimitRange |
| namespaces | ns | v1 | false | Namespace |
| nodes | no | v1 | false | Node |
| persistentvolumeclaims | pvc | v1 | true | PersistentVolumeClaim |
| persistentvolumes | pv | v1 | false | PersistentVolume |
| pods | po | v1 | true | Podpodtemplates |
| replicationcontrollers | rc | v1 | true | ReplicationController |
| resourcequotas | quota | v1 | true | ResourceQuota |
| secrets | v1 | true | Secret | |
| serviceaccounts | sa | v1 | true | ServiceAccount |
| services | svc | v1 | true | Service |
| mutatingwebhookconfigurations | admissionregistration.k8s.io/v1 | false | MutatingWebhookConfiguration | |
| validatingwebhookconfigurations | admissionregistration.k8s.io/v1 | false | ValidatingWebhookConfiguration | |
| customresourcedefinitions | crd,crds | apiextensions.k8s.io/v1 | false | CustomResourceDefinition |
| apiservices | apiregistration.k8s.io/v1 | false | APIService | |
| controllerrevisions | apps/v1 | true | ControllerRevision | |
| daemonsets | ds | apps/v1 | true | DaemonSet |
| deployments | deploy | apps/v1 | true | Deployment |
| replicasets | rs | apps/v1 | true | ReplicaSet |
| statefulsets | sts | apps/v1 | true | StatefulSet |
| tokenreviews | authentication.k8s.io/v1 | false | TokenReview | |
| localsubjectaccessreviews | authorization.k8s.io/v1 | true | LocalSubjectAccessReview | |
| selfsubjectaccessreviews | authorization.k8s.io/v1 | false | SelfSubjectAccessReview | |
| selfsubjectrulesreviews | authorization.k8s.io/v1 | false | SelfSubjectRulesReview | |
| subjectaccessreviews | authorization.k8s.io/v1 | false | SubjectAccessReview | |
| horizontalpodautoscalers | hpa | autoscaling/v1 | true | HorizontalPodAutoscaler |
| cronjobs | cj | batch/v1 | true | CronJob |
| jobs | batch/v1 | true | Jobcertificatesigningrequests | |
| leases | coordination.k8s.io/v1 | true | Lease | |
| bgpconfigurations | crd.projectcalico.org/v1 | false | BGPConfiguration | |
| bgppeers | crd.projectcalico.org/v1 | false | BGPPeer | |
| blockaffinities | crd.projectcalico.org/v1 | false | BlockAffinity | |
| clusterinformations | crd.projectcalico.org/v1 | false | ClusterInformation | |
| felixconfigurations | crd.projectcalico.org/v1 | false | FelixConfiguration | |
| globalnetworkpolicies | crd.projectcalico.org/v1 | false | GlobalNetworkPolicy | |
| globalnetworksets | crd.projectcalico.org/v1 | false | GlobalNetworkSet | |
| hostendpoints | crd.projectcalico.org/v1 | false | HostEndpoint | |
| ipamblocks | crd.projectcalico.org/v1 | false | IPAMBlock | |
| ipamconfigs | crd.projectcalico.org/v1 | false | IPAMConfig | |
| ipamhandles | crd.projectcalico.org/v1 | false | IPAMHandle | |
| ippools | crd.projectcalico.org/v1 | false | IPPool | |
| kubecontrollersconfigurations | crd.projectcalico.org/v1 | false | KubeControllersConfiguration | |
| networkpolicies | crd.projectcalico.org/v1 | true | NetworkPolicy | |
| networksets | crd.projectcalico.org/v1 | true | NetworkSet | |
| endpointslices | discovery.k8s.io/v1 | true | EndpointSlice | |
| events | ev | events.k8s.io/v1 | true | Event |
| flowschemas | flowcontrol.apiserver.k8s.io/v1beta1 | false | FlowSchema | |
| prioritylevelconfigurations | flowcontrol.apiserver.k8s.io/v1beta1 | false | PriorityLevelConfiguration | |
| nodes | metrics.k8s.io/v1beta1 | false | NodeMetrics | |
| pods | metrics.k8s.io/v1beta1 | true | PodMetrics | |
| ingressclasses | networking.k8s.io/v1 | false | IngressClass | |
| ingresses | ing | networking.k8s.io/v1 | true | Ingress |
| networkpolicies | netpol | networking.k8s.io/v1 | true | NetworkPolicy |
| runtimeclasses | node.k8s.io/v1 | false | RuntimeClass | |
| poddisruptionbudgets | pdb | policy/v1 | true | PodDisruptionBudget |
| podsecuritypolicies | psp | policy/v1beta1 | false | PodSecurityPolicy |
| clusterrolebindings | rbac.authorization.k8s.io/v1 | false | ClusterRoleBinding | |
| clusterroles | rbac.authorization.k8s.io/v1 | false | ClusterRole | |
| rolebindings | rbac.authorization.k8s.io/v1 | true | RoleBinding | |
| roles | rbac.authorization.k8s.io/v1 | true | Role | |
| priorityclasses | pc | scheduling.k8s.io/v1 | false | PriorityClass |
| csidrivers | storage.k8s.io/v1 | false | CSIDriver | |
| csinodes | storage.k8s.io/v1 | false | CSINode | |
| csistoragecapacities | storage.k8s.io/v1beta1 | true | CSIStorageCapacity | |
| storageclasses | sc | storage.k8s.io/v1 | false | StorageClass |
| volumeattachments | storage.k8s.io/v1 | false | VolumeAttachment |
2. Two management roles for the Kubernetes cluster: Master and Node
| Master and Node |
|---|
 |
1. Master role
Master in Kubernetes refers to cluster control nodes. Each Kubernetes cluster needs a Master node to manage and control the entire cluster. Basically, all control commands of Kubernetes are sent to it, which is responsible for the specific execution process. All commands we execute later are basically running on the Master node.
Master nodes typically occupy a single server (three servers are recommended for highly available deployments), mainly because they are so important that they are the "heads" of the entire cluster and will fail to manage cluster content server applications if they are down or unavailable. The following set of critical processes run on the Master node.
| Critical processes on Master nodes | – |
|---|---|
| Kubernetes API Server (kube-apiserver) | The key service process that provides the HTTP Rest interface is the only entrance to add, delete, change, check and so on for all resources in Kubernetes, as well as the entrance process controlled by the cluster. |
| Kubernetes Controller Manager (kube-controller-manager) | The automation control center for all resource objects in Kubernetes can be understood as the "super-director" of the resource objects. |
| Kubernetes Scheduler (kube-scheduler) | The process responsible for resource scheduling (Pod scheduling) is equivalent to the "dispatch room" of a bus company. |
| etcd | You also need to start an etcd service on the Master node, because all the data for the resource objects in Kubernetes is stored in the etcd. |
In addition to Master, other machines in the Kubernetes cluster are called Node nodes
2. Node Role
In earlier versions, also known as Miniono, like Master, the Node node could be either a physical host or a virtual machine. Node nodes are the workload nodes in the Kubermetes cluster, and each Node is assigned some workload (Docker container) by the Master. When a Node goes down, the workload on it is automatically transferred by the Master to other nodes.
The following set of critical processes run on each Node node.
| Run critical processes on each Node node | – |
|---|---|
| kubelet | Responsible for creating containers for Pod, starting and stopping tasks, and working closely with Master nodes to achieve the basic functions of cluster management. |
| kube-proxy | Important components to implement communication and load balancing mechanisms for Kubernetes Service.) |
| Docker Engine | (docker): Docker engine, responsible for container creation and management on this machine. |
Node nodes can be dynamically added to the Kubernetes cluster during runtime, provided that these critical processes are properly installed, configured, and started on this node, and by default kubelet registers itself with Master, which is also the recommended mode of Node management for Kubernetes.
Once Node is included in cluster management, the kubelet process periodically reports its own information to the Master node, such as operating system, Docker version, CPU and memory conditions of the machine, and which Pod s are currently running, so that the Master can be aware of each Node's resource usage and achieve an efficient and balanced resource scheduling strategy. When a Node fails to report information for a specified period of time, it is judged by Master as "disconnected". The status of Node is marked as not Ready, and Master triggers the automatic process of "heavy workload transfer".
View Node and Node Details in Cluster
┌──[root@vms81.liruilongs.github.io]-[~]
└─$kubectl get nodes
NAME                         STATUS     ROLES                  AGE   VERSION
vms81.liruilongs.github.io   Ready      control-plane,master   47d   v1.22.2
vms82.liruilongs.github.io   Ready      worker1                47d   v1.22.2
vms83.liruilongs.github.io   NotReady   worker2                47d   v1.22.2
┌──[root@vms81.liruilongs.github.io]-[~]
└─$kubectl describe  node vms82.liruilongs.github.io
# Basic information about Node: name, label, creation time, etc.
Name:               vms82.liruilongs.github.io
Roles:              worker1
Labels:             beta.kubernetes.io/arch=amd64
                    beta.kubernetes.io/os=linux
                    disktype=node1
                    kubernetes.io/arch=amd64
                    kubernetes.io/hostname=vms82.liruilongs.github.io
                    kubernetes.io/os=linux
                    node-role.kubernetes.io/worker1=
Annotations:        dest: This is a working node
                    kubeadm.alpha.kubernetes.io/cri-socket: /var/run/dockershim.sock
                    node.alpha.kubernetes.io/ttl: 0
                    projectcalico.org/IPv4Address: 192.168.26.82/24
                    projectcalico.org/IPv4IPIPTunnelAddr: 10.244.171.128
                    volumes.kubernetes.io/controller-managed-attach-detach: true
CreationTimestamp:  Thu, 07 Oct 2021 01:15:45 +0800
Taints:             <none>
Unschedulable:      false
Lease:
  HolderIdentity:  vms82.liruilongs.github.io
  AcquireTime:     <unset>
  RenewTime:       Tue, 23 Nov 2021 23:08:16 +0800
# Node is currently running. After Node starts, it will do a series of self-checks:
# For example, if the disk is full, label OutODisk=True if it is full
# Otherwise continue checking for insufficient memory (if not, mark MemoryPressure=True)
# Last thing is OK, set to Ready state (Ready=True)
# This state indicates that Node is in a healthy state on which Master will be able to schedule new tasks (such as starting Pod)
Conditions:
  Type                 Status  LastHeartbeatTime                 LastTransitionTime                Reason
        Message
  ----                 ------  -----------------                 ------------------                ------
        -------
  NetworkUnavailable   False   Tue, 23 Nov 2021 23:02:52 +0800   Tue, 23 Nov 2021 23:02:52 +0800   CalicoIsUp
        Calico is running on this node
  MemoryPressure       False   Tue, 23 Nov 2021 23:05:32 +0800   Tue, 23 Nov 2021 22:45:03 +0800   KubeletHasSufficientMemory   kubelet has sufficient memory available
  DiskPressure         False   Tue, 23 Nov 2021 23:05:32 +0800   Tue, 23 Nov 2021 22:45:03 +0800   KubeletHasNoDiskPressure     kubelet has no disk pressure
  PIDPressure          False   Tue, 23 Nov 2021 23:05:32 +0800   Tue, 23 Nov 2021 22:45:03 +0800   KubeletHasSufficientPID      kubelet has sufficient PID available
  Ready                True    Tue, 23 Nov 2021 23:05:32 +0800   Tue, 23 Nov 2021 22:45:03 +0800   KubeletReady
        kubelet is posting ready status
# Host address and host name of Node.
Addresses:
  InternalIP:  192.168.26.82
  Hostname:    vms82.liruilongs.github.io
# Total Resources on Node: Describes the system resources available to Node, including CPU, memory, maximum dispatchable Pod, etc. Notice that Kubernetes has now experimentally supported GPU resource allocation (alpha.kubernetes.io/nvidia-gpu=0)
Capacity:
  cpu:                2
  ephemeral-storage:  153525Mi
  hugepages-1Gi:      0
  hugepages-2Mi:      0
  memory:             4030172Ki
  pods:               110
# Node Assignable Resource Amount: Describes the amount of resource Node is currently available for allocation.
Allocatable:
  cpu:                2
  ephemeral-storage:  144884367121
  hugepages-1Gi:      0
  hugepages-2Mi:      0
  memory:             3927772Ki
  pods:               110
# Host system information: Includes the unique identification UUID of the host, Linux kernel version number, operating system type and version, Kubernetes version number, kubelet and kube-proxy version number, etc.
System Info:
  Machine ID:                 1ee67b1c4230405a851cf0107d6e89f5
  System UUID:                C0EA4D56-ED9A-39CF-6942-5B66704F6E6F
  Boot ID:                    b0e42864-9778-4ded-af4c-a88a64f988db
  Kernel Version:             3.10.0-693.el7.x86_64
  OS Image:                   CentOS Linux 7 (Core)
  Operating System:           linux
  Architecture:               amd64
  Container Runtime Version:  docker://20.10.9
  Kubelet Version:            v1.22.2
  Kube-Proxy Version:         v1.22.2
PodCIDR:                      10.244.1.0/24
PodCIDRs:                     10.244.1.0/24
# Pod list summary information currently running
Non-terminated Pods:          (3 in total)
  Namespace                   Name                              CPU Requests  CPU Limits  Memory Requests  Memory Limits  Age
  ---------                   ----                              ------------  ----------  ---------------  -------------  ---
  kube-system                 calico-node-ntm7v                 250m (12%)    0 (0%)      0 (0%)           0 (0%)         47d
  kube-system                 kube-proxy-nzm24                  0 (0%)        0 (0%)      0 (0%)           0 (0%)         35d
  kube-system                 metrics-server-bcfb98c76-wxv5l    0 (0%)        0 (0%)      0 (0%)           0 (0%)         27m
# Summary information about the use of allocated resources, such as the minimum and maximum allowable usage of a resource request as a percentage of the total system.
Allocated resources:
  (Total limits may be over 100 percent, i.e., overcommitted.)
  Resource           Requests    Limits
  --------           --------    ------
  cpu                250m (12%)  0 (0%)
  memory             0 (0%)      0 (0%)
  ephemeral-storage  0 (0%)      0 (0%)
  hugepages-1Gi      0 (0%)      0 (0%)
  hugepages-2Mi      0 (0%)      0 (0%)
# Node related Event information.
Events:
  Type    Reason                   Age                 From     Message
  ----    ------                   ----                ----     -------
  Normal  NodeHasSufficientMemory  23m (x3 over 3d4h)  kubelet  Node vms82.liruilongs.github.io status is now: NodeHasSufficientMemory
  Normal  NodeHasNoDiskPressure    23m (x3 over 3d4h)  kubelet  Node vms82.liruilongs.github.io status is now: NodeHasNoDiskPressure
  Normal  NodeHasSufficientPID     23m (x3 over 3d4h)  kubelet  Node vms82.liruilongs.github.io status is now: NodeHasSufficientPID
  Normal  NodeReady                23m (x2 over 3d4h)  kubelet  Node vms82.liruilongs.github.io status is now: NodeReady
┌──[root@vms81.liruilongs.github.io]-[~]
└─$
To summarize, we need to operate on k8s, how do we operate on the management nodes? We accept user requests through kube-apiserver, take charge of resource scheduling through kubu-scheduler, process with work1 or work2 computing nodes, and then run a proxy service kubelet on each node to control the operation of each node. But the state of each node, whether it is healthy or not, we don't know, here we need kube-controller-manager
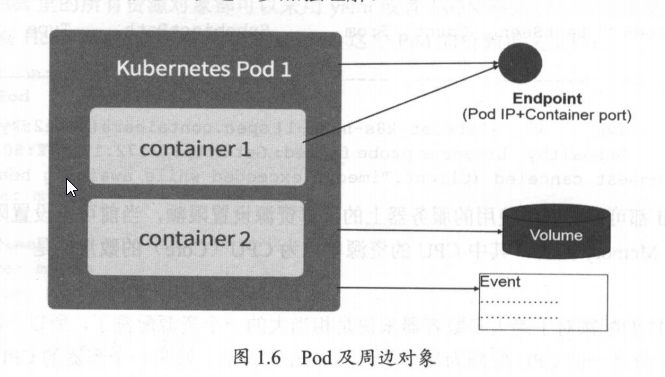
3. Pod Resource Object
Pod is the most important and basic concept of Kubernetes.
Each Pod has a special Purse container called the Root Container. Pause containers are mirrored as part of the Kubernetes platform, and in addition to Pause containers, each Pod contains one or more closely related user business containers.
Pause Container
| Why did Kubernetes design a new concept of Pod and Pod has such a special structure? |
|---|
| One of the reasons is that in the case of a group of containers as a unit, it is difficult to simply judge and act effectively on the "whole". Introducing a business-independent and non-fatal Pause container as the root container of a Pod, whose state represents the state of the entire container group, solves this problem simply and skillfully. |
| Reason two: Multiple business containers in Pod share the IP of the Pause container and share the Volume attached to the Pause container, which not only simplifies the communication between closely related business containers, but also solves the file sharing problem between them. |
Pod IP
Kubernetes assigns each Pod a unique IP address, called Pod IP, which is shared by multiple containers within a Pod. Kuberetes requires that the underlying network support TCP/P direct communication between any two Pods in the cluster, which is usually achieved using virtual two-layer network technology (link-layer bridges).
In Kubernetes, a container in one Pod can communicate directly with a Pod container on another host.
Normal PD and Static Pod
There are actually two types of Pods: ordinary Pod and static Pod. If you deploy them in the way of kubeadm, static pods are created slightly differently in the node and master nodes.
| Two types of Pod | describe |
|---|---|
| Static Pod | Instead of being stored in Kubernetes'etcd store, it is stored in a specific file on a specific Node and only starts running on that Node. |
| Ordinary Pod | Once created, it is stored in the etcd, then dispatched and binded to a specific Node by Kubernetes Masten, which is instantiated by the kubelet process on the corresponding Node into a set of related Docker containers and started. |
Normally, pods are managed uniformly on the master. Static pods are pods that are not created and dispatched by the master but are specific to the node itself. Once kubelet is started on the node, the pod will be created automatically. Understand that, combined with java's static familiarity, static method understanding, that is, some pods that need to be created when a node is initialized
For example, if kubeadm installs k8s, all services run as containers. It is much more convenient than binary. In this case, how related components of master node run without k8s environment and how to build master node involves static pod.
By default, when a container in a Pod stops, Kubernetes automatically detects the problem and restarts the Pod (restarts all containers in the Pod), and if the Node where the Pod is located is down, all Pods on the Node are rescheduled to other nodes.
| – |
|---|
 |
All resource objects in Kubernetes can be defined or described using a file in yaml or JSON format. Here is the resource definition file for myweb, a Pod we used in the previous Hello World example:
apiVersion: v1
kind: Pod                # Pod Definition
metadata:
  name: myweb            # Pod Name
  lables:
    name: myweb
spec:                    # Container group contained
  containers:
    - name: myweb
      image: kubeguide/tomcat-app:v1
      ports:
        - containerPort: 8080
      env:
        - name: MYSQL_SERVICE_HOST
          value: 'mysql'
        - name: MYSQL_SERVICE_PORT
          value: '3306'
Kubernetes'Event concept, Event is the record of an event, which records the earliest occurrence time, the last occurrence time, the number of repetitions, the originator, the type, and the cause of the event. Events are usually associated with a specific resource object and are important reference information for troubleshooting.
Pod also has Event records. When we find that a Pod is too late to create, we can use kubectl describe pod xxxx to view its description to locate the cause of the problem
In Kubernetes, quota limits for a computing resource require the following two parameters.
| Calculate resources for quota limitation |
|---|
| Requests: The minimum number of requests for this resource, and the system must meet the requirements. |
| Limits: The maximum allowable usage of this resource cannot be breached and may be restarted by Kubernetes Kill when the container attempts to use more than this amount of resource. |
Usually we set Request to a smaller value that meets the resource requirements of the container under normal workload, and Limit to the maximum resource usage under peak load.
For example, the following definition indicates that the MysQL container requests a minimum of 0.25 CPUs and 64MiB memory, and that the resource quota used by the MySQL container during run time is 0.5 CPUs and 128MiB memory:
....
resources:
  requests:
    memory: "64Mi"
    cpu: "250m"
  limits:
    memory: "128Mi"
    cpu: "500m"
...
Diagram of objects around Pod Pod
4. Lable Label
Label is another core concept in the Kubernetes system. A Label is a key-value pair. The key and value are specified by the user himself.
Labels can be attached to various resource objects, such as Node, Pod, Service, RC, etc. A resource object can define any number of Labels, and the same Label can also be added to any number of resource objects. Labels are usually defined at the time of resource object definition, or can be added or deleted dynamically after object creation.
Multidimensional resource grouping management functions can be implemented by bundling one or more different Label s with a specified resource object to facilitate flexible and convenient management of resource allocation, scheduling, configuration, deployment, and so on.
For example, deploy different versions of applications to different environments; Or monitor and analyze applications (logging, monitoring, alerts, etc.). Some common Label examples are as follows.
Version Label: "release" : "stable", "release":"canary"....
Environment Label: "environment":"dev", "environment":"ga","environment":"production"·
Schema Label: "ier":"frontend," "tier":"backend", "tier":"midleware"
Partition Label: "artition":"customerA", "partition": "customerB".
Quality control label: "track": "daily","track":"weeky"
Complex conditional selection can be achieved by a combination of multiple Label Selector expressions, separated by','and the relationship between several conditions is''AND', that is, multiple conditions are met at the same time, such as the following example:
name=Label Name
env != Label Name
name in (Label 1, Label 2)
name not in(Label 1)
name in (redis-master, redis-slave):Match all tags`name=redis-master`perhaps`name=redis-slave`Resource object.
name not in (phn-frontend):Match all without labels name=php-frontend Resource object.
name=redis-slave, env!=production
name notin (php-frontend),env!=production
apiVersion: v1
kind: Pod
metadata:
  name: myweb
  lables:
    app: myweb
# The management object RC and Service define a Selector in the spec to associate with a Pod.
apiVersion: v1
kind: ReplicationController
metadata:
  name: myweb
spec:
  replicas: 1
  selector:
    app: myweb
  template:
  ...slightly...
apiVersion" v1
kind: Service
metadata:
  name: myweb
spec:
  selector:
    app: myweb
  ports:
    port: 8080
Emerging management objects such as Deployment, ReplicaSet, DaemonSet, and Job can use set-based filter criteria definitions in the Selector, for example:
selector:
  matchLabels:
     app: myweb
  matchExpressions:
     - {key: tire,operator: In,values: [frontend]}
     - {key: environment, operator: NotIn, values: [dev]}
Match Labels define a set of Labels as they do when written directly in Selector; match Expressions define a set of set-based filter conditions, and the available conditional operators include In, NotIn, Exists, and DoesNotExist.
If matchLabels and matchExpressions are set at the same time, the two groups of conditions are "AND" relationships, that is, all conditions need to be met at the same time to complete the selection.
There are several important scenarios for Label Selector in Kubernetes:
The kube-controller process filters the number of OD copies to be monitored through the Label Selector defined on the resource object RC, so that the number of Pod copies is always in line with the fully automatic control process expected
The kube-proxy process chooses the corresponding Pod through the Service's Label Selector, automatically establishes the request forwarding routing table from each Service to the corresponding Pod, thus implementing the Service's smart load balancing mechanism
By defining specific Labels for some Nodes and using NodeSelector as a Label scheduling strategy in the Pod definition file, the kube-scheduler process achieves the Pod "directed scheduling" feature.
apiVersion: v1
kind: Pod
metadata:
  creationTimestamp: null
  labels:
    run: podnodea
  name: podnodea
spec:
  containers:
  - image: nginx
    imagePullPolicy: IfNotPresent
    name: podnodea
    resources: {}
  affinity:
    nodeAffinity: #Host affinity
      requiredDuringSchedulingIgnoredDuringExecution: #Hard Policy
        nodeSelectorTerms:
        - matchExpressions:
          - key: kubernetes.io/hostname
            operator: In
            values:
            - vms85.liruilongs.github.io
            - vms84.liruilongs.github.io
  dnsPolicy: ClusterFirst
  restartPolicy: Always
status: {}
5, Replication Controller
RC is one of the core concepts in the Kubernetes system. Simply put, it defines an expected scenario in which the number of copies of a Pod is declared to match an expected value at any time, so the definition of RC includes the following sections.
| Definition of RC |
|---|
| Pod expects replicas |
| Label Selector for filtering target Pod s |
| The od template used to create a new Pod when the number of copies of the Pod is less than expected. |
The following is an example of a complete RC definition that ensures that this Pod with tier-frontend tags (running the Tomcat container) always has only one copy throughout the Kubernetes cluster:
apiVersion: v1
kind: ReplicationController
metadata:
  name: frontend
spec:
  replicas: 1
  selector:
    tier: frontend
  template:
    metadata:
      labels:
        app: app-demo
        tier: frontend
    spec:
      containers:
      - name: tomcat-demo
        image: tomcat
        imagePullPolicy: IfNotPresent
        env:
        - name: GET_HOSTS_FROM
          value: dns
        ports:
        - containerPort: 80
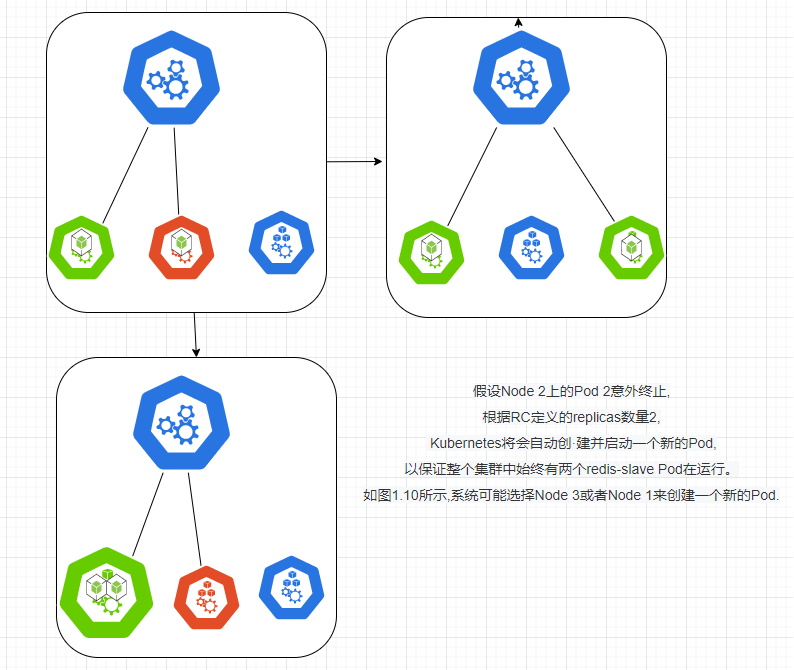
When we define an RC and submit it it to the Kubernetes cluster, the Controller Manager component on the Master node is notified, periodically patrols the target Pod that is currently alive in the system, and ensures that the number of target Pod instances is exactly what the RC expects. If too many copies of the Pod are running, the system stops some Pods, otherwise the system automatically creates some more Pods
Through RC, Kubernetes achieves high availability of user application clusters and greatly reduces many manual operations that system administrators need to complete in traditional IT environments (such as host monitoring scripts, application monitoring scripts, failure recovery scripts, etc.)
Let's take a cluster of three Node nodes as an example to illustrate how Kubernetes achieves automatic control of the number of Pod replicas through RC. If redis-slave is defined in our RC and requires three copies to be maintained, it is possible for the system to create a Pod on two Nodes. Figure 1.9 describes the creation of a redis-slave Pod on two Nodes.
At runtime, we can modify the number of copies of the RC to achieve the Pod's dynamic scaling function, which can be done by executing the kubectl scale command at one click:
kubectl scale rc redsi-slave --replicas=3
It is important to note that deleting an RC does not affect the Pods that have been created through it. In order to delete all Pods, you can set the replicas value to 0 and then update the RC. In addition, kubectl provides stop and delete commands to delete all Pods controlled by RC and RC at once.
When upgrades are applied, they are usually achieved by building a new Docker image and replacing the old one with a new one. In the process of system upgrade, we want a smooth way, such as 10 corresponding old versions of PODs in the current system. The best way is to stop one old version of Pod at a time and create a new version of Pod at the same time. During the whole upgrade process, the number of running Pods is always 10, through the RC mechanism. Kubernetes easily implements this advanced and practical feature, known as Rolling Update
6, Deployment
Deployment is a new concept introduced by Kubernetes v1.2 for the purpose of better resolving Pod organization issues.
One of Deployment's biggest upgrades to the RC is that we can always be aware of the progress of the current Pod "deployment". In fact, since it takes some time for a Pod to be created, dispatched, bound to a node, and start the corresponding container on the target Node, we expect the system to start the target state of N copies of the Pod, which is actually the final state resulting from a continuously changing "deployment process".
There are several typical scenarios for Deployment.
| Typical use scenarios for Deployment |
|---|
| Create a Deployment object to generate the corresponding Replica Set and complete the creation of a copy of the Pod. |
| Check Deployment's status to see if the deployment action is complete (the number of Pod copies is as expected) |
| Update Deployment to create a new Pod (such as a mirror upgrade). |
| If the current Deployment is unstable, roll back to an earlier version of Deployment. |
| Pause Deployment so that you can modify configuration items for multiple PodTemplateSpec s at once, then restore Deployment for a new publication. |
| Extend Deployment to cope with high load. |
| View the status of Deployment as an indicator of the success of the publication. |
| Clean up older versions of ReplicaSets that are no longer needed. |
The definition of Deployment is similar to that of Replica Set except that API declarations differ from Kind types, etc.
apiversion: extensions/vlbetal       apiversion: v1
kind: Deployment                     kind: ReplicaSet
metadata:                            metadata:
  name: nginx-deployment               name: nginx-repset
Create a tomcat-deployment.yaml Deployment description file:
apiVersion: extensions/v1betal
kind: Deployment
metadata:
  name: frontend
spec:
  replicas: 1
  selector:
  matchLabels:
    tier: frontend
  matchExpressions:
    - {key: tier, operator: In,value: [frontend]}
  template:
    metadata:
      labels:
        app: app-demo
        tier: frontend
    spec:
      containers:
      - name: tomcat-demo
        images: tomcat
        imagePullPolicy:  IfNotPresent
        ports:
        - containerPort: 8080
Run the following command to create Deployment:
kubectl create -f tomcat-deploment.yaml
The quantities involved in the above output are explained below.
| Number | explain |
|---|---|
| DESIRED | The expected number of copies of a Pod, Replica defined in Deployment. |
| CURRENT | The current Replica value, which is actually the Replica value in the Replica Set created by Deployment, continues to increase until the DESIRED is reached, indicating that the entire deployment process is complete. |
| UP-TO-DATE | The number of copies of the latest version of the Pod, indicating how many Pod copies have been successfully upgraded during the rolling upgrade process. |
| AVAILABLE | The number of Pod copies available in the current cluster, that is, the number of pods currently alive in the cluster. |
Run the following command to see the corresponding Replica Set, and we see that its name is related to the name of Deployment:
┌──[root@vms81.liruilongs.github.io]-[~/ansible]
└─$kubectl get rs -A
NAMESPACE     NAME                                 DESIRED   CURRENT   READY   AGE
kube-system   calico-kube-controllers-78d6f96c7b   1         1         1       47d
kube-system   coredns-545d6fc579                   0         0         0       47d
kube-system   coredns-7f6cbbb7b8                   2         2         2       36d
kube-system   kuboard-78dccb7d9f                   1         1         1       11d
kube-system   metrics-server-bcfb98c76
7, Horizontal Pod Autoscaler
HPA, like previous RC and Deployment, belongs to a Kubernetes resource object. HPA implements this principle by tracking and analyzing the load changes of all target Pods controlled by RC to determine whether the number of copies of the target Pods needs to be adjusted. Currently, HPA can measure Pod load in two ways.
| Horizontal Pod Autoscaler |
|---|
| CPUUtilizationPercentage. |
| Application-defined metrics, such as the number of requests (TPS or QPS) for a service per second |
apiversion: autoscaling/v1
kind: HorizontalPodAutoscaler
metadata:
  name: php-apache
  namespace: default
spec
  maxReplicas: 10
  minReplicas: 1
  scaleTargetRef:
    kind: Deployment
    name: php-apache
  targetcpuutilizationPercentage: 90
CPUUtilization Percentage is an arithmetic mean, which is the average CPU utilization of all copies of the target Pod itself. A Pod's own CPU utilization is the Pod's current CPU usage divided by its Pod Request value. For example, if we define a Pod's Pod Request as 0.4 and the current Pod's CPU usage is 0.2, its CPU usage is 50%
Based on the above definition, we know that the target object of this HPA control is a Pod copy named php-apache Deployment, which triggers automatic dynamic expansion when the value of CPU Utilization Percentage for these Pod copies exceeds 90%. One constraint that must be met when expanding or scaling is that the number of copies of Pod is between 1 and 10.
In addition to creating an HPA resource object by directly defining the yaml file and invoking the command of kubectrl create, we can create an equivalent HPA resource object directly from the following simple command line:
kubectl autoscale deployment php-apache --cpu-percent=90--min-1 --max=10
8, StatefulSet
In the Kubernetes system, Pod's management objects RC, Deployment, DaemonSet and Job are stateless-oriented services. But in reality, many services are stateful, especially some complex middleware clusters, such as MysQL Cluster, MongoDB Cluster, ZooKeeper Cluster, etc. These application clusters have some common points:
| Common Points |
|---|
| Each node has a fixed identity ID through which members of the cluster can discover and communicate with each other. |
| The size of the cluster is relatively fixed, and the size of the cluster cannot be changed at will. |
| Each node in a cluster is stateful and usually persists data to permanent storage. |
| If the disk is corrupted, a node in the cluster will not function properly and the cluster functionality will be impaired |
If we use RC/Deployment to control the number of copies of a Pod to achieve the above stateful cluster, we will find that point 1 is unsatisfactory because the name of a Pod is randomly generated, and the IP address of a Pod is determined at run time and may change. We cannot determine a unique and constant ID for each Pod beforehand.
In order to be able to recover a failed node on another node, a Pod in this cluster needs to be attached to some shared storage. To solve this problem, Kubernetes introduced PetSet as a new resource object from v1.4 and renamed it StatefulSet at v1.5. StatefulSet is essentially a special variant of DeploymentRC. It has some features as follows.)
| Characteristic |
|---|
| Each Pod in the StatefulSet has a stable and unique network identity that can be used to discover other members of the cluster. Assuming the name of the StatefulSet is kafka, the first Pod is kafka-0, the second is kafk-1, and so on.) |
| The starting and stopping order of the StatefulSet-controlled Pod copies is controlled, and the first n-1 Pods are already running and ready when the nth Pod is operated on) |
| Pod in StatefulSet uses a stable persistent storage volume, which is implemented via PV/PVC. Deleting Pod does not delete StatefulSet-related storage volumes by default (for data security). |
In addition to bundling with PV volumes to store Pod's state data, statefulSet is also used with Headless Services, which are defined in each StatefulSet to declare which Headless Service it belongs to. The key difference between Headless Services and regular Services is that it does not have Cluster IP. If you resolve the DNS domain name of Headless Services, A list of Endpoint s for all Pods corresponding to that Service is returned. On the basis of Headless Service, StatefulSet creates a DNS domain name for each Pod instance controlled by StatefulSet in the format:
$(podname).$(headless service name)
9. Service (Service)
Service is also one of the core resource objects in Kubernetes. Each service in Kubernetes is actually a "micro service" in the micro service architecture that we often mention. Before we said Pod,RC and other resource objects are actually "bride" for what this section called "service" - Kubernetes Service. The logical relationship between Pod,RC and Service.
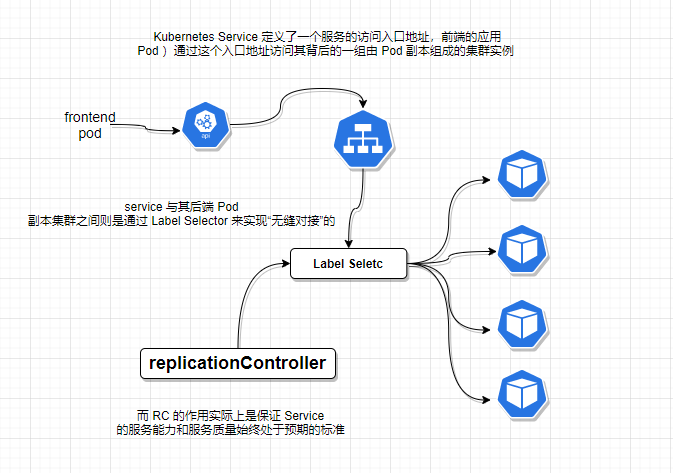
Kubernetes'Service defines an access entry address for a service through which front-end applications (Pods) access a set of cluster instances consisting of Pod replicas behind it, and Label Selector is used to seamlessly dock between Services and their back-end Pod replica clusters. The role of RC is actually to ensure that the service capability and quality of service of Service are always in the intervening period.
Each Pod is assigned a separate IP address, and each Pod provides a separate Endpoint(Pod IP+ContainerPort) for client access. Now multiple copies of a Pod form a cluster to provide services. How do clients access them? The general practice is to deploy a load balancer (software or hardware),
The kube-proxy process running on each Node in Kubernetes is actually an intelligent software load balancer that forwards requests for services to a Pod instance on the back end and implements load balancing and session maintenance mechanisms for services internally.
Kubernetes invented a very clever and far-reaching design:
Instead of sharing a load balancer's IP address, each Service is assigned a globally unique virtual IP address, which is called Cluster IP. As a result, each Service becomes a "communication node" with a unique IP address, and Service calls become the most fundamental TCP network communication problem.
We know that the Endpoint address of a Pod changes as the Pod is destroyed and recreated, because the IP address of the new Pod is different from the old Pod. Once a service is created, Kubernetes automatically assigns it an available Cluster IP, and its Cluster IP will not change throughout the service life cycle. Thus, the service found this difficult problem easily solved in the architecture of Kubernetes: as long as a DNS domain name mapping between Service's Name and Service's CLUSTER IP address is done, the problem can be solved perfectly.
┌──[root@vms81.liruilongs.github.io]-[~/ansible/k8s-pod-create]
└─$kubectl get svc myweb -o yaml
apiVersion: v1
kind: Service
metadata:
  creationTimestamp: "2021-10-16T14:25:08Z"
  name: myweb
  namespace: liruilong-pod-create
  resourceVersion: "339816"
  uid: 695aa461-166c-4937-89ed-7b16ac49c96b
spec:
  clusterIP: 10.109.233.35
  clusterIPs:
  - 10.109.233.35
  externalTrafficPolicy: Cluster
  ipFamilies:
  - IPv4
  ipFamilyPolicy: SingleStack
  ports:
  - nodePort: 30001
    port: 8080
    protocol: TCP
    targetPort: 8080
  selector:
    app: myweb
  sessionAffinity: None
  type: NodePort
status:
  loadBalancer: {}
Kubernetes Service supports multiple Endpoints, requiring each Endpoint to define a name to distinguish between them in the presence of multiple Endpoints. Here is an example of Tomcat's multi-port Service definition:
spec:
  ports:
  - port: 8080
    name: service-port
  - port: 8005
    name: shutdown-port
Why do multiple ports need to be named for each port? This involves Kubernetes'service discovery mechanism
Service Discovery Mechanism for Kubernetes
| Service Discovery Mechanism for Kubernetes |
|---|
| Kubernetes originally addressed this problem by using Linux environment variables, in which each Service generated some corresponding Linux environment variables (ENVs) and automatically injected them into each Pod's container at startup |
| Kubernetes later introduced the DNS system by using Add-On value-added packages, using the service name as the DNS domain name, so that the program could use the service name directly to establish communication connections. Most applications on Kubernetes now use DNS as an emerging service discovery mechanism |
External system access to Service issues
| "Three IP s" in Kubernetes | describe |
|---|---|
| Node IP | The IP address of the Node node, Node IP is the IP address of the physical network card of each node in the Kubernetes cluster. This is a real physical network through which all servers belonging to this network can communicate directly, regardless of whether some of them do not belong to this Kubernetes cluster. This also indicates that nodes outside the Kubernetes cluster must communicate through Node IP when accessing a node within the Kubernetes cluster or TCP/IP services. |
| Pod IP | Pod's IP address: Pod IP is the IP address of each Pod. It is assigned by Docker Engine based on the IP address segment of the dockero bridge, usually a virtual two-tier network. As we said earlier, Kubernetes requires that Pods located on different Nodes communicate directly with each other, so one Pod container in Kubernetes accesses another Pod container. It communicates through the virtual two-tier network where Pod IP resides, while real TCP/IP traffic flows through the physical network card where Node IP resides. |
| Cluster IP | The IP address of the service, Cluster IP only works on the Kubernetes Service object and is managed and assigned by Kubernetes (from the Cluster IP address pool). Cluster IP cannot be pinged because there is no Entity Network Object to respond to. Cluster IP can only be combined with Service Port to form a specific communication port. Separate Cluster IP does not have the basis for TCPIP communication, and they belong to a closed space such as Kubernetes cluster. Nodes outside the cluster need to do some extra work if they want to access this communication port. Within the Kubernetes cluster, communication between Node IP network, Pod IP network and Cluster IP network uses a special routing rule designed by Kubermetes in its own programming way, which is very different from the IP routing we are familiar with. |
NodePort is the most direct, effective and common way for external systems to access services. As an example of tomcat-service, we can extend the definition of Service as follows:
...
spec:
  type: NodePort
  posts:
   - port: 8080
     nodePort: 31002
  selector:
    tier: frontend
...
That is, we can access the Service through nodePort:31002. NodePort is implemented by opening a corresponding TCP listening port for Services that need external access on each Node in the Kubernetes cluster. The Service can be accessed by the external system with either Node's IP address + a specific NodePort port, and the netstat command can be run on any Node. We can see that the NodePort port is being listened on:
Service Load Balancing Problem
However, NodePort has not completely solved all the problems of accessing Service s externally, such as load balancing. If there are 10 Nodes in our cluster, it is best to have a load balancer at this time. External requests only need to access the IP address of the load balancer, which is responsible for forwarding traffic to a Node Port later on. Figure
| Load balancing for NodePort |
|---|
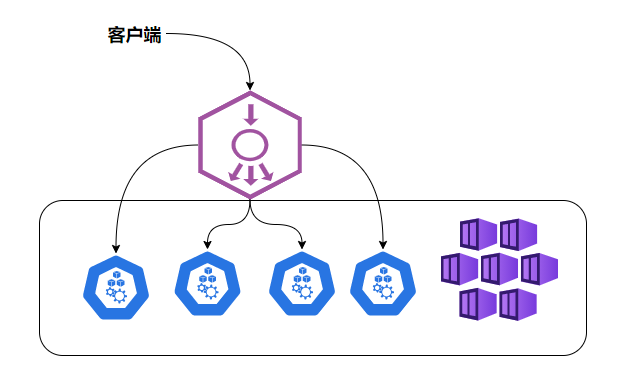 |
| The Load balancer component is independent of the Kubernetes cluster and is usually a hardware load balancer or a software implementation such as HAProxy or Nginx. For each Service, we usually need to configure a corresponding Load balancer instance to forward traffic to the back-end Node |
| Kubernetes provides an automated solution. If our cluster runs on Google's GCE public cloud, then as long as we change the type-NodePort of Service to type-LoadBalancer, Kubernetes automatically creates a corresponding Load balancer instance and returns its IP address for external clients to use. |
10. Volume (Storage Volume)
Volume is a shared directory in Pod that can be accessed by multiple containers. Kuberetes'Volume concept, purpose and purpose are similar to Docker's Volume, but they cannot be equivalent.
| Volume |
|---|
| The Volume in Kubernetes is defined on a Pod and then mounted in a specific file directory by multiple containers in a Pod. |
| The Volume in Kubernetes has the same life cycle as Pod, but is not related to the life cycle of the container, and the data in the Volume will not be lost when the container terminates or restarts. |
| Kubernetes supports many types of Volume s, such as GlusterFS, Ceph, and other advanced distributed file systems. |
Volume is also simpler to use. In most cases, we declare a Volume on a Pod, then reference the Volume in the container and Mount it to a directory in the container. For example, if we want to add a Volume named datavol to the previous Tomcat Pod and Mount it to the container's / mydata-data directory, we can simply modify the definition file for Pod as follows (note the bold part):
template:
  metadata:
    labels:
      app: app-demo
      tier: frontend
  spec:
    volumes:
      - name: datavol
        emptyDir: {}
    containers:
    - name: tomcat-demo
      image: tomcat
      volumeMounts:
        - mountPath: /myddata-data
          name: datavol
      imagePullPolicy: IfNotPresent
In addition to letting multiple containers in a Pod share files, letting container data write to the host's disk, or writing files to network storage, Kubernetes'Volume extends a very useful feature, namely
Container profiles are centralized for definition and management through ConfigMap, a new resource object.
Kubernetes offers a very rich variety of Volume types, described one by one below.
1. emptyDir
An emptyDir Volume is created when Pod is assigned to Node. As you can see from its name, its initial content is empty and there is no need to specify the corresponding directory file on the host, because this is a directory that Kubernetes automatically assigns, and when Pod is removed from Node, the data in emptyDir is permanently deleted. Some uses of emptyDir are as follows.
| Some uses of emptyDir |
|---|
| Temporary space, such as temporary directories, needed for some applications to run without being permanently preserved. |
| Temporary save directory for the intermediate process CheckPoint of a long task. |
| A directory where one container needs to get data from another container (multi-container shared directory) |
2. hostPath
Host Path is a file or directory on the host that is mounted on a Pod and can be used in several ways.
|When log files generated by container applications need to be permanently saved, they can be stored using the host's high-speed file system. |
When you need to access container applications of the Docker engine's internal data structure on the host machine, you can make the container internal applications have direct access to the Docker's file system by defining hostPath as the host/var/lib/docker directory.
When using this type of Volume, the following points should be noted.
Pod s with the same configuration on different Node s may have inconsistent results for accessing directories and files on Volume due to different directories and files on the host.)
If resource quota management is used, Kubernetes cannot manage the resources used by hostPath on the host. In the following example, a Volume of hostPath type is defined using the host/data directory:
volumes:
  - name: "persistent-storage"
    hostPath:
      path: "/data"
3. gcePersistentDisk
Using this type of Volume means using the Persistent Disk (PD) provided by Google's public cloud to store Volume's data. Unlike emptyDir, the content on the PD is stored permanently. When the Pod is deleted, the PD is simply uninstalled but not deleted. Note that you need to create a permanent disk (PD) before you can use gcePersistentDisk.
4. awsElasticBlockStore
Similar to GCE, this type of Volume uses the EBS Volume provided by Amazon's public cloud to store data, requiring an EBS Volume to be created before using AWS Elastic BlockStore.
5. NFS
When storing data using a shared directory provided by the NFS Network File System, we need to deploy an NFSServer in the system, for example, to define a Volume of type NES
yum -y install nfs-utils
...
volumes:
- name: test-volume
  nfs:
    server: nfs.server.locathost
    path: "/"
....
11, Persistent Volume
Volume is defined on a Pod and is part of a "computing resource", but in fact, "network storage" is an entity resource that exists relatively independently of "computing resource". For example, in the case of virtual machines, we usually define a network store, then draw a "network disk" from it and attach it to the virtual machine
Persistent Volume (PV) and its associated Persistent Volume Claim (PVC) play a similar role. PV can be interpreted as a corresponding block of storage in a network store in a Kubernetes cluster, which is similar to Volume but has the following differences.
| The difference between Persistent Volume and Volume |
|---|
| PV can only be network storage and does not belong to any Node, but it can be accessed on each Node. |
| PV is not defined on a Pod, but is defined independently of the Pod. |
| The types currently supported by PV include gcePersistentDisk, AWSElastic BlockStore, AzureFileAzureDisk, FC (Fibre Channel). Flocker, NFS, isCSI, RBD (Rados Block Device) CephFS. Cinder, GlusterFS. VsphereVolume. Quobyte Volumes, VMware Photon.PortworxVolumes, ScalelO Volumes and HostPath (for single machine testing only). |
apiversion: v1
kind: PersistentVolume
metadata:
  name: pv0003
spec:
  capacity:
    storage: 5Gi
  accessModes:
  - ReadWriteOnce
  nfs:
    path: /somepath
    server: 172.17.0.2
PV's accessModes property, which currently has the following types:
- ReadWriteOnce: Read and write permissions, and can only be mounted by a single Node.
- ReadOnlyMany: Read-only permission, allows mounting by multiple Node s.
- ReadWriteMany: Read and write permissions, allow mounting by multiple Node s.
If a Pod wants to apply for a certain type of PV, it first needs to define a PersistentVolumeClaim (PVC) object:
kind: Persistentvolumeclaim
apiversion: v1
metadata:
  name: myclaim
spec:
  accessModes:
  - Readwriteonce
  resources:
    requests:
      storage: BGi
Reference PVC
volumes:
  - name: mypd
    persistentvolumeclaim:
      claimName: myclaim
| A PV is a stateful object that has the following states. |
|---|
| Available: Idle state. |
| Bound: already bound to a Pvc. |
| Released: The corresponding PVC has been deleted, but the resources have not yet been reclaimed by the cluster. |
| Failed: PV auto-recycling failed. |
12. Namespace (Namespace)
Namespace is a very important concept in the Kubernetes system, and Namespace is used in many cases to isolate resources from multiple tenants. By "assigning" resource objects within a cluster to different Namespaces, Namespaces form logically grouped groups of different projects, groups, or user groups that can be managed separately while sharing the resources that use the entire cluster. When the Kubernetes cluster is started, a Namespace named "default" is created, which can be viewed through kubectl:
| Different namespace s are isolated from each other |
|---|
| View all namespaces |
| View the current namespace |
| Set Namespace |
The various pod s of kub-system itself are the default spaces for kubamd. Pods use namespaces to isolate each other
┌──[root@vms81.liruilongs.github.io]-[~/ansible]
└─$kubectl get namespaces
NAME              STATUS   AGE
default           Active   13h
kube-node-lease   Active   13h
kube-public       Active   13h
kube-system       Active   13h
┌──[root@vms81.liruilongs.github.io]-[~/ansible]
└─$kubectl get ns
NAME              STATUS   AGE
default           Active   13h
kube-node-lease   Active   13h
kube-public       Active   13h
kube-system       Active   13h
┌──[root@vms81.liruilongs.github.io]-[~/ansible]
└─$
Namespace Basic Commands
┌──[root@vms81.liruilongs.github.io]-[~/ansible]
└─$kubectl create ns liruilong
namespace/liruilong created
┌──[root@vms81.liruilongs.github.io]-[~/ansible]
└─$kubectl get ns
NAME              STATUS   AGE
default           Active   13h
kube-node-lease   Active   13h
kube-public       Active   13h
kube-system       Active   13h
liruilong         Active   4s
┌──[root@vms81.liruilongs.github.io]-[~/ansible]
└─$kubectl create ns k8s-demo
namespace/k8s-demo created
┌──[root@vms81.liruilongs.github.io]-[~/ansible]
└─$kubectl get ns
NAME              STATUS   AGE
default           Active   13h
k8s-demo          Active   3s
kube-node-lease   Active   13h
kube-public       Active   13h
kube-system       Active   13h
liruilong         Active   20s
┌──[root@vms81.liruilongs.github.io]-[~/ansible]
└─$kubectl delete ns  k8s-demo
namespace "k8s-demo" deleted
┌──[root@vms81.liruilongs.github.io]-[~/ansible]
└─$kubectl get ns
NAME              STATUS   AGE
default           Active   13h
kube-node-lease   Active   13h
kube-public       Active   13h
kube-system       Active   13h
liruilong         Active   54s
┌──[root@vms81.liruilongs.github.io]-[~/ansible]
└─$
Namespace Switching
┌──[root@vms81.liruilongs.github.io]-[~/.kube]
└─$vim config
┌──[root@vms81.liruilongs.github.io]-[~/.kube]
└─$kubectl config get-contexts
CURRENT   NAME       CLUSTER    AUTHINFO            NAMESPACE
*         context1   cluster1   kubernetes-admin1
          context2   cluster2   kubernetes-admin2
┌──[root@vms81.liruilongs.github.io]-[~/.kube]
└─$kubectl config set-context context2 --namespace=kube-system
Context "context2" modified.
┌──[root@vms81.liruilongs.github.io]-[~/.kube]
└─$kubectl config get-contexts
CURRENT   NAME       CLUSTER    AUTHINFO            NAMESPACE
*         context1   cluster1   kubernetes-admin1
          context2   cluster2   kubernetes-admin2   kube-system
┌──[root@vms81.liruilongs.github.io]-[~/.kube]
└─$kubectl config set-context context1 --namespace=kube-public
Context "context1" modified.
Or you can switch namespaces this way
kubectl config set-context $(kubectl config current-context) --namespace=<namespace>
kubectl config view | grep namespace
kubectl get pods
Specify namespace when creating pod
apiVersion: v1
kind: Pod
metadata:
  creationTimestamp: null
  labels:
    run: pod-static
  name: pod-static
  namespeace: default
spec:
  containers:
  - image: nginx
    imagePullPolicy: IfNotPresent
    name: pod-demo
    resources: {}
  dnsPolicy: ClusterFirst
  restartPolicy: Always
status: {}
When we create a Namespace for each tenant to achieve multi-tenant resource isolation, we can also combine Kubernetes'resource quota management to limit the resources that different tenants can consume, such as CPU usage, memory usage, and so on.
13. Annotation
Annotation is similar to Label in that it is defined as a key/value pair.
Unlike Label, which has strict naming rules, it defines metadata for Kubernetes objects and is used for Label Selector.
Annotation is user-defined "additional" information for easy external tool lookup, and Kubernetes'module itself tags some special information about the resource object through Annotation.
┌──[root@vms81.liruilongs.github.io]-[~/ansible/k8s-pod-create]
└─$kubectl annotate nodes vms82.liruilongs.github.io "dest=This is a working node"
node/vms82.liruilongs.github.io annotated
┌──[root@vms81.liruilongs.github.io]-[~/ansible/k8s-pod-create]
└─$kubectl describe nodes vms82.liruilongs.github.io
Name:               vms82.liruilongs.github.io
Roles:              worker1
Labels:             beta.kubernetes.io/arch=amd64
                    beta.kubernetes.io/os=linux
                    disktype=node1
                    kubernetes.io/arch=amd64
                    kubernetes.io/hostname=vms82.liruilongs.github.io
                    kubernetes.io/os=linux
                    node-role.kubernetes.io/worker1=
Annotations:        dest: This is a working node
                    kubeadm.alpha.kubernetes.io/cri-socket: /var/run/dockershim.sock
                    node.alpha.kubernetes.io/ttl: 0
                    projectcalico.org/IPv4Address: 192.168.26.82/24
                    projectcalico.org/IPv4IPIPTunnelAddr: 10.244.171.128
                    volumes.kubernetes.io/controller-managed-attach-detach: true
.....................
| In general, the information recorded with Annotation is as follows |
|---|
| build information, release information, Docker mirror information, such as timestamp, release id number, PR number, mirror hash value, docker registry address, and so on. |
| Address information for resource pools such as log, monitoring, and analysis libraries. |
| Program debugging tool information, such as tool name, version number, and so on. |
| Contact information for the team, such as phone number, person in charge name, web address, etc. |