1, hello world
using spring mvc mainly solves the problem of Servlet redundancy before. Usually, maven's web project is used and related dependencies are imported.
about MVC mode, it represents model view controller mode. This pattern is used for layered development of applications.
Model - a Model represents an object or JAVA POJO (entity) that accesses data. It can also have logic to update the controller when the data changes.
View - a View represents a visualization of the data contained in the model.
Controller - the Controller acts on models and views. It controls the flow of data to model objects and updates the view when the data changes. It separates the view from the model.
1. Join dependency
<dependency>
    <groupId>org.springframework</groupId>
    <artifactId>spring-webmvc</artifactId>
    <version>5.2.12.RELEASE</version>
</dependency>
<dependency>
    <groupId>com.fasterxml.jackson.core</groupId>
    <artifactId>jackson-databind</artifactId>
    <version>2.12.3</version>
</dependency>
note: jackson is a very mainstream and high-performance object serialization json and deserialization class library in the world. It is comparable to Alibaba's fastjson in China.
2. On the web XML configures the dispatcher servlet to match all requests, and specifies that its creation time is when the web application starts.
<servlet>
    <servlet-name>springDispatcherServlet</servlet-name>
    <servlet-class>org.springframework.web.servlet.DispatcherServlet</servlet-class>
    <init-param>
        <param-name>contextConfigLocation</param-name>
        <param-value>classpath:spring-mvc.xml</param-value>
    </init-param>
    <load-on-startup>1</load-on-startup>
</servlet>
<servlet-mapping>
    <servlet-name>springDispatcherServlet</servlet-name>
    <url-pattern>/</url-pattern>
</servlet-mapping>
3. Create spring-mvc.net under resource XML file, as follows:
<?xml version="1.0" encoding="UTF-8"?>
<beans xmlns="http://www.springframework.org/schema/beans"
       xmlns:xsi="http://www.w3.org/2001/XMLSchema-instance"
       xmlns:context="http://www.springframework.org/schema/context"
       xmlns:mvc="http://www.springframework.org/schema/mvc"
       xsi:schemaLocation="http://www.springframework.org/schema/beans
       http://www.springframework.org/schema/beans/spring-beans.xsd
		http://www.springframework.org/schema/context
		http://www.springframework.org/schema/context/spring-context.xsd
		http://www.springframework.org/schema/mvc
		http://www.springframework.org/schema/mvc/spring-mvc.xsd">

    <!-- Which package is the controller in -->
    <context:component-scan base-package="cn.hxzy.springmvc.controller" />
    <!-- When the request cannot be found requestMapping Find static resources when -->
    <mvc:default-servlet-handler />
    <!-- Enable annotation driven-->
    <mvc:annotation-driven />
    <!-- View resolution -->
    <bean class="org.springframework.web.servlet.view.InternalResourceViewResolver"
            id="internalResourceViewResolver">
        <!-- prefix -->
        <property name="prefix" value="/WEB-INF/jsp/" />
        <!-- suffix -->
        <property name="suffix" value=".jsp" />
    </bean>
</beans>
4 write controller
import org.springframework.stereotype.Controller;
import org.springframework.web.bind.annotation.RequestMapping;

@Controller
public class IndexController {

    @RequestMapping("/index")
    public String index() {
        System.out.println("index");
        return "index";
    }
}
note: package scanning can also scan the specified annotation in the following way. All annotations of Controller and ControllerAdvice are scanned as spring mvc
<context:component-scan base-package="cn.hxzy.springmvc">
    <context:include-filter type="annotation"
            expression="org.springframework.stereotype.Controller"/>
    <context:include-filter type="annotation"
            expression="org.springframework.web.bind.annotation.ControllerAdvice"/>
</context:component-scan>
the above operation can complete the configuration of spring mvc. When the browser client sends a request, it will be sent by the web When the springDispatcherServlet in XML matches, the request will enter the spring mvc. Internally, all RequestMapping paths will be matched with the request path. If they match, the method will be called. Finally, the return value of the method will be spliced with the prefix and suffix of internalResourceViewResolver, forwarded to the corresponding view, and the view will be returned to the browser client.
redirection in spring mvc is very simple. You only need to splice the redirect keyword before returning the string. If there is no such keyword, it is forwarding.
@GetMapping("aa/bb")
public String index() {
    return "redirect:/index";
}
practice:
1. Create project demo1 and add three pages index jsp,login.jsp,register.jsp, and use @ RequestMapper to forward them so that they can jump normally.
Reference code:
import org.springframework.stereotype.Controller;
import org.springframework.web.bind.annotation.RequestMapping;

@Controller
public class PublicController {

    @RequestMapping("/index")
    public String index() {
        return "index";
    }
    @RequestMapping("/login")
    public String login() {
        return "login";
    }
    @RequestMapping("/register")
    public String register() {
        return "register";
    }
}
2, Character encoding filter
in the previous jsp Servlet development, the more practical solution to Chinese garbled code is to use the filter for unified coding. Using the filter can solve the problem of inconsistent Chinese character coding between the server and the client. On the web Add the character encoding filter provided by spring MVC to XML, and configure the initialization parameter encoding to utf-8 for the interceptor, so that all requests and responses can be transmitted in utf-8 encoding.
<filter>
    <filter-name>characterEncodingFilter</filter-name>
    <filter-class>org.springframework.web.filter.CharacterEncodingFilter</filter-class>
    <init-param>
        <param-name>encoding</param-name>
        <param-value>UTF-8</param-value>
    </init-param>
</filter>
<filter-mapping>
    <filter-name>characterEncodingFilter</filter-name>
    <url-pattern>/*</url-pattern>
</filter-mapping>
the above is the character encoding filter. It can be seen from the source code that the filter can be compatible with a variety of character encoding. Developers need to pass the character encoding used in this website into the initialization parameters of the filter.
3, Spring Bean scope (from)
the scope of beans introduced in spring includes single instance and multiple instances. Spring mvc extends them to adapt to web development. Five scopes are defined for bean, which are singleton (singleton), prototype (prototype), request, session and global session.
-
Singleton: Singleton mode. Only one shared Bean instance exists in the Spring IoC container. No matter how many beans reference it, it always points to the same object. This mode is not safe in multithreading. Singleton scope is the default scope in Spring.
-
Prototype: prototype mode. Every time the bean defined by the prototype is obtained through the Spring container, the container will create a new bean instance. Each bean instance has its own properties and state, while the singleton global has only one object. As a rule of thumb, use the prototype scope for stateful beans and the singleton scope for stateless beans.
-
Request: in an Http Request, the container will return the same instance of the Bean. For different Http requests, a new Bean will be generated, and the Bean is only valid in the current Http Request. When the current Http Request ends, the Bean instance will also be destroyed.
-
Session: in an Http Session, the container will return the same instance of the bean. For different session requests, a new instance will be created, and the bean instance is only valid in the current session. Like Http requests, each session request creates a new instance, but different instances do not share attributes, and the instance is only valid in its own session request. When the request ends, the instance will be destroyed.
-
global Session: in a global Http Session, the container will return the same instance of the Bean, which is only valid when using portlet context.
4, Mapping request
use the @ RequestMapping annotation in spring mvc to map the corresponding request path, which is the same as the address annotation in servlet. This annotation can modify classes and methods, but it is not as strict as a servlet address and needs to start with a slash.
modifier class: provides preliminary request mapping information, that is, the parent path of the request.
method Department: provide further subdivision mapping information. The URL at the overlay class definition. If the class definition is not marked, it is its own URL.
use the method attribute to specify the request method, or use @ PostMapping, which is equivalent to the following.
@RequestMapping(value = "/testMethod", method = RequestMethod.POST)
you can use params and headers to map requests more accurately. Params and headers support simple expressions.
@RequestMapping(value = "testParamsAndHeaders", params = { "username","age!=10" }, headers = { "Accept-Language=en-US,zh;q=0.8" })
The request parameters and request headers must meet the corresponding requirements before calling, otherwise the interface cannot be called.
@Wildcards are supported in RequestMapping
@RequestMapping("/testAntPath/*/abc")
? Match one character
*Match any string in the file name (but excluding /)
**Matching multi-layer paths
note: spring MVC interface method parameters support common objects in servlet s, such as request, response, session, etc. the framework will automatically obtain the location of the object injected into the formal parameter from the Tomcat container.
- HttpServletRequest
- HttpServletResponse
- HttpSession
- java.security.Principal
- Locale
- InputStream
- OutputStream
- Reader
- Writer
public void testServletAPI(Writer out) throws IOException {
    out.write("hello springmvc");
}
practice:
1. Use spring mvc to create an interface. The client browser calls this interface to automatically add a random integer with the key of 0-100 to the session. And forward to the index page to display the random number.
reference code:
controller:
import org.springframework.stereotype.Controller;
import org.springframework.web.bind.annotation.RequestMapping;
import javax.servlet.http.HttpServletRequest;
import javax.servlet.http.HttpServletResponse;
import javax.servlet.http.HttpSession;
import java.io.IOException;

@Controller
public class PublicController {

    @RequestMapping("/index")
    public String index() {
        return "index";
    }

    @RequestMapping("/test")
    public void register(HttpSession session, HttpServletResponse response) throws IOException {
        session.setAttribute("number", (int) (Math.random() * 101));
        response.sendRedirect("index");
    }
}
page:
<%@ page contentType="text/html;charset=UTF-8" language="java" %>
<html>
<head>
    <title>Generate random number</title>
</head>
<body>
Random number: ${number}
<br>
<a href="${pageContext.request.contextPath}/test">generate</a>
</body>
</html>
5, Get general parameters
spring MVC greatly simplifies the way to obtain the parameters of the client browser. Developers no longer need the request object to obtain the parameters. Generally, only the user's method parameter name corresponds to the parameter name passed in from the front end, and the corresponding parameters can be automatically received. If the parameter names are inconsistent, the RequestParam annotation can be used for mapping, At the same time, you can also use this annotation to set the parameter to be mandatory and not empty, and set the default value.
1.@RequestParam
if the parameter name of the method is the same as the key in the request, it can be omitted.
@RequestMapping
public String testRequestParam(
        @RequestParam(value = "username") String un,
        @RequestParam(value = "age", defaultValue = "0") int age) {
   return "index";
}
@RequestParam to map request parameters
The value is the parameter name of the request parameter
Required whether the parameter is required. The default value is true
defaultValue is the default value of the request parameter. If the parameter has a default value, required will automatically change to false
You can also use the object to accept parameters. spring MVC will automatically create the object and set the client parameters to the corresponding object.
@RequestMapping
public String testPojo(User user) {
    return "success";
}
It also supports cascading attributes, such as role ID, dept.address, etc., which will be automatically injected into the role and dept in user.
2.@PathVariable
in many mainstream applications, simple and a small number of parameters are generally spliced at the end of the interface instead of question mark splicing. The @ PathVariable annotation can be used to map placeholders in the URL to parameters of the target method. It should be noted that the method using the parameter decorated with @ PathVariable has a lower priority than the exact matching priority during mapping.
@RequestMapping("/index/{id}")
public String testPathVariable(@PathVariable("id") Integer id) {
  System.out.println("testPathVariable: " + id);
}
note: when using the @ PathVariable annotation, although the priority is lower than the exact match, it will be higher than the static resource. For example, the static resource is / CSS / style CSS will be mapped by @ RequestMapping("{path}/{name}"), so generally @ PathVariable is used to obtain only the last test.
6, rest client
in actual development, the data receiving interface is usually designed in post mode for data security. In actual development, there may be no time to write the page and ajax to verify the availability of the interface. At this time, a tool software is needed to test the relevant interfaces. Common interface debugging tools include postman, soap ui, restTemplate, etc. for developers' convenience, idea installs and opens the rest client plug-in by default to debug the interface.
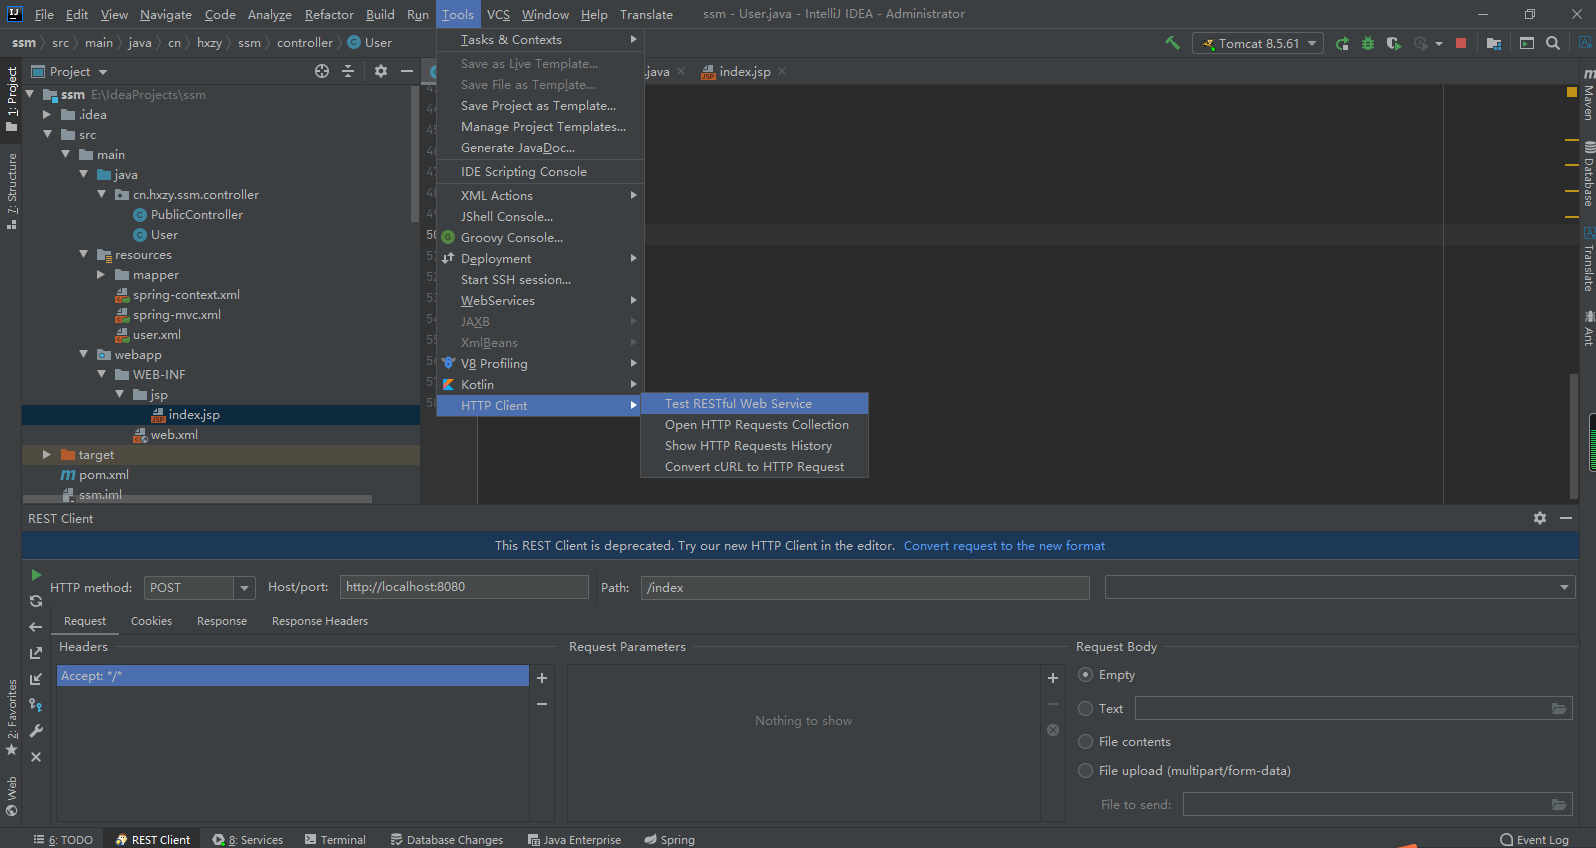
1.HTTP method is used to specify the request method. The common request methods are GET and POST
2.host/port mainly configures the requested protocol, host and port. The specific interface Path is specified by Path
3.Headers is used to specify the request header. For details, please refer to the request header in the notes section.
4.Request Parameters can add common request parameters.
5.Request Body is used to specify the file at the time of request, native json request, etc.
7, Parameter format processing
parameter format has always been a headache in front and back-end development. In terms of time, 2021-1-28 17:33:16, 2021 / 1 / 28 and 2021-1-28 are used. The DateTimeFormat annotation can well specify the corresponding format for the front-end data injection time. Similarly, in mathematics, sometimes numbers are added with a comma every three digits, and the NumberFormat annotation is used to complete data format processing.
case:
@DateTimeFormat(pattern="yyyy-MM-dd")
private Date birth;
case:
1,456,333.5
@NumberFormat(pattern="#,###,###.#")
private Float salary;
there is another solution to specify the front-end time injection format. Using InitBinder annotation can make all time formats in the whole class use the specified format.
@RequestMapping("date")
public String date(Date date){
    System.out.println(date);
    return "hello";
}

@InitBinder
public void initBinder(ServletRequestDataBinder binder){
    binder.registerCustomEditor(Date.class, new CustomDateEditor(new SimpleDateFormat("yyyy-MM-dd"),
        true));
}
exercise:
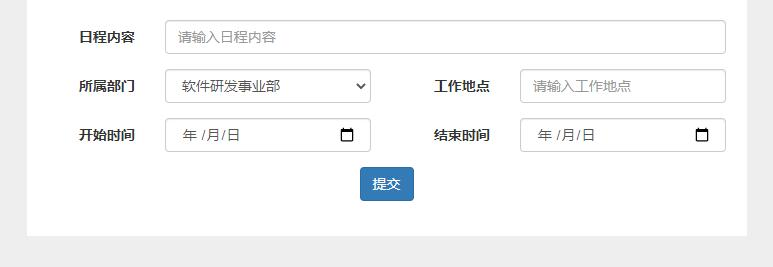
1. Complete the operation of the department schedule according to the design drawing, and the submitted data can be received and printed by the back end.
reference code:
jsp
<%@ page contentType="text/html;charset=UTF-8" language="java" %>
<html>
<head>
    <title>New department schedule</title>
    <link rel="stylesheet" href="${pageContext.request.contextPath}/css/bootstrap.min.css">
</head>
<body style="background-color: #eee">
<div class="container">
    <form class="form-horizontal" style="padding: 20px;background-color:white" action="addData" method="post">
        <div class="form-group">
            <label class="col-sm-2 control-label">Schedule content</label>
            <div class="col-sm-10">
                <input type="text" class="form-control" name="content" placeholder="Please enter the schedule content">
            </div>
        </div>
        <div class="form-group">
            <label class="col-sm-2 control-label">Department</label>
            <div class="col-sm-4">
                <select class="form-control" name="deptId">
                    <option value="1">Software R & D Division</option>
                    <option value="2">Network publicity Division</option>
                </select>
            </div>
            <label class="col-sm-2 control-label">Duty station</label>
            <div class="col-sm-4">
                <input class="form-control" name="address" placeholder="Please enter a work location">
            </div>
        </div>
        <div class="form-group">
            <label class="col-sm-2 control-label">start time</label>
            <div class="col-sm-4">
                <input class="form-control" name="startDate" type="date">
            </div>
            <label class="col-sm-2 control-label">End time</label>
            <div class="col-sm-4">
                <input class="form-control" name="endDate" type="date">
            </div>
        </div>
        <div class="form-group">
            <div class="text-center">
                <button type="submit" class="btn btn-primary">Submit</button>
            </div>
        </div>
    </form>
</div>
</body>
</html>
controller:
import org.springframework.format.annotation.DateTimeFormat;
import org.springframework.stereotype.Controller;
import org.springframework.web.bind.annotation.PostMapping;
import org.springframework.web.bind.annotation.RequestMapping;
import org.springframework.web.bind.annotation.RequestParam;
import java.util.Date;

@Controller
public class IndexController {

    @RequestMapping("/")
    public String index() {
        return "index";
    }

    @PostMapping("/addData")
    public String addData(@RequestParam String content,
                          @RequestParam(defaultValue = "1") Integer deptId,
                          @RequestParam String address,
                          @DateTimeFormat(pattern = "yyyy-MM-dd") Date startDate,
                          @DateTimeFormat(pattern = "yyyy-MM-dd") Date endDate) {
        System.out.println(content);
        System.out.println(deptId);
        System.out.println(address);
        System.out.println(startDate);
        System.out.println(endDate);
        return "index";
    }
}
8, Get special parameters (from)
in actual development, some parameters in the request header of the client browser are often obtained. The original method is to inject the request object into the interface method parameters and obtain the parameters in the request header through the request object. Of course, you can also get the parameters in the request header through the annotation RequestHeader@ The usage of RequestHeader is similar to @ RequestParam, but @ RequestHeader cannot be omitted.
public String testRequestHeader(@RequestHeader(value = "Accept-Language") String al) {
    return SUCCESS;
}
@ Cookie value can obtain a Cookie value in the request header. The usage is similar to @ RequestParam, except @ CookieValue cannot be omitted.
public String testCookieValue(@CookieValue("JSESSIONID") String sessionId) {
    return SUCCESS;
}
practice:
1. The request header contains the relevant parameters of the client browser and system, and displays the operating system version, browser type and other information on the home page.
reference code:
@Controller
public class IndexController {

    @RequestMapping("index")
    public String index(@RequestHeader(value = "User-Agent") String userAgent, HttpServletRequest request) {
        if (userAgent.contains("Windows NT 10.0")) {
            request.setAttribute("system", "Windows 10");
        }
        if (userAgent.contains("Chrome")) {
            request.setAttribute("browser", "Google");
        }
        if (userAgent.contains("Firefox")) {
            request.setAttribute("browser", "Firefox");
        }
        return "index";
    }
}
jsp
<%@ page contentType="text/html;charset=UTF-8" language="java" %>
<html>
<head>
    <title></title>
    <link rel="stylesheet" href="${pageContext.request.contextPath}/css/bootstrap.min.css">
</head>
<body style="background-color: #eee">
<div class="container">
    <div class="row">
        <label class="col-sm-2 text-right">System version</label>
        <div class="col-sm-4">
            <input class="form-control" name="system" value="${system}" readonly>
        </div>
        <label class="col-sm-2 text-right">browser</label>
        <div class="col-sm-4">
            <input class="form-control" name="browser" value="${browser}" readonly>
        </div>
    </div>
</div>
</body>
</html>
9, Entity object attribute validation
in actual development, user parameter verification is an essential development logic. Not only the front-end verification (using JavaScript for parameter verification), but also the back-end verification after obtaining the parameters. One of the more commonly used is to use a general verification specification provided by hibernate. This verification rule is used in the later spring boot framework.
import related dependencies
<dependency>
  <groupId>org.hibernate</groupId>
  <artifactId>hibernate-validator</artifactId>
  <version>6.1.0.Final</version>
</dependency>
add verification annotation on the entity
@NotEmpty
private String lastName;

@Email
private String email;

@Past//Before current time
@DateTimeFormat(pattern="yyyy-MM-dd")
private Date birth;
add verification annotation to the interface method parameters to be verified, and the front-end data will be verified automatically when it comes.
@GetMapping(value = "/")
public String index2(@Validated User user, Errors result) {
    System.out.println("I was called" + user);
    for (FieldError error : result.getFieldErrors()) {
        System.out.println(error.getField() + ":" + error.getDefaultMessage());
    }
    return "hello";
}
Chapter exercise:
1. Create project demo1 and complete the verification logic of registration and login, and add corresponding parameter verification on the back-end code (the account password is not empty during login, and all attributes are not empty during registration). At the same time, use bootstrap to beautify the written page.
2. In a highly concurrent system, traffic control is very important. When huge traffic is directly requested to our server, the interface may not be available soon. If it is not processed, it may even make the whole application unavailable. That requires current limiting. As the name suggests, current limiting is to limit the flow. Through current limiting, we can well control the QPS of the system, so as to achieve the purpose of protecting the system. Please use AOP to crosscut all rest interfaces to complete the current limiting logic of 2qps twice a second.
reference code:
import org.springframework.stereotype.Controller;
import org.springframework.validation.annotation.Validated;
import org.springframework.web.bind.annotation.GetMapping;
import org.springframework.web.bind.annotation.PostMapping;
import javax.validation.constraints.NotBlank;
import javax.validation.constraints.NotNull;

@Controller
public class PublicController {

    @GetMapping("/index")
    public String index() {
        return "index";
    }

    @PostMapping("login")
    public String login(@Validated(User.Login.class) User user) {
        System.out.println(user);
        return "index";
    }
    @PostMapping("register")
    public String register(@Validated(User.Register.class) User user) {
        System.out.println(user);
        return "index";
    }
}

class User{
    private Integer id;
    @NotBlank(groups = Register.class)
    private String name;
    @NotBlank(groups = {Register.class,Login.class})
    private String loginName;
    @NotBlank(groups = {Register.class,Login.class})
    private String loginPassword;
    @NotNull(groups = Register.class)
    private Integer classId;

    interface Register{}
    interface Login{}

    public Integer getId() {
        return id;
    }

    public void setId(Integer id) {
        this.id = id;
    }

    public String getName() {
        return name;
    }

    public void setName(String name) {
        this.name = name;
    }

    public String getLoginName() {
        return loginName;
    }

    public void setLoginName(String loginName) {
        this.loginName = loginName;
    }

    public String getLoginPassword() {
        return loginPassword;
    }

    public void setLoginPassword(String loginPassword) {
        this.loginPassword = loginPassword;
    }

    public Integer getClassId() {
        return classId;
    }

    public void setClassId(Integer classId) {
        this.classId = classId;
    }

    @Override
    public String toString() {
        return "User{" +
                "id=" + id +
                ", name='" + name + '\'' +
                ", loginName='" + loginName + '\'' +
                ", loginPassword='" + loginPassword + '\'' +
                ", classId=" + classId +
                '}';
    }
}