1, Preparation before class
python docx library is required for processing Word in python. The terminal executes the following installation commands:
- pip3 install python-docx
Note: there may be less use of word, which is not serious, but the latter invitation can be used as a useful reference, which may be used. For example, your wedding invitation, salary slip, notice, etc., you don't need to write one by one (of course, you can't do it to show your sincerity.)
get down to business,
2, Key points of knowledge
- R & D logic is to explain logic, generally from top to bottom, following the ideas of What - Why - How or what - what - how;
1. Preheating: a preliminary understanding of docx
(1) Create a new blank word and insert text
# Import library
from docx import Document

# New blank document
doc_1 = Document()

# Add title (0 is equivalent to the title of the article, the default level is 1, and the level range is 0-9)
doc_1.add_heading('New blank document title, level 0',level = 0)
doc_1.add_heading('New blank document title, level 1',level = 1)
doc_1.add_heading('Create a new blank document title at level 2',level = 2)

# New paragraph
paragraph_1 = doc_1.add_paragraph('This is the beginning of the first paragraph\n Please take care!')

# Bold
paragraph_1.add_run('Bold font').bold = True
paragraph_1.add_run('Normal font')

# Italics
paragraph_1.add_run('Italic Font').italic =True

# New paragraph (below current paragraph)
paragraph_2 = doc_1.add_paragraph('The new second paragraph.')

# New paragraph (above designated end)
prior_paragraph = paragraph_1.insert_paragraph_before('Paragraph inserted before the first paragraph of text')

# Add page break (flexible typesetting)
doc_1.add_page_break()

# New paragraph (above designated end)
paragraph_3 = doc_1.add_paragraph('This is the first paragraph on the second page!')

# Save file (under current directory)
doc_1.save('doc_1.docx')
2. Formal: word operation of python automation
Before operation, we need to understand the page structure of Word document:
- Document - Document
- Paragraph - paragraph
- Text block - Run
**Python docx regards the whole article as a Document * * object, and its basic structure is as follows:
- Each * * Document contains many Paragraph objects representing "paragraphs", which are stored in Document Paragraphs * *.
- Each * * Paragraph has many Run objects representing "inline elements", which are stored in the Paragraph Runs * *.
In * * Python docx, run is the most basic unit, and the text style in each run object is consistent, that is, when generating document objects from docx files, python docx * * will divide the text into run objects according to the change of style.
(1) Introduction to the overall page structure
Let's take a small case as the main line to string documents, paragraphs and text blocks:
# Import library
from docx import Document
from docx.shared import RGBColor, Pt,Inches,Cm
from docx.enum.text import WD_PARAGRAPH_ALIGNMENT
from docx.oxml.ns import qn

# New document (Datawhale)
doc_1 = Document()

# Font settings (global)
'''Change only font.name Is not enough, you need to call._element.rPr.rFonts of set()method.'''

doc_1.styles['Normal'].font.name = u'Song style'
doc_1.styles['Normal']._element.rPr.rFonts.set(qn('w:eastAsia'), u'Song style')

# Add a title (0 is equivalent to the title of the article, the default level is 1, the level range is 0-9, and it is automatically underlined when 0)
heading_1 = doc_1.add_heading('Jay Chou',level = 0)
heading_1.alignment = WD_PARAGRAPH_ALIGNMENT.CENTER   #Center alignment, left alignment by default

# New paragraph
paragraph_1 = doc_1.add_paragraph()
'''
Format paragraph: first line indented 0.75cm,Left, back distance 1.0 inch,1.5 Double line spacing.
'''
paragraph_1.paragraph_format.first_line_indent = Cm(0.75)
paragraph_1.paragraph_format.alignment =  WD_PARAGRAPH_ALIGNMENT.LEFT
paragraph_1.paragraph_format.space_after =  Inches(1.0)
paragraph_1.paragraph_format.line_spacing =  1.5

text = 'Chinese pop singer in Taiwan, China' \
       'Music creators, composers, Lyricists' \
       'Producer, one of the bosses of Javier music company and director.' \
       'In recent years, he has set foot in the film industry. Jay Chou is the most revolutionary and indicator of Asian pop music after 2000' \
       'Sexual singer songwriter, known as the "king of Asian pop". He broke through the theme and form of the original Asian music' \
       'Style, integrating multiple music materials to create changeable song styles, especially hip-hop integrating Chinese and western music styles' \
       'Or rhythm and blues is the most famous, which can be said to be the pioneer of creating the "Chinese style" of Chinese pop music. Jay Chou's' \
       'It has broken the long-standing stagnation of Asian pop music and opened a new page for Asian pop music!'

r_1 = paragraph_1.add_run(text)
r_1.font.size =Pt(10)    #Font size
r_1.font.bold =True       #Bold
r_1.font.color.rgb =RGBColor(255,0,0)      #colour

# Save file (under current directory)
doc_1.save('Jay Chou.docx')
From the above example, we can see that the smallest operation object is a text block, which is operated through the specification of run. Such as font size, color, etc; The next level – the format of the paragraph is through the paragraph_format;
(2) Font settings
Through (1), students have noticed that the font setting is a global variable. If I want to set different fonts in different parts, what should I do? This requires operation and setting before application.
'''Font setting 1.py'''
#Import library
from docx import Document
from docx.oxml.ns import qn
from docx.enum.style import WD_STYLE_TYPE

document = Document() # New docx document

# Set Tahoma style
style_font = document.styles.add_style('Song style', WD_STYLE_TYPE.CHARACTER)
style_font.font.name = 'Song style'
document.styles['Song style']._element.rPr.rFonts.set(qn('w:eastAsia'), u'Song style')

# Set Kaiti style
style_font = document.styles.add_style('Regular script', WD_STYLE_TYPE.CHARACTER)
style_font.font.name = 'Regular script'
document.styles['Regular script']._element.rPr.rFonts.set(qn('w:eastAsia'), u'Regular script') # All fonts in the paragraph

# Set the style of song characters in Chinese
style_font = document.styles.add_style('Chinese song', WD_STYLE_TYPE.CHARACTER)
style_font.font.name = 'Chinese song'
document.styles['Chinese song']._element.rPr.rFonts.set(qn('w:eastAsia'), u'Chinese song')

paragraph1 = document.add_paragraph() # Add paragraph
run = paragraph1.add_run(u'aBCDefg This is Chinese', style='Song style') # Set Tahoma style

font = run.font #Set font
font.name = 'Cambira' # Set Western Font
paragraph1.add_run(u'aBCDefg This is Chinese', style='Regular script').font.name = 'Cambira'
paragraph1.add_run(u'aBCDefg This is Chinese', style='Chinese song').font.name = 'Cambira'

document.save('Font setting 1.docx')
'''Font setting 2.py'''
#Import library
from docx import Document
from docx.oxml.ns import qn
from docx.enum.style import WD_STYLE_TYPE

#Define font setting function
def font_setting(doc,text,font_cn):
       style_add = doc.styles.add_style(font_cn, WD_STYLE_TYPE.CHARACTER)
       style_add.font.name = font_cn
       doc.styles[font_cn]._element.rPr.rFonts.set(qn('w:eastAsia'), font_cn)
       par = doc.add_paragraph()
       text = par.add_run(text, style=font_cn)

doc = Document()
a = 'Children, do you have many question marks'
b = 'Why are people reading comics there'
c = 'I'm learning to draw and talk to the piano'

font_setting(doc,a,'Song style')
font_setting(doc,b,'Chinese song')
font_setting(doc,c,'Blackbody')

doc.save('Font setting 2.docx')
We can easily see that the font setting is 1 Py and font settings 2 The difference of Py is whether it is the same paragraph and the font is set to 2 Py has a custom function. Students can choose from specific scenes in practical work.
(3) Insert pictures and tables
#Import library
from docx import Document
from docx.shared import Inches

#open documents
doc_1 = Document('Jay Chou.docx')   #Documents stored in the above script

#New picture
doc_1.add_picture('Jay Chou.jpg',width=Inches(1.0), height=Inches(1.0))

# Create a table with 3 rows and 1 column
table1 = doc_1.add_table(rows=2, cols=1)
table1.style='Medium Grid 1 Accent 1'  #There are many table styles, such as Light Shading Accent 1

# Modify the content of the cell in Row 2 and column 3 to Yingkou
table1.cell(0, 0).text = 'Yingkou'
# Change the content of the cell in row 3 and column 4 to people
table1.rows[1].cells[0].text = 'the people'

# Add a new row at the bottom of the table
row_cells = table1.add_row().cells
# Add content to the first column of the new row
row_cells[0].text = 'come on.'

doc_1.save('Jay Chou cheers for Yingkou.docx')
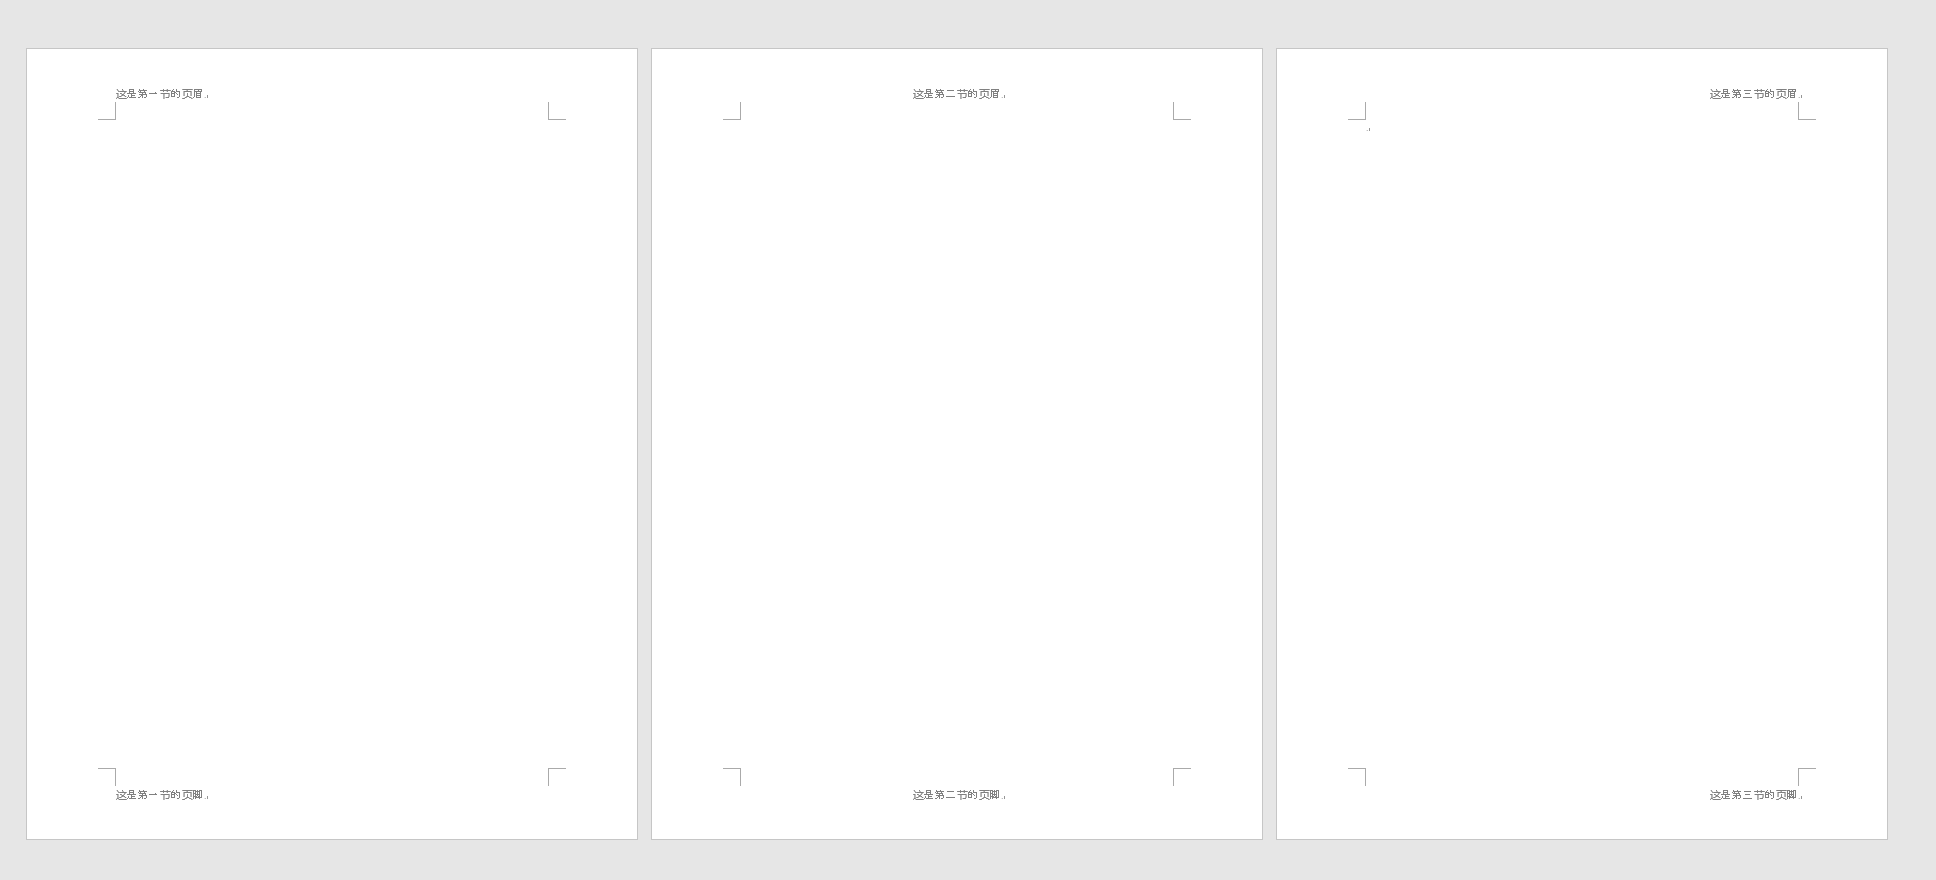
(4) Set header and footer
In the python docx package, the header and footer objects in the section should be used for specific settings.
from docx import Document
from docx.enum.text import WD_PARAGRAPH_ALIGNMENT

document = Document() # New document

header = document.sections[0].header # Gets the header of the first section
print('Default number of paragraphs in header:', len(header.paragraphs))
paragraph = header.paragraphs[0] # Gets the first paragraph of the header
paragraph.add_run('This is the header of the first section') # Add page content
footer = document.sections[0].footer # Gets the footer of the first section
paragraph = footer.paragraphs[0] # Gets the first paragraph of the footer
paragraph.add_run('This is the footer of the first section') # Add footer content


'''stay docx Two more sections are added to the document, a total of three sections. The page and footer will display "the same as the previous section".
If you do not use the content and style of the previous section, you should header.is_linked_to_previous Property or footer.is_linked_to_previous The property of is set to False,
Used to release "link previous section header" or "link previous section footer".'''
document.add_section() # Add a new section
document.add_section() # Add section 3
header = document.sections[1].header # Get the header of section 2
header.is_linked_to_previous = False # Do not use the content and style of the previous section

#Snap settings
header = document.sections[1].header # Get the header of section 2
header.is_linked_to_previous = False # Do not use the content and style of the previous section
paragraph = header.paragraphs[0]
paragraph.add_run('This is the header of section 2')
paragraph.alignment = WD_PARAGRAPH_ALIGNMENT.CENTER # Set header center alignment
document.sections[1].footer.is_linked_to_previous = False
footer.paragraphs[0].add_run('This is the footer of section 2') # Add section 2 footer
footer.paragraphs[0].alignment = WD_PARAGRAPH_ALIGNMENT.CENTER # Set section 2 footer center alignment
header = document.sections[2].header # Get the header of section 3
header.is_linked_to_previous = False # Do not use the content and style of the previous section
paragraph = header.paragraphs[0] # Gets the paragraph in the header
paragraph.add_run('This is the header of section 3')
paragraph.alignment = WD_PARAGRAPH_ALIGNMENT.RIGHT # Set header right alignment
document.sections[2].footer.is_linked_to_previous = False
footer.paragraphs[0].add_run('This is the footer of section 3') # Add section 3 footer
footer.paragraphs[0].alignment = WD_PARAGRAPH_ALIGNMENT.RIGHT # Set section 3 footer right alignment
document.save('Header footer 1.docx') # Save document
Default number of paragraphs in header: 1
The results are as follows:
(5) Code extension
'''Snap settings '''
from docx.enum.text import WD_ALIGN_PARAGRAPH
#LEFT: align LEFT
#CENTER: text centered
#RIGHT: align RIGHT
#JUSTIFY: align text at both ends

'''Set paragraph line spacing'''
from docx.shared import Length
# SINGLE: SINGLE line spacing (default)
#ONE_ POINT_ Five: 1.5 times line spacing
# DOUBLE2: double line spacing
#AT_LEAST: minimum value
#Actual: fixed value
# MULTIPLE: MULTIPLE line spacing

paragraph.line_spacing_rule = WD_LINE_SPACING.EXACTLY #Fixed value
paragraph_format.line_spacing = Pt(18) # Fixed value 18 lbs
paragraph.line_spacing_rule = WD_LINE_SPACING.MULTIPLE #Multiple line spacing
paragraph_format.line_spacing = 1.75 # 1.75 times line spacing

'''Set font properties'''
from docx.shared import RGBColor,Pt
#all_caps: all capital letters
#bold: bold
#Color: font color

#double_strike: double strike
#Hidden: hidden
#imprint: imprint
#Italic: italic
#name: font
#shadow: shadow
#strike: strike
#Subscript: subscript
#Superscript: superscript
#Underline: underline
---------------------------------------------------------------------------
3, Project practice
1, Demand
As an executive of the company, you invite partners to participate in the company's meetings;
The list of participants is as follows:

The proposed invitation format is as follows:
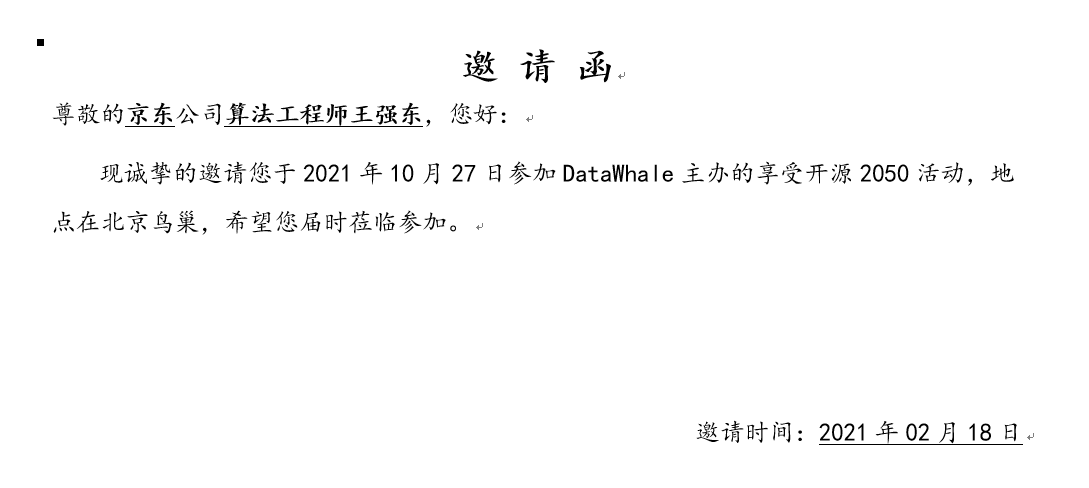
According to the list of participants, use python to generate invitations in batch.
2, Demand analysis
The logic is relatively simple:
- Obtain the information of each line in Excel file and extract parameters; Design the invitation style and output it according to the obtained parameters
- Design word paragraph, font and other styles.
3, Code
# Import library
from openpyxl import load_workbook
from docx import Document
from docx.enum.text import WD_PARAGRAPH_ALIGNMENT
from docx.shared import RGBColor, Pt,Inches,Cm
from docx.oxml.ns import qn


path = r'D:\study\word automation'
# The path is the location of the Excel file, which can be changed according to the actual situation

workbook = load_workbook(path + r'\excel reach word.xlsx')
sheet = workbook.active   #Default WorkSheet

n = 0   #In order not to traverse the title (the first line of excel)
for row in sheet.rows:
    if n:
        company = row[0].value
        office = row[1].value
        name = row[2].value
        date = str(row[3].value).split()[0]
        print(company, office, name, date)


        doc = Document()
        heading_1 = 'invitation'
        paragraph_1 = doc.add_heading(heading_1, level=1)
        # Center alignment
        paragraph_1.alignment = WD_PARAGRAPH_ALIGNMENT.CENTER
        # Modify larger font size separately
        for run in paragraph_1.runs:
            run.font.size = Pt(17)

        greeting_word_1 = 'honorific'
        greeting_word_2 = 'company'
        greeting_word_3 = ',Hello!'
        paragraph_2 = doc.add_paragraph()

        paragraph_2.add_run(greeting_word_1)
        r_1 = paragraph_2.add_run(company)
        r_1.font.bold = True  # Bold
        r_1.font.underline = True    #Underline

        paragraph_2.add_run(greeting_word_2)

        r_2 = paragraph_2.add_run(office)
        r_2.font.bold = True  # Bold
        r_2.font.underline = True    #Underline

        r_3 = paragraph_2.add_run(name)
        r_3.font.bold = True  # Bold
        r_3.font.underline = True    #Underline
        paragraph_2.add_run(greeting_word_3)

        paragraph_3 = doc.add_paragraph()
        paragraph_3.add_run('We sincerely invite you to attend on October 27, 2021 DataWhale The open source 2050 activity is hosted in Beijing bird's nest. I hope you will come and participate at that time.')
        paragraph_3.paragraph_format.first_line_indent = Cm(0.75)
        paragraph_3.paragraph_format.alignment = WD_PARAGRAPH_ALIGNMENT.LEFT
        paragraph_3.paragraph_format.space_after = Inches(1.0)
        paragraph_3.paragraph_format.line_spacing = 1.5

        paragraph_4 = doc.add_paragraph()
        date_word_1 = 'Invitation time:'
        paragraph_4.add_run(date_word_1)
        paragraph_4.alignment = WD_PARAGRAPH_ALIGNMENT.RIGHT
        sign_date = "{}year{}month{}day".format(date.split('-')[0], date.split('-')[1], date.split('-')[2])
        paragraph_4.add_run(sign_date).underline = True
        paragraph_4.alignment = WD_PARAGRAPH_ALIGNMENT.RIGHT

        #Set full text font
        for paragraph in doc.paragraphs:
            for run in paragraph.runs:
                run.font.color.rgb = RGBColor(0, 0, 0)
                run.font.name = 'Regular script'
                r = run._element.rPr.rFonts
                r.set(qn('w:eastAsia'), 'Regular script')
        doc.save(path + "\{}-invitation.docx".format(name))
    n = n + 1