Access control refers to the control and management of visitors' access to protected resources. The control management ensures that authorized persons can access protected resources, and unauthorized persons cannot access protected resources.
Access control in real life can be achieved by payment or authentication. For example, when you go to the cinema to see a movie, you need to buy enough tickets, otherwise the ticket inspector won't let you in.
There are many models for access control, such as:
- Discretionary access control model
- Mandatory access control model (MAC: Mandatory Access Control)
- Role based access control model (RBAC)
- Attribute based access control model (ABAC)
DAC
Independent access control (DAC): the system will identify the user, and then determine whether the user can perform any operations, such as reading or modifying, according to the information of the access object's permission control list (ACL: Access Control List) or permission control matrix (ACL: Access Control Matrix). Users with object permissions can assign the permissions of the object to other users, so it is called "discrete" control.
Autonomous access control model is a relatively loose but effective means to protect resources from illegal access and use. It is said that it is loose because it is under independent control and is transferred by personal will when protecting resources; It is effective because it can clearly and explicitly point out what permissions the subject uses when accessing or using an object. Any access behavior beyond the specified permissions will be blocked after being determined by the access control list.
A typical scenario is in the Linux file system: each file in the system (some special files may not be available, such as block device files) has an owner. The owner of the file is the user (or event, or another file) of the computer that created the file. Then the autonomous access control permission of this file is set and allocated by its creator. The owner of the file has access rights and can assign access rights to himself and other users
MAC
Mandatory access control (MAC: Mandatory Access Control) is used to manage the information in the system by security level and class, so as to ensure that each user can only access those marked access control. Under the marked access control, users (or other subjects) and files (or other objects) are marked with fixed security attributes (such as security level, access authority, etc.). When each access occurs, The system detects security attributes to determine whether a user has access to the file.
Mac was first mainly used in military applications, usually combined with DAC. The filtering results of the two access control mechanisms will accumulate to achieve better access control effect. In other words, a subject can really access an object only after passing the dual filtering device of DAC restriction check and MAC restriction check. On the one hand, users can use DAC to prevent other users from attacking the objects whose ownership belongs to them; On the other hand, because users cannot directly change MAC attributes, MAC provides an insurmountable and stronger security layer to prevent other users from accidentally or deliberately abusing DAC.
RBAC
Role based access control (RBAC): various permissions are not directly granted to specific users, but a role set is established between the user set and the permission set. Each role corresponds to a set of corresponding permissions. Once a user is assigned an appropriate role, the user will have all the operation permissions of this role. At present, the role-based access control model is widely used, especially in the field of SAAS in direction 2B. Role access is the focus of our introduction today.
Although RBAC simplifies permission management, it is still not flexible enough for role management in complex scenarios. For example, the authority between subject and object is complex and changeable, which may require maintaining a large number of roles and their authorization relationships; New objects also need to deal with all relevant roles. Attribute based role access control is to solve this problem.
ABAC
Attribute based access control is a very flexible access control model. Attributes include the attributes of request subject, request object, request context, operation, etc. For example, Lao Zhang, as a head teacher (the attribute of the subject), can kick Xiao Ming, who is an ordinary student (the attribute of the object), in class (the attribute of the context). It can be seen that ABAC can achieve very complex permission control as long as the attributes are accurately defined and divided.
For example, the class leader (position) of class 2 (class) of sophomore (grade) planning department (Major) can upload (operate) the photos of the class on the school intranet (environment).
However, due to the complexity of ABAC, it seems a little overqualified for the current SAAS field. Therefore, there are few platforms using ABAC in the SAAS field. At present, some cloud services are more used by ABAC.
RBAC in data stack
RBAC's permission scheme is adopted in our products, so we only analyze RBAC at present.
RBAC is role access control. First of all, we need to know the user's role. In this regard, our project has two modules: user management and role management.
user management
The user management of uic provides the functions of creating, editing and deleting user accounts.
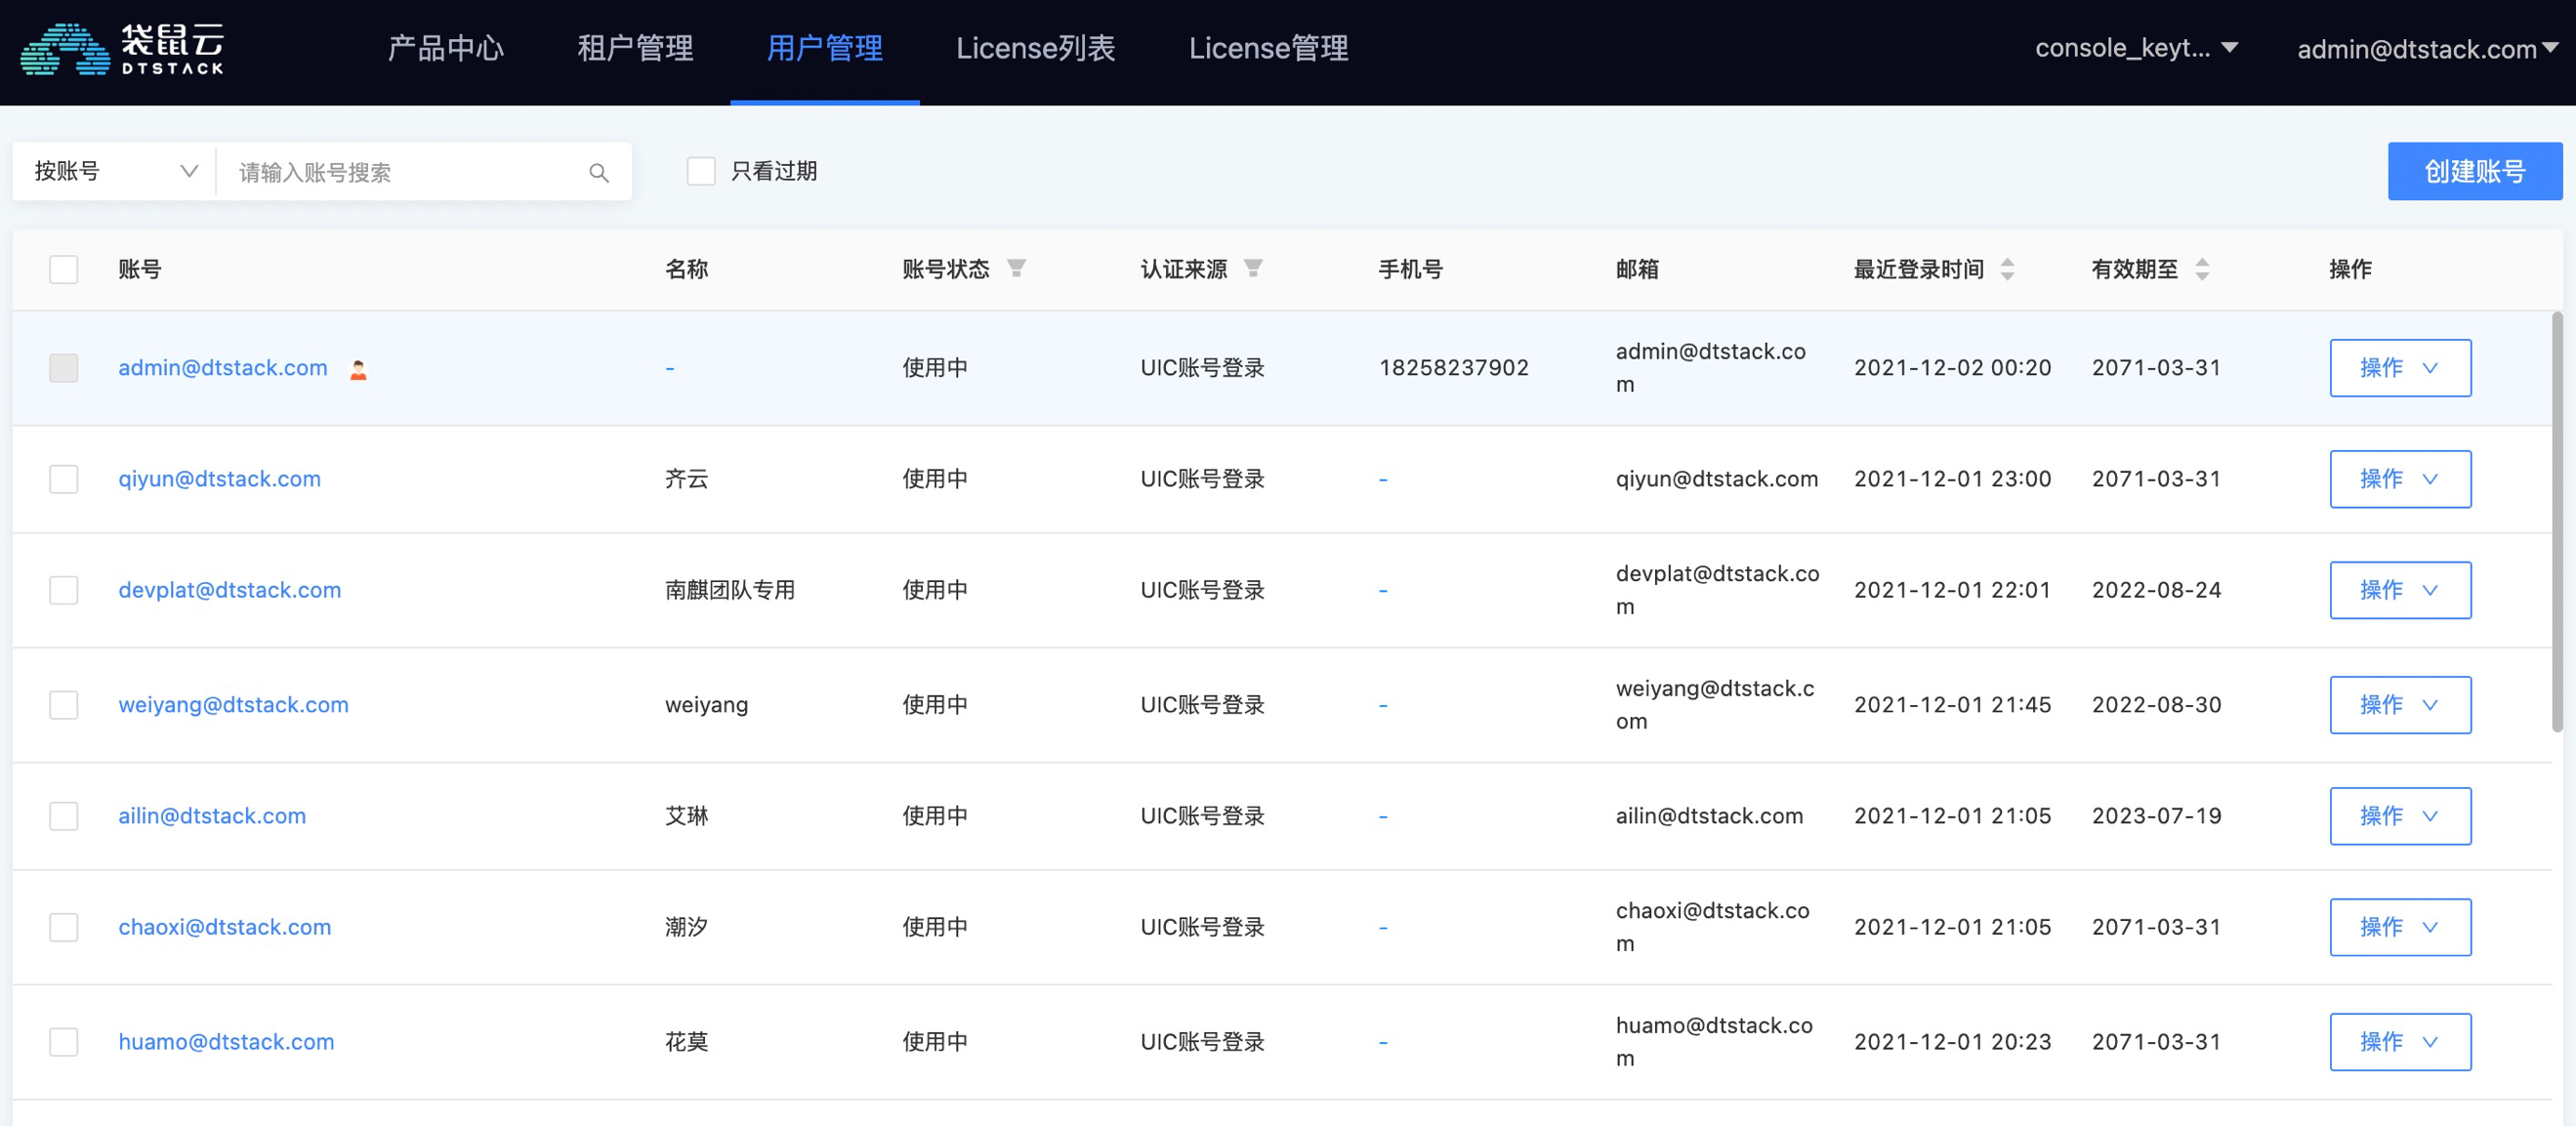
In the products of several stacks, there are tenants, and there is also a user management under each tenant to manage the users in the tenant. It can set the roles of the current user, including tenant owner, project owner and project manager.
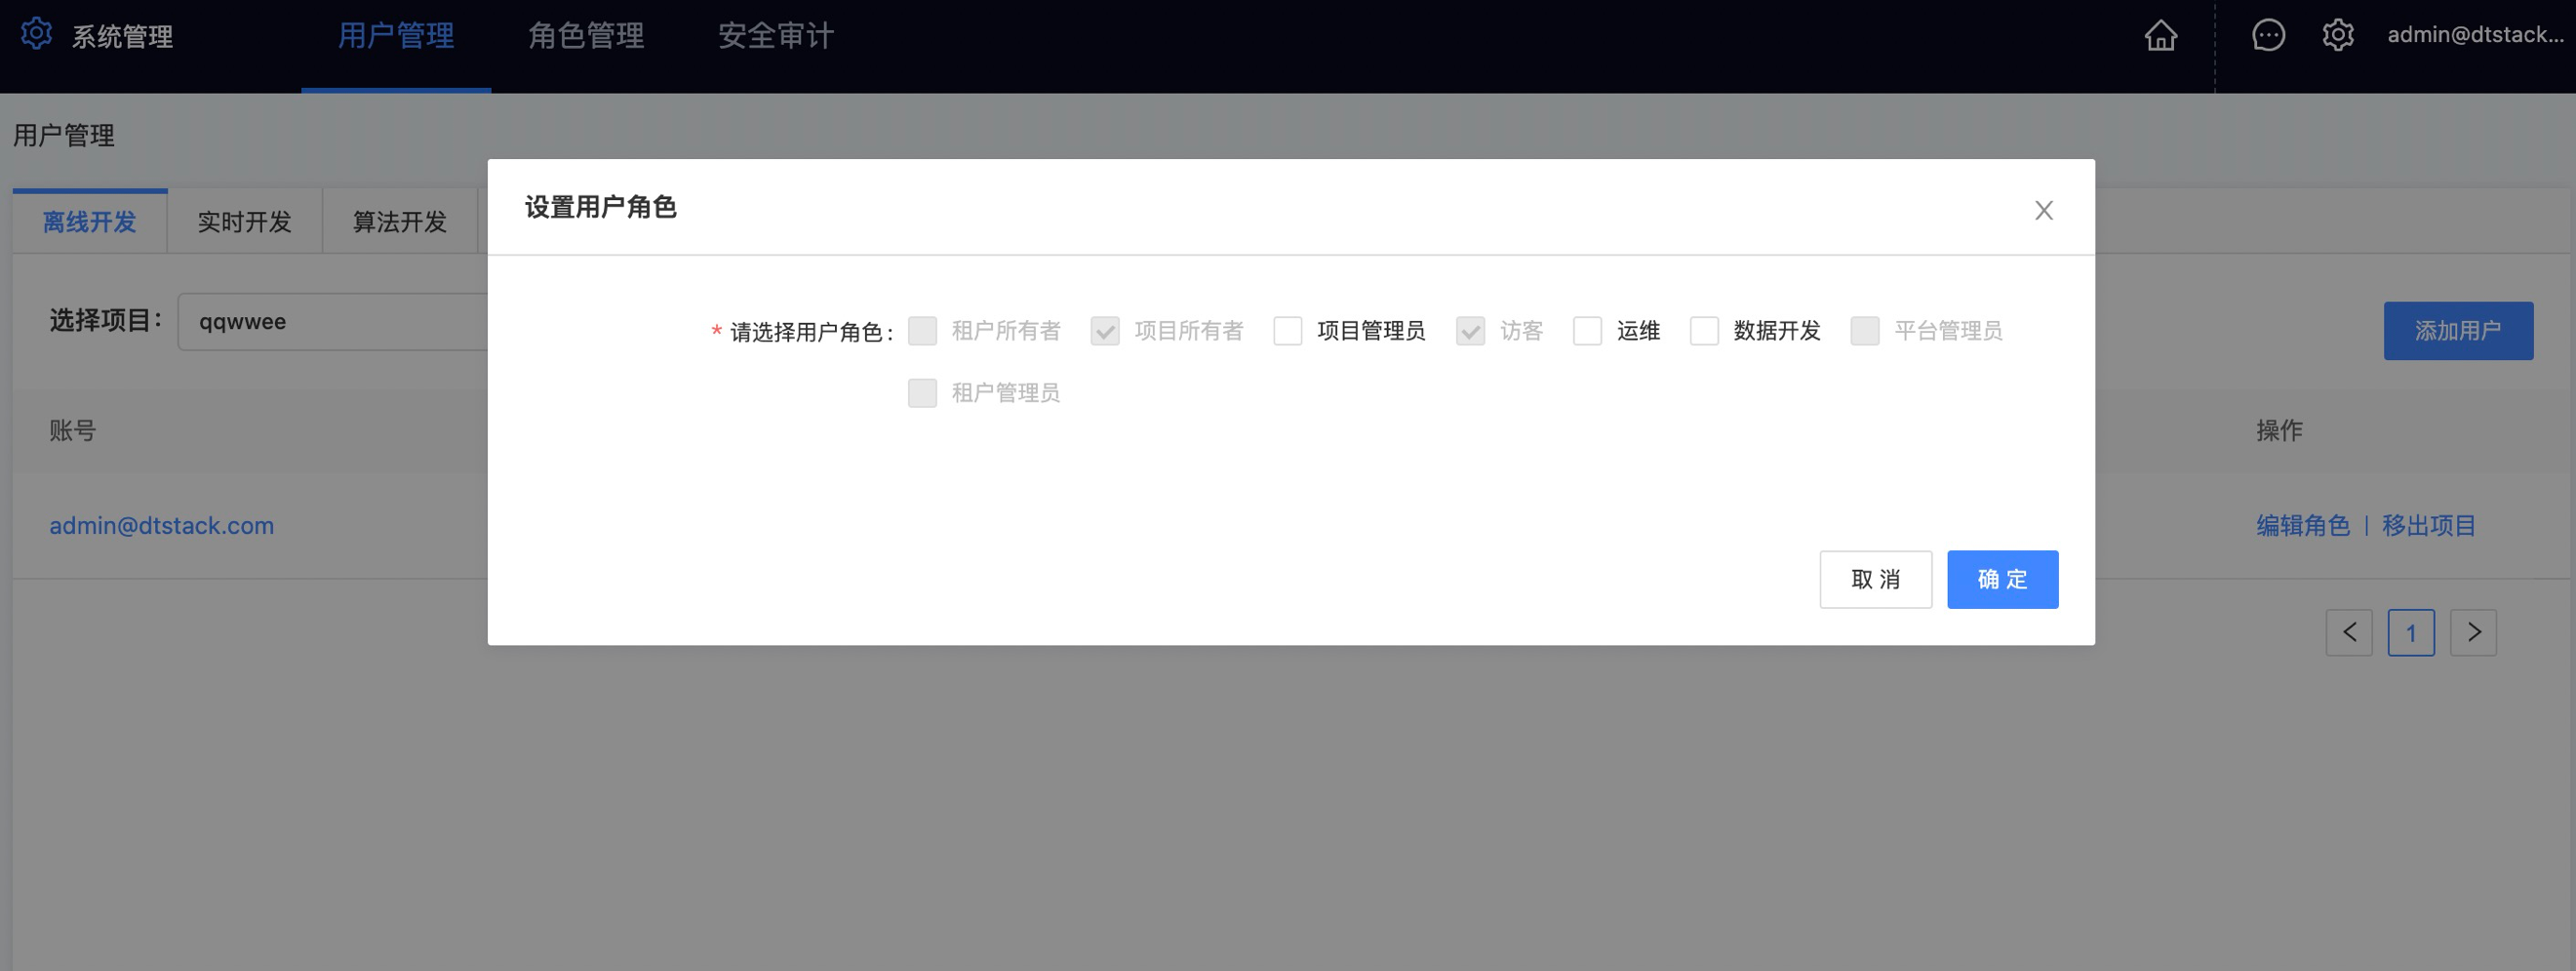
Role management
In role management, you can see the definition of a role and its access permissions.
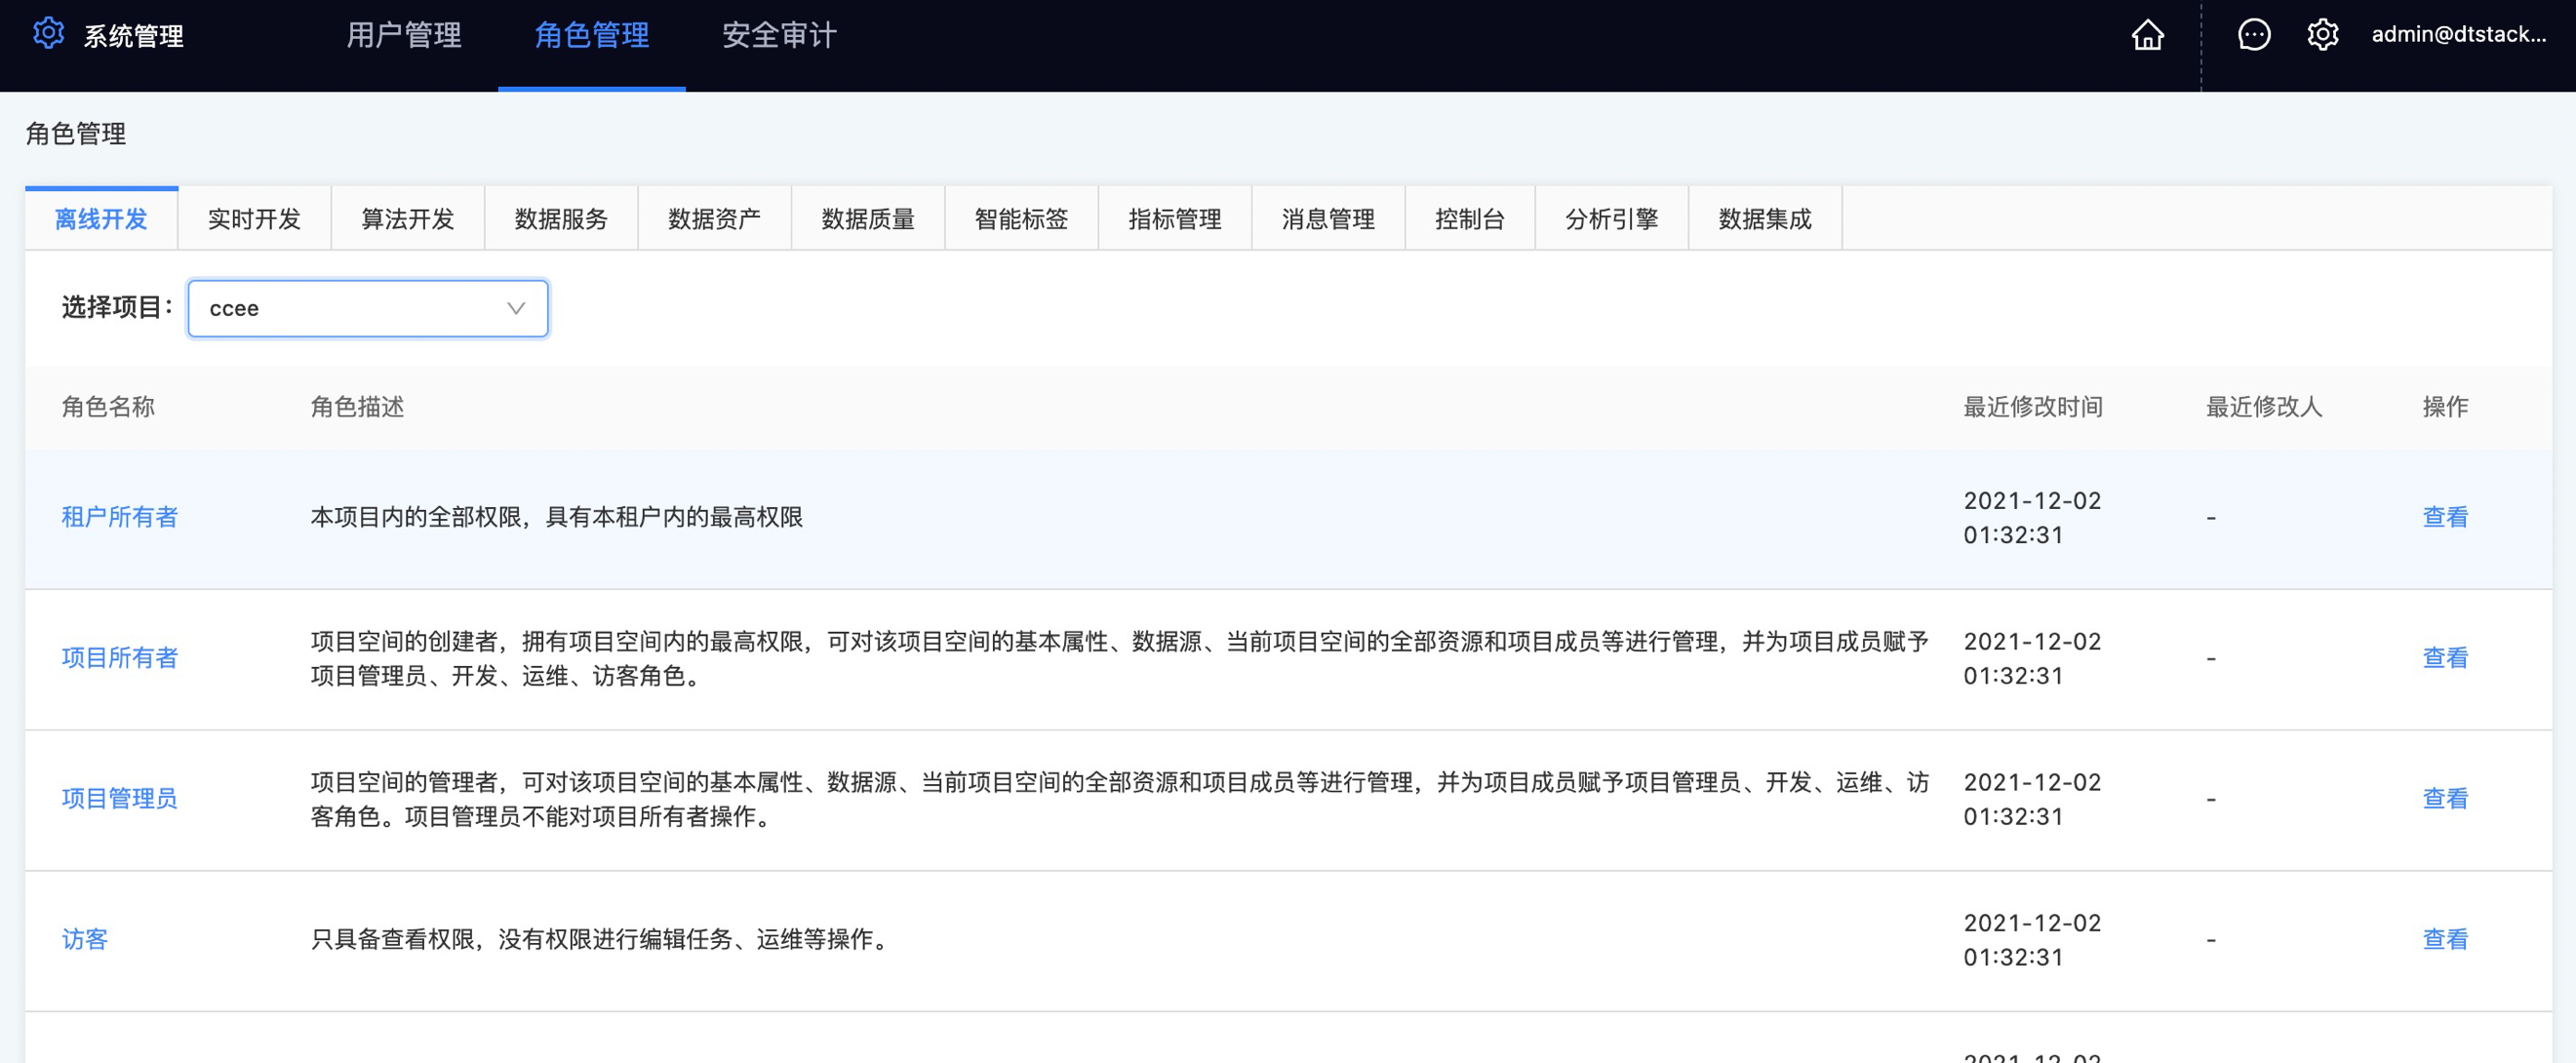
Through the user definition in user management and role management, we can get the complete product access permission of the current user. When a user enters a function, we can compare the current access permission and the user's access permission, and then draw the conclusion of whether to enter or not.
For our front-end developers, what we need is
- Get a role permission of the user
- Compare the obtained permissions and process the results differently
Let's see how the permission scheme of ant design pro is handled.
Permission scheme in ant design pro
How is the permission scheme in ant design pro, which is commonly used in the industry, designed?
Get user role permissions
At the beginning, login verification will be carried out while entering the page. If you don't log in, you will jump to the login page for login operation. After successful login, the role data of the CURRENT user will be saved into localStorage through setAuthority method, which is convenient for us to obtain when we re-enter the page. For those that have passed the login verification, they will directly enter the project and render the basic layout component of the page. In the basic layout component, we use the Authorized component. When we mount the Authorized component, we trigger renderAuthorize to assign a value to CURRENT. CURRENT will be used for subsequent permission checks, which is critical.

The renderAuthorize method is a Coriolis function that assigns a value to CURRENT when the role data is obtained internally using getAuthority.
let CURRENT: string | string[] = 'NULL';

type CurrentAuthorityType = string | string[] | (() => typeof CURRENT);
/**
 * use  authority or getAuthority
 * @param {string|()=>String} currentAuthority
 */
const renderAuthorize = (Authorized: any) => (currentAuthority: CurrentAuthorityType) => {
  if (currentAuthority) {
    if (typeof currentAuthority === 'function') {
      CURRENT = currentAuthority();
    }
    if (
      Object.prototype.toString.call(currentAuthority) === '[object String]' ||
      Array.isArray(currentAuthority)
    ) {
      CURRENT = currentAuthority as string[];
    }
  } else {
    CURRENT = 'NULL';
  }
  return Authorized;
};

export { CURRENT };
export default (Authorized: any) => renderAuthorize(Authorized);
At this point, the permission acquisition and update of the project are completed. The next step is permission verification
Verification authority
For permission verification, the following environment parameters are required:
- authority: current access permission, that is, access permission
- currentAuthority: the role of the CURRENT user, that is, CURRENT
- target: verify the successfully displayed components
- Exception: the component that failed to verify
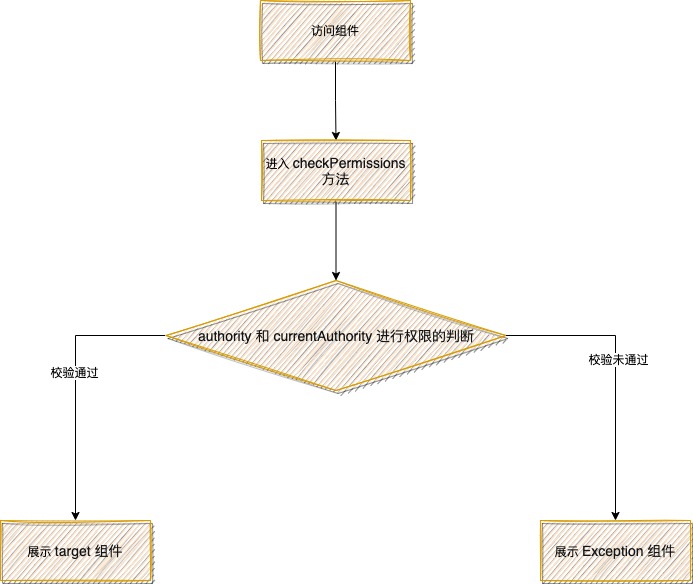
For the components that need permission verification, the Authorized component is used for combination. Within the Authorized component, the checkPermissions method is implemented to verify whether the current user role has permission to access. If you have permission, the current component will be displayed directly. If not, messages such as no permission will be displayed.
Implementation of Authorized component
type IAuthorizedType = React.FunctionComponent<AuthorizedProps> & {
  Secured: typeof Secured;
  check: typeof check;
  AuthorizedRoute: typeof AuthorizedRoute;
};

const Authorized: React.FunctionComponent<AuthorizedProps> = ({
  children,
  authority,
  noMatch = (
    <Result
      status="403"
      title="403"
      subTitle="Sorry, you are not authorized to access this page."
    />
  ),
}) => {
  const childrenRender: React.ReactNode = typeof children === 'undefined' ? null : children;
  const dom = check(authority, childrenRender, noMatch);
  return <>{dom}</>;
};

function check<T, K>(authority: IAuthorityType, target: T, Exception: K): T | K | React.ReactNode {
  return checkPermissions<T, K>(authority, CURRENT, target, Exception);
}

/**
 * General permission checking method
 * Common check permissions method
 * @param { Permission judgment | permission judgment} authority
 * @param { Your permission description} currentauthority
 * @param { Passing components} target
 * @param { Failed components | no pass components} exception
 */
const checkPermissions = <T, K>(
  authority: IAuthorityType,
  currentAuthority: string | string[],
  target: T,
  Exception: K,
): T | K | React.ReactNode => {
  // No judgment authority View all by default
  // Retirement authority, return target;
  if (!authority) {
    return target;
  }
  // Array processing
  if (Array.isArray(authority)) {
    if (Array.isArray(currentAuthority)) {
      if (currentAuthority.some((item) => authority.includes(item))) {
        return target;
      }
    } else if (authority.includes(currentAuthority)) {
      return target;
    }
    return Exception;
  }
  // string processing
  if (typeof authority === 'string') {
    if (Array.isArray(currentAuthority)) {
      if (currentAuthority.some((item) => authority === item)) {
        return target;
      }
    } else if (authority === currentAuthority) {
      return target;
    }
    return Exception;
  }
  // Promise processing
  if (authority instanceof Promise) {
    return <PromiseRender<T, K> ok={target} error={Exception} promise={authority} />;
  }
  // Function processing
  if (typeof authority === 'function') {
    const bool = authority(currentAuthority);
    // After the function is executed, the return value is Promise
    if (bool instanceof Promise) {
      return <PromiseRender<T, K> ok={target} error={Exception} promise={bool} />;
    }
    if (bool) {
      return target;
    }
    return Exception;
  }
  throw new Error('unsupported parameters');
};
Using the Authorized component
It is very convenient to use on the page. For the components that need permission control, use the Authorized component to combine them.
function NoMatch = () => {
	return <div>404</div>
}

<Authorized authority={'admin'} noMatch={NoMatch}>
  {children}
</Authorized>
We can also use routing to match components. This is because in v4, no matter where the components are written, only matching will render the secondary components.
<Authorized
    authority={authority}
    noMatch={<Route {...rest} render={() => <Redirect to={{ pathname: redirectPath }} />} />}
  >
    <Route
      {...rest}
      render={(props: any) => (Component ? <Component {...props} /> : render(props))}
    />
</Authorized>
Our authority scheme
At present, we have two sets of permission schemes: one is the old permission scheme for offline quality products, and the other is the new permission scheme for asset tags.
Old permission scheme
In the old scheme, the data is obtained through the interface, but the obtained data only reaches the menu level. Store the obtained data into the cache for the convenience of our business package and sub products. Monitor the change of page address in the service package, judge whether there is permission to enter the current page, and carry out corresponding processing according to the results. In fact, it is a routing guard function. In the sub product, whether to display the current menu entry is determined according to the data. The combination of the two forms our old scheme.
With the growth of several stacks, the old scheme slowly exposed many problems.
- The scope of permission control is too small. We only control it to the menu level. For special pages and some scenarios, we need to control functions (such as editing, adding, deleting, etc.), at present, only the back-end interface is restricted, and there is no restriction on the page. If we need to implement this function, we need to add additional interfaces and processing logic,
- We divide the permission processing into two parts, business package and sub product, but the coupling between them is very high. One place often needs to be changed, and the other needs to be changed.
- In the business package, we control the page access logic of each product. Whenever we need to add a menu, we need to add a corresponding menu processing logic. When we add a product, we need to add all the menu logic corresponding to the product. At present, the sub products of several stacks have exceeded 10 +, so we can imagine how bloated this processing logic is.
The actual problems are more than the above three points, but these three points are enough for us to explore new permission schemes.
New permission scheme
In the new scheme, the business package only retains the public method of permission, decentralizes the logic of page permission judgment, and the sub products maintain their own permission judgment logic. It is also very easy to modify the logic of a permission,
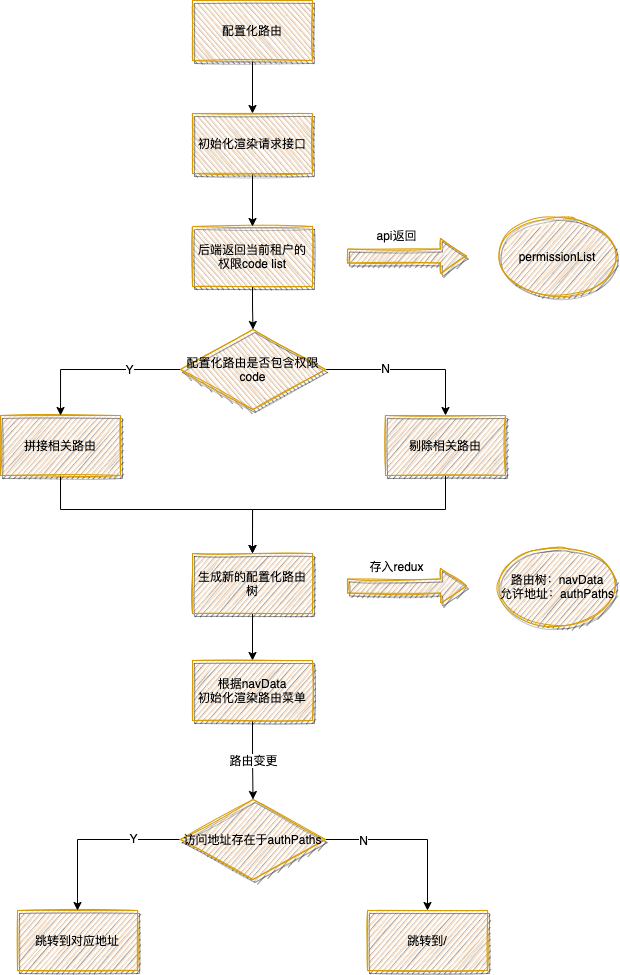
Compared with judging by roles in ant design pro, in the new scheme, we hand over the judgment logic of role permissions to the back end, which returns the corresponding code set after corresponding processing.
We define a code code for each module that needs to set access permission to compare whether the same code can be found in the set returned by the back end. If the description can be found, we have access to the current module, otherwise, we don't.
After this treatment, we only need to care about whether we can enter.
When the permission point is obtained, the route list with access permission will be cached according to the permission point. When the route is changed, you can find it in the authorized route list. If it is not found, you can perform operations such as redirection, that is, the function of route guard.
summary
After the above introduction, we have learned about the permission scheme, which is mainly divided into two stages:
- Permission acquisition stage: in the permission acquisition stage, the user usually obtains the corresponding permission according to the user information at the first time when logging in or entering the project
- Permission verification stage: compare the user's permission with the access permission of the current module, and operate according to the results
After knowing these, you can formulate corresponding permission schemes in combination with your own scenarios.