Welcome to my GitHub
Here we classify and summarize all the original works of Xinchen (including supporting source code): https://github.com/zq2599/blog_demos
About "camera practice of JavaCV" series
- As the name suggests, "JavaCV camera actual combat" is a collection of actual combat that uses the JavaCV framework to process various cameras. This is an original series in the field of computer vision by Xinchen as a Java programmer. Through continuous coding practice, we can learn and master various operations of video, audio, pictures and other resources with you
In addition, it should be noted that the cameras used in the whole series are USB cameras or built-in cameras of notebooks, < font color = "red" > not smart cameras based on network access < / font >
Overview of this article
- As the beginning of the whole series, this article is very important. All aspects from environment to code will lay a good foundation for subsequent articles. In short, this article consists of the following contents:
- Environment and version information
- Basic routine analysis
- Basic frame coding
- Deploy media server
- Let's start with the environment and version information
Environment and version information
- Now explain the software and hardware environment involved in the actual combat. You can refer to:
- Operating system: win10
- JDK: 1.8.0_291
- maven: 3.8.1
- IDEA: 2021.2.2(Ultimate Edition)
- JavaCV: 1.5.6
- Media server: nginx RTMP deployed based on dockek. The image is: < font color = "blue" > alfg / nginx RTMP: v1 3.1</font>
Source download
- The complete source code of JavaCV camera practice can be downloaded from GitHub. The address and link information are shown in the table below( https://github.com/zq2599/blo...):
| name | link | remarks |
|---|---|---|
| Project Home | https://github.com/zq2599/blo... | The project is on the GitHub home page |
| git warehouse address (https) | https://github.com/zq2599/blo... | The warehouse address of the source code of the project, https protocol |
| git warehouse address (ssh) | git@github.com:zq2599/blog_demos.git | The warehouse address of the source code of the project, ssh protocol |
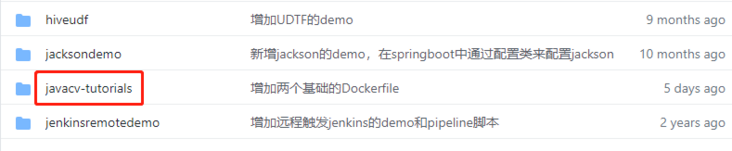
- There are multiple folders in this git project. The source code of this article is in the < font color = "blue" > javacv tutorials < / font > folder, as shown in the red box below:
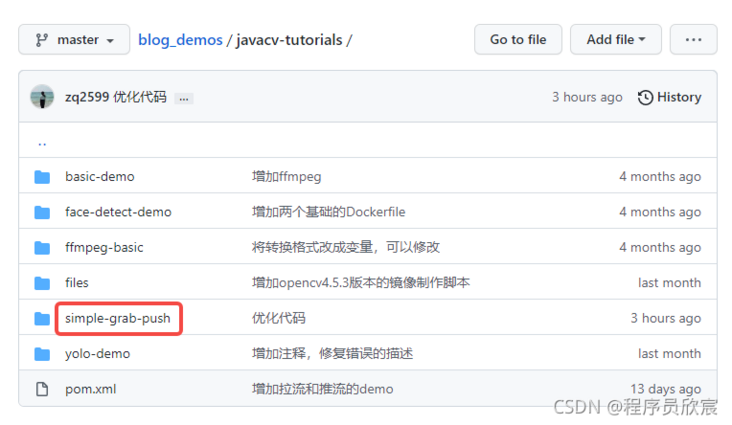
- < font color = "blue" > JavaCV tutorials < / font > there are several sub projects. The code of JavaCV camera practice series is under the < font color = "red" > Simple grab push < / font > Project:
Basic routine analysis
- There are several camera based actual battles in the whole series, such as window preview, saving videos as files, pushing videos to media servers, etc. the basic routines are roughly the same, represented by the simplest flow chart as follows:
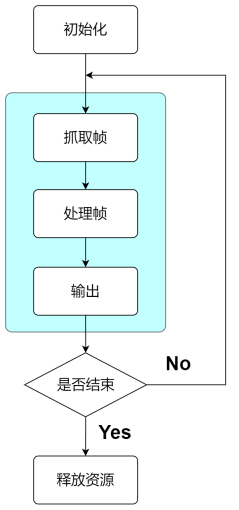
- As can be seen from the above figure, the whole process is to constantly take frames from the camera, and then process and output them
Basic frame coding
- After reading the above basic routine, you may have the idea that since the routine is fixed, the code can also be fixed according to the routine
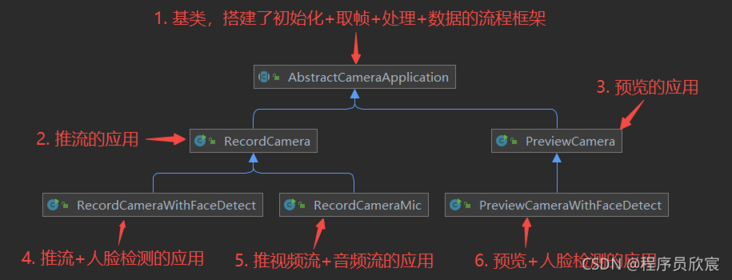
- Yes, next, let's consider how to fix the code according to the < font color = "blue" > routine < / font >. My idea is to develop an abstract class called < font color = "red" > abstractcameraapplication < / font >, which is the parent class of each application in the JavaCV camera practice series. It is responsible for building the whole process of initialization, framing, processing and output, Its subclasses focus on the specific processing and output of frame data. The UML diagram of the whole system is as follows:
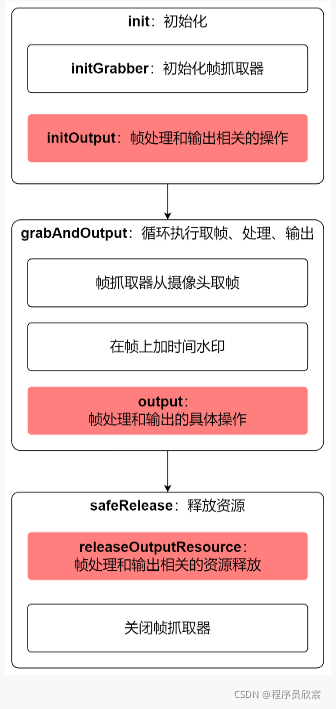
- Next, we should develop the abstract class < font color = "red" > AbstractCameraApplication Java < / font >, design before coding. The following figure is the main method and execution process of AbstractCameraApplication. All bold text is the method name, and the red block represents the abstract method left for subclass implementation:
- The next step is to create a project. Here I create a maven project, POM The XML is as follows:
<?xml version="1.0" encoding="UTF-8"?>
<project xmlns="http://maven.apache.org/POM/4.0.0"
         xmlns:xsi="http://www.w3.org/2001/XMLSchema-instance"
         xsi:schemaLocation="http://maven.apache.org/POM/4.0.0 http://maven.apache.org/xsd/maven-4.0.0.xsd">
    <parent>
        <artifactId>javacv-tutorials</artifactId>
        <groupId>com.bolingcavalry</groupId>
        <version>1.0-SNAPSHOT</version>
    </parent>
    <modelVersion>4.0.0</modelVersion>
    <groupId>com.bolingcavalry</groupId>
    <version>1.0-SNAPSHOT</version>
    <artifactId>simple-grab-push</artifactId>
    <packaging>jar</packaging>

    <properties>
        <!-- javacpp current version -->
        <javacpp.version>1.5.6</javacpp.version>
    </properties>

    <dependencies>
        <dependency>
            <groupId>org.projectlombok</groupId>
            <artifactId>lombok</artifactId>
        </dependency>
        <dependency>
            <groupId>ch.qos.logback</groupId>
            <artifactId>logback-classic</artifactId>
            <version>1.2.3</version>
        </dependency>
        <dependency>
            <groupId>org.apache.logging.log4j</groupId>
            <artifactId>log4j-to-slf4j</artifactId>
            <version>2.13.3</version>
        </dependency>

        <!-- javacv Related dependencies, one is enough -->
        <dependency>
            <groupId>org.bytedeco</groupId>
            <artifactId>javacv-platform</artifactId>
            <version>${javacpp.version}</version>
        </dependency>
    </dependencies>
</project>- Next is < font color = "red" > abstractcameraapplication The complete code of Java < / font >, the process and method names of these codes are consistent with the above figure, and detailed comments are added. Several points to note will be mentioned later:
package com.bolingcavalry.grabpush.camera;

import lombok.Getter;
import lombok.extern.slf4j.Slf4j;
import org.bytedeco.ffmpeg.global.avutil;
import org.bytedeco.javacv.*;
import org.bytedeco.opencv.global.opencv_imgproc;
import org.bytedeco.opencv.opencv_core.Mat;
import org.bytedeco.opencv.opencv_core.Scalar;

import java.text.SimpleDateFormat;
import java.util.Date;

/**
 * @author will
 * @email zq2599@gmail.com
 * @date 2021/11/19 8:07 morning
 * @description The basic class of camera application, which defines the basic flow of pulling and pushing streams. The subclass only needs to implement specific business methods
 */
@Slf4j
public abstract class AbstractCameraApplication {

    /**
     * Camera serial number. If there is only one camera, it is 0
     */
    protected static final int CAMERA_INDEX = 0;

    /**
     * Frame grabber
     */
    protected FrameGrabber grabber;

    /**
     * Output frame rate
     */
    @Getter
    private final double frameRate = 30;

    /**
     * Width of camera video
     */
    @Getter
    private final int cameraImageWidth = 1280;

    /**
     * Camera video high
     */
    @Getter
    private final int cameraImageHeight = 720;

    /**
     * converter
     */
    private final OpenCVFrameConverter.ToIplImage openCVConverter = new OpenCVFrameConverter.ToIplImage();

    /**
     * Instantiate and initialize resources related to output operations
     */
    protected abstract void initOutput() throws Exception;

    /**
     * output
     */
    protected abstract void output(Frame frame) throws Exception;

    /**
     * Release resources related to output operations
     */
    protected abstract void releaseOutputResource() throws Exception;

    /**
     * Interval between two frames
     * @return
     */
    protected int getInterval() {
        // Assuming 15 frames per second, the interval between two frames is (1000 / 15) milliseconds
        return (int)(1000/ frameRate);
    }

    /**
     * Instantiate the frame grabber, the default OpenCVFrameGrabber object,
     * Subclasses can override themselves as needed
     * @throws FFmpegFrameGrabber.Exception
     */
    protected void instanceGrabber() throws FrameGrabber.Exception {
        grabber = new OpenCVFrameGrabber(CAMERA_INDEX);
    }

    /**
     * Grab a frame with the frame grabber, and call the grab() method by default,
     * Subclasses can be overridden on demand
     * @return
     */
    protected Frame grabFrame() throws FrameGrabber.Exception {
        return grabber.grab();
    }

    /**
     * Initialize frame grabber
     * @throws Exception
     */
    protected void initGrabber() throws Exception {
        // Instantiate frame grabber
        instanceGrabber();

        // The camera may have multiple resolutions, which are specified here
        // You can specify the width and height, or call grabber instead Getimagewidth to get,
        grabber.setImageWidth(cameraImageWidth);
        grabber.setImageHeight(cameraImageHeight);

        // Open gripper
        grabber.start();
    }

    /**
     * Preview and output
     * @param grabSeconds Duration
     * @throws Exception
     */
    private void grabAndOutput(int grabSeconds) throws Exception {
        // Time tool used to add watermark
        SimpleDateFormat simpleDateFormat = new SimpleDateFormat("yyyy-MM-dd HH:mm:ss");

        long endTime = System.currentTimeMillis() + 1000L *grabSeconds;

        // The interval between two frame outputs is 1000 divided by the frame rate by default. Subclasses can be modified as appropriate
        int interVal = getInterval();

        // The position of the watermark on the picture
        org.bytedeco.opencv.opencv_core.Point point = new org.bytedeco.opencv.opencv_core.Point(15, 35);

        Frame captureFrame;
        Mat mat;

        // The cycle ends after the specified time
        while (System.currentTimeMillis()<endTime) {
            // Take one frame
            captureFrame = grabFrame();

            if (null==captureFrame) {
                log.error("The frame object is empty");
                break;
            }

            // Convert frame object to mat object
            mat = openCVConverter.convertToMat(captureFrame);

            // Add a watermark on the picture. The watermark content is the current time and the position is the upper left corner
            opencv_imgproc.putText(mat,
                    simpleDateFormat.format(new Date()),
                    point,
                    opencv_imgproc.CV_FONT_VECTOR0,
                    0.8,
                    new Scalar(0, 200, 255, 0),
                    1,
                    0,
                    false);

            // Subclass output
            output(openCVConverter.convert(mat));

            // At appropriate intervals, so that the flesh can not feel the flash screen
            if(interVal>0) {
                Thread.sleep(interVal);
            }
        }

        log.info("Output end");
    }

    /**
     * Free all resources
     */
    private void safeRelease() {
        try {
            // Resources to be released by subclasses
            releaseOutputResource();
        } catch (Exception exception) {
            log.error("do releaseOutputResource error", exception);
        }

        if (null!=grabber) {
            try {
                grabber.close();
            } catch (Exception exception) {
                log.error("close grabber error", exception);
            }
        }
    }

    /**
     * All initialization operations are integrated
     * @throws Exception
     */
    private void init() throws Exception {
        long startTime = System.currentTimeMillis();

        // Set ffmepg log level
        avutil.av_log_set_level(avutil.AV_LOG_INFO);
        FFmpegLogCallback.set();

        // Instantiate and initialize frame grabber
        initGrabber();

        // Instantiate and initialize resources related to output operations,
        // The specific output is determined by subclasses, such as window preview, saving video files, etc
        initOutput();

        log.info("Initialization completed, time consuming[{}]MS, frame rate[{}],Image width[{}],Image height[{}]",
                System.currentTimeMillis()-startTime,
                frameRate,
                cameraImageWidth,
                cameraImageHeight);
    }

    /**
     * Perform grab and output operations
     */
    public void action(int grabSeconds) {
        try {
            // Initialization operation
            init();
            // Continuous pull and push
            grabAndOutput(grabSeconds);
        } catch (Exception exception) {
            log.error("execute action error", exception);
        } finally {
            // Release resources anyway
            safeRelease();
        }
    }
}- The above code has the following points to pay attention to:
- The OpenCVFrameGrabber object, the frame grabber, is responsible for fetching data from the camera
- In the initGrabber method, the width and height of the image are set for the frame grabber through the setImageWidth and setImageHeight methods. In fact, the width and height can be automatically adapted by the frame grabber without setting the width and height. However, considering that some cameras support multiple resolutions, they are still set actively according to their actual situation
- In the grabAndOutput method, a while loop is used to continuously fetch frames, process and output. The end condition of this while loop is the specified time. Such an end condition may not meet your needs. Please adjust it according to your actual situation (for example, check whether a key is pressed)
- In the grabAndOutput method, convert the obtained frame into a Mat object, then add text on the Mat object with the content of the current time, convert the Mat object into a frame object, and pass the frame object to the < font color = "blue" > output < / font > method of the subclass. In this way, when the subclass processes and outputs, the obtained frames have a time watermark
- So far, the parent class has been completed. In the next practice, we just need to focus on using the child class to process and output frame data
Deploy media server
- Some of the actual battles of JavaCV camera series involve streaming and remote playback, which requires the use of streaming media server. The role of streaming media server is shown in the figure below. We have also deployed it in advance in this article:
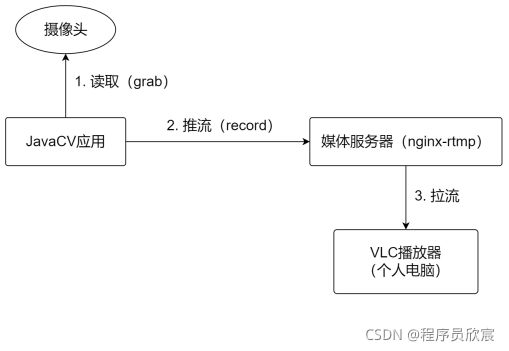
- For the type of media server, I chose the commonly used < font color = "blue" > nginx RTMP < / font >. For simplicity, I found a linux computer and deployed it with docker, that is, one line of command:
docker run -d --name nginx_rtmp -p 1935:1935 -p 18080:80 alfg/nginx-rtmp:v1.3.1
- Another special case is that I have an idle raspberry pie 3B, which can also be used as a media server. It is also deployed with docker. Here, it should be noted that the image should be < font color = "blue" > shapelescookie / nginx RTMP ffmpeg: latest < / font >. This image has ARM64 version, which is suitable for raspberry Pie:
docker run -d --name nginx_rtmp -p 1935:1935 -p 18080:80 shamelesscookie/nginx-rtmp-ffmpeg:latest
So far, the preparations for JavaCV's camera practice series have been completed. In the next article, let's start a wonderful experience. Xinchen is original and won't let you down~
You're not alone. Xinchen's original accompanies you all the way