Welcome to my GitHub
Here we classify and summarize all the original works of Xinchen (including supporting source code): https://github.com/zq2599/blog_demos
About face recognition
-
This paper is the first article in the "JavaCV face recognition Trilogy" JavaCV camera practice 8: face detection In this paper, we detect the face and mark it with a box, but only frame the face has little effect. It's best to identify the person's identity, so we can do a lot of things, such as check-in, alarm, etc. This is the face recognition we will challenge next
-
Face recognition involves two steps: training and recognition. Next, let's explain briefly
-
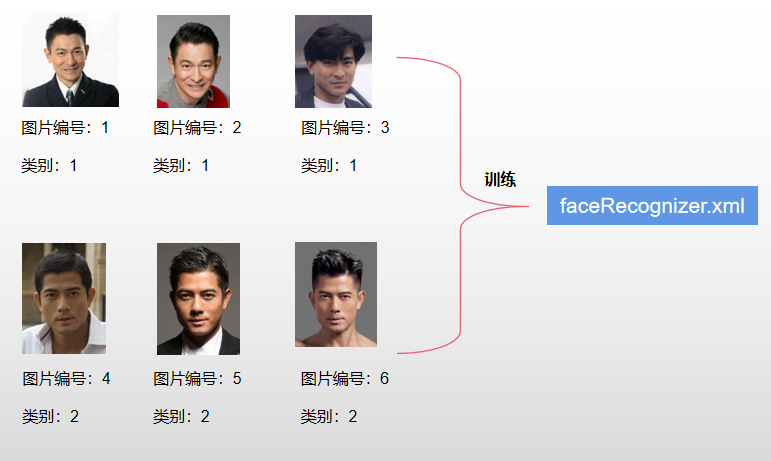
First look at what training is. As shown in the figure below, use six photos of two heavenly kings to train. There are two categories in total. After the training, get the model file facerecognizer xml:
-
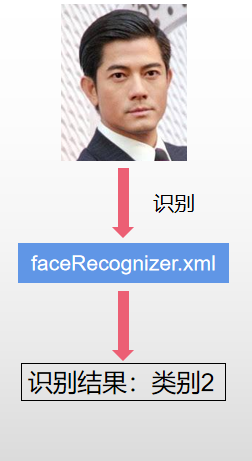
After successful training, we take a new photo to the model for recognition, and the result is the category during training. After such recognition, we have determined the identity of the new photo:
-
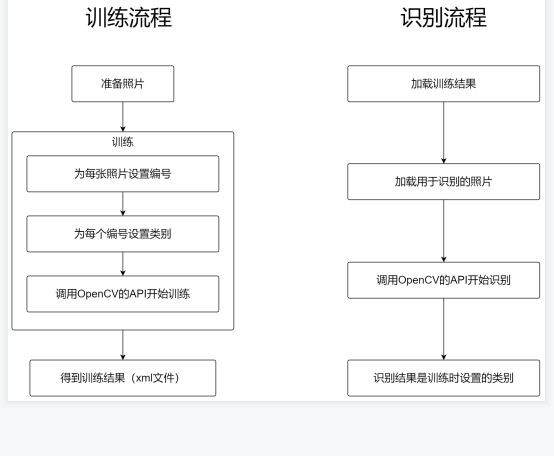
Training and identification are described in more detail below with a flowchart:
About JavaCV face recognition Trilogy
There are three articles in the JavaCV face recognition trilogy, which are as follows:
- Save faces in video as pictures: This article introduces how to detect each face in the camera through JavaCV and save each face as a picture. This method allows us to quickly obtain a large number of face photos for training
- Training: how to train models with classified photos
- Recognition and preview: get the trained model, recognize the face of each frame in the video, and mark the results on the picture for preview
- The whole trilogy is also a part of the JavaCV camera practice series, which is the ninth, tenth and eleventh of the JavaCV camera practice series
Overview of this article
- What we need to do in this article is to prepare the photos for training
- You may wonder: can't I just find some photos myself? Can't you search the Internet, photo albums and photos? Yes, as long as you find the face you want to recognize, and this article introduces another method: detect the face with the help of the camera, then save the face size photos on the hard disk, use these photos for training, measure multiple photos, and the model at the training place has better results in detecting new photos
- The specific methods are as follows:
- Write a program to detect the face of the camera photos. Each detected face is saved as a picture. Note that it is not a complete picture of the camera video frame, but each face is detected. Save the rectangle of the face as a picture, and save a gray-scale picture, not a color picture (only a gray-scale picture is required for training and detection)
- Then find a place where there is no one to run the program. One person looks at the camera and starts... Scratching his head. All kinds of light and dark, all kinds of angles and all kinds of expressions are used to save them as pictures
- Because the models trained with these pictures cover various brightness, angles and expressions, the final recognition effect will be better
- Next, let's write this program
Source download
- The complete source code of JavaCV camera practice can be downloaded from GitHub. The address and link information are shown in the table below( https://github.com/zq2599/blog_demos):
| name | link | remarks |
|---|---|---|
| Project Home | https://github.com/zq2599/blog_demos | The project is on the GitHub home page |
| git warehouse address (https) | https://github.com/zq2599/blog_demos.git | The warehouse address of the source code of the project, https protocol |
| git warehouse address (ssh) | git@github.com:zq2599/blog_demos.git | The project source code warehouse address, ssh protocol |
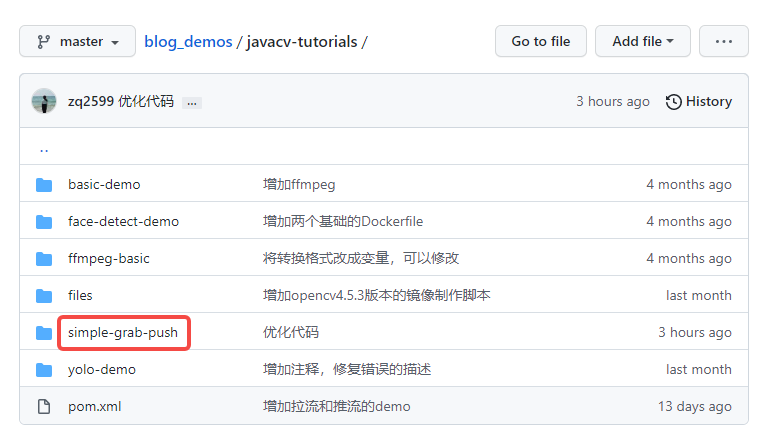
- There are multiple folders in the git project. The source code of this article is in the javacv tutorials folder, as shown in the red box below:

- There are several sub projects in JavaCV tutorials. The code of JavaCV camera practice series is under the simple grab push project:
Code: detection service
- First, define a detection related interface, detectservice Java, as follows, mainly defines three methods init, convert and releaseOutputResource, where init is used to initialize the detection service, Convert is responsible for processing a single frame (this article is to detect the face and save the face photo on the hard disk). releaseOutputResource is executed at the end to release resources. In addition, there is a static method buildGrayImage, which is very simple to generate the Mat object corresponding to the gray image:
package com.bolingcavalry.grabpush.extend;

import com.bolingcavalry.grabpush.Constants;
import org.bytedeco.javacv.Frame;
import org.bytedeco.javacv.OpenCVFrameConverter;
import org.bytedeco.opencv.opencv_core.*;
import org.bytedeco.opencv.opencv_objdetect.CascadeClassifier;
import static org.bytedeco.opencv.global.opencv_core.CV_8UC1;
import static org.bytedeco.opencv.global.opencv_imgcodecs.imwrite;
import static org.bytedeco.opencv.global.opencv_imgproc.*;

/**
 * @author willzhao
 * @version 1.0
 * @description General interface of testing tools
 * @date 2021/12/5 10:57
 */
public interface DetectService {

    /**
     * A MAT of the same size is constructed according to the incoming MAT, and gray images are stored for future detection
     * @param src MAT object of the original picture
     * @return MAT object of grayscale image of the same size
     */
    static Mat buildGrayImage(Mat src) {
        return new Mat(src.rows(), src.cols(), CV_8UC1);
    }

    /**
     * Initialization operations, such as model download
     * @throws Exception
     */
    void init() throws Exception;

    /**
     * Get the original frame, identify it and add box selection
     * @param frame
     * @return
     */
    Frame convert(Frame frame);

    /**
     * Release resources
     */
    void releaseOutputResource();
}
- Then is the implementation class of DetectService, detectandsaveservice Java, the complete code is as follows. There are several points to note, which will be mentioned later:
package com.bolingcavalry.grabpush.extend;

import com.bolingcavalry.grabpush.Constants;
import lombok.extern.slf4j.Slf4j;
import org.bytedeco.javacpp.Loader;
import org.bytedeco.javacv.Frame;
import org.bytedeco.javacv.OpenCVFrameConverter;
import org.bytedeco.opencv.opencv_core.*;
import org.bytedeco.opencv.opencv_objdetect.CascadeClassifier;
import java.io.File;
import java.net.URL;
import java.text.SimpleDateFormat;
import java.util.Date;
import java.util.concurrent.atomic.AtomicInteger;
import static org.bytedeco.opencv.global.opencv_imgcodecs.imwrite;
import static org.bytedeco.opencv.global.opencv_imgproc.*;

/**
 * @author willzhao
 * @version 1.0
 * @description A service that detects faces and saves them to the hard disk
 * @date 2021/12/3 8:09
 */
@Slf4j
public class DetectAndSaveService implements DetectService {

    /**
     * The object of the original picture in each frame
     */
    private Mat grabbedImage = null;

    /**
     * Gray image object corresponding to the original image
     */
    private Mat grayImage = null;

    /**
     * classifier
     */
    private CascadeClassifier classifier;

    /**
     * converter
     */
    private OpenCVFrameConverter.ToMat converter = new OpenCVFrameConverter.ToMat();

    /**
     * Download address of model file
     */
    private String modelFileUrl;

    /**
     * Location for storing face pictures
     */
    private String basePath;

    /**
     * Total number of recorded pictures
     */
    private final AtomicInteger num = new AtomicInteger();

    /**
     * Training picture size
     */
    Size size = new Size(Constants.RESIZE_WIDTH, Constants.RESIZE_HEIGHT);

    /**
     * Construction method, where the download address of the model file is specified
     * @param modelFileUrl Face detection model address
     * @param basePath The storage address of the detected small face image on the hard disk
     */
    public DetectAndSaveService(String modelFileUrl, String basePath) {
        this.modelFileUrl = modelFileUrl;

        // The picture is saved on the hard disk. Note that the fixed prefix of the file name is the current year, month, day, hour, minute and second
        this.basePath = basePath
                      + new SimpleDateFormat("yyyyMMddHHmmss").format(new Date())
                      + "-";
    }

    /**
     * Initialization of audio sampling object
     * @throws Exception
     */
    @Override
    public void init() throws Exception {
        // Download model file
        URL url = new URL(modelFileUrl);

        File file = Loader.cacheResource(url);

        // Full address after model file download
        String classifierName = file.getAbsolutePath();

        // Instantiate the classifier according to the model file
        classifier = new CascadeClassifier(classifierName);

        if (classifier == null) {
            log.error("Error loading classifier file [{}]", classifierName);
            System.exit(1);
        }
    }

    @Override
    public Frame convert(Frame frame) {
        // From frame to Mat
        grabbedImage = converter.convert(frame);

        // Grayscale Mat for detection
        if (null==grayImage) {
            grayImage = DetectService.buildGrayImage(grabbedImage);
        }

        String filePath = basePath + num.incrementAndGet();

        // Carry out face recognition and process according to the results to get the frame displayed in the preview window
        return detectAndSave(classifier, converter, frame, grabbedImage, grayImage, filePath , size);
    }

    /**
     * Before the end of the program, release the resources of face recognition
     */
    @Override
    public void releaseOutputResource() {
        if (null!=grabbedImage) {
            grabbedImage.release();
        }

        if (null!=grayImage) {
            grayImage.release();
        }

        if (null==classifier) {
            classifier.close();
        }
    }

    /**
     *
     * @param classifier classifier
     * @param converter Conversion tool
     * @param rawFrame Original frame
     * @param grabbedImage Mat object of the original picture
     * @param grayImage The Mat object of the grayscale picture corresponding to the original picture
     * @param basePath Basic path of picture
     * @param size Required picture size for training
     * @return
     */
    static Frame detectAndSave(CascadeClassifier classifier,
                               OpenCVFrameConverter.ToMat converter,
                               Frame rawFrame,
                               Mat grabbedImage,
                               Mat grayImage,
                               String basePath,
                               Size size) {

        // Convert current picture to grayscale picture
        cvtColor(grabbedImage, grayImage, CV_BGR2GRAY);

        // Container for storing test results
        RectVector objects = new RectVector();

        // Start detection
        classifier.detectMultiScale(grayImage, objects);

        // Total test results
        long total = objects.size();

        // If no result is detected, it will be returned in advance
        if (total<1) {
            return rawFrame;
        }

        // Suppose a person is facing the camera, because if the detection result is greater than 1, there is obviously a problem with the detection
        if (total>1) {
            return rawFrame;
        }

        Mat faceMat;

        // If there is a test result, a rectangular box is constructed according to the data of the result and drawn on the original drawing
        // The previous judgment ensures that there is only one face at this time
        Rect r = objects.get(0);

        // Get the Mat object of a small rectangular image from the complete gray image
        faceMat = new Mat(grayImage, r);

        // The size of the picture used in training is fixed, so it should be adjusted here
        resize(faceMat, faceMat, size);

        // Where to save pictures
        String imagePath = basePath + "." + Constants.IMG_TYPE;

        // Save picture to hard disk
        imwrite(imagePath, faceMat);

        // Location information of human face
        int x = r.x(), y = r.y(), w = r.width(), h = r.height();

        // Draw a rectangle on your face
        rectangle(grabbedImage, new Point(x, y), new Point(x + w, y + h), Scalar.RED, 1, CV_AA, 0);

        // Release detection result resource
        objects.close();

        // Convert the marked picture into a frame and return
        return converter.convert(grabbedImage);
    }
}
- There are several points to note in the above code:
- In the detectAndSave method, if the number of faces detected in the current photo is greater than 1, it will be returned in advance without processing. This is because it is assumed that there is only one person in front of the camera when the program is running. Therefore, if more than one face is detected, it is considered that the detection of the current photo is inaccurate, The current photo is no longer processed (detection errors are often found in actual use, such as detecting a rectangular box as a face). You can adjust the logic of returning in advance according to your own environment
- imwrite method can save Mat to hard disk in the form of picture
- Before saving the file to disk, the resize method is called, and the picture is adjusted to 164*164 size. This is because the following training and testing are used uniformly.
- Now that the core code has been written, you need to write some more code to use DetectAndSaveService
Code: run frame
- One of the camera practice of JavaCV: Fundamentals The parent class AbstractCameraApplication has been prepared in the simple grab push project created, so this article continues to use the project to create subclasses to implement those abstract methods
- Before coding, first review the basic structure of the parent class, as shown in the figure below. Bold is each method defined by the parent class, and the red blocks require subclasses to implement abstract methods. Therefore, next, we can implement the three red methods with the goal of local window Preview:
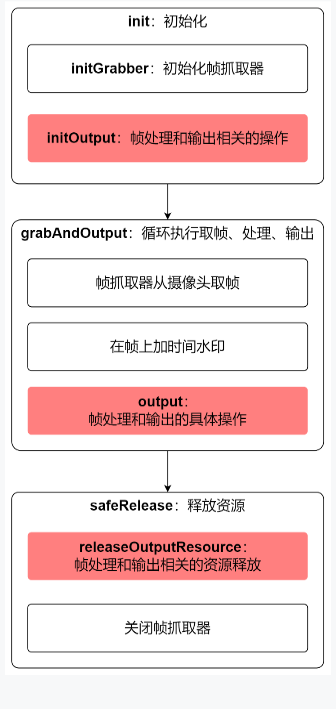
- Create a new file previewcamerawithdetectandsave Java, which is a subclass of AbstractCameraApplication. Its code is very simple. Next, it will be described in the order shown in the figure above
- First define the member variable previewCanvas of CanvasFrame type, which is the local window for displaying video frames:
protected CanvasFrame previewCanvas
- Take the DetectService created earlier as the member variable, which will be used in later detection:
    /**
     * Test tool interface
     */
    private DetectService detectService;
- The construction method of PreviewCameraWithDetectAndSave accepts an instance of DetectService:
    /**
     * Different detection tools can be passed in through the construction method
     * @param detectService
     */
    public PreviewCameraWithDetectAndSave(DetectService detectService) {
        this.detectService = detectService;
    }
- The initialization operation is followed by the instantiation and parameter setting of previewCanvas:
    @Override
    protected void initOutput() throws Exception {
        previewCanvas = new CanvasFrame("Preview the camera, detect the face and save it on the hard disk", CanvasFrame.getDefaultGamma() / grabber.getGamma());
        previewCanvas.setDefaultCloseOperation(JFrame.EXIT_ON_CLOSE);
        previewCanvas.setAlwaysOnTop(true);

        // Detect the initialization operation of the service
        detectService.init();
    }
- Next is the output method, which defines what to do after getting each frame of video data. Here, detectservice is called Convert detects the face and saves the picture, and then displays it in the local window:
    @Override
    protected void output(Frame frame) {
        // The original frame is first handed over to the detection service for processing, which includes object detection, and then the detection results are marked on the original picture,
        // Then convert to frame return
        Frame detectedFrame = detectService.convert(frame);
        // The frame displayed on the preview window is the frame marked with the detection results
        previewCanvas.showImage(detectedFrame);
    }
- Finally, after the video processing cycle is completed and before the program exits, close the local window first, and then release the resources of the detection service:
    @Override
    protected void releaseOutputResource() {
        if (null!= previewCanvas) {
            previewCanvas.dispose();
        }

        // The detection tool should also release resources
        detectService.releaseOutputResource();
    }
- Because the detection is time-consuming, the interval between two frames is lower than the normal Preview:
    @Override
    protected int getInterval() {
        return super.getInterval()/8;
    }
- So far, the function has been developed, and then write the main method. When instantiating DetectAndSaveService, note that there are two input parameters. The first is the download address of the face detection model, the second is the location where the face photos are saved locally, and the parameter 1000 of the action method shows that the Preview duration is 1000 seconds:
    public static void main(String[] args) {
        String modelFileUrl = "https://raw.github.com/opencv/opencv/master/data/haarcascades/haarcascade_frontalface_alt.xml";
        new PreviewCameraWithDetectAndSave(
                new DetectAndSaveService(
                        modelFileUrl,
                        "E:\\temp\\202112\\18\\001\\man"))
                .action(1000);
    }
Grab a picture of the first person
-
Run the main method, and then invite mass actor A to the stage. Watch him face the camera alone and start... Scratching his head. Use all kinds of lights, angles and expressions. Hey, I can't bear to look straight at
-
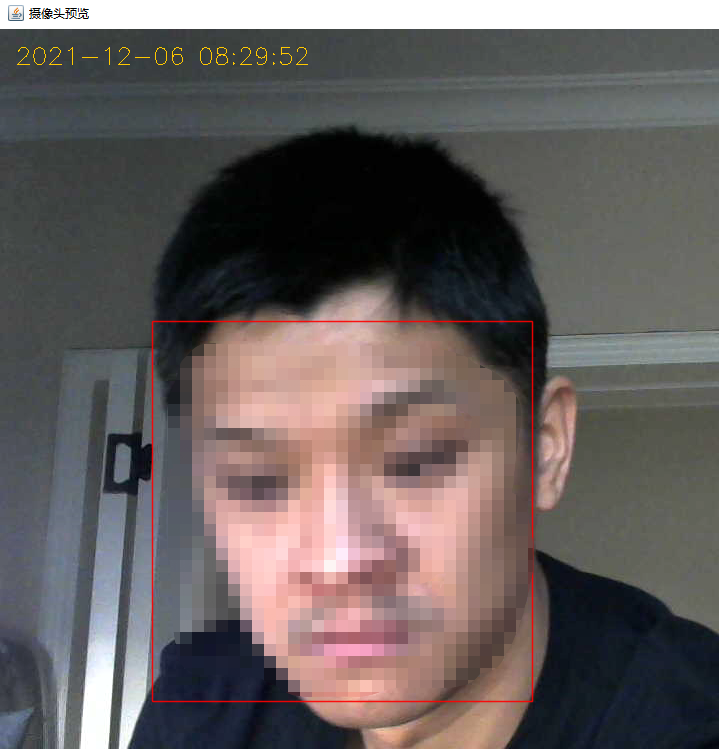
Since the preview window is opened, you can see the effect of camera shooting. The rectangle with red box will eventually be saved as A picture. Please pay attention to adjusting the angle and expression. Mass actor A seems to be keen on self shooting and has A good time. Well, let him fly himself:
-
After a certain number of pictures are detected, it can be completed. I have saved 259 here, as shown in the following figure:

-
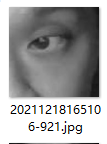
For the above photos, it is recommended to check all the photos with the naked eye and delete all the photos that are not human faces. I found more than ten photos that are not human faces. For example, the following one recognizes part of the face as human faces, which is obviously a problem. Delete such photos instead of training:
-
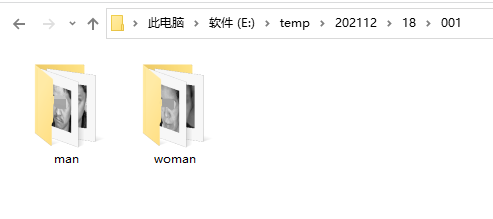
All the above photos are saved in E:\temp2112 E: \ temp \ 202112 \ 18 \ 001 \ man 1\man directory
Grab a picture of the second person
-
Modify the code, change the directory where the pictures are stored in the main method to E:\temp2112 e: \ temp \ 202112 \ 18 \ 001 \ woman,1\woman, then run the program again, invite mass actor B to appear, and beg her to face the camera alone like the previous mass actor, and start... Scratching her head. Use all kinds of light, all kinds of angles and all kinds of expressions
-
Therefore, we successfully got a large number of face pictures of the second mass actor. Remember to observe each photo with the naked eye and delete the inaccurate ones
-
So far, with the help of the program written above, we have easily obtained A large number of face photos of two mass actors, of which the photos of A are saved in E:\temp2112 E: \ temp \ 202112 \ 18 \ 001 \ man 1\man and the photos of B are saved in E:\temp2112 E: \ temp \ 202112 \ 18 \ 001 \ woman:1\woman:
-
So far, the task of this article has been completed. The next article will use these photos for training to prepare for the final recognition;