Mean shift is applied to object track. Its main ideas are as follows:
As shown in the figure below, applying mean shift algorithm to the point set can locate the most dense position of the point set, and the most dense position of the point set is the position of the object we need to track.
1) why is the most dense position of the point set the position of the object we need to track? In general, this is implemented using} histogram backprojection,
histogram backprojection converts the original image into a point set similar to the following figure, more accurately into a probability map of whether it is a tracked object or not.
2) in the following figure, the density of point set is used to simulate the probability map. The accurate way should use gray image to express the probability value of the object at each point.
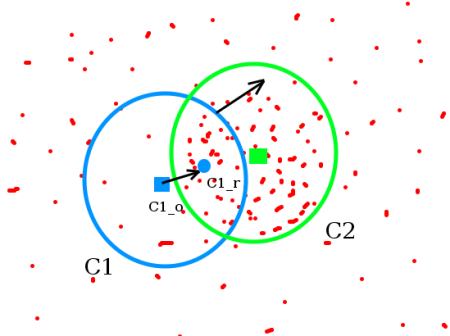
3) the mean shift algorithm first uses an initial point c1_o. Calculate the center of gravity C1 of the point set in the concentric circle where the point is located_ r. Obviously from c1_r and c1_o not at the same point,
Use c1_r is the latest center point, and repeat the above steps until cn_o and cn_ If the distance between R is enough, it is considered that the center point of the object is found.
With the general working principle of mean shift, you need to understand how to generate probability graphs. The generation of probability map is generally based on {histogram backprojection,
Use the function cv::calcBackProject(const) Mat * images,int nimages,const int * channels,InputArray hist,OutputArray backProject,const float ** ranges,double scale = 1,bool uniform = true )
The basic idea of generating histogram back projection is as follows:
1) calculate the image histogram.
2) traverse the original image, find the corresponding intensity value of each point on the histogram, and use the intensity value as the probability value of the point, that is, realize the back projection of the histogram.
So far, we have obtained histogram back projection, which is generally expressed visually by gray image. So what information does the back projection contain?
In an image, the gray (or color) value will be concentrated in a certain interval, that is, the probability of occurrence in a specific interval is large. The point with large value in the back projection image indicates that the gray (or color) occurrence frequency of the point is high.
We can only get the above information by implementing histogram back projection on a whole image. So how to use histogram direction projection to realize image segmentation and target tracking?
By introducing a manually marked region and applying histogram back projection on the original image and target region image, image segmentation and target tracking can be realized. The method is as follows:
1) manually select the local area of the object to be segmented or the local area of the object to be tracked. The local area is emphasized here because the accuracy of the algorithm will be affected when the selected area contains background information.
For segmentation applications with good consistency of foreground objects, perfect segmentation can be achieved by selecting a small local region. For object tracking applications, checking the tracked object as much as possible can improve the tracking stability.
2) for color images, the color space of the original image and the target image is converted to HSV space, which can avoid the influence of illumination change (the object has color invariance).
Because the gray image has no color information, it can only use the gray information for tracking and segmentation. Obviously, it will be affected by the change of illumination. A possible solution is to use histogram equalization to suppress the influence of illumination.
3) use cv::calcHist function to calculate the histogram of the target image. For color images, h and S channels can be selected to calculate the histogram, or H channel can be selected to calculate the histogram. I think selecting h and S channels to calculate the histogram can provide more accurate analysis results.
4) use the cv::normalize function to normalize the histogram so that the sum of histogram probability is 1.
4) the histogram back projection is realized by using the function cv::calcBackProject, where images is the original image and hist is the histogram of the target image.
The function maps the probability values of different points on the target image to the original image, that is, the probability that each point on the original image belongs to the target image is obtained.
5) for the application of image segmentation, a suitable threshold is used on the back projection of the original image to preliminarily segment the specific object, then some morphological algorithms are used to eliminate the noise area, and the contour extraction algorithm is used to segment the object.
6) for the object tracking application, use the CV:: meanshift (inputarray, probimage, rect & window, termcriteria) function to track the position of the target object on each frame of the image in the video,
Among them, probImage is the probability graph obtained by calcBackProject function, window is the initial search area of mean shift algorithm, and criteria is the iteration stop condition.
So far, we have understood all the processes of using meanshift to realize target tracking, and some test codes are given below:
 1 #include "opencv2/video/tracking.hpp"
 2 #include "opencv2/imgproc/imgproc.hpp"
 3 #include "opencv2/highgui/highgui.hpp"
 4
 5 using namespace cv;
 6 using namespace std;
 7
 8 int main(int argc, const char** argv)
 9 {
10     // Omit some codes
11     ......
12
13     Mat image;
14     int trackObject = 0; // Perform relevant operations when it is non-zero, mark the target when it is less than zero, and track the target when it is greater than zero
15     int vmin = 10, vmax = 256, smin = 30; // Brightness, saturation, interval correlation
16
17     namedWindow("meanShift_camShift", 0);
18
19     for (;;)
20     {
21         cap >> image;
22         if (image.empty())
23             break;
24
25         // use HSV Under space hue Component tracking
26         // One possible option is to use normalization RG Chromaticity diagram replacement HSV, RG The calculation amount of chromaticity diagram is less than HSV
27         cvtColor(image, hsv, COLOR_BGR2HSV);
28
29         if (trackObject)
30         {
31             int _vmin = vmin, _vmax = vmax;
32
33             // formation mask Images, scalar Defined HSV Component interval
34             inRange(hsv, Scalar(0, smin, MIN(_vmin, _vmax)),
35                 Scalar(180, 256, MAX(_vmin, _vmax)), mask);
36             int ch[] = { 0, 0 };
37             hue.create(hsv.size(), hsv.depth());
38             // extract hue weight
39             mixChannels(&hsv, 1, &hue, 1, ch, 1);
40
41             if (trackObject < 0)
42             {
43                 // Calculate target area hue Component histogram
44                 Mat roi(hue, selection), maskroi(mask, selection);
45                 calcHist(&roi, 1, 0, maskroi, hist, 1, &hsize, &phranges);
46                 normalize(hist, hist, 0, 255, CV_MINMAX);
47
48                 trackWindow = selection;
49                 trackObject = 1;
50             }
51
52             // Set target area hue The histogram direction is projected onto the original image to obtain the probability map of the target area on the original image
53             calcBackProject(&hue, 1, 0, hist, backproj, &phranges);
54             backproj &= mask;
55
56             // use meanshift perhaps camshift Tracking objects, camshift yes meanshift Improved version
57             meanShift(backproj, trackWindow,
58                 TermCriteria(CV_TERMCRIT_EPS | CV_TERMCRIT_ITER, 10, 1));
59             /*RotatedRect trackBox = CamShift(backproj, trackWindow,
60             TermCriteria(CV_TERMCRIT_EPS | CV_TERMCRIT_ITER, 10, 1));*/
61             if (trackWindow.area() <= 1)
62             {
63                 int cols = backproj.cols, rows = backproj.rows, r = (MIN(cols, rows) + 5) / 6;
64                 trackWindow = Rect(trackWindow.x - r, trackWindow.y - r,
65                     trackWindow.x + r, trackWindow.y + r) &
66                     Rect(0, 0, cols, rows);
67             }
68
69             rectangle(image, trackWindow, Scalar(0, 0, 255), 3, CV_AA);
70             //ellipse(image, trackBox, Scalar(0, 0, 255), 3, CV_AA);
71         }
72
73         imshow("meanShift_camShift", image);
74     }
75
76     return 0;
77 }
The above code is from the opencv sample code. I only intercepted some key codes. For the complete code, please refer to opencv \ samples \ CPP \ camshiftdemo cpp.
Mean shift tracking uses a fixed area to iterate the center of the tracked object. When the field of view size changes, mean shift tracks that the object size does not change. At the same time, it will also produce tracking error because the tracking size is inconsistent with the imaging size of the object. Therefore, camshift is introduced.
Continuously adaptive mean shift uses the zero order moment of the back projection map as the basis for field size evaluation, and uses the first-order moment and the second-order moment to obtain the position and orientation of the tracked object, so as to obtain a better tracking.
opencv provides the cv::Camshift function to achieve better object tracking. Unlike meanshift, its return value uses a rotation matrix to represent the position and shape of the tracked object.
References:
OpenCV: Meanshift and Camshift