Today, we will introduce a component of service invocation: OpenFeign, which is also a cruel role beyond its predecessors (Ribbon and Feign).
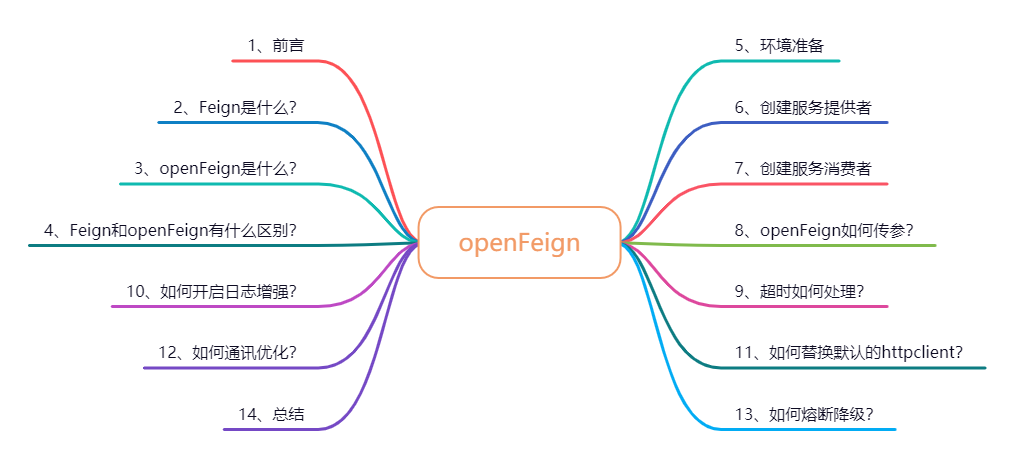
The article contents are as follows:
2. What is Feign?
Feign is also a tough role. Feign aims to make Java Http clients easier.
Feign integrates Ribbon and RestTemplate to realize load balancing and execute Http calls, but encapsulates the original method (Ribbon+RestTemplate). Instead of manually using RestTemplate to call services, developers define an interface and mark an annotation in this interface to complete service calls, which is more in line with the purpose of interface oriented programming, Simplified development.
Unfortunately, Feign has stopped iterating now. Of course, many enterprises are using Feign now.
Readers who want to learn Feign can go to the spring Cloud official website to learn. It will not be introduced in detail here. It is not the focus of today.
3. What is openFeign?
Feign, which stops iteration, was introduced earlier. To put it simply, OpenFeign is a spring cloud that supports spring MVC annotations based on feign, such as @ RequestMapping. OpenFeign's @ FeignClient can parse the interface under the @ RequestMapping annotation of spring MVC, generate implementation classes through dynamic proxy, implement load balancing in the classes and call other services.
Official website address: https://docs.spring.io/spring-cloud-openfeign/docs/2.2.10.BUILD-SNAPSHOT/reference/html
4. What's the difference between Feign and openFeign?
| Feign | openFiegn |
|---|---|
| Feign is a lightweight RESTful HTTP service client in the spring cloud component. Feign has a built-in Ribbon to do client load balancing and call the services of the service registry. Feign is used by using feign's annotation to define an interface. By calling this interface, you can call the service of the service registry | OpenFeign is a spring cloud that supports spring MVC annotations based on Feign, such as @ RequestMapping. OpenFeign's @ FeignClient can parse the interface under the @ RequestMapping annotation of spring MVC, generate implementation classes through dynamic proxy, implement load balancing in the classes and call other services. |
5. Environmental preparation
The Spring Cloud version, JDK environment and project environment in this article are the same as those in the previous Nacos article: Fifty five pictures tell you how strong is the soul ferry Nacos of micro service?.
Eureka is no longer used in the registration center. Nacos is directly used as the registration and configuration center. If not, you can view Nacos articles.
The project structure built in this article is shown in the figure below:
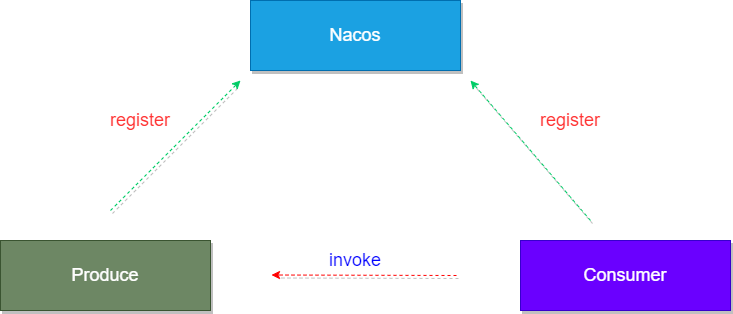
The registry uses Nacos to create micro services, namely, the service provider product and the service Consumer.
6. Create service provider
Since microservices call each other, there must be service providers. Create openFeign-provider9005 and register in Nacos. The configuration is as follows:
server:
  port: 9005
spring:
  application:
    ##  Specify the service name, the name in nacos
    name: openFeign-provider
  cloud:
    nacos:
      discovery:
        #  Service address of nacos, IP address in nacos server: port number
        server-addr: 127.0.0.1:8848
management:
  endpoints:
    web:
      exposure:
        ##  There are special characters in the yml file, which must be contained in single quotation marks, otherwise an error will be reported at startup
        include: '*'
Note: the name specified by spring.application.name here will be used in the openFeign interface call.
The project source code will be uploaded. There will be any dependent source code about how to register into Nacos. Combined with the previous Nacos article, it is not difficult!
7. Create a service consumer
Create a new module openfeign-consumer 9006 as a consumer service. The steps are as follows.
1. Add dependency
In addition to the Nacos registry dependency, openFeign dependency should be added as follows:
<dependency>
      <groupId>org.springframework.cloud</groupId>
      <artifactId>spring-cloud-starter-openfeign</artifactId>
</dependency>
2. Add annotation @ EnableFeignClients to enable openFeign function
The old routine. Add an annotation @ EnableFeignClients on the main boot class of Spring boot to enable the openFeign function, as follows:
@SpringBootApplication
@EnableDiscoveryClient
@EnableFeignClients
public class OpenFeignConsumer9006Application
{
    public static void main(String[] args) {
        SpringApplication.run(OpenFeignConsumer9006Application.class, args);
    }
}
3. New openFeign interface
Create an openFeign interface and annotate it with @ FeignClient annotation, as follows:
@FeignClient(value = "openFeign-provider")
public interface OpenFeignService {
}
Note: the value attribute in the @ FeignClient annotation specifies the service name of the service provider in the nacos registry.
4. Create a new Controller debug
Create a new controller to debug the interface, and directly call the openFeign interface, as follows:
@RestController
@RequestMapping("/openfeign")
public class OpenFeignController {

}
Well, so far, an openFeign microservice has been built. It does not realize specific functions. Let's do it a little bit.
8. How does openFeign pass parameters?
There are many ways of interface parameter transfer in development, but there are certain rules for parameter transfer in openFeign, which are described in detail below.
1. Passing JSON data
This is also a common parameter passing rule in interface development. The parameters are identified by @ RequestBody in Spring Boot.
The JSON parameter passing method in the provider interface is as follows:
@RestController
@RequestMapping("/openfeign/provider")
public class OpenFeignProviderController {
    @PostMapping("/order2")
    public Order createOrder2(@RequestBody Order order){
        return order;
    }
}
The parameter code in the openFeign interface of consumer is as follows:
@FeignClient(value = "openFeign-provider")
public interface OpenFeignService {
    /**
     * The parameter is marked with @ RequestBody by default. The @ RequestBody here can be left blank
     * Method name arbitrary
     */
    @PostMapping("/openfeign/provider/order2")
    Order createOrder2(@RequestBody Order order);
}
Note: the default parameter transfer method of openFeign is JSON parameter transfer (@ RequestBody), so the @ RequestBody annotation can not be used when defining the interface, but it is generally filled in for standardization.
2. POJO form transfer parameters
This parameter transfer method is also commonly used. Parameters are received using POJO objects.
Provider service provider code is as follows:
@RestController
@RequestMapping("/openfeign/provider")
public class OpenFeignProviderController {
    @PostMapping("/order1")
    public Order createOrder1(Order order){
        return order;
    }
}
The openFeign code of consumer is as follows:
@FeignClient(value = "openFeign-provider")
public interface OpenFeignService {
    /**
     * The parameter is marked with @ RequestBody by default. If the parameter is passed through the POJO form, it is marked with @ SpringQueryMap
     */
    @PostMapping("/openfeign/provider/order1")
    Order createOrder1(@SpringQueryMap Order order);
}
Many people on the Internet wonder how POJO forms can be transferred. The official document clearly gives the solution as follows:
openFeign provides an annotation @ SpringQueryMap, which perfectly solves the problem of POJO form parameter transfer.
3. Parameters carried in URL
This method is used for GET requests in restful mode, which is also a common request method.
Provider service provider code is as follows:
@RestController
@RequestMapping("/openfeign/provider")
public class OpenFeignProviderController {

    @GetMapping("/test/{id}")
    public String test(@PathVariable("id")Integer id){
        return "accept one msg id="+id;
}
The consumer openFeign interface is as follows:
@FeignClient(value = "openFeign-provider")
public interface OpenFeignService {

    @GetMapping("/openfeign/provider/test/{id}")
    String get(@PathVariable("id")Integer id);
}
It is easy to understand how to use the annotation @ PathVariable to receive placeholders in URLs.
4. Common form parameters
This method is not recommended, but many developers are using it.
Provider service provider code is as follows:
@RestController
@RequestMapping("/openfeign/provider")
public class OpenFeignProviderController {
    @PostMapping("/test2")
    public String test2(String id,String name){
        return MessageFormat.format("accept on msg id={0},name={1}",id,name);
    }
}
The openFeign interface parameters of consumer consumers are as follows:
@FeignClient(value = "openFeign-provider")
public interface OpenFeignService {
    /**
     * The @ RequestParam annotation must be marked, and the value attribute must be filled with the parameter name
     * The method parameter name can be arbitrary, but the value attribute in the @ RequestParam annotation must be the same as the parameter name in the provider
     */
    @PostMapping("/openfeign/provider/test2")
    String test(@RequestParam("id") String arg1,@RequestParam("name") String arg2);
}
5. Summary
There are many ways to transfer parameters, such as file transfer... Here are just four common ways to transfer parameters.
9. How to handle timeout?
To understand timeout processing, let's take a look at an example: I sleep the provider service interface for 3 seconds. The interface is as follows:
@PostMapping("/test2")
public String test2(String id,String name) throws InterruptedException {
        Thread.sleep(3000);
        return MessageFormat.format("accept on msg id={0},name={1}",id,name);
}
At this time, we call the openFeign interface of consumer, and the returned results are as follows:
It is obvious that the program is abnormal and the interface call timeout is returned. what? why?...........
openFeign actually has a default timeout. The default timeout is 10 seconds for connection and 60 seconds for reading. The source code is in feign.Request.Options#Options(), as shown in the following figure:
Then the question comes: why do I report timeout when I only sleep for 3 seconds?
In fact, openFeign integrates Ribbon. The default connection timeout and read timeout of Ribbon are 1 second. The source code is in the org.springframework.cloud.openfeign.ribbon.FeignLoadBalancer#execute() method, as shown in the following figure:
If openFeign does not set the corresponding timeout, the default timeout of Ribbon will be used.
After understanding the principle of timeout setting, it is clear that two schemes are generated, as follows:
-
Set the timeout for openFeign
-
Set the timeout for the Ribbon
1. Set the timeout of the Ribbon (not recommended)
The settings are simple. Add the following settings to the configuration file:
ribbon:
  #  Value is the time taken to establish the link, which is applicable when the network condition is normal,   Time spent linking at both ends
  ReadTimeout: 5000
  #  It refers to the time taken to read available resources from the server after the link is established
  ConectTimeout: 5000
2. Set the timeout of openFeign (recommended)
openFeign is very simple to set the timeout. You only need to configure it in the configuration file, as follows:
feign:
  client:
    config:
      ##  default   Set the global timeout. Specify the service name. You can set the timeout of a single service
      default:
        connectTimeout: 5000
        readTimeout: 5000
default sets the global timeout, which is effective for all openFeign interface services
However, normal business logic may involve calls to multiple openFeign interfaces, as shown in the following figure:
The pseudo code in the figure above is as follows:
public T invoke(){
    //one   Call serviceA
    serviceA();

    //two   Call serviceA
    serviceB();

    //three   Call serviceA
    serviceC();
}
Can the global timeout configured above pass? Obviously, serviceA and serviceB can be called successfully, but serviceC cannot be executed successfully. It must report timeout.
At this time, we can configure a separate timeout for serviceC as follows:
feign:
  client:
    config:
      ##  default   Set the global timeout. Specify the service name. You can set the timeout of a single service
      default:
        connectTimeout: 5000
        readTimeout: 5000
      ##  Configure the timeout for serviceC service separately
      serviceC:
        connectTimeout: 30000
        readTimeout: 30000
Note: the timeout for a single configuration will override the global configuration.
10. How to enable log enhancement?
Although openFeign provides log enhancement, it does not display any logs by default, but developers can configure the log level themselves in the debugging phase.
The log level of openFeign is as follows:
-
NONE: default, no logs are displayed;
-
BASIC: only record the request method, URL, response status code and execution time;
-
HEADERS: in addition to the information defined in BASIC, there are also header information of request and response;
-
FULL: in addition to the information defined in HEADERS, there are also the body and metadata of the request and response.
The configuration is also very simple. The steps are as follows:
1. Configure the log level in the configuration class
You need to customize a configuration class to set the log level as follows:
Note: the logger here is in feign package.
2. Set the interface log level in the yaml file
You only need to adjust the interface log level of the specified package or openFeign in the configuration file as follows:
logging:
  level:
    cn.myjszl.service: debug
cn.myjszl.service here is the package name of the openFeign interface. Of course, you can also configure a specific openFeign interface.
3. Demonstration effect
In the above steps, the log is set to FULL. At this time, a request is issued. The log effect is as follows:
The log details the contents of the request header and request body.
11. How do I replace the default httpclient?
Feign uses the JDK native URLConnection to send HTTP requests by default. There is no connection pool, but a long connection will be maintained for each address, that is, using the HTTP persistence connection.
In the production environment, the default http client is usually not used. There are usually two options:
-
Using Apache httpclient
-
Using OkHttp
As for which is better, in fact, each has its own advantages. I prefer Apache httpclient. After all, the old brand has no problem with stability.
So how to replace it? In fact, it is very simple. The following demonstration uses Apache httpclient instead.
1. Add ApacheHttpClient dependency
Add the following dependencies in the pom file of openFeign interface service:
<!--     use Apache HttpClient replace Feign Primordial httpclient-->
    <dependency>
      <groupId>org.apache.httpcomponents</groupId>
      <artifactId>httpclient</artifactId>
    </dependency>

    <dependency>
      <groupId>io.github.openfeign</groupId>
      <artifactId>feign-httpclient</artifactId>
    </dependency>
Why add the above dependencies? It is not difficult to see from the source code. Please see the class org.springframework.cloud.openfeign.FeignAutoConfiguration.HttpClientFeignConfiguration. The code is as follows:
For the generation conditions in the above red box, @ ConditionalOnClass(ApacheHttpClient.class) must have ApacheHttpClient to take effect, and feign.httpclient.enabled must be set to true.
2. Open in configuration file
To enable configuration in the configuration file, the code is as follows:
feign:
  client:
    httpclient:
      #  open   Http   Client
      enabled: true
3. How to verify that the replacement is successful?
In fact, it is very simple. In feign. Synchronousmethodhandler#executeanddecade() method, you can clearly see which client to call, as shown in the following figure:
As you can see in the figure above, the Apache httpclient is finally invoked.
4. Summary
The above steps only demonstrate one alternative scheme, and the remaining one will not be demonstrated. The principle is the same.
12. How to optimize communication?
Before talking about how to optimize, let's take a look at the GZIP compression algorithm. The concept is as follows:
gzip is a data format, which uses deflate algorithm to compress data; gzip is a popular data compression algorithm, which is widely used, especially on Linux platform.
When GZIP is compressed to a plain text data, the effect is very obvious, and the data size can be reduced by more than 70%.
The compressed network data actually reduces the number of bytes transmitted on the network. The most obvious advantage is that it can speed up the loading of web pages. The benefits of faster web page loading are self-evident. In addition to saving traffic and improving users' browsing experience, another potential benefit is that GZIP has a better relationship with search engine crawling tools. For example, Google can retrieve web pages faster than ordinary manual crawling by directly reading GZIP files.
The principle of GZIP compression transmission is shown in the figure below:
According to the above figure, the disassembly steps are as follows:
-
The client requests the server with the fields: accept encoding: gzip, deflate in the header, indicating to the server the compression format (gzip or deflate) supported by the client. If the header is not sent, the server will not compress.
-
After receiving the request, if the server finds that the request header contains the accept encoding field and supports this type of compression, it will compress the response message and return it to the client, and carry the content encoding: gzip message header, indicating that the response message has been compressed according to this format.
-
After receiving the response, the client first determines whether there is a content encoding header. If so, decompress the message in this format. Otherwise, it shall be handled as normal message.
openFeign supports request / response to enable GZIP compression. The overall process is as follows:
In the above figure, only two pieces of GZIP transmission are involved, namely application client - > application service and application service - > application client.
Note: the GZIP supported by openFeign is only the request and response of the openFeign interface, that is, the openFeign consumer invokes the service provider's interface.
openFeign is also very simple to open GZIP. You only need to open the following configuration in the configuration file:
feign:
  ##  Turn on compression
  compression:
    request:
      enabled: true
      ##  Turn on the compression threshold, in bytes. The default is 2048, that is, 2k. Here, it is set to 10 bytes for demonstration effect
      min-request-size: 10
      mime-types: text/xml,application/xml,application/json
    response:
      enabled: true
After the above configuration is completed, send a request, and you can clearly see that GZIP compression has been carried in the request header, as shown in the following figure:
13. How to downgrade?
The common frameworks include Hystrix and Sentinel. By default, openFeign supports Hystrix, which is reflected in the official documents. After all, it is a milk compatriots, ha ha
However, Alibaba Sentinel completely kills Hystrix in terms of functional features, simplicity and ease of use. Therefore, this chapter uses openFeign+Sentinel for integration to realize service degradation.
Note: Sentinel will not be introduced here, but will be introduced in detail in the next article.
1. Add Sentinel dependency
Add sentinel dependency in the pom file of openFeign-consumer9006 consumer (because the aggregation module is used, the version number is not specified), as follows:
<dependency>
      <groupId>com.alibaba.cloud</groupId>
      <artifactId>spring-cloud-starter-alibaba-sentinel</artifactId>
</dependency>
2. Enable sentinel in configuration file
To use the downgrade function of sentinel in openFeign, you need to open it in the configuration file and add the following configuration:
feign:
  sentinel:
    enabled: true
3. Add demotion callback class
This class must implement the same class as the openFeign interface, as shown in the following figure:
OpenFeignFallbackService is a degraded callback class. Once an exception occurs in the corresponding interface in OpenFeignService, the corresponding method in this class will be called for degradation processing.
4. Add fallback attribute
Add the fallback attribute in @ FeignClient. The attribute value is the class of degraded callback, as follows:
@FeignClient(value = "openFeign-provider",fallback = OpenFeignFallbackService.class)
public interface OpenFeignService {}
5. Demonstration
After the above four steps, the fuse degradation of openFeign has been set. At this time, the effect is demonstrated.
Via postman call http://localhost:9006/openfeign/order3 The normal logic return of this interface is shown in the figure below:
Now create an exception manually and throw an exception in the interface provided by the service, as shown in the following figure:

Call again at this time http://localhost:9006/openfeign/order3 , return as shown in the figure below:
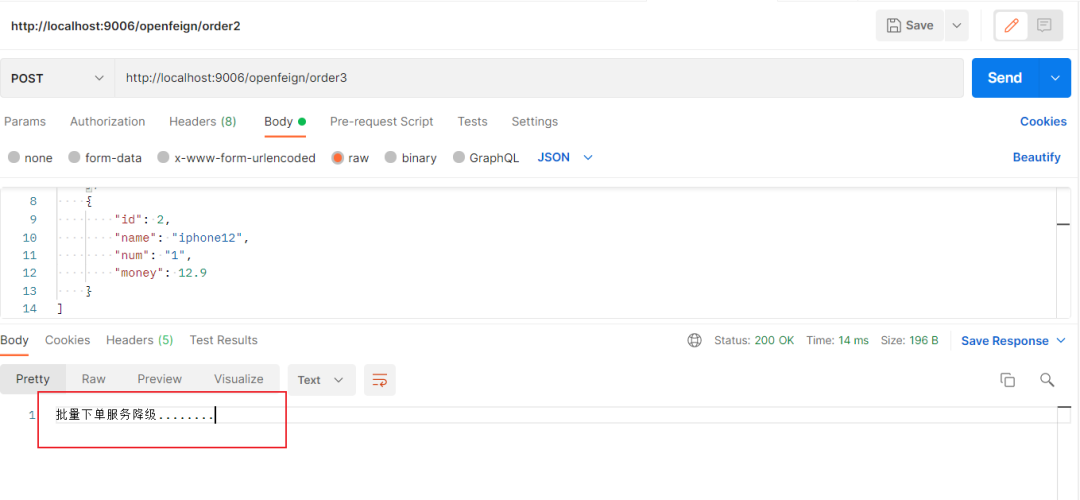
Oh, you can clearly see that the service has been successfully downgraded and called. Oh, the function is completed.
Note: in the actual development, the returned results should be customized according to the architecture. This is just for the convenience of demonstration, not for reference. Ha ha.