brief introduction
This instruction is applicable to openGauss database. Through this instruction, you can understand the two backup and recovery types and various backup and recovery schemes supported by openGauss database, and provide data reliability guarantee mechanism in the process of backup and recovery.
Content description
Data backup is one of the important means to protect data security. In order to better protect data security, openGauss database supports two backup and recovery types and a variety of backup and recovery schemes, and provides data reliability guarantee mechanism in the process of backup and recovery.
Backup and recovery types can be divided into logical backup and recovery, physical backup and recovery.
Preconditions
- Because this experiment is mainly to backup and restore the database on the openEuler operating system, we need to master the basic operation and system commands of Linux system.
- The experimental premise and database recovery verification need to master the basic operation and SQL syntax of openGauss database. openGauss database supports SQL2003 standard syntax.
Description of experimental environment
- Networking description
The experimental environment is openGauss database management system, which is installed on Huawei cloud openEuler elastic server ECS. - Equipment introduction
In order to meet the experimental needs of database principle and practice course, it is recommended that each set of experimental environment adopt the following configuration:
The correspondence between equipment name, model and version is as follows:
| Equipment name | Equipment model | Software version |
|---|---|---|
| database | openGauss | openGauss 1.0.0 |
| operating system | openEuler | openEuler 20.3LTS |
Experimental overview
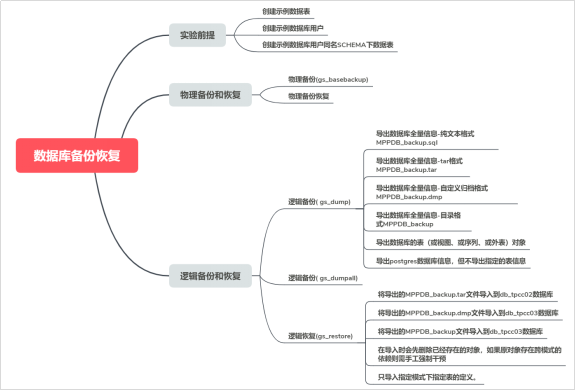
Database backup and recovery
Experimental introduction
About this experiment
This experiment mainly describes two backup and recovery types and various backup and recovery schemes supported by openGauss database, and can provide data reliability guarantee mechanism in the process of backup and recovery.
Experimental purpose
- Master the logical backup and recovery methods in openGauss database;
- Master the methods of physical backup and recovery of openGauss database;
- It can provide data reliability guarantee mechanism in the process of backup and recovery.
Experimental premise
Before backing up the database, perform the following operations on the database:
Step 1 switch to the omm user and log in to the database master node with the operating system user omm.
su – omm
Step 2 start the database service
gs_om -t start
Step 3 connect to openGauss database.
gsql -d postgres -p 26000 -r
Step 4 create customer_t1 table.
postgres=#DROP TABLE IF EXISTS customer_t1;

postgres=#CREATE TABLE customer_t1
(
    c_customer_sk             integer,
    c_customer_id             char(5),
    c_first_name              char(6),
    c_last_name               char(8)
);
When the result is displayed as the following information, it indicates that the creation is successful.
CREATE TABLE
Step 5 insert data into the table.
postgres=# INSERT INTO customer_t1 (c_customer_sk, c_customer_id, c_first_name) VALUES
(3769, 'hello', DEFAULT) ,
(6885, 'maps', 'Joes'),
(4321, 'tpcds', 'Lily'),
(9527, 'world', 'James');
The display result is:
INSERT 0 4
Step 6 view the data in the table.
postgres=# select * from customer_t1;

 c_customer_sk | c_customer_id | c_first_name | c_last_name
---------------+---------------+--------------+-------------
          6885 | maps          | Joes         |
          4321 | tpcds         | Lily         |
          9527 | world         | James        |
          3769 | hello         |              |
(4 rows)
Step 7 create customer_t2 table
postgres=#DROP TABLE IF EXISTS customer_t2;

postgres=#CREATE TABLE customer_t2
(
    c_customer_sk             integer,
    c_customer_id             char(5),
    c_first_name              char(6),
    c_last_name               char(8)
);
When the result is displayed as the following information, it indicates that the creation is successful.
CREATE TABLE
Step 8 insert data into the table
postgres=# INSERT INTO customer_t2 (c_customer_sk, c_customer_id, c_first_name) VALUES
(3769, 'hello', DEFAULT) ,
(6885, 'maps', 'Joes'),
(9527, 'world', 'James');
The display result is:
INSERT 0 3
Step 9 view the data in the table.
select * from customer_t2;

 c_customer_sk | c_customer_id | c_first_name | c_last_name
---------------+---------------+--------------+-------------
          3769 | hello         |              |
          6885 | maps          | Joes         |
          9527 | world         | James        |
(3 rows)
Step 10 create user lucy.
postgres=# DROP user IF EXISTS lucy;
postgres=# CREATE USER lucy WITH PASSWORD "Bigdata@123";
Step 11 switch to Lucy user.
postgres=# \c - lucy

Password for user lucy:
Non-SSL connection (SSL connection is recommended when requiring high-security)
You are now connected to database "postgres" as user "lucy".
Step 12 create the table of lucy shema.
postgres=# DROP TABLE IF EXISTS lucy.mytable;

postgres=# CREATE TABLE mytable (firstcol int);
Step 13 insert data into the table.
postgres=# INSERT INTO mytable values (100);
When the result displays the following information, it indicates that the data insertion is successful.
INSERT 0 1
Step 14 view the data in the table.
postgres=# SELECT * from mytable;
The display result is:
 firstcol
----------
      100
(1 row)
Step 15 exit the database:
postgres=#\q
Physical backup and recovery
After openGauss is successfully deployed, various problems and abnormal states will be encountered during the operation of the database. openGauss provides GS_ Base backup tool for basic backup. gs_ The basebackup tool is executed by the operating system user omm.
Experimental premise
Create a folder to store backup files before backing up the database.
Step 1 switch to the omm user and log in to the database master node with the operating system user omm.
su - omm
Step 2 create a folder to store backup files.
mkdir -p /home/omm/physical/backup
Physical backup
Step 1 if the database service is not started, start the database service (be sure to start the database service with the operating system user omm. If not, switch the user).
gs_om -t start
The results are displayed as:
Starting cluster.
=========================================
=========================================
Successfully started.
Step 2 make a physical backup of the database.
gs_basebackup -D /home/omm/physical/backup -p 26000
Parameter - D directory indicates the directory of backup file output. Required.
The results are displayed as:
INFO:  The starting position of the xlog copy of the full build is: 1/D5000028. The slot minimum LSN is: 0/0.
begin build tablespace list
finish build tablespace list
begin get xlog by xlogstream
 check identify system success
 send START_REPLICATION 1/D5000000 success
 keepalive message is received
 keepalive message is received
 keepalive message is received
 keepalive message is received
 keepalive message is received
 keepalive message is received
 keepalive message is received
 keepalive message is received
Step 3 switch to the storage backup folder to view the backup files.
cd /home/omm/physical/backup
ls
The display is as follows:
backup_label        mot.conf     pg_errorinfo      pg_llog       pg_snapshots  pg_xlog               server.key
base                pg_clog      pg_hba.conf       pg_multixact  pg_stat_tmp   postgresql.conf       server.key.cipher
cacert.pem          pg_copydir   pg_hba.conf.bak   pg_notify     pg_tblspc     postgresql.conf.bak   server.key.rand
global              pg_csnlog    pg_hba.conf.lock  pg_replslot   pg_twophase   postgresql.conf.lock
gswlm_userinfo.cfg  pg_ctl.lock  pg_ident.conf     pg_serial     PG_VERSION    server.crt
Physical backup and recovery
When the database fails, it needs to be restored from the backup file. Because gs_basebackup is to back up the database in binary, so you can directly copy and replace the original files during recovery, or directly start the database on the backed up library.
explain:
- If the current database instance is running, there may be port conflicts when starting the database directly from the backup file. In this case, you need to modify the port parameter of the configuration file or specify a port when starting the database.
- If the current backup file is the primary and standby database, you may need to modify the replication connection between the primary and standby databases. Postgres. In the configuration file replconninfo1 and replconninfo2 in conf.
When the database has problems and needs to be restored from backup, the steps are as follows:
Step 1 stop opengauss ((be sure to stop the database service with the operating system user omm. If not, please switch users).
gs_om -t stop
The results displayed are:
Stopping cluster.
=========================================
Successfully stopped cluster.
=========================================
End stop cluster.
Step 2 clean up all or part of the files in the original library.
cd /gaussdb/data/
ls
View the folder name of the database node (the folder name is defined during database installation, and different data may be different).
db1
The list of files to view is as follows:
cd db1
ls

base                mot.conf     pg_errorinfo      pg_llog       pg_serial     PG_VERSION            postmaster.opts
cacert.pem          pg_clog      pg_hba.conf       pg_location   pg_snapshots  pg_xlog               server.crt
gaussdb.state       pg_copydir   pg_hba.conf.bak   pg_multixact  pg_stat_tmp   postgresql.conf       server.key
global              pg_csnlog    pg_hba.conf.lock  pg_notify     pg_tblspc     postgresql.conf.bak   server.key.cipher
gswlm_userinfo.cfg  pg_ctl.lock  pg_ident.conf     pg_replslot   pg_twophase   postgresql.conf.lock  server.key.rand
Delete files and destroy database files.
rm -rf *
ls
After deleting the file, the list is as follows:
base    pg_clog     pg_csnlog     pg_llog      pg_multixact  pg_replslot  pg_snapshots  pg_tblspc    pg_xlog
global  pg_copydir  pg_errorinfo  pg_location  pg_notify     pg_serial    pg_stat_tmp   pg_twophase
Or empty:
[omm@ecs-ecs-c9bf db1]$
Step 3 use the database system user permissions to restore the required database files from the backup. Db1 in "/ gaussdb/data/db1" is the name of the database node folder. Different databases may be different. Please check and confirm.
cp -r /home/omm/physical/backup/. /gaussdb/data/db1
The backup takes about a few minutes. The list of files after recovery is as follows:
cd /gaussdb/data/db1
ls

backup_label.old    mot.conf      pg_hba.conf       pg_multixact  pg_tblspc            postgresql.conf.lock  server.key.rand
base                pg_clog       pg_hba.conf.bak   pg_notify     pg_twophase          postmaster.opts
cacert.pem          pg_copydir    pg_hba.conf.lock  pg_replslot   PG_VERSION           postmaster.pid
gaussdb.state       pg_csnlog     pg_ident.conf     pg_serial     pg_xlog              server.crt
global              pg_ctl.lock   pg_llog           pg_snapshots  postgresql.conf      server.key
gswlm_userinfo.cfg  pg_errorinfo  pg_location       pg_stat_tmp   postgresql.conf.bak  server.key.cipher
If there is a linked file in the database, you need to modify it to link to the correct file.
Step 4 restart the database server and check the contents of the database to ensure that the database has been restored to the required state.
gs_om -t start

Starting cluster.
=========================================
=========================================
Successfully started.
Logical backup and recovery
The data is backed up through logical export. Logical backup can only dump the data based on the backup time, so it can only recover the data saved during backup. For the data between the failure point and the backup point, logical backup is powerless. Logical backup is suitable for backing up the data with little change. When these data are damaged due to misoperation, it can be quickly recovered through logical backup. If the whole database is restored through logical backup, it usually needs to rebuild the database and import backup data. For databases with high availability requirements, this recovery time is too long and is usually not adopted. Because logical backup is platform independent, it is more common that logical backup is used as a main means of data migration and movement.
Experimental premise
Create a folder to store backup files before backing up the database.
Step 1 switch to the omm user and log in to the database master node with the operating system user omm.
su - omm
Step 2 create a folder to store backup files.
mkdir -p /home/omm/logical/backup
gs_dump
matters needing attention
- If openGauss has any local data to add to the template1 database, set GS_ The output of dump is restored to a real empty database, otherwise an error may occur because the definition of the added object is copied. To create an empty database without local addition, you need to copy from template0 instead of template1, for example:
CREATE DATABASE foo WITH TEMPLATE template0;
- The file size of tar archive format shall not exceed 8GB (the inherent limitation of tar file format). There is no limit to the overall size of the tar document and any other output format, which may be required by the operating system.
- By GS_ The dump file generated by dump does not contain the statistics used by the optimizer to make execution plan decisions. Therefore, it is best to run ANALYZE after recovering from a dump file to ensure the best effect. The dump file does not contain any ALTER DATABASE... SET commands, which are SET by gs_dumpall dump, as well as database users and other installation settings.
- Use gs_dump dumps the database to SQL text files or other formats: in the example“ Bigdata@123 ”Indicates the database user password. "/ home/omm/logical/backup/MPPDB_backup.sql" indicates the exported file; "26000" indicates the database server port; "postgres" indicates the name of the database to be accessed.
Note: when exporting, please ensure that the directory exists and that the current operating system user has read and write permissions.
gs_dump backup example 1
Execute gs_dump, export the full information of postgres database, and export the mppdb_ backup. The SQL file format is plain text.
Step 1 log in to the database master node as the operating system user omm.
su - omm
Step 2 execute gs_dump, exported mppdb_ backup. The SQL file format is plain text.
gs_dump -U omm -W Bigdata@123 -f /home/omm/logical/backup/MPPDB_backup.sql -p 26000 postgres -F p
After execution, it is displayed as:
gs_dump[port='26000'][postgres][2020-07-29 14:00:49]: The total objects number is 348.
gs_dump[port='26000'][postgres][2020-07-29 14:00:49]: [100.00%] 348 objects have been dumped.
gs_dump[port='26000'][postgres][2020-07-29 14:00:49]: dump database postgres successfully
gs_dump[port='26000'][postgres][2020-07-29 14:00:49]: total time: 176  ms
Step 3 switch to the backup folder and view the MPPDB_backup.sql file.
ll /home/omm/logical/backup/
total 4.0K
-rw------- 1 omm dbgrp 2.7K Jul 29 14:00 MPPDB_backup.sql

cat /home/omm/logical/backup/MPPDB_backup.sql
--
-- PostgreSQL database dump
--
SET statement_timeout = 0;
SET xmloption = content;
SET client_encoding = 'SQL_ASCII';
SET standard_conforming_strings = on;
SET check_function_bodies = false;
SET client_min_messages = warning;
--
-- Name: postgres; Type: COMMENT; Schema: -; Owner: omm
--
COMMENT ON DATABASE postgres IS 'default administrative connection database';
--
-- Name: lucy; Type: SCHEMA; Schema: -; Owner: lucy
--
CREATE SCHEMA lucy;
ALTER SCHEMA lucy OWNER TO lucy;
SET search_path = lucy;
SET default_tablespace = '';
SET default_with_oids = false;
--
-- Name: mytable; Type: TABLE; Schema: lucy; Owner: lucy; Tablespace:
--
CREATE TABLE mytable (
    firstcol integer
)
WITH (orientation=row, compression=no);
ALTER TABLE lucy.mytable OWNER TO lucy;
SET search_path = public;
--
-- Name: customer_t1; Type: TABLE; Schema: public; Owner: omm; Tablespace:
--
CREATE TABLE customer_t1 (
    a integer,
    b integer,
    c integer,
    d integer
)
WITH (orientation=row, compression=no);
ALTER TABLE public.customer_t1 OWNER TO omm;
......
REVOKE ALL ON SCHEMA public FROM PUBLIC;
REVOKE ALL ON SCHEMA public FROM omm;
GRANT ALL ON SCHEMA public TO omm;
GRANT USAGE ON SCHEMA public TO PUBLIC;
--
-- PostgreSQL database dump complete
--
gs_dump backup example 2
Execute gs_dump, export the full information of postgres database, and export the MPPDB_backup.tar file format is tar.
Step 1 log in to the database master node as the operating system user omm.
su - omm
Step 2 execute gs_dump, exported mppdb_ backup. The tar file format is tar format.
gs_dump -U omm -W Bigdata@123 -f /home/omm/logical/backup/MPPDB_backup.tar -p 26000 postgres -F t
The results after operation are:
gs_dump[port='26000'][postgres][2020-07-28 16:19:14]: The total objects number is 341.
gs_dump[port='26000'][postgres][2020-07-28 16:19:14]: [100.00%] 341 objects have been dumped.
gs_dump[port='26000'][postgres][2020-07-28 16:19:14]: dump database postgres successfully
gs_dump[port='26000'][postgres][2020-07-28 16:19:14]: total time: 169  ms
Step 3: view the generated file information.
ll /home/omm/logical/backup/

total 12K
-rw------- 1 omm dbgrp 1.5K Jul 28 13:47 MPPDB_backup.sql
-rw------- 1 omm dbgrp 8.0K Jul 28 19:31 MPPDB_backup.tar
gs_dump backup example 3
Execute gs_dump, export the full information of postgres database, and export the mppdb_ backup. The DMP file format is a custom archive format.
Step 1 log in to the database master node as the operating system user omm.
su - omm
Step 2 execute gs_dump, exported mppdb_ backup. The DMP file format is a custom archive format.
gs_dump -U omm -W Bigdata@123 -f /home/omm/logical/backup/MPPDB_backup.dmp -p 26000 postgres -F c
The results after operation are:
gs_dump[port='26000'][postgres][2020-07-28 19:32:20]: The total objects number is 341.
gs_dump[port='26000'][postgres][2020-07-28 19:32:20]: [100.00%] 341 objects have been dumped.
gs_dump[port='26000'][postgres][2020-07-28 19:32:20]: dump database postgres successfully
gs_dump[port='26000'][postgres][2020-07-28 19:32:20]: total time: 167  ms
Step 3: view the generated file information.
ll /home/omm/logical/backup/

total 16K
-rw------- 1 omm dbgrp 2.5K Jul 28 19:32 MPPDB_backup.dmp
-rw------- 1 omm dbgrp 1.5K Jul 28 13:47 MPPDB_backup.sql
-rw------- 1 omm dbgrp 8.0K Jul 28 19:31 MPPDB_backup.tar
gs_dump backup example 4
Execute gs_dump, export the full information of postgres database, and export the mppdb_ The backup file format is directory format.
Step 1 log in to the database master node as the operating system user omm.
su - omm
Step 2 execute gs_dump, exported mppdb_ The backup file format is directory format.
gs_dump -U omm -W Bigdata@123 -f /home/omm/logical/backup/MPPDB_backup -p 26000 postgres -F d
The results after operation are:
gs_dump[port='26000'][postgres][2020-07-28 19:35:59]: The total objects number is 341.
gs_dump[port='26000'][postgres][2020-07-28 19:35:59]: [100.00%] 341 objects have been dumped.
gs_dump[port='26000'][postgres][2020-07-28 19:35:59]: dump database postgres successfully
gs_dump[port='26000'][postgres][2020-07-28 19:35:59]: total time: 173  ms
Step 3: view the generated file information.
ll /home/omm/logical/backup/

total 20K
drwx------ 2 omm dbgrp 4.0K Jul 28 19:35 MPPDB_backup
-rw------- 1 omm dbgrp 2.5K Jul 28 19:32 MPPDB_backup.dmp
-rw------- 1 omm dbgrp 1.5K Jul 28 13:47 MPPDB_backup.sql
-rw------- 1 omm dbgrp 8.0K Jul 28 19:31 MPPDB_backup.tar
gs_dump backup example 5
Execute gs_dump, export the table (or view, or sequence, or appearance) objects of the postgres database, such as table customer_t1.
Step 1 log in to the database master node as the operating system user omm.
su - omm
Step 2 execute gs_dump, exported table customer_t1.
gs_dump -U omm -W Bigdata@123 -f /home/omm/logical/backup/bkp_shl2.sql -t public.customer_t1 -p 26000 postgres
The results after operation are:
gs_dump[port='26000'][postgres][2020-08-15 19:54:12]: The total objects number is 336.
gs_dump[port='26000'][postgres][2020-08-15 19:54:12]: [100.00%] 336 objects have been dumped.
gs_dump[port='26000'][postgres][2020-08-15 19:54:12]: dump database postgres successfully
gs_dump[port='26000'][postgres][2020-08-15 19:54:12]: total time: 157  ms
Step 3: view the generated file information.
ll /home/omm/logical/backup/

total 480K
-rw------- 1 omm dbgrp  939 Aug 15 19:54 bkp_shl2.sql
drwx------ 2 omm dbgrp 4.0K Aug 15 19:39 MPPDB_backup
-rw------- 1 omm dbgrp 112K Aug 15 19:38 MPPDB_backup.dmp
-rw------- 1 omm dbgrp 110K Aug 15 19:33 MPPDB_backup.sql
-rw------- 1 omm dbgrp 248K Aug 15 19:36 MPPDB_backup.tar
Step 4: view the generated sql file.
cat /home/omm/logical/backup/bkp_shl2.sql

--
-- PostgreSQL database dump
--

SET statement_timeout = 0;
SET xmloption = content;
SET client_encoding = 'SQL_ASCII';
SET standard_conforming_strings = on;
SET check_function_bodies = false;
SET client_min_messages = warning;

SET search_path = public;

SET default_tablespace = '';

SET default_with_oids = false;

--
-- Name: customer_t1; Type: TABLE; Schema: public; Owner: omm; Tablespace:
--

CREATE TABLE customer_t1 (
    c_customer_sk integer,
    c_customer_id character(5),
    c_first_name character(6),
    c_last_name character(8)
)
WITH (orientation=row, compression=no);


ALTER TABLE public.customer_t1 OWNER TO omm;

--
-- Data for Name: customer_t1; Type: TABLE DATA; Schema: public; Owner: omm
--

COPY customer_t1 (c_customer_sk, c_customer_id, c_first_name, c_last_name) FROM stdin;
3769	hello	\N	\N
6885	maps 	Joes  	\N
4321	tpcds	Lily  	\N
9527	world	James 	\N
\.
;

--
-- PostgreSQL database dump complete
--
gs_dump backup example 6
Execute gs_dump, export the postgres database information, but not / home / mppdb_ temp. Table information specified in SQL. Exported mppdb_ backup. The SQL file format is plain text.
Step 1 log in to the database master node as the operating system user omm.
su - omm
Step 2 create MPPDB_temp.sql, fill in the table name of the table that will not be exported. For example, customer_t1 table.
vi /home/omm/logical/MPPDB_temp.sql
Enter "i", switch to INSERT mode, and enter "public customer_ T1 ", press" ESC ", enter" wq "and exit after saving.
Step 3 execute gs_dump, export postgres database information, but not mppdb_ temp. Table information specified in SQL.
gs_dump -U omm -W Bigdata@123 -p 26000 postgres --exclude-table-file=/home/omm/logical/MPPDB_temp.sql -f /home/omm/logical/backup/MPPDB_backup2.sql
The results after operation are:
gs_dump[port='26000'][postgres][2020-08-15 20:15:24]: The total objects number is 403.
gs_dump[port='26000'][postgres][2020-08-15 20:15:24]: [100.00%] 403 objects have been dumped.
gs_dump[port='26000'][postgres][2020-08-15 20:15:24]: dump database postgres successfully
gs_dump[port='26000'][postgres][2020-08-15 20:15:24]: total time: 238  ms
Step 4: view the generated file information.
ll /home/omm/logical/backup/

total 592K
-rw------- 1 omm dbgrp  939 Aug 15 19:54 bkp_shl2.sql
drwx------ 2 omm dbgrp 4.0K Aug 15 19:39 MPPDB_backup
-rw------- 1 omm dbgrp 110K Aug 15 20:15 MPPDB_backup2.sql
-rw------- 1 omm dbgrp 112K Aug 15 19:38 MPPDB_backup.dmp
-rw------- 1 omm dbgrp 110K Aug 15 19:33 MPPDB_backup.sql
-rw------- 1 omm dbgrp 248K Aug 15 19:36 MPPDB_backup.tar
Step 5 check the generated sql file and confirm that the customer is not backed up_ T1 table.
cat /home/omm/logical/backup/MPPDB_backup2.sql

--
-- PostgreSQL database dump
--
SET statement_timeout = 0;
SET xmloption = content;
SET client_encoding = 'SQL_ASCII';
SET standard_conforming_strings = on;
SET check_function_bodies = false;
SET client_min_messages = warning;
--
-- Name: postgres; Type: COMMENT; Schema: -; Owner: omm
--
COMMENT ON DATABASE postgres IS 'default administrative connection database';
--
-- Name: lucy; Type: SCHEMA; Schema: -; Owner: lucy
--
CREATE SCHEMA lucy;
ALTER SCHEMA lucy OWNER TO lucy;
SET search_path = lucy;
SET default_tablespace = '';
SET default_with_oids = false;
--
-- Name: mytable; Type: TABLE; Schema: lucy; Owner: lucy; Tablespace:
--
CREATE TABLE mytable (
    firstcol integer
)
WITH (orientation=row, compression=no);
ALTER TABLE lucy.mytable OWNER TO lucy;
SET search_path = public;

REVOKE ALL ON SCHEMA public FROM PUBLIC;
REVOKE ALL ON SCHEMA public FROM omm;
GRANT ALL ON SCHEMA public TO omm;
GRANT USAGE ON SCHEMA public TO PUBLIC;
--
-- PostgreSQL database dump complete
--
gs_dumpall
gs_dumpall is a tool used by openGauss to export all database related information. It can export all data of openGauss database, including data of default database postgres, data of custom database, and global objects common to all openGauss databases.
gs_dumpall exports all openGauss databases in two parts:
gs_dumpall itself exports global objects common to all databases, including information about database users and groups, tablespaces, and attributes (for example, access rights applicable to the whole database).
gs_dumpall calls gs_dump to export the SQL script file of each database in openGauss. The script file contains all the SQL statements required to restore the database to its saved state.
The results of the above two parts are SQL script files in plain text format. Running the script file with gsql can restore the openGauss database.
Parameter Description:
| parameter | Parameter description |
|---|---|
| -f, –filename=FILEN | Sends the output to the specified file. If omitted here, standard output is used. |
| -a, –data-only | Only dump data, not dump mode (data definition). |
| -c, –clean | Execute SQL statements to clean up (delete) the databases before re creating them. Dump commands for roles and tablespaces have been added. |
| -g, –globals-only | Dump only global objects (roles and tablespaces), no database. |
| -s, –schema-only | Dump only object definitions (schemas), not data. |
| -t, –tablespaces-only | Dump only tablespaces, not databases or roles. |
| -h, –host | Specifies the name of the host. This parameter is only for openGauss, and only 127.0.0.1 can be used for the native machine in openGauss. |
| -l, –database | Specify the database name of the connected dump global object and find out which other databases need to be dumped. If not specified, the postgres database will be used. If the postgres database does not exist, template1 will be used. |
| -p, –port | Specify the TCP port or local Unix domain socket suffix that the server listens on to ensure connectivity. The default value is set to the PGPORT environment variable. When the thread pool is enabled, it is recommended to use pooler port, that is, listening port + 1. |
| -U, –username | The user name of the connection. |
| -W, –passwor | Specifies the password for the user connection. If the authentication policy of the host is trust, the password of the system administrator will not be verified, that is, there is no need to enter the - W option; If there is no - W option and you are not a system administrator, the Dump Restore tool prompts the user for a password |
Operation steps:
Step 1 switch to the omm user and log in to the database master node with the operating system user omm.
su - omm
Step 2 use gs_dumpall exports all openGauss databases at once.
gs_dumpall -f /home/omm/logical/backup/bkp2.sql -p 26000
The results are displayed as:
gs_dump[port='26000'][dbname='postgres'][2020-07-28 20:39:29]: The total objects number is 345.
gs_dump[port='26000'][dbname='postgres'][2020-07-28 20:39:29]: [100.00%] 345 objects have been dumped.
gs_dump[port='26000'][dbname='postgres'][2020-07-28 20:39:29]: dump database dbname='postgres' successfully
gs_dump[port='26000'][dbname='postgres'][2020-07-28 20:39:29]: total time: 172  ms
gs_dumpall[port='26000'][2020-07-28 20:39:29]: dumpall operation successful
gs_dumpall[port='26000'][2020-07-28 20:39:29]: total time: 213  ms
Step 3: view the generated file information.
ll /home/omm/logical/backup/

total 48K
-rw------- 1 omm dbgrp 6.2K Feb  5 15:36 bkp2.sql
-rw------- 1 omm dbgrp  934 Feb  5 15:33 bkp_shl2.sql
drwx------ 2 omm dbgrp 4.0K Feb  5 15:32 MPPDB_backup
-rw------- 1 omm dbgrp 3.0K Feb  5 15:35 MPPDB_backup2.sql
-rw------- 1 omm dbgrp 4.1K Feb  5 15:32 MPPDB_backup.dmp
-rw------- 1 omm dbgrp 3.0K Feb  5 15:30 MPPDB_backup.sql
-rw------- 1 omm dbgrp  14K Feb  5 15:31 MPPDB_backup.tar
gs_restore
gs_restore is provided by openGauss for gs_dump is an import tool for exporting data. With this tool, you can use GS_ Import the export file generated by dump.
gs_ The restore tool is executed by the operating system user omm.
The main functions include:
- Import to database:
If a database is specified in the connection parameters, the data will be imported into the specified database. Where, parallel import must specify the password of the connection. - Import to script file:
If the import database is not specified, a script containing the SQL statements necessary to rebuild the database is created and written to a file or standard output. Equivalent to direct use of gs_dump export to plain text format.
Parameter Description:
Table 1-4gs_ Description of restore parameter| parameter | Parameter description |
|---|---|
| -d, –dbname=NAME | Connect to the database dbname and import it directly into the database. |
| -f, –file=FILENAME | Specify the output file of the generated script or the output file of the list when - l is used. The default is standard output. |
| -F, –format=c/d/t | Specify the archive format. Due to gs_restore automatically determines the format, so there is no need to specify the format. Value range: c/custom: the filing form is GS_ Custom format of dump. d/directory: this archive form is a directory archive form. t/tar: this archive is a tar archive. |
| -a, -data-only | Import only data, not schema (data definition). gs_restore is imported by appending. |
| -c, –clean | Clean up (delete) database objects that already exist in the database to be restored before re creating the database objects. |
| -e, –exit-on-error | If there is an error when sending SQL statement to the database, please exit. It will continue by default, and a series of error messages will be displayed after import. |
| -n, –schema=NAME | Import only objects in enumerated schemas. This option can be used with the - t option to import a specified table. Multiple input - n_ schemaname_ Multiple modes can be imported. |
| -s, –schema-only | Only import the mode (data definition), not the data (table content). The current sequence value will not be imported. |
| -s, –schema-only | Only import the mode (data definition), not the data (table content). The current sequence value will not be imported. |
| -t, –table=NAME | Import only enumerated table definitions, data, or definitions and data. When this option is used together with the - n option, it is used to specify the table object in a certain mode- n when the parameter is not entered, it defaults to PUBLIC mode. Multiple input of - n -t can import multiple tables in the specified mode. |
| -h, --host=HOSTNAME | The specified host name. If the value starts with a slash, it will be used as the directory of Unix domain sockets. The default value is taken from PGHOST environment variable; If not set, a Unix domain socket will be started to establish a connection. This parameter is only for openGauss, and only 127.0.0.1 can be used for the native machine in openGauss. |
| -p, --port=PORT | Specify the TCP port or local Unix domain socket suffix that the server listens on to ensure connectivity. The default value is set to the PGPORT environment variable. When the thread pool is enabled, it is recommended to use pooler port, that is, listening port + 1. |
| -U, --username=NAME | The user name of the connection. |
| -W, --password=PASSWORD | Specifies the password for the user connection. If the authentication policy of the host is trust, the password of the system administrator will not be verified, that is, there is no need to enter the - W parameter; If there is no - W parameter and you are not a system administrator, "gs_restore" will prompt the user for a password. |
gs_restore import example 1
Execute gs_restore, the mppdb to be exported_ backup. Import tar file (tar format) into db_tpcc01 database.
Step 1 switch to the omm user and log in to the database master node with the operating system user omm.
su - omm
Step 2 connect to openGauss database.
gsql -d postgres -p 26000 -r
Step 3 create the database.
postgres=#  DROP DATABASE IF EXISTS db_tpcc01;
postgres=#  CREATE DATABASE db_tpcc01;
When the result is displayed as the following information, it indicates that the creation is successful.
CREATE DATABASE
Step 4 exit the database.
postgres=# \q
Step 5 perform gs_restore, the mppdb to be exported_ backup. Import tar file (tar format) into db_tpcc01 database.
gs_restore /home/omm/logical/backup/MPPDB_backup.tar -p 26000 -d db_tpcc01
If successful, the following is displayed:
start restore operation ...
table customer_t1 complete data imported !
Finish reading 11 SQL statements!
end restore operation ...
restore operation successful
total time: 19  ms
Step 6 connect db_tpcc01 database.
gsql -d db_tpcc01 -p 26000 -r
Step 7: view the recovered customers in the database_ T1 table.
db_tpcc01=# select * from customer_t1;
 c_customer_sk | c_customer_id | c_first_name | c_last_name
---------------+---------------+--------------+-------------
          6885 | maps          | Joes         |
          4321 | tpcds         | Lily         |
          9527 | world         | James        |
          3769 | hello         |              |
(4 rows)
Step 8 exit db_tpcc01 database.
db_tpcc01=# \q
gs_restore import example 2
Execute gs_restore, the mppdb to be exported_ backup. Import DMP file (custom archive format) into db_tpcc02 database.
Step 1 switch to the omm user and log in to the database master node with the operating system user omm.
su - omm
Step 2 connect to openGauss database.
gsql -d postgres -p 26000 -r
Step 3 create the database.
postgres=#  DROP DATABASE IF EXISTS db_tpcc02;
postgres=#  CREATE DATABASE db_tpcc02;
When the result is displayed as the following information, it indicates that the creation is successful.
CREATE DATABASE
Step 4 exit the database.
postgres=# \q
Step 5 perform gs_restore, the mppdb to be exported_ backup. Import DMP file (custom archive format) into db_tpcc02 database.
gs_restore /home/omm/logical/backup/MPPDB_backup.dmp -p 26000 -d db_tpcc02
If successful, the following is displayed:
start restore operation ...
table customer_t1 complete data imported !
Finish reading 11 SQL statements!
end restore operation ...
restore operation successful
total time: 19  ms
Step 6 connect DB_ Cctp02 database.
gsql -d db_tpcc02 -p 26000 -r
Step 7: view the recovered customers in the database_ T1 table.
db_tpcc02=# select * from customer_t1;
 c_customer_sk | c_customer_id | c_first_name | c_last_name
---------------+---------------+--------------+-------------
          6885 | maps          | Joes         |
          4321 | tpcds         | Lily         |
          9527 | world         | James        |
          3769 | hello         |              |
(4 rows)
Step 8 exit db_tpcc02 database.
db_tpcc02=# \q
gs_restore import example 3
Execute gs_restore, the mppdb to be exported_ The backup file (directory format) is imported into the postgres database.
Step 1 switch to the omm user and log in to the database master node with the operating system user omm.
su - omm
Step 2 connect to openGauss database.
gsql -d postgres -p 26000 -r
Step 3 create the database.
postgres=#  DROP DATABASE IF EXISTS db_tpcc03;
postgres=#  CREATE DATABASE db_tpcc03;
When the result is displayed as the following information, it indicates that the creation is successful.
CREATE DATABASE
Step 4 exit the database.
postgres=# \q
Step 5 perform gs_restore, the mppdb to be exported_ Import backup file (directory format) into db_tpcc03 database.
gs_restore /home/omm/logical/backup/MPPDB_backup -p 26000 -d db_tpcc03
If successful, the following is displayed:
start restore operation ...
table customer_t1 complete data imported !
Finish reading 11 SQL statements!
end restore operation ...
restore operation successful
total time: 19  ms
Step 6 connect db_tpcc03 database.
gsql -d db_tpcc03 -p 26000 -r
Step 7: view the recovered customers in the database_ T1 table.
db_tpcc02=# select * from customer_t1;
 c_customer_sk | c_customer_id | c_first_name | c_last_name
---------------+---------------+--------------+-------------
          6885 | maps          | Joes         |
          4321 | tpcds         | Lily         |
          9527 | world         | James        |
          3769 | hello         |              |
(4 rows)
Step 8 exit db_tpcc03 database.
db_tpcc03=# \q
gs_restore import example 4
Execute gs_restore, mppdb using custom archive format_ backup. DMP file to perform the following import operations. During import, clean up (delete) the database objects that already exist in the database to be restored before re creating the database objects.
Step 1 since all objects have been restored to dB in backup example 1_ Tpcc01 is in the database, so if you do not delete the existing objects before importing again, an error message will appear.
gs_restore -W Bigdata@123 /home/omm/logical/backup/MPPDB_backup.dmp -p 26000 -d db_tpcc01
The display is as follows:
start restore operation ...
......
Error from TOC entry 601; 1259 41883 TABLE customer_t1 omm
could not execute query: ERROR:  relation "customer_t1" already exists
    Command was: CREATE TABLE customer_t1 (
    c_customer_sk integer,
    c_customer_id character(5),
    c_first_name character(6),
    c_l...
table customer_t1 complete data imported !
Finish reading 11 SQL statements!
end restore operation ...
WARNING: errors ignored on restore: 3
restore operation successful
total time: 19  ms
Step 2 connect db_tpcc01 database
gsql -d db_tpcc01 -p 26000 -r
Step 3: view the recovered customers in the database_ T1 table.
db_tpcc01=# select * from customer_t1;
 c_customer_sk | c_customer_id | c_first_name | c_last_name
---------------+---------------+--------------+-------------
          6885 | maps          | Joes         |
          4321 | tpcds         | Lily         |
          9527 | world         | James        |
          3769 | hello         |              |
          6885 | maps          | Joes         |
          4321 | tpcds         | Lily         |
          9527 | world         | James        |
          3769 | hello         |              |

(8 rows)
The original data table has not been deleted. The imported data table imports data in the way of data addition.
Step 4 exit the database
db_tpcc01=# \q
Step 5 enter the following command, manually delete the dependency using the - c parameter, and then re create it after the import is completed.
gs_restore -W Bigdata@123 /home/omm/logical/backup/MPPDB_backup.dmp -p 26000 -d db_tpcc01 -e -c
The display is as follows:
start restore operation ...
Finish reading 11 SQL statements!
end restore operation ...
restore operation successful
total time: 14  ms
Note: if the original object has cross pattern dependencies, manual forced intervention is required.
Step 6 connect db_tpcc01 database
gsql -d db_tpcc01 -p 26000 -r
Step 7: view the recovered customers in the database_ T1 table.
db_tpcc01=# select * from customer_t1;
 c_customer_sk | c_customer_id | c_first_name | c_last_name
---------------+---------------+--------------+-------------
          6885 | maps          | Joes         |
          4321 | tpcds         | Lily         |
          9527 | world         | James        |
          3769 | hello         |              |
(8 rows)
Step 8 exit the database
db_tpcc01=# \q
The original data table has been cleared and the imported data table is restored.
gs_restore import example 5
Execute gs_restore, mppdb using custom archive format_ backup. DMP file to perform the following import operations. Import only the table customer in PUBLIC mode_ Definition of T1.
Step 1 switch to the omm user and log in to the database master node with the operating system user omm.
su - omm
Step 2 connect to openGauss database.
gsql -d postgres -p 26000 -r
Step 3 create the database.
postgres=#  DROP DATABASE IF EXISTS db_tpcc04;
postgres=#  CREATE DATABASE db_tpcc04;
When the result is displayed as the following information, it indicates that the creation is successful.
CREATE DATABASE
Step 4 exit the database.
postgres=# \q
Step 5 perform gs_restore: only import the table customer in PUBLIC mode_ Definition of T1.
gs_restore /home/omm/logical/backup/MPPDB_backup.dmp -p 26000 -d db_tpcc04 -n public -t customer_t1
If successful, the following is displayed:
start restore operation ...
table customer_t1 complete data imported !
Finish reading 17 SQL statements!
end restore operation ...
restore operation successful
total time: 18  ms
Step 6 connect db_tpcc04 database.
gsql -d db_tpcc04 -p 26000 -r
Step 7: view the recovered customers in the database_ T1 table.
db_tpcc04# select * from customer_t1;
 c_customer_sk | c_customer_id | c_first_name | c_last_name
---------------+---------------+--------------+-------------
          6885 | maps          | Joes         |
          4321 | tpcds         | Lily         |
          9527 | world         | James        |
          3769 | hello         |              |
(4 rows)
Step 8: view the table in LUCY mode in the postgres database.
db_tpcc04=# select * from lucy.mytable;
The display results are as follows:
ERROR:  schema "lucy" does not exist
LINE 1: select * from lucy.mytable;
Step 9: check the customer in PUBLIC mode in the postgres database_ T2 table.
db_tpcc04=# select * from customer_t2;
The display results are as follows:
ERROR:  schema "lucy" does not exist
LINE 1: select * from lucy.mytable;
Step 9: check the customer in PUBLIC mode in the postgres database_ T2 table.
db_tpcc04=# select * from customer_t2;
The display results are as follows:
ERROR:  relation "customer_t2" does not exist on dn_6001
LINE 1: select * from customer_t2;
Description: only customers in PUBLIC shema mode are restored_ T1 table.
Step 10 exit the database.
postgres=# \q
The experiment is over.