OpenGL 12 lecture code - by yjq
reference material
OpenGL Getting Started tutorial
[infringement legislation and deletion]
First lecture
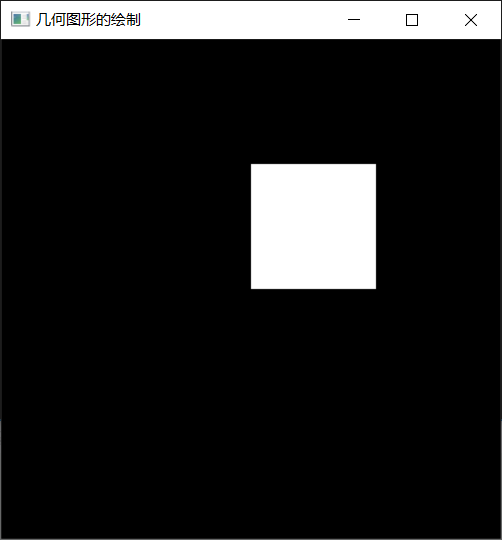
Draw a rectangle
#include<stdio.h>
#include<stdlib.h>
#include <math.h>
#include<glut.h>
#include<glaux.h>

void myDisplay(void)
{
    glClear(GL_COLOR_BUFFER_BIT);
    //glBegin(GL_POINTS);
    glBegin(GL_POLYGON);//Single simple fill polygon
    glVertex2f(0.0f, 0.0f);
    glVertex2f(0.5f, 0.0f);
    glVertex2f(0.5f, 0.5f);
    glVertex2f(0.0f, 0.5f);
    glEnd();
    //glRectf(-0.5f, -0.5f, 0.5f, 0.5f);
    glFlush();
}

int main(int argc, char* argv[])
{
    glutInit(&argc, argv);
    glutInitDisplayMode(GLUT_RGB | GLUT_SINGLE);
    int cx = glutGet(GLUT_SCREEN_WIDTH);
    int cy = glutGet(GLUT_SCREEN_HEIGHT);//To center the window
    glutInitWindowPosition((cx - 400) / 2, (cy - 400) / 2);
    glutInitWindowSize(400, 400);
    glutCreateWindow("Drawing of geometry");
    glutDisplayFunc(&myDisplay);
    glutMainLoop();
    return 0;
}
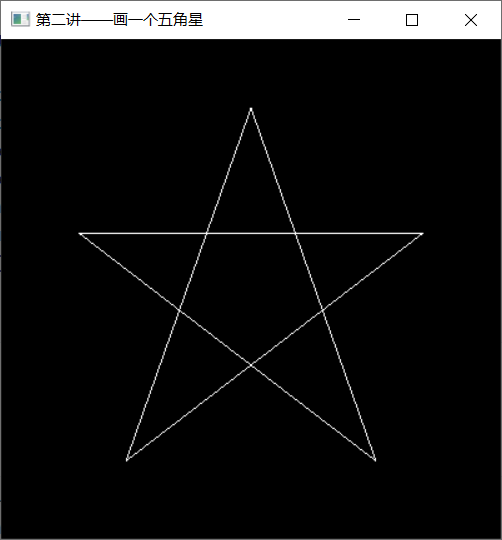
Lecture 2
Draw a five pointed star
#include<stdio.h>
#include<stdlib.h>
#include <math.h>
#include<glut.h>
#include<glaux.h>

const int n = 1000;
//Modify the value of const int n and observe the output changes when n=3,4,5,8,10,15,20,30,50 and other different values
const GLfloat R = 0.5f;
const GLfloat Pi = 3.1415926536;

void myDisplay(void)
{
    //Draw a five pointed star
    GLfloat a = 1 / (2 - 2 * cos(72 * Pi / 180));
    GLfloat bx = a * cos(18 * Pi / 180);
    GLfloat by = a * sin(18 * Pi / 180);
    GLfloat cy = -a * cos(18 * Pi / 180);
    GLfloat
        PointA[2] = { 0, a },
        PointB[2] = { bx, by },
        PointC[2] = { 0.5, cy },
        PointD[2] = { -0.5, cy },
        PointE[2] = { -bx, by };

    glClear(GL_COLOR_BUFFER_BIT);
    // In the order of a - > C - > e - > b - > D - > A, five pointed stars can be drawn in one stroke
    glBegin(GL_LINE_LOOP);
    glVertex2fv(PointA);
    glVertex2fv(PointC);
    glVertex2fv(PointE);
    glVertex2fv(PointB);
    glVertex2fv(PointD);
    glEnd();
    glFlush();
}
int main(int argc, char* argv[])
{
    glutInit(&argc, argv);
    glutInitDisplayMode(GLUT_RGB | GLUT_SINGLE);
    int cx = glutGet(GLUT_SCREEN_WIDTH);
    int cy = glutGet(GLUT_SCREEN_HEIGHT);//To center the window
    glutInitWindowPosition((cx - 400) / 2, (cy - 400) / 2);
    glutInitWindowSize(400, 400);
    glutCreateWindow("Lesson 2 - draw a five pointed star");
    glutDisplayFunc(&myDisplay);
    glutMainLoop();
    return 0;
}
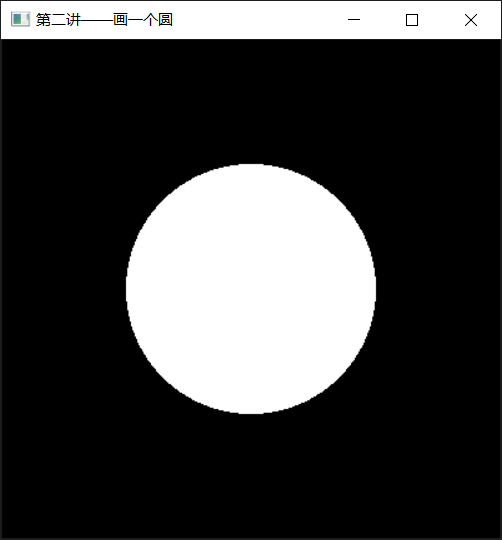
Draw a circle
#include<stdio.h>
#include<stdlib.h>
#include <math.h>
#include<glut.h>
#include<glaux.h>

const int n = 1000;
//Modify the value of const int n and observe the output changes when n=3,4,5,8,10,15,20,30,50 and other different values
const GLfloat R = 0.5f;
const GLfloat Pi = 3.1415926536;

void myDisplay(void)
{
    //Draw a circle
    int i;
    glClear(GL_COLOR_BUFFER_BIT);
    glBegin(GL_POLYGON);//Single simple fill polygon
    for (i = 0; i < n; i++) {
        glVertex2f(R * cos(2 * Pi / n * i), R * sin(2 * Pi / n * i));
    }
    glEnd();
    glFlush();
}

int main(int argc, char* argv[])
{
    glutInit(&argc, argv);
    glutInitDisplayMode(GLUT_RGB | GLUT_SINGLE);
    int cx = glutGet(GLUT_SCREEN_WIDTH);
    int cy = glutGet(GLUT_SCREEN_HEIGHT);//To center the window
    glutInitWindowPosition((cx - 400) / 2, (cy - 400) / 2);
    glutInitWindowSize(400, 400);
    glutCreateWindow("Lesson 2 - draw a circle");
    glutDisplayFunc(&myDisplay);
    glutMainLoop();
    return 0;
}
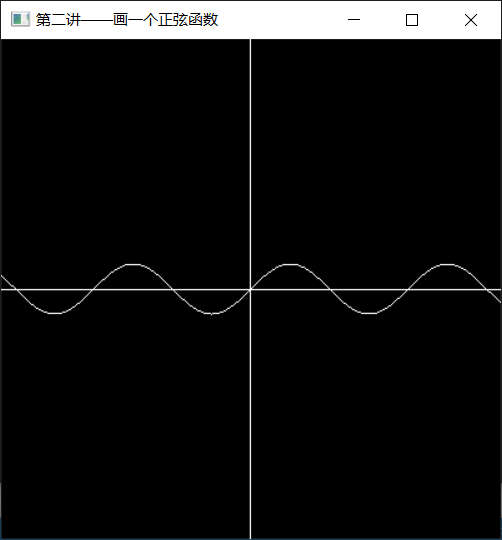
Draw a sine function
#include<stdio.h>
#include<stdlib.h>
#include <math.h>
#include<glut.h>
#include<glaux.h>

const GLfloat factor = 0.1f;
void myDisplay(void)
{
    GLfloat x;
    glClear(GL_COLOR_BUFFER_BIT);
    glBegin(GL_LINES);
    glVertex2f(-1.0f, 0.0f);
    glVertex2f(1.0f, 0.0f);        // The above two points can draw the x-axis
    glVertex2f(0.0f, -1.0f);
    glVertex2f(0.0f, 1.0f);        // The above two points can draw the y-axis
    glEnd();
    glBegin(GL_LINE_STRIP);
    for (x = -1.0f / factor; x < 1.0f / factor; x += 0.01f)
    {
        glVertex2f(x * factor, sin(x) * factor);
    }
    glEnd();
    glFlush();
}

int main(int argc, char* argv[])
{
    glutInit(&argc, argv);
    glutInitDisplayMode(GLUT_RGB | GLUT_SINGLE);
    int cx = glutGet(GLUT_SCREEN_WIDTH);
    int cy = glutGet(GLUT_SCREEN_HEIGHT);//To center the window
    glutInitWindowPosition((cx - 400) / 2, (cy - 400) / 2);
    glutInitWindowSize(400, 400);
    glutCreateWindow("Lesson 2 - draw a sine function");
    glutDisplayFunc(&myDisplay);
    glutMainLoop();
    return 0;
}
Lecture 3
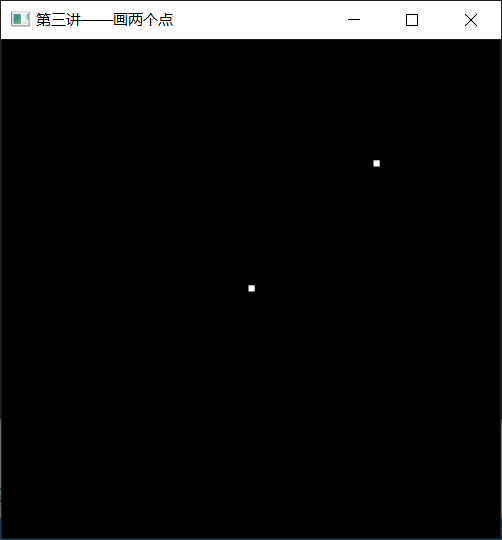
Draw point
#include<stdio.h>
#include<stdlib.h>
#include <math.h>
#include<glut.h>
#include<glaux.h>

void myDisplay(void)
{
    glClear(GL_COLOR_BUFFER_BIT);
    glPointSize(5.0f);
    glBegin(GL_POINTS);
    glVertex2f(0.0f, 0.0f);
    glVertex2f(0.5f, 0.5f);
    glEnd();
    glFlush();
}


int main(int argc, char* argv[])
{
    glutInit(&argc, argv);
    glutInitDisplayMode(GLUT_RGB | GLUT_SINGLE);
    int cx = glutGet(GLUT_SCREEN_WIDTH);
    int cy = glutGet(GLUT_SCREEN_HEIGHT);//To center the window
    glutInitWindowPosition((cx - 400) / 2, (cy - 400) / 2);
    glutInitWindowSize(400, 400);
    glutCreateWindow("Lesson 3 - draw two dots");
    glutDisplayFunc(&myDisplay);
    glutMainLoop();
    return 0;
}
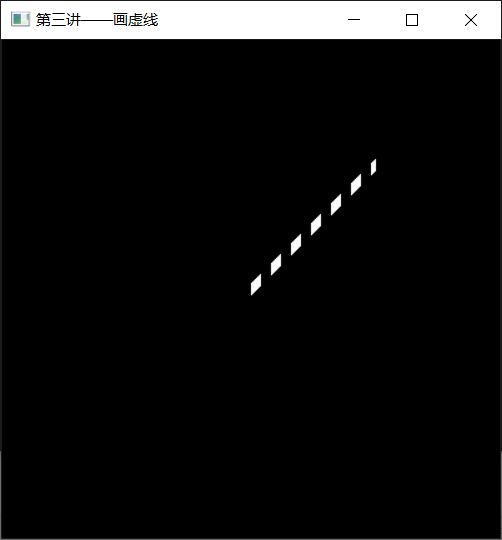
Draw a dotted line
pattern is a sequence with a length of 16 composed of 1 and 0. From the lowest point, if it is 1, the next factor points on the straight line will be drawn as real; If it is 0, the next factor points on the line that should be drawn will be drawn as virtual.
Here are some examples:
[the external chain picture transfer fails. The source station may have an anti-theft chain mechanism. It is recommended to save the picture and upload it directly (img-f4bjj6wd-164197577776) (C: / users / 26969 / appdata / local / temp / msohtmlclip1 / 01 / clip_image001. GIF)]
#include<stdio.h>
#include<stdlib.h>
#include <math.h>
#include<glut.h>
#include<glaux.h>

void myDisplay(void)
{
    glClear(GL_COLOR_BUFFER_BIT);
    glEnable(GL_LINE_STIPPLE);
    glLineStipple(2, 0x0F0F);
    glLineWidth(10.0f);
    glBegin(GL_LINES);
    glVertex2f(0.0f, 0.0f);
    glVertex2f(0.5f, 0.5f);
    glEnd();
    glFlush();
}


int main(int argc, char* argv[])
{
    glutInit(&argc, argv);
    glutInitDisplayMode(GLUT_RGB | GLUT_SINGLE);
    int cx = glutGet(GLUT_SCREEN_WIDTH);
    int cy = glutGet(GLUT_SCREEN_HEIGHT);//To center the window
    glutInitWindowPosition((cx - 400) / 2, (cy - 400) / 2);
    glutInitWindowSize(400, 400);
    glutCreateWindow("Lesson 3 - draw a dotted line");
    glutDisplayFunc(&myDisplay);
    glutMainLoop();
    return 0;
}
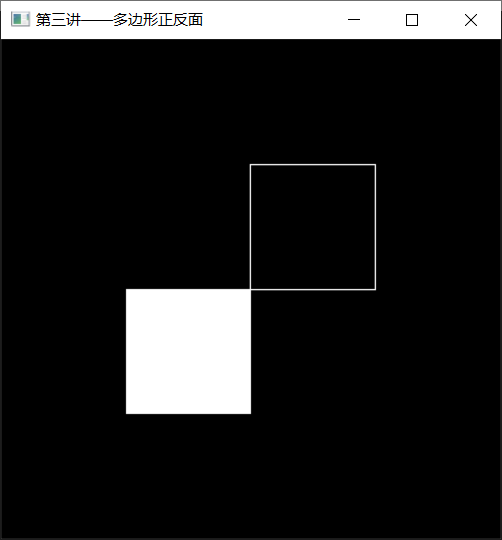
polygon
Two sides of a polygon
From a 3D perspective, a polygon has two faces. Each face can be drawn in different ways: fill, draw only edge contours, and draw only vertices. Fill is the default. You can set different ways for two faces.
glPolygonMode(GL_FRONT, GL_FILL);      // Set the front face to fill
glPolygonMode(GL_BACK, GL_LINE);      // Set the reverse side as the edge drawing method
glPolygonMode(GL_FRONT_AND_BACK, GL_POINT); // Sets how both sides are vertex drawn
Back and forth reversal
You can exchange the concepts of "positive" and "negative" through the glFrontFace function.
 glFrontFace(GL_CCW); // Set CCW direction to "front", CCW is counter clockwise, CounterClockWise
 glFrontFace(GL_CW);  // Set the CW direction to "front", CW is ClockWise, ClockWise
#include<stdio.h>
#include<stdlib.h>
#include <math.h>
#include<glut.h>
#include<glaux.h>
void myDisplay(void)
{
    glClear(GL_COLOR_BUFFER_BIT);
    glPolygonMode(GL_FRONT, GL_FILL); // Set the front face to fill mode
    glPolygonMode(GL_BACK, GL_LINE);  // Set the reverse side to linear mode
    glFrontFace(GL_CCW);              // Set the counterclockwise direction to the front
    glBegin(GL_POLYGON);              // Draw a square counterclockwise, at the bottom left
    glVertex2f(-0.5f, -0.5f);
    glVertex2f(0.0f, -0.5f);
    glVertex2f(0.0f, 0.0f);
    glVertex2f(-0.5f, 0.0f);
    glEnd();
    glBegin(GL_POLYGON);              // Draw a square clockwise, at the top right
    glVertex2f(0.0f, 0.0f);
    glVertex2f(0.0f, 0.5f);
    glVertex2f(0.5f, 0.5f);
    glVertex2f(0.5f, 0.0f);
    glEnd();
    glFlush();
}


int main(int argc, char* argv[])
{
    glutInit(&argc, argv);
    glutInitDisplayMode(GLUT_RGB | GLUT_SINGLE);
    int cx = glutGet(GLUT_SCREEN_WIDTH);
    int cy = glutGet(GLUT_SCREEN_HEIGHT);//To center the window
    glutInitWindowPosition((cx - 400) / 2, (cy - 400) / 2);
    glutInitWindowSize(400, 400);
    glutCreateWindow("Lesson 3 - polygon front and back");
    glutDisplayFunc(&myDisplay);
    glutMainLoop();
    return 0;
}
Cull polygon surface
Use glEnable(GL_CULL_FACE); To start the culling function (you can turn it off by using glDisable(GL_CULL_FACE))
Then, use glCullFace to cull.
The parameter of glCullFace can be GL_FRONT,GL_BACK or GL_FRONT_AND_BACK, which means to eliminate the polygons on the front, the back and the positive and negative sides respectively.
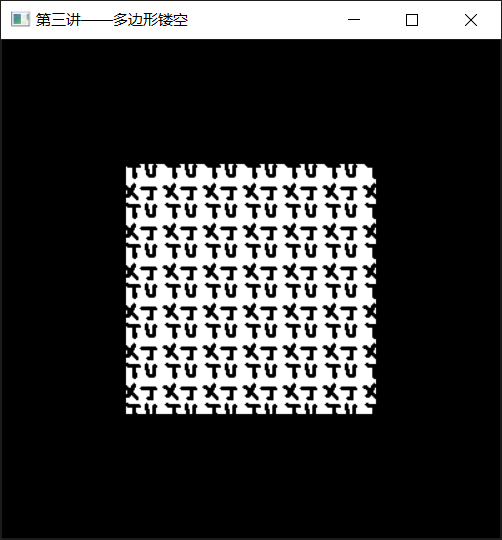
Hollowed out polygon
Use glEnable(GL_POLYGON_STIPPLE); To start the hollowed out mode (it can be turned off by using glDisable(GL_POLYGON_STIPPLE).
Then, use glpolygonstepple to set the style of hollowing out.
void glPolygonStipple(const GLubyte*mask);
The parameter mask points to a space with a length of 128 bytes, which indicates how a 32 * 32 rectangle should be hollowed out. Among them, the first byte indicates whether the 8 pixels at the bottom left are hollowed out from left to right (or right to left, which can be modified) (1 indicates no hollowing out, display the pixel; 0 indicates hollowing out, display the color behind), and the last byte indicates whether the 8 pixels at the top right are hollowed out.
Black corresponds to binary zero (hollowed out), and white corresponds to binary one (not hollowed out). Save after editing.
#include<stdio.h>
#include<stdlib.h>
#include <math.h>
#include<glut.h>
#include<glaux.h>
void myDisplay(void)
{
	//Hollowed out effect
	glClear(GL_COLOR_BUFFER_BIT);
	static GLubyte Mask[128];
	FILE* fp;
	fopen_s(&fp,"mask.bmp", "rb");
	if (!fp)
		exit(0);
	if (fseek(fp, -(int)sizeof(Mask), SEEK_END))
		exit(0);
	if (!fread(Mask, sizeof(Mask), 1, fp))
		exit(0);
	fclose(fp);
	glClear(GL_COLOR_BUFFER_BIT);
	glEnable(GL_POLYGON_STIPPLE);//Start culling function
	glPolygonStipple(Mask);
	glRectf(-0.5f, -0.5f, 0.5f, 0.5f);   // Draw a square with a hollowed out effect
	glFlush();
}

int main(int argc, char* argv[])
{
	glutInit(&argc, argv);
	glutInitDisplayMode(GLUT_RGB | GLUT_SINGLE);
	int cx = glutGet(GLUT_SCREEN_WIDTH);
	int cy = glutGet(GLUT_SCREEN_HEIGHT);//To center the window
	glutInitWindowPosition((cx - 400) / 2, (cy - 400) / 2);
	glutInitWindowSize(400, 400);
	glutCreateWindow("Lesson 3 - polygon hollowing out");
	glutDisplayFunc(&myDisplay);
	glutMainLoop();
	return 0;
}

Lecture 4
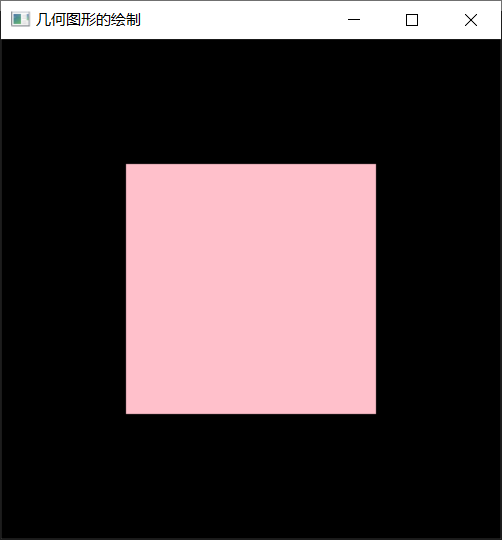
RGBA color
void myDisplay(void)
{
    glClear(GL_COLOR_BUFFER_BIT);
    glColor3ub(255,192,203);//Pink
    glRectf(-0.5f, -0.5f, 0.5f, 0.5f);
    glFlush();
}
glColor series functions have different values representing the "maximum" color when the parameter types are different.
Using f and d as suffix functions, 1.0 represents the maximum use.
b is used as the suffix function, and 127 represents the maximum use.
Using ub as the suffix function, 255 represents the maximum use.
Using s as the suffix function, 32767 represents the maximum use.
Using us as the suffix function, 65535 represents the maximum use.
By default, OpenGL will calculate other points between two vertices and fill them with "appropriate" colors to make the color values of adjacent points closer. If you use RGB mode, it looks like it has a gradient effect. If the color index mode is used, the index values of adjacent points are close. If the close items in the color table are set to close colors, it also looks like the effect of gradient. However, if the colors of close items in the color table are very different, it may look strange.
Use the glShadeModel function to turn off this calculation. If the colors of vertices are different, all other points between vertices are set to be the same as a point. (the color of the points specified after the straight line shall prevail, while the color of any vertex of the polygon shall prevail, which is determined by the implementation.) To avoid this uncertainty, try to use the same color in polygons.
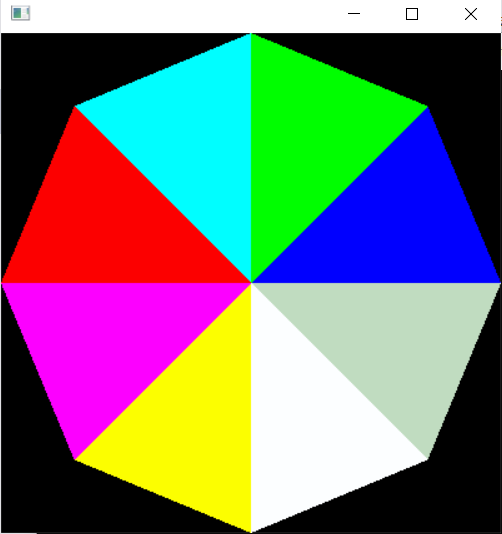
Color index
#include<stdio.h>
#include<stdlib.h>
#include <math.h>
#include<glut.h>
#include<glaux.h>
#include <time.h>
#include "tex.h"

#pragma comment (lib, "opengl32.lib")
#pragma comment (lib, "glaux.lib")
#pragma comment(lib, "legacy_stdio_definitions.lib")


const GLdouble Pi = 3.1415926536;
void myDisplay(void)
{
    int i;
    for (i = 0; i < 8; ++i)
        auxSetOneColor(i, (float)(i & 0x04), (float)(i & 0x02), (float)(i & 0x01));
    glShadeModel(GL_FLAT);
    glClear(GL_COLOR_BUFFER_BIT);
    glBegin(GL_TRIANGLE_FAN);
    glVertex2f(0.0f, 0.0f);
    for (i = 0; i <= 8; ++i)
    {
        glIndexi(i);
        glVertex2f(cos(i * Pi / 4), sin(i * Pi / 4));
    }
    glEnd();
    glFlush();
}

int main(void)
{
    auxInitDisplayMode(AUX_SINGLE | AUX_INDEX);
    auxInitPosition(0, 0, 400, 400);
    auxInitWindow(L"");
    myDisplay();
    Sleep(10 * 1000);
    return 0;
}
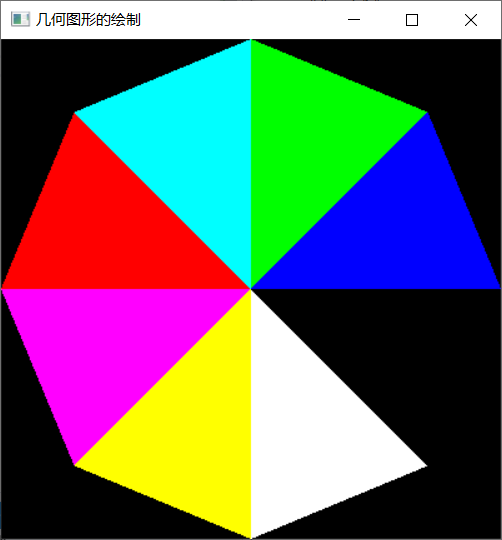
color table
 glShadeModel How to use:
 glShadeModel(GL_SMOOTH);  // Smooth mode, which is also the default
 glShadeModel(GL_FLAT);   // Monochrome mode
void myDisplay(void)
{
    int i;
   /* glShadeModel(GL_FLAT);*/
    glClear(GL_COLOR_BUFFER_BIT);
    glBegin(GL_TRIANGLE_FAN);
    glColor3f(1.0f, 1.0f, 1.0f);
    glVertex2f(0.0f, 0.0f);
    for (i = 0; i <= 8; ++i)
    {
        glColor3f(i & 0x04, i & 0x02, i & 0x01);
        glVertex2f(cos(i * Pi / 4), sin(i * Pi / 4));
    }
    glEnd();
    glFlush();
}
Lecture 5
From the point of view of "relative movement", changing the position and direction of the observation point is equivalent to changing the position and direction of the object itself. In OpenGL, these two functions are even implemented using the same function.
Since the transformation of model and view is realized through matrix operation, the matrix of current operation should be set as "model view matrix" before transformation. The method of setting is GL_MODELVIEW calls the glMatrixMode function for the parameter, as follows:
glMatrixMode(GL_MODELVIEW);
Usually, we need to set the current matrix as the identity matrix before transformation. This also requires only one line of code:
glLoadIdentity();
Then, you can transform the model and view. Model and view transformation mainly involves three functions:
glTranslate *, multiply the current matrix by a matrix representing a moving object. The three parameters represent the displacement values in three coordinates respectively.
glRotate *, multiply the current matrix by a matrix representing the rotating object. The object will rotate counterclockwise around a straight line from (0,0,0) to (x,y,z). The parameter angle represents the angle of rotation.
glScale *, multiply the current matrix by a matrix representing the scaled object. x. Y and Z respectively represent the scaling in this direction.
The results of "moving before rotating" and "rotating before moving" are likely to be different, which should be paid special attention to when learning.
When rotating, the coordinate system rotates with the object. When moving, the coordinate system moves with the object. In this way, there is no need to consider the reverse order of the code.
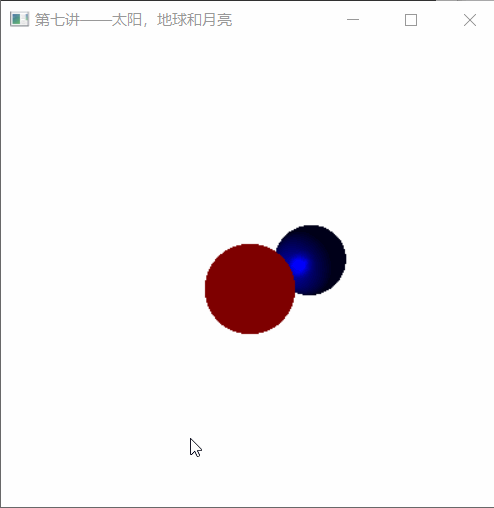
Sun Moon earth
#include<stdio.h>
#include<stdlib.h>
#include <math.h>
#include<glut.h>
#include<glaux.h>


// Sun, earth and moon
// Suppose every month is 30 days
// 12 months a year, a total of 360 days
static int day = 200; // Change of day: from 0 to 359
void myDisplay(void)
{
    glDepthFunc(GL_ALWAYS);//Always draw
    glEnable(GL_DEPTH_TEST);
    glClear(GL_COLOR_BUFFER_BIT | GL_DEPTH_BUFFER_BIT);

    glMatrixMode(GL_PROJECTION);
    glLoadIdentity();
    gluPerspective(75, 1, 1, 400000000);
    glMatrixMode(GL_MODELVIEW);
    glLoadIdentity();
    gluLookAt(0, -200000000, 200000000, 0, 0, 0, 0, 0, 1);

    // Draw the red sun
    glColor3f(1.0f, 0.0f, 0.0f);
    glutSolidSphere(69600000, 20, 20);
    // Draw the blue "Earth"
    glColor3f(0.0f, 0.0f, 1.0f);
    glRotatef(day / 360.0 * 360.0, 0.0f, 0.0f, -1.0f);
    glTranslatef(150000000, 0.0f, 0.0f);
    glutSolidSphere(15945000, 20, 20);
    // Draw a yellow "Moon"
    glColor3f(1.0f, 1.0f, 0.0f);
    glRotatef(day / 30.0 * 360.0 - day / 360.0 * 360.0, 0.0f, 0.0f, -1.0f);
    glTranslatef(38000000, 0.0f, 0.0f);
    glutSolidSphere(4345000, 20, 20);
    glFlush();
}


int  main(int argc, char* argv[])
{
    glutInit(&argc, argv);
    glutInitDisplayMode(GLUT_RGB | GLUT_SINGLE);
    int cx = glutGet(GLUT_SCREEN_WIDTH);
    int cy = glutGet(GLUT_SCREEN_HEIGHT);//To center the window
    glutInitWindowPosition((cx - 400) / 2, (cy - 400) / 2);
    glutInitWindowSize(400, 400);
    glutCreateWindow("Lesson 5 - sun, moon and earth");
    glutDisplayFunc(myDisplay);
    glutMainLoop();
    return 0;
}
Lecture 6
Sun Moon earth plus rotation
#include<stdio.h>
#include<stdlib.h>
#include <math.h>
#include<glut.h>
#include<glaux.h>
#include<time.h>
static int day = 200; // Change of day: from 0 to 359
double CalFrequency()
{
    static int count;
    static double save;
    static clock_t last, current;
    double timegap;

    ++count;
    if (count <= 50)
        return save;
    count = 0;
    last = current;
    current = clock();
    timegap = (current - last) / (double)CLK_TCK;
    save = 50.0 / timegap;
    return save;
}//Count the calling frequency of the function itself

void myDisplay(void)
{
    double FPS = CalFrequency();
    printf("FPS = %f\n", FPS);
    glDepthFunc(GL_ALWAYS);//Always draw
    glEnable(GL_DEPTH_TEST);
    glClear(GL_COLOR_BUFFER_BIT | GL_DEPTH_BUFFER_BIT);

    glMatrixMode(GL_PROJECTION);
    glLoadIdentity();
    gluPerspective(75, 1, 1, 400000000);
    glMatrixMode(GL_MODELVIEW);
    glLoadIdentity();
    gluLookAt(0, -200000000, 200000000, 0, 0, 0, 0, 0, 1);

    // Draw the red sun
    glColor3f(1.0f, 0.0f, 0.0f);
    glutSolidSphere(69600000, 20, 20);
    // Draw the blue "Earth"
    glColor3f(0.0f, 0.0f, 1.0f);
    glRotatef(day / 360.0 * 360.0, 0.0f, 0.0f, -1.0f);
    glTranslatef(150000000, 0.0f, 0.0f);
    glutSolidSphere(15945000, 20, 20);
    // Draw a yellow "Moon"
    glColor3f(1.0f, 1.0f, 0.0f);
    glRotatef(day / 30.0 * 360.0 - day / 360.0 * 360.0, 0.0f, 0.0f, -1.0f);
    glTranslatef(38000000, 0.0f, 0.0f);
    glutSolidSphere(4345000, 20, 20);

    glFlush();
    glutSwapBuffers();
}

void myIdle(void)
{
    /* The new function is called in idle time to move the date back one day and redraw it to achieve the animation effect */
    ++day;
    if (day >= 360)
        day = 0;
    myDisplay();
}

int main(int argc, char* argv[])
{
    glutInit(&argc, argv);
    glutInitDisplayMode(GLUT_RGB | GLUT_DOUBLE); // Modified parameter to GLUT_DOUBLE
    glutInitWindowPosition(100, 100);
    glutInitWindowSize(400, 400);
    glutCreateWindow("Lesson 6 - sun, earth and moon");   // Changed window title
    glutDisplayFunc(&myDisplay);
    glutIdleFunc(&myIdle);               // Call a function when the CPU is idle
    glutMainLoop();
    return 0;
}
[external link picture transfer failed. The source station may have anti-theft chain mechanism. It is recommended to save the picture and upload it directly (img-y5sa4phu-164197577778) (C: / users / 26969 / desktop /% E7% AC% AC% E5% 85% ad% E8% AE% B2. GIF)]
Lecture 7
Sun, moon and light
#include<stdio.h>
#include<stdlib.h>
#include <math.h>
#include<glut.h>
#include<glaux.h>
#include<time.h>
#define WIDTH 400
#define HEIGHT 400

static GLfloat angle = 0.0f;

void myDisplay(void)
{
    glClear(GL_COLOR_BUFFER_BIT | GL_DEPTH_BUFFER_BIT);
    glClearColor(1.0, 1.0, 1.0,1.0);
    // Create perspective view
    glMatrixMode(GL_PROJECTION);
    glLoadIdentity();
    gluPerspective(90.0f, 1.0f, 1.0f, 20.0f);
    glMatrixMode(GL_MODELVIEW);
    glLoadIdentity();
    gluLookAt(0.0, 5.0, -10.0, 0.0, 0.0, 0.0, 0.0, 1.0, 0.0);

    // Defines the solar light source, which is a white light source
    {
        GLfloat sun_light_position[] = { 0.0f, 0.0f, 0.0f, 1.0f };//Light source location
        GLfloat sun_light_ambient[] = { 0.0f, 0.0f, 0.0f, 1.0f }; //Light left after multiple reflection
        GLfloat sun_light_diffuse[] = { 1.0f, 1.0f, 1.0f, 1.0f };//Diffuse light
        GLfloat sun_light_specular[] = { 1.0f, 1.0f, 1.0f, 1.0f };//Specular reflected light

        glLightfv(GL_LIGHT0, GL_POSITION, sun_light_position);
        glLightfv(GL_LIGHT0, GL_AMBIENT, sun_light_ambient);
        glLightfv(GL_LIGHT0, GL_DIFFUSE, sun_light_diffuse);
        glLightfv(GL_LIGHT0, GL_SPECULAR, sun_light_specular);

        glEnable(GL_LIGHT0);
        glEnable(GL_LIGHTING);
        glEnable(GL_DEPTH_TEST);
    }

    // Define the material of the sun and paint the sun
    {
        GLfloat sun_mat_ambient[] = { 0.0f, 0.0f, 0.0f, 1.0f };
        GLfloat sun_mat_diffuse[] = { 0.0f, 0.0f, 0.0f, 1.0f };
        GLfloat sun_mat_specular[] = { 0.0f, 0.0f, 0.0f, 1.0f };
        GLfloat sun_mat_emission[] = { 0.5f, 0.0f, 0.0f, 1.0f };
        GLfloat sun_mat_shininess = 0.0f;

        glMaterialfv(GL_FRONT, GL_AMBIENT, sun_mat_ambient);
        glMaterialfv(GL_FRONT, GL_DIFFUSE, sun_mat_diffuse);
        glMaterialfv(GL_FRONT, GL_SPECULAR, sun_mat_specular);
        glMaterialfv(GL_FRONT, GL_EMISSION, sun_mat_emission);
        glMaterialf(GL_FRONT, GL_SHININESS, sun_mat_shininess);

        glutSolidSphere(2.0, 40, 32);
    }

    // Define the earth's material and paint the earth
    {
        GLfloat earth_mat_ambient[] = { 0.0f, 0.0f, 0.5f, 1.0f };
        GLfloat earth_mat_diffuse[] = { 0.0f, 0.0f, 0.5f, 1.0f };//Similar to blue
        GLfloat earth_mat_specular[] = { 0.0f, 0.0f, 1.0f, 1.0f };
        GLfloat earth_mat_emission[] = { 0.0f, 0.0f, 0.0f, 1.0f };
        GLfloat earth_mat_shininess = 30.0f;

        glMaterialfv(GL_FRONT, GL_AMBIENT, earth_mat_ambient);
        glMaterialfv(GL_FRONT, GL_DIFFUSE, earth_mat_diffuse);
        glMaterialfv(GL_FRONT, GL_SPECULAR, earth_mat_specular);
        glMaterialfv(GL_FRONT, GL_EMISSION, earth_mat_emission);
        glMaterialf(GL_FRONT, GL_SHININESS, earth_mat_shininess);

        glRotatef(angle, 0.0f, -1.0f, 0.0f);
        glTranslatef(5.0f, 0.0f, 0.0f);
        glutSolidSphere(2.0, 40, 32);
    }

    glutSwapBuffers();
}
void myIdle(void)
{
    angle += 1.0f;
    if (angle >= 360.0f)
        angle = 0.0f;
    myDisplay();
}

int main(int argc, char* argv[])
{
    glutInit(&argc, argv);
    glutInitDisplayMode(GLUT_RGB | GLUT_DOUBLE); // Modified parameter to GLUT_DOUBLE
    glutInitWindowPosition(100, 100);
    glutInitWindowSize(WIDTH,HEIGHT);
    glutCreateWindow("Lesson 7 - sun, earth and moon");   // Changed window title
    glutDisplayFunc(&myDisplay);
    glutIdleFunc(&myIdle);               // Call a function when the CPU is idle
    glutMainLoop();
    return 0;
}
Lecture 8
1, Assign display list number
OpenGL allows multiple display lists to exist at the same time, just as C language allows multiple functions to exist in a program at the same time. In C language, different functions are distinguished by different names, while in OpenGL, different display lists are distinguished by different positive integers.
You can specify some different positive integers to represent different display lists. However, if you are not careful, one display list may overwrite another display list. To avoid this problem, the glGenLists function is used to automatically assign an unused display list number.
The glGenLists function has a parameter i, indicating that i consecutive unused display list numbers are to be assigned. Returns the smallest of several consecutive numbers assigned. For example, glGenLists(3); If 20 is returned, three consecutive numbers 20, 21 and 22 are assigned. If the function returns zero, the allocation fails.
You can use the glIsList function to determine whether a number has been used as a display list.
2, Create display list
Creating a display list is actually loading the calls of various OpenGL functions into the display list. Use glNewList to start loading and glEndList to end loading. glNewList has two parameters. The first parameter is a positive integer indicating which display list to load. The second parameter has two values. If it is GL_COMPILE, it means that the following contents are only loaded into the display list, but they are not executed now; If GL_COMPILE_AND_EXECUTE means to execute the loaded content while loading.
For example, if you need to load the commands "set the color to red and specify a vertex with coordinates of (0,0)" into the display list numbered list and do not execute them when loading, you can use the following code:
 glNewList(list, GL_COMPILE);
 glColor3f(1.0f, 0.0f, 0.0f);
 glVertex2f(0.0f, 0.0f);
 glEnd();
Note: the display list can only load OpenGL functions, not other contents. For example:
 int i = 3;
 glNewList(list, GL_COMPILE);
 if( i > 20 )
   glColor3f(1.0f, 0.0f, 0.0f);
 glVertex2f(0.0f, 0.0f);
 glEnd();
The if judgment is not loaded into the display list. In the future, even if the value of i is modified so that the condition of i > 20 holds, glColor3f this function will not be executed. Because it doesn't exist in the display list at all.
In addition, not all OpenGL functions can be loaded into the display list. For example, the various functions used for queries cannot be loaded into the display list because they all have return values, and neither the glCallList nor glCallLists functions know how to handle these return values. In the network mode, the functions for setting the client state cannot be loaded into the display list because the display list is saved to the server. Various functions for setting the client state are executed before they are sent to the server, and the server cannot execute these functions. The actions of assigning, creating and deleting a display list cannot be loaded into another display list, but the actions calling a display list can be loaded into another display list.
3, Call display list
Use the glCallList function to call a display list. This function has a parameter indicating the number of the display list to call. For example, to call the display list numbered 10, use glCallList(10) directly; That's it.
Using the glCallLists function, you can call a series of display lists.
The function has three parameters. The first parameter indicates how many display lists to call.
The second parameter represents the storage format of the numbers of these display lists, which can be
GL_BYTE (each number is represented by a GLbyte), GL_UNSIGNED_BYTE (each number)
Use one GLubyte Means), GL_SHORT,GL_UNSIGNED_SHORT,GL_INT,GL_UNSIGNED_INT,GL_FLOAT.
The third parameter indicates where the numbers of these display lists are located. Before using this function, you need to use the glListBase function to set an offset. Assuming that the offset is k and the display list numbers required to be called in glCallLists are l1, l2, l3,..., the display list actually called is l1+k, l2+k, l3+k.
For example:
 GLuint lists[] = {1, 3, 4, 8};
 glListBase(10);
 glCallLists(4, GL_UNSIGNED_INT, lists);
In fact, the four display lists numbered 11, 13, 14 and 18 are called.
Note: the action "call display list" itself can also be installed in another display list.
4, Destroy display list
Destroy the display list to recycle resources. Use glDeleteLists to destroy a list of consecutively numbered display lists.
For example, use glDeleteLists(20, 4); The four display lists 20, 21, 22 and 23 will be destroyed.
Using the display list will bring some overhead. For example, saving various actions to the display list will occupy a certain amount of memory resources. However, if used properly, displaying the list can improve the performance of the program. This is mainly reflected in the following aspects:
1. Significantly reduce the number of calls to opengl functions. If the function call is made through the network (Linux and other operating systems support this way, that is, the application sends an OpenGL request on the client and another server on the network carries out the actual drawing operation), saving the display list on the server can greatly reduce the network burden.
2. Save intermediate results to avoid unnecessary calculations. For example, in the previous sample program, the calculation results of cos and sin functions are directly saved to the display list, and there is no need to repeat the calculation in the future.
3. Easy to optimize. We already know that when using glTranslate *, glRotate *, glScale * and other functions, matrix multiplication is actually performed. Because these functions are often combined, matrix multiplication usually occurs. At this time, if these operations are saved to the display list, some complex OpenGL versions will try to calculate part of the results of the multiplication first, so as to improve the running speed of the program. Similar examples may exist in other aspects.
At the same time, the display list also brings convenience to the program design. When setting some properties, we often call some related functions together (for example, put the functions that set various properties of the light source together). At this time, if these operations of setting properties are loaded into the display list, the group switching of properties can be realized.
Of course, even if using display lists can improve performance in some cases, the improvement is likely to be insignificant. After all, there is little room for performance improvement on the premise that the hardware configuration and general software algorithms remain unchanged.
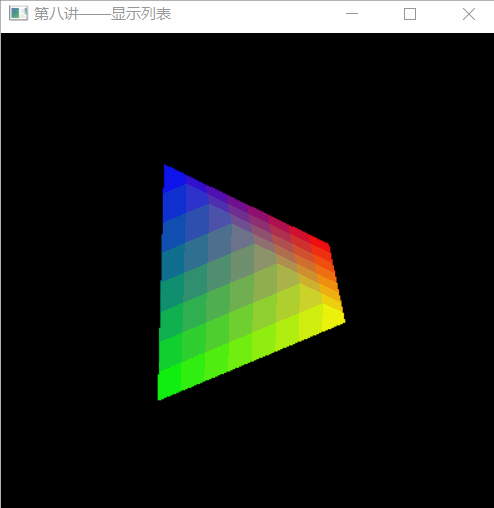
give an example
There are so many contents in the display list. Let's take a look at an example.
Suppose we need to draw a rotating color tetrahedron, we can consider this: set a global variable angle, and then let its value increase continuously (return to 0 after reaching 360, and repeat). Each time you need to draw a figure, rotate according to the value of angle, and then draw a regular tetrahedron. Here, the regular tetrahedron is realized by the display list, that is, several OpenGL functions for drawing the regular tetrahedron are installed in a display list, and then each time you need to draw, you can call the display list.
#include<stdio.h>
#include<stdlib.h>
#include <math.h>
#include<glut.h>
#include<glaux.h>
#define WIDTH 400
#define HEIGHT 400

#define ColoredVertex(c, v) do{ glColor3fv(c); glVertex3fv(v); }while(0)

GLfloat angle = 0.0f;

void myDisplay(void)
{
    static int list = 0;
    if (list == 0)
    {
        // If the display list does not exist, it is created
        GLfloat
            PointA[] = { 0.5f, (GLfloat) (-sqrt(6.0f) / 12) , (GLfloat)(-sqrt(3.0f) / 6) },
            PointB[] = { -0.5f, (GLfloat)(-sqrt(6.0f) / 12) , (GLfloat)(-sqrt(3.0f) / 6) },
            PointC[] = { 0.0f, (GLfloat)(-sqrt(6.0f) / 12) ,   (GLfloat)(sqrt(3.0f) / 3) },
            PointD[] = { 0.0f,   (GLfloat)(sqrt(6.0f) / 4),             0 };
        GLfloat
            ColorR[] = { 1, 0, 0 },
            ColorG[] = { 0, 1, 0 },
            ColorB[] = { 0, 0, 1 },
            ColorY[] = { 1, 1, 0 };

        list = glGenLists(1);
        glNewList(list, GL_COMPILE);
        glBegin(GL_TRIANGLES);
        // Plane ABC
        ColoredVertex(ColorR, PointA);
        ColoredVertex(ColorG, PointB);
        ColoredVertex(ColorB, PointC);
        // Plane ACD
        ColoredVertex(ColorR, PointA);
        ColoredVertex(ColorB, PointC);
        ColoredVertex(ColorY, PointD);
        // Plane CBD
        ColoredVertex(ColorB, PointC);
        ColoredVertex(ColorG, PointB);
        ColoredVertex(ColorY, PointD);
        // Plane BAD
        ColoredVertex(ColorG, PointB);
        ColoredVertex(ColorR, PointA);
        ColoredVertex(ColorY, PointD);
        glEnd();
        glEndList();

        glEnable(GL_DEPTH_TEST);
    }
    // The display list has been created and will be called every time you draw a regular tetrahedron
    glClear(GL_COLOR_BUFFER_BIT | GL_DEPTH_BUFFER_BIT);
    glPushMatrix();
    glRotatef(angle, 1, 0.5, 0);
    glCallList(list);
    glPopMatrix();
    glutSwapBuffers();
}

void myIdle(void)
{
    ++angle;
    if (angle >= 360.0f)
        angle = 0.0f;
    myDisplay();
}

int main(int argc, char* argv[])
{
    glutInit(&argc, argv);
    glutInitDisplayMode(GLUT_RGBA | GLUT_DOUBLE);
    glutInitWindowPosition(200, 200);
    glutInitWindowSize(WIDTH, HEIGHT);
    glutCreateWindow("Lesson 8 - display list");
    glutDisplayFunc(&myDisplay);
    glutIdleFunc(&myIdle);
    glutMainLoop();
    return 0;
}
Lecture 9
Start mixing
To use the blending function of OpenGL, you only need to call: glEnable(GL_BLEND); Just.
To turn off the blending function of OpenGL, you only need to call: glDisable(GL_BLEND); Just.
Source factor and target factor
The color to be drawn is called "source color", and the original color is called "target color".
OpenGL will take out the source color and the target color respectively, multiply them by a coefficient (the coefficient multiplied by the source color is called "source factor", and the coefficient multiplied by the target color is called "target factor"), and then add them to get a new color.
Let's use a mathematical formula to express this operation. Suppose that the four components of the source color (referring to the values of red, green, blue and alpha) are (Rs, Gs, Bs, As) and the four components of the target color are (Rd, Gd, Bd, Ad), and set the source factor as (Sr, Sg, Sb, Sa) and the target factor as (Dr, Dg, Db, Da). The new color generated by mixing can be expressed as:
Rs*Sr+Rd*Dr, Gs*Sg+Gd*Dg, Bs*Sb+Bd*Db, As*Sa+Ad*Da
Of course, if a color component exceeds 1.0, it will be automatically intercepted as 1.0, and there is no need to consider the problem of crossing the boundary.
The source factor and target factor can be set through the glBlendFunc function** glBlendFunc has two parameters. The former represents the source factor and the latter represents the target factor** These two parameters can be multiple values. The commonly used parameters are described below.
 GL_ZERO:    Indicates the use of 0.0 As a factor, it is actually equivalent to not using this color to participate in the mixing operation.
 GL_ONE:    Indicates the use of 1.0 As a factor, it is actually equivalent to completely using this color to participate in the mixing operation.
 GL_SRC_ALPHA: Indicates that the source color is used alpha Value as a factor.
 GL_DST_ALPHA: Indicates that the target color is used alpha Value as a factor.
 GL_ONE_MINUS_SRC_ALPHA: Indicates 1.0 Subtracts the color of the source alpha Value as a factor.
 GL_ONE_MINUS_DST_ALPHA: Indicates 1.0 Minus the target color alpha Value as a factor.
In addition, there is GL_SRC_COLOR (take the four components of the source color as the four components of the factor respectively), GL_ONE_MINUS_SRC_COLOR,GL_DST_COLOR,GL_ONE_MINUS_DST_COLOR, etc. the first two can only be used to set the target factor in the old version of OpenGL, and the last two can only be used to set the source factor in the old version of OpenGL. The new version of OpenGL does not have this restriction and supports the new GL_CONST_COLOR (set a constant color with its four components as the four components of the factor), GL_ONE_MINUS_CONST_COLOR,GL_CONST_ALPHA,GL_ONE_MINUS_CONST_ALPHA. There is also GL_SRC_ALPHA_SATURATE.
🏷 For example:
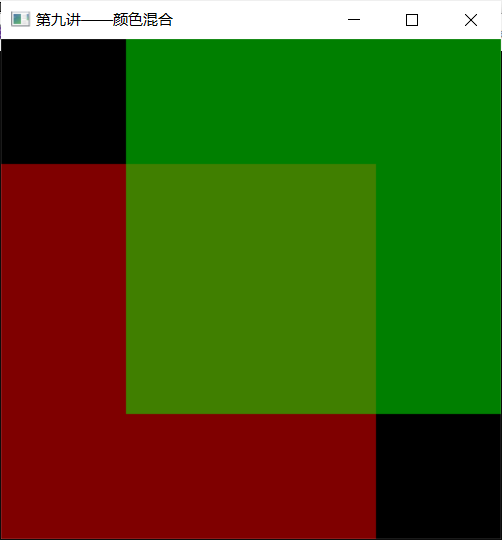
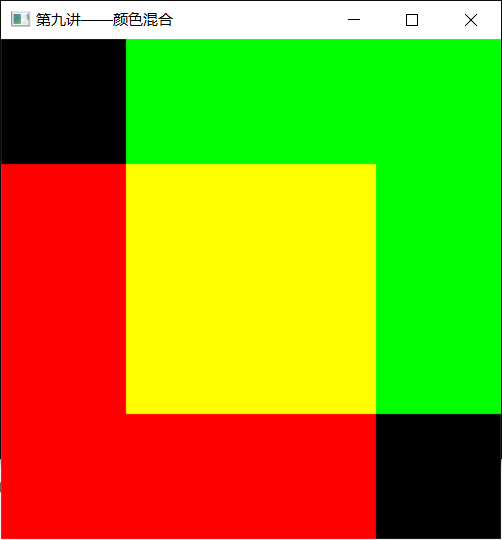
one ️⃣ If glBlendFunc(GL_ONE, GL_ZERO) is set;, It means that the source color is used completely and the target color is not used at all, so the picture effect is consistent with that without mixing (of course, the efficiency may be a little lower). If the source factor and target factor are not set, this is the default setting.
two ️⃣ If glBlendFunc(GL_ZERO, GL_ONE) is set;, It means that the source color is not used at all, so no matter what you want to draw, it will not be drawn in the end. (however, this does not mean that this setting is useless. Sometimes it may be used for special purposes)
three ️⃣ If glBlendFunc(GL_SRC_ALPHA, GL_ONE_MINUS_SRC_ALPHA) is set;, It means that the source color is multiplied by its own alpha value, and the target color is multiplied by 1.0 minus the alpha value of the source color. In this way, the greater the alpha value of the source color, the greater the proportion of the source color in the new color, and the proportion of the target color is reduced. In this case, we can simply understand the alpha value of the source color as "Opacity". This is also the most common way to mix.
four ️⃣ If glBlendFunc(GL_ONE, GL_ONE) is set;, It means that the source color and target color are completely used. The final color is actually a simple addition of the two colors. For example, red (1, 0, 0) and green (0, 1, 0) are added to get (1, 1, 0), and the result is yellow.
⚠️ be careful:
The so-called source color and target color are related to the drawing order. If you draw a red object first, then draw a green object on it. Then green is the source color and red is the target color. If the order is reversed, red is the source color and green is the target color. When drawing, attention should be paid to the order so that the drawn source color corresponds to the set source factor and the target color corresponds to the set target factor. Don't be confused by the chaotic order.
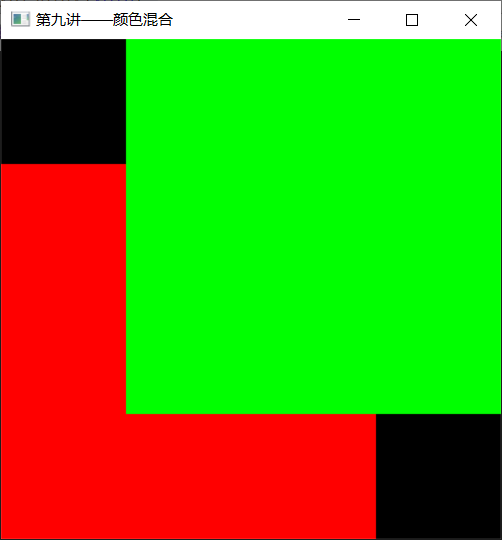
Examples of 2D graphics blending
Let's look at a simple example to mix two different colors together. For ease of observation, we draw two rectangles: glRectf(-1, -1, 0.5, 0.5);glRectf(-0.5, -0.5, 1, 1);, The two rectangles have an overlapping area for us to observe the effect of mixing.
Let's take a look at using glBlendFunc(GL_ONE, GL_ZERO); , the result is the same as when mixing is not used.
#include<stdio.h>
#include<stdlib.h>
#include <math.h>
#include<glut.h>
#include<glaux.h>
#define WIDTH 400
#define HEIGHT 400

void myDisplay(void)
{
    glClear(GL_COLOR_BUFFER_BIT);

    glEnable(GL_BLEND);
    //glBlendFunc(GL_ONE, GL_ZERO);// It is no different from non mixing
    //glBlendFunc(GL_SRC_ALPHA, GL_ONE_MINUS_SRC_ALPHA);// Indicates that the alpha value of the source color is used as the factor, and that the alpha value of the source color is subtracted by 1.0 as the factor.
    glBlendFunc(GL_ONE, GL_ONE);//Mix two colors
    glColor4f(1, 0, 0, 0.5);
    glRectf(-1, -1, 0.5, 0.5);
    glColor4f(0, 1, 0, 0.5);
    glRectf(-0.5, -0.5, 1, 1);

    glutSwapBuffers();
}


int main(int argc, char* argv[])
{
    glutInit(&argc, argv);
    glutInitDisplayMode(GLUT_RGBA | GLUT_DOUBLE);
    glutInitWindowPosition(200, 200);
    glutInitWindowSize(WIDTH, HEIGHT);
    glutCreateWindow("Lesson 9 - color blending");
    glutDisplayFunc(&myDisplay);
    glutMainLoop();
    return 0;
}
3D blending
A depth buffer is a piece of data that records how close each pixel is to the observer. With the depth buffer test enabled, if the pixel to be drawn is closer than the original pixel, the pixel will be drawn. Otherwise, the pixels will be ignored and will not be drawn. This is very useful when drawing opaque objects - whether drawing near objects first and then far objects, drawing far objects first and then near objects, or simply drawing in a chaotic order, the final display result is always that the near objects cover the far objects.
When drawing translucent objects, set the depth buffer to read-only, so that although translucent objects are drawn, the depth buffer remains in its original state. If another object appears after the translucent object and before the opaque object, it can also be drawn
First draw all opaque objects. If both objects are opaque, it doesn't matter who comes first. Then, set the depth buffer to read-only. Next, draw all translucent objects. If both objects are translucent, you only need to decide who will be the first and who will be the second (note that the first drawn will become the "target color" and the second drawn will become the "source color", so the drawing order will have some impact on the results). Finally, set the depth buffer to be readable and writable.
glDepthMask(GL_FALSE);The depth buffer can be set to read-only
glDepthMask(GL_TRUE);The depth buffer can be set to be readable and writable.
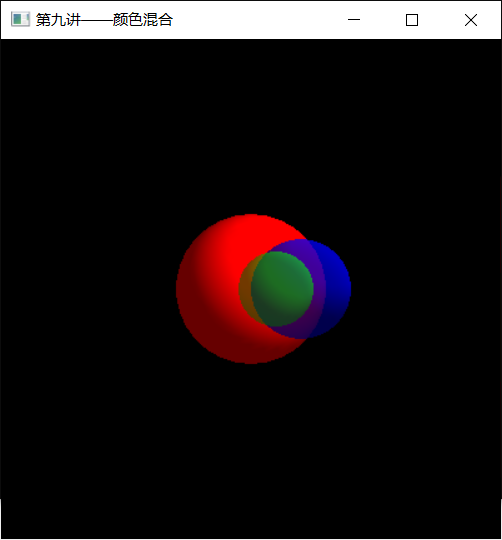
To draw some translucent and opaque spheres. Suppose there are three spheres, one red opaque, one green translucent and one blue translucent. Red is the farthest, green is in the middle, and blue is the nearest. According to the above description, * * the red opaque sphere must be drawn first, while the order of green and blue can be modified at will** Here, in order to demonstrate the harm of not paying attention to setting depth buffer, we deliberately draw the nearest blue sphere first, and then the green sphere. In order to make these spheres a little three-dimensional, we use light. Set a white light source at (1, 1, - 1).
#include<stdio.h>
#include<stdlib.h>
#include <math.h>
#include<glut.h>
#include<glaux.h>
#define WIDTH 400
#define HEIGHT 400

void myDisplay1(void)
{
    glClear(GL_COLOR_BUFFER_BIT);

    glEnable(GL_BLEND);
    //glBlendFunc(GL_ONE, GL_ZERO);// It is no different from non mixing
    //glBlendFunc(GL_SRC_ALPHA, GL_ONE_MINUS_SRC_ALPHA);// Indicates that the alpha value of the source color is used as the factor, and that the alpha value of the source color is subtracted by 1.0 as the factor.
    glBlendFunc(GL_ONE, GL_ONE);//Mix two colors
    glColor4f(1, 0, 0, 0.5);
    glRectf(-1, -1, 0.5, 0.5);
    glColor4f(0, 1, 0, 0.5);
    glRectf(-0.5, -0.5, 1, 1);

    glutSwapBuffers();
}

void setLight(void)
{
    static const GLfloat light_position[] = { 1.0f, 1.0f, -1.0f, 1.0f };
    static const GLfloat light_ambient[] = { 0.2f, 0.2f, 0.2f, 1.0f };
    static const GLfloat light_diffuse[] = { 1.0f, 1.0f, 1.0f, 1.0f };
    static const GLfloat light_specular[] = { 1.0f, 1.0f, 1.0f, 1.0f };

    glLightfv(GL_LIGHT0, GL_POSITION, light_position);
    glLightfv(GL_LIGHT0, GL_AMBIENT, light_ambient);
    glLightfv(GL_LIGHT0, GL_DIFFUSE, light_diffuse);
    glLightfv(GL_LIGHT0, GL_SPECULAR, light_specular);

    glEnable(GL_LIGHT0);
    glEnable(GL_LIGHTING);
    glEnable(GL_DEPTH_TEST);
}
//Each sphere has a different color. So their materials are also different. Here, a function is used to set the material.
void setMatirial(const GLfloat mat_diffuse[4], GLfloat mat_shininess)
{
    static const GLfloat mat_specular[] = { 0.0f, 0.0f, 0.0f, 1.0f };
    static const GLfloat mat_emission[] = { 0.0f, 0.0f, 0.0f, 1.0f };

    glMaterialfv(GL_FRONT, GL_AMBIENT_AND_DIFFUSE, mat_diffuse);
    glMaterialfv(GL_FRONT, GL_SPECULAR, mat_specular);
    glMaterialfv(GL_FRONT, GL_EMISSION, mat_emission);
    glMaterialf(GL_FRONT, GL_SHININESS, mat_shininess);
}

void myDisplay2(void)
{
    // Define some material colors
    const static GLfloat red_color[] = { 1.0f, 0.0f, 0.0f, 1.0f };
    const static GLfloat green_color[] = { 0.0f, 1.0f, 0.0f, 0.3333f };
    const static GLfloat blue_color[] = { 0.0f, 0.0f, 1.0f, 0.5f };

    // Clear screen
    glClear(GL_COLOR_BUFFER_BIT | GL_DEPTH_BUFFER_BIT);

    // Start mixing and set the mixing factor
    glEnable(GL_BLEND);
    glBlendFunc(GL_SRC_ALPHA, GL_ONE_MINUS_SRC_ALPHA);

    // Set light source
    setLight();

    // Draw an opaque red sphere with a radius of. 3 (farthest from the observer) centered on (0, 0, 0.5)
    setMatirial(red_color, 30.0);
    glPushMatrix();
    glTranslatef(0.0f, 0.0f, 0.5f);
    glutSolidSphere(0.3, 30, 30);
    glPopMatrix();

    // The translucent object will be drawn next, so set the depth buffer to read-only
    glDepthMask(GL_FALSE);

    // Draw a translucent blue sphere with a radius of. 2 (closest to the observer) centered on (0.2, 0, - 0.5)
    setMatirial(blue_color, 30.0);
    glPushMatrix();
    glTranslatef(0.2f, 0.0f, -0.5f);
    glutSolidSphere(0.2, 30, 30);//The first parameter represents the radius of the sphere, and the last two parameters represent the number of "faces". In short, it is the accuracy of the sphere. The larger the value, the more accurate it is. Of course, the slower the speed is
    glPopMatrix();

    // Draw a translucent green sphere with a radius of. 15 (between the first two spheres) centered on (0.1, 0, 0)
    setMatirial(green_color, 30.0);
    glPushMatrix();
    glTranslatef(0.1, 0, 0);
    glutSolidSphere(0.15, 30, 30);
    glPopMatrix();

    // Complete the drawing of translucent objects and restore the depth buffer to a readable and writable form
    glDepthMask(GL_TRUE);

    glutSwapBuffers();
}


int main(int argc, char* argv[])
{
    glutInit(&argc, argv);
    glutInitDisplayMode(GLUT_RGBA | GLUT_DOUBLE);
    glutInitWindowPosition(200, 200);
    glutInitWindowSize(WIDTH, HEIGHT);
    glutCreateWindow("Lesson 9 - color blending");
    glutDisplayFunc(&myDisplay2);
    glutMainLoop();
    return 0;
}
In 3D mixing, not only the source factor and target factor, but also the depth buffer should be considered. All opaque objects must be drawn before translucent objects. Before drawing translucent objects, you also need to set the depth buffer to read-only form, otherwise screen errors may occur.
Lecture 10
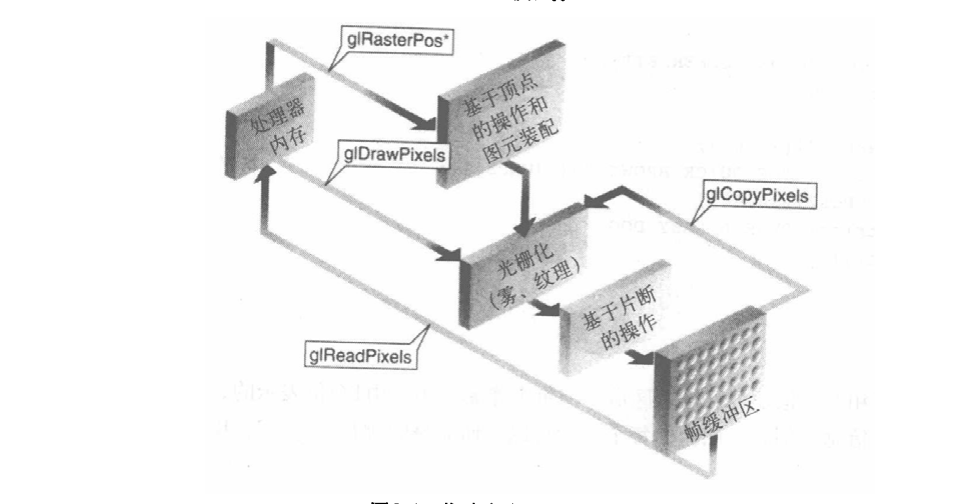
ReadPixels: read some pixels. At present, it can be simply understood as "reading the drawn pixel (which may have been saved to the video memory of the graphics card) into the memory".
glDrawPixels: draw some pixels. At present, it can be simply understood as "drawing some data in memory as pixel data".
glCopyPixels: copy some pixels. At present, it can be simply understood as "copying the drawn pixels from one position to another". Although functionally, it seems to be equivalent to reading pixels first and then drawing pixels, in fact, it does not need to convert the drawn pixels (which may have been saved into the video memory of the graphics card) into memory data, and then re draw from the memory data, so it is much faster than reading and drawing first.
These three functions can complete simple pixel reading, drawing and copying tasks, but they can also complete more complex tasks
The BMP file used by Windows has a file header at the beginning, with a size of 54 bytes. Information including file format identification, number of colors, image size, compression method, etc. is saved. Because we only discuss BMP with 24 bit color uncompressed, we basically don't need to pay attention to the information in the file header. Only the item "size" is useful to us.
Read the first 54 bytes from a correct BMP file and modify the width and height information to get a new file header. Suppose we first create a 1 * 1 Size 24 bit color bmp with the file name dummy BMP, and assume that the new BMP file name is grab bmp. You can write the following code:
The width and height of the image are 32-bit integers, and the addresses in the file are 0x0012 and 0x0016 respectively,
Read the first 54 bytes from a correct BMP file and modify the width and height information to get a new file header. Suppose we first create a 1 * 1 Size 24 bit color bmp with the file name dummy BMP, and assume that the new BMP file name is grab bmp. You can write the following code:
Copy the code to the sample program of any previous course and save the image content as BMP file by calling the grab function at the end of the drawing function. (when I wrote this tutorial, many places used this code for screenshots. Once this code is written, it is very convenient to run.)
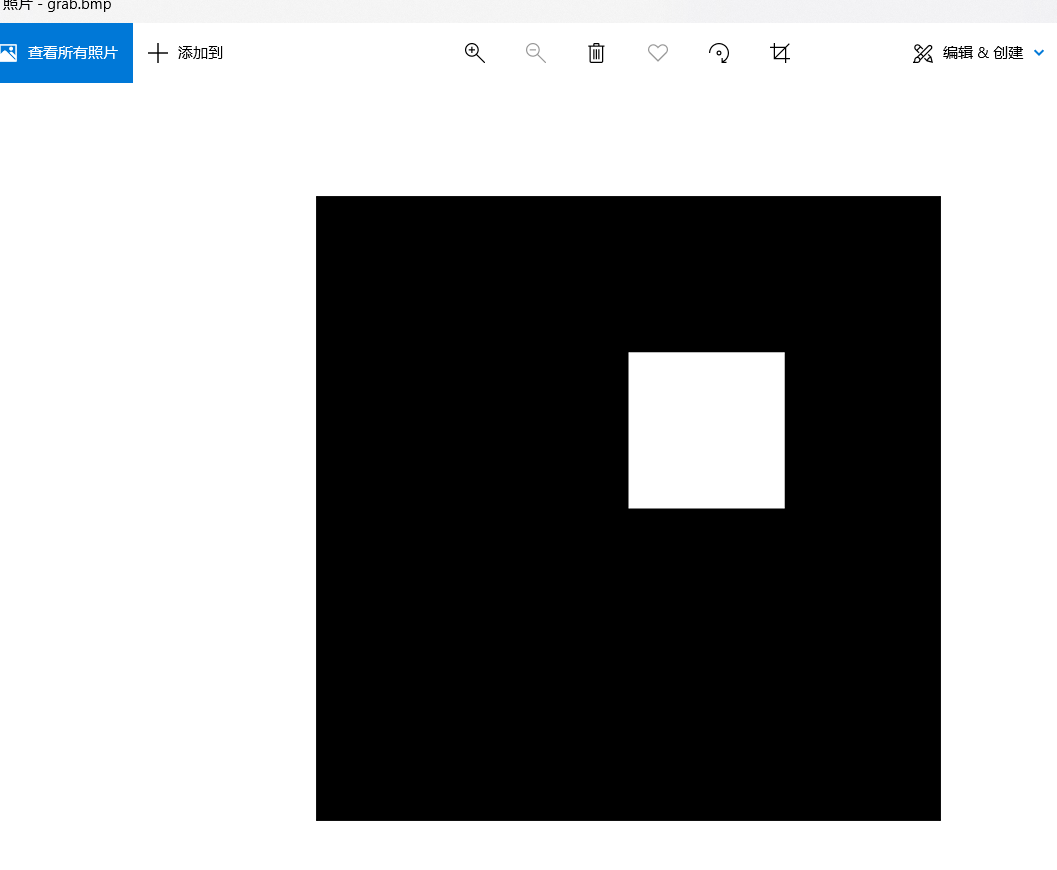
Pixel reading
#define WindowWidth   500
#define WindowHeight 500

/* Function grab
* Grab pixels in the window
* Suppose the window width is WindowWidth and the height is WindowHeight
*/
#define BMP_Header_Length 54
void grab(void)
{
	glReadBuffer(GL_FRONT);
	FILE* pDummyFile;
	FILE* pWritingFile;
	GLubyte* pPixelData;
	GLubyte   BMP_Header[BMP_Header_Length];
	GLint     i, j;
	GLint     PixelDataLength;

	// Calculate the actual length of pixel data
	i = WindowWidth * 3;    // Get the pixel data length of each row
	//In the BMP file of 24 bit color, every three bytes represent the color of one pixel.
	while (i % 4 != 0)       // Supplement the data until i is a multiple of 4
		++i;                // There were faster algorithms,
						   // However, it only pursues intuition and has no high requirements for speed
	PixelDataLength = i * WindowHeight;

	// Allocate memory and open files
	pPixelData = (GLubyte*)malloc(PixelDataLength);
	if (pPixelData == 0)
		exit(0);

	fopen_s(&pDummyFile,"dummy.bmp", "rb");
	if (pDummyFile == 0)
		exit(0);

	fopen_s(&pWritingFile,"grab.bmp", "wb");
	if (pWritingFile == 0)
		exit(0);

	// Read pixel
	glPixelStorei(GL_UNPACK_ALIGNMENT, 4);//4 alignment
	glReadPixels(0, 0, WindowWidth, WindowHeight,
		GL_BGR_EXT, GL_UNSIGNED_BYTE, pPixelData);//The last parameter is the location where the pixel is stored in memory after reading

	// Put dummy The file header of BMP is copied to the file header of the new file
	fread(BMP_Header, sizeof(BMP_Header), 1, pDummyFile);
	fwrite(BMP_Header, sizeof(BMP_Header), 1, pWritingFile);
	fseek(pWritingFile, 0x0012, SEEK_SET); //Move to position 0x0012 and read the width
	i = WindowWidth;
	//After reading, it will automatically go to the next height
	j = WindowHeight;
	fwrite(&i, sizeof(i), 1, pWritingFile);
	fwrite(&j, sizeof(j), 1, pWritingFile);

	// Write pixel data
	fseek(pWritingFile, 0, SEEK_END);//The end of the current file, that is, after the header information
	//Offset start position: file header 0(SEEK_SET), current position 1(SEEK_CUR), file tail 2(SEEK_END))
	fwrite(pPixelData, PixelDataLength, 1, pWritingFile);

	// Free memory and close files
	fclose(pDummyFile);
	fclose(pWritingFile);
	free(pPixelData);
}
void init()
{
	{

		/*Set light source*/
		GLfloat light_position[] = { 0.5,0.0,1.0,0.0 };//Light source location
		GLfloat light_ambient[] = { 1.0,1.0,1.0,1.0 };   //Light left after multiple reflection
		GLfloat light_diffuse[] = { 1.0,1.0,1.0,1.0 };   //Diffuse light
		GLfloat light_specular[] = { 1.0,1.0,1.0,1.0 };   //Specular reflected light

		glLightfv(GL_LIGHT0, GL_POSITION, light_position);//Sets the position of the light source
		glLightfv(GL_LIGHT0, GL_AMBIENT, light_ambient);
		glLightfv(GL_LIGHT0, GL_DIFFUSE, light_diffuse);
		glLightfv(GL_LIGHT0, GL_SPECULAR, light_specular);
	}

	{
		/*Sets the material of the ball*/
		GLfloat sphere_specular[] = { 1.0,1.0,1.0,1.0 };
		GLfloat sphere_diffuse[] = { 1.0,1.0,1.0,1.0 };
		GLfloat sphere_ambient[] = { 0.0,0.0,0.0,1.0 };
		GLfloat sphere_emission[] = { 0.0,0.0,0.0,1.0 };//Outward astigmatism
		GLfloat sphere_shininess[] = { 100.0 }; //Specular reflection index

		glMaterialfv(GL_FRONT, GL_AMBIENT, sphere_ambient);
		glMaterialfv(GL_FRONT, GL_DIFFUSE, sphere_diffuse);
		glMaterialfv(GL_FRONT, GL_SPECULAR, sphere_specular);
		glMaterialfv(GL_FRONT, GL_EMISSION, sphere_emission);
		glMaterialfv(GL_FRONT, GL_SPECULAR, sphere_specular);
		glMaterialfv(GL_FRONT, GL_SHININESS, sphere_shininess);
	}

	GLfloat gl_model_ambient[] = { 0.2,0.2,0.2,1.0 };//Weak ambient light makes objects visible

	glClearColor(1.0, 0.75, 0.78, 1.0);//background color
	glShadeModel(GL_SMOOTH);//smooth coloring

	glLightModelfv(GL_LIGHT_MODEL_AMBIENT, gl_model_ambient);
	//Specifies the global ambient light for objects to be visible
	glEnable(GL_LIGHTING);//Start lighting
	glEnable(GL_LIGHT0);	//Start light source
	glEnable(GL_DEPTH_TEST);//Start depth test
}
void myDisplay()
{
	glClear(GL_COLOR_BUFFER_BIT | GL_DEPTH_BUFFER_BIT);
	glutSolidSphere(1.0, 3000, 1000);//Radius, north-south longitude, latitude
	grab();
	glFlush();
}
void reshape(int w, int h)
{
	glViewport(0, 0, (GLsizei)w, (GLsizei)h);//Make the pixel matrix occupy the whole new window
	glMatrixMode(GL_PROJECTION);//Set the matrix of the current operation to projection view matrix
	glLoadIdentity();

	float nowRange = 2;
	GLfloat nRange = (GLfloat)nowRange;

	if (w <= h) //Change the size of the window and the shape of the graph remains unchanged
		glOrtho(-nRange, nRange, -nRange * h / w, nRange * h / w, -nRange, nRange);
	else
		glOrtho(-nRange * w / h, nRange * w / h, -nRange, nRange, -nRange, nRange);
	//Sets the current visual space as orthographic
	glMatrixMode(GL_MODELVIEW);//Set the matrix of the current operation to model view matrix
	glLoadIdentity();

}
int main(int argc, char* argv[])
{
	glutInit(&argc, argv);
	glutInitDisplayMode(GLUT_RGBA | GLUT_SINGLE);
	int cx = glutGet(GLUT_SCREEN_WIDTH);
	int cy = glutGet(GLUT_SCREEN_HEIGHT);//To center the window
	glutInitWindowPosition((cx - 400) / 2, (cy - 400) / 2);
	glutInitWindowSize(WindowWidth, WindowHeight);
	glutCreateWindow("OpenGL3D Fundamentals of programming");
	init();//Initialize view settings
	glutDisplayFunc(&myDisplay);
	glutReshapeFunc(reshape);//Change window
	glutMainLoop();
	return 0;
}
glPixelStorei(GL_UNPACK_ALIGNMENT,4) controls the alignment of the read data. By default, 4 bytes are aligned, that is, the number of image data bytes in a row must be an integer multiple of 4, that is, when reading data, 4 bytes are read to render one row, and then 4 bytes are read to render the second row. For RGB 3-byte pixels, if there are 10 pixels in a row, i.e. 30 bytes, in the 4-byte alignment mode, OpenGL It will read 32 bytes of data. If you don't pay attention, it will cause the reading of the function in glTextImage to cross the boundary and crash completely.

glReadPixels
The function has a total of seven parameters. The first four parameters can get a rectangle, and the pixels contained in the rectangle will be read out. (the first and second parameters represent the horizontal and vertical coordinates of the lower left corner of the rectangle. The coordinates are zero in the lower left corner of the window and the maximum in the upper right corner; the third and fourth parameters represent the width and height of the rectangle)
The fifth parameter represents the read content, for example: GL_RGB will read the red, green and blue data of pixels in turn, GL_RGBA will read the red, green, blue and alpha data of pixels in turn, and GL_RED only reads the red data of pixels (similar to GL_GREEN, GL_BLUE, and GL_ALPHA). If the RGBA color mode is not used, but the color index mode is used, GL can also be used_ COLOR_ Index to read the color index of pixels. At present, we only need to know these, but we can actually read other contents, such as the depth data of the depth buffer.
The sixth parameter indicates the format used when the read content is saved to memory, such as GL_UNSIGNED_BYTE will save various data as GLubyte, GL_FLOAT will save various data as GLfloat, etc.
The seventh parameter represents a pointer. After the pixel data is read, it will be saved to the address represented by this pointer.
glDrawPixels
The parameter contents of the glDrawPixels function are roughly the same as those of the glReadPixels function. Its first, second, third and fourth parameters correspond to the third, fourth, fifth and sixth parameters of the glReadPixels function, respectively, and represent the image width, image height, pixel data content and the format of pixel data in memory in turn. The last parameter of the two functions is also corresponding. glReadPixels represents the location of the pixel in memory after reading, and glDrawPixels represents the location of the pixel data used for drawing in memory.
Pixel rendering
#include<stdio.h>
#include<stdlib.h>
#include <math.h>
#include<glut.h>
#include<glaux.h>
#include <time.h>
static GLint ImageWidth;
static GLint ImageHeight;
static GLint PixelLength;
static GLubyte* PixelData;
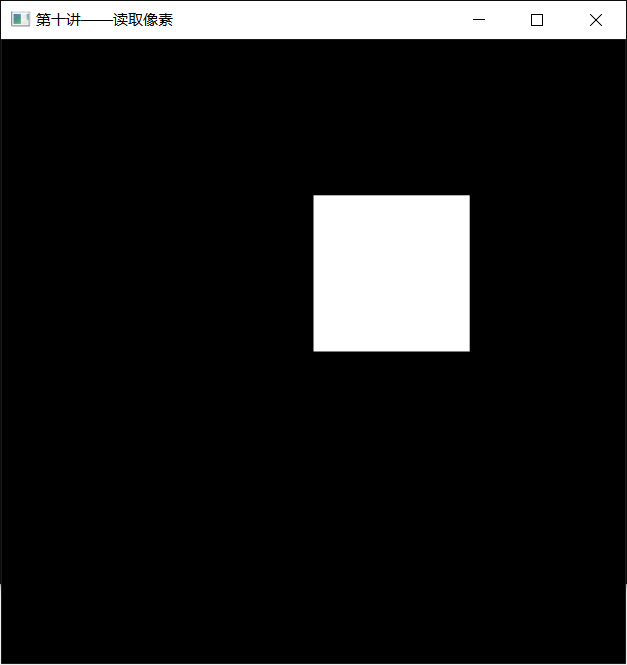
void display(void)
{
// It is not necessary to clear the screen
// Each time you draw, the screen covers the entire screen
// Therefore, the result is the same whether the screen is cleared or not
// glClear(GL_COLOR_BUFFER_BIT);
// Draw pixel
glDrawPixels(ImageWidth, ImageHeight,
GL_BGR_EXT, GL_UNSIGNED_BYTE, PixelData);
// Finish drawing
glutSwapBuffers();
}
int main(int argc, char* argv[])
{
// Open file
FILE* pFile;
fopen_s(&pFile, "grab.bmp", "rb");
if (pFile == 0)
exit(0);
// Read image size information
fseek(pFile, 0x0012, SEEK_SET);
fread(&ImageWidth, sizeof(ImageWidth), 1, pFile);
fread(&ImageHeight, sizeof(ImageHeight), 1, pFile);
// Calculate pixel data length
PixelLength = ImageWidth * 3;
while (PixelLength % 4 != 0)
++PixelLength;
PixelLength *= ImageHeight;
// Read pixel data
PixelData = (GLubyte*)malloc(PixelLength);
if (PixelData == 0)
exit(0);
fseek(pFile, 54, SEEK_SET);
fread(PixelData, PixelLength, 1, pFile);
// Close file
fclose(pFile);
// Initialize GLUT and run
glutInit(&argc, argv);
glutInitDisplayMode(GLUT_DOUBLE | GLUT_RGBA);
glutInitWindowPosition(100, 100);
glutInitWindowSize(ImageWidth, ImageHeight);
glutCreateWindow("Read pixel");
glutDisplayFunc(&display);
glutMainLoop();
return 0;
}
Using glCopyPixels to copy new pixel data directly from pixel data avoids the format conversion of redundant data, and may also reduce some data copying operations (because the data may be copied directly by the graphics card without going through the main memory), so it is more efficient.
The glCopyPixels function also sets the drawing position through the glRasterPos * series of functions. Because it does not need to involve the main memory, it does not need to specify the format of the data in memory or use any pointers.
The glCopyPixels function has five parameters. The first and second parameters represent the lower left corner coordinates of the rectangle of the copied pixel source, the third and fourth parameters represent the width and height of the copied pixel source, and the fifth parameter usually uses GL_COLOR represents the color of the copied pixel, but it can also be GL_DEPTH or GL_STENCIL, which means copy depth buffer data or template buffer data respectively.
Pixel copy
After making a triangle, copy the pixels and flip them horizontally and vertically at the same time, then reduce it to half of the original and draw it. After drawing, call the previous grab function to save all the contents in the screen as grab.. bmp.
#include<stdio.h>
#include<stdlib.h>
#include <math.h>
#include<glut.h>
#include<glaux.h>
#include <time.h>

#define WindowWidth   500
#define WindowHeight 500

/* Function grab
* Grab pixels in the window
* Suppose the window width is WindowWidth and the height is WindowHeight
*/
#define BMP_Header_Length 54
void grab(void)
{
	glReadBuffer(GL_FRONT);
	FILE* pDummyFile;
	FILE* pWritingFile;
	GLubyte* pPixelData;
	GLubyte   BMP_Header[BMP_Header_Length];
	GLint     i, j;
	GLint     PixelDataLength;

	// Calculate the actual length of pixel data
	i = WindowWidth * 3;    // Get the pixel data length of each row
	//In the BMP file of 24 bit color, every three bytes represent the color of one pixel.
	while (i % 4 != 0)       // Supplement the data until i is a multiple of 4
		++i;                // There were faster algorithms,
						   // However, it only pursues intuition and has no high requirements for speed
	PixelDataLength = i * WindowHeight;

	// Allocate memory and open files
	pPixelData = (GLubyte*)malloc(PixelDataLength);
	if (pPixelData == 0)
		exit(0);

	fopen_s(&pDummyFile,"dummy.bmp", "rb");
	if (pDummyFile == 0)
		exit(0);

	fopen_s(&pWritingFile,"grab.bmp", "wb");
	if (pWritingFile == 0)
		exit(0);

	// Read pixel
	glPixelStorei(GL_UNPACK_ALIGNMENT, 4);//4 alignment
	glReadPixels(0, 0, WindowWidth, WindowHeight,
		GL_BGR_EXT, GL_UNSIGNED_BYTE, pPixelData);//The last parameter is the location where the pixel is stored in memory after reading

	// Put dummy The file header of BMP is copied to the file header of the new file
	fread(BMP_Header, sizeof(BMP_Header), 1, pDummyFile);
	fwrite(BMP_Header, sizeof(BMP_Header), 1, pWritingFile);
	fseek(pWritingFile, 0x0012, SEEK_SET); //Move to position 0x0012 and read the width
	i = WindowWidth;
	//After reading, it will automatically go to the next height
	j = WindowHeight;
	fwrite(&i, sizeof(i), 1, pWritingFile);
	fwrite(&j, sizeof(j), 1, pWritingFile);

	// Write pixel data
	fseek(pWritingFile, 0, SEEK_END);//The end of the current file, that is, after the header information
	//Offset start position: file header 0(SEEK_SET), current position 1(SEEK_CUR), file tail 2(SEEK_END))
	fwrite(pPixelData, PixelDataLength, 1, pWritingFile);

	// Free memory and close files
	fclose(pDummyFile);
	fclose(pWritingFile);
	free(pPixelData);
}

void display(void)
{
	// Clear screen
	glClear(GL_COLOR_BUFFER_BIT);

	// draw
	glBegin(GL_TRIANGLES);
	glColor3f(1.0f, 0.0f, 0.0f);    glVertex2f(0.0f, 0.0f);
	glColor3f(0.0f, 1.0f, 0.0f);    glVertex2f(1.0f, 0.0f);
	glColor3f(0.0f, 0.0f, 1.0f);    glVertex2f(0.5f, 1.0f);
	glEnd();
	glPixelZoom(-0.5f, -0.5f);
	glRasterPos2i(1, 1);
	glCopyPixels(WindowWidth / 2, WindowHeight / 2,
		WindowWidth / 2, WindowHeight / 2, GL_COLOR);

	// Finish drawing, capture the image and save it as BMP file
	glutSwapBuffers();
	grab();
}

int main(int argc, char* argv[])
{
	glutInit(&argc, argv);
	glutInitDisplayMode(GLUT_RGBA | GLUT_DOUBLE);
	int cx = glutGet(GLUT_SCREEN_WIDTH);
	int cy = glutGet(GLUT_SCREEN_HEIGHT);//To center the window
	glutInitWindowPosition((cx - 400) / 2, (cy - 400) / 2);
	glutInitWindowSize(WindowWidth, WindowHeight);
	glutCreateWindow("OpenGL3D Fundamentals of programming");
	glutDisplayFunc(&display);
	glutMainLoop();
	return 0;
}
Lesson 11
1. Enable and load textures
    glEnable(GL_TEXTURE_2D);  // Enable 2D texture
    glDisable(GL_TEXTURE_2D); // Disable 2D textures
Using the glTexImage2D function, you can load a two-dimensional texture
one ️⃣ The first parameter is the specified target. In our introductory textbook, this parameter will always use GL_TEXTURE_2D.
two ️⃣ The second parameter is "multiple levels of detail". Now we do not consider multiple texture details, so this parameter is set to zero.
three ️⃣ The third parameter has two uses. In OpenGL 1.0, the original version, integers are used to represent the number of color components. For example, pixel data is represented by RGB color, and there are three values of red, green and blue, so the parameter is set to 3. If pixel data is represented by RGBA color, there are four values of red, green, blue and alpha, so the parameter is set to 4. In later versions, GL can be used directly_ RGB or GL_RGBA to represent the above situation is more intuitive (and brings some other benefits, which will not be mentioned here for the time being). Note: Although we use Windows BMP files as textures, blue pixels are generally at the top, and their real format is GL_ BGR instead of GL_RGB is different in data order, but GL is still used here because it is also red, green and blue_ RGB. (if GL_BGR is used, OpenGL will not recognize this parameter, resulting in an error)
four ️⃣ The fourth and fifth parameters are the width and height of two-dimensional texture pixels. Here is a very important point to note: in many previous versions of OpenGL, the size of the texture must be an integer power of 2, that is, the width and height of the texture can only be the equivalent of 16, 32, 64, 128 and 256. This restriction was not lifted until the latest version. Moreover, some OpenGL implementations (for example, OpenGL attached to the driver of on-board graphics card on some PC s) do not support such a high version of OpenGL. Therefore, pay special attention to its size when using textures. Try to use the texture of the integer power of 2. When this requirement cannot be met, use the gluScaleImage function to scale the image to the specified size (useful in the following examples). In addition, both the old version and the new version limit the maximum texture size. For example, an OpenGL implementation may require that the maximum texture cannot exceed 1024 * 1024. You can use the following code to obtain the maximum texture supported by OpenGL:
GLint max;
glGetIntegerv(GL_MAX_TEXTURE_SIZE, &max);
Such a value of max is the maximum texture supported in the current OpenGL implementation.
For a long time, many graphics programs like to use 256 * 256 textures, not only because 256 is the integer power of 2, but also because some hardware can use 8-bit integers to represent texture coordinates, and the 8th power of 2 is exactly 256. This ingenious combination creates some good conditions for hardware optimization when dealing with texture coordinates.
five ️⃣ The sixth parameter is the size of the texture border. We do not use the texture border, so it is set to zero here.
six ️⃣ The last three parameters are used in the same way as the last three parameters of the glDrawPixels function. Refer to the last three parameters of glReadPixels for their meanings. You can review the relevant contents of Lesson 10, which will not be repeated here.
For example, if there is a pixel image with the size of width/*height and the format of the most commonly used 24 bit BGR in Windows system, which is saved in pixels. To load such an image as a texture, you can use the following code:
glTexImage2D(GL_TEXTURE_2D, 0, GL_RGB, width, height, 0, GL_BGR_EXT, GL_UNSIGNED_BYTE, pixels);
Note that the process of loading texture may be slow because the texture data is usually large, such as a 512 * 512 BGR format image with a size of 0.75M. To transfer these pixel data from main memory to special graphics hardware, it may also be necessary to convert the pixel format specified in the program into a format recognized by graphics hardware (or the format that can give full play to the performance of graphics hardware). These operations require more time.
2. Texture coordinates
As long as the pixel position of each vertex in the texture image is specified, OpenGL will automatically calculate the pixel position of other points other than vertices in the texture image.
When drawing a line segment, we set one endpoint to use "the color of the lowest left corner in the texture image" as its color, and the other endpoint to use "the color of the upper right corner in the texture image" as its color, then OpenGL will automatically select the color of the appropriate position in the texture image, Fill each pixel of the line segment (for example, the midpoint of the line segment may be the color of the pixel in the center of the texture image).
Use the glTexCoord * series of functions to specify texture coordinates. The use of these functions is very similar to using the glVertex * series of functions to specify vertex coordinates. For example: glTexCoord2f(0.0f, 0.0f); Specifies to use (0, 0) texture coordinates
Usually, each vertex uses a different texture, so the following form of code is common.
glBegin( /* ... */ );
    glTexCoord2f( /* ... */ );  glVertex3f( /* ... */ );
    glTexCoord2f( /* ... */ );  glVertex3f( /* ... */ );
    /* ... */
glEnd();
Functions of operation matrices such as glRotate *, glScale *, glTranslate * can be used to handle the work of "converting texture coordinates"
3. Texture parameters
Use the glTexParameter * series of functions to set texture parameters. Generally, the following four parameters need to be set:
one ️⃣ GL_TEXTURE_MAG_FILTER: refers to how a texture image should be processed when it is used on a shape larger than it (i.e. it is possible that a pixel in the texture image will be applied to multiple pixels in the actual drawing. For example, applying a 256 * 256 texture image to a 512 * 512 Square). Selectable settings are GL_NEAREST and GL_LINEAR, the former means "use the color of the pixel with the closest coordinates in the texture as the pixel color to be drawn", and the latter means "use several colors with the closest coordinates in the texture to get the pixel color to be drawn through the weighted average algorithm". The former requires only simple comparison and requires less operation, which may be faster, while the latter requires weighted average calculation, which involves division operation, which may be slower (but if there is special processing hardware, they may also have the same speed). In terms of visual effect, the former is poor, and in some cases, the sawtooth phenomenon is obvious, and the latter will be better (but if the texture image itself is relatively large, the visual effect of the two will be relatively close).
two ️⃣ GL_TEXTURE_MIN_FILTER: refers to how to deal with a texture image when it is used on a shape less than (or equal to) it (that is, it is possible that multiple pixels in the texture image can be applied to a pixel in actual drawing. For example, apply a 256 * 256 texture image to a 128 * 128 square). Selectable settings are
GL_NEAREST,GL_LINEAR,GL_NEAREST_MIPMAP_NEAREST,GL_NEAREST_MIPMAP_LINEAR,GL_LINEAR_MIPMAP_NEAREST and GL_LINEAR_MIPMAP_LINEAR.
The last four of them involve mipmap, which we don't need to understand for the time being. The first two options are and GL_ TEXTURE_ MAG_ Similar in filter.
three ️⃣ GL_TEXTURE_WRAP_S: It refers to how to handle when the first dimension coordinate value of texture coordinate is greater than 1.0 or less than 0.0. The basic options are GL_CLAMP and GL_REPEAT, the former means "truncation", that is, those exceeding 1.0 are treated as 1.0, and those less than 0.0 are treated as 0.0. The latter means "Repetition", that is, add an appropriate integer (which can be positive or negative) to the coordinate value to get a value in the range of [0.0, 1.0], and then use this value as the new texture coordinate. For example, for a two-dimensional texture, when drawing a shape, a pixel needs to get the color of the pixel with coordinates of (3.5, 0.5) in the texture. If the coordinate value of the first dimension is more than 1.0, it is in GL_CLAMP mode will be converted to (1.0, 0.5) in GL_REPEAT mode will be converted to (0.5, 0.5). In the later version of OpenGL, a new processing method is added, which is not introduced here. If this parameter is not specified, it defaults to GL_REPEAT.
four ️⃣ GL_TEXTURE_WRAP_T: It refers to how to handle when the 2D coordinate value of texture coordinates is greater than 1.0 or less than 0.0. Options and GL_TEXTURE_WRAP_S is similar and will not be repeated. If this parameter is not specified, it defaults to GL_REPEAT.
The codes for setting parameters are as follows:
glTexParameteri(GL_TEXTURE_2D, GL_TEXTURE_WRAP_S, GL_REPEAT);
4. Texture object
We can put each texture (including texture pixel data, texture size and other information, as well as the texture parameters mentioned above) into one texture object, and save multiple textures at the same time by creating multiple texture objects. In this way, before using the texture for the first time, load all the textures, and then when painting, you only need to indicate which texture object to use.
Using texture objects is similar to using display lists: a positive integer is used as the number of texture objects. Before use, you can call glGenTextures to assign texture objects. This function has two common uses:
GLuint texture_ID;
glGenTextures(1, &texture_ID); // Assign a texture object number

perhaps
    :
GLuint texture_ID_list[5];
glGenTextures(5, texture_ID_list); // Assign the number of 5 texture objects
Zero is a special texture object number, which means "default texture object". If it is assigned correctly, glGenTextures will not assign this number. Corresponding to glGenTextures is glDeleteTextures, which is used to destroy a texture object.
After assigning a texture object number, use the glBindTexture function to specify the texture object currently used. Then you can use glTexImage * series functions to specify texture pixels, glTexParameter * series functions to specify texture parameters, and glTexCoord * series functions to specify texture coordinates. If the glBindTexture function is not used, the glTexImage *, glTexParameter *, glTexCoord * series of functions operate on a texture object numbered 0 by default.
The glBindTexture function has two parameters. The first parameter is the target that needs to use texture. Because we only study 2D texture now, we specify it as GL_TEXTURE_2D, the second parameter is the number of textures used.
Using multiple texture objects allows OpenGL to save multiple textures at the same time. When using, you only need to call the glBindTexture function to switch between different textures without loading textures repeatedly. Therefore, the rendering speed of animation will be significantly improved. Typical codes are as follows:
// At the beginning of the program: assign the texture number and load the texture
glGenTextures( /* ... */ );
glBindTexture(GL_TEXTURE_2D, texture_ID_1);
// Load first texture
glBindTexture(GL_TEXTURE_2D, texture_ID_2);
// Load second texture

// When painting, switch and use textures without loading
glBindTexture(GL_TEXTURE_2D, texture_ID_1); // Specifies the first texture
// Use first texture
glBindTexture(GL_TEXTURE_2D, texture_ID_2); // Specifies the second texture
// Use second texture
5. Example
#include<stdio.h>
#include<stdlib.h>
#include <math.h>
#include<glut.h>
#include<glaux.h>
#include <time.h>

#define WindowWidth   500
#define WindowHeight 500

/* Function grab
 * Grab pixels in the window
 * Suppose the window width is WindowWidth and the height is WindowHeight
 */
#define BMP_Header_Length 54
void grab(void)
{
    FILE* pDummyFile;
    FILE* pWritingFile;
    GLubyte* pPixelData;
    GLubyte  BMP_Header[BMP_Header_Length];
    GLint    i, j;
    GLint    PixelDataLength;

    // Calculate the actual length of pixel data
    i = WindowWidth * 3;   // Get the pixel data length of each row
    while (i % 4 != 0)      // Supplement the data until i is a multiple of
        ++i;               // There were faster algorithms,
                           // However, it only pursues intuition and has no high requirements for speed
    PixelDataLength = i * WindowHeight;

    // Allocate memory and open files
    pPixelData = (GLubyte*)malloc(PixelDataLength);
    if (pPixelData == 0)
        exit(0);

    fopen_s(&pDummyFile, "dummy.bmp", "rb");
    if (pDummyFile == 0)
        exit(0);

    fopen_s(&pWritingFile, "grab.bmp", "wb");
    if (pWritingFile == 0)
        exit(0);

    // Read pixel
    glPixelStorei(GL_UNPACK_ALIGNMENT, 4);
    glReadPixels(0, 0, WindowWidth, WindowHeight,
        GL_BGR_EXT, GL_UNSIGNED_BYTE, pPixelData);

    // Put dummy The file header of BMP is copied to the file header of the new file
    fread(BMP_Header, sizeof(BMP_Header), 1, pDummyFile);
    fwrite(BMP_Header, sizeof(BMP_Header), 1, pWritingFile);
    fseek(pWritingFile, 0x0012, SEEK_SET);
    i = WindowWidth;
    j = WindowHeight;
    fwrite(&i, sizeof(i), 1, pWritingFile);
    fwrite(&j, sizeof(j), 1, pWritingFile);

    // Write pixel data
    fseek(pWritingFile, 0, SEEK_END);
    fwrite(pPixelData, PixelDataLength, 1, pWritingFile);

    // Free memory and close files
    fclose(pDummyFile);
    fclose(pWritingFile);
    free(pPixelData);
}

/* Function power_of_two
 * Check whether an integer is the integer power of 2. If yes, return 1; otherwise, return 0
 * In fact, just check the number of binary bits. If there is exactly 1, it returns 1, otherwise it returns 0
 * A trick is used to "see how many bits there are"
 * Using N & = (n-1) can reduce one of n (you can think about the specific principle by yourself)
 */
int power_of_two(int n)
{
    if (n <= 0)
        return 0;
    return (n & (n - 1)) == 0;
}

/* Function load_texture
 * Read a BMP file as a texture
 * If it fails, it returns 0. If it succeeds, it returns the texture number
 */
GLuint load_texture(const char* file_name)
{
    GLint width, height, total_bytes;
    GLubyte* pixels = 0;
    GLuint last_texture_ID, texture_ID = 0;

    // Open the file. If it fails, return
    FILE* pFile;
    fopen_s(&pFile, file_name, "rb");
    if (pFile == 0)
        return 0;

    // Read the width and height of the image in the file
    fseek(pFile, 0x0012, SEEK_SET);
    fread(&width, 4, 1, pFile);
    fread(&height, 4, 1, pFile);
    fseek(pFile, BMP_Header_Length, SEEK_SET);

    // Calculate the number of bytes occupied by pixels in each row, and calculate the total number of pixel bytes based on this data
    {
        GLint line_bytes = width * 3;
        while (line_bytes % 4 != 0)
            ++line_bytes;
        total_bytes = line_bytes * height;
    }

    // Allocate memory based on total pixel bytes
    pixels = (GLubyte*)malloc(total_bytes);
    if (pixels == 0)
    {
        fclose(pFile);
        return 0;
    }

    // Read pixel data
    if (fread(pixels, total_bytes, 1, pFile) <= 0)
    {
        free(pixels);
        fclose(pFile);
        return 0;
    }

    // In older versions of OpenGL
    // If the width and height of the image are not an integer power of, scaling is required
    // The OpenGL version is not checked here. For the sake of version compatibility, it is treated as the old version
    // In addition, whether the old version or the new version,
    // When the width and height of the image exceed the maximum supported by the current OpenGL implementation, it should also be scaled
    {
        GLint max;
        glGetIntegerv(GL_MAX_TEXTURE_SIZE, &max);
        if (!power_of_two(width)
            || !power_of_two(height)
            || width > max
            || height > max)
        {
            const GLint new_width = 256;
            const GLint new_height = 256; // Specifies that the new size after scaling is a square with side length
            GLint new_line_bytes, new_total_bytes;
            GLubyte* new_pixels = 0;

            // Calculate the number of bytes required per line and the total number of bytes
            new_line_bytes = new_width * 3;
            while (new_line_bytes % 4 != 0)
                ++new_line_bytes;
            new_total_bytes = new_line_bytes * new_height;

            // Allocate memory
            new_pixels = (GLubyte*)malloc(new_total_bytes);
            if (new_pixels == 0)
            {
                free(pixels);
                fclose(pFile);
                return 0;
            }

            // Pixel scaling
            gluScaleImage(GL_RGB,
                width, height, GL_UNSIGNED_BYTE, pixels,
                new_width, new_height, GL_UNSIGNED_BYTE, new_pixels);

            // Release the original pixel data, point the pixels to the new pixel data, and reset the width and height
            free(pixels);
            pixels = new_pixels;
            width = new_width;
            height = new_height;
        }
    }

    // Assign a new texture number
    glGenTextures(1, &texture_ID);
    if (texture_ID == 0)
    {
        free(pixels);
        fclose(pFile);
        return 0;
    }

    // Bind the new texture, load the texture and set the texture parameters
    // Before binding, the texture number of the original binding is obtained for final restoration
    glGetIntegerv(GL_TEXTURE_BINDING_2D, (GLint*)&last_texture_ID);
    glBindTexture(GL_TEXTURE_2D, texture_ID);
    glTexParameteri(GL_TEXTURE_2D, GL_TEXTURE_MIN_FILTER, GL_LINEAR);
    glTexParameteri(GL_TEXTURE_2D, GL_TEXTURE_MAG_FILTER, GL_LINEAR);
    glTexParameteri(GL_TEXTURE_2D, GL_TEXTURE_WRAP_S, GL_REPEAT);
    glTexParameteri(GL_TEXTURE_2D, GL_TEXTURE_WRAP_T, GL_REPEAT);
    glTexEnvf(GL_TEXTURE_ENV, GL_TEXTURE_ENV_MODE, GL_REPLACE);
    glTexImage2D(GL_TEXTURE_2D, 0, GL_RGB, width, height, 0,
        GL_BGR_EXT, GL_UNSIGNED_BYTE, pixels);//Using the glTexImage2D function, you can load a two-dimensional texture
    glBindTexture(GL_TEXTURE_2D, last_texture_ID);//Specifies the texture object currently used

    // The memory previously allocated for pixels can be released after using glTexImage2D
    // Because at this time, the pixel data has been saved separately by OpenGL (may be saved to special graphics hardware)
    free(pixels);
    return texture_ID;
}
/* The number of the two texture objects
 */
GLuint texGround;
GLuint texWall;

void display(void)
{
    // Clear screen
    glClear(GL_COLOR_BUFFER_BIT | GL_DEPTH_BUFFER_BIT);

    // Set Perspective
    glMatrixMode(GL_PROJECTION);
    glLoadIdentity();
    gluPerspective(75, 1, 1, 21);
    glMatrixMode(GL_MODELVIEW);
    glLoadIdentity();
    gluLookAt(1, 5, 5, 0, 0, 0, 0, 0, 1);

    // Paint land using the land texture
    glBindTexture(GL_TEXTURE_2D, texGround);
    glBegin(GL_QUADS);//QUADS refers to quadrilateral,
    glTexCoord2f(0.0f, 0.0f); glVertex3f(-8.0f, -8.0f, 0.0f);
    glTexCoord2f(0.0f, 5.0f); glVertex3f(-8.0f, 8.0f, 0.0f);
    glTexCoord2f(5.0f, 5.0f); glVertex3f(8.0f, 8.0f, 0.0f);
    glTexCoord2f(5.0f, 0.0f); glVertex3f(8.0f, -8.0f, 0.0f);
    glEnd();
    // Paint the fence using the wall texture
    glBindTexture(GL_TEXTURE_2D, texWall);
    glBegin(GL_QUADS);
    glTexCoord2f(0.0f, 0.0f); glVertex3f(-6.0f, -3.0f, 0.0f);
    glTexCoord2f(0.0f, 1.0f); glVertex3f(-6.0f, -3.0f, 1.5f);
    glTexCoord2f(5.0f, 1.0f); glVertex3f(6.0f, -3.0f, 1.5f);
    glTexCoord2f(5.0f, 0.0f); glVertex3f(6.0f, -3.0f, 0.0f);
    glEnd();

    // Rotate and draw another
    glRotatef(-90, 0, 0, 1);
    glBegin(GL_QUADS);
    glTexCoord2f(0.0f, 0.0f); glVertex3f(-6.0f, -3.0f, 0.0f);
    glTexCoord2f(0.0f, 1.0f); glVertex3f(-6.0f, -3.0f, 1.5f);
    glTexCoord2f(5.0f, 1.0f); glVertex3f(6.0f, -3.0f, 1.5f);
    glTexCoord2f(5.0f, 0.0f); glVertex3f(6.0f, -3.0f, 0.0f);
    glEnd();

    // Swap buffers and save pixel data to a file
    grab();//order
    glutSwapBuffers();

}

int main(int argc, char* argv[])
{
    // GLUT initialization
    glutInit(&argc, argv);
    glutInitDisplayMode(GLUT_DOUBLE | GLUT_RGBA);
    glutInitWindowPosition(100, 100);
    glutInitWindowSize(WindowWidth, WindowHeight);
    glutCreateWindow("Lesson 11 - texture mapping test");
    glutDisplayFunc(&display);

    // Do some initialization here
    glEnable(GL_DEPTH_TEST);
    glEnable(GL_TEXTURE_2D);
    texGround = load_texture("ground.bmp");
    printf("%d", (int)texGround);
    texWall = load_texture("wall.bmp");
    printf("%d", (int)texWall);
    // Start display
    glutMainLoop();

    return 0;
}
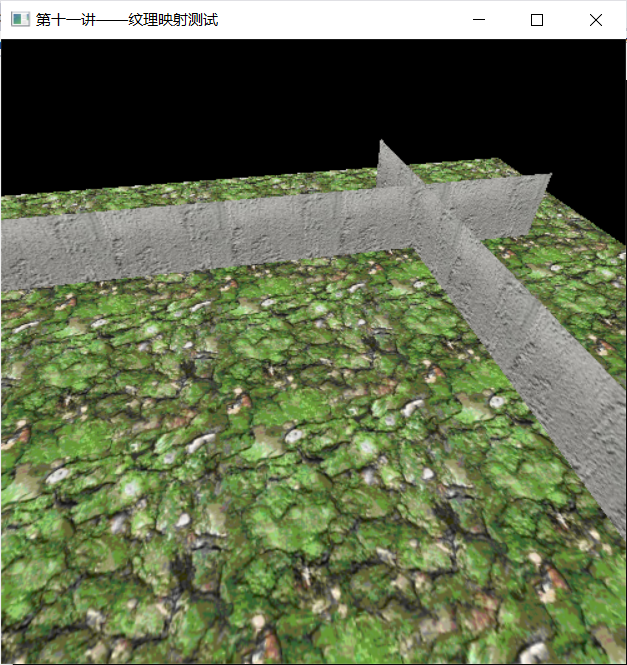
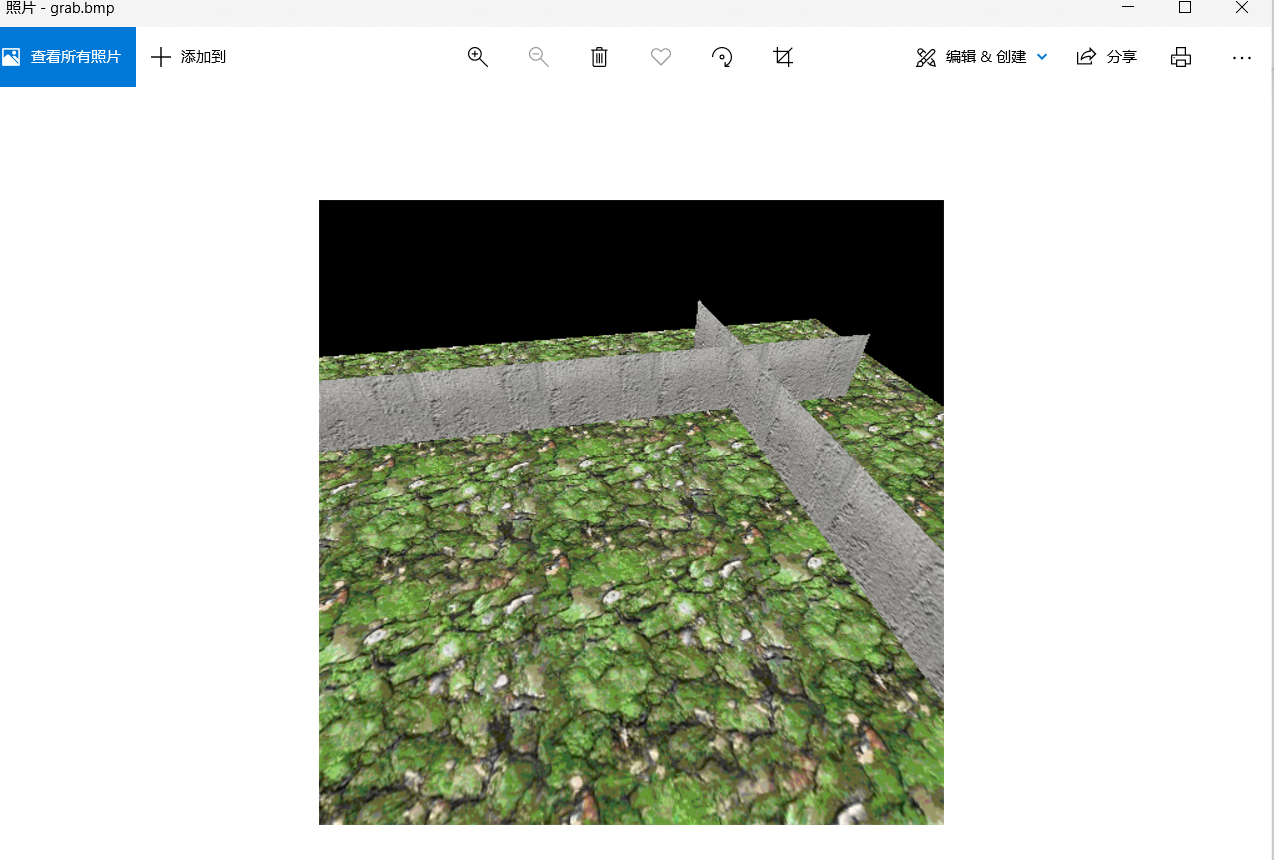
Lesson 12
Fragment testing is actually testing each pixel. Only the pixels that pass the test will be drawn, and the pixels that fail the test will not be drawn. OpenGL provides a variety of test operations, which can achieve some special effects.
As long as there is a depth buffer, whether the depth test is enabled or not, OpenGL will try to write the depth data into the buffer when the pixel is drawn, unless glDepthMask(GL_FALSE) is called to prohibit writing. These depth data can be used for some interesting purposes besides routine tests, such as drawing shadows and so on.
In addition to depth testing, OpenGL also provides clipping testing, Alpha testing and template testing.
Crop test
The clipping test is used to limit the drawing area. We can specify a rectangular clipping window. When clipping test is enabled, only pixels in this window can be drawn, and other pixels will be discarded. In other words, no matter how you draw, pixels outside the clipping window will not be modified.
You can enable or disable clipping tests by the following code:
glEnable(GL_SCISSOR_TEST); // Enable clipping test
glDisable(GL_SCISSOR_TEST); // Disable clipping test
You can specify a clipping window with position (x, y), width and height through the following code.
glScissor(x, y, width, height);
Note that the coordinates of the OpenGL window are * * (0, 0) in the lower left corner and (width, height) * * in the upper right corner, which is different from the Windows system window.
Another way to ensure that pixels are only drawn into a specific rectangular area is viewport transformation (introduced in Section 3 of lesson 5). But viewport transformation and clipping tests are different. Viewport transformation is to scale all the contents to an appropriate size and put them into a rectangular area; The clipping test does not scale, and pixels beyond the rectangular range are directly ignored.
Alpha Testing
In the previous lesson, we knew that the Alpha value of pixels can be used for blending operations. In fact, Alpha value has another purpose, which is Alpha test. When each pixel is about to be drawn, if the Alpha test is started, OpenGL will check the Alpha value of the pixel, and only the pixels whose Alpha value meets the conditions will be drawn (strictly speaking, the pixels that meet the conditions will pass this test, the next test will be carried out, and the drawing can be carried out only if all the tests pass). If the conditions are not met, the drawing will not be carried out. This "condition" can be: always pass (default), always fail, pass if it is greater than the set value, pass if it is less than the set value, pass if it is equal to the set value, pass if it is greater than or equal to the set value, pass if it is less than or equal to the set value, and pass if it is not equal to the set value.
If we need to draw a picture and some parts of the picture are transparent (imagine that you draw a picture first and then draw a picture frame, then many parts of the picture frame are transparent, so you can see the following photos through the picture frame), then you can use alpha test. Set the alpha value of all * * places in the picture where transparency is required to be 0.0, and the alpha value of places where transparency is not required to be 1.0, * * and then set the pass condition of alpha test to "pass if greater than 0.5", so as to achieve the purpose. Of course, you can also set the alpha value to 1.0 where transparency is required and 0.0 where transparency is not required, and then set the condition to "pass if it is less than 0.5". Alpha test is often set in more than one way, which can be selected according to personal preferences and actual needs.
You can enable or disable Alpha testing through the following code:
glEnable(GL_ALPHA_TEST); // Enable Alpha test
glDisable(GL_ALPHA_TEST); // Disable Alpha test
You can set the Alpha test condition to "pass if greater than 0.5" through the following code:
glAlphaFunc(GL_GREATER, 0.5f);
The second parameter of the function represents the set value for comparison. The first parameter is the comparison method, except GL_ In addition to less (pass if less than), you can also select:
 GL_ALWAYS(Always pass),
 GL_NEVER(Always fail),
 GL_LESS(Less than (pass),
 GL_LEQUAL(Less than or equal to,
 GL_EQUAL(Equal to (pass),
 GL_GEQUAL(Pass if greater than or equal to),
 GL_NOTEQUAL(If not, pass).
Almost all the effects that can be achieved by alpha test can be realized by OpenGL mixing function. So why do you need an alpha test? The answer is, it's performance related. Alpha test can get the final result by simply comparing the size, while mixed operation generally requires multiplication, and the performance is reduced. In addition, the order of OpenGL test is: clipping test, alpha test, template test and depth test. If a test fails, the next step will not be performed, and the mixing operation will be performed only if all tests pass. Therefore, in the case of alpha test, transparent pixels do not need to go through template test and depth test; If mixing operation is used, even transparent pixels need template test and depth test, and the performance will be degraded. Another point: for those "transparent" pixels, if the alpha test is used, the "transparent" pixels will not pass the test, so the depth value of the pixels will not be modified; When using the blending operation, although the color of the pixel is not modified, its depth value may be modified.
Therefore, if all pixels are "transparent" or "opaque", and there is no "translucency", try to use Alpha test instead of mixing operation. When you need to draw translucent pixels, you use the blending operation.
give an example
#include<stdio.h>
#include<stdlib.h>
#include <math.h>
#include<glut.h>
#include<glaux.h>
#include <time.h>
#include "tex.h"
/* Converts the current texture BGR format to BGRA format
 * If the RGB value of the pixel in the texture does not differ from the specified RGB by more than absolute, set Alpha to 0.0, otherwise set to 1.0
 */
void texture_colorkey(GLubyte r, GLubyte g, GLubyte b, GLubyte absolute)
{
    GLint width, height;
    GLubyte* pixels = 0;

    // Get the size information of the texture
    glGetTexLevelParameteriv(GL_TEXTURE_2D, 0, GL_TEXTURE_WIDTH, &width);
    glGetTexLevelParameteriv(GL_TEXTURE_2D, 0, GL_TEXTURE_HEIGHT, &height);

    // Allocate space and get texture pixels
    pixels = (GLubyte*)malloc(width * height * 4);
    if (pixels == 0)
        return;
    glGetTexImage(GL_TEXTURE_2D, 0, GL_BGRA_EXT, GL_UNSIGNED_BYTE, pixels);

    // Modify the Alpha value in the pixel
    // Where, pixels[i*4], pixels[i*4+1], pixels[i*4+2], pixels[i*4+3]
    //   Represents the blue, green, red and Alpha components of the ith pixel respectively, 0 represents the minimum and 255 represents the maximum
    {
        GLint i;
        GLint count = width * height;
        for (i = 0; i < count; ++i)
        {
            if (abs(pixels[i * 4] - b) <= absolute
                && abs(pixels[i * 4 + 1] - g) <= absolute
                && abs(pixels[i * 4 + 2] - r) <= absolute)
                pixels[i * 4 + 3] = 0;
            else
                pixels[i * 4 + 3] = 255;
        }
    }

    // Reset the modified pixels into the texture to free up memory
    glTexImage2D(GL_TEXTURE_2D, 0, GL_RGBA, width, height, 0,
        GL_BGRA_EXT, GL_UNSIGNED_BYTE, pixels);
    free(pixels);
}
void display(void)
{
    static int initialized = 0;
    static GLuint texWindow = 0;
    static GLuint texPicture = 0;

    // Perform initialization operations, including reading photos, reading photo frames, converting photo frames from BGR color to BGRA, and enabling two-dimensional texture
    if (!initialized)
    {
        texPicture = load_texture("pic.bmp");
        texWindow = load_texture("window.bmp");
        glBindTexture(GL_TEXTURE_2D, texWindow);
        texture_colorkey(255, 255, 255, 10);

        glEnable(GL_TEXTURE_2D);

        initialized = 1;
    }

    // Clear screen
    glClear(GL_COLOR_BUFFER_BIT);

    // Draw photos. At this time, Alpha test is not required, and all pixels are drawn
    glBindTexture(GL_TEXTURE_2D, texPicture);
    glDisable(GL_ALPHA_TEST);
    glBegin(GL_QUADS);
    glTexCoord2f(0, 0);     glVertex2f(-1.0f, -1.0f);
    glTexCoord2f(0, 1);     glVertex2f(-1.0f, 1.0f);
    glTexCoord2f(1, 1);     glVertex2f(1.0f, 1.0f);
    glTexCoord2f(1, 0);     glVertex2f(1.0f, -1.0f);
    glEnd();

    // Draw the photo frame. At this time, conduct Alpha test, and only draw the pixels of the opaque part
    glBindTexture(GL_TEXTURE_2D, texWindow);
    glEnable(GL_ALPHA_TEST);
    glAlphaFunc(GL_GREATER, 0.5f);
    glBegin(GL_QUADS);
    glTexCoord2f(0, 0);     glVertex2f(-1.0f, -1.0f);
    glTexCoord2f(0, 1);     glVertex2f(-1.0f, 1.0f);
    glTexCoord2f(1, 1);     glVertex2f(1.0f, 1.0f);
    glTexCoord2f(1, 0);     glVertex2f(1.0f, -1.0f);
    glEnd();

    // Swap buffer
    glutSwapBuffers();
}

int main(int argc, char* argv[])
{
    // GLUT initialization
    glutInit(&argc, argv);
    glutInitDisplayMode(GLUT_DOUBLE | GLUT_RGBA);
    glutInitWindowPosition(100, 100);
    glutInitWindowSize(500,500);
    glutCreateWindow("Lesson 12—— alpha test");
    glutDisplayFunc(&display);

    glutMainLoop();

    return 0;
}
Template test
Template testing requires a template buffer, which is specified when initializing OpenGL. If you use the GLUT toolkit, you can add GLUT to the parameter when calling the glutInitDisplayMode function_ Stencil, for example:
glutInitDisplayMode(GLUT_DOUBLE | GLUT_RGBA | GLUT_STENCIL);
glEnable(GL_STENCIL_TEST); // Enable template testing
glDisable(GL_STENCIL_TEST); // Disable template testing
OpenGL saves a "template value" for each pixel in the template buffer. When a pixel needs template test, the set template reference value is compared with the "template value" of the pixel. Those that meet the conditions pass the test, and those that do not meet the conditions are discarded and will not be drawn.
The condition settings are similar to those in the Alpha test. However, note that the Alpha test uses floating-point numbers for comparison, while the template test uses integers for comparison. There are also eight situations for comparison: always pass, always fail, pass if greater than, pass if less than, pass if greater than or equal to, pass if less than or equal to, pass if equal to, pass if equal to, and pass if not equal to.
glStencilFunc(GL_LESS, 3, mask);
This code sets the condition of the template test as "pass if it is less than 3". The meaning of the first two parameters of glStencilFunc is similar to the two parameters of glalphaffunc. The meaning of the third parameter is: if comparing, only the bits with binary 1 in the mask will be compared. For example, the template value of a pixel is 5 (binary 101), while the binary value of the mask is 00000011. Because only the last two bits are compared, the last two bits of 5 are 01, which is actually less than 3, so it will pass the test.
How to set the "template value" of pixels? The glClear function resets the template values of all pixels. The code is as follows:
glClear(GL_STENCIL_BUFFER_BIT);
 The color value and template value can be reset at the same time:
glClear(GL_COLOR_BUFFER_BIT | GL_STENCIL_BUFFER_BIT);
 As can be used glClearColor Function to specify the color after clearing the screen. In that case, you can also use glClearStencil Function to specify the template value after reset.
 The "template value" of each pixel will change according to the results of template test and depth test.
glStencilOp(fail, zfail, zpass);
This function specifies how the template value should change in three cases. The first parameter indicates how to change when the template test fails; The second parameter indicates how to change when the template test passes but the depth test fails; The third parameter indicates how to change when both template test and depth test pass. If the template test is not used, it is considered that the template test is always passed; If the depth test is not enabled, the depth test is considered to always pass)
Changes can be:
 GL_KEEP(Do not change, which is also the default value),
 GL_ZERO(Return to zero),
 GL_REPLACE(Replace the current template value with the set value in the test condition),
 GL_INCR(Increase by 1, but remain unchanged if it is already the maximum value),
 GL_INCR_WRAP(Increase by 1, but restart from zero if it is already the maximum),
 GL_DECR(Decrease by 1, but if it is already zero, it remains unchanged),
 GL_DECR_WRAP(Decrease by 1, but reset to the maximum value if it is already zero),
 GL_INVERT(Bit by bit (negative).
In the new version of OpenGL, different template test conditions and template value change methods are allowed for the front and back of polygons, so there are glStencilFuncSeparate function and glStencilOpSeparate function. These two functions are similar to glStencilFunc and glStencilOp respectively. Only one parameter face is added at the front to specify which face is currently set. GL can be selected_ FRONT, GL_ BACK, GL_ FRONT_ AND_ BACK.
Note: the template buffer is a little different from the depth buffer. Whether the depth test is enabled or not, when a pixel is drawn, the depth value of the pixel is always reset (unless glDepthMask(GL_FALSE);). If template test is not enabled, the template value of pixels will remain unchanged. It is possible to modify the template value of pixels only when template test is enabled.
Try not to use the glStencilFuncSeparate and glStencilOpSeparate functions.
As you can see from the above, using the clipping test can limit the drawing area to a rectangular area. However, if you need to limit the drawing area to an irregular area, you need to use the template test.
For example: draw a lake and the surrounding trees, and then draw the reflection of the trees in the lake. In order to ensure that the reflection is correctly limited to the lake surface, a template test can be used. The specific steps are as follows:
(1) Close the template test and draw the ground and trees.
(2) Open the template test and use glClear to set the template value of all pixels to 0.
(3) Set glStencilFunc(GL_ALWAYS, 1, 1); glStencilOp(GL_KEEP, GL_KEEP, GL_REPLACE); Draw the surface of the lake. In this way, the "template value" of pixels on the water surface of the lake is 1, while the "template value" of pixels elsewhere is 0.
(4) Set glStencilFunc(GL_EQUAL, 1, 1); glStencilOp(GL_KEEP, GL_KEEP, GL_KEEP); Draw a reflection. In this way, only the pixels with the template value of 1 will be drawn, so only the pixels of the "water surface" can be replaced by the pixels of the reflection, while other pixels remain unchanged.
give an example
There is a sphere and a plane mirror in space. Standing at a special observation point, we can see the mirror image of the sphere in the plane mirror, and the mirror image is at the edge of the plane mirror. Part of it cannot be displayed due to the limitation of the size of the plane mirror. The effect of the whole scene is as follows:
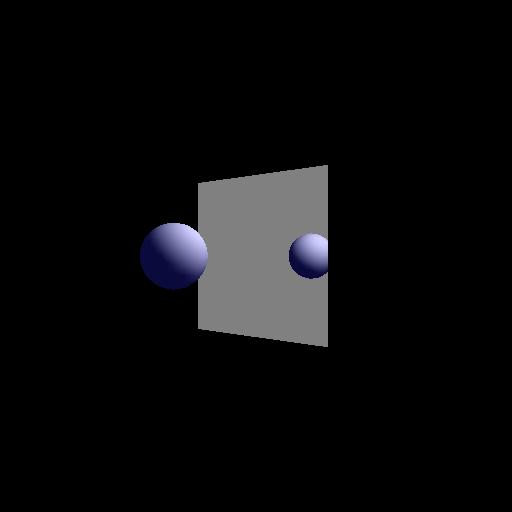
Assuming that the plane of the plane mirror is exactly the plane determined by the X-axis and Y-axis, the sphere and its mirror image in the plane mirror are symmetrical about this plane. We use a draw_sphere function to draw the sphere, first call the function to draw the sphere itself, then call glScalef(1.0f, 1.0f, -1.0f). Then call draw_sphere function, you can draw a mirror image of the sphere.
Another thing to note is that because it is a 3D scene, we * * have started the depth test** However, standing at the observer's position, the mirror image of the sphere is actually "behind" the plane mirror, that is, if it is drawn in a conventional way, the plane mirror will cover the mirror image, which is not the effect we want. The solution is: set the depth buffer as read-only, draw the plane mirror, then set the depth buffer as writable, and draw the mirror "behind" the plane mirror.
If the depth test is turned off and some "back" polygons are drawn before "front" polygons, the back of the sphere will block the front instead, which is not the effect we want. In order to ensure that the front can block the back, the depth test should be opened.
#include<stdio.h>
#include<stdlib.h>
#include <math.h>
#include<glut.h>
#include<glaux.h>
#include <time.h>
#include "tex.h"
void draw_sphere()
{
    // Set light source
    glEnable(GL_LIGHTING);
    glEnable(GL_LIGHT0);
    {
        GLfloat
            pos[] = { 5.0f, 5.0f, 0.0f, 1.0f },
            ambient[] = { 0.0f, 1.0f, 1.0f, 1.0f };
        glLightfv(GL_LIGHT0, GL_POSITION, pos);
        glLightfv(GL_LIGHT0, GL_AMBIENT, ambient);
    }

    // Draw a sphere
    glColor3f(1, 0, 0);
    glPushMatrix();
    glTranslatef(0, 0, 2);
    glutSolidSphere(0.5, 20, 20);
    glPopMatrix();
}

void display(void)
{
    // Clear screen
    glClear(GL_COLOR_BUFFER_BIT | GL_DEPTH_BUFFER_BIT);

    // Set observation point
    glMatrixMode(GL_PROJECTION);
    glLoadIdentity();
    gluPerspective(60, 1, 5, 25);
    glMatrixMode(GL_MODELVIEW);
    glLoadIdentity();
    gluLookAt(5, 0, 6.5, 0, 0, 0, 0, 1, 0);

    glEnable(GL_DEPTH_TEST);

    // Draw sphere
    glDisable(GL_STENCIL_TEST);
    draw_sphere();

    // Draw a flat mirror. Pay attention to setting template buffer while drawing.
    // In addition, in order to ensure that the mirror image behind the plane mirror can be drawn correctly, the depth buffer needs to be set to read-only when drawing the plane mirror.
    // Temporarily turns off lighting effects while painting
    glClearStencil(0);
    glClear(GL_STENCIL_BUFFER_BIT);
    glStencilFunc(GL_ALWAYS, 1, 0xFF);
    glStencilOp(GL_KEEP, GL_KEEP, GL_REPLACE);
    glEnable(GL_STENCIL_TEST);

    glDisable(GL_LIGHTING);
    glColor3f(0.5f, 0.5f, 0.5f);
    glDepthMask(GL_FALSE);
    glRectf(-1.5f, -1.5f, 1.5f, 1.5f);
    glDepthMask(GL_TRUE);

    // Draw a sphere symmetrical to the previous sphere about the plane mirror. Note that the position of the light source should also be changed symmetrically
    // Because the plane mirror is the plane determined by the X-axis and Y-axis, symmetry can be realized as long as the Z coordinate is reversed
    // In order to ensure that the drawing range of the sphere is limited to the interior of the plane mirror, the template test is used
    glStencilFunc(GL_EQUAL, 1, 0xFF);
    glStencilOp(GL_KEEP, GL_KEEP, GL_REPLACE);
    glScalef(1.0f, 1.0f, -1.0f);
    draw_sphere();

    // Swap buffer
    glutSwapBuffers();
}
int main(int argc, char* argv[])
{
    // GLUT initialization
    glutInit(&argc, argv);
    glutInitDisplayMode(GLUT_DOUBLE | GLUT_RGBA);
    glutInitWindowPosition(100, 100);
    glutInitWindowSize(500, 500);
    glutCreateWindow("Lesson 12 - template testing");
    glutDisplayFunc(&display);

    glutMainLoop();

    return 0;
}
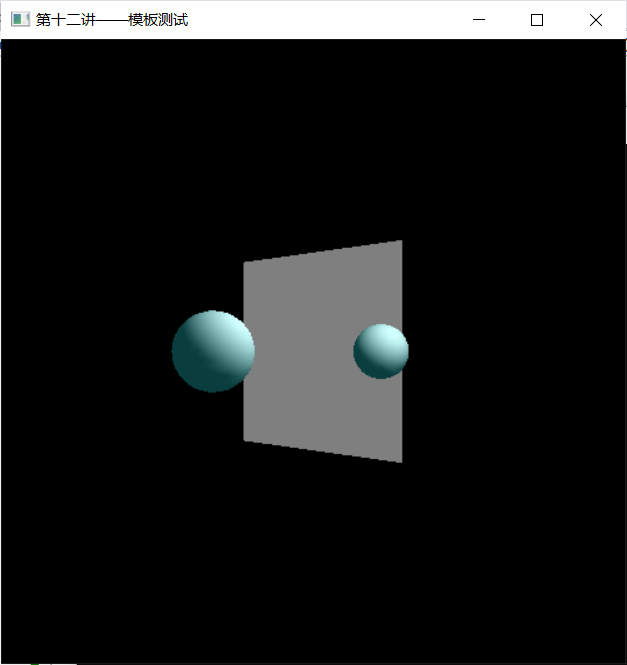
Depth test
Depth testing requires a depth buffer, which is similar to template testing requiring a template buffer. If you use the GLUT toolkit, you can add GLUT to the parameter when calling the glutInitDisplayMode function_ Depth, which explicitly specifies that a depth buffer is required.
The implementation principle of depth test and template test is very similar. Both save a value of a pixel in a buffer. When a test is needed, compare the saved value with another value to determine whether it passes the test. The difference between the two is that the template test is to set a value and compare it with the "template value" of the pixel during the test, while the depth test is to calculate the depth according to the spatial coordinates of the vertex and compare it with the "depth value" of the pixel. In other words, the template test needs to specify a value as the comparison reference, and in the depth test, the reference value used for this comparison is automatically calculated by OpenGL according to the spatial coordinates.
The glEnable/glDisable function enables or disables depth testing.
glEnable(GL_DEPTH_TEST); // Enable depth test glDisable(GL_DEPTH_TEST)// Disable depth testing
There are also eight conditions for passing the test, which are the same as the condition settings in the Alpha test. The condition setting is completed through the glDepthFunc function, and the default value is GL_LESS.
glDepthFunc(GL_LESS);
Compared with template testing, depth testing is applied much more frequently. Almost all 3D scene rendering uses depth test. Because of this, almost all OpenGL implementations provide hardware support for in-depth testing. Therefore, although the implementation principles of the two are similar, in-depth testing is likely to be much faster than template testing. Of course, there is little intersection between the two tests in application. Generally, there is no case of using one test to replace the other.