In the previous tutorial, we discussed the observation matrix and how to use the observation matrix to move the scene (we moved back a little). OpenGL itself does not have the concept of camera, but we can simulate the camera by moving all objects in the scene in the opposite direction to produce a feeling that we are moving, rather than the scene is moving.
In this section, we will discuss how to configure a camera in OpenGL, and we will discuss the FPS style camera, so that you can move freely in 3D scenes. We will also discuss keyboard and mouse input, and finally complete a custom camera class.
Camera / viewing space
When we discuss camera / view space, we are talking about all vertex coordinates in the scene when the camera's perspective is taken as the scene origin: the observation matrix transforms all world coordinates into observation coordinates relative to the camera's position and direction. To define a camera, we need its position in world space, the direction of observation, a vector pointing to its right and a vector pointing above it. Careful readers may have noticed that we actually created a coordinate system with three unit axes perpendicular to each other and taking the position of the camera as the origin.
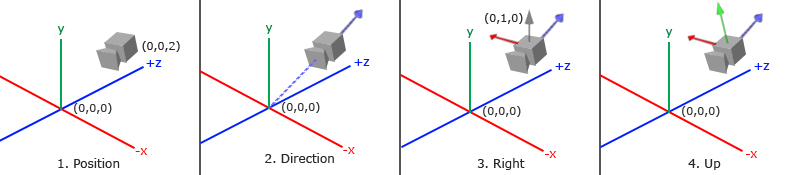
1. Camera position
Getting the camera position is simple. Camera position is simply a vector pointing to the camera position in world space. We set the camera position to the same position as in the previous section:
glm::vec3 cameraPos = glm::vec3(0.0f, 0.0f, 3.0f);
Don't forget that the positive z axis points to you from the screen. If we want the camera to move backward, we move along the positive z axis.
2. Camera direction
The next required vector is the direction of the camera, which refers to the direction in which the camera points. Now let's point the camera to the scene origin: (0, 0, 0). Remember if we subtract two vectors, we can get the difference between the two vectors? The result of subtracting the camera position vector from the scene origin vector is the camera pointing vector. Since we know that the camera points to the negative direction of the z-axis, we want the direction vector to point to the positive direction of the z-axis of the camera. If we exchange the subtraction order, we will get a vector pointing to the positive z-axis of the camera:
glm::vec3 cameraTarget = glm::vec3(0.0f, 0.0f, 0.0f);
glm::vec3 cameraDirection = glm::normalize(cameraPos - cameraTarget);
The direction vector is not the best name because it actually points in the opposite direction from it to the target vector.
3. Right shaft
Another vector we need is a right vector, which represents the positive direction of the x-axis of the camera space. To get the right vector, we need to use a trick: first define an up vector. Next, cross multiply the up vector and the direction vector obtained in step 2. The result of the cross multiplication of two vectors will be perpendicular to both vectors at the same time, so we will get the vector pointing to the positive direction of the X axis (if we exchange the order of the cross multiplication of two vectors, we will get the opposite vector pointing to the negative direction of the X axis):
glm::vec3 up = glm::vec3(0.0f, 1.0f, 0.0f);
glm::vec3 cameraRight = glm::normalize(glm::cross(up, cameraDirection));
4. Upper shaft
Now that we have x-axis vector and z-axis vector, it is relatively simple to obtain a positive y-axis vector pointing to the camera: we cross multiply the right vector and the direction vector:
glm::vec3 cameraUp = glm::cross(cameraDirection, cameraRight);
With the help of cross multiplication and some tricks, we created all the vectors that make up the observation / camera space. For readers who want to learn more about mathematical principles, it is suggested that in linear algebra this process is called Gram Schmidt orthogonalization (Gram-Schmidt Process). Using these camera vectors, we can create a LookAt matrix, which is very useful when creating cameras.
Look At
One of the benefits of using a matrix is if you use three perpendicular to each other The (or nonlinear) axis defines a coordinate space. You can use these three axes plus a translation vector to create a matrix, and you can multiply this matrix by any vector to transform it to that coordinate space. This is what LookAt matrix does. Now we have three mutually perpendicular axes and a position coordinate that defines the camera space, and we can create We built our own LookAt matrix:
LookAt=⎡⎣⎢⎢⎢⎢RxUxDx0RyUyDy0RzUzDz00001⎤⎦⎥⎥⎥⎥∗⎡⎣⎢⎢⎢⎢100001000010−Px−Py−Pz1⎤⎦⎥⎥⎥⎥LookAt=[RxRyRz0UxUyUz0DxDyDz00001]∗[100−Px010−Py001−Pz0001]
Where RR is the right vector, UU is the upper vector, DD is the direction vector and PP is the camera position vector. Note that the position vector is the opposite, because we eventually want to translate the world in the opposite direction of our own movement. Taking this LookAt matrix as an observation matrix can efficiently transform all world coordinates to the observation space just defined. The LookAt matrix is as its name implies: it creates an observation matrix that looks at a given target.
Fortunately, GLM has provided these support. All we need to do is define a camera position, a target position and a vector representing the upper vector in world space (the upper vector we use to calculate the right vector). Then GLM will create a LookAt matrix, which we can use as our observation matrix:
glm::mat4 view;
view = glm::lookAt(glm::vec3(0.0f, 0.0f, 3.0f),
           glm::vec3(0.0f, 0.0f, 0.0f),
           glm::vec3(0.0f, 1.0f, 0.0f));
The glm::LookAt function requires a position, target, and up vector. It creates the same observation matrix as used in the previous section.
Before discussing user input, let's do something interesting by rotating our camera in the scene. We will keep the camera's gaze at (0, 0, 0).
We need to use a little knowledge of trigonometry to create an x and z coordinate in each frame, which will represent a point on the circle, and we will use it as the position of the camera. By recalculating the x and y coordinates, we will traverse all the points on the circle so that the camera will rotate around the scene. We define the radius of the circle in advance, and use the glfwGetTime function of GLFW to recreate the observation matrix in each rendering iteration to expand the circle.
float radius = 10.0f;
float camX = sin(glfwGetTime()) * radius;
float camZ = cos(glfwGetTime()) * radius;
glm::mat4 view;
view = glm::lookAt(glm::vec3(camX, 0.0, camZ), glm::vec3(0.0, 0.0, 0.0), glm::vec3(0.0, 1.0, 0.0));
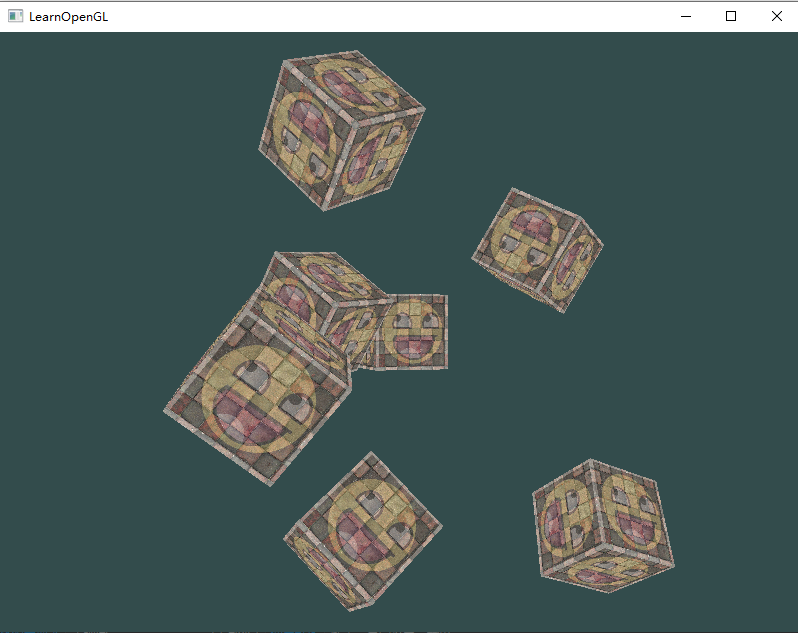
If you run the code, you should get the following results:
https://download.csdn.net/download/LIJIWEI0611/21962842
With this short piece of code, the camera will now rotate around the scene over time. Try changing the radius and position / direction parameters yourself to see how the LookAt matrix works. Meanwhile, if you get stuck somewhere, there are Source code.
Free movement
It's really fun to let the camera go around the scene, but it's more fun to let us move the camera ourselves! First, we must set up a camera system, so it is useful to define some camera variables in front of our program:
glm::vec3 cameraPos   = glm::vec3(0.0f, 0.0f,  3.0f);
glm::vec3 cameraFront = glm::vec3(0.0f, 0.0f, -1.0f);
glm::vec3 cameraUp    = glm::vec3(0.0f, 1.0f,  0.0f);
The LookAt function is now:
view = glm::lookAt(cameraPos, cameraPos + cameraFront, cameraUp);
We first set the camera position to the previously defined cameraPos. The direction is the current position plus the direction vector we just defined. This ensures that the camera will look in the direction of the target no matter how we move. Let's fiddle with these vectors and update the cameraPos vector when some buttons are pressed.
We have defined a processInput function for GLFW keyboard input. Let's add several key commands to check:
void processInput(GLFWwindow *window)
{
    ...
    float cameraSpeed = 0.05f; // adjust accordingly
    if (glfwGetKey(window, GLFW_KEY_W) == GLFW_PRESS)
        cameraPos += cameraSpeed * cameraFront;
    if (glfwGetKey(window, GLFW_KEY_S) == GLFW_PRESS)
        cameraPos -= cameraSpeed * cameraFront;
    if (glfwGetKey(window, GLFW_KEY_A) == GLFW_PRESS)
        cameraPos -= glm::normalize(glm::cross(cameraFront, cameraUp)) * cameraSpeed;
    if (glfwGetKey(window, GLFW_KEY_D) == GLFW_PRESS)
        cameraPos += glm::normalize(glm::cross(cameraFront, cameraUp)) * cameraSpeed;
}
When we press any of the WASD keys, the camera position will be updated accordingly. If we want to move forward or backward, we add or subtract the position vector from the direction vector. If we want to move left and right, we can use cross multiplication to create a right vector and move along it accordingly. This creates the familiar strafe effect when using the camera.
Note that we normalized the right vector. If we do not standardize this vector, the final cross multiplication result will return vectors of different sizes according to the cameraFront variable. If we don't standardize the vector, we have to accelerate or decelerate according to the orientation of the camera, but if we standardize, the movement is uniform.
Now you should be able to move the camera. Although the moving speed is related to the system, you may need to adjust the cameraSpeed.
Moving speed
At present, our moving speed is a constant. There is no problem in theory, but in practice, depending on the capacity of the processor, some people may draw more frames per second than others, that is, call the processInput function at a higher frequency. As a result, depending on the configuration, some people may move very fast, while others will move very slowly. When you release your program, you must ensure that it moves at the same speed on all hardware.
Graphics programs and games usually track a deltaTime variable that stores the time taken to render the previous frame. We multiply all the speeds by the delta time value. As a result, if our delta time is large, it means that the rendering of the previous frame takes more time, so the speed of this frame needs to be higher to balance the rendering time. When using this method, whether your computer is fast or slow, the speed of the camera will be balanced accordingly, so that the experience of each user is the same.
We track two global variables to calculate the deltaTime value:
float deltaTime = 0.0f; // The time difference between the current frame and the previous frame
float lastFrame = 0.0f; // Time of last frame
In each frame, we calculate a new delta time for later use.
float currentFrame = glfwGetTime();
deltaTime = currentFrame - lastFrame;
lastFrame = currentFrame;
Now we have delta time, which can be taken into account when calculating the speed:
void processInput(GLFWwindow *window)
{
  float cameraSpeed = 2.5f * deltaTime;
  ...
}
Combined with the previous part, we have a smoother camera system:
#include <glad/glad.h>
#include <GLFW/glfw3.h>
#define STB_IMAGE_IMPLEMENTATION
#include <stb_image.h>

#include <glm/glm.hpp>
#include <glm/gtc/matrix_transform.hpp>
#include <glm/gtc/type_ptr.hpp>

#include <learnopengl/shader_m.h>

#include <iostream>

void framebuffer_size_callback(GLFWwindow* window, int width, int height);
void processInput(GLFWwindow *window);

// settings
const unsigned int SCR_WIDTH = 800;
const unsigned int SCR_HEIGHT = 600;

// camera
glm::vec3 cameraPos = glm::vec3(0.0f, 0.0f, 3.0f);
glm::vec3 cameraFront = glm::vec3(0.0f, 0.0f, -1.0f);
glm::vec3 cameraUp = glm::vec3(0.0f, 1.0f, 0.0f);

// timing
float deltaTime = 0.0f;	// time between current frame and last frame
float lastFrame = 0.0f;

int main()
{
  // glfw: initialize and configure
  // ------------------------------
  glfwInit();
  glfwWindowHint(GLFW_CONTEXT_VERSION_MAJOR, 3);
  glfwWindowHint(GLFW_CONTEXT_VERSION_MINOR, 3);
  glfwWindowHint(GLFW_OPENGL_PROFILE, GLFW_OPENGL_CORE_PROFILE);

#ifdef __APPLE__
  glfwWindowHint(GLFW_OPENGL_FORWARD_COMPAT, GL_TRUE);
#endif

  // glfw window creation
  // --------------------
  GLFWwindow* window = glfwCreateWindow(SCR_WIDTH, SCR_HEIGHT, "LearnOpenGL", NULL, NULL);
  if (window == NULL)
  {
    std::cout << "Failed to create GLFW window" << std::endl;
    glfwTerminate();
    return -1;
  }
  glfwMakeContextCurrent(window);
  glfwSetFramebufferSizeCallback(window, framebuffer_size_callback);

  // glad: load all OpenGL function pointers
  // ---------------------------------------
  if (!gladLoadGLLoader((GLADloadproc)glfwGetProcAddress))
  {
    std::cout << "Failed to initialize GLAD" << std::endl;
    return -1;
  }

  // configure global opengl state
  // -----------------------------
  glEnable(GL_DEPTH_TEST);

  // build and compile our shader zprogram
  // ------------------------------------
  Shader ourShader("./coordinate/coordinate.vs", "./coordinate/coordinate.fs");

  // set up vertex data (and buffer(s)) and configure vertex attributes
  // ------------------------------------------------------------------
  float vertices[] = {
      -0.5f, -0.5f, -0.5f,  0.0f, 0.0f,
       0.5f, -0.5f, -0.5f,  1.0f, 0.0f,
       0.5f,  0.5f, -0.5f,  1.0f, 1.0f,
       0.5f,  0.5f, -0.5f,  1.0f, 1.0f,
      -0.5f,  0.5f, -0.5f,  0.0f, 1.0f,
      -0.5f, -0.5f, -0.5f,  0.0f, 0.0f,

      -0.5f, -0.5f,  0.5f,  0.0f, 0.0f,
       0.5f, -0.5f,  0.5f,  1.0f, 0.0f,
       0.5f,  0.5f,  0.5f,  1.0f, 1.0f,
       0.5f,  0.5f,  0.5f,  1.0f, 1.0f,
      -0.5f,  0.5f,  0.5f,  0.0f, 1.0f,
      -0.5f, -0.5f,  0.5f,  0.0f, 0.0f,

      -0.5f,  0.5f,  0.5f,  1.0f, 0.0f,
      -0.5f,  0.5f, -0.5f,  1.0f, 1.0f,
      -0.5f, -0.5f, -0.5f,  0.0f, 1.0f,
      -0.5f, -0.5f, -0.5f,  0.0f, 1.0f,
      -0.5f, -0.5f,  0.5f,  0.0f, 0.0f,
      -0.5f,  0.5f,  0.5f,  1.0f, 0.0f,

       0.5f,  0.5f,  0.5f,  1.0f, 0.0f,
       0.5f,  0.5f, -0.5f,  1.0f, 1.0f,
       0.5f, -0.5f, -0.5f,  0.0f, 1.0f,
       0.5f, -0.5f, -0.5f,  0.0f, 1.0f,
       0.5f, -0.5f,  0.5f,  0.0f, 0.0f,
       0.5f,  0.5f,  0.5f,  1.0f, 0.0f,

      -0.5f, -0.5f, -0.5f,  0.0f, 1.0f,
       0.5f, -0.5f, -0.5f,  1.0f, 1.0f,
       0.5f, -0.5f,  0.5f,  1.0f, 0.0f,
       0.5f, -0.5f,  0.5f,  1.0f, 0.0f,
      -0.5f, -0.5f,  0.5f,  0.0f, 0.0f,
      -0.5f, -0.5f, -0.5f,  0.0f, 1.0f,

      -0.5f,  0.5f, -0.5f,  0.0f, 1.0f,
       0.5f,  0.5f, -0.5f,  1.0f, 1.0f,
       0.5f,  0.5f,  0.5f,  1.0f, 0.0f,
       0.5f,  0.5f,  0.5f,  1.0f, 0.0f,
      -0.5f,  0.5f,  0.5f,  0.0f, 0.0f,
      -0.5f,  0.5f, -0.5f,  0.0f, 1.0f
  };
  // world space positions of our cubes
  glm::vec3 cubePositions[] = {
      glm::vec3(0.0f,  0.0f,  0.0f),
      glm::vec3(2.0f,  5.0f, -15.0f),
      glm::vec3(-1.5f, -2.2f, -2.5f),
      glm::vec3(-3.8f, -2.0f, -12.3f),
      glm::vec3(2.4f, -0.4f, -3.5f),
      glm::vec3(-1.7f,  3.0f, -7.5f),
      glm::vec3(1.3f, -2.0f, -2.5f),
      glm::vec3(1.5f,  2.0f, -2.5f),
      glm::vec3(1.5f,  0.2f, -1.5f),
      glm::vec3(-1.3f,  1.0f, -1.5f)
  };
  unsigned int VBO, VAO;
  glGenVertexArrays(1, &VAO);
  glGenBuffers(1, &VBO);

  glBindVertexArray(VAO);

  glBindBuffer(GL_ARRAY_BUFFER, VBO);
  glBufferData(GL_ARRAY_BUFFER, sizeof(vertices), vertices, GL_STATIC_DRAW);

  // position attribute
  glVertexAttribPointer(0, 3, GL_FLOAT, GL_FALSE, 5 * sizeof(float), (void*)0);
  glEnableVertexAttribArray(0);
  // texture coord attribute
  glVertexAttribPointer(1, 2, GL_FLOAT, GL_FALSE, 5 * sizeof(float), (void*)(3 * sizeof(float)));
  glEnableVertexAttribArray(1);


  // load and create a texture
  // -------------------------
  unsigned int texture1, texture2;
  // texture 1
  // ---------
  glGenTextures(1, &texture1);
  glBindTexture(GL_TEXTURE_2D, texture1);
  // set the texture wrapping parameters
  glTexParameteri(GL_TEXTURE_2D, GL_TEXTURE_WRAP_S, GL_REPEAT);
  glTexParameteri(GL_TEXTURE_2D, GL_TEXTURE_WRAP_T, GL_REPEAT);
  // set texture filtering parameters
  glTexParameteri(GL_TEXTURE_2D, GL_TEXTURE_MIN_FILTER, GL_LINEAR);
  glTexParameteri(GL_TEXTURE_2D, GL_TEXTURE_MAG_FILTER, GL_LINEAR);
  // load image, create texture and generate mipmaps
  int width, height, nrChannels;
  stbi_set_flip_vertically_on_load(true); // tell stb_image.h to flip loaded texture's on the y-axis.
  unsigned char *data = stbi_load("./img/wall.jpg", &width, &height, &nrChannels, 0);
  if (data)
  {
    glTexImage2D(GL_TEXTURE_2D, 0, GL_RGB, width, height, 0, GL_RGB, GL_UNSIGNED_BYTE, data);
    glGenerateMipmap(GL_TEXTURE_2D);
  }
  else
  {
    std::cout << "Failed to load texture" << std::endl;
  }
  stbi_image_free(data);
  // texture 2
  // ---------
  glGenTextures(1, &texture2);
  glBindTexture(GL_TEXTURE_2D, texture2);
  // set the texture wrapping parameters
  glTexParameteri(GL_TEXTURE_2D, GL_TEXTURE_WRAP_S, GL_REPEAT);
  glTexParameteri(GL_TEXTURE_2D, GL_TEXTURE_WRAP_T, GL_REPEAT);
  // set texture filtering parameters
  glTexParameteri(GL_TEXTURE_2D, GL_TEXTURE_MIN_FILTER, GL_LINEAR);
  glTexParameteri(GL_TEXTURE_2D, GL_TEXTURE_MAG_FILTER, GL_LINEAR);
  // load image, create texture and generate mipmaps
  data = stbi_load("./img/awesomeface.png", &width, &height, &nrChannels, 0);
  if (data)
  {
    // note that the awesomeface.png has transparency and thus an alpha channel, so make sure to tell OpenGL the data type is of GL_RGBA
    glTexImage2D(GL_TEXTURE_2D, 0, GL_RGB, width, height, 0, GL_RGBA, GL_UNSIGNED_BYTE, data);
    glGenerateMipmap(GL_TEXTURE_2D);
  }
  else
  {
    std::cout << "Failed to load texture" << std::endl;
  }
  stbi_image_free(data);

  // tell opengl for each sampler to which texture unit it belongs to (only has to be done once)
  // -------------------------------------------------------------------------------------------
  ourShader.use();
  ourShader.setInt("texture1", 0);
  ourShader.setInt("texture2", 1);

  // pass projection matrix to shader (as projection matrix rarely changes there's no need to do this per frame)
  // -----------------------------------------------------------------------------------------------------------
  glm::mat4 projection = glm::perspective((45.0f), (float)SCR_WIDTH / (float)SCR_HEIGHT, 0.1f, 100.0f);
  ourShader.setMat4("projection", projection);


  // render loop
  // -----------
  while (!glfwWindowShouldClose(window))
  {
    // per-frame time logic
    // --------------------
    float currentFrame = glfwGetTime();
    deltaTime = currentFrame - lastFrame;
    lastFrame = currentFrame;

    // input
    // -----
    processInput(window);

    // render
    // ------
    glClearColor(0.2f, 0.3f, 0.3f, 1.0f);
    glClear(GL_COLOR_BUFFER_BIT | GL_DEPTH_BUFFER_BIT);

    // bind textures on corresponding texture units
    glActiveTexture(GL_TEXTURE0);
    glBindTexture(GL_TEXTURE_2D, texture1);
    glActiveTexture(GL_TEXTURE1);
    glBindTexture(GL_TEXTURE_2D, texture2);

    // activate shader
    ourShader.use();

    // camera/view transformation
    glm::mat4 view = glm::lookAt(cameraPos, cameraPos + cameraFront, cameraUp);
    ourShader.setMat4("view", view);

    // render boxes
    glBindVertexArray(VAO);
    for (unsigned int i = 0; i < 10; i++)
    {
      // calculate the model matrix for each object and pass it to shader before drawing
      glm::mat4 model = glm::mat4(1.0f); // make sure to initialize matrix to identity matrix first
      model = glm::translate(model, cubePositions[i]);
      float angle = 20.0f * i;
      model = glm::rotate(model, (angle), glm::vec3(1.0f, 0.3f, 0.5f));
      ourShader.setMat4("model", model);

      glDrawArrays(GL_TRIANGLES, 0, 36);
    }

    // glfw: swap buffers and poll IO events (keys pressed/released, mouse moved etc.)
    // -------------------------------------------------------------------------------
    glfwSwapBuffers(window);
    glfwPollEvents();
  }

  // optional: de-allocate all resources once they've outlived their purpose:
  // ------------------------------------------------------------------------
  glDeleteVertexArrays(1, &VAO);
  glDeleteBuffers(1, &VBO);

  // glfw: terminate, clearing all previously allocated GLFW resources.
  // ------------------------------------------------------------------
  glfwTerminate();
  return 0;
}

// process all input: query GLFW whether relevant keys are pressed/released this frame and react accordingly
// ---------------------------------------------------------------------------------------------------------
void processInput(GLFWwindow *window)
{
  if (glfwGetKey(window, GLFW_KEY_ESCAPE) == GLFW_PRESS)
    glfwSetWindowShouldClose(window, true);

  float cameraSpeed = 2.5 * deltaTime;
  if (glfwGetKey(window, GLFW_KEY_W) == GLFW_PRESS)
    cameraPos += cameraSpeed * cameraFront;
  if (glfwGetKey(window, GLFW_KEY_S) == GLFW_PRESS)
    cameraPos -= cameraSpeed * cameraFront;
  if (glfwGetKey(window, GLFW_KEY_A) == GLFW_PRESS)
    cameraPos += glm::normalize(glm::cross(cameraFront, cameraUp)) * cameraSpeed;
  if (glfwGetKey(window, GLFW_KEY_D) == GLFW_PRESS)
    cameraPos -= glm::normalize(glm::cross(cameraFront, cameraUp)) * cameraSpeed;
}

// glfw: whenever the window size changed (by OS or user resize) this callback function executes
// ---------------------------------------------------------------------------------------------
void framebuffer_size_callback(GLFWwindow* window, int width, int height)
{
  // make sure the viewport matches the new window dimensions; note that width and
  // height will be significantly larger than specified on retina displays.
  glViewport(0, 0, width, height);
}
View movement
It's not fun to move only with the keyboard. In particular, we can't turn, and our movement is very limited. It's time to add the mouse!
In order to change the viewing angle, we need to change the cameraFront vector according to the input of the mouse. However, changing the direction vector according to the mouse movement is a bit complex and requires some trigonometry. If you know little about trigonometry, don't worry. You can skip this part and copy and paste our code directly; Come back when you want to know more.
Euler angle
Euler angle is three values that can represent any rotation in 3D space, which was proposed by Leonhard Euler in the 18th century. There are three kinds of Euler angles: pitch, yaw and roll. The following pictures show their meanings:
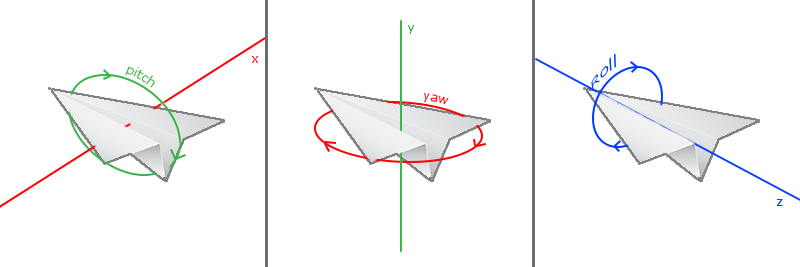
Pitch angle is an angle that describes how we look up or down, which can be seen in the first picture. The second picture shows the yaw angle, which shows how far we look left and right. The roll angle represents how we roll the camera, which is usually used in spacecraft cameras. Each Euler angle has a value to represent. By combining the three angles, we can calculate any rotation vector in 3D space.
For our camera system, we only care about pitch angle and yaw angle, so we won't discuss roll angle. Given a pitch angle and yaw angle, we can convert them into a 3D vector representing the new direction vector. The conversion of pitch angle and yaw angle into direction vector requires some trigonometric knowledge. Let's start with the most basic situation:
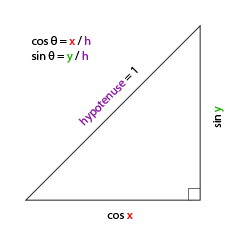
If we define the length of the beveled edge as 1, we can know that the length of the adjacent edge is cos x/h=cos x/1=cos x/h=cos x/1=cos x, and its opposite edge is sin y/h=sin y/1=sin ysin y/h=sin y/1=sin y. In this way, we obtain a general formula that can obtain the length in the X and Y directions, which depends on the given angle. We use it to calculate the component of the direction vector:
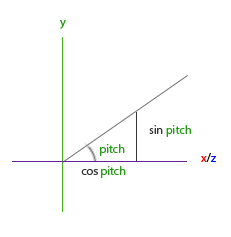
This triangle looks very similar to the previous triangle, so if we imagine ourselves looking at the y axis in the xz plane, we can calculate its strength in the length / y direction based on the calculation of the first triangle (how much we look up or down). From the figure, we can see that the y value for a given elevation angle is equal to sin θ sin θ:
direction.y = sin(glm::radians(pitch)); // Notice that we first turn the angle into radians
Here we only update the y value, and carefully observe that the x and z components are also affected. From the triangles, we can see that their values are equal to:
direction.x = cos(glm::radians(pitch));
direction.z = cos(glm::radians(pitch));
See if we can find the required component for yaw angle:
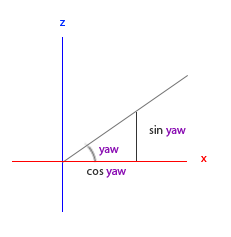
Like the triangle of pitch angle, we can see that the x component depends on the value of cos(yaw), and the z value also depends on the sine of yaw angle. Add this to the previous value to get the direction vector based on pitch angle and yaw angle:
direction.x = cos(glm::radians(pitch)) * cos(glm::radians(yaw)); // Direction represents the front axis of the camera, which is opposite to the direction vector of the second camera in the first picture in this paper
direction.y = sin(glm::radians(pitch));
direction.z = cos(glm::radians(pitch)) * sin(glm::radians(yaw));
In this way, we have a 3-dimensional direction vector that can convert the pitch angle and yaw angle into the camera used to rotate the angle of view freely. You may wonder: how do we get the pitch angle and yaw angle?
Mouse input
Yaw angle and pitch angle are determined by mouse (or handle) movement. The horizontal movement affects the yaw angle, and the vertical movement affects the pitch angle. Its principle is to store the position of the mouse in the previous frame. In the current frame, we calculate the difference between the current mouse position and the position of the previous frame. If the horizontal / vertical difference is greater, the pitch angle or yaw angle will change more, that is, the camera needs to move more Distance.
First, we want to tell GLFW that it should hide the cursor and capture it. The snap cursor represents, If the focus is on your program, the cursor should stay in the window (unless the program loses focus or exits). We can complete it with a simple configuration call:
glfwSetInputMode(window, GLFW_CURSOR, GLFW_CURSOR_DISABLED);
After calling this function, no matter how we move the mouse, the cursor will not be displayed and it will not leave the window. Perfect for FPS camera system.
In order to calculate the pitch angle and yaw angle, we need to let GLFW monitor mouse movement events. (similar to keyboard input) we will use a callback function. The prototype of the function is as follows:
void mouse_callback(GLFWwindow* window, double xpos, double ypos);
xpos and ypos here represent the current mouse position. When we register the callback function with GLFW, the mouse moves mouse_ The callback function will be called:
glfwSetCursorPosCallback(window, mouse_callback);
When processing the mouse input of FPS style camera, we must do the following steps before finally obtaining the direction vector:
- Calculates the offset of the mouse from the previous frame.
- Add the offset to the pitch and yaw angles of the camera.
- Limit the maximum and minimum values of yaw angle and pitch angle.
- Calculate the direction vector.
The first step is to calculate the offset of the mouse from the previous frame. We must first store the mouse position of the previous frame in the program. We set its initial value to the center of the screen (the size of the screen is 800x600):
float lastX = 400, lastY = 300;
Then, in the mouse callback function, we calculate the offset of the mouse position of the current frame and the previous frame:
float xoffset = xpos - lastX;
float yoffset = lastY - ypos; // Notice the opposite here, because the y coordinate increases from the bottom to the top
lastX = xpos;
lastY = ypos;

float sensitivity = 0.05f;
xoffset *= sensitivity;
yoffset *= sensitivity;
Note that we multiply the offset by the sensitivity value. If we ignore this value, the mouse movement will be too large; you can experiment yourself to find a suitable sensitivity value.
Next, we add the offset to the global variables pitch and yaw:
yaw   += xoffset;
pitch += yoffset;
Third, we need to add some restrictions to the camera, In this way, the camera will not move strangely (and some strange problems will be avoided). For the pitch angle, the user should not look higher than 89 degrees (the viewing angle will be reversed at 90 degrees, so we take 89 degrees as the limit), and it is also not allowed to be less than - 89 degrees. This can ensure that users can only see the sky or feet, but can not exceed this limit. We can change it to the limit value when the value exceeds the limit:
if(pitch > 89.0f)
  pitch =  89.0f;
if(pitch < -89.0f)
  pitch = -89.0f;
Note that we do not set a limit on the yaw angle because we do not want to limit the user's horizontal rotation. Of course, it's also easy to set limits on yaw angle. You can do it yourself if you like.
The fourth and final step is to calculate the true direction vector through pitch angle and yaw angle:
glm::vec3 front;
front.x = cos(glm::radians(pitch)) * cos(glm::radians(yaw));
front.y = sin(glm::radians(pitch));
front.z = cos(glm::radians(pitch)) * sin(glm::radians(yaw));
cameraFront = glm::normalize(front);
The calculated direction vector will contain all the rotations calculated according to the mouse movement. Since the cameraFront vector has been included in the lookAt function of GLM, we have no problem.
If you run the code now, you will find that the camera will jump when the window gets focus for the first time. The reason for this problem is that when your mouse moves into the window, the mouse callback function will be called. At this time, xpos and ypos will be equal to the position where the mouse just enters the screen. This is usually a place far from the center of the screen, resulting in a large offset, so it will jump. We can simply use a bool variable to check whether we get mouse input for the first time. If so, we can first update the initial position of the mouse to xpos and ypos values, so as to solve this problem; The next mouse movement will use the mouse position coordinates just entered to calculate the offset:
if(firstMouse) // This bool variable is initially set to true
{
    lastX = xpos;
    lastY = ypos;
    firstMouse = false;
}
The final code should look like this:
void mouse_callback(GLFWwindow* window, double xpos, double ypos)
{
    if(firstMouse)
    {
        lastX = xpos;
        lastY = ypos;
        firstMouse = false;
    }

    float xoffset = xpos - lastX;
    float yoffset = lastY - ypos;
    lastX = xpos;
    lastY = ypos;

    float sensitivity = 0.05;
    xoffset *= sensitivity;
    yoffset *= sensitivity;

    yaw   += xoffset;
    pitch += yoffset;

    if(pitch > 89.0f)
        pitch = 89.0f;
    if(pitch < -89.0f)
        pitch = -89.0f;

    glm::vec3 front;
    front.x = cos(glm::radians(yaw)) * cos(glm::radians(pitch));
    front.y = sin(glm::radians(pitch));
    front.z = sin(glm::radians(yaw)) * cos(glm::radians(pitch));
    cameraFront = glm::normalize(front);
}
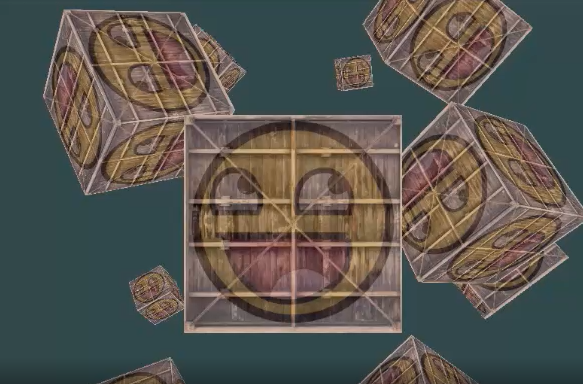
Now we can move freely in the 3D scene!
zoom
As an addition to our camera system, we will also implement a zoom interface. In the previous tutorial, we said that the field of view or fov defines how wide we can see in the scene. When the field of view becomes smaller, the space projected from the scene will be reduced, resulting in the feeling of zoom in. We will use the mouse wheel to zoom in. Like mouse movement and keyboard input, we need a callback function of mouse wheel:
void scroll_callback(GLFWwindow* window, double xoffset, double yoffset)
{
  if(fov >= 1.0f && fov <= 45.0f)
    fov -= yoffset;
  if(fov <= 1.0f)
    fov = 1.0f;
  if(fov >= 45.0f)
    fov = 45.0f;
}
When scrolling the mouse wheel, the yoffset value represents the size of our vertical scrolling. When scroll_ After the callback function is called, we change the contents of the global variable fov variable. Since 45.0f is the default field of view value, we will limit the zoom level to 1.0f to 45.0f.
Now we must upload the perspective projection matrix to the GPU at each frame, but now we use the fov variable as its field of view:
projection = glm::perspective(glm::radians(fov), 800.0f / 600.0f, 0.1f, 100.0f);
Finally, don't forget to register the callback function of the mouse wheel:
glfwSetScrollCallback(window, scroll_callback);
Now we have implemented a simple camera system that allows us to move freely in a 3D environment.
You can experiment freely. If you encounter difficulties, you can compare them source code.
Note that the camera system using Euler angle is not perfect. Depending on your perspective constraints or configuration, you may still introduce gimbal lock Question. The best camera system uses quaternions, but we will leave this to be discussed later. (translation note: here You can view the implementation of quaternion camera)
Camera class
In the next tutorial, we will always use a camera to browse the scene and observe the results from all angles. However, because a camera will occupy a lot of space in each tutorial, we will abstract from the details and create our own camera object. It will complete most of the work and provide some additional functions. Unlike the shader tutorial, we won't take you step by step to create the camera class. We will only provide you with a (fully annotated) code. If you want to know its internal structure, you can read it yourself.
Like shader objects, we write the camera class in a separate header file. You can here Find it and you should be able to understand all the code by now. We recommend that you at least take a look at this class to see how to create your own camera class.
The camera system we introduced is an FPS style camera, which can meet the needs of most situations and is compatible with Euler angle. However, be careful when creating different camera systems, such as flight simulation camera. Each camera system has its own advantages and disadvantages, so ensure that they are studied in detail. For example, the FPS camera does not allow the pitch angle to be greater than 90 degrees, and we use a fixed upper vector (0, 1, 0), which cannot be used when the roll angle needs to be considered.
Using the new camera object, the updated version of the source code can be found in here Found.
Link: https://pan.baidu.com/s/1GyuAGjUuUM8RAd8Gc9BUyg
Extraction code: 5fxt