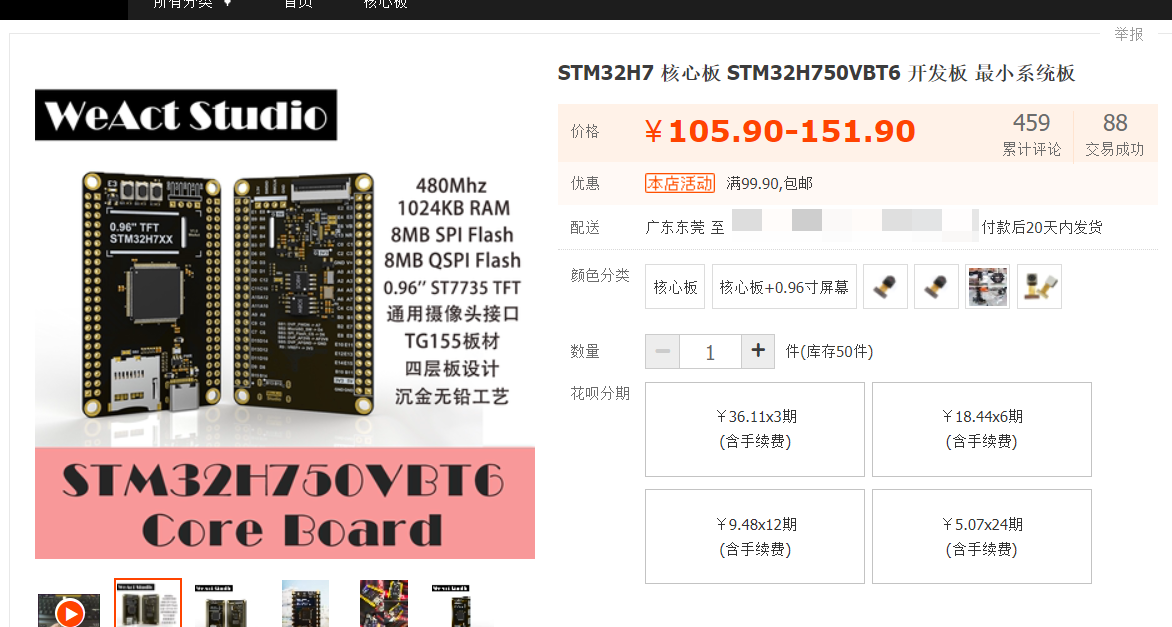
I just came home with an H7 board. I thought about configuring the openmv part first and then developing the whole H7. This board supports the brush writing of openmv. The firmware brush writing provides the way of internal flash and external flash, which is very convenient.
The board is as follows. It belongs to the weact family. You can find it by searching weact on Taobao:
1. Brush firmware
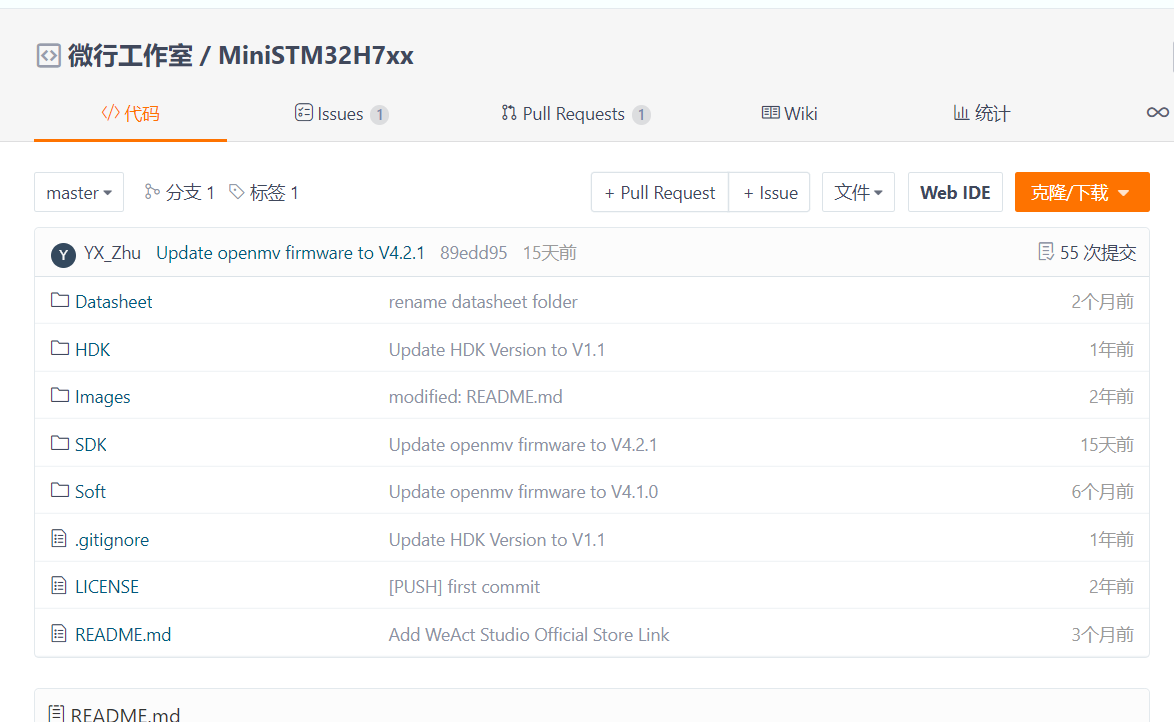
Data download:
https://gitee.com/WeAct-TC
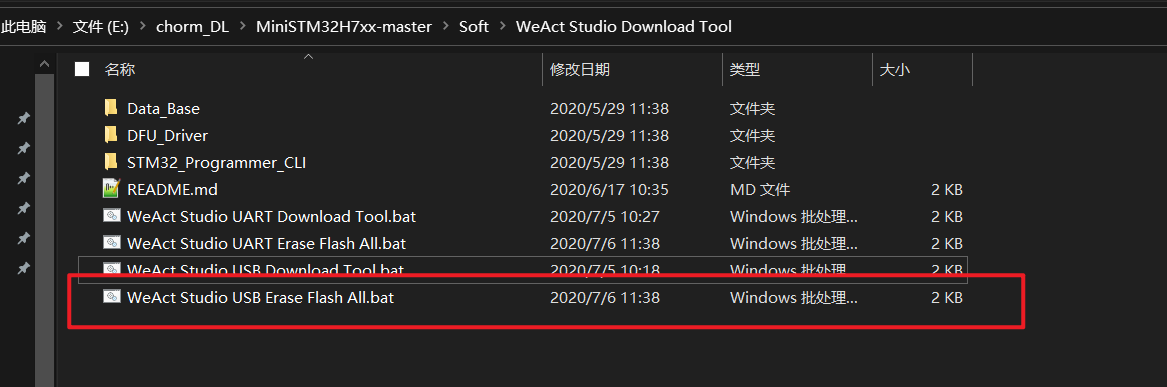
The steps are as follows:
- Let the board enter the dfu mode to prepare for writing. Connect the typec port, press and hold the boot key to power on, enter the dfu mode, and check whether the computer detects the dfu interface. If so, everything goes well (if the dfu interface is not detected, install the dfu driver and try it several times)
- Use the official batch processing tool to understand flash (I don't know if it's necessary. Anyway, I did it)
- Use the download tool to download, openmv Bin can be dragged into the download box. It is explained here. Openmv Bin is a combination of boot file and flash file. You don't need to download it separately. You can download it directly at the default address 0x8000000
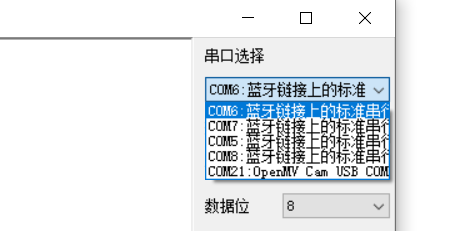
- After downloading, you can see the green light flashing. This is the self inspection light of openmv. Turn on the serial port assistant and you can see that there is an additional serial port with openmv
- Open ide to connect
- Run the helloword routine and everything goes well!
2. Start configuring openmv
Reference documents:
https://book.openmv.cc/
https://docs.singtown.com/micropython/zh/latest/openmvcam/index.html

3. Image acquisition and display
Use the camera to get the image and use time to get the frame rate
import sensor,image,time

sensor.reset() # Reset camera
sensor.set_pixformat(sensor.RGB565) # Set the color format to RGB565
sensor.set_framesize(sensor.QVGA) # Set image size
sensor.skip_frames(time = 2000) # Jump some frames at the beginning
# sensor.skip_frames(10) # Directly specify the number of frames to skip
clock = time.clock() # It is mainly used to record the frame rate

while(True):
    clock.tick() # This frame rate can be recorded
    img = sensor.snapshot() # Take pictures + get images
    print(clock.fps())
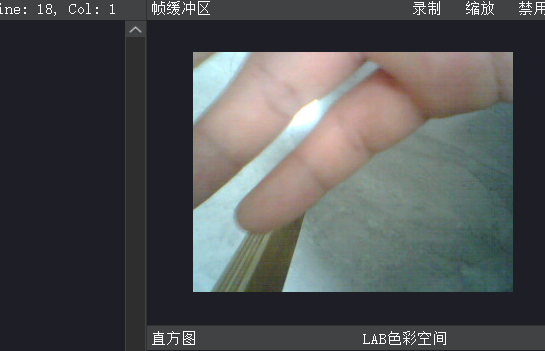
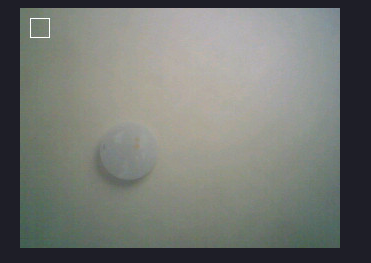
The effect is as follows:
Function summary above
Image format:
- GRAYSCALE
- RGB565
Image size: (divide down by 2 each time)
- QVGA 320*240
- QQVGA 460*120
- QQQVGA 80*60
White balance and automatic gain
Note that these two are to make the image more realistic, that is, to enhance the image by some means. In fact, they do not change the original image. The result is to enhance the visual effect, that is, to add some parameters to the image
sensor.set_auto_gain(True) # automatic gain
sensor.set_auto_whitebal(True) # white balance
sensor.set_auto_exposure(True) # Auto exposure
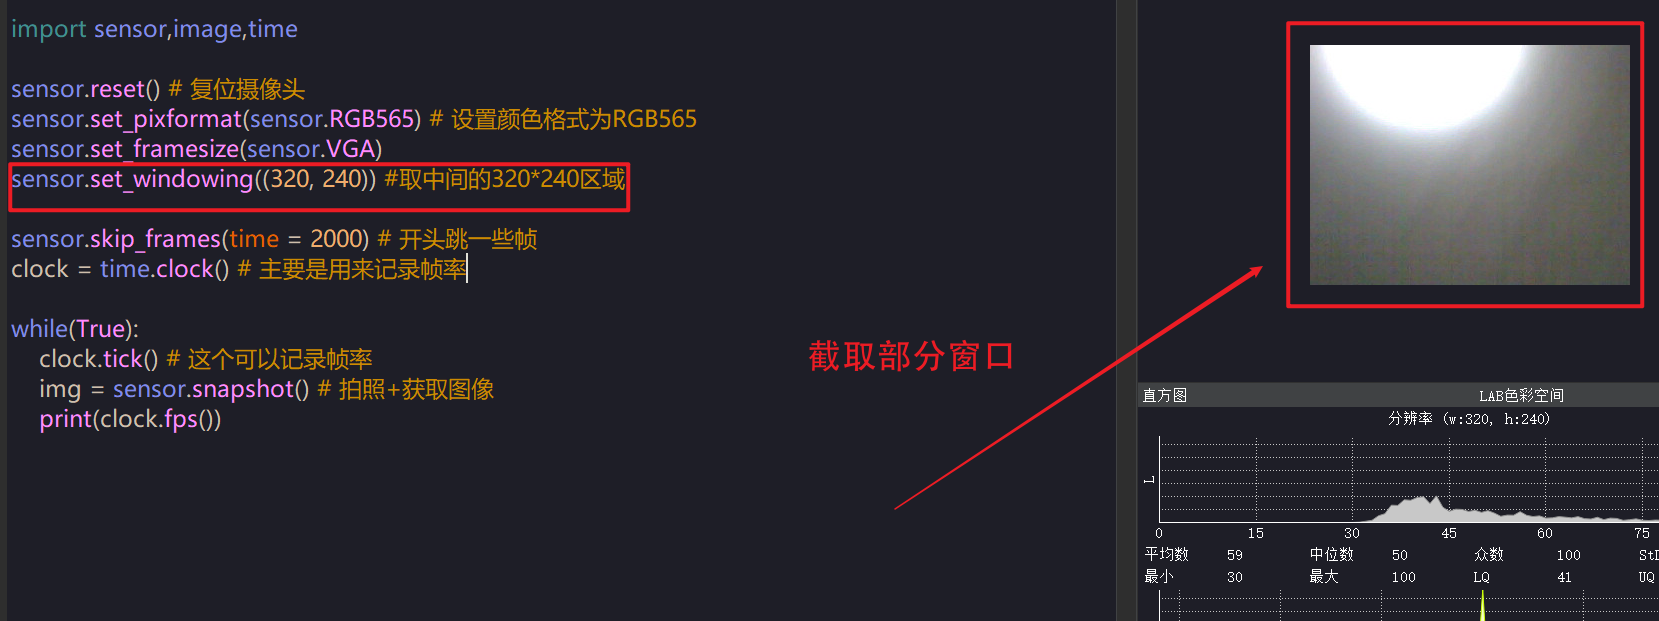
Intercept an area
import sensor,image,time

sensor.reset() # Reset camera
sensor.set_pixformat(sensor.RGB565) # Set the color format to RGB565
sensor.set_framesize(sensor.VGA)
sensor.set_windowing((320, 240)) #Take the 320 * 240 area in the middle

sensor.skip_frames(time = 2000) # Jump some frames at the beginning
clock = time.clock() # It is mainly used to record the frame rate

while(True):
    clock.tick() # This can record the frame rate
    img = sensor.snapshot() # Take pictures + get images
    print(clock.fps())
Lens flip
import sensor,image,time

sensor.reset() # Reset camera
sensor.set_pixformat(sensor.RGB565) # Set the color format to RGB565
sensor.set_framesize(sensor.QVGA)

sensor.set_hmirror(True) # Flip horizontally
sensor.set_vflip(True) # Flip vertically
sensor.skip_frames(time = 2000) # Jump some frames at the beginning
clock = time.clock() # It is mainly used to record the frame rate

while(True):
    clock.tick() # This can record the frame rate
    img = sensor.snapshot() # Take pictures + get images
    print(clock.fps())
Here is the flip of the camera, especially for some places where the structural design of the camera is unreasonable, which is particularly important!!!!
4. Modify the image, obtain pixels and add elements
Get the pixel value of a point and modify the pixel value of a point
import sensor,image,time

sensor.reset() # Reset camera
sensor.set_pixformat(sensor.RGB565) # Set the color format to RGB565
sensor.set_framesize(sensor.QVGA)

sensor.set_hmirror(True) # Flip horizontally
sensor.set_vflip(True) # Flip vertically
sensor.skip_frames(time = 2000) # Jump some frames at the beginning
clock = time.clock() # It is mainly used to record the frame rate

img = sensor.snapshot()
print(img.get_pixel(10,10)) # Gets the pixel value of the point
img.set_pixel(10,10,(255,0,0)) # modify
print(img.get_pixel(10,10) # Print again and the pixel value changes
Get area pixel value
ROI = (10,10,20,20)

while(True):
    clock.tick() # This can record the frame rate
    img = sensor.snapshot() # Take pictures + get images
    print(img.get_statistics(roi=ROI)) # Print area average color value
    print(clock.fps())
It can be seen that the obtained region pixel value contains a lot of things, which is much richer than that of a certain point

The returned values are mainly grayscale values, and then lab values. Here we focus on lab values, because lab has great advantages in color tracking. For an introduction to color space, please refer to another article: opecv answer tree record
Get LAB value of ROI area
#Set ROI area size
ROI = (10,10,20,20)


while(True):
    clock.tick() # This can record the frame rate
    img = sensor.snapshot() # Take pictures + get images

    # Obtain the lab value (mode) of the three areas
    color_l= img.get_statistics(roi=ROI) .l_mode()
    color_a= img.get_statistics(roi=ROI) .a_mode()
    color_b= img.get_statistics(roi=ROI) .b_mode()
    print(color_l,color_a,color_b)
    img.draw_rectangle(ROI)
    #print(clock.fps())
The drawing function has been touched above. In fact, the drawing function plays a very important role in visualization. Generally speaking, the results of the code need to be carefully sorted out. The results can be visualized by using the drawing function.
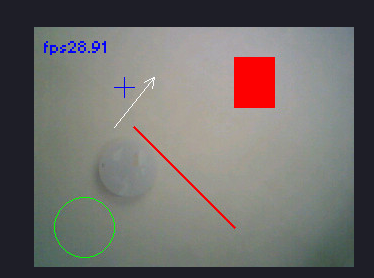
Let's start using common drawing functions
while(True):
    clock.tick() # This can record the frame rate
    img = sensor.snapshot() # Take pictures + get images

    img.draw_line((100, 100, 200, 200), color=(255,0,0),thickness=3)
    img.draw_rectangle((200, 30, 41, 51), color=(255,0,0),fill = True)
    img.draw_circle(50, 200, 30,color=(0,255,0))
    img.draw_cross(90,60,size=10,color=(0,0,255))
    img.draw_arrow((80,100,120,50))
    #img.draw_string(10,10, "hello world!",scale = 2,color=(0,0,255))
    img.draw_string(10,10, "fps"+str(clock.fps()),mono_space = False,scale = 2,color=(0,0,255))

    print(clock.fps())
For more drawing functions and usage, please refer to: image - machine vision - micro Python 1.9.2 documentation (singtown.com)
It's very detailed. You need to know more and make more suggestions. It's mainly about some default parameters. They are very important and can achieve many desired effects. Pay special attention to:
- The change of this image will not have any effect on the original image, and its color will not have any image on the original image
- Many things only need a very basic parameter. For example, the starting point and ending point are OK. Other things can be obtained quickly by checking the document
5. Basic operations using images - color tracking
To find color patches, openmv provides the find blob function to find color patches. This principle is based on the principle of threshold, that is, to search the area that meets the threshold and find color patches
- Pause the image and frame the desired area
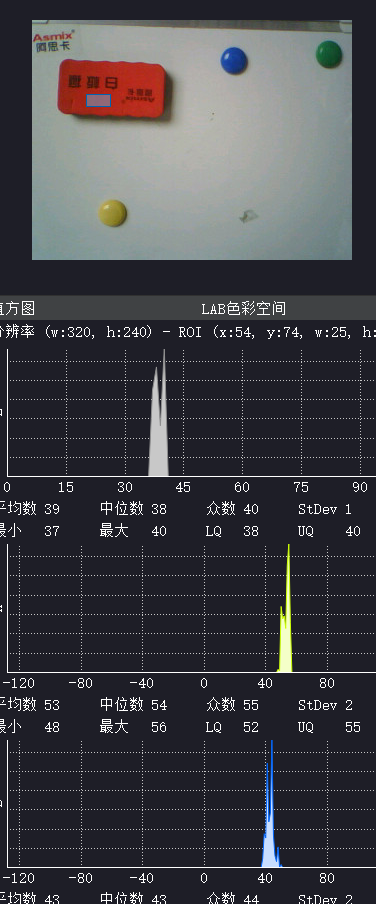
- Find the image according to the approximate area range of LAB in the figure above
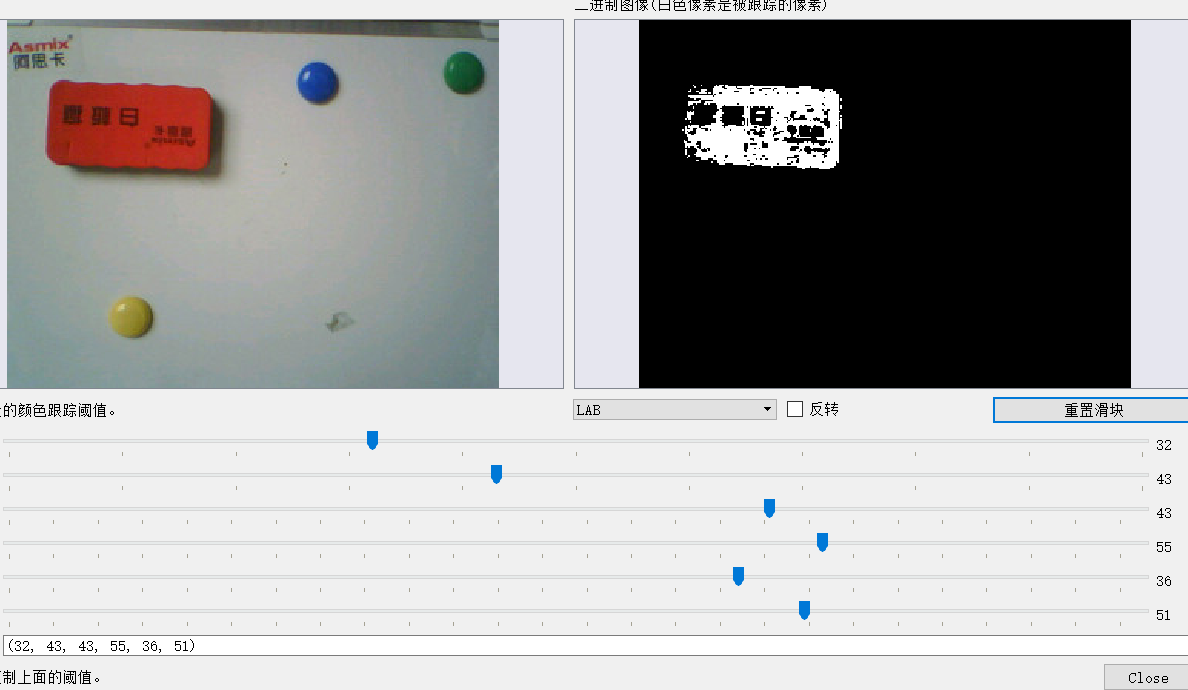
Use find_blobs function to search for color patches. The document is described as follows:
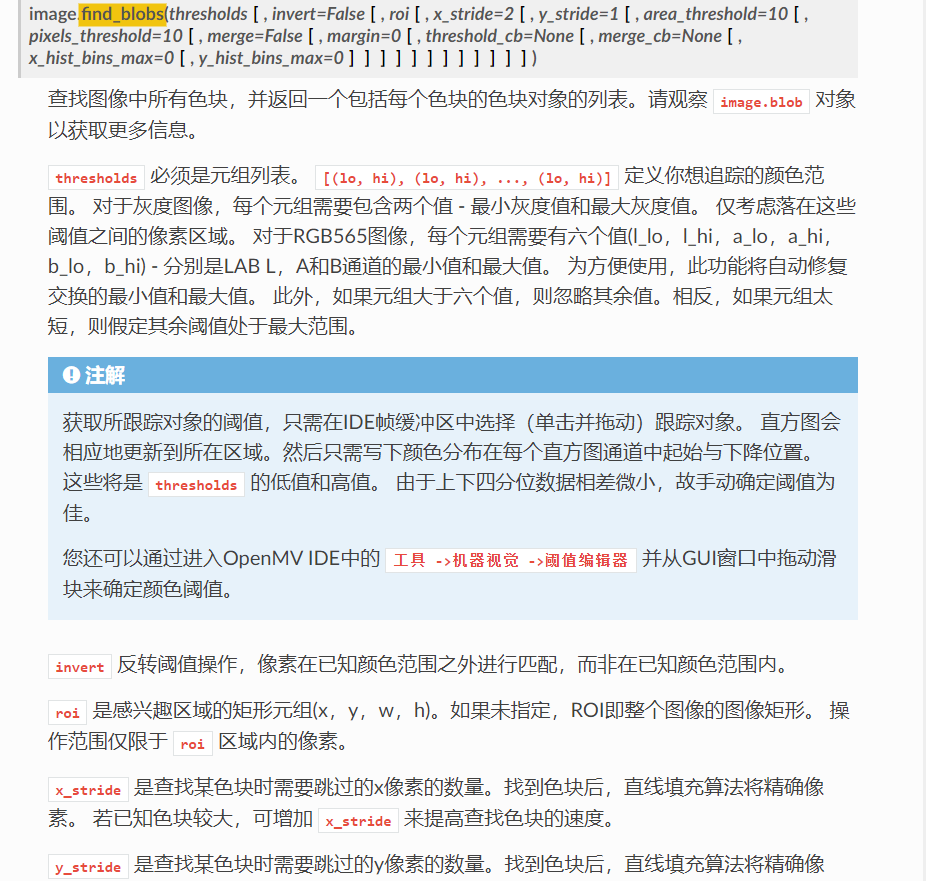
The search code is as follows:
# Find the color block threshold area
red = (32, 43, 43, 55, 36, 51)
yellow = (45, 68, -14, -1, 42, 56)
blue = (18, 39, 2, 32, -58, -32)
green = (18, 39, -40, -20, 8, 21)

while(True):
    clock.tick() # This can record the frame rate
    img = sensor.snapshot() # Take pictures + get images
    blobs = img.find_blobs([red,yellow,blue,green],area_threshold = 80) # An area filter is added, and values smaller than the area are filtered out
    for blob in blobs:
        img.draw_rectangle(blob.rect())
    print(clock.fps())
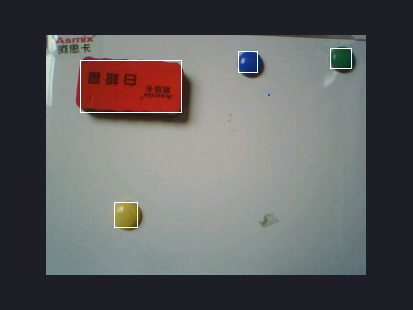
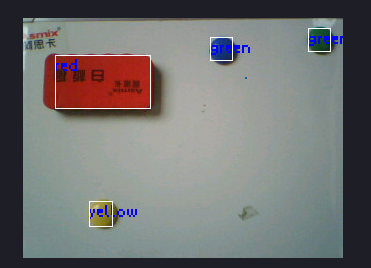
Now start to mark the color blocks found:
# Find the color block threshold area
red = (32, 43, 43, 55, 36, 51)
yellow = (45, 68, -14, -1, 42, 56)
blue = (18, 39, 2, 32, -58, -32)
green = (18, 39, -40, -20, 8, 21)

while(True):
    clock.tick() # This can record the frame rate
    img = sensor.snapshot() # Take pictures + get images
    blobs = img.find_blobs([red,yellow,blue,green],area_threshold = 80)
    for blob in blobs:
        #print(blob.code())
        #print(blob.x,blob.y)
        if blob.code() == 1:
            img.draw_string(blob.x(),blob.y(), 'red',mono_space = False,scale = 2,color=(0,0,255))
        elif blob.code() == 2:
            img.draw_string(blob.x(),blob.y(), 'yellow',mono_space = False,scale = 2,color=(0,0,255))
        elif blob.code() == 3:
            img.draw_string(blob.x(),blob.y(), 'blue',mono_space = False,scale = 2,color=(255,0,0))
        else:
            img.draw_string(blob.x(),blob.y(), 'green',mono_space = False,scale = 2,color=(0,0,255))
        img.draw_rectangle(blob.rect())
    print(clock.fps())
It is to use the traversal method, match with the prepared identification, and then use the drawing function to identify:
There are other commonly used ones, such as area and center coordinates, which are also OK. See the reference documents for details
6. Identification code
AprilTag code
Let's start the tracking of the AprilTag part. It's not introduced here. You can use it directly
- First of all, AprilTag is not a code, but a series of codes. Different codes belong to different families
- The difference between codes of different families lies in the different effective regions. With the change of effective regions, the recognition accuracy will change
- Here, openmv recommends TAG36H11 family
- The machine vision tool in ide can be used to generate AprilTag code directly
- When using, pay attention to turn off white balance and automatic gain
Searching for AprilTag is a bit like searching for a small ball. There is also a special function to find it
import sensor,image,time

sensor.reset() # Reset camera
sensor.set_pixformat(sensor.RGB565) # Set the color format to RGB565
sensor.set_framesize(sensor.QQVGA)

sensor.set_auto_gain(False)
sensor.set_auto_whitebal(False)
sensor.skip_frames(time = 2000) # Jump some frames at the beginning
clock = time.clock() # It is mainly used to record the frame rate

while(True):
    clock.tick() # This can record the frame rate
    img = sensor.snapshot() # Take pictures + get images
    # Look for signs
    for tag in img.find_apriltags():
        img.draw_rectangle(tag.rect(),color = (0,0,255))
        img.draw_cross(tag.cx(),tag.cy(),color = (0,0,255))
        degress = 180 * tag.rotation() / math.pi # Rotation angle
        print(tag.id(),degrees())
    #print(clock.fps())
It can be seen that in addition to the id, the rotation angle can also be identified. The angle is the radian value, which is converted by mathematical function
QR code
After obtaining the image, use the following code:
    img = sensor.snapshot()
    for code in img.find_qrcodes():
        print(code)
7. Template matching
A method called ncc template matching is used here. The official description is as follows:
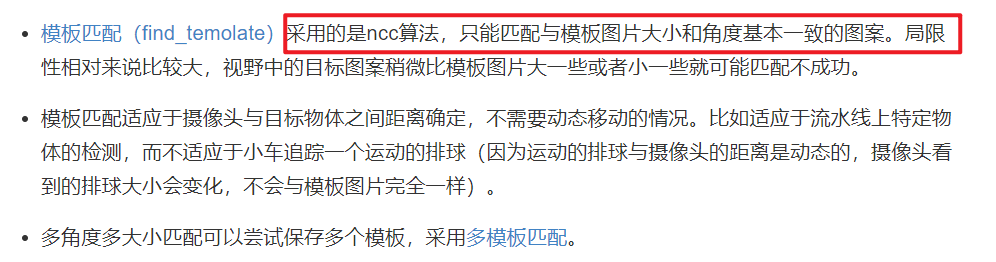
Here is a summary of my feelings when using it:
- Gray image is required for use, that is, the original rgb565 needs to be changed into gray input. Of course, it can be converted into gray for template matching, and then the original color image can be retained
- To add two packages, in the image
- The template adopts the pgm diagram. The official does not take this diagram, so it needs to be converted by itself
- Templates can be obtained from flash or sd card, but flash is not recommended because there is not enough memory
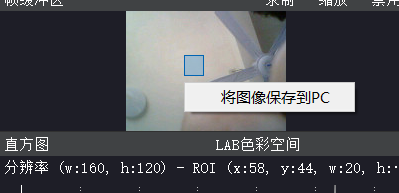
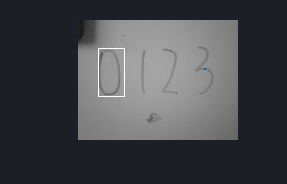
Check the box to get the template. The default saving is bmp lossless format
from image import SEARCH_EX, SEARCH_DS
import sensor,image,time
from image import SEARCH_EX, SEARCH_DS

sensor.reset() # Reset camera
sensor.set_pixformat(sensor.GRAYSCALE) # Set color format to grayscale
sensor.set_framesize(sensor.QQVGA)

#sensor.set_auto_gain(False)
#sensor.set_auto_whitebal(False)
sensor.skip_frames(time = 2000) # Jump some frames at the beginning
template = image.Image("/1.pgm")
clock = time.clock() # It is mainly used to record the frame rate

while(True):
    img = sensor.snapshot()
    r = img.find_template(template, 0.70, step=4, search=SEARCH_EX)
    if r:
        img.draw_rectangle(r)
The effect is as follows:
To match multiple templates, first select multiple templates on the spot:

Retrieve templates
import sensor,image,time
from image import SEARCH_EX, SEARCH_DS

sensor.reset() # Reset camera
sensor.set_pixformat(sensor.GRAYSCALE) # Set the color format to RGB565
sensor.set_framesize(sensor.QQVGA)

#sensor.set_auto_gain(False)
#sensor.set_auto_whitebal(False)
sensor.skip_frames(time = 2000) # Jump some frames at the beginning
templates = ["00.pgm","01.pgm","02.pgm","03.pgm"]
clock = time.clock() # It is mainly used to record the frame rate

while(True):
    img = sensor.snapshot()
    for t in templates:
        template = image.Image(t)
        r = img.find_template(template, 0.70, step=4, search=SEARCH_EX) #, roi=(10, 0, 60, 60))
        if r:
            img.draw_rectangle(r)
            print(t)
After my actual measurement, the effect is not very good
8. The distance is solved by the method of proportion
In fact, this is quite simple. We basically know the principle of near large and far small. Then the size is the area of the region. All objects can be compared according to the area of the region. Of course, this error is very large. It can only be used as a perceptual understanding, and the result will be affected by many factors
- Firstly, the area of a pixel area is obtained by the previous color block method
import sensor,image,time
sensor.reset() # Reset camera
sensor.set_pixformat(sensor.RGB565) # Set the color format to RGB565
sensor.set_framesize(sensor.QVGA)
#sensor.set_auto_gain(False)
#sensor.set_auto_whitebal(False)
sensor.skip_frames(time = 2000) # Jump some frames at the beginning
clock = time.clock() # It is mainly used to record the frame rate
#red = (32, 43, 43, 55, 36, 51)
#yellow = (45, 68, -14, -1, 42, 56)
blue = (18, 39, 2, 32, -58, -32)
#green = (18, 39, -40, -20, 8, 21)
while(True):
clock.tick() # This can record the frame rate
img = sensor.snapshot() # Take pictures + get images
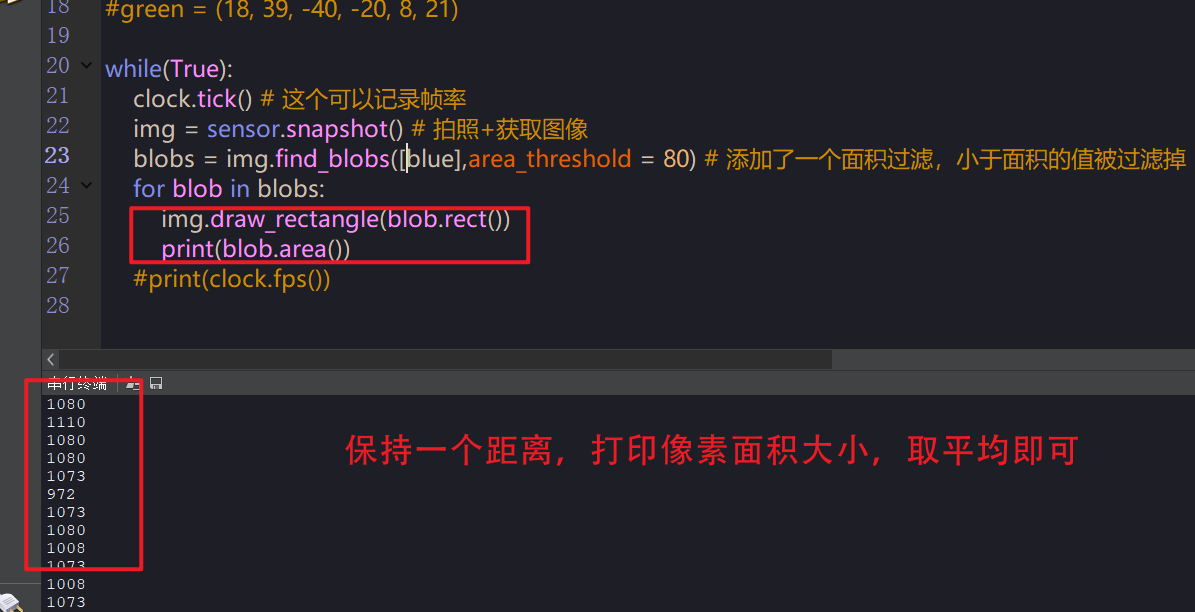
blobs = img.find_blobs([blue],area_threshold = 80) # An area filter is added, and values smaller than the area are filtered out
for blob in blobs:
img.draw_rectangle(blob.rect())
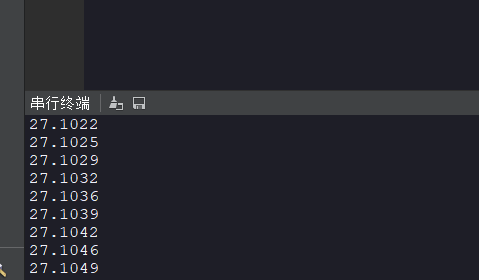
print(blob.area())
It can be seen that the printed pixel values are as follows. This is the most basic scale coefficient
- Use scale to calculate distance
import sensor,image,time
sensor.reset() # Reset camera
sensor.set_pixformat(sensor.RGB565) # Set the color format to RGB565
sensor.set_framesize(sensor.QVGA)
#sensor.set_auto_gain(False)
#sensor.set_auto_whitebal(False)
sensor.skip_frames(time = 2000) # Jump some frames at the beginning
clock = time.clock() # It is mainly used to record the frame rate
#red = (32, 43, 43, 55, 36, 51)
#yellow = (45, 68, -14, -1, 42, 56)
blue = (18, 39, 2, 32, -58, -32)
#green = (18, 39, -40, -20, 8, 21)
k = 600
while(True):
clock.tick() # This can record the frame rate
img = sensor.snapshot() # Take pictures + get images
blobs = img.find_blobs([blue],area_threshold = 80) # An area filter is added, and values smaller than the area are filtered out
if len(blobs) == 1: # Only one box was searched
b = blobs[0] # Is to get this box
img.draw_rectangle(b[0:4]) # Draw rectangle
img.draw_cross(b[5],b[6]) # Cross center
lm = (b[2]+b[3])/2 # Area = width * height
length = k/lm # Use the scale because it starts with 10 cm, an integer
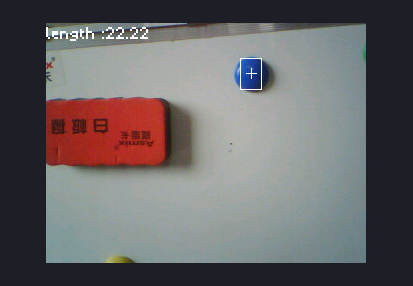
img.draw_string(0, 0,"length :%.2f"%(length),mono_space = False,scale = 2)
The operation results are as follows:
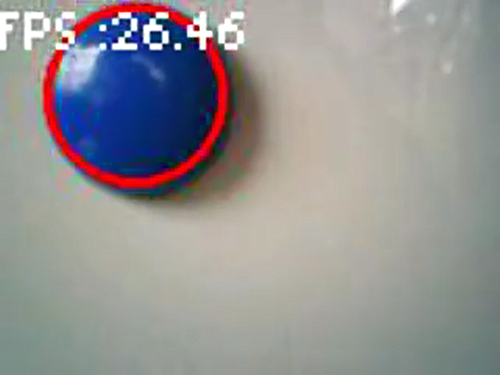
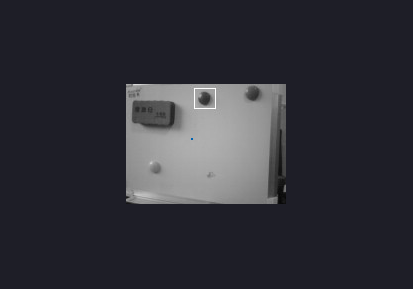
9. Combined use
Here is mainly the combination of color and color block. The use is to find the area of the circle first, and then find the area in the area of the circle where the color threshold meets the requirements
The function parameters of finding circle are as follows:
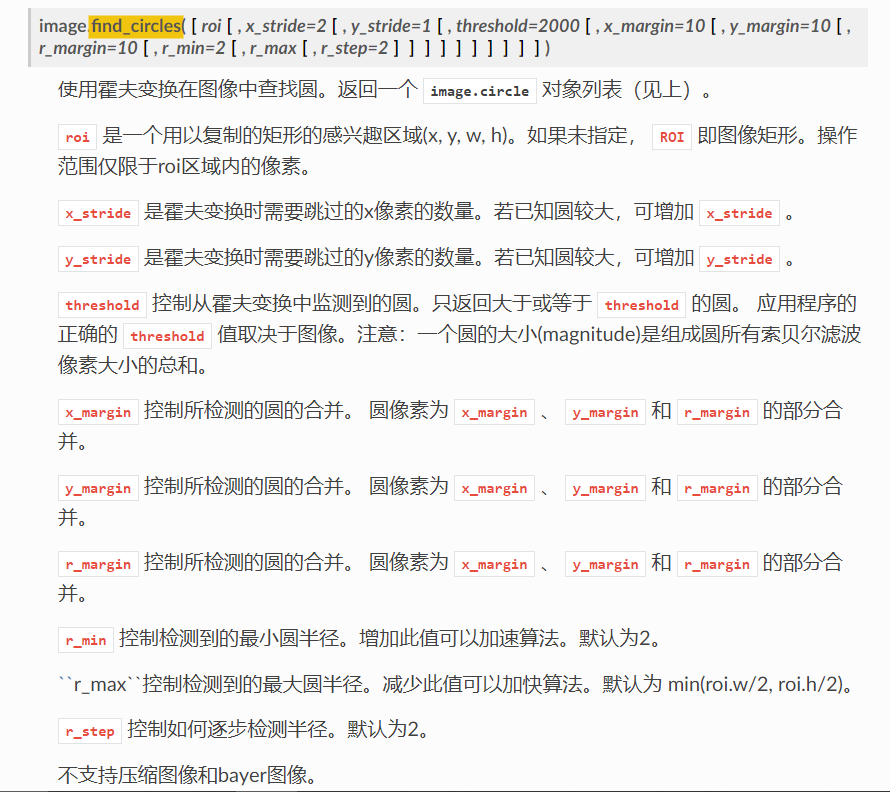
The code is as follows:
import sensor,image,time

sensor.reset() # Reset camera
sensor.set_pixformat(sensor.RGB565) # Set the color format to RGB565
sensor.set_framesize(sensor.QQVGA)

#sensor.set_auto_gain(False)
#sensor.set_auto_whitebal(False)
sensor.skip_frames(time = 2000) # Jump some frames at the beginning

clock = time.clock() # It is mainly used to record the frame rate

#red = (32, 43, 43, 55, 36, 51)
#yellow = (45, 68, -14, -1, 42, 56)
blue = (18, 39, 2, 32, -58, -32)
#green = (18, 39, -40, -20, 8, 21)


while(True):
    clock.tick() # This can record the frame rate
    img = sensor.snapshot() # Take pictures + get images
    for c in img.find_circles(r_min = 10):
        area = (c.x()-c.r(), c.y()-c.r(), 2*c.r(), 2*c.r())
        statistics = img.get_statistics(roi=area)
        if 18<statistics.l_mode()<50 and 2<statistics.a_mode()<38 and -60<statistics.b_mode()<-22:
            img.draw_circle(c.x(), c.y(), c.r(), color = (255, 0, 0),thickness=3)
        else:
            img.draw_rectangle(area, color = (255, 255, 255))
        img.draw_string(0, 0,"FPS :%.2f"%(clock.fps()),mono_space = False,scale = 2)
The effect is as follows: