1. Virtual Machine Gets ip
1) Isolation of DHCP services with namspace
Neutron provides DHCP services through dnsmasq, while dnsmasq isolates each network service independently through Linux Network Namespace
On a two-tier network, VLAN can divide a physical switch into several independent virtual switches. Similarly, on a three-tier network, Linux network namespace can divide a physical three-tier network into several separate virtual three-tier networks.
Each namespace has its own independent network stack, including route table, firewall rule, network interface device, etc.
Neutron provides independent DHCP and routing services for each network through namespace, allowing tenants to create overlapping networks. Without namespace, the network can't overlap, thus losing a lot of flexibility.
Each dnsmasq process is located in a separate namespace, named qdhcp - < network ID >, such as flat_net:
    The ip netns list command lists all namespace s

    IP netns exec < network namespace name > < command > Manage namespace
2)root namespace
In fact, the host itself also has a namespace, called root namespace, with all physical and virtual interface device s. Physical interface can only be located in root namespace.
The newly created namespace defaults to only one loopback device. Administrators can add virtual interface s, such as bridge s, tap s, and other devices to a namespace.
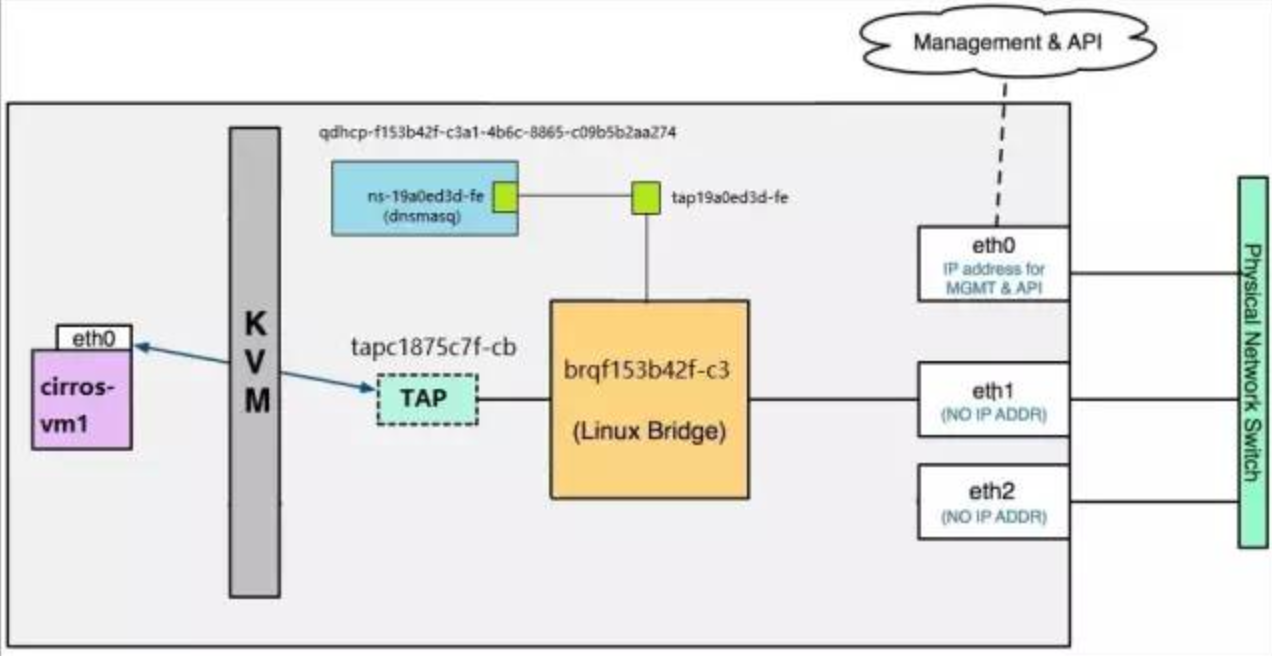
For flat_net DHCP device tap19a0ed3d-fe, it needs to be placed in namespace qdhcp-7bf09be4-8653-4869-84f0-33494f238627, but this will cause a problem: tap19a0ed3d-fe will not be able to connect directly with the gedevice brqf153b42f-c3 in root namespace.
Neutron uses veth pair to solve this problem.
veth pair is a pair of special network devices, which are like a virtual wire and can be used to connect two namespace s. Enter data to one end of veth pair and read it at the other end.
tap19a0ed3d-fe and ns-19a0ed3d-fe are Veth pairs. They connect qdhcp-f153b42f-c3a1-4b6c-8865-c09b5b2aa274 to brqf153b42f-c3.
As shown in the following figure:
The ns-ba07bb93 configuration can be viewed through the ip netns exec qdhcp-7bf09be4-8653-4869-84f0-33494f238627 ip a command.
3) Process analysis of dhcp IP acquisition
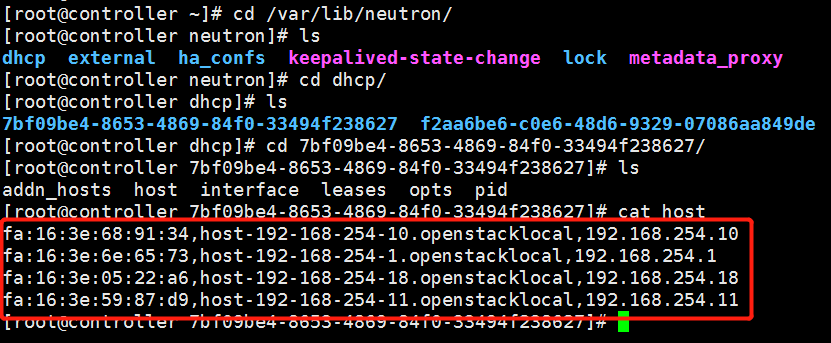
When an instance is created, Neutron assigns it a port containing MAC and IP address information. This information is synchronously updated to the host file of dnsmasq. As shown in the following figure:
At the same time, nova-compute r sets the MAC address of virtual machine VIF.
Everything is ready. The process of obtaining IP by instance is as follows:
(1) vm starts up and sends out DHCPDISCOVER broadcasting, which can be received in the whole net.
(2) The broadcasting arrives at veth tap19a0ed3d-fe and then transmits to ns-19a0ed3d-fe at the other end of veth pair. Dnsmasq listens on it, dnsmasq checks its host file and finds that there are corresponding items, so dnsmasq sends IP (192.168.254.18), subnet mask (255.255.255.0), address lease term and other information to vm with DHCPOFFER message.
(3) vm sends DHCPREQUEST message to confirm acceptance of the DHCPOFFER.
(4) dnsmasq sends confirmation message DHCPACK, and the whole process ends.
2. Introduction to VXLAN
1) Overay network concept
Overay network refers to the network built on other networks. Nodes in overlay network can be seen as connected through virtual (or logical) links. Overlay network may consist of several physical links at the bottom level, but for nodes, these underlying implementations need not be concerned.
For example, a P2P network is an overlay network, and so is a tunnel. vxlan and gre are both based on tunnel technology, and they are also overlay networks.
At present, linux bridge only supports vxlan, but does not support gre.
Openvswitch supports both. Vxlan is very similar to gre implementation, and vxlan is used more, so this tutorial only introduces vxlan.
2) Introduction to VXLAN:
VXLAN is Virtual eXtensible Local Area Network. As the name describes, VXLAN provides the same Ethernet layer 2 service as VLAN, but it has stronger scalability and flexibility. Compared with VLAN,
VXLAN has the following advantages:
(1) Support more two-tier network segments.
VLAN uses 12-bit tagging VLAN ID to support up to 4094 VLANs, which can become a bottleneck for large cloud deployment. The ID (VNI or VNID) of VXLAN is labeled with 24-bit, supporting 16777216 two-tier segments.
(2) Better use of existing network paths.
VLAN uses Spanning Tree Protocol to avoid loops, which results in half of the network paths being block ed. VXLAN packets are encapsulated in UDP and transmitted through three layers. All paths can be used.
(3) Avoid the exhaustion of MAC tables in physical switches.
Because of the tunneling mechanism, the TOR (Top on Rack) switch does not need to record the information of the virtual machine in the MAC table.
3) VXLAN package and package format:
VXLAN is a network based on two layers and three layers. By encapsulating the two-tier data into UDP, the number of two-tier network segments in the data center is expanded.
VXLAN is a solution to support large-scale multi-tenant network environment in existing physical network facilities. The transmission protocol of VXLAN is IP + UDP.
VXLAN defines a MAC-in-UDP encapsulation format. VXLAN header is added before the original Layer 2 network packet, and then put into UDP and IP packets. Through MAC-in-UDP encapsulation, VXLAN can build a Layer 2 tunnel on Layer 3 network.
The format of the VXLAN package is as follows
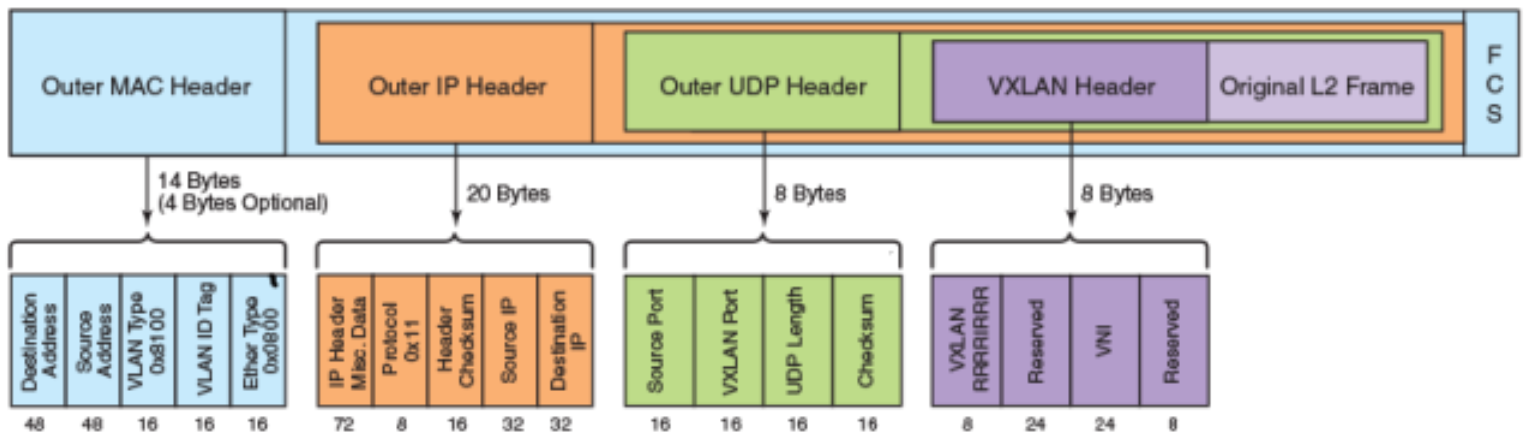
As shown in the figure above, VXLAN introduces 8-byte VXLAN header, with VNI accounting for 24-bit. VXLAN and the original L2 frame are encapsulated in UDP packages. This 24-bit VNI is used to label different two-tier network segments and can support 16777216 LANs.
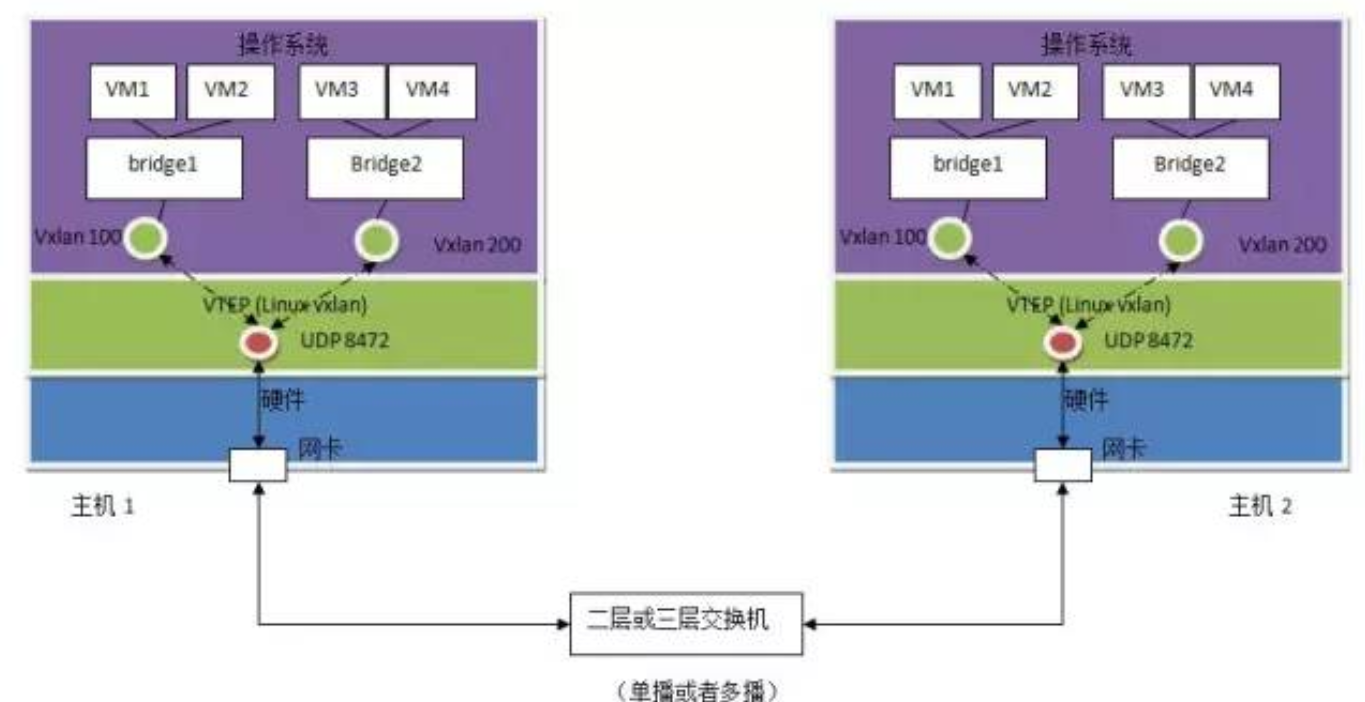
4)VXLAN Tunnel Endpoint
VXLAN uses VXLAN tunnel endpoint (VTE) device to process VXLAN encapsulation and de-encapsulation. Each VTEP has an IP interface with an IP address configured. VTEP uses this IP to encapsulate Layer 2 frame, and transmits and receives encapsulated VXLAN data packets through the IP interface.
Here's a schematic of VTEP
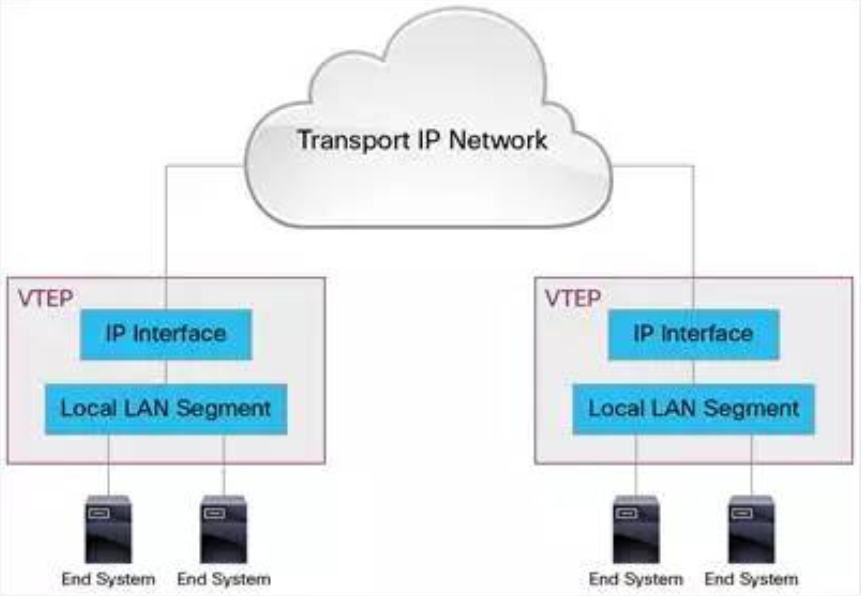
VXLAN is independent of the underlying network topology; conversely, the underlying IP network between two VTEPs is also independent of VXLAN. VXLAN packets are routed according to the IP header of the outer layer, which takes the VTEP IP at both ends as the source and target IP.
VXLAN packaging and forwarding process, and Linux native support for VXLAN
VXLAN Packet Forwarding Process
VXLAN builds tunnels between VTEP s and transmits encapsulated Layer 2 data through Layer 3 network. The following example demonstrates how data is transmitted over VXLAN

(1) In the figure, Host-A and Host-B are located in VXLAN of VNI 10. They communicate through VXLAN tunnel established between VTE-1 and VTE-2. The data transmission process is as follows:
(a) When Host-A sends data to Host-B, the MAC and IP of Host-B serve as the target MAC and IP of the data packet, and the MAC of Host-A serves as the source MAC and IP of the data packet, and then sends the data through VTP-1.
b) VTE-1 finds the VTE-2 corresponding to MAC-B from the mapping table maintained by itself, then executes VXLAN encapsulation, plus VXLAN header, UDP header, and outer IP and MAC header. At this time, the outer IP header, the target address is the IP of VTP-2, and the source address is the IP of VTP-1. At the same time, because the next hop is Router-1, the target address in the outer MAC header is Router-1 MAC.
c) After sending the data packet from VTP-1, the router of the external network will route according to the outer IP header, and finally reach Router-2, which is connected with VTP-2.
d) Router-2 sends data packets to VTP-2. VTP-2 is responsible for unpacking data packets, and removes the outer MAC header, the outer IP header, the UDP header and the VXLAN header in turn. VTP-2 sends data packets to Host-B based on the target MAC address.
The above process shows that VTEP is the core component of VXLAN, responsible for data encapsulation and decomposition. Tunnels are also built between VTEPs, which are responsible for data transmission.
(2) How does VTEP get information about IP-MAC-VTEP in advance?
a) Neutron knows the status and information of each port; the port stores IP, MAC-related data.
b) When instance starts, its port state changes as follows: down - > build - > active.
c) Whenever the state of the port changes, Neutron notifies the Neutron agent on each node by RPC message, which enables VTEP to update the relevant information of VM and port. Based on this information, VTEP can determine which VMs are on other Host s and their MAC addresses, so that it can communicate directly with them, thus avoiding unnecessary tunnel connections and broadcasting.
(3) Linux support for VXLAN
VTEP can be implemented either by proprietary hardware or by pure software. At present, the mature VTEP software implementations include:
a) Linux with VXLAN kernel module
b)Open vSwitch
Let's first look at how Linux supports VXLAN
The way of realization is as follows:
A) Linux vxlan creates a UDP Socket, which is listened on port 8472 by default.
b) Linux vxlan receives the vxlan package on UDP socket, unpacks it, transfers it to a vxlan interface according to its vxlan ID, and then transfers it to the virtual machine through the linux bridge it connects to.
c) Linux vxlan encapsulates data packets sent by virtual machines into multicast UDP packets and sends them out from network cards.
Network Card Assignment Example
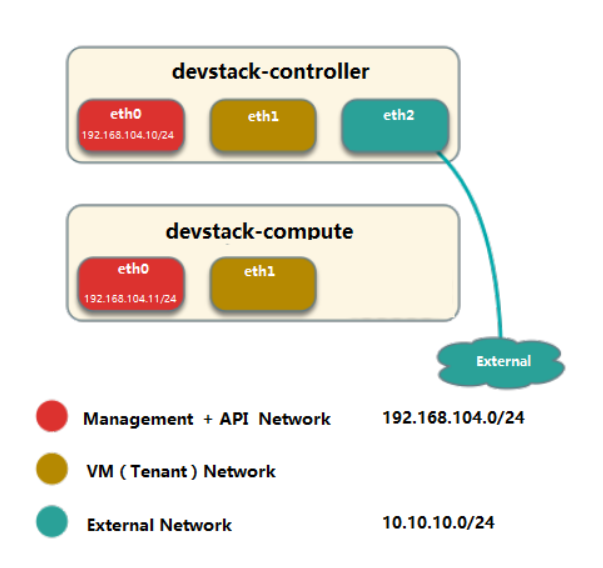
(a) Three network cards (eth0, eth1, eth2) of the control node and two network cards (eth0, eth1) of the computing node.
b) Merge Management and API networks, using eth0, IP segment 192.168.104.0/24.
c) VM networks use eht1.
d) The eth2 of the control node is connected to the External network, and the IP segment is 10.10.10.0/24.
ML2 mechanism driver: Linux Bridge and Open vSwitch
Linux Bridge

Open vSwitch 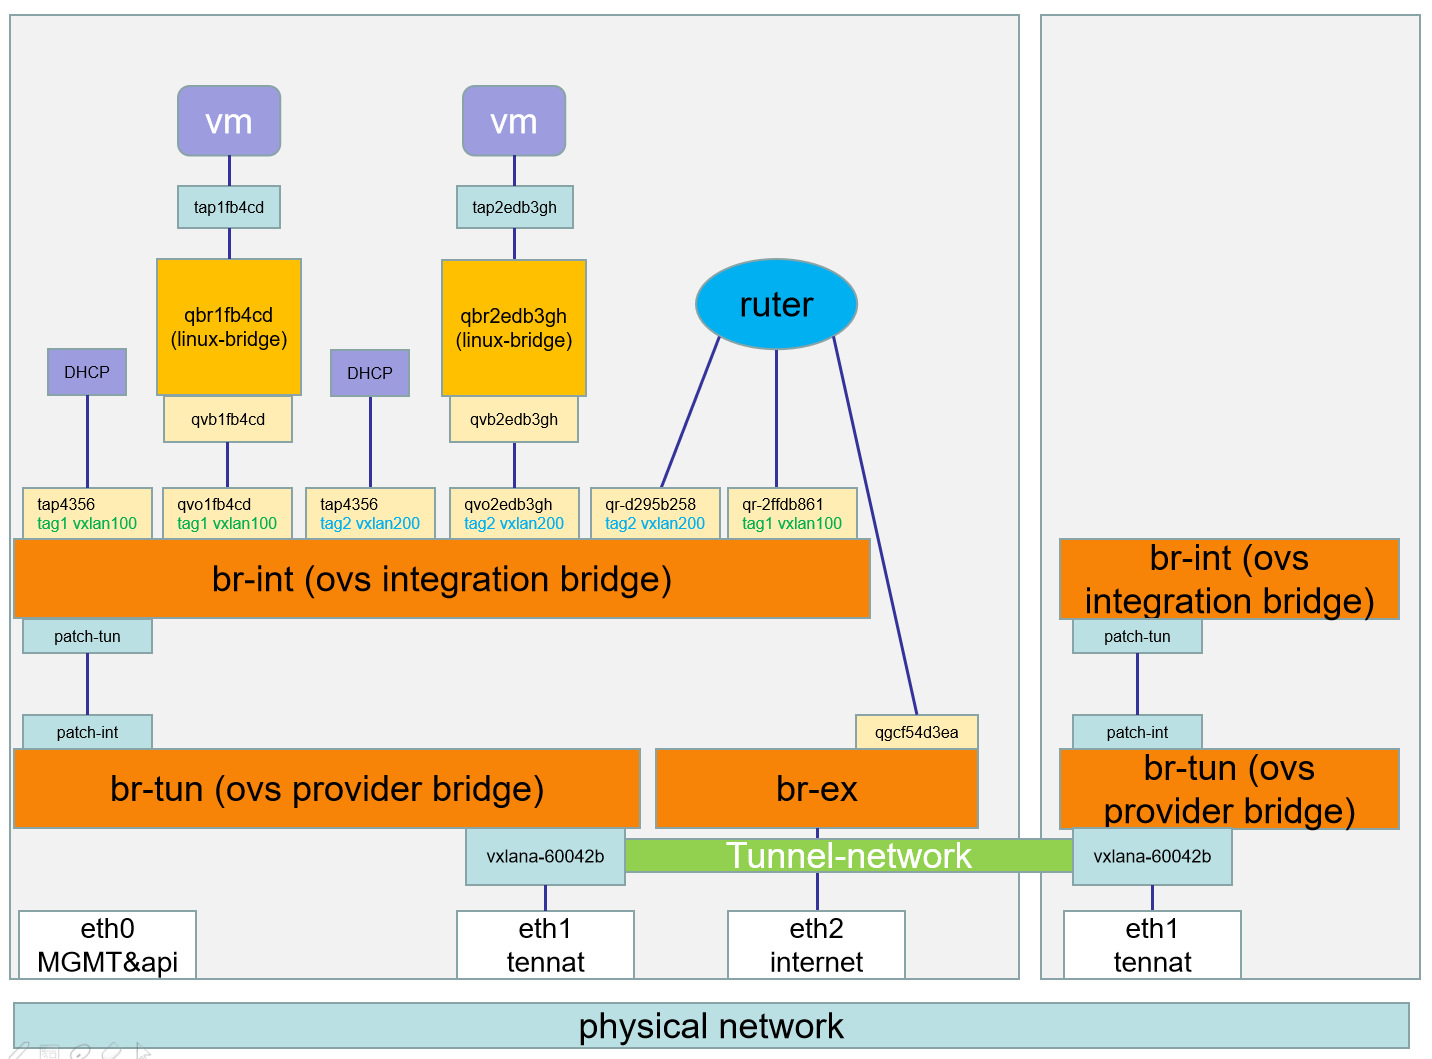
Network devices in Open vSwitch:
br-ex: A bridge connecting external networks.
br-int: An integration bridge where all instance s of virtual network cards and other virtual network devices will be connected.
br-tun: Tunnel bridge. VxLAN and GRE networks based on tunnel technology will use this bridge to communicate.
tap interface: named tapXXXX.
linux bridge: named qbrXXXX.
veth pair: named qvbXXXX, qvoXXXX
OVS integration bridge: named br-int.
OVS patch ports: Named int-br-ethX and phy-br-ethX (X is the serial number of interface).
OVS provider bridge: named br-ethX (X is the serial number of interface).
Physical interface: Named ethX (X is the serial number of interface).
OVS tunnel bridge: named br-tun.
3. Introduction of Three-Layer Network
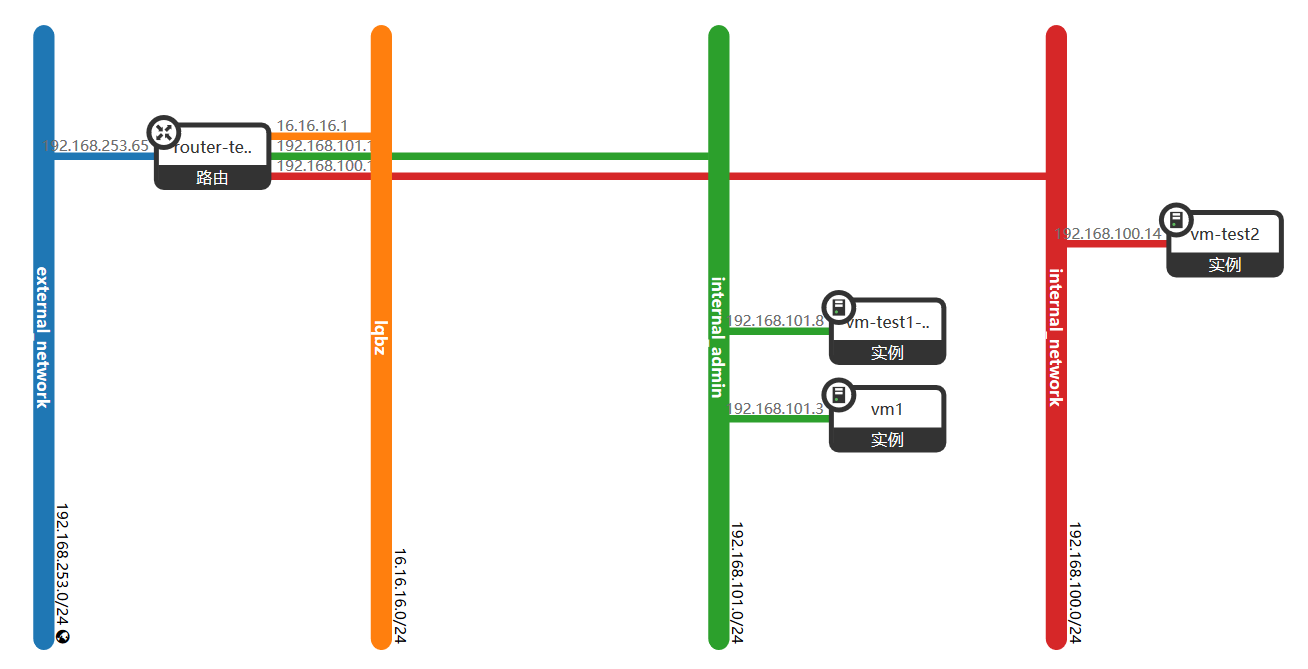
1) Virtual Machine Access Extranet:
(1) Visit an external network address 192.168.253.3 in the virtual machine and trace the route with the traceroute command.
(2) According to the network topology, the virtual machine accesses the external network through the gateway 192.168.101.1 of the network segment, and then forwards it through the routed external network interface to 192.168.253.3.
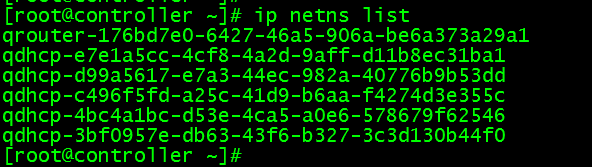
View the routing namespace
ip netns list
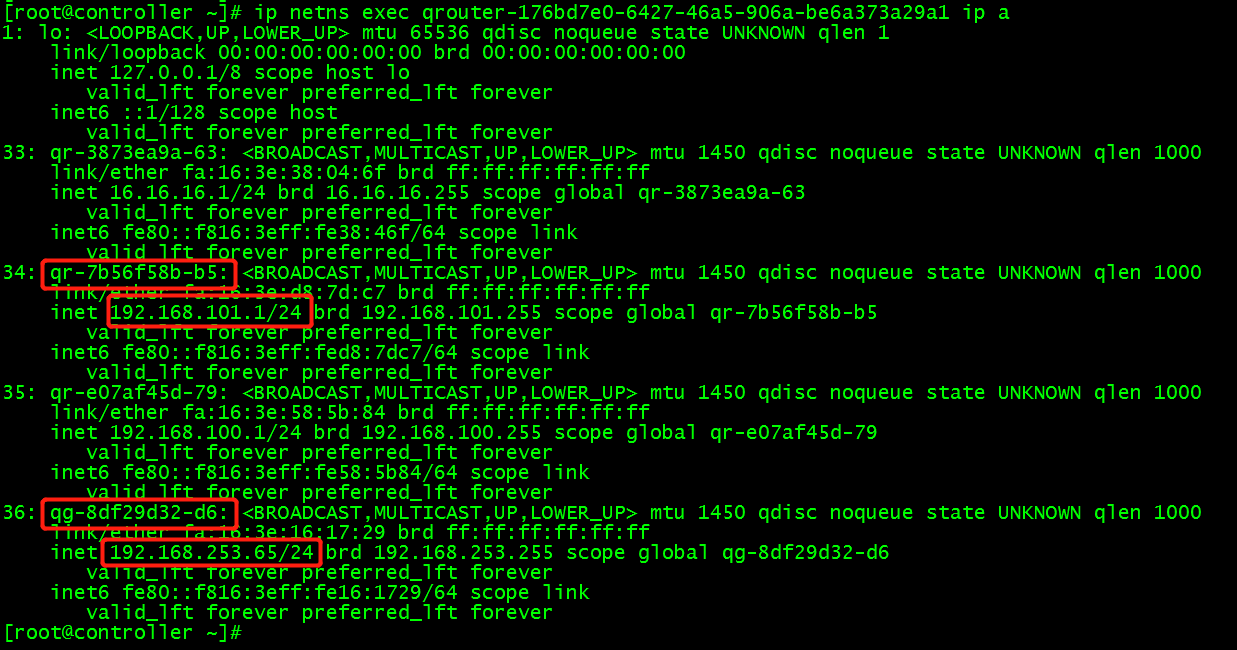
(3) Look at the network configuration of the routing namespace and find the ports and ip of the routing connection to the external network.
ip netns exec qrouter-176bd7e0-6427-46a5-906a-be6a373a29a1 ip a
The external network ports on the route are connected to the external bridge br-ex: ovs-vsctl show
(4) View routing iptables NAT forwarding rules and record SNAT s for private networks
ip netns exec qrouter-176bd7e0-6427-46a5-906a-be6a373a29a1 iptables -t nat -L
ip netns exec qrouter-176bd7e0-6427-46a5-906a-be6a373a29a1 iptables -t nat -S
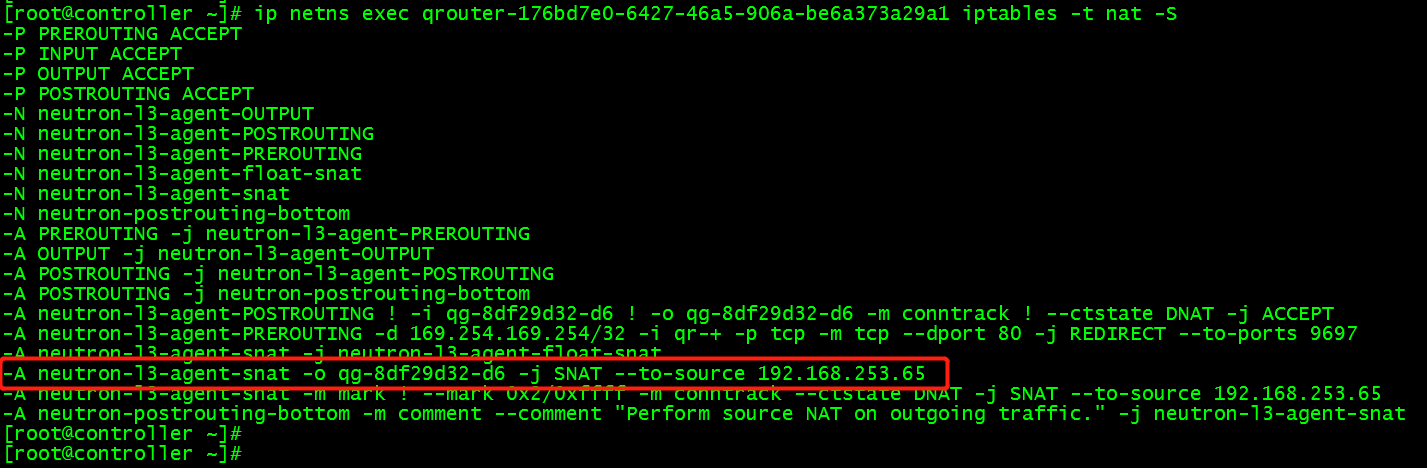
Rule Interpretation: - A neutron-l3-agent-snat-o qg-8df29d32-d6-j SNAT-to-source 192.168.253.65 records the data packets flowing into interface qg-8df29d32-d6 as SNAT (forwarding based on source address), and modifies the source address to 192.168.253.65.
(5) Verification
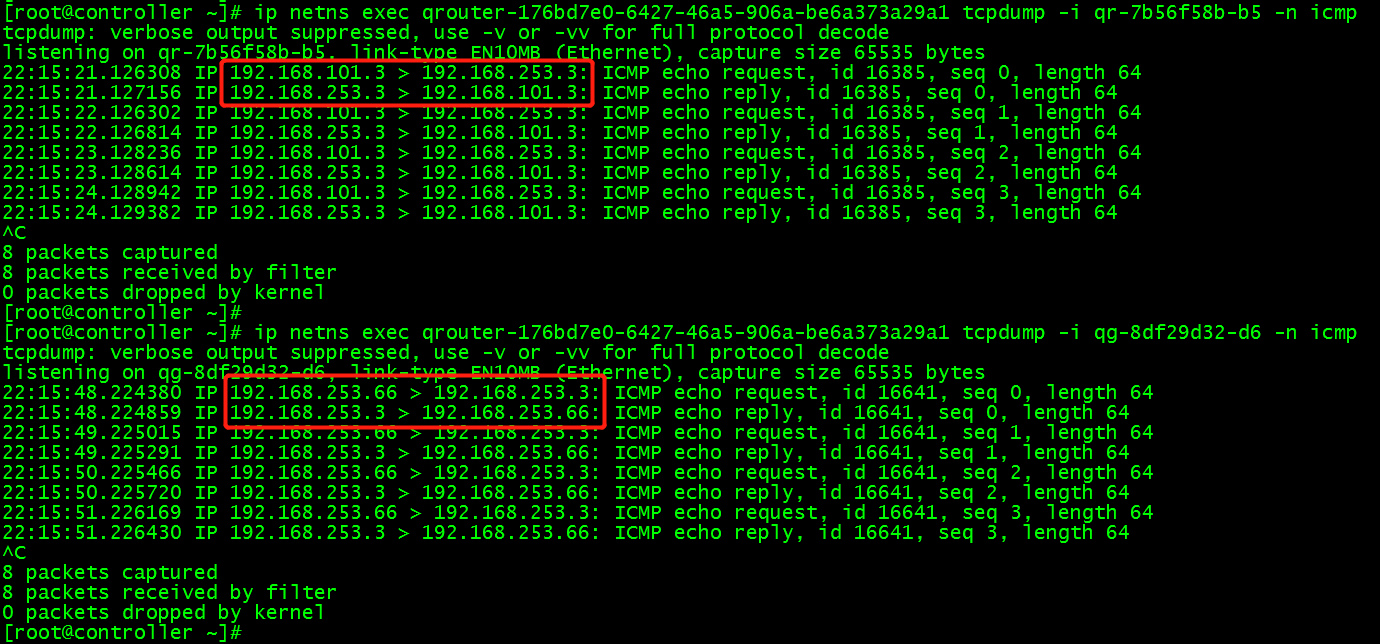
When virtual machine ping 192.168.253.3, the behavior of SNAT can be verified by observing the icmp data packets of router's two interface ts by tcpdump:
In routing qrouter-176bd7e0-6427-46a5-906a-be6a373a29a1, the gateway interface qr-7b56f58b-b5 of private network can be found, and icmp packets of gateway interface can be grabbed in routing:
ip netns exec qrouter-176bd7e0-6427-46a5-906a-be6a373a29a1 tcpdump -i qr-7b56f58b-b5 -n icmp

In routing, the icmp packet of the external network interface qg-8df29d32-d6 of the route is grabbed:
ip netns exec qrouter-176bd7e0-6427-46a5-906a-be6a373a29a1 tcpdump -i qg-8df29d32-d6 -n icmp

2) Virtual Machine for External Network Access-floating ip Principle
SNAT enables instance to access the extranet directly, but the extranet can not access instance directly. Because instance has no external IP. Here "direct access instance" refers to a communication connection initiated by an external network, such as an SSH instance from an external network.
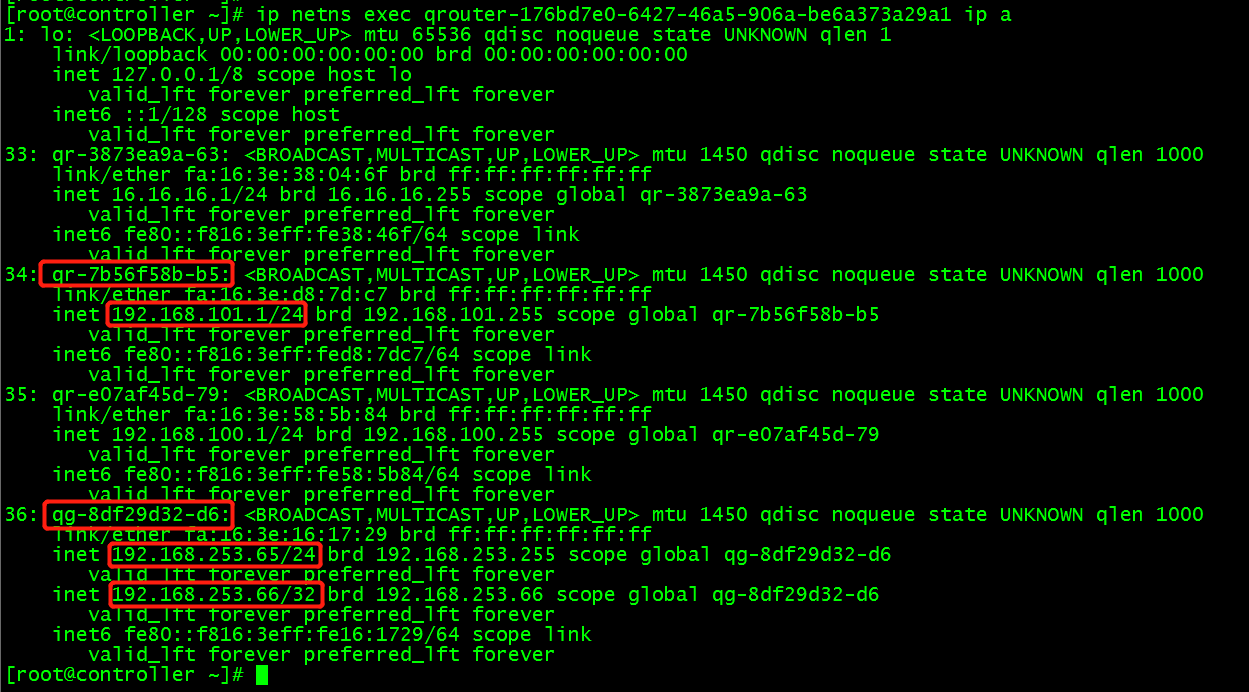
(1) Firstly, the instance is bound to floating ip192.168.253.66. floating IP is configured on router's external network interface, and then look at router's interface configuration:
(2) In the example, ping 192.168.253.3 external network address, on the routing qr-7b56f58b-b5 interface, the instance accesses the external network ip, and the external network IP forwards the data packet back to the instance ip; but on the routing qg-8df29d32-d6 interface, it always communicates with the external network through floating IP 192.168.253.66.
(3) The reason is that in routing, iptables do DNA T (forwarding based on destination address) to view router's NAT rules.
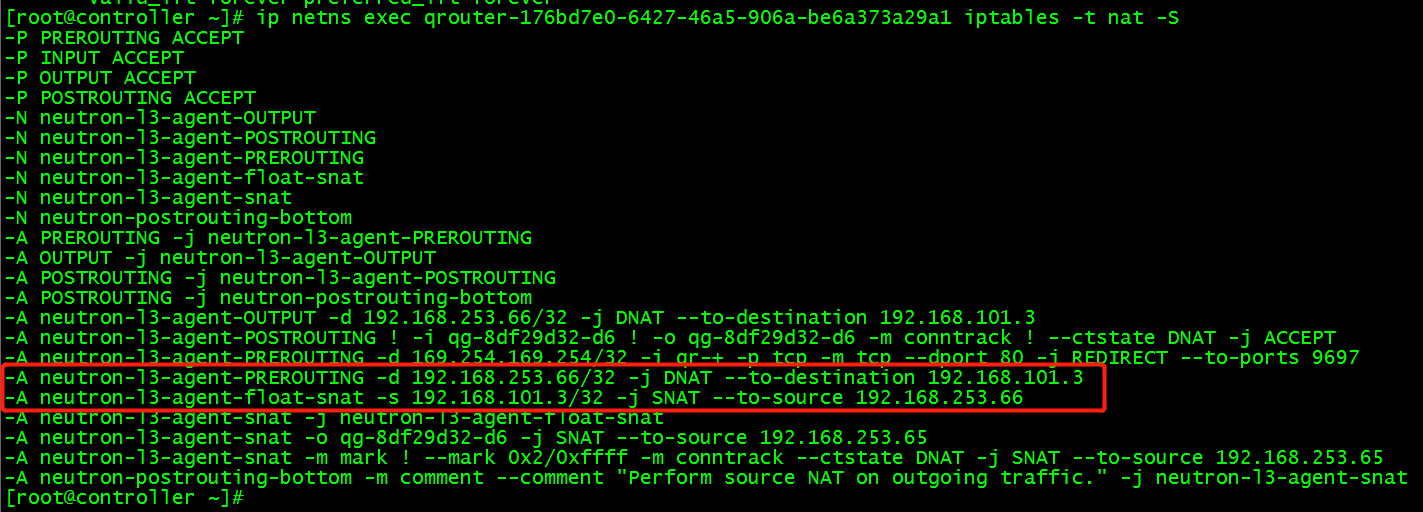
When router receives a packet from an extranet, if the destination address is floating IP 192.168.254.66, the destination address is modified to the instance IP 192.168.101.3. In this way, the package of the external network can be sent to an example.
When the instance sends data to the extranet, the source address 192.168.101.3 will be modified to floating IP 192.168.253.66.
4. Building neutron services
1) Environmental preparation
(1) Database preparation
    create database neutron;

    grant all privileges on neutron.* to 'neutron'@'localhost' identified by 'NEUTRON_DBPASS';
    grant all privileges on neutron.* to 'neutron'@'%' identified by 'NEUTRON_DBPASS';
(2) Creating Users and Services
Create neutron users
    openstack user create --domain default --password=neutron neutron
    +---------------------+----------------------------------+
    | Field               | Value                            |
    +---------------------+----------------------------------+
    | domain_id           | default                          |
    | enabled             | True                             |
    | id                  | 99d0fc3a849a4951b92135799fed0673 |
    | name                | neutron                          |
    | options             | {}                               |
    | password_expires_at | None                             |
    +---------------------+----------------------------------+
Set the cinder user role to admin
openstack role add --project service --user neutron admin
Create cinder services
    openstack service create --name neutron --description "OpenStack Networking" network
    +-------------+----------------------------------+
    | Field       | Value                            |
    +-------------+----------------------------------+
    | description | OpenStack Networking             |
    | enabled     | True                             |
    | id          | 3e79c5a9080043d2b49d06e58affeb76 |
    | name        | neutron                          |
    | type        | network                          |
    +-------------+----------------------------------+
(3) Create endpoint of neutron service
    openstack endpoint create --region RegionOne network public http://node1:9696
    +--------------+----------------------------------+
    | Field        | Value                            |
    +--------------+----------------------------------+
    | enabled      | True                             |
    | id           | 14cf89b4812a44e9ba657bb04f4b058d |
    | interface    | public                           |
    | region       | RegionOne                        |
    | region_id    | RegionOne                        |
    | service_id   | 3e79c5a9080043d2b49d06e58affeb76 |
    | service_name | neutron                          |
    | service_type | network                          |
    | url          | http://node1:9696                |
    +--------------+----------------------------------+


    openstack endpoint create --region RegionOne network internal http://node1:9696
    +--------------+----------------------------------+
    | Field        | Value                            |
    +--------------+----------------------------------+
    | enabled      | True                             |
    | id           | e521a19f51f44a9a823361cb570b982f |
    | interface    | internal                         |
    | region       | RegionOne                        |
    | region_id    | RegionOne                        |
    | service_id   | 3e79c5a9080043d2b49d06e58affeb76 |
    | service_name | neutron                          |
    | service_type | network                          |
    | url          | http://node1:9696                |
    +--------------+----------------------------------+


    openstack endpoint create --region RegionOne network admin http://node1:9696
    +--------------+----------------------------------+
    | Field        | Value                            |
    +--------------+----------------------------------+
    | enabled      | True                             |
    | id           | b2a4f6dc0289426291317b80265145fc |
    | interface    | admin                            |
    | region       | RegionOne                        |
    | region_id    | RegionOne                        |
    | service_id   | 3e79c5a9080043d2b49d06e58affeb76 |
    | service_name | neutron                          |
    | service_type | network                          |
    | url          | http://node1:9696                |
    +--------------+----------------------------------+
2) Configuration network correlation
(1) Installation of relevant software packages
yum install openstack-neutron openstack-neutron-ml2 openvswitch openstack-neutron-openvswitch ebtables -y
(2) Modify neutron configuration file
vim /etc/neutron/neutron.conf
[DEFAULT]
state_path = /var/lib/neutron
auth_strategy = keystone
core_plugin = ml2
service_plugins = router
dhcp_agent_notification = true
allow_overlapping_ips = True
notify_nova_on_port_status_changes = true
notify_nova_on_port_data_changes = true
transport_url = rabbit://openstack:admin@node1
...
[database]
connection = mysql+pymysql://neutron:NEUTRON_DBPASS@node1/neutron
...
[keystone_authtoken]
auth_uri = http://node1:5000
auth_url = http://node1:35357
memcached_servers = node1:11211
auth_type = password
project_domain_name = default
user_domain_name = default
project_name = service
username = neutron
password = neutron
...
[nova]
region_name = RegionOne
auth_url = http://node1:35357
auth_type = password
project_domain_name = default
project_name = service
user_domain_name = default
username = nova
password = nova
...
[oslo_concurrency]
lock_path = $state_path/lock
...
(3) Modify the Modular Layer 2 (ML2) plug-in configuration file
vim /etc/neutron/plugins/ml2/ml2_conf.ini
[ml2]
type_drivers = flat,vxlan
tenant_network_types = vxlan
mechanism_drivers = openvswitch,l2population
extension_drivers = port_security
...
[ml2_type_vxlan]
vni_ranges = 1:1000
...
[securitygroup]
enable_ipset = true
(4) Modify the openvswitch_agent configuration file
vim /etc/neutron/plugins/ml2/openvswitch_agent.ini
...
[agent]
tunnel_types = vxlan
l2_population = True
...
[ovs]
tunnel_bridge = br-tun
local_ip = 192.168.192.134(Network Card of Tenant Network ip)
bridge_mappings =
...
[securitygroup]
firewall_driver = iptables_hybrid
enable_security_group = true
...
(5) Modify layer-3 agent configuration file
vim /etc/neutron/l3_agent.ini
[DEFAULT]
interface_driver = openvswitch
external_network_bridge = br-ex
...
(6) Modify the metadata_agent configuration file
vim /etc/neutron/metadata_agent.ini
[DEFAULT]
nova_metadata_ip = node1
metadata_proxy_shared_secret = METADATA_SECRET
...
(7) Modify dhcp_agent configuration file
vim /etc/neutron/dhcp_agent.ini
[DEFAULT]
interface_driver = openvswitch
dhcp_driver = neutron.agent.linux.dhcp.Dnsmasq
enable_isolated_metadata = true
...
3) Configuring Computing Services to Use Network Services
vim /etc/nova/nova.conf
...
[neutron]
url = http://node1:9696
auth_url = http://node1:35357
auth_type = password
project_domain_name = default
user_domain_name = default
region_name = RegionOne
project_name = service
username = neutron
password = neutron
service_metadata_proxy = true
metadata_proxy_shared_secret = METADATA_SECRET
...
4) Creating Soft Connections
ln -s /etc/neutron/plugins/ml2/ml2_conf.ini /etc/neutron/plugin.ini
5) Synchronized database
    su -s /bin/sh -c "neutron-db-manage --config-file /etc/neutron/neutron.conf \
      --config-file /etc/neutron/plugins/ml2/ml2_conf.ini upgrade head" neutron
6) Start up services
    systemctl restart openstack-nova-api.service

    systemctl start neutron-server.service neutron-dhcp-agent.service openvswitch \
      neutron-openvswitch-agent neutron-metadata-agent.service

    systemctl enable neutron-server.service neutron-dhcp-agent.service openvswitch \
      neutron-openvswitch-agent neutron-metadata-agent.service
7) Add a network card and set up a network bridge to prohibit access to IP
vim /etc/sysconfig/network-scripts/ifcfg-ens38
TYPE=Ethernet
NAME=ens38
UUID=be119028-7b80-312f-85cd-ed1ea343254e
ONBOOT=yes
DEVICE=ens38
IPV6INIT=no
    ovs-vsctl add-br br-ex
    ovs-vsctl add-port br-ex ens38

    ovs-vsctl show
    f6f8d962-bbe0-4dc8-9582-a5d041145cc8
        Manager "ptcp:6640:127.0.0.1"
            is_connected: true
        Bridge br-tun
            Controller "tcp:127.0.0.1:6633"
                is_connected: true
            fail_mode: secure
            Port br-tun
                Interface br-tun
                    type: internal
            Port patch-int
                Interface patch-int
                    type: patch
                    options: {peer=patch-tun}
        Bridge br-int
            Controller "tcp:127.0.0.1:6633"
                is_connected: true
            fail_mode: secure
            Port patch-tun
                Interface patch-tun
                    type: patch
                    options: {peer=patch-int}
            Port br-int
                Interface br-int
                    type: internal
        Bridge br-ex
            Port "ens38"
                Interface "ens38"
            Port br-ex
                Interface br-ex
                    type: internal
        ovs_version: "2.9.0"
8) Configuring Computing Nodes
(1) Installation of relevant software packages
yum install openvswitch openstack-neutron-openvswitch ebtables ipset -y
(2) Configure neutron configuration file
vim /etc/neutron/neutron.conf
[DEFAULT]
auth_strategy = keystone
transport_url = rabbit://openstack:admin@node1
...
[keystone_authtoken]
auth_uri = http://node1:5000
auth_url = http://node1:35357
memcached_servers = node1:11211
auth_type = password
project_domain_name = default
user_domain_name = default
project_name = service
username = neutron
password = neutron
...
[oslo_concurrency]
lock_path = $state_path/lock
...
(3) Configuring network-related services
vim /etc/neutron/plugins/ml2/openvswitch_agent.ini
...
[agent]
tunnel_types = vxlan
l2_population = True
...
[ovs]
tunnel_bridge = br-tun
local_ip = 192.168.192.135
bridge_mappings =
...
[securitygroup]
firewall_driver = iptables_hybrid
enable_security_group = true
(4) Configuring Computing Services to Use Network Services
vim /etc/nova/nova.conf
...
[neutron]
url = http://node1:9696
auth_url = http://node1:35357
auth_type = password
project_domain_name = default
user_domain_name = default
region_name = RegionOne
project_name = service
username = neutron
password = neutron
service_metadata_proxy = true
metadata_proxy_shared_secret = METADATA_SECRET
...
(5) Start up related services
  systemctl restart openstack-nova-compute.service

  systemctl enable openvswitch neutron-openvswitch-agent
  systemctl start openvswitch neutron-openvswitch-agent