In the previous article, I introduced the YOLOX target detection model. I know that it is based on Pytroch and similar to the YOLOv5 target detection model. The article link is:
YOLOX, which is more powerful than YOLOv5, officially supports OpenVINO reasoning
Based on the ONNX model of YOLOX, this paper tests the models of YOLOX small and YOLOX tiny respectively. Hardware configuration and software version:
Win10 64 bit
CPU CORE i7 8thVS2017OpenVINO2021.4
Model description
The input and output formats of the two models are as follows:

Take the YOLOX small version as an example to explain what the output content is. See the output diagram of the model as follows:

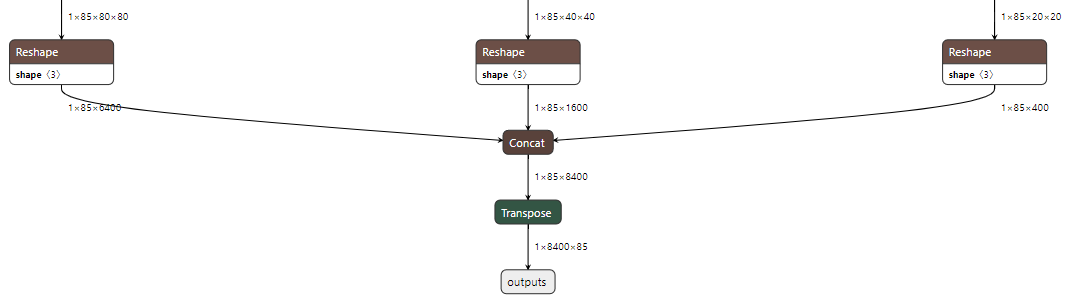
There are three output layers, which are 8 times, 16 times and 32 times downsampling respectively. The calculation method of 8400 output is as follows:
80x80+40x40+20x20 = 6400+1600+400=8400
Corresponding to 8 times, 16 times and 32 times of the downsampling size of 640 respectively. The first four of 85 are cx, cy, w and h, the fifth is the object prediction score, and the last 80 are COCO categories.
You can see that it is very similar to the parsing of YOLOv5. Then, its requirements for image prediction are as follows:
Input channel sequence: RGB,Type floating point number 0~1 Average value entered between: 0.485f, 0.456f, 0.406f Normalized variance of input: 0.229f, 0.224f, 0.225f
Code implementation part
First, the model needs to be loaded. After downloading the corresponding model ONNX format file from github, load the YOLOX model through IECore. The code is as follows:
std::cout << "YOLOX Demo" << std::endl;
Core ie;
std::vector<std::string> availableDevices = ie.GetAvailableDevices();
for (int i = 0; i < availableDevices.size(); i++) {
    printf("supported device name : %s \n", availableDevices[i].c_str());
}

//Load detection model
auto network = ie.ReadNetwork("D:/yolox.onnx");
Set the input and output of the model. Note that the input is set to FP32. Read the name of the input and output layer. The code is as follows:
//Request network input and output information
InferenceEngine::InputsDataMap input_info(network.getInputsInfo());
InferenceEngine::OutputsDataMap output_info(network.getOutputsInfo());
//Set input format
std::string input_name = "";
for (auto &item : input_info) {
    auto input_data = item.second;
    input_name = item.first;
    input_data->setPrecision(Precision::FP32);
    input_data->setLayout(Layout::NCHW);
}
printf("get it \n");

//Format output
std::string output_name = "";
for (auto &item : output_info) {
    auto output_data = item.second;
    output_name = item.first;
    std::cout <<"output name: "<< item.first << std::endl;
    output_data->setPrecision(Precision::FP32);
}
The following is the grid of three output layers. The coordinate information of each point on each grid is generated. When parsing the output data later, the data corresponding to each grid needs to be obtained according to the index
//Generate grid and anchor information of three output layers
std::vector<int> strides = { 8, 16, 32 };
std::vector<GridAndStride> grid_strides;
generate_grids_and_stride(IMG_W, strides, grid_strides);
Where generate_ grids_ and_ I borrowed the official code for stripe. I think this part can be omitted and can be calculated directly from the index. Maybe it will be faster. I borrowed it for the time being. The code of this method is as follows:
const float IMG_W = 640.0f;
struct GridAndStride
{
    int gh;
    int gw;
    int stride;
};

void generate_grids_and_stride(int target_size, std::vector<int>& strides, std::vector<GridAndStride>& grid_strides)
{
    for (auto stride : strides)
    {
        int num_grid = target_size / stride;
        for (int g1 = 0; g1 < num_grid; g1++)
        {
            for (int g0 = 0; g0 < num_grid; g0++)
            {
                GridAndStride gs;
                gs.gh = g0;
                gs.gw = g1;
                gs.stride = stride;
                grid_strides.push_back(gs);
            }
        }
    }
}
It's easy to create a reasoning request and start executing the reasoning. The parsing part of the reasoning is as follows:
//Start reasoning - support image and video
cv::Mat image = cv::imread("D:/zidane.jpg");
inferAndOutput(image, grid_strides, input_name, output_name, infer_request);
Inforandoutput is my method of reasoning and parsing output results. This method first obtains the output, and then obtains the output from the grid according to the index_ The original official method of querying the corresponding location information of the corresponding grid in strips is rather verbose and the code is not concise enough. I made a slight change. With the help of the NMS function of OpenCV in OpenVINO, I reorganized it and changed it to the current method. It is found that the amount of code can be reduced and the readability can be improved. The code of this method is as follows:
void inferAndOutput(cv::Mat &image, std::vector<GridAndStride> &grid_strides, std::string &input_name, std::string &output_name, InferRequest &infer_request) {
    int64 start = cv::getTickCount();
    Blob::Ptr imgBlob = infer_request.GetBlob(input_name);
    float sx = static_cast<float>(image.cols) / IMG_W;
    float sy = static_cast<float>(image.rows) / IMG_W;

    //Reasoning
    blobFromImage(image, imgBlob);
    infer_request.Infer();
    const Blob::Ptr output_blob = infer_request.GetBlob(output_name);

    const float* outblob = static_cast<PrecisionTrait<Precision::FP32>::value_type*>(output_blob->buffer());
    const SizeVector outputDims = output_blob->getTensorDesc().getDims();
    const int num_anchors = grid_strides.size();
    const int num_class = 80;

    //Processing and parsing output results
    std::vector<cv::Rect> boxes;
    std::vector<int> classIds;
    std::vector<float> confidences;

    for (int anchor_idx = 0; anchor_idx < num_anchors; anchor_idx++)
    {
        const int grid0 = grid_strides[anchor_idx].gh; // H
        const int grid1 = grid_strides[anchor_idx].gw; // W
        const int stride = grid_strides[anchor_idx].stride; // stride
        const int basic_pos = anchor_idx * 85;
        float x_center = (outblob[basic_pos + 0] + grid0) * stride * sx;
        float y_center = (outblob[basic_pos + 1] + grid1) * stride * sy;
        float w = exp(outblob[basic_pos + 2]) * stride * sx;
        float h = exp(outblob[basic_pos + 3]) * stride * sy;
        float x0 = x_center - w * 0.5f;
        float y0 = y_center - h * 0.5f;

        float box_objectness = outblob[basic_pos + 4];
        for (int class_idx = 0; class_idx < num_class; class_idx++)
        {
            float box_cls_score = outblob[basic_pos + 5 + class_idx];
            float box_prob = box_objectness * box_cls_score;
            if (box_prob > 0.25)
            {
                cv::Rect rect;
                rect.x = x0;
                rect.y = y0;
                rect.width = w;
                rect.height = h;

                classIds.push_back(class_idx);
                confidences.push_back((float)box_prob);
                boxes.push_back(rect);
            }

        } // class loop
    }

    std::vector<int> indices;
    cv::dnn::NMSBoxes(boxes, confidences, 0.25, 0.5, indices);
    for (size_t i = 0; i < indices.size(); ++i)
    {
        int idx = indices[i];
        cv::Rect box = boxes[idx];
        rectangle(image, box, cv::Scalar(140, 199, 0), 4, 8, 0);
    }
    float fps = cv::getTickFrequency() / (cv::getTickCount() - start);
    float time = (cv::getTickCount() - start) / cv::getTickFrequency();

    std::ostringstream ss;
    ss << "FPS : " << fps << " detection time: " << time * 1000 << " ms";
    cv::putText(image, ss.str(), cv::Point(20, 50), 0, 1.0, cv::Scalar(0, 0, 255), 2);

    cv::imshow("OpenVINO2021.4+YOLOX Demo@JiaZhiGang", image);
}
Operation and test
First, test with a test image of YOLOv5. The running results of the samll version model based on YOLOX are as follows:

It is consistent with the test results of yoov5 small version, and there is no sense of violation!
The running results of video test (YOLOX Small version model) are as follows:

I don't think the small version of YOLOv5 has fast reasoning speed (on my machine)! The output parsing code needs to be further optimized.
The running results of video test (YOLOX Tiny version model) are as follows:
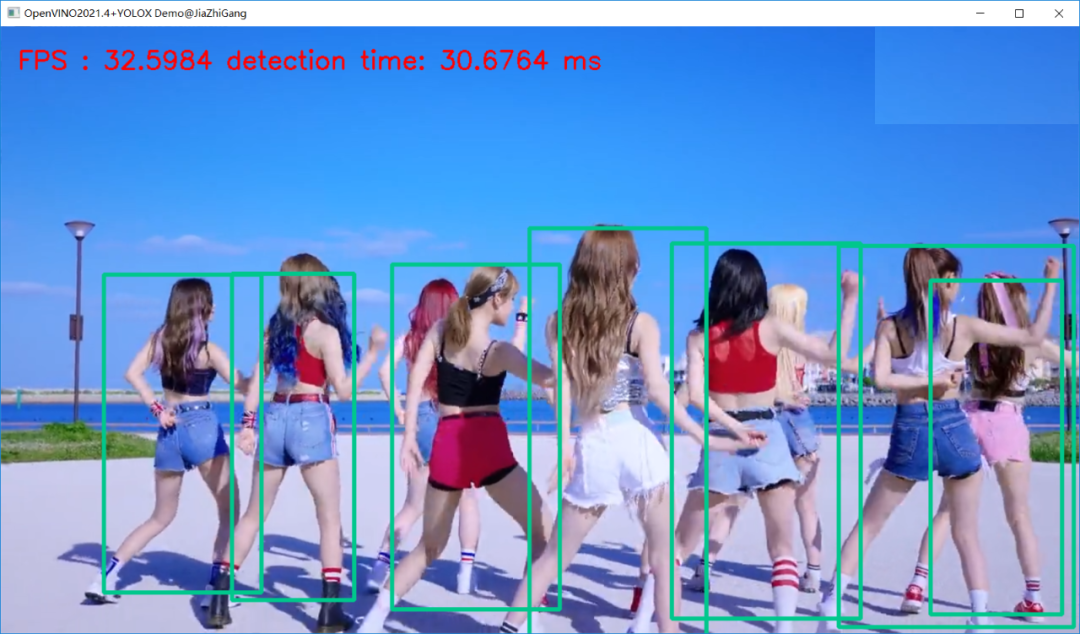
The CPU can be 30+ FPS.