Overview of Cocos2d-x physics engine
when we try to make a complex game, the game needs to simulate the situation of the real world, such as simulating the collision of two objects, simulating the object receiving gravity, etc.
Do you need to use a physical engine
don't use a physics engine when your requirements are simple. For example, you only need to determine whether there is a collision between the two objects. It may be sufficient to use the update function of the node object and the containsPoint() method of the Rect object in combination. For example:
void  update(float dt)
{
    auto p = touch->getLocation();
    auto rect = this->getBoundingBox();

    if(rect.containsPoint(p))
    {
        //do something,intersection
    }
}
this method of checking the intersection to determine whether two objects collide can only solve very simple requirements and cannot be extended. For example, if you want to develop a game, there are 100 sprite objects in a scene. You need to judge whether they collide with each other. If you use this method, it will be very complex. At the same time, the performance consumption will seriously affect the CPU utilization and the frame rate of the game. This game can't be played at all.
the physical engine is needed at this time. In simulating physical scenarios, the physical engine has good scalability and low performance consumption. Like the scenario just mentioned, it can be well solved by using the physics engine. If you know physics engine for the first time, you will feel strange. Here is a simple example:
//Create a static physical body
auto physicsBody = PhysicsBody::createBox(Size(65.0f,81.0f),PhysicsMaterial(0.1f,1.0f,0.0f));
physicsBody->setDynamic(false);

//Create a sprite
auto sprite = Sprite::create("whiteSprite.png");
sprite->setPosition(Vec2(400,400));

//Sprites use physicsBody physical bodies
sprite->addComponent(physicsBody);

//Add contact event listener
auto contactListener = EventListenerPhysicsContact::create();
contactListener->onContactBegin = CC_CALLBACK_1(onContactBegin,this);
_eventDispatcher->addEventListenerWithSceneGraphPriority(contactListener, this);
code flow:
- PhysicsBody object creation
- Sprite object creation
- The PhysicsBody object is added to the Sprite object as a component
- Create a listener to respond to the onContactBegin() event
Terms and concepts
in order to better understand the physics engine, we need to understand some of the following terms and concepts.
Rigid Bodies
rigid bodies describe the physical properties of abstract objects, including mass, position, rotation angle, velocity and damping. In Cocos2d-x, the rigid body is represented by the PhysicsBody object. When the rigid body is associated with the shape, the rigid body object has geometry. If it is not associated with the shape, the rigid body is only the physical attribute set of an abstract object.
Material
material describes the material properties of abstract objects:
- Density: density, used to calculate the mass of an object
- Friction: friction, used to simulate contact and sliding between objects
- restitution: recovery coefficient, a coefficient that simulates the rebound of an object. The coefficient is generally set between 0 and 1. 0 means no rebound and 1 means complete rebound.
Shape
shape describes the geometric attributes of an abstract object. Only when the shape is associated with a rigid body can the rigid body have geometry. If you need a rigid body with complex shapes, you can associate multiple shapes for it. Each shape object is related to a PhysicsMaterial and has the following attributes: type, area, mass, moment, offset and tag.
- Type: describes the type of shape, such as circle, rectangle, polygon, etc.
- Area: used to calculate the mass of rigid body. Density and area determine the mass of rigid body
- Mass: the mass of the rigid body, which affects the acceleration obtained by the object under a given force, and the force on the object in a gravitational field
- moment: the torque required by the rigid body to obtain a specific angular acceleration
- Offset: the offset relative to the center of the rigid body in the current coordinates of the rigid body
- Tag: a tag of a shape object. As you may remember, all Node objects can be assigned a tag for identification and easier access. The tag function of shape objects is the same.
these shape objects are predefined in Cocos2d-x:
- PhysicsShape: base class of object shape
- PhysicsShapeCircle: a solid circle, which cannot be used to realize a hollow circle
- PhysicsShapePolygon: solid and convex polygon
- PhysicsShapeBox: rectangle, which is a special convex polygon
- PhysicsShapeEdgeSegment: represents a line segment
- PhysicsShapeEdgePolygon: a hollow polygon, a polygon edge composed of multiple line segments.
- PhysicsShapeEdgeBox: a hollow rectangle with four line segments at the edge
- PhysicsShapeEdgeChain: chain shape, which can effectively connect many edges
Connection / joint
contacts and joint objects describe how rigid bodies are related to each other.
World
The physical world is an abstract world, which is filled by all the objects. You can add rigid bodies, shapes and constraints to the physical world, and then update the whole world as a whole. The physical world controls the interaction of all elements. Among them, many interactions realized by physical API s are related to * world *.
PhysicsWorld
physical world is the core object of physical simulation by Cocos2d-x. Many things happen in the physical world at the same time, just like the world we live in. Imagine a simple realistic scene - the kitchen. When you think, you depict the object world of the kitchen in your mind! There are some objects in the kitchen world, such as food, knives and electrical appliances. In this world, these objects will interact. They touch each other and respond to contact. For example: cut food with a knife and put it in an electric appliance to do such a thing. Did the knife cut the food? It may have been cut, or it may not have been cut, or the knife is not suitable for this at all.
the physical world is deeply integrated with the Scene. You only need to call the initWithPhysics() method of the Scene object to create a Scene containing the physical world. Pay attention to judge the return value of the function during initialization. initWithPhysics() returns true after successful initialization and false after failure.
if(!Scene::initWithPhysics())
{

}
every physical world has attributes related to it:
- Gravity: global gravity, which is applied to the whole physical world. The default value is Vec2(0.0f,-98.0f);
- Speed: the speed of the physical world. The speed here refers to a ratio of the running of a simulated world. The default value is 1.0
- updateRate: the refresh rate of the physical world. The refresh rate here refers to the ratio of the refresh time of the game engine to the refresh time of the physical world
- Substeps: the number of substeps per refresh in the physical world
the process of refreshing the physical world is called stepping. According to the default setting, the physical world will be refreshed automatically continuously, which is called automatic stepping. Each frame will be refreshed continuously. You can disable the automatic stepping of a physical world by setAutoStep(false), and then manually refresh the physical world by setting the stepping time by PhysicsWorld::step(time). The game world is refreshed by frame. The physical world can be refreshed more frequently through the setting of substeps, so as to carry out finer step control.
physical rigid body objects have position and velocity. You can apply forces, motion, damping, impulses and so on. Rigid bodies can be static or dynamic. Static rigid bodies will not move in the simulation world and look like infinite mass. Dynamic rigid bodies are a complete simulation. Rigid bodies can be moved manually by players. More commonly, they are moved by forces. Dynamic rigid bodies can collide with all types of rigid bodies. Cocos2d-x provides a Node::setPhysicsbody() method to associate node objects with physical rigid body objects.
let's create a static physical rigid body object and five dynamic physical rigid body objects, and make five dynamic rigid body objects move:
auto physicsBody = PhysicsBody::createBox(Size(65.0f,81.0f),PhysicsMaterial(0.1f,1.0f,0.0f));
physicsBody->setDynamic(false);

//Create a sprite
auto sprite = Sprite::create("whiteSprite.png");
sprite->setPosition(s_centre);
this->addChild(sprite);

//Apply physical bodies to sprites
sprite->addComponent(physicsBody);

//Add five dynamic rigid bodies
for(int i=0;i<5;i++)
{
    physicsBody = PhysicsBody::createBox(Size(65.0f,81.0f),PhysicsMaterial(0.1f,1.0f,0.0f));

    //Set the object not to be affected by the gravitational force of the physical world
    physicsBody->setGravityEnable(false);

    //Sets the initial speed of the physical body
    physicsBody->setVelocity(Vec2(cocos2d::random(-500,500),cocos2d::random(-500,500)));

    physicsBody->setTag(DRAG_BODYS_TAG);

    sprite = Sprite::create("blueSprite.png");
    sprite->setPosition(Vec2(s_centre.x + cocos2d::random(-300,300),
                s_centre.y + cocos2d::random(-300,300)));
    sprite->addComponent(physicsBody);

    this->addChild(sprite);
}
as a result, five dynamic physical rigid body objects and one static physical rigid body object collide continuously, as shown in the figure:
collision
rigid body objects can collide with each other. When they touch each other, they are considered to have collided. When a collision occurs, a series of events will be triggered, which can be completely ignored.
Collision filtering
collision filtering allows you to enable or prevent collisions between shapes. The engine supports the use of type and group bit mask for collision filtering.
Cocos2d-x has 32 supported collision types, and the type of each shape can be specified. You can also specify which types can collide with this shape, which is done through masks. For example:
auto sprite1 = addSpriteAtPosition(Vec2(s_centre.x - 150,s_centre.y));
sprite1->getPhysicsBody()->setCategoryBitmask(0x02); //0010
sprite1->getPhysicsBody()->setCollisionBitmask(0x01); //0001

sprite1 = addSpriteAtPosition(Vec2(s_centre.x - 150,s_centre.y + 100));
sprite1->getPhysicsBody()->setCategoryBitmask(0x02);    // 0010
sprite1->getPhysicsBody()->setCollisionBitmask(0x01);   // 0001

auto sprite2 = addSpriteAtPosition(Vec2(s_centre.x + 150,s_centre.y),1);
sprite2->getPhysicsBody()->setCategoryBitmask(0x01);    // 0001
sprite2->getPhysicsBody()->setCollisionBitmask(0x02);   // 0010

auto sprite3 = addSpriteAtPosition(Vec2(s_centre.x + 150,s_centre.y + 100),2);
sprite3->getPhysicsBody()->setCategoryBitmask(0x03);    // 0011
sprite3->getPhysicsBody()->setCollisionBitmask(0x03);   // 0011
you can determine the occurrence of collision by checking the judgment type and mask:
if((shepeA->getCategoryBitmask() & shapeB->getCollisionBitmask()) == 0
|| (shapeB->getCategoryBitmask() & shapeA->getCollisionBitmask()) == 0)
{
    //shapes can't collide
    ret = false;
}

collision group allows you to specify a complete group index. You can make shapes with the same group index always Collide (positive index) or never Collide (negative index and zero index). Different shapes for group indexes. You can filter by type and mask, that is, group filtering has higher priority than type filtering.
Connection / joint
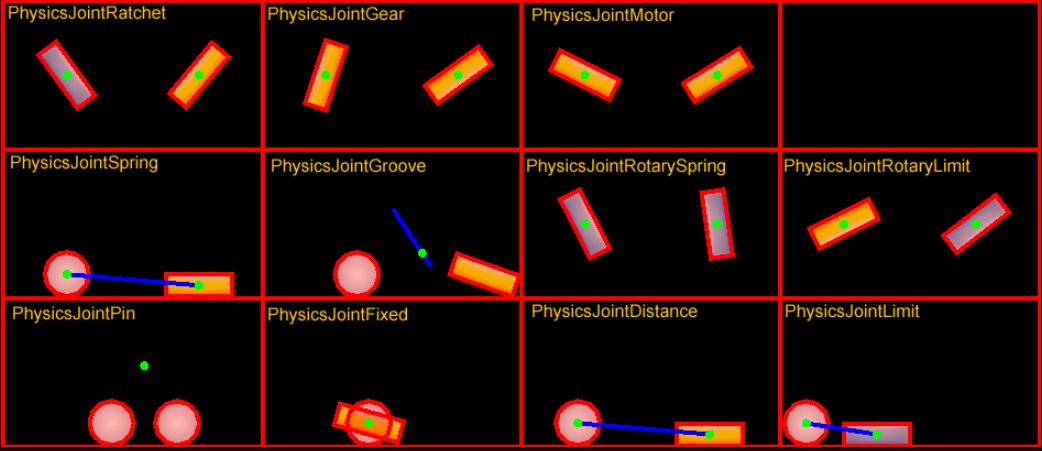
joints are a way to connect different rigid bodies together, just as human joints connect different parts of the human body together. Joints connect different rigid bodies. Rigid bodies can be static. Each joint class is a subclass of PhysicsJoint. You can set joint - > setcollisionenable (false) to avoid collision between interrelated rigid bodies. The definition of joints requires you to provide some geometric data. Most joints are defined through anchors, and other joints have their own definition methods.
- PhysicsJointFixed: fixed point joint, which fixes two rigid bodies to a specific point. If you want to create some composite rigid bodies that will break later, it is very appropriate to use fixed joints.
- The distance between the two rigid bodies is limited as if they were connected by the rope.
- PhysicsJointPin: nail joint, which allows two rigid bodies to rotate independently around an anchor point, as if they were nailed together.
- PhysicsJointDistance: fixed distance joint, which sets the fixed distance between two rigid bodies.
- PhysicsJointSpring: a spring joint is like connecting a spring to two rigid bodies. It just pulls and bounces away from each other.
- PhysicsJointRotarySpring: spring rotation joint is similar to spring joint, but the mutual influence of the position of two rigid bodies becomes the mutual influence of rotation.
- PhysicsJointRotaryLimit: limit the rotation joint, which is similar to the limit joint, but the mutual influence of the position of two rigid bodies becomes the mutual influence of rotation
- Physicsjointrachet: similar to socket wrench.
- PhysicsJointGear: drive joints to keep the angular velocity ratio of a pair of rigid bodies unchanged.
- PhysicsJointMotor: a motor joint that keeps the relative angular velocity of a pair of rigid bodies constant.
collision detection
a Contact is an object created by the physics engine to manage collisions between two shapes. The Contact object is not created manually by the user, but automatically. Here are two terms of cantaloupe:
- contact point: the point at which two shapes want to contact
- contact normal: collision normal refers to the unit vector from one shape to another
you can get PhysicsShape from a contact object to get the rigid body:
bool onContactBegin(PhysicsContact& contact)
{
    auto bodyA = contact.getShapeA()->getBody();
    auto bodyB = contact.getShapeB()->getBody();
    return true;
}
you can access collisions through the collision listener, which supports four events: begin, pre solve, post solve and separate.
- Begin: when this event is received, the two shapes just begin to contact. Returning true in the callback function can make the collision continue to be processed. If false is returned, the physical engine will ignore the whole collision, and the preSolve() and postSolve() callback functions will also be skipped. However, when the two shapes stop overlapping, you can still receive the separete event.
- Pre solve: when this event is received, the two shapes touch each other. If false is returned in the callback function, the physical engine will ignore the collision. If true is returned, the collision will continue to be processed. In addition, you can use setresolution(), setFriction(), or setSurfaceVelocity() methods to set custom recovery system, friction, and surface velocity to override the default collision attributes.
- Post solve: when this event is received, the two shapes have contacted and their collision has been handled.
- separate: when this event is received, the two shapes have just stopped contacting.
you can use EventListenerPhysicsContactWithBodies, EventListenerPhysicsContactWithShapes, EventListenerPhysicsContactWithGroup to listen to some events of rigid bodies, shapes and groups of interest. In addition, you need to set the mask related to physical collision. Note: by default, only event listeners are created, and collision events cannot be received.
example:
bool init()
{
    //Create a static physical rigid body
    auto sprite = addSpriteAtPosition(s_centre.1);
    sprite->setTag(10);
    sprite->getPhysicsBody()->setContactTestBitmask(0xFFFFFFFF);
    sprite->getPhysicsBody()->setDynamic(false);

    //Add an event listener
    auto contactListener = EventListenerPhysicsContact::create();
    contactListener->onContactBegin = CC_CALLBACK_1(PhysicsDemoCollisionProcessing::onContactBegin, this);
    _eventDispatcher->addEventListenerWithSceneGraphPriority(contactListener, this);

    this->schedule(CC_SCHEDULE_SELECTOR(PhysicsDemoCollisionProcessing::tick), 0.3f);
    return true;
}


void tick(float dt)
{
    auto sprite1 = addSpriteAtPosition(Vec2(s_centre.x + cocos2d::random(-300,300),
      s_centre.y + cocos2d::random(-300,300)));
    auto physicsBody = sprite1->getPhysicsBody();
    physicsBody->setVelocity(Vec2(cocos2d::random(-500,500),cocos2d::random(-500,500)));
    physicsBody->setContactTestBitmask(0xFFFFFFFF);
}


bool onContactBegin(PhysicsContact& contact)
{
    auto nodeA = contact.getShapeA()->getBody()->getNode();
    auto nodeB = contact.getShapeB()->getBody()->getNode();

    if (nodeA && nodeB)
    {
        if (nodeA->getTag() == 10)
        {
            nodeB->removeFromParentAndCleanup(true);
        }
        else if (nodeB->getTag() == 10)
        {
            nodeA->removeFromParentAndCleanup(true);
        }
    }

    return true;
}
query
you must have the experience of standing in one place and looking around. You can see the places close to you and far away from you. You can judge how far they are from you. The physical engine also provides a similar spatial query function.
Cocos2d-x provides PhysicsWorld object support point query, ray query and rectangle query.
Point query
when you came across something, such as your desk, you can take this scenario as an example of point query. Point query is to check whether there are objects within a certain distance around a point. Through point query, you can find the point closest to a fixed point in an object, or find the object closest to a fixed point, which is very suitable for judging the object picked up by clicking the mouse. You can also use it for some other simple perception.
Ray query
when you look around, an object in your line of sight will certainly attract your attention. You can use this scenario as an example of ray query. Ray query is to check whether the rays emitted from a fixed point intersect an object. If they intersect, an intersection can be obtained, which is very suitable for judging whether the bullet (ignoring the flight time of the bullet) hits.
example:
void tick(float dt)
{
    Vec2 d(300 * cosf(_angle), 300 * sinf(_angle));
    Vec2 point2 = s_centre + d;
    if (_drawNode)
    {
        removeChild(_drawNode);
    }
    _drawNode = DrawNode::create();

    Vec2 points[5];
    int num = 0;
    auto func = [&points, &num](PhysicsWorld& world,
        const PhysicsRayCastInfo& info, void* data)->bool
    {
        if (num < 5)
        {
            points[num++] = info.contact;
        }
        return true;
    };

    s_currScene->getPhysicsWorld()->rayCast(func, s_centre, point2, nullptr);

    _drawNode->drawSegment(s_centre, point2, 1, Color4F::RED);
    for (int i = 0; i < num; ++i)
    {
        _drawNode->drawDot(points[i], 3, Color4F(1.0f, 1.0f, 1.0f, 1.0f));
    }
    addChild(_drawNode);

    _angle += 1.5f * (float)M_PI / 180.0f;
}
Rectangular query
matrix query provides a method to quickly check which objects are in the area, which is very easy to implement:
auto func = [](PhysicsWorld& world, PhysicsShape& shape, void* userData)->bool
{
    //Return true from the callback to continue rect queries
    return true;
}

scene->getPhysicsWorld()->queryRect(func, Rect(0,0,200,200), nullptr);
this is an example of using rectangular query when making Logo smash:
debugging
if you want to draw a red box around the rigid body to help debugging, you can simply add these two to the initialization code of the physical scene. Of course, you can also learn the official test project, add a menu, and control whether to turn on the debugging function in the callback function of the menu.
Director::getInstance()->getRunningScene()->getPhysics3DWorld()->setDebugDrawEnable(true);
Director::getInstance()->getRunningScene()->setPhysics3DDebugCamera(cameraObjecct);
Disable physical engine
using the built-in physics engine is a good choice. It is stable and powerful. However, if you really want to use some other physical engines, you only need to use base / ccconfig H CC in the document_ USE_ Physics can be changed to 0, and the built-in physics engine can be disabled.