Detailed tutorials can be used for reference Official documents
1, Installation instructions
Before installing PaddleDetection, you need to install dependency PaddlePaddle first. You can think of it as a kernel and install PaddleDetection with it.
First, we can create a new virtual environment named paddle and activate the environment.
conda create -n paddle python=3.7
conda activate paddle
Install the library functions required for PP Yolo network.
pip install opencv-python==4.2.0.34 Cython matplotlib scikit-image numpy==1.17.4
Install PaddlePaddle
# If CUDA10 is installed on your machine, run the following command to install it
pip install paddlepaddle-gpu==1.8.4.post107 -i https://mirror.baidu.com/pypi/simple
For other versions, please refer to Installation documentation.
Verify that the installation was successful using the following command:
# View PaddlePaddle version
python -c "import paddle; print(paddle.__version__)"
Other dependent installations
Install pycocotools
pip install pycocotools
Installing paddedetection
To install Python dependency libraries:
Python dependency library is in requirements Txt, which can be installed by the following command:
pip install -r requirements.txt
Clone paddedetection Library:
Clone paddedetection with the following command:
cd <path/to/clone/PaddleDetection>
git clone https://github.com/PaddlePaddle/PaddleDetection.git
Verify successful installation:
python ppdet/modeling/tests/test_architectures.py
After passing the test, the following information will be prompted:
..........
----------------------------------------------------------------------
Ran 12 tests in 2.480s
OK (skipped=2)
Pre training model prediction
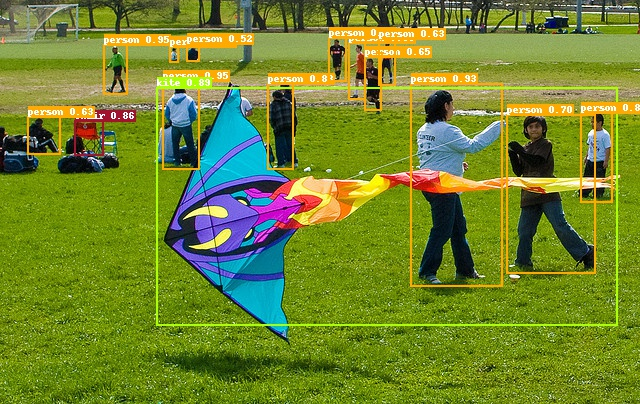
Use the pre training model to predict the image and quickly experience the prediction effect of the model:
# use_gpu parameter sets whether to use GPU
python tools/infer.py -c configs/ppyolo/ppyolo.yml -o use_gpu=true weights=https://paddlemodels.bj.bcebos.com/object_detection/ppyolo.pdparams --infer_img=demo/000000014439.jpg
An image with the same name as the prediction result will be generated in the output folder.
The results are as follows:

2, Quick start
Set up graphics card
export CUDA_VISIBLE_DEVICES=0
1, Quick experience
# Using PP-YOLO algorithm to pre train the model on COCO data set to predict a picture
python tools/infer.py -c configs/ppyolo/ppyolo.yml -o use_gpu=true weights=https://paddlemodels.bj.bcebos.com/object_detection/ppyolo.pdparams --infer_img=demo/000000014439.jpg
2, Prepare data
The data set refers to the Kaggle data set, which contains 877 images and four data categories: crosswalk, speedlimit, stop and traffic. The data is divided into 701 graphs in the training set and 176 graphs in the test set.
# Note: you can skip this step and the training will be downloaded automatically later
python dataset/roadsign_voc/download_roadsign_voc.py
3, Training, evaluation and prediction
1. Training
# It takes about 1 hour (use_gpu=false) to test the CPU while training, and about 5 minutes for 1080Ti GPU.
# -The c parameter specifies which profile to use
# -The o parameter indicates the global variables in the specified configuration file (overwriting the settings in the configuration file). The settings here use gpu,
# --The eval parameter indicates to evaluate while training, and will automatically save an evaluation result named best_model.pdmodel model

python tools/train.py -c configs/yolov3_mobilenet_v1_roadsign.yml --eval -o use_gpu=true
If you want to observe the loss curve in real time through VisualDL, add – use in the training command_ VDL = true, and via – vdl_log_dir set the log saving path, refer to Original file.
2. Evaluation
# The evaluation defaults to the best saved during the training_ model
# -The c parameter specifies which profile to use
# -o parameter indicates the global variable in the specified configuration file (overwriting the setting in the configuration file), which needs to be evaluated with a single card

CUDA_VISIBLE_DEVICES=0 python tools/eval.py -c configs/yolov3_mobilenet_v1_roadsign.yml -o use_gpu=true
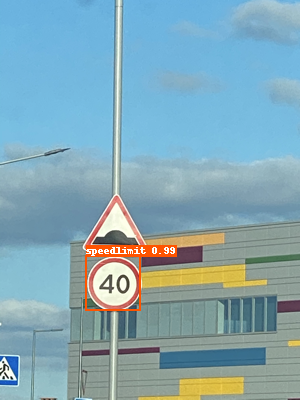
3. Forecast
# -The c parameter specifies which profile to use
# -o parameter indicates the global variable in the specified configuration file (overrides the setting in the configuration file)
# --infer_ The IMG parameter specifies the predicted image path
# After the prediction, an image with the same name as the prediction result will be generated in the output folder

python tools/infer.py -c configs/yolov3_mobilenet_v1_roadsign.yml -o use_gpu=true --infer_img=demo/road554.png
The results are as follows:
3, Getting started
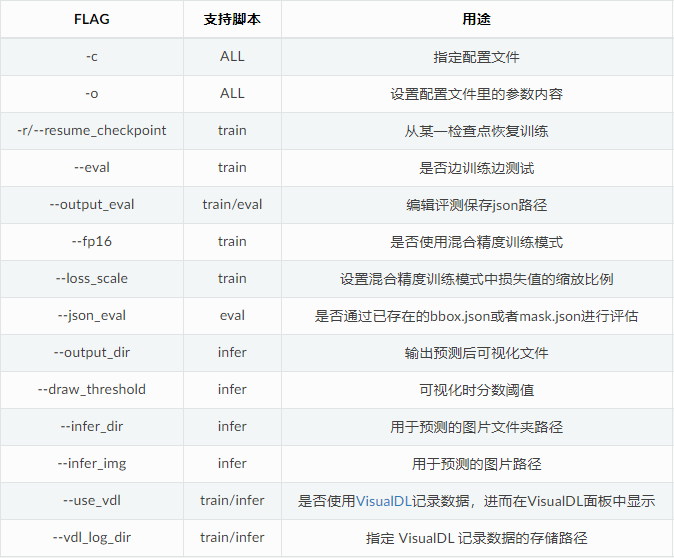
Optional parameter list
Use example
Test while training
export CUDA_VISIBLE_DEVICES=0,1,2,3,4,5,6,7
python -u tools/train.py -c configs/faster_rcnn_r50_1x.yml --eval
Assessments are performed alternately during the training and are evaluated in each snapshot_ Start at ITER. After each evaluation, the best mAP model will be evaluated and saved to best_ Under the model folder.
Fine tune other tasks
When using the pre training model fine tune for other tasks, you can directly load the pre training model, and the parameters with mismatched shapes will be automatically ignored, for example:
export CUDA_VISIBLE_DEVICES=0,1,2,3,4,5,6,7
python -u tools/train.py -c configs/faster_rcnn_r50_1x.yml \
                       -o pretrain_weights=output/faster_rcnn_r50_1x/model_final \
You can also ignore the parameter name specified in the display in the following two ways:
- Setting finetune in YAML configuration file_ exclude_ pretrained_ params
- Add - O finetune to the command line_ exclude_ pretrained_ Params selectively loads the pre training model.
export CUDA_VISIBLE_DEVICES=0,1,2,3,4,5,6,7
python -u tools/train.py -c configs/faster_rcnn_r50_1x.yml \
                       -o pretrain_weights=output/faster_rcnn_r50_1x/model_final \
                          finetune_exclude_pretrained_params=['cls_score','bbox_pred']
Tips:
CUDA_ VISIBLE_ The devices parameter can specify different GPU s. For example: export CUDA_VISIBLE_DEVICES=0,1,2,3.
If the dataset is not found locally, it will be automatically downloaded and saved in ~ / In cache / pad / dataset.
The pre training model is automatically downloaded and saved in ~ / In cache / pad / weights.
Model checkpoints are saved in output by default. You can modify save in the configuration file_ Dir.
Model evaluation
Specify weights and dataset paths
export CUDA_VISIBLE_DEVICES=0
python -u tools/eval.py -c configs/faster_rcnn_r50_1x.yml \
                      -o weights=https://paddlemodels.bj.bcebos.com/object_detection/faster_rcnn_r50_1x.tar \
The evaluation model can be a local path, such as output / fast_ rcnn_ r50_ 1x/model_ Final, or MODEL_ZOO Model links given in.
Evaluated by json file
export CUDA_VISIBLE_DEVICES=0
python -u tools/eval.py -c configs/faster_rcnn_r50_1x.yml \
           --json_eval \
           --output_eval evaluation/
The json file must be named bbox json or mask json in the evaluation / directory.
Tips:
R-CNN and SSD models do not support multi GPU evaluation at present, and will be supported in subsequent versions
model prediction
Set output path & & set prediction threshold
export CUDA_VISIBLE_DEVICES=0
python -u tools/infer.py -c configs/faster_rcnn_r50_1x.yml \
                    --infer_img=demo/000000570688.jpg \
                    --output_dir=infer_output/ \
                    --draw_threshold=0.5 \
                    -o weights=output/faster_rcnn_r50_1x/model_final \
How to train a custom dataset
1. Prepare data
First, you need to convert the dataset to standard COCO format or VOC format.
2. Select model
Paddedetection provides rich model libraries, which can be found in model base View the indicators of each model in. You can select the appropriate model according to the actual deployment of computing power. At the same time, you can also select the appropriate model according to different use scenarios. For details, please refer to Characteristic model.
3. Generate Anchor
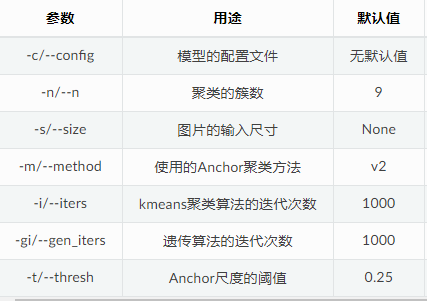
In the yolo series model, you can run tools/anchor_cluster.py to get the Anchor that is applicable to your dataset. The method of use is as follows:
python tools/anchor_cluster.py -c configs/ppyolo/ppyolo.yml -n 9 -s 608 -m v2 -i 1000
Currently, tools / anchor_ cluster. The main parameter configurations supported by py are shown in the following table:
4. Modify parameter configuration
Data path configuration: in yaml configuration file, according to 1 The path prepared in data preparation. Configure the paths of TrainReader, EvalReader and TestReader.
COCO dataset:
dataset:
     !COCODataSet
     image_dir: val2017 # The image data is based on the relative path of the root directory of the dataset
     anno_path: annotations/instances_val2017.json  # The dimension file is based on the relative path of the dataset root directory
     dataset_dir: dataset/coco  # Dataset root directory
     with_background: true  # Whether the background is used as a label. The default value is true.
VOC dataset:
dataset:
     !VOCDataSet
     anno_path: trainval.txt   # The training set list file is based on the relative path of the dataset root directory
     dataset_dir: dataset/voc  # Dataset root directory
     use_default_label: true   # Whether to use the default label. The default is true.
     with_background: true  # Whether the background is used as a label. The default value is true.
Note: if you use your own dataset for training, you need to use_ default_ Set the label to false and modify the label in the root directory of the dataset_ list. Txt file, add your own class alias, where the line number corresponds to the category number.
Modify the number of categories: if the number of categories in your dataset is different from that in COCO/VOC, you need to modify the number of categories in yaml configuration file, num_classes: XX. Note: if with is set in dataset_ Background: true, then num_ The number of classes must be the number of real categories + 1 (the background is also counted as class 1)
Modify relevant parameters of LearningRate as required:
If the number of GPU cards changes, adjust lr according to the relationship between lr and batch size: Learning rate adjustment strategy
The total number of self data samples is different from that of COCO, according to batch_size, the total number of samples, and the total number of iterations max_iters, and milestones in LearningRate.
Pre training model configuration: through pre train in yaml configuration file_ Weights: the path / to / weights parameter can configure the path, which can be a link or a weight file path. For details, please refer to Migrating learning documents.
5. Start training and deployment
After the parameter configuration is completed, you can start training the model. After the training test is completed, the model can be deployed as needed.
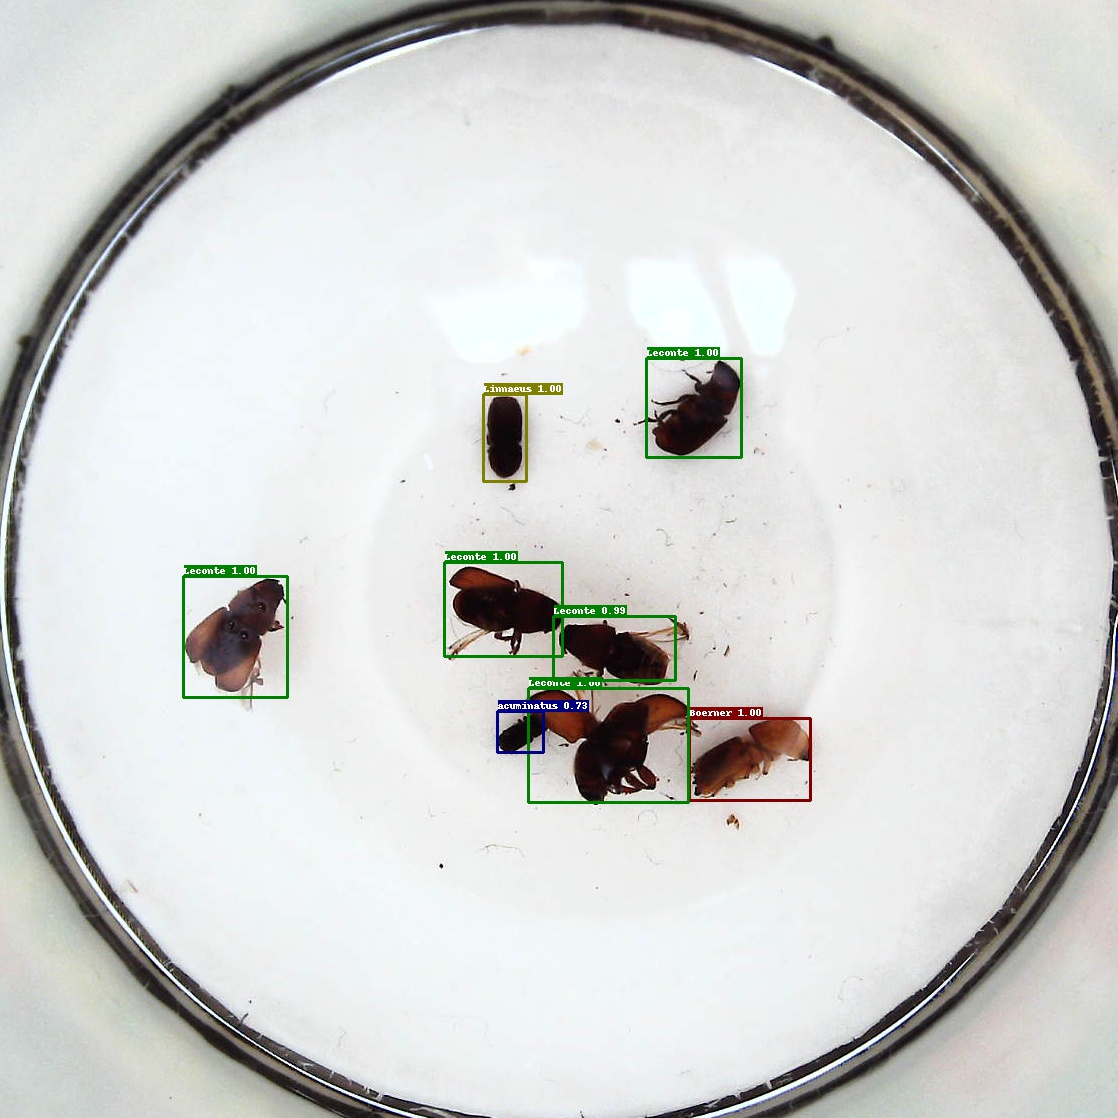
Attachment: a custom dataset demo
We take AI insect recognition dataset as an example
Step 1: prepare data
The annotation files of the dataset are all xml files, and the tagged picture name list file trainval is missing in the dataset Txt and test Txt, so it needs to be generated. Use the following python script and execute it under the root directory of the dataset to generate trainval Txt and test Txt file:
import os
file_train = open('trainval.txt', 'w')
file_test = open('test.txt', 'w')
for xml_name in os.listdir('train/annotations/xmls'):
    file_train.write(xml_name[:-4] + '\n')
for xml_name in os.listdir('val/annotations/xmls'):
    file_test.write(xml_name[:-4] + '\n')
file_train.close()
file_test.close()
Copy all xml annotation files under train/annotations/xmls and val/annotations/xmls in the dataset to vocdevkit / voc207 / annotations, copy all pictures under train/images / and val/images / in the dataset to vocdevkit / voc207 / jpegimages, and copy the trainval generated in the first step Txt and test Txt file to vocdevkit / voc207 / imagesets / main.
Finally, the final trainval is output in the root directory of the dataset Txt and test Txt file:
python dataset/voc/create_list.py -d path/to/dataset
Step 2: select the model and modify the configuration file
Because insects are relatively small and belong to the category of small object detection, we choose the fast RCNN series model.
Then based on configs / fast_ rcnn_ r50_ fpn_ 1x. Modify the YML file:
Modify Reader module: in order to facilitate model evaluation, metric needs to be changed to VOC; The Reader section is already in fast_ fpn_ Reader. After the definition is completed in YML, the content to be modified can be overwritten here, as shown in the following yaml configuration:
...
metric: VOC
...
_READER_: 'faster_fpn_reader.yml'
TrainReader:
  dataset:
    !VOCDataSet
    dataset_dir: path/to/dataset
    anno_path: trainval.txt
    use_default_label: false
  batch_size: 2

EvalReader:
  inputs_def:
    fields: ['image', 'im_info', 'im_id',  'im_shape', 'gt_bbox', 'gt_class', 'is_difficult']
  dataset:
    !VOCDataSet
    dataset_dir: path/to/dataset
    anno_path: test.txt
    use_default_label: false

TestReader:
  dataset:
    !ImageFolder
    anno_path: path/to/dataset/label_list.txt
    use_default_label: false
Modify parameters such as training rounds and learning rate:
The learning rate has a linear transformation relationship with the number of GPUs. If the number of GPUs is halved, the learning rate will also be halved. Due to the fast in paddedetection_ rcnn_ r50_ The FPN model is trained in an 8-card GPU environment, so we need to divide the learning rate by 8:
max_iters: 10200
...
LearningRate:
base_lr: 0.0025
schedulers:
- !PiecewiseDecay
  gamma: 0.1
  milestones: [6800, 9000]
Step 3: start training
In order to make the model converge faster, we use the model trained on the COCO data set for migration learning, and add the – eval parameter to indicate that we test while training:
export CUDA_VISIBLE_DEVICES=0
python -u tools/train.py -c configs/faster_rcnn_r50_fpn_1x.yml \
              -o pretrain_weights=https://paddlemodels.bj.bcebos.com/object_detection/faster_rcnn_r50_fpn_1x.tar \
              finetune_exclude_pretrained_params=['cls_score','bbox_pred'] \
              --eval
If you want to make the model converge better, you can continue to increase max_iters, training 2x, 3x and other models, but it does not mean that the more training rounds, the better the effect. Over fitting should be prevented.
After the training, you can select a test set image to test, and the output result image will be saved in the output directory by default:
python -u tools/infer.py -c configs/faster_rcnn_r50_fpn_1x.yml \
              --infer_img=path/to/dataset/2572.jpeg