catalogue
2. In mybatis_ Import the paging plug-in in the config.xml file
3. Write mapper interface and mapper.xml
7. Write the front-end interface to turn pages
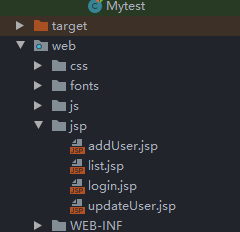
8. The corresponding location of the view parser and the web directory
1. Import jar package
       <dependency>
            <groupId>com.github.pagehelper</groupId>
            <artifactId>pagehelper</artifactId>
            <version>5.1.2</version>
        </dependency>
2. In mybatis_ Import the paging plug-in in the config.xml file
Pay attention to the location of the plug-in in the mybatis configuration file, otherwise it will explode red
<!--The location of the paging plug-in in the configuration file must be correct, otherwise it will explode red-->
    <plugins>
        <plugin interceptor="com.github.pagehelper.PageInterceptor">
        </plugin>
    </plugins>
3. Write mapper interface and mapper.xml
Interface:

     //Query user list
    List<User> finAllUser();


mapper.xml:

    <select id="finAllUser" parameterType="int" resultType="User">
        select * from user
    </select>>
4. Write service layer
Service Interface:

     PageInfo<User> findUserByPage(int Pagenum,int size);

Interface implementation class:

    public PageInfo<User> findUserByPage(int pagenum, int size){
        if(pagenum==0)
            pagenum=1;//When it comes to the last page, the value of Pagenum on the next page is 0. All Pagenum values to be assigned
        //Use the paging plug-in tool to complete paging
        PageHelper.startPage(pagenum,size);
        //Query all user data
        List<User> list = userDao.finAllUser();
        //Transfer all user data into pageinfo < user >, and other properties will be calculated according to the data of the current page
        PageInfo<User> pageInfo=new PageInfo<>(list);
        return pageInfo;
    }
The return value is PageInfo object:
1. Input the current page number and the data displayed on each page
2. The parameters in the Pageinfo object only need to inject all user data, and other properties will be calculated based on all user data.
All parameters in pageinfo are as follows:
//Current page
private int pageNum;
// Number of pages
private int pageSize;
// Number of current pages
private int size;
// Since startRow and endRow are not commonly used, here is a specific usage
// You can "display a total of size data from startRow to endRow" on the page
// The row number of the first element of the current page in the database
private int startRow;
// The row number of the last element of the current page in the database
private int endRow;
// Total records
private long total;
// PageCount
private int pages;
// Result set (data displayed per page)
private List<T> list;
// first page
private int firstPage;
// next page before
private int prePage;
// Is it the first page
private boolean isFirstPage = false;
// Is it the last page
private boolean isLastPage = false;
// Is there a previous page
private boolean hasPreviousPage = false;
// Next page
private boolean hasNextPage = false;
// Number of navigation pages
private int navigatePages;
// All navigation page numbers
private int[] navigatepageNums;
5. Writing test classes
    @Test
    public void Pagein(){
        ApplicationContext context = new ClassPathXmlApplicationContext("applicationContext.xml");
        UserService userServiceImpl = (UserService) context.getBean("userServiceImpl");
        PageInfo<User> userByPage = userServiceImpl.findUserByPage(1, 3);
        System.out.println("The next page is:"+userByPage.getNextPage());
        System.out.println("Current page data is:"+userByPage.getList().toString());
        System.out.println("The total number of users is:"+userByPage.getTotal());
        System.out.println("The total number of pages is:"+userByPage.getPageSize());
}
6. Write Controller
This Controller just enters the form interface and displays the data on the first page of paging.
    @RequestMapping("/split")//Display first page data
    public String split(Model model)
    {
        PageInfo info= userService.findUserByPage(1,3);//Three pieces of data per page on the first page
        model.addAttribute("info",info);
        return "list";
    }
At this time, access the controller, the front-end list.jsp interface, parse the data from info and display it

7. Write the front-end interface to turn pages
Synchronous refresh enables the previous page, the next page, and the specified page
$ {pageContext.request.contextPath}/user/ajaxsplit?page = page number to turn to
  <a href="${pageContext.request.contextPath}/user/ajaxsplit?page=${info.prePage}"
                aria-label="Previous">
  <span aria-hidden="true">«</span></a>
 </li>
       <c:forEach begin="1" end="${info.pages}" var="i">
            <c:if test="${info.pageNum==i}">
          <li>
              <a href="${pageContext.request.contextPath}/user/ajaxsplit?page=${i}"
                      style="background-color: grey">${i}</a>
            </li>
        </c:if>
                      <c:if test="${info.pageNum!=i}">
            <li>
            <a href="${pageContext.request.contextPath}/user/ajaxsplit?page=${i}">${i}</a>
            </li>
         </c:if>
           </c:forEach>
    <li>
     <a href="${pageContext.request.contextPath}/user/ajaxsplit?page=${info.nextPage}"
       aria- label="Next">
    <span aria-hidden="true">»</span></a>
    </li>
</li>
Background ajaxsplit
    @RequestMapping("/ajaxsplit")//Pagination display
    public String ajaxsplit(int page,Model model)
    {
        PageInfo info= userService.findUserByPage(page,3);//3 pieces of data per page
        model.addAttribute("info",info);
        return "list";
    }
Now when you add a user, it will be added to the last page. You only need to modify the sql statement in Mapper.xml
select * from user order by id desc
Descending by id
8. The corresponding location of the view parser and the web directory

