1, Form form
Create an HTML form for user input, which is represented by a < from > tag,
The < form > element contains one or more of the following form elements: for example, < action > < input > < textarea > < Select > < optioon > < fileset >
1. Form important attribute action
Action attribute indicates the address that the current form needs to submit. Take registration as an example. In web development, users need to fill in information and submit to complete the registration operation. When we click the submit button, the page will give our information to the link corresponding to the action attribute, so a link address is added after the action.
<form action="url Link address">

</form>
2. name attribute
Adding < name > will be more standardized and easy to identify. If we add < name > attribute, when our information is submitted to the url address (background) of the action, the submitted information will be marked. We can distinguish the content submitted by the form through the name value. For example, assign register to the < name > attribute, You can see at a glance that the submitted form information is used for registration.
<form name="regist" action="url address">

</form>
3. method property
The methon attribute indicates the method used by the form to submit data to the background. Two methods can be selected: get and post. Among them, get is the default method, but the get submission method is not so safe compared with post. The submission method is generally informed by the back-end programmer.
<form name = "regist" action = "url address" method = "post">

</form>
4. enctype attribute
To upload files (including pictures), the value of enctype attribute should be set to enctype = "multipart / from data", for example:
<form name = "regist" action = "url address" method = "post" entype = "multipart/from-data></form>
| Attribute name | effect |
| text/plain | Set plain text data submission |
| multipart/from-data | Set file data upload |
| application/x-www-from-urlencoded | Default value |
5. target attribute
The target tag indicates where to open the action URL, that is, where to open the table data submitted by us after we click the submit button. The target attribute is often assigned a value to it_ blank and_ self, where_ blank means to open in a new window_ self means to open in the current frame, which is the default opening method.
<form name = "regist" action = "url address" method = "post" target="_self">

<form>
2, Form control
1. Text input box
You can refer to the article on imput mentioned earlier (in point 14): The fifth part is a hodgepodge of tag elements in the basic composition of HTML pages_ m0_66451927 blog - CSDN blog
| Attribute name | effect |
|---|---|
| name (required) | Identify the current data content to facilitate the background to judge the data according to the name value |
| type | Set the control type. The values can be text, which means text file, and password, which means the input content is password |
| size | Set the length of input displayed on the screen |
| placeholder | Set prompt |
| minlength | Set the minimum length of input data |
| manlength | Set the maximum length of input data |
Examples are as follows:
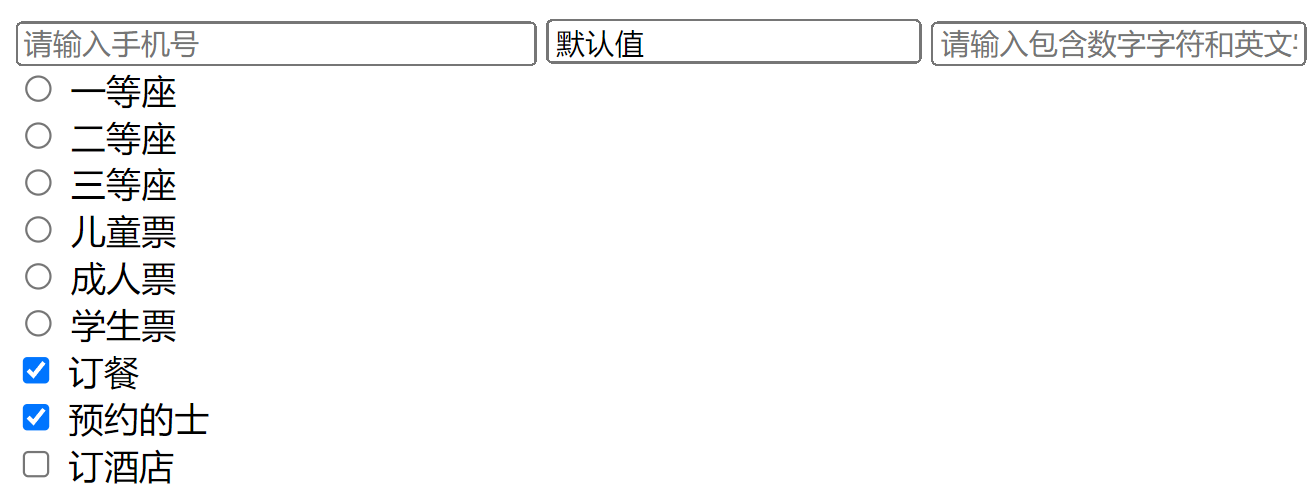
<form name = "register" action="" methon = "post" enctype="application/x-www-from-urlencoded">
        <input size="30" maxlength="11" placeholder="Please enter your mobile number" name = "phone namber" type = "text">
        <input value = "Default value" placeholder = "Please enter the verification code" name = "Captcha" type ="text">
        <input placeholder="Please enter the password containing numeric characters and English letters. The length of the password shall not be less than 8 digits" minlength = "8" name = "password" type ="password">
    </form>
Operation results:

be careful:
The name attribute in the input attribute must be given. When we enter the content in the text input box of the input tag and submit it to the background, when the submitted data reaches the background, it will be judged by the value of the name we enter, which is used to identify the current data content.
2. radio
Since the single option is relatively simple, let's take an example to understand that the name value is used as radio1 and radio2 respectively to represent the two groups.
 <form name = "register" action="" methon = "post" enctype="application/x-www-from-urlencoded">
        <input size="30" maxlength="11" placeholder="Please enter your mobile number" name = "phone namber" type = "text">
        <input value = "Default value" placeholder = "Please enter the verification code" name = "Captcha" type ="text">
        <input placeholder="Please enter the password containing numeric characters and English letters. The length of the password shall not be less than 8 digits" minlength = "8" name = "password" type ="password">
        <br>
        <input name = "radio1" type="radio" value = "first class" > First class seat <br/>
        <input name = "radio1" type="radio" value = "second class"> second-class seat <br/>
        <input name = "radio1" type="radio" value = "third class" > Third class seat <br/>

        <input name = "radio2" type="radio" value = "child ticket"> children ticket <br>
        <input name = "radio2" type="radio" value = "adult ticket"> Adult ticket <br>
        <input name = "radio2" type="radio" value = "student ticket"> student ticket <br>

    </form>
Operation results:

The value attribute inside represents the value of each selected item. When the form is submitted, it is the value of the selected value.
3. Check box
As the name suggests, a check box is one that allows you to select multiple options.
 <form name = "register" action="" methon = "post" enctype="application/x-www-from-urlencoded">
        <input size="30" maxlength="11" placeholder="Please enter your mobile number" name = "phone namber" type = "text">
        <input value = "Default value" placeholder = "Please enter the verification code" name = "Captcha" type ="text">
        <input placeholder="Please enter the password containing numeric characters and English letters. The length of the password shall not be less than 8 digits" minlength = "8" name = "password" type ="password">
        <br>
        <input name = "radio1" type="radio" value = "first class" > First class seat <br/>
        <input name = "radio1" type="radio" value = "second class"> second-class seat <br/>
        <input name = "radio1" type="radio" value = "third class" > Third class seat <br/>

        <input name = "radio2" type="radio" value = "child ticket"> children ticket <br>
        <input name = "radio2" type="radio" value = "adult ticket"> Adult ticket <br>
        <input name = "radio2" type="radio" value = "student ticket"> student ticket <br>

        <input name = "checkbox1" type = "checkbox" value = "make a reservations" > Order a meal <br>
        <input name = "checkbox1" type = "checkbox" value = "hail a taxi" > Booking a taxi <br>
        <input name = "checkbox1" type = "checkbox" value = "reserve a hotel" > Hotel Reservation <br>

    </form>
Operation results:
These tags can be placed in the from form or directly in the HTML document.
4. file upload
Click the "select file" button to add a file
<input name = "file" type = "file" />

5. Multi line text input box textarea
You can enter multiple lines of text, drag the "shadow" area in the lower right corner, and drag the text to adjust the size, as shown in the following example:
<textarea name="textarea" cols="30" rows="15"></textarea>
Operation results:

Add the attribute resize and assign the value none to drag the text.
<textarea style="resize:none;" name="textarea" cols="30" rows="15"></textarea>
The operation results are as follows: the slash disappears:

6. submit button
Before we learn the submit button, we first learn the button ordinary button label
<button>Normal button</button>
The button button is more flexible than the submit button. For example, a picture can be embedded. At this time, the picture has the characteristics of a button, as shown in the following example:
<button><img src = "./img/1.jpeg"></button>
Operation results:

Now let's introduce a submit button in the input tab. Just change the input type to submit. Click the submit button to submit the information we fill in
Examples are as follows:
<input type="submit" value="Submit">
Operation results:

7. Drop down list
The drop-down list uses the select tag, and the options in the select tag use the option tag. The select object represents a drop-down list in an HTML form.
Example code:
<select>
            <option value="breakfast">Order breakfast</option>
            <option value="lunch">Order lunch</option>
            <option value="dinner">Order dinner</option>
            <option value="taxi">Book a taxi</option>
            <option value="hotel">Hotel Reservation</option>
        </select>
Operation results:
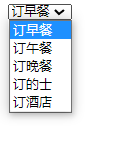
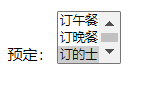
The above drop-down list can only select one option by default. If we want to order both meals and hotels, we can't achieve it. There is only one display style of the drop-down list. In order to solve these problems, we will introduce several properties of select and slightly optimize the list.
| Attribute name | effect |
|---|---|
| name | Like the name attribute of < input > tag, it is mainly used to submit data |
| size | Let the drop-down list of the page display multiple options |
| multiple | When multiple is assigned as multiple, press and hold ctrl + left mouse button to select multiple options |
| selected | When the < Select > tag is set with the multiple attribute, assign the value selected to the selected attribute in the < option > tag, and set an item to be pre selected by default and displayed in gray |
Example code:
 reserve:
        <select name="selectList" multiple="multiple" size="3">
            <option value="breakfast">Order breakfast</option>
            <option value="lunch">Order lunch</option>
            <option value="dinner">Order dinner</option>
            <option value="taxi" selected="selected">Book a taxi</option>
            <option value="hotel">Hotel Reservation</option>
        </select>
Operation results:
After learning, of course, try and make a form~
<!DOCTYPE html>
<html lang="en">
<head>
    <meta charset="UTF-8">
    <meta http-equiv="X-UA-Compatible" content="IE=edge">
    <meta name="viewport" content="width=device-width, initial-scale=1.0">
    <title>form</title>
</head>
<body>
    <form name = "register" action="" methon = "post" enctype="application/x-www-from-urlencoded">
        User registration or login
        <br>
        <input size="30" maxlength="11" placeholder="Please enter your mobile number" name = "phone namber" type = "text">
        <br>
        <input value = "Default value" placeholder = "Please enter the verification code" name = "Captcha" type ="text">
        <button>Get verification code</button>
        <br>
        <input placeholder="Please enter the password containing numeric characters and English letters. The length of the password shall not be less than 8 digits" minlength = "8" name = "password" type ="password">
        <br>
        <input placeholder="Please re-enter your password" minlength = "8" name = "password" type ="password">
        full name: <input type="text" name="Name"><br>
        Certificate type:
        <select name="selectList">
            <option value="IDcard" selected="selected">ID</option>
            <option value="password">passport</option>
            <option value="One-wayPermits">Hong Kong and Macao pass</option>
            <option value="TaiwanPermits">Taiwan pass</option>
            <option value="FPRC">Alien permanent residence ID card</option>
        </select>
        <br>
        Certificate No: <input type="text" name="ID_number"><br>
       <input type="submit" value="Submit">
        <br>
        <br>

        <input name = "radio1" type="radio" value = "first class" > First class seat <br/>
        <input name = "radio1" type="radio" value = "second class"> second-class seat <br/>
        <input name = "radio1" type="radio" value = "third class" > Third class seat <br/>
        <br>
        <input name = "radio2" type="radio" value = "child ticket"> children ticket <br>
        <input name = "radio2" type="radio" value = "adult ticket"> Adult ticket <br>
        <input name = "radio2" type="radio" value = "student ticket"> student ticket <br>
        <br>
        reserve:
        <select name="selectList" multiple="multiple" size="3">
            <option value="breakfast">Order breakfast</option>
            <option value="lunch">Order lunch</option>
            <option value="dinner">Order dinner</option>
            <option value="taxi" selected="selected">Book a taxi</option>
            <option value="hotel">Hotel Reservation</option>
        </select>

    </form>

</body>
</html>
Operation results:

From: rookie tutorial &[first stage of front-end employment course] detailed explanation of HTML5 zero foundation to actual combat (VIII) form_ 1_bit blog - CSDN blog