Password encryption and microservice authentication JWT
##Learning objectives
1. When the user registers, the password of the user in the database is encrypted and stored (using spring security).
2. Use JWT authentication.
1, BCrypt password encryption
Considering the security of any application, the password must not be saved in clear text. The password should be encrypted by hash algorithm.
For example, there is a good choice of salt algorithm. Spring Security
BCryptPasswordEncoder class is provided to implement the PasswordEncoder interface of Spring, and BCrypt strong hash method is used to encrypt the password of users in the database. The BCrypt strong hash method encrypts differently each time.
2, Common authentication mechanisms
2.1,HTTP Basic Auth
HTTP Basic Auth simply means that the user's username and password are provided every time the API is requested
password, in short, Basic Auth is the simplest authentication method used with RESTful API. You only need to provide
The user name and password can be used, but they are used in the production environment due to the risk of exposing the user name and password to the third-party client
Use less and less. Therefore, when developing restful APIs open to the outside world, try to avoid using HTTP Basic
Auth
2.2 Cookie Auth
Cookie authentication mechanism is to create a Session object on the server side for one request authentication, and create a Session object on the client side at the same time
A Cookie object is created on the browser side of; The Cookie object brought by the client is used to communicate with the server
session object matching to achieve state management. By default, cookie s are deleted when we close the browser
Except. However, the expiration time of the cookie can be modified to make the cookie valid for a certain period of time;
2.3 OAuth
OAuth (open authorization) is an open authorization standard that allows users to allow third-party applications to access the user's
Private resources (such as photos, videos, contact lists) stored on a web service without the user name and
The password is provided to third-party applications.
OAuth allows users to provide a token instead of a user name and password to access the specific service they store
Donor data. Each token authorizes a specific third-party system (e.g., video editing website) at a specific time
Access specific resources (e.g. just videos in an album) within a segment (e.g. within the next 2 hours). this
Similarly, OAuth allows users to authorize third-party websites to access certain specific messages they store in other service providers
Information, not everything.
Here is oauth2 Process for 0
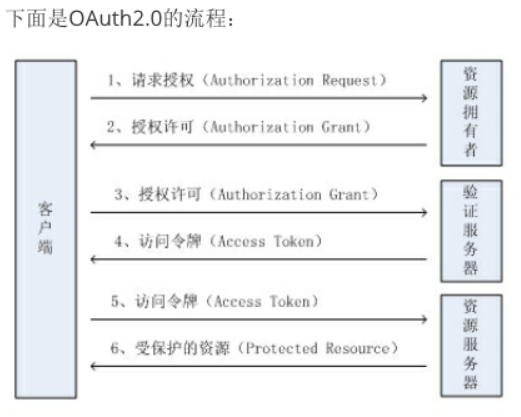
This OAuth based authentication mechanism is applicable to Internet products of individual consumers, such as social apps
But it is not suitable for enterprise applications with their own authentication authority management.
2.4 Token Auth
Using the Token based authentication method, there is no need to store the user's login record on the server. The general process is as follows:
The client requests login with user name and password.
The server receives the request to verify the user name and password.
After successful verification, the server will issue a Token and send it to the client.
After receiving the Token, the client can store it, for example, in a Cookie.
Every time the client requests resources from the server, it needs to bring the Token issued by the server.
The server receives the request, and then verifies the Token carried in the client request. If the verification is successful, it will report to the
The client returns the requested data.
The following is the process of Token Auth:
Key points: what are the advantages and disadvantages of Token mechanism over Cookie mechanism?
- Support cross domain access: cookies do not allow domain access, which does not exist for the Token mechanism. The premise is that the transmitted user authentication information is transmitted through the HTTP header
- Stateless (also known as server extensible line): the Token mechanism does not need to store session information on the server because the Token
It contains the information of all login users, and only needs to store the status information in the cookie or local media of the client - More applicable to CDN: you can request all the information of your server through the content distribution network (such as javascript,
HTML, pictures, etc.), and your server only needs to provide API - Decoupling: there is no need to bind to a specific authentication scheme. Token s can be generated anywhere, as long as
When your API is called, you can make a Token generation call More suitable for mobile applications: when your client is a native platform (iOS,
Android, Windows 8, etc.), cookies are not supported (you need to process them through the Cookie container), and Token recognition is adopted at this time
The certification mechanism will be much simpler. - CSRF: since you no longer rely on cookies, you don't need to consider the prevention of CSRF (Cross Site Request Forgery).
- Performance: a round-trip network time (query session information through the database) is much more time-consuming than a Token verification and parsing of HMACSHA256 calculation
- No special treatment is required for the login page: if you use Protractor for function test, no special treatment is required for the login page
3, What is JSON Web Token (JWT)
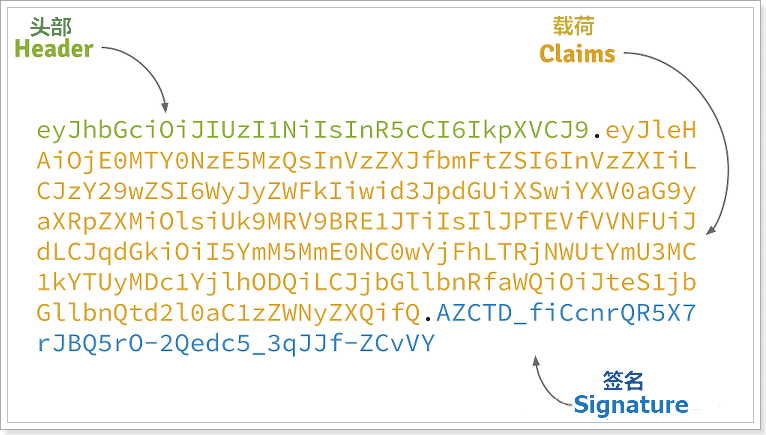
JWT format composition: header + payload + signature
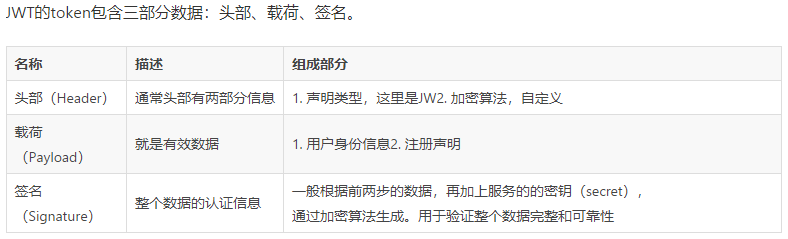
Header
The header is used to describe the most basic information about the JWT, such as its type and the algorithm used for signature. Can be represented as a JSON object. For example, the following header indicates that the signature algorithm is HS256 algorithm. We do BASE64 1 Encode the following contents: {"typ": "JWT", "alg": "HS256"}. The encoded string is as follows:
JTdCJTIydHlwJTIyJTNBJTIySldUJTIyJTJDJTIyYWxnJTIyJTNBJTIySFMyNTYlMjIlN0Q=
Load (payload)
Payload is the place where valid information is stored. The name seems to refer specifically to the goods carried on the aircraft. These valid information includes three parts:
(1) Declaration registered in the standard (recommended but not mandatory)
iss: jwt issuer.
Sub: the user JWT is targeting.
aud: the party receiving jwt.
Exp: the expiration time of JWT, which must be greater than the issuing time.
nbf: define the time before which this jwt is unavailable.
IAT: issuing time of JWT.
JTI: the unique identity of JWT, which is mainly used as a one-time token to avoid replay attacks.
(2) Public statement
Any information can be added to the public statement. Generally, the user's relevant information or other necessary information required by the business can be added
However, it is not recommended to add sensitive information because this part can be decrypted on the client.
(3) Private declaration
Private declaration is a declaration jointly defined by providers and consumers. It is generally not recommended to store sensitive information because base64
Symmetric decryption means that this part of information can be classified as plaintext information.
Define a payload: {"sub": "1234567890", "name": "John Doe", "admin": true}, and then encode it with base64 to get the second part of Jwt as follows: jtdjjtiyc3vijtiyjtnbjtiymtizndu2nzg5mcuymiuyqyuymm5hbwulmjilm0elmjjkb2hujuewrg9ljtiyjtiyywrtaw4lmjilm0f0cnvljtde
signature
The third part of jwt is a visa information, which consists of three parts:
Header (after Base64)
Payload (after Base64)
secret
This part requires the use of base64 encrypted header and base64 encrypted payload to connect the formed string, and then conduct salt secret combination encryption through the encryption method declared in the header, and then form the third part of jwt as follows: (that is, encrypt the encrypted string with the signature algorithm specified in the header to obtain the third part)
TJVA95OrM7E2cBab30RMHrHDcEfxjoYZgeFONFh7HgQ
Connect these three parts into a complete string to form the final jwt as follows:
JTdCJTIydHlwJTIyJTNBJTIySldUJTIyJTJDJTIyYWxnJTIyJTNBJTIySFMyNTYlMjIlN0Q=.JTdCJTIyc3ViJTIyJTNBJTIyMTIzNDU2Nzg5MCUyMiUyQyUyMm5hbWUlMjIlM0ElMjJKb2huJUEwRG9lJTIyJTJDJTIyYWRtaW4lMjIlM0F0cnVlJTdE.TJVA95OrM7E2cBab30RMHrHDcEfxjoYZgeFONFh7HgQ
Knowledge point 1:
The Signature part is the Signature of the first two parts to prevent data tampering. First, you need to specify a secret. This key is only known to the server and cannot be disclosed to users. Then use the Signature algorithm specified in the Header to generate a Signature according to the following formula: HMACSHA256(base64UrlEncode(header) + "+ base64UrlEncode(payload), secret) .
After calculating the Signature, spell the Header, Payload and Signature into a string, and use (.) Separated, you can return to the user.
Knowledge point 2:
Secret is saved on the server side, and the issuance and generation of jwt is also on the server side. Secret is used to issue jwt and verify jwt, so it is the private key of your server side and should not be revealed in any scenario. Once the client knows this secret, it means that the client can sign jwt it by itself.
4, Case code demonstration
Requirement: to delete a user, you must have administrator permission, otherwise you cannot delete it.
Front end and back end agreement: when the front end requests the back end, it needs to add header information Authorization, with the content of Bear + space
+token
<dependency>
    <groupId>io.jsonwebtoken</groupId>
    <artifactId>jjwt</artifactId>
    <version>0.6.0</version>
</dependency>
Tool class for user generated and parsed token
@ConfigurationProperties("jwt.config")
public class JwtUtil {

    private String key;
    private long ttl;//An hour

    public String getKey() {return key;}
    public void setKey(String key) {this.key = key;}
    public long getTtl() {return ttl;}
    public void setTtl(long ttl) {this.ttl = ttl;}

    // Generate JWT
    public String createJWT(String id, String subject, String roles) {
        long nowMillis = System.currentTimeMillis();
        Date now = new Date(nowMillis);
        JwtBuilder builder = Jwts.builder().setId(id)
                .setSubject(subject)
                .setIssuedAt(now)
                .signWith(SignatureAlgorithm.HS256, key).claim("roles", roles);
        if (ttl > 0) {
            builder.setExpiration(new Date(nowMillis + ttl));
        }
        return builder.compact();
    }

    // Parsing JWT
    public Claims parseJWT(String jwtStr) {
        return Jwts.parser()
                .setSigningKey(key)
                .parseClaimsJws(jwtStr)
                .getBody();
    }

}
Start class injection JwtUtil tool class
@SpringBootApplication
public class BcryptJwtApplication {

    public static void main(String[] args) {
        SpringApplication.run(BcryptJwtApplication.class, args);
    }

    @Bean
    public JwtUtil jwtUtil() {
        return new JwtUtil();
    }

}
Create interceptor class
If each method writes a piece of code to verify the correctness of the user's login token, the redundancy is too high, which is not conducive to maintenance. We can put this code into the interceptor to agree to intercept, and then judge the user token.
Spring provides me with
org.springframework.web.servlet.handler.HandlerInterceptorAdapter this adapter,
By inheriting this class, you can easily implement your own interceptor.
He has three methods:
After the andview page is called but not configured, the andview page is returned for preprocessing
Dyeing), return processing (the page has been rendered).
In preHandle, you can perform encoding, security control and other processing;
In the postHandle, you have the opportunity to modify ModelAndView;
In afterCompletion, you can judge whether an exception has occurred according to whether the ex is null and log it.
@Component
public class JwtInterceptor extends HandlerInterceptorAdapter {

    @Autowired
    private JwtUtil jwtUtil;

    public boolean preHandle(HttpServletRequest request, HttpServletResponse response, Object handler) {

        System.out.println("Pass the interceptor");

        final String authHeader = request.getHeader("Authorization");//Get header information
        if (authHeader != null && authHeader.startsWith("Bearer ")) {   // Note that Bearer + space
            final String token = authHeader.substring(7);
            Claims claims = jwtUtil.parseJWT(token);
            if (claims != null) {
                if ("admin".equals(claims.get("roles"))) {//If you are an administrator
                    request.setAttribute("admin_claims", claims);
                }
                if ("user".equals(claims.get("roles"))) {//If it is an ordinary user
                    request.setAttribute("user_claims", claims);
                }
            }
        }

        return true;
    }
}
Configure interceptor class
@Configuration
public class ApplicationConfig extends WebMvcConfigurationSupport {

    @Autowired
    private JwtInterceptor jwtInterceptor;

    protected void addInterceptors(InterceptorRegistry registry) {

        registry.addInterceptor(jwtInterceptor)
                .addPathPatterns("/**")
                .excludePathPatterns("/**/login");
    }
}
Control layer controller
@RestController
@CrossOrigin
@RequestMapping("/admin")
public class AdminController {

    @Autowired
    private AdminService adminService;

    @Autowired
    private JwtUtil jwtUtil;

    // Admin user login
    @RequestMapping(value = "/login", method = RequestMethod.POST)
    public Result login(@RequestBody Admin admin) {

        Admin loginUser = adminService.findByLoginNameAndPassword(admin.getLoginname(), admin.getPassword());

        if (null == loginUser) {
            return new Result(false, StatusCode.LOGINERROR, "Login failed. Please check whether the user name or password is correct");
        }

        // Generate a token and return it to the foreground
        String token = jwtUtil.createJWT(loginUser.getId(), loginUser.getLoginname(), "admin");
        Map<String, Object> map = new HashMap<>();
        map.put("token", token);
        map.put("role", "admin");
        map.put("name", loginUser.getLoginname());

        return new Result(true, StatusCode.OK, "Login successful", map);
    }

    // Add Admin user
    @RequestMapping(value = "/add", method = RequestMethod.POST)
    public Result add(@RequestBody Admin admin) {
        adminService.add(admin);
        return new Result(true, StatusCode.OK, "Increase success");
    }
}
Business processing layer service
@Service
public class AdminService {

    @Autowired
    private AdminDao adminDao;

    @Autowired
    private BCryptPasswordEncoder encoder;

    // Query according to login user name and password
    public Admin findByLoginNameAndPassword(String loginName, String password) {

        Admin admin = adminDao.findByLoginname(loginName);
        if (null != admin && encoder.matches(password, admin.getPassword())) {
            return admin;
        }

        return null;
    }

    // Add administrator
    public void add(Admin admin) {
        admin.setId(UUIDUtil.getUUID());    // Primary key
        // Password encryption
        String newPassword = encoder.encode(admin.getPassword());
        admin.setPassword(newPassword);
        adminDao.save(admin);
    }

}
Data access layer dao
public interface AdminDao extends JpaRepository<Admin, String>, JpaSpecificationExecutor<Admin> {

    // Administrator login verification
    Admin findByLoginname(String loginName);
}
Modify the delete method of UserController
@RestController
@CrossOrigin
@RequestMapping("/user")
public class UserController {

    @Autowired
    private UserService userService;

    @Autowired
    private HttpServletRequest servletRequest;

    /**
     * Delete: to delete a user, you must have administrator privileges, otherwise you cannot delete it
     * <p>
     * Front end and back end agreement: when the front end requests micro services, it needs to add header information Authorization, with the content of Bear + space + token
     *
     * @param id
     */
    @RequestMapping(value = "/{id}", method = RequestMethod.DELETE)
    public Result delete(@PathVariable String id) {

        Claims claims = (Claims) servletRequest.getAttribute("admin_claims");
        if (null == claims) {
            return new Result(true, StatusCode.ACCESSERROR, "No access");
        }
        userService.deleteById(id);
        return new Result(true, StatusCode.OK, "Deleted successfully");
    }

}
Test generation token steps
1. As above, use Postman to register an Admin account
2. Use Postman to simulate access and login to see if a token is returned
3. After using Bear + space + token, put it into the header to delete the user and see whether the deletion is successful.
Little knowledge: Base64 is a representation method of binary data based on 64 printable characters. Due to 2
The 6th power of is equal to 64, so every 6 bits is a unit, corresponding to a printable character. Three bytes have 24 bytes
Bits, corresponding to 4 Base64 units, that is, 3 bytes need to be represented by 4 printable characters. In JDK
It provides very convenient BASE64Encoder and BASE64Decoder, which can be used very conveniently
Complete the encoding and decoding based on BASE64. ↩︎