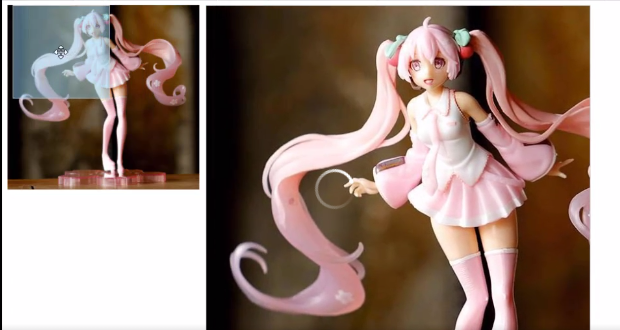
First, let's look at the effect of an East:
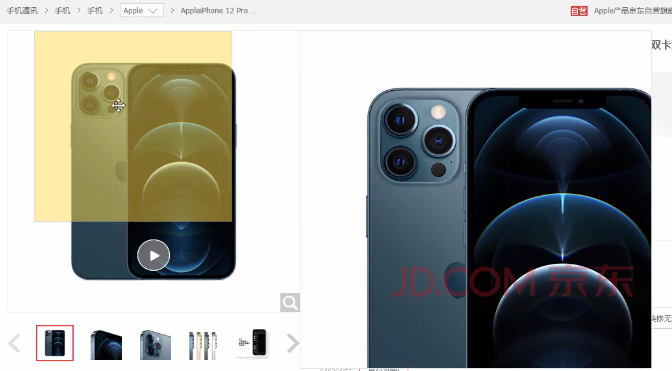
This case can be divided into three functional modules:
- The mouse passes through the small picture box, the mask layer and the large picture box are displayed, and leaves the hidden mask layer and the large picture box.
- The mask layer follows the mouse.
- Move the mask layer and the big picture follows.
To realize this case, we need to use the following knowledge points:
| attribute | effect |
|---|---|
| element.offsetTop | Returns the offset of an element from the top border of a parent element with an anchor |
| element.offsetLeft | Returns the offset of the element relative to the left border with the anchor parent element |
| element.offsetWidth | Returns the width of itself, including padding, border and content area, and returns the value without unit. |
| element.offsetHeight | Returns the height of itself, including padding, border and content area, and returns the value without unit. |
| event.pageX | Returns the x coordinate of the mouse relative to the entire document, and returns the value without units |
| event.pageY | Returns the y coordinate of the mouse relative to the entire document, and returns a value without units |
First, build the page layout:
<div class="box">
     <!-- A small box for storing a small picture -->
     <img src="./chuying.jpg">
     <!-- mask  -->
     <div class="mask"></div>
     <!-- Big box and big picture -->
     <div class="big">
         <img src="./chuying.jpg">
     </div>
 </div>
CSS:
 .box {
     position: relative;
     width: 300px;
     height: 300px;
     cursor: move;
 }

 .box img {
     width: 100%;
 }

 .box .mask {
     display: none;
     position: absolute;
     width: 150px;
     height: 150px;
     left: 0;
     top: 0;
     background-color: rgba(135, 206, 235, 0.5);
     border: 1px solid #cccccc;
 }

 .big {
     display: none;
     position: absolute;
     width: 600px;
     height: 600px;
     top: 0;
     left: 310px;
     border: 1px solid #ccc;
     overflow: hidden;
 }

 .big img {
     position: absolute;
     width: 800px;
     height: 800px;
     left: 0;
     top: 0;
 }
Module I:
When the mouse passes through the small box, the mask layer and the large picture box are displayed (display: block). There is a mouse over event. When the mouse leaves the small box, the mask layer and the large picture box are hidden (display: none).
Here, just add the corresponding mouse event to the small box (. Box), and then modify the value of the display attribute of the mask layer and the large picture box.
JS code:
// First, get three elements: small box, mask layer and large box
 var box = document.querySelector('.box');
 var mask = document.querySelector('.mask');
 var big = document.querySelector('.big');
 // When the mouse passes the box, the mask layer and big box are displayed
 box.addEventListener('mouseover', function () {
     mask.style.display = 'block';
     big.style.display = 'block';
 })
 // When the mouse leaves the box, hide the mask layer and big box
 box.addEventListener('mouseout', function () {
     mask.style.display = 'none';
     big.style.display = 'none';
 })
Module 1 is completed.
Module 2:
To move the mask layer with the mouse, first get the position of the mouse in the small box, and then give the coordinates of the mouse in the small box to the left and top of the mask layer respectively.
 box.addEventListener('mousemove', function(e) {
     // Get the position of the mouse in the small box
     var mouseX = e.pageX - this.offsetLeft;
     var mouseY = e.pageY - this.offsetTop;
     // Assign the mouse coordinates to the left top of the mask layer
     mask.style.left = mouseX + 'px';
     mask.style.top = mouseY + 'px';
 })
There is a problem at this time. The mouse is always in the upper left corner of the mask layer:
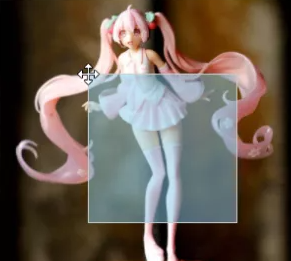
If we want the mouse to be in the middle of the mask layer, it is unrealistic to modify the coordinates of the mouse. We can modify the left and top values of the mask layer. If we subtract half of the width and height of the mask layer from the left and top values respectively, it is equivalent to moving the mask layer to the left and up half of its width and height. At this time, the position of the mouse does not change, so the position of the mask layer after moving, The mouse is just in the center of the mask layer.
 box.addEventListener('mousemove', function(e) {
     // Get the position of the mouse in the small box
     var mouseX = e.pageX - this.offsetLeft;
     var mouseY = e.pageY - this.offsetTop;
 // Subtract half the width and height of the mask layer from the mouse coordinates to obtain the offset of the new mask layer
     var maskX = mouseX - mask.offsetWidth / 2;
     var maskY = mouseY - mask.offsetHeight / 2;
 // Sets the offset of the mask layer
     mask.style.left = maskX + 'px';
     mask.style.top = maskY + 'px';
 })
At this time, the mouse is in the middle of the mask layer, and the mask layer follows the mouse, but there is a new problem. The mask layer can move out of the small box:
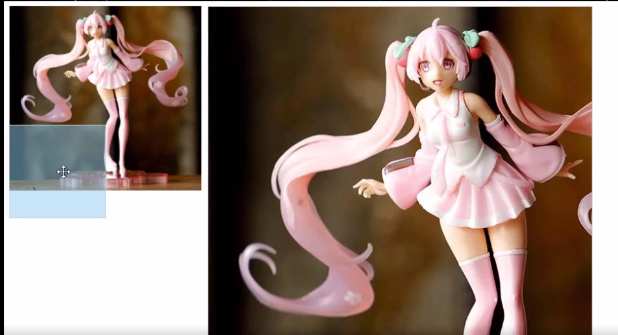
To solve this problem, we have to set the boundary when the mask layer moves with the mouse. When the mouse coordinate minus half of the mask layer width is less than 0, we should make the left of the mask layer = 0; When the mouse coordinate minus half of the height of the mask layer is less than 0, the top of the mask layer should be equal to 0; Then the maximum offset of the mask layer should be the width and height of the small box minus the width and height of the mask layer.
 box.addEventListener('mousemove', function(e) {
     // Get the position of the mouse in the small box
     var mouseX = e.pageX - this.offsetLeft;
     var mouseY = e.pageY - this.offsetTop;
     // Subtract half the width and height of the mask layer from the mouse coordinates to obtain the offset of the new mask layer
     var maskX = mouseX - mask.offsetWidth / 2;
     var maskY = mouseY - mask.offsetHeight / 2;
     // The maximum movement distance of the mask layer
     var maskXMax = this.offsetWidth - mask.offsetWidth;
     var maskYMax = this.offsetHeight - mask.offsetHeight;

     // Set move boundary
     if (maskX < 0) {
         maskX = 0;
    } else if (maskX >= maskXMax) {
         maskX = maskXMax;
    }
     if (maskY < 0) {
         maskY = 0;
    } else if (maskY >= maskYMax) {
         maskY = maskYMax;
    }

     // Sets the offset of the mask layer
     mask.style.left = maskX + 'px';
     mask.style.top = maskY + 'px';

 })
Module 2 is completed.
Module 3:
Move the mask layer, and the large picture will follow the movement to present the enlarged effect. To achieve this effect, it is necessary to meet the condition of moving distance of mask layer: maximum moving distance of mask layer = moving distance of large picture: maximum moving distance of large picture. In this condition, the moving distance of the mask layer, the maximum moving distance of the mask layer and the maximum moving distance of the large picture are all available or have been obtained. Then the moving distance of the large picture = the moving distance of the mask layer * the maximum moving distance of the large picture / the maximum moving distance of the mask layer.
On the basis of module 2, add the following code snippet.
 // Get big picture
 var bigImg = document.querySelector('.big img');
 // Calculate the moving distance of large pictures
 var bigImgX = maskX * (big.offsetWidth - bigImg.offsetWidth) / maskXMax;
 var bigImgY = maskY * (big.offsetHeight - bigImg.offsetHeight) / maskYMax;
 // Set the offset of large pictures
 bigImg.style.left = bigImgX + 'px';
 bigImg.style.top = bigImgY + 'px';
Module 3 is completed.
Complete JS code of the case:
 // First, get three elements: small box, mask layer and large box
 var box = document.querySelector('.box');
 var mask = document.querySelector('.mask');
 var big = document.querySelector('.big');
 // When the mouse passes the box, the mask layer and big box are displayed
 box.addEventListener('mouseover', function () {
     mask.style.display = 'block';
     big.style.display = 'block';
 })
 // When the mouse leaves the box, hide the mask layer and big box
 box.addEventListener('mouseout', function () {
     mask.style.display = 'none';
     big.style.display = 'none';
 })

 box.addEventListener('mousemove', function(e) {
     // Get the position of the mouse in the small box
     var mouseX = e.pageX - this.offsetLeft;
     var mouseY = e.pageY - this.offsetTop;
     // Subtract half the width and height of the mask layer from the mouse coordinates to obtain the offset of the new mask layer
     var maskX = mouseX - mask.offsetWidth / 2;
     var maskY = mouseY - mask.offsetHeight / 2;
     // The maximum movement distance of the mask layer
     var maskXMax = this.offsetWidth - mask.offsetWidth;
     var maskYMax = this.offsetHeight - mask.offsetHeight;

     // Set move boundary
     if (maskX < 0) {
         maskX = 0;
    } else if (maskX >= maskXMax) {
         maskX = maskXMax;
    }
     if (maskY < 0) {
         maskY = 0;
    } else if (maskY >= maskYMax) {
         maskY = maskYMax;
    }

     // Sets the offset of the mask layer
     mask.style.left = maskX + 'px';
     mask.style.top = maskY + 'px';

     // Get big picture
     var bigImg = document.querySelector('.big img');
     // Calculate the moving distance of large pictures
     var bigImgX = maskX * (big.offsetWidth - bigImg.offsetWidth) / maskXMax;
     var bigImgY = maskY * (big.offsetHeight - bigImg.offsetHeight) / maskYMax;
     // Set the offset of large pictures
     bigImg.style.left = bigImgX + 'px';
     bigImg.style.top = bigImgY + 'px';
 })
Finally, let's look at the final effect and compare whether the effect of a certain East is consistent.