Python wechat ordering applet course video
https://edu.csdn.net/course/detail/36074
Python practical quantitative transaction financial management system
https://edu.csdn.net/course/detail/35475
preface
This article will bring some knowledge about hard disk mounting in disk management under Linux and Linux operating system. This is probably the most practical Linux hard disk mount article introduced so far. It is more detailed. Due to work reasons, it is often used. The main purpose is to let more people know that it is not so difficult to mount disks under Linux.
There are several common file systems, the old file system ext file system (ext2, ext3, ext4).
An excellent XFS file system is recommended in the Redhat7 series, which has surpassed the ext file system in performance. XFS file system is a file system developed by Silicon Graphic Inc (SGI) for IRIX (a Unix operating system), which was later transplanted to Linux operating system. XFS is an advanced log file system, which has the advantage of great scalability and robustness.
There is also a btrfs (B-tree file system is usually read as Buffer FS, Better FS and B-tree FS) file system, which is also excellent. Redhat7 comes with it.
btrfs has many characteristics. For example, write snapshot, snapshot of snapshot, built-in RAID (commonly referred to as disk array) and subvolume. The core concept is design
Fault tolerant, repairable, and easy to manage. The maximum capacity of btrfs is 16EB for volumes and 16EB for a single file.
Note: the whole process of this article is to install and select the language. The language is simplified Chinese version, so please don't be surprised to see the display of Chinese characters.
text
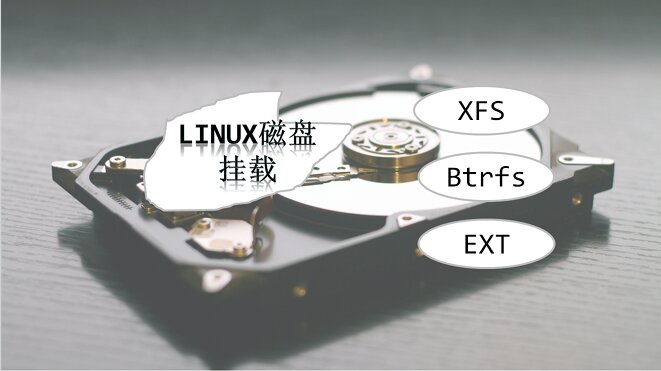
Start with a picture, and the article depends on editing. Just kidding. It's just for fun. The following pictures have pointed out the core content of this article.
Suggestion: for testing, you can use the virtual machine with linux (Redhat series or Ubuntu environment).
1, View system partition
fdisk parameter description
Delete the existing hard disk partition, and you will be prompted which serial number needs to be deleted.
- Delete partition: d
- New partition: n
- View partition information: p
- Save partition change information: w
- Exit without saving: q
- Get help: m
1. List partition tables
List the partition table. As can be seen from the options listed below, the original disk / dev/sda: 21.5 GB is allocated when the linux operating system is initially installed. Another disk is my new disk sdb for test demonstration.
fidsk -l
[root@cnwangk /]# fdisk -l

disk /dev/sda: 21.5 GB, 21474836480 Bytes, 41943040 sectors
Units = a sector of 1 * 512 = 512 bytes
 Sector Size (logic/Physics): 512 byte / 512 byte
I/O size(minimum/optimum): 512 byte / 512 byte
 Disk label type: dos
 Disk identifier: 0 x0001805e

   equipment Boot      Start         End      Blocks   Id  System
/dev/sda1   *        2048      411647      204800   83  Linux
/dev/sda2          411648     4507647     2048000   83  Linux
/dev/sda3         4507648     8603647     2048000   82  Linux swap / Solaris
/dev/sda4         8603648    41943039    16669696    5  Extended
/dev/sda5         8605696    41943039    16668672   83  Linux

disk /dev/sdb: 10.7 GB, 10737418240 Bytes, 20971520 sectors
Units = a sector of 1 * 512 = 512 bytes
 Sector Size (logic/Physics): 512 byte / 512 byte
I/O size(minimum/optimum): 512 byte / 512 byte
 Disk label type: dos
 Disk identifier: 0 x95df3b22

   equipment Boot      Start         End      Blocks   Id  System
/dev/sdb2        10485760    20971519     5242880   83  Linux
Directly enter the fdisk command, and the Chinese version will prompt help information and usage
fdisk [option] <disk>    Change partition table
#For example, the new disk sdb
fdisk /dev/sdb
fdisk [option] -l <disk> List partition tables
fdisk -s <partition>        Give partition size(Number of blocks)
2, Establishing linux file system
1. xfs file system
As shown below, I will create a new xfs file system, pointing to the new disk file path / dev/sdb. It is also the default recommended format of Redhat7 series.
mkfs.xfs /dev/sdb
A simple explanation: xfs file system provides a backup partition tool xfsdump for users to use. The advantage is that users can backup the data on the xfs file system without the help of third-party software. The backup process is as follows:
xfsdump /backup/dump_sdc1 /sdc1
2. btrfs file system
As shown below, I will create a new btrfs file system, pointing to the new disk file path / dev/sdb. The following final demonstration is also the configuration of the btrfs file system.
mkfs.btrfs /dev/sdb
3. ext file system
In RedHat 6 and before, the ext file system was used. Later, the xfs file system was recommended for the 7 series.
mkfs.ext4 /dev/sdb
3, Create the path to mount
1. Create mounted file data
Use the mkdir command to create a data directory for subsequent mounting of new disks.
mkdir /data
View the created mount path data, which is initially empty
ls /data
2. Use disk
Write a simple shell script as a demonstration
echo -e "echo "hello linux"\necho "create btrfs filesystem"" >> /data/data.sh
After writing a simple shell script, the test looks at and executes the script
#Check the files in the data disk again
[root@cnwangk /]# ls /data/
data.sh
sh /data/data.sh
#Run script
[root@cnwangk /]# sh /data/data.sh
hello linux
create btrfs filesystem
As can be seen from the above, a basic disk management will lead to the use of some basic commands, such as ls, mkdir, echo, etc. The audience of this article needs to master some basic command knowledge of linux. Of course, you can see this article, which also shows that you still have some foundation.
4, Partition / dev/sdb using fdisk
1. Partition command fdisk
Use fdisk to partition the newly added disk / dev/sdb. In the previous demonstration, I have used primary partition 2. Now I am demonstrating the logical expansion partition, using the parameter e.
- New partition: n
- Add primary partition: p
- Extended partition: e
- Note: you can customize the size or press enter to use the default size and sector.
fdisk /dev/sdb
[root@cnwangk /]# fdisk /dev/sdb
 Welcome fdisk (util-linux 2.23.2).

The changes remain in memory until you decide to write the changes to disk.
Think twice before using the write command.

command(input m get help): n #Add a new partition, p is the primary partition, and e is the extended partition
Partition type:
   p   primary (1 primary, 0 extended, 3 free)
   e   extended
Select (default p): e
 Partition number (1,3,4,Default 1): 1
 Start sector (2048-20971519,The default is 2048):
The default value 2048 will be used
Last a sector, +a sector or +size{K,M,G} (2048-10485759,The default is 10485759):
The default value 10485759 will be used
 Partition 1 is set to Extended Type, size set to 5 GiB

command(input m get help): p #Use parameter p to view the unsaved partition information

disk /dev/sdb: 10.7 GB, 10737418240 Bytes, 20971520 sectors
Units = a sector of 1 * 512 = 512 bytes
 Sector Size (logic/Physics): 512 byte / 512 byte
I/O size(minimum/optimum): 512 byte / 512 byte
 Disk label type: dos
 Disk identifier: 0 x95df3b22
#View the device information of the new partition
   equipment Boot      Start         End      Blocks   Id  System
/dev/sdb1            2048    10485759     5241856    5  Extended
/dev/sdb2        10485760    20971519     5242880   83  Linux

command(input m get help): w #Enter w parameter to save, and enter q to exit without saving.
The partition table has been altered!

Calling ioctl() to re-read partition table.

WARNING: Re-reading the partition table failed with error 16: Device or resource busy.
The kernel still uses the old table. The new table will be used at
the next reboot or after you run partprobe(8) or kpartx(8)
Synchronizing disks.
5, Establish btrfs file system
1. Establish file system
Create a new btrfs file system, execute this command after determining to partition, and finally mount the disk.
mkfs.btrfs /dev/sdb2
You can also use the following command
mkfs -t btrfs /dev/sdb2
6, Mount file system
1. Mount command mount
Then set up the btrfs file system above and mount it to the new data directory. Although the mount is successful, it only takes effect temporarily. Restart will drop the hard disk after the mount. Moreover, the volume label will be displayed as a long string of letters and numbers, similar to this s1k544y55fsa445dda44sd45eff4 string. The reason is that Linux still takes the file system as the core. There is no concept of directory, but it is convenient for everyone to understand. They are used to calling it this way.
1.1. Mount with mount. You can see sdb2 because you have created a partition sdb1 before.
mount /dev/sdb2 /data
1.2. Uninstall using umount
umount /dev/sdb2 /data
2. Write fstab file
2.1. The permanent effect needs to be written into the / etc/fstab file, and the echo command is used to append data to the fstab file.
#The first parameter / dev/sdb can also write UUID information here
# First parameter second parameter third parameter fourth parameter fifth parameter
echo /dev/sdb1    /data   	  btrfs    	  defaults     0 0  	>>  /etc/fstab
echo /dev/sdb2    /data   	  btrfs    	  defaults     0 0  	>>  /etc/fstab
2.2. Enter the blkid command to view the volume label or UUID
# blkid command
[root@cnwangk /]# blkid
/dev/sda5: UUID="d4708f44-beed-4a9b-bb11-94706e6c0cf5" TYPE="xfs"
/dev/sda1: UUID="7d56f743-a42d-42e2-876e-d839cc583fa7" TYPE="xfs"
/dev/sda2: UUID="953b1070-a13a-4b67-ac63-cc376c1dee8d" TYPE="xfs"
/dev/sda3: UUID="b075b6d0-4d37-4f18-ae59-bf380862b440" TYPE="swap"
/dev/sdb2: UUID="294c0c25-04be-4791-ab06-520c4283cb58" UUID_SUB="a8b7194a-a694-4a8a-bee1-0ab49821e6bb" TYPE="btrfs"
2.3. Of course, you can use the commands provided with btrfs to view the uuid of disk files
[root@cnwangk /]# btrfs filesystem show
Label: none  uuid: 294c0c25-04be-4791-ab06-520c4283cb58
        Total devices 1 FS bytes used 192.00KiB
        devid    1 size 5.00GiB used 536.00MiB path /dev/sdb2
7, Write profile permanently
1. Configuration file fstab display
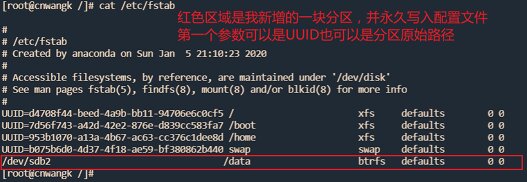
Note: solve the problem of disk dropping after restart. It should be emphasized that once there is an error or exception in the parameters written to the configuration file, the server will probably fail to start, so be careful when modifying. It is best to make a backup before operation.
The following is the content of my / ect/fstab configuration file. You can see that / dev/sdb2 is the configuration of a newly added disk after partition. The file system format is btrfs.
# /etc/fstab
# Created by anaconda on Sun Jan 5 21:10:23 2020
#
# Accessible filesystems, by reference, are maintained under '/dev/disk'
# See man pages fstab(5), findfs(8), mount(8) and/or blkid(8) for more info
#
UUID=d4708f44-beed-4a9b-bb11-94706e6c0cf5 /                       xfs     defaults        0 0
UUID=7d56f743-a42d-42e2-876e-d839cc583fa7 /boot                   xfs     defaults        0 0
UUID=953b1070-a13a-4b67-ac63-cc376c1dee8d /home                   xfs     defaults        0 0
UUID=b075b6d0-4d37-4f18-ae59-bf380862b440 swap                    swap    defaults        0 0
/dev/sdb2                                /data                    btrfs   defaults        0 0
2. Detailed explanation of some parameters
Write the volume label information to the / etc/fstab file (the default recommended format of Redhat7 series is xfs, which can be seen from the display given in this article)
- First parameter: / dev/sdb1 (raw disk partition path)
- The second parameter: / data (the newly created file path of the mounted disk. The Linux core is a file system, so it is a file path)
- The third parameter: btrfs (Mount disk file system format)
- The fourth parameter: defaults
- Fifth parameter: 0
#The first parameter / dev/sdb can also write UUID information here
# First parameter second parameter third parameter fourth parameter fifth parameter
echo /dev/sdb1    /data   	  btrfs    	  defaults     0 0  	>>  /etc/fstab
3. Modify profile
You can edit the file directly and add disk mount information: vim /etc/fstab
Write to the / etc/fstab configuration file. xfs or btrfs is recommended for the file system, depending on the actual situation:
/dev/sdb2    /data     ext4    defaults    0 0
/dev/sdb2    /data     xfs     defaults    0 0
/dev/sdb2    /data     btrfs   defaults    0 0
Restart takes effect: reboot or shutdown -r now
Verify whether the mount is successful. After restarting the system, you can see that my newly mounted disk / dev/sdb2 has taken effect and written to the fstab configuration file.
df -h
[root@cnwangk /]# df -h
 file system        Capacity used available used% Mount point
devtmpfs        907M     0  907M    0% /dev
tmpfs           917M     0  917M    0% /dev/shm
tmpfs           917M  9.3M  908M    2% /run
tmpfs           917M     0  917M    0% /sys/fs/cgroup
/dev/sda5        16G  7.1G  8.9G   45% /
/dev/sdb2       5.0G   17M  4.5G    1% /data
/dev/sda2       2.0G   34M  2.0G    2% /home
/dev/sda1       197M  154M   43M   79% /boot
tmpfs           184M     0  184M    0% /run/user/0
8, Disk management
In fact, disk management commands have been used to partition the hard disk. mkfs and fdisk are basic disk management. There is also the most commonly used df, which is used to view the disk space occupation; Mount and umount commands mount and unmount disks. The following third-party ssm management tools are mainly introduced.
When you see this ssm, don't confuse it with the framework combination ssm (spring MVC mybatis) in Java Web.
1. ssm management tools
ssm (System Storage Manager) manages logical volumes. It is not installed by default. You need to install it manually. Download the rpm package or install it online directly from yum source:
#Provide yum online installation mode
yum -y install system-storage-manager.noarch
After installation, use the ssm command as follows to show the effect:
[root@cnwangk /]# ssm list
-----------------------------------------------------------------
Device        Free       Used      Total  Pool        Mount point
-----------------------------------------------------------------
/dev/fd0                         4.00 KB
/dev/sda                        20.00 GB
/dev/sda1                      200.00 MB              /boot
/dev/sda2                        1.95 GB              /home
/dev/sda3                        1.95 GB              SWAP
/dev/sda4                        1.00 KB
/dev/sda5                       15.90 GB              /
/dev/sdb                        10.00 GB
/dev/sdb1                        1.00 MB
/dev/sdb2  4.48 GB  536.00 MB    5.00 GB  btrfs_sdb2
-----------------------------------------------------------------
-----------------------------------------------------
Pool        Type   Devices     Free     Used    Total
-----------------------------------------------------
btrfs_sdb2  btrfs  1        5.00 GB  5.00 GB  5.00 GB
-----------------------------------------------------
-----------------------------------------------------------------------------------
Volume      Pool        Volume size  FS       FS size      Free  Type   Mount point
-----------------------------------------------------------------------------------
btrfs_sdb2  btrfs_sdb2      5.00 GB  btrfs    5.00 GB   5.00 GB  btrfs  /data
/dev/sda1                 200.00 MB  xfs    196.66 MB  42.79 MB         /boot
/dev/sda2                   1.95 GB  xfs      1.94 GB   1.91 GB         /home
/dev/sda5                  15.90 GB  xfs     15.89 GB   8.87 GB         /
-----------------------------------------------------------------------------------
2. linux's own disk commands
For example, check the disk space status and add the parameter - h to display it in the form of (K, M, G). Although df can be displayed in many forms, it is most commonly used in personal work, and the - h parameter is used most frequently. The following is an example of adding parameter - H:
df -h
[root@cnwangk /]# df -h
 file system        Capacity used available used% Mount point
devtmpfs        907M     0  907M    0% /dev
tmpfs           917M     0  917M    0% /dev/shm
tmpfs           917M  9.3M  908M    2% /run
tmpfs           917M     0  917M    0% /sys/fs/cgroup
/dev/sda5        16G  7.1G  8.9G   45% /
/dev/sdb2       5.0G   17M  4.5G    1% /data
/dev/sda2       2.0G   34M  2.0G    2% /home
/dev/sda1       197M  154M   43M   79% /boot
tmpfs           184M     0  184M    0% /run/user/0
Add the - a parameter after the df command to display the disk usage of all file systems. The output content is not pasted here. The display content is too long.
df -ah
The above is all the content of this article. I hope it can be helpful to your work. Feel well written, take out your one button three times. If I feel that the summary is not in place, I hope I can leave your valuable opinions. I will adjust and optimize it in the article.
It's not easy to be original. Please indicate the source for reprint. This article will be uploaded to gitee or github and VX public platforms from time to time.
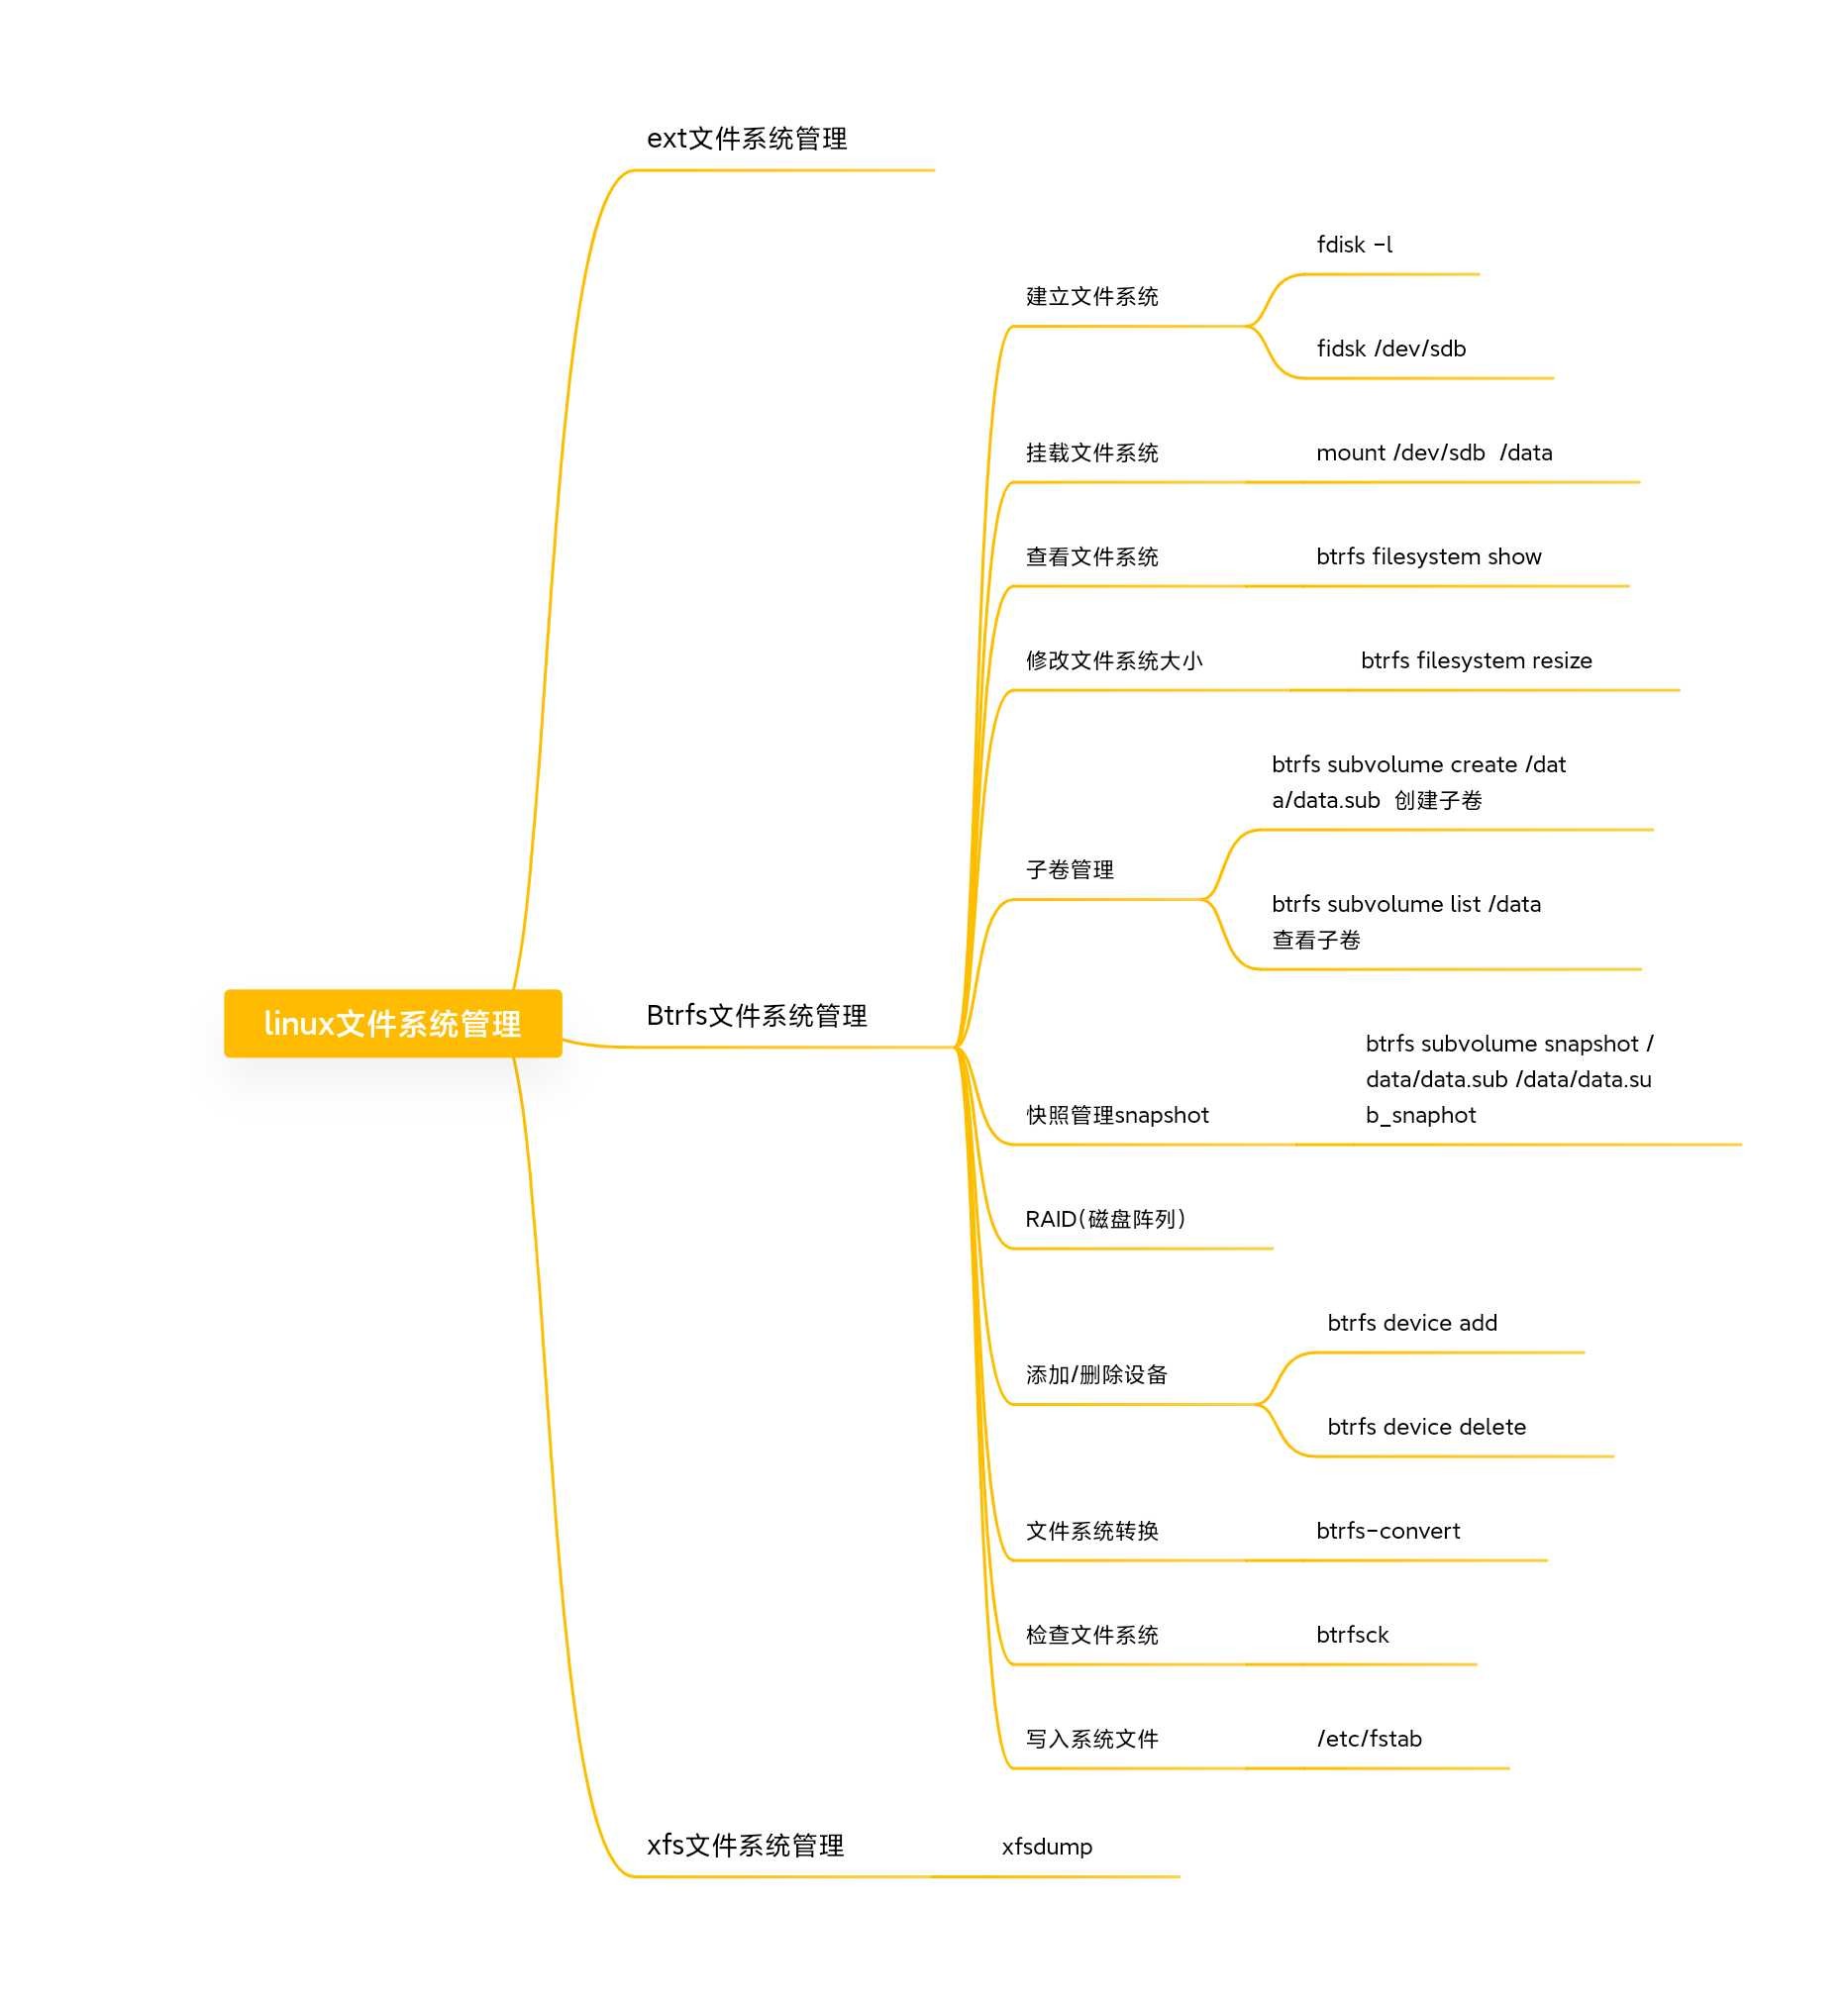
Finally, give a mind map and make do with it. You should have an impression!