Objectives:
- Understand the characteristics of Haproxy
- Easily use Haproxy to build clusters
Content:
1, HAProxy features:
- Support two proxy modes: TCP (layer 4) and HTTP (layer 7), and support virtual host;
- It can supplement some shortcomings of Nginx, such as Session retention, Cookie guidance and so on
- Support url detection, back-end server problem detection will be very helpful.
- More load balancing strategies, such as dynamic round robin, weighted source hash, weighted URL hash and weighted parameter hash
- In terms of efficiency, HAProxy has better load balancing speed than Nginx.
- HAProxy can load balance Mysql and detect and load balance the backend DB nodes.
- Support load balancing algorithms: Round Robin, weight Round Robin, source, RI and RDP cookie
- Applicable scenario: in the early stage of website construction, Haproxy can be selected as the reverse proxy load balancing (or the load balancing function can not be used if the traffic is not large), because its configuration is simple and its performance can meet the general business scenarios.
2, Case
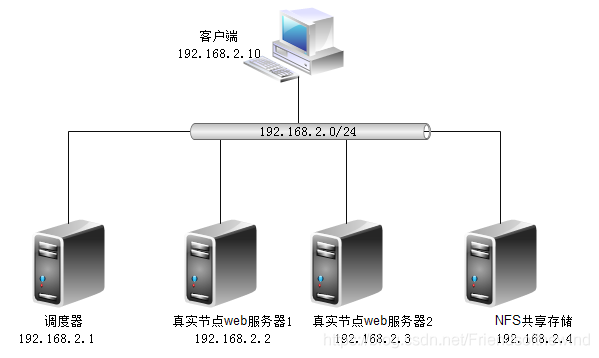
- Environment construction
Use script to configure IP address for each server and set firewall policy (the experimental environment is temporarily closed)
#!/bin/bash
sed -i '2c BOOTPROTO=static'   /etc/sysconfig/network-scripts/ifcfg-ens33
sed -i '17c ONBOOT=yes'   /etc/sysconfig/network-scripts/ifcfg-ens33
sed -i '17a IPADDR=192.168.2.1'  /etc/sysconfig/network-scripts/ifcfg-ens33
ifdown ens33;ifup ens33
systemctl stop firewalld
setenforce 0
- Compile and install Nginx server
See details Easily set up Nginx service - Compile and install Haproxy
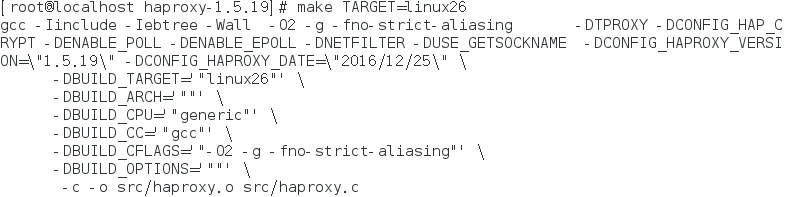
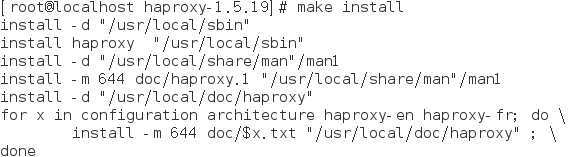
Mount the system disk and install the dependency package (omit the disk and configure the yum Warehouse process)
yum -y install pcre-devel  bzip2-devel
 decompression
tar xf /mnt/haproxy-1.5.19.tar.gz -C /usr/src/
Enter the directory after decompression
cd /usr/src/haproxy-1.5.19/
Specify system type 64 bit
make TARGET=linux26
 install
make install
Execute the command of specifying the system type, as shown below:
Execute the installation command, as shown below:
- haproxy server configuration (Note: This is a technical difficulty)
(1) Create profile
Create a directory in the system directory
mkdir  -p  /etc/haproxy
 Copy sample configuration file
cp  examples/haproxy.cfg   /etc/haproxy/
Edit the copied profile
vim   /etc/haproxy/haproxy.cfg
Edit profile content
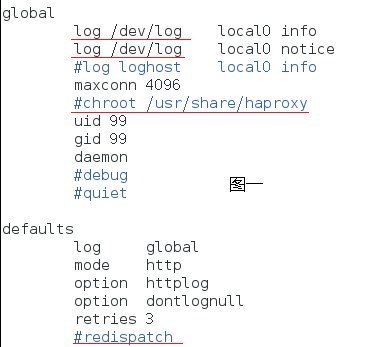

Explanation:
global
        log /dev/log   local0 info  //Configure logging. 1ocal0 is a logging device. It is stored in the system log by default.
        log /dev/log  local1 notice //notice is a log level, which usually has 24 levels
        maxconn 4096    //Defines the maximum number of connections per haproxy process

chroot /usr/share/haproxy //Lock it in the specified directory. Since the configuration directory is not in this location, it is commented out
        uid 99
        gid 99
        daemon //Run in guard mode
        nbproc 4   //Set the number of processes when haproxy starts. The setting of this value should be consistent with the number of CPU cores of the server,
        defaults The configuration item configures default parameters, which are generally inherited by the application component. If there is no special statement in the application component, the default configuration parameter settings will be installed.

defaults
        log     global  //Define log is the log definition in g1oba1 configuration
        mode    http   http Mode, or tcp pattern
        option  httplog  Enable http journal
        option  dontlognull Do not record empty links
        retries 3  Defines the number of failed reconnections to the backend server
       #redispatch forcibly directs the customer's request to another back-end server to ensure the normal operation of the service
        maxconn 2000
        contimeout 5000 //Connection timeout
        clitimeout 50000 //Client timeout
        srvtimeout 50000 //Server timeout

 listen webcluster 0.0.0.0:80 //The application is a web service. It listens for IP address and port. 0.0.0 represents any IP address
  option httpchk GET /index.html  //Check the index of the server HTML file
  balance roundrobin      //Scheduling algorithm round robin
  server inst1 192.168.2.2:80 check inter 2000 fall 3 //Define online nodes
  server inst2 192.168.2.3:80 check inter 2000 fall 3

[check]Receive health monitoring
[inter 2000]Duration of monitoring interval, in milliseconds
[rise 3]After monitoring how many times, it is considered that the back-end server is available
[fall 3]How many times does the monitoring fail and the back-end server is considered unavailable
- Create self starting script
Copy the sample to the system file directory
cp /usr/src/haproxy-1.5.19/examples/haproxy.init  /etc/init.d/haproxy
 Create soft links haproxy Default search path added to the command
 ln -s /usr/local/sbin/haproxy  /usr/sbin/haproxy
Set execution permission
chmod  +x /etc/init.d/haproxy
 Add to boot profile
chkconfig  --add /etc/init.d/haproxy
 Manual start haproxy
/etc/init.d/haproxy   start
- Log of haproxy
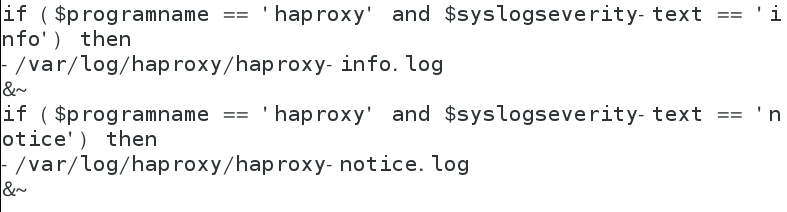
To facilitate management, haproxy related configurations are defined independently to haproxy Conf and put it in / etc / rsyslog D /, all configuration files in this directory will be loaded automatically when rsyslog is started.
modify rsyslog to configure
vim  /etc/rsyslog.d/haproxy.conf

restart rsyslog service
systemctl restart rsyslog

Test log information
tail -f /var/log/haproxy/haproxy-info.log
The rsyslog configuration is modified as follows:
- Test high availability
If NFS is not configured, refresh the access cluster ip and display web1 and web2 contents respectively


Configure NFS, refresh the access cluster ip, and display the same content

- The test haproxy log is defined independently to the specified file
