introduction
As vue3 is accepted by the majority of developers and its own ecology is gradually improved, more students are improving in the engineering direction of vue3. This article just introduces how to better use vue3 and its surrounding plug-ins, and let them be combined into the whole project.
In addition, Vue3's support for Typescript syntax programming is also one of the highlights. In order to explore the engineering construction of new technologies, this paper will integrate the official surroundings such as Typescript, vite and pinia into the project.
Next, in order to make you better understand the idea of engineering of the project, this paper will study it step by step according to the following keywords (the first four steps can be skipped when looking at the project code):
script setup of vue3 Typescript Vite pinia Engineering construction
script setup
< script setup > is used in single file component (SFC) Combined API Compile time syntax sugar.
Make a simple demo and compare the difference between script setup and script:
// Single file component script setup writing mode
<script setup>
import { ref } from 'vue'

const count = ref(0)
</script>

<template>
  <button @click="count++">{{ count }}</button>
</template>
// Normal script writing mode
<script>
import { ref } from 'vue'
export default {
setup(props) {
const count = ref(0)
// Expose to template
return {
count
}
}
}
</script>
<template>
<button @click="count++">{{ count }}</button>
</template>As can be seen from the above examples, script setup weakens the vue template programming experience and makes the code more concise. Developers only need to introduce the correct hooks and write the logic in the script.
All components of the project adopt this development mode. Compared with the ordinary < script > syntax, vue officially affirmed its advantages:
Less template content, more concise code.
Can declare props and throw events using pure Typescript.
Better runtime performance (its template will be compiled into rendering functions with the same scope without any intermediate agents).
Better IDE type inference performance (less effort for language servers to pull types away from code)
Finally, the author believes that Vue3 is a Vue hooks revolution in a way. Through the reference of compositionApi, the component writing method is more light and concise; Script setup just makes this experience more thorough, makes the writing method of single file components closer to functional programming, and seamlessly switches between react and Vue.
Typescript
In recent years, the front-end has become more and more vocal about TypeScript, and TypeScript has become a necessary skill for the front-end. TypeScript is a superset of JS types and supports features such as generics, types, namespaces and enumerations, which makes up for the shortcomings of JS in large-scale application development.
In the vue2 version, if you want to use typescript, you need to borrow Vue class component, Vue property decorator and other decorators to judge, and it is inconvenient to change to a specific code structure for Vue to identify.
In the era of Vue3, the framework has been perfectly compatible with typescript, and the configuration is simple, and the code intrusion is small, which brings great convenience to developers.
Vite
Vite It is a new front-end construction tool, which can significantly improve the front-end development experience. vite still has its unique advantages over webpack. Here is an article recommended Vite's good and bad For your reference.
Why choose vite to replace webpack in the project? Considering the community and individuals, there are several points: (don't start it specifically, the tweet has been analyzed in great detail)
- Vite is lighter and fast enough to build webpack is implemented using nodejs, while viite uses esbuild to pre build dependencies. Esbuild is written in Go and is not an order of magnitude faster than the packer pre build dependency written in JavaScript.
- Officially produced by Vue, it has good compatibility with Vue project
- The development momentum is rapid and the future can be expected
Of course, everything has two sides. So far, vite also has many defects. For example, the ecology is not mature without webpack, and the hidden unstable factors in the production environment are the problems it will face now.
However, with dreams and courage to move forward, without the birth of new forces, where does the technological development come from? In contrast, vite is more like a youth and moves forward step by step.
Pinia
Pinia is Vue JS lightweight state management library, recently very popular. It uses the new reaction system in Vue 3 to build an intuitive and fully typed state management library.
Compared with Vuex, Pinia has the following advantages:
Full TypeScript support: adding typescripts is easier than adding typescripts in Vuex
Extremely lightweight (about 1KB)
store actions are scheduled as regular function calls instead of using the dispatch method or MapAction helper functions, which is common in Vuex
Support multiple stores
Support Vue devtools, SSR and webpack code splitting
As for the advanced use of Pinia, the author has opened an additional article to introduce it. If you are interested, you can read it: Pinia advanced: elegant setup writing + encapsulation into your enterprise project
Engineering construction
To get back to business, we integrate the above technologies into one project. Projects generally used for enterprise level production should have the following capabilities:
- Strong fault tolerance and expansibility
- High cohesion of components, reducing coupling between modules
- Clear project execution bus, convenient to add slot logic
- Highly abstract global method
- Resource compression + performance optimization
Against these indicators, we will gradually build a preliminary engineering framework.
Note: programming knowledge such as vue3 syntax and pinia usage will not be described in detail here. You can search online or directly find it in the project.
1. Technology stack
Programming: vue3 x + Typescript
Build tool: Vite
Routing | state management: Vue router + Pinia
UI Element: nutui
2. Engineering structure
.
├── README.md
├── index.html           Project entrance
├── mock                 mock catalogue
├── package.json
├── public
├── src
│   ├── App.vue          Main application
│   ├── api              Request Center
│   ├── assets           Resource directory (picture less,css Etc.)
│   ├── components       Project components
│   ├── constants        constant
│   ├── env.d.ts         Global declaration
│   ├── main.ts          Main entrance
│   ├── pages            page directory
│   ├── router           Routing configuration
│   ├── types            ts type definition
│   ├── store            pinia State management
│   └── utils            Basic Toolkit
├── test                 test case
├── tsconfig.json        ts to configure
├── .eslintrc.js         eslint to configure
├── .prettierrc.json     prettier to configure
├── .gitignore           git Ignore configuration
└── vite.config.ts       vite to configure
Among them, src/utils places global methods for calling files in the whole project scope. Of course, the event bus of project initialization is also placed here, "which will be described in detail below". src/types and src/constants store the type definitions and constants of the project respectively, and divide the directory according to the page structure.
3. Project configuration
Build Vite + Vue project
# npm 6.x
npm init vite@latest my-vue-app --template vue

# npm 7 +, additional double horizontal lines are required:
npm init vite@latest my-vue-app -- --template vue

# yarn
yarn create vite my-vue-app --template vue

# pnpm
pnpm create vite my-vue-app -- --template vue
Then follow the prompts!
Vite configuration
import { defineConfig, ConfigEnv } from 'vite';
import vue from '@vitejs/plugin-vue';
import styleImport from 'vite-plugin-style-import';

import { viteMockServe } from 'vite-plugin-mock';

const path = require('path')

// https://vitejs.dev/config/
export default defineConfig(({ command }: ConfigEnv) => {
  return {
    base: './',
    plugins: [
      vue(),
      // mock
      viteMockServe({
        mockPath: 'mock', //mock file address
        localEnabled: !!process.env.USE_MOCK, // Development packaging switch
        prodEnabled: !!process.env.USE_CHUNK_MOCK, // Production packaging switch
        logger: false, //Show request log on console
        supportTs: true
      }),
      styleImport({
        libs: [
          // Nutui on demand loading configuration, see https://nutui.jd.com/#/start
          {
            libraryName: '@nutui/nutui',
            libraryNameChangeCase: 'pascalCase',
            resolveStyle: name => {
              return `@nutui/nutui/dist/packages/${name}/index.scss`;
            }
          }
        ]
      })
    ],
    resolve: {
      alias: [
        {
          find: '@',
          replacement: '/src'
        }
      ]
    },
    css: {
      // css preprocessor
      preprocessorOptions: {
        scss: {
          // Configure nutui global scss variable
          additionalData: `@import "@nutui/nutui/dist/styles/variables.scss";`
        },
        less: {
          charset: false,
          additionalData: '@import "./src/assets/less/common.less";'
        }
      }
    },
    build: {
      terserOptions: {
        compress: {
          drop_console: true
        }
      },
      outDir: 'dist', //Specify output path
      assetsDir: 'assets' //Specify the storage path for generating static resources
    }
  };
});
The project adds a mock mode for developers to simulate data requests without a server. It is globally configured into vite through the vite plugin mock plug-in. The mock interface returns and is added in the mock directory. The mock mode startup command: npm run dev:mock.
FYI: the vite plugin mock plug-in provides devtools network interception capability under the vite scaffold. If you want to realize more mock scenarios, please use mockjs "the project has been installed and is directly available".
Coding specification
Event bus
In order to standardize the initialization process of the project and facilitate the insertion of user-defined logic in the process, in main The TS entry calls the initialize(app) method. The initialize code is as follows:
/**
 * Project initialization bus
 */

// Initialize nutui style
import '@nutui/nutui/dist/style.css';

import { initRem } from '@/utils/calcRem';
import nutUiList from '@/utils/nutuiImport';
import router from '@/router';
import { createPinia } from 'pinia';
import { registerStore } from '@/store';

export const initialize = async (app: any) => {
  // Initialize rem
  initRem(window, document.documentElement);
  window.calcRem(1080);
  console.trace('rem Initialization complete...');

  // Load nutui components on demand
  Object.values(nutUiList).forEach(co => {
    app.use(co);
  });
  console.trace('nutui Component loading complete...');

  // Mount routing
  app.use(router);
  console.trace('router Mounted...');

  // Register pinia state management library
  app.use(createPinia());
  registerStore();
  console.trace('pinia State Library registered...');
};
In the method, the rem adaptive layout initialization, UI component on-demand loading, routing, State Library initialization and other operations of the page are completed respectively. In addition, initialize supports asynchronous logic injection. If necessary, you can add it yourself and return it with Promise package.
The execution time of ps: initialize method is before the main App is mounted. Do not put the dom operation logic here
4. Request Center
Src / API contains asynchronous requests for each page. It also divides the directory through the page structure. src/api/index.ts is its entry file, which is used to aggregate each request module. The code is as follows:
import { Request } from './request';
import box from './box';
import user from './user';

// Initialize axios
Request.init();

export default {
  box,
  user
  // ... Other request modules
};
The Request here is the class object of the Request center and returns an axios instance, Src / API / Request The TS code is as follows:
import axios, { AxiosInstance, AxiosError, AxiosRequestConfig } from 'axios';
import {
  IRequestParams,
  IRequestResponse,
  TBackData
} from '@/types/global/request';
import { Toast } from '@nutui/nutui';

interface MyAxiosInstance extends AxiosInstance {
  (config: AxiosRequestConfig): Promise<any>;
  (url: string, config?: AxiosRequestConfig): Promise<any>;
}

export class Request {
  public static axiosInstance: MyAxiosInstance;

  public static init() {
    // Create an axios instance
    this.axiosInstance = axios.create({
      baseURL: '/api',
      timeout: 10000
    });
    // Initialize interceptor
    this.initInterceptors();
  }

  // Initialize interceptor
  public static initInterceptors() {
    // Set post request header
    this.axiosInstance.defaults.headers.post['Content-Type'] =
      'application/x-www-form-urlencoded';
    /**
     * request interceptor
     * Before each request, if there is a token, the token will be carried in the request header
     */
    this.axiosInstance.interceptors.request.use(
      (config: IRequestParams) => {
        const token = localStorage.getItem('ACCESS_TOKEN');
        if (token) {
          config.headers.Authorization = 'Bearer ' + token;
        }
        return config;
      },
      (error: any) => {
        Toast.fail(error);
      }
    );

    // Response interceptor
    this.axiosInstance.interceptors.response.use(
      // Request succeeded
      (response: IRequestResponse): TBackData => {
        const {
          data: { code, message, data }
        } = response;
        if (response.status !== 200 || code !== 0) {
          Request.errorHandle(response, message);
        }
        return data;
      },
      // request was aborted
      (error: AxiosError): Promise<any> => {
        const { response } = error;
        if (response) {
          // The request has been issued, but it is not in the range of 2xx
          Request.errorHandle(response);
        } else {
          Toast.fail('Abnormal network connection,Please try again later!');
        }
        return Promise.reject(response?.data);
      }
    );
  }

  /**
   * http Handshake error
   * @param res Response callback, which performs different operations according to different responses
   * @param message
   */
  private static errorHandle(res: IRequestResponse, message?: string) {
    // Status code judgment
    switch (res.status) {
      case 401:
        break;
      case 403:
        break;
      case 404:
        Toast.fail('The requested resource does not exist');
        break;
      default:
        // Error information judgment
        message && Toast.fail(message);
    }
  }
}
Several things have been done:
- Configure the axios instance, set the request and corresponding interception operation in the interceptor, and regulate the retcode and message returned by the server;
- Rewrite the ts type of AxiosInstance (from AxiosPromise → promise < any >), so that the caller can correctly judge the type of returned data;
- Set an initialization function init() to generate an instance of axios for the project to call;
- Configure errorHandle handle to handle errors;
Of course, in step 2, you can add additional request interception, such as RSA encryption, local cache strategy, etc. when there is too much logic, it is recommended to introduce it through the function.
At this point, we can happily use axios to request data.
// api module → request Center
import { Request } from './request';

userInfo: (options?: IRequestParams): Promise<TUser> =>
  Request.axiosInstance({
    url: '/userInfo',
    method: 'post',
    desc: 'Get user information',
    isJSON: true,
    ...options
  })


// Business module → api module
import request from '@/api/index';

request.user
  .userInfo({
    data: {
      token
    }
  })
  .then(res => {
    // do something...
  });
5. SSR
To be added
performance testing
Development environment startup
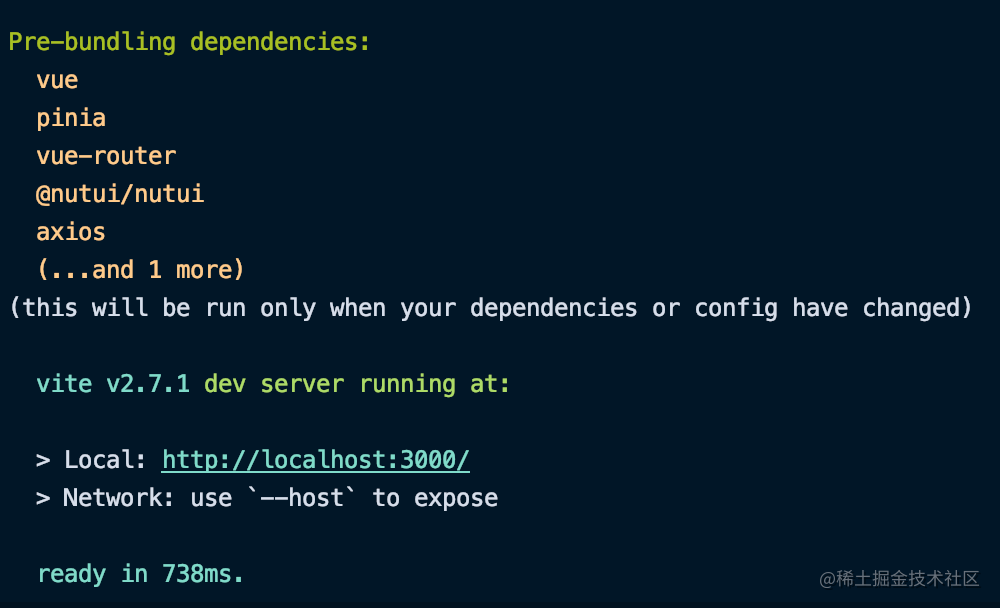
As can be seen from the figure, Vite injected six dependencies into the main application after pre bundling during cold start. The whole project took only 738ms to start, and the performance was quite fast. I can't help but sigh here. I really have a set of engineering research 😆.
In addition, the project also uses vite plugin style import plug-in to introduce the style of nutui view framework on demand, which also plays a positive role in resource saving.
Resource package after construction
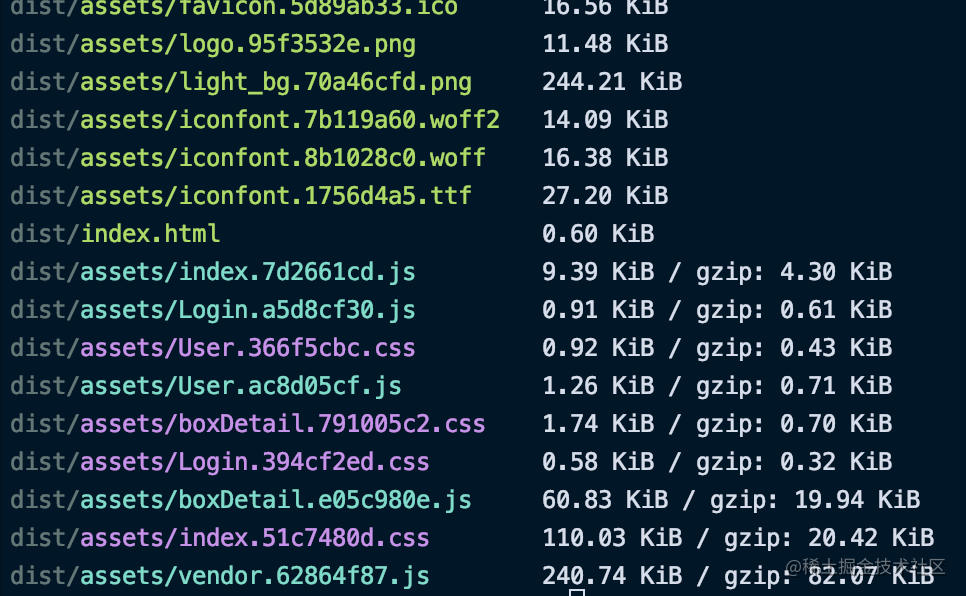
The subcontracting strategy is to cut according to the routing page and separate js and css separately.
Lighthouse test
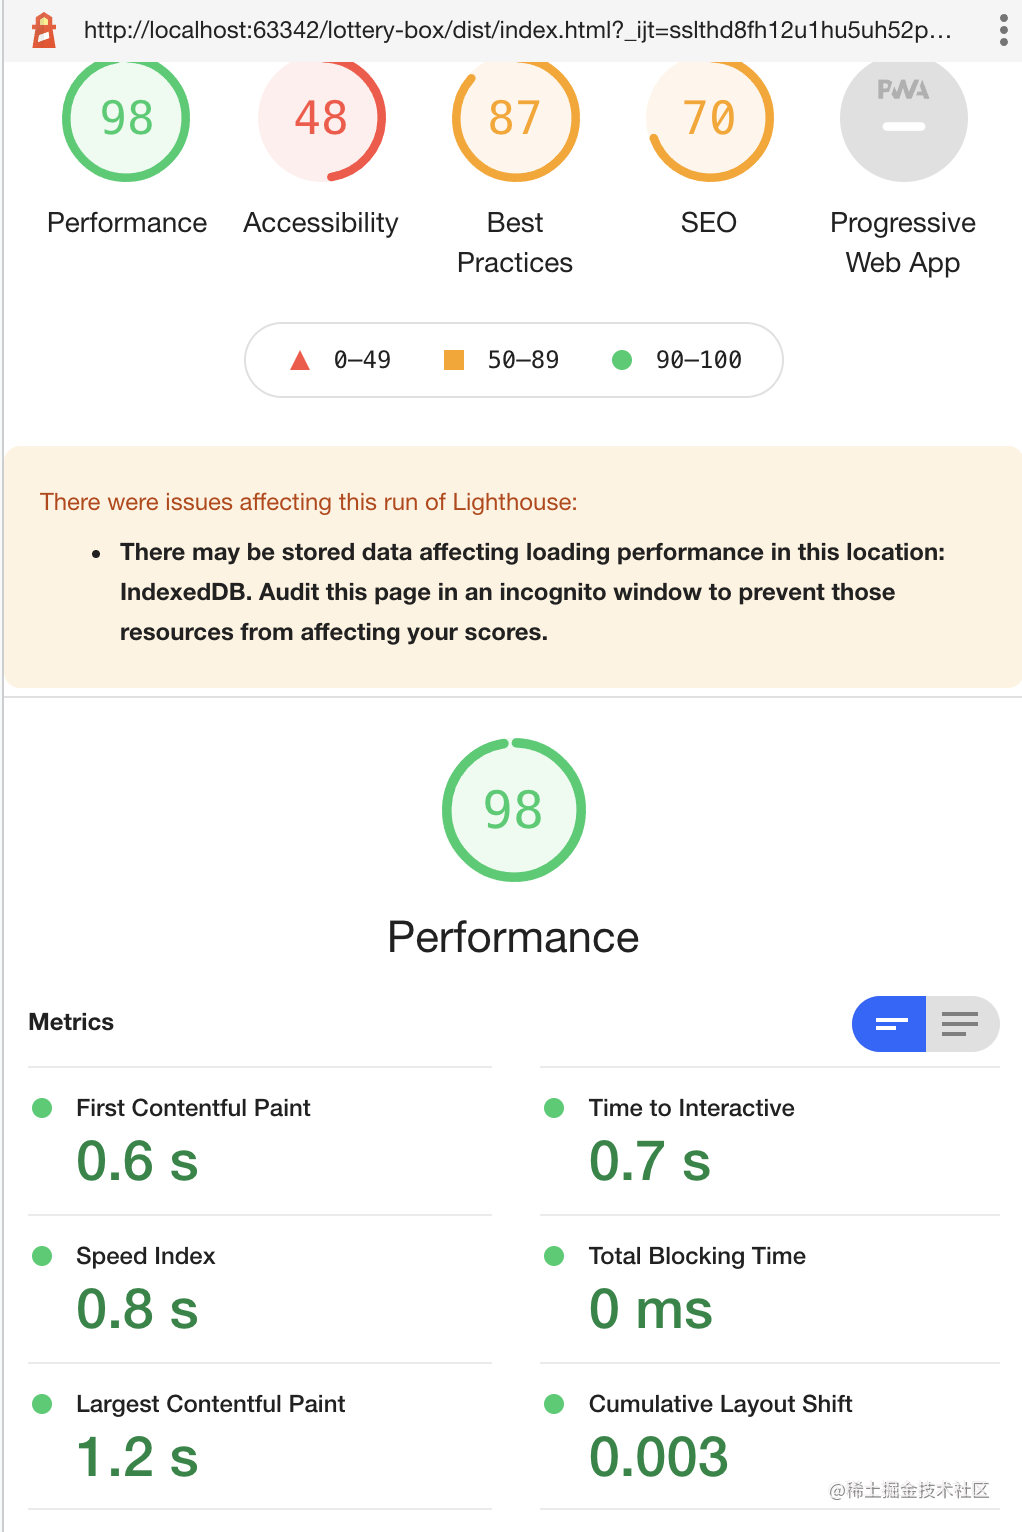
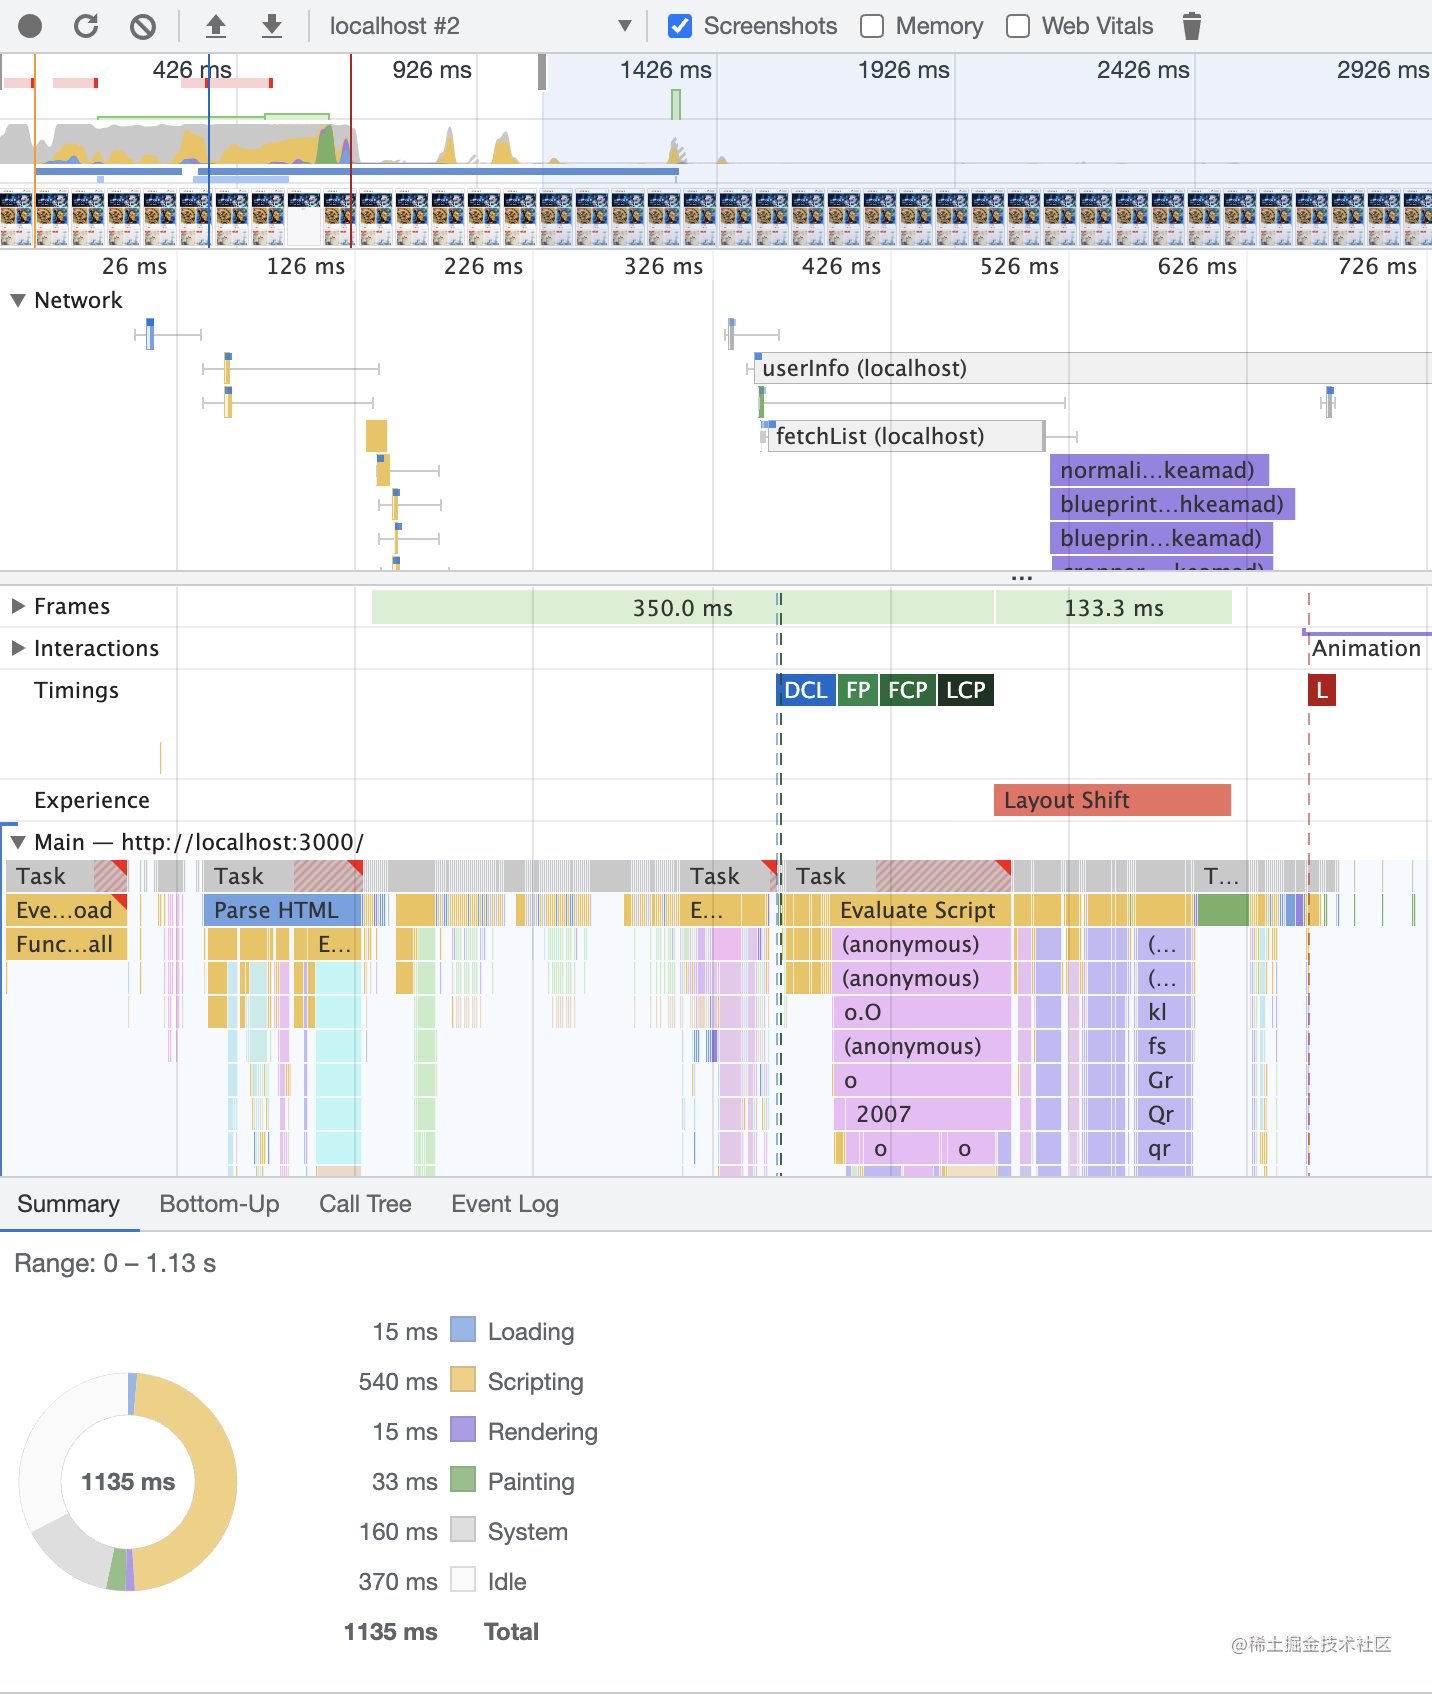
The above is a local test. The first screen is about 1000ms~1500ms, and the pressure is mainly from the vendor js loading and first screen picture resources pulling (first screen picture resources come from the network). In fact, after the module is split and loaded, the js package on the home page is compressed to 4.3kb through gzip.
Of course, the real scenario is that the project will not be able to load local resources after deploying ECs, but the optimization can be accelerated through CDN, and the effect is also remarkable.
Performance
Reference articles
Core differences between Vite and Webpack
Write at the end
Thank you for reading and welcome correction.