1: Tool preparation
vscode is recommended for tools:
- Download address:
================Official website address ================
================Baidu SkyDrive ================ - Use the default extension program to download and box to download the required development tools

Here are the extension programs subscribed by the author: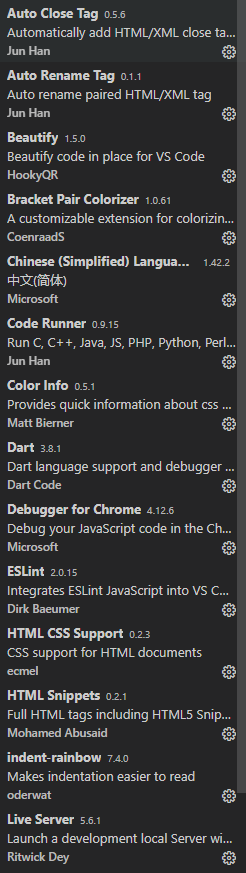
2: Understanding HTML
① HTML basic syntax:
An HTML document consists of a series of elements. HTML elements refer to all the code from the start tag to the end tag
For the convenience of understanding, HTML tags are roughly divided into basic tags, format tags, text tags, image tags, table tags and frame tags
The general label format is as follows
< tagnameattribute1 = valueattribute2 = valueattribute3 = valuecontent < / tagName >
② Basic structure of HTML document
The main structure of HTML document can be divided into three parts: Web page area , header area , content area.
1. Used to represent HTML documents and identify HTML documents
2. It forms the beginning of HTML, which can be used to write the title, keywords and content description of the web page, and can increase the priority of the web page to be displayed, generally written by professionals
3. The main part of the HTML document is written here, including many tags
③ HTML common tags
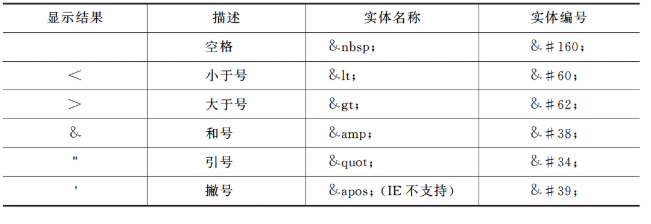
1. < p > < / P > paragraph label, in which the text is written directly, each paragraph will start with another line. There are two points to be noted: first, it will only keep the space, and the continuous space will be replaced with a space, so will the line breaking. The second point is that if you can't write "< or" > "in the text, the browser will mistakenly think it's an expression. If you want to write, you must use character entities. The entity names of some symbols are given below.
2. <! --- > annotation label, no difference from other languages
3. < br / > newline label, similar to "/ n"
4. < div > < div > block, its function is to block, each block will play another line, a pair of div tags can place text, pictures or other elements in the middle, div is usually used as the container of styles
5. < H1 > < / H1 > title label, used to display the title, with h1~h6 labels, more than h6 is h6
6. < span > < span > interval. The span label is used to divide the interval. It is usually used as a container of styles. By default, it will not be independent in rows, and multiple intervals will be displayed continuously on one row
7. List, which is divided into unordered list, ordered list and definition list.
ul means no list is needed. Its function is to display a thick dot for each list item
ol represents an ordered list. Its purpose is to display the sequence number of each list item
Items in the list are marked with < li > < li > when defined with < UL > < UL > or < ol > < ol >
Code:
<!DOCTYPE html>
<html lang="en">
<head>
    <meta charset="UTF-8">
    <meta name="viewport" content="width=device-width, initial-scale=1.0">
    <title>Document</title>
</head>
<body>
    <ul>
        <li>This is an unordered list</li>
        <li>Here is a sequence table</li>
        <ol>
            <li>first line</li>
            <li>Second elements</li>
            <li>Third elements</li>
        </ol>
    </ul>
</body>
</html>
Effect: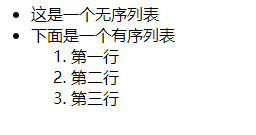
< DL > < DL > represents a list of definitions. In the < DL > < DL > tag, you can use < DT > to represent the item < DD > to represent the description
For example:
<!DOCTYPE html>
<html>
	<head>
		<meta charset="utf-8">
		<title></title>
	</head>
	<body>
		<dl>
			<dt>Project representation</dt>
			<dd>Presentation description</dd>
		</dl>
	</body>
</html>
Effect:
8. < img >. One can use jpg, png, gif. The png image can have a good effect, but the image takes up a lot of space. These three kinds of photos depend on the situation
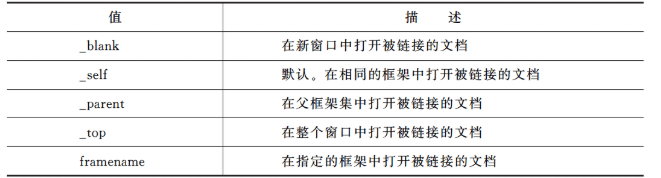
9. < a > < a > hyperlink, click the link to adjust to the predetermined website, file or picture, and the middle of the tag can be picture text or page element. The attribute href of the tag indicates that the link destination includes a relative URL and an absolute URL. The target attribute is described as follows:
④ : table element
Table is a very important function of HTML. It can design a variety of tables by using a variety of attributes to make the page more beautiful
The < Table > < Table > label divides the boundaries of the table. The table tag has four properties
align: alignment method. Values can be left, center, or right.
bgcolor: background color, value can be 16 base, rgb color or color name
Border: border. The default value is 0. The border thickness can be increased by increasing the value
Width: width in px or% units
< tr > < tr > is a row label, a pair of row labels define a row in the table, < td > < td > is a cell label, a pair of cell labels define a cell, < th > < th > is a header label, a pair of header labels replace < td > < td > as a header cell, the default text in the header is bold and aligned in the middle
In the < td > < td > and < th > < th > tags, there are colspan cross column and rowspan cross row attributes. The specific usage is as follows
Code:
<!DOCTYPE html>
<html>
	<head>
		<meta charset="utf-8" />
		<title></title>
	</head>
	<body>
		<table border="1">
			<tr>
				<td rowspan="2" width="100" height="200" align="center">A</td>
				<td colspan="2" width="200" height="100" align="center">B</td>
			</tr>
			<tr>
				<td width="100" height="100" align="center">E</td>
				<td rowspan="2" width="100" height="200" align="center">C</td>
			</tr>
			<tr>
				<td colspan="2" width="200" height="100" align="center">D</td>
			</tr>
		</table>


	</body>
</html>
Effect:
⑤ : form element
< form > < form > is the form label, and other form elements should be placed in the middle of this pair of labels.
< input > is the text box label. The input type is defined by the type attribute type. The name attribute is used to find the data in the text box
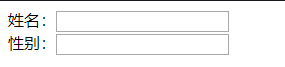
Text box: type="text"
<form>
			Name: < input type = "text" / > < br / >
			Gender: < input type = "text" / >
</form>
Password box: type="password"
<form>
			//Password: < input type="password" />
</form>

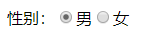
Radio button: type="radio"
<form>
			//Gender: < input type="radio" />male<input type="radio" />female
</form>
Check box type = "check box"
		<table border="1">
			<tr>
				<td width="200" height="200">
				<form>
					Please choose your favorite fruit:<br /><br />
					<input type="checkbox" name="favoritefruit" value="1"/>Apple<br /><br />
					<input type="checkbox" name="favoritefruit" value="1"/>Orange<br /><br />
					<input type="checkbox" name="favoritefruit" value="1"/>Mango<br /><br />
				</form>
				</td>
			</tr>
		</table>

Drop-down list
Drop-down list
		<form>
			<select>
				<option value="0">==Choice==</option>
				<option value="1">Specialty</option>
				<option value="1">Undergraduate</option>
				<option value="1">master</option>
				<option value="1">Doctor and above</option>
			</select>
		</form>

Group drop-down list
			<select>
				<optgroup label="Coffee">
					<option value="a">Cappuccino</option>
					<option value="b">Mocha</option>
				</optgroup>
				<optgroup label="tea">
					<option value="c">Black tea</option>\
					<option value="d">Green Tea</option>
				</optgroup>
			</select>

Multiple drop-down list
			<select size="4" multiple="multiple">
				<option value="1">fruit juice</option>
				<option value="2">milk</option>
				<option value="3">tea</option>
				<option value="4">Coffee</option>
			</select>

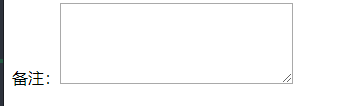
Text fields for entering large amounts of text
		<form>
			//Note: < textarea name="comment" rows="5" cols="30"></textarea>
		</form>
There are three kinds of buttons: submit, reset and common buttons
Submission:
When the user clicks the submit button, the content of the form will be transferred to another file. The action attribute action of the form defines the file name of the destination file. The file defined by the action attribute usually processes the received input data.
		<form name="text" action="index2.html" method="get">
			message:<input type="text" name="message"/>
			<input type="submit" value="Submission" />
		</form>
Reset and normal buttons:
		<form>
			<input type="reset" value="Reset"/>
			<input type="button" value="Button" />
		</form>
The function of hidden field is to require the form to complete some specific operations, which do not need to be seen by users. A typical application is to transfer parameter values between pages. You can use hidden fields when you need to pass some parameter values without the user seeing them
		<form>
			<input type="hidden" name="password" value="1100"/>
		</form>

