preface
Let's take a look at the system architecture of Android:

The full name of HAL is Hardware Abstract Layer, that is, Hardware Abstract Layer. It shields the implementation details of hardware downward and provides abstract interface upward. HAL is the direct interface between the underlying hardware and the upper framework. The framework layer can operate hardware devices through HAL.
Why HAL?
Many early computer systems did not have any form of hardware abstraction, which means that anyone who writes programs for the system must know how each hardware device communicates with the rest of the system. This is a great challenge for software developers, because they must know how each hardware device in the system works to ensure software compatibility. A program that uses hardware abstraction instead of directly communicating with a hardware device. It conveys the program to the operating system what the device should do, and then the operating system will generate hardware related instructions to the device. This means that programmers do not need to know how a particular device works to make their programs compatible with the device.
We know that Android is developed based on Linux. The traditional Linux hardware operation is basically in the kernel, while Android divides the hardware operation into two parts, HAL and kernel driver. HAL is implemented in user space and driver in kernel space. This is because the code in the Linux kernel needs to be open source (following the GUN License). If the operation of hardware is placed in the kernel, it will damage the interests of hardware manufacturers, because it is a trade secret of other manufacturers, and now the HAL layer is located in the user space (this part of the code follows the Apache License without opening the source code), hardware manufacturers can put their core algorithms on the HAL layer to protect their own interests, so that the Android system can be supported by more manufacturers.
HAL under Windows is located at the bottom of the operating system. It directly operates physical hardware devices, uses abstract interfaces to isolate the specific implementation of different hardware, and provides a unified interface for the upper operating system and device drivers to abstract the hardware. HAL under Linux is different from Windows. HAL layer is not located at the bottom of the operating system and directly operates the hardware, but above the operating system kernel layer and driver. It is a service program running in user space.
Android source code compilation
Reference article:
- Android system development series (1): Android 12 source code download, compilation and brushing;
- [original] source code compilation (1) -- detailed explanation of Android 6.0 source code compilation ;
- Download android 6.0 source code from Google's official website, compile and brush it into nexus 6p mobile phone.
HAL architecture
The source code directory of HAL layer is mainly as follows:
1)Generally, except for the following three, they are related to hardware manufacturers hal catalog:
/hardware/libhardware_legacy/   The old architecture adopts the way of link library module
/hardware/libhardware         New architecture, adjusted to HAL stub
/hardware/ril              Radio abstraction layer

2)libhardware The structure of the directory is as follows:
/hardware/libhardware/hardware.c  Compile into libhardware.s put/system/lib

3)/hardware/libhardware/include/hardware The directory contains the following header files:
hardware.h         General hardware module header file
copybit.h          copybit Module header file
gralloc.h          gralloc Module header file
lights.h           Backlight module header file
overlay.h          overlay Module header file
qemud.h            qemud Module header file
sensors.h          Sensor module header file

4)/hardware/libhardware/modules  Many hardware modules are defined in the directory:
hardware/msm7k
/hardware/qcom
/hardware/ti
/device/Samsung
/device/moto
 These hardware modules are compiled into xxx.xxx.so,Target location is/system/lib/hw catalogue
HAL new and old architecture
Located in libhardware_ The "old HAL architecture" under legacy directory and the "new HAL architecture" under libhardware directory are shown in the following figure:

1. Legacy Module architecture
The Android user application or framework layer code is implemented by Java. Java runs in the Dalvik virtual machine. There is no way to directly access the underlying hardware. It can only be implemented by calling the so local library code. There are operation codes for the underlying hardware in the so local library code. That is to say, application level or frame level Java code, through JNI technology call C or C++ written so library code, in the so library code call the underlying driver, to achieve the upper application of the hardware request operation. The so library for hardware operation is module.
Old libhardware_legacy architecture realizes the access logic processing of the driver in the so dynamic link library. The application or framework directly calls the function through the so dynamic link library to access the hardware driver at Runtime (JNI part).
Although this design architecture meets the needs of Java applications to access hardware, it makes the coupling between the upper and lower levels of our code too high. The user program or framework code must load the module library. If the underlying hardware changes, the moudle needs to be recompiled, and the upper layer also needs to make corresponding changes; At the same time, if multiple applications access the hardware at the same time and load modules, the same module will be mapped multiple times by multiple processes, resulting in code reentry. Therefore, Google has proposed a new HAL architecture.
2. New HAL Stub architecture
The new architecture uses the mode of Module Stub, which means stub or pile. In fact, it simply means that an object represents. It can be seen from the above architecture that the upper application layer or framework layer code loads the so library code, which we call module. The stub of each hardware object is registered in the HAL layer. When the upper layer needs to access the hardware, it will find it from the currently registered hardware object stub, After finding it, the stub will provide the operations interface of the hardware object to the upper module. The operation interface is saved in the module, and the upper application or framework accesses the hardware through the module operation interface.
The libhardware architecture adopts the Proxy proxy mode, although the Stub is still in * So exists, but HAL has set * The concrete implementation of is hidden. The Stub provides the operations method to HAL. The Runtime obtains its operations method through the so provided by the Stub and informs the Runtime of the callback interface callback method. In this way, both Runtime and Stub have methods called by the other party. An application's request calls the Stub's operations method through Runtime, and the Stub responds to the operations method and returns by calling the callback method of Runtime. As shown below, take Led as an example:

The Led App is an Android application. The Java code in the Led App cannot operate the hardware. The hardware operation is handed over to the local module library_ runtime. So, it finds the Led Stub from the current system. After finding it, the Led Stub returns the hardware driven operation to the module. When the Led App operates the hardware, it indirectly accesses the underlying hardware through the operation interface saved in the module.
3. Comparison between Module architecture and Stub architecture
In the module architecture, the local code is implemented by the so library. The upper layer directly maps the so library into the process space. There will be problems of code reentry and multiple device opening. Although the new Stub framework also needs to load the module library, this module does not contain the function of operating the underlying hardware driver. It only stores the operation interface provided by the underlying Stub, which plays the role of "interface provider". When the Stub is used for the first time, it is loaded into memory. When it is reused later, it only returns the hardware object operation interface. There will be no problem that the device is opened multiple times. Moreover, since only the function pointer is returned during multi process access, the code has no reentry problem.
4. The application calls the complete process of HAL layer
The HAL of Android needs to be implemented through JNI(Java Native Interface). JNI is simply a dynamic link library that java programs can call C/C + +. In this way, HAL can be written in C/C + + language with higher efficiency. Android APP can be called directly so (the first Module architecture method above) can also be called through app - > app_manager - > Service (java) - > Service (JNI) - > HAL (the second Stub architecture method above).
The basic framework of the second method is as follows:

Continue to take the calling process of LED as an example:
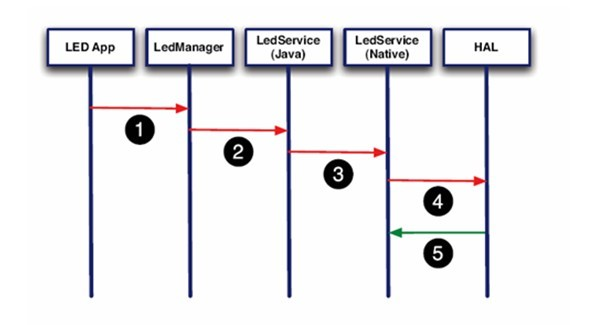
Describe the call process as follows:
- JNI - > general hardware module - > hardware module - > kernel driver interface;
- Specifically: JNI - > libhardware so->xxx. xxx. so->kernel;
- To be more specific: JNI calls hardware in android frameworks HW defined in C_ get_ Module function to get the hardware module, then call the hardware module in the method, the hardware module directly calls the kernel interface to complete the related functions (never mind cannot read, it will not explain, explain below).
Structure of HAL
Generally speaking, HAL moudle needs to involve three key structures:
struct hw_module_t;           //Abstract hardware module structure
struct hw_module_methods_t;   //Hardware module method structure
struct hw_device_t;           //Abstract hardware device structure
These three structures are defined in hardware H, specific code path:
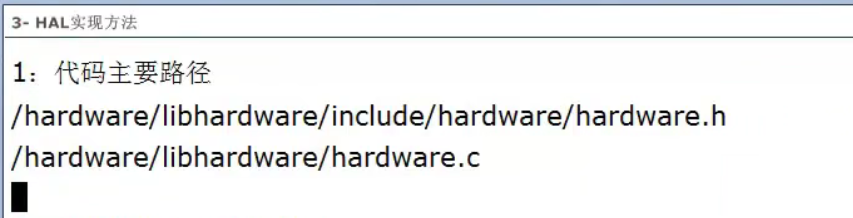
As shown in the figure below:
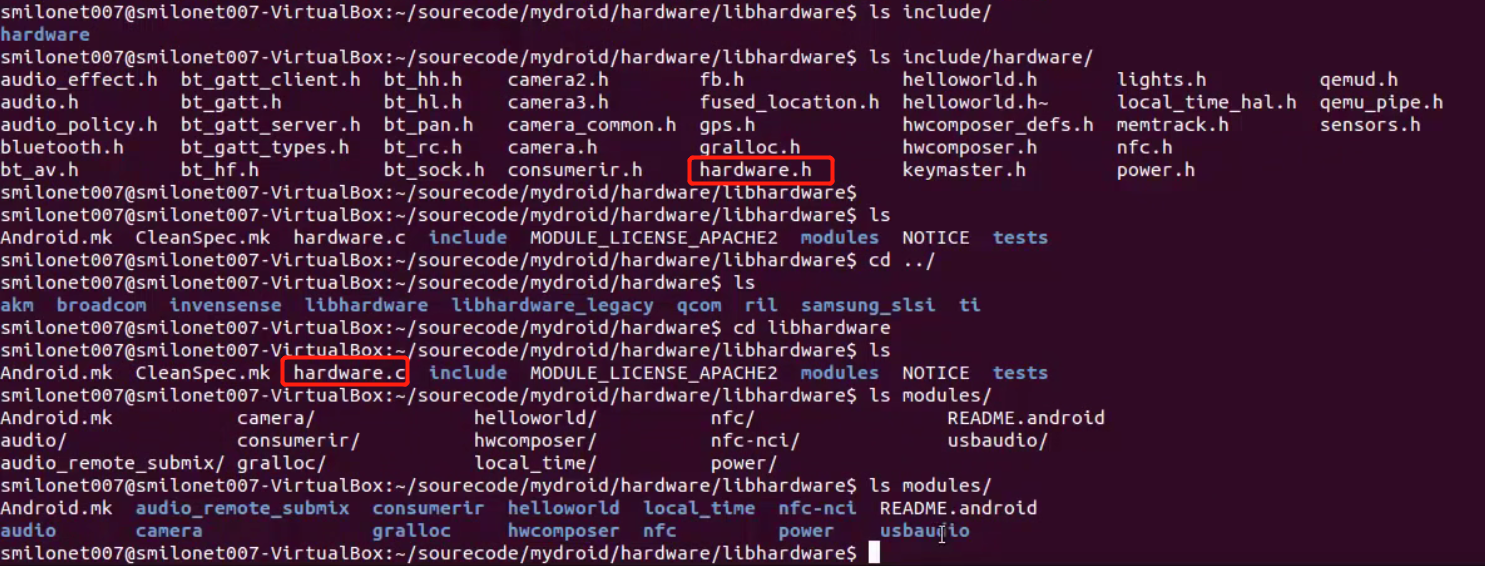
The header file hardware The code of H is as follows:
/**
* Every hardware module must have a data structure named HAL_MODULE_INFO_SYM
* and the fields of this data structure must begin with hw_module_t
* followed by module specific information.
*/
typedef struct hw_module_t
{
    uint32_t tag;
    uint16_t version_major;
    uint16_t version_minor;
    cost char* id;
    const char* author;
    struct hw_module_methods_t* methods;
    void* dso;
    uint32_t reserved[10];
}hw_module_t;

/**
* Create a function list
*/
typedef struct hw_module_methods_t
{
    /** Open a specific device */
    int (*open)(const struct hw_module_t* module, const char* id,
                struct hw_device_t** device);
} hw_module_methods_t;

/**
* Every device data structure must begin with hw_device_t
* followed by module specific public methods and attributes.
*/
typedef struct hw_device_t
{
    /** tag must be initialized to HARDWARE_DEVICE_TAG */
    uint32_t tag;
    uint32_t version;
    struct hw_module_t* module;
    uint32_t reserved[12];
    int (*close)(struct hw_device_t* device)
}hw_device_t;
The above key variables and structures of HAL module are summarized as follows:

Android HAL abstracts various hardware devices into hardware modules, and HAL uses hw_module_t structure describes a class of hardware abstract modules. Each hardware abstraction module corresponds to a dynamic link library, which is generally provided by the manufacturer. This dynamic link library must respect the naming specification of HAL before it can be loaded by HAL, as we will see later. Each type of hardware abstraction module contains multiple independent hardware devices. HAL uses hw_device_t structure describes the independent hardware devices in the hardware module. Let's analyze the three structures of HAL moudle.
1. First look at the generic hardware module structure defined in the header file hw_module_t. It declares the interface function called by JNI hw_get_module. The specific definitions are as follows:
/**
* Every hardware module must have a data structure named HAL_MODULE_INFO_SYM
 * and the fields of this data structure must begin with hw_module_t
 * followed by module specific information.
 */
typedef struct hw_module_t {
  /** tag must be initialized to HARDWARE_MODULE_TAG */
  uint32_t tag;
  /** major version number for the module */
  uint16_t version_major;
  /** minor version number of the module */
  uint16_t version_minor;
  /** Identifier of module */
  const char *id;
  /** Name of this module */
  const char *name;
  /** Author/owner/implementor of the module */
  const char *author;
  /** Modules methods */
  struct hw_module_methods_t* methods; //Method of hardware module
  /** module's dso */
  void* dso;
  /** padding to 128 bytes, reserved for future use */
  uint32_t reserved[32-7];
} hw_module_t;
As noted in the note, all HAL modules should have a HAL_ MODULE_ INFO_ SYM named structure, and this structure should be named HW_ module_ T is the first member (it can be understood here as an inheritance relationship, which is equivalent to the HAL_MODULE_INFO_SYM structure of the hardware module. It inherits hw_module_t, but there is no concept of inheritance in C language, which is indirectly realized by including it in the structure). Let's take lights and sensor as an example:
struct sensors_module_t {
    struct hw_module_t common;
    int (*get_sensors_list)(struct sensors_module_t* module,
            struct sensor_t const** list);
};

/*
 * The lights Module
 */
struct light_module_t HAL_MODULE_INFO_SYM = {
    .common: {
        tag: HARDWARE_MODULE_TAG,
        version_major: 1,
        version_minor: 0,
        id: LIGHTS_HARDWARE_MODULE_ID,
        name: "Lights module",
        author: "Rockchip",
        methods: &light_module_methods,
    }
};

const struct sensors_module_t HAL_MODULE_INFO_SYM = {
    .common = {
        .tag = HARDWARE_MODULE_TAG,
        .version_major = 1,
        .version_minor = 0,
        .id = SENSORS_HARDWARE_MODULE_ID,
        .name = "Stingray SENSORS Module",
        .author = "Motorola",
        .methods = &sensors_module_methods,
    },
    .get_sensors_list = sensors__get_sensors_list
};
2. In HW_ module_ The hardware module method structure HW is more important in t_ module_ methods_ T is defined as follows:
typedef struct hw_module_methods_t {
    /** Open a specific device */
    int (*open)(const struct hw_module_t* module, const char* id,
            struct hw_device_t** device);
} hw_module_methods_t;
This method has only one function pointer open. This method defines HAL_MODULE_INFO_SYM is initialized. It can be inferred from the parameters that open is used to open the hardware module and obtain the hardware devices in the module. Since a hardware abstraction module may contain multiple devices, it is necessary to obtain the corresponding hardware device HW according to the incoming device id_ device_ t. So the device here represents an open hardware device.
3,hw_ module_ methods_ The device structure parameter called hw_ in t device_ t. As mentioned earlier, HAL uses hw_device_t structure describes the independent hardware equipment in the hardware module, which is defined as follows:
/**
 * Every device data structure must begin with hw_device_t
 * followed by module specific public methods and attributes.
 */
typedef struct hw_device_t
    /** tag must be initialized to HARDWARE_DEVICE_TAG */
    uint32_t tag;
    /** version number for hw_device_t */
    uint32_t version;
    /** reference to the module this device belongs to */
    struct hw_module_t* module;
    /** padding reserved for future use */
    uint32_t reserved[12];
    /** Close this device */
    int (*close)(struct hw_device_t* device);
} hw_device_t;
HAL stipulates that each hardware device must define a hardware device description structure, which must be expressed in hw_device_t as the first member variable, followed by device related public functions and properties.
- tag: initialize to constant HARDWARE_DEVICE_TAG;
- Module: indicates which hardware abstract module the hardware device belongs to;
- Close: function pointer used to close the hardware device.
Let's also look at the following practical examples:
struct light_device_t {
    struct hw_device_t common;
    int (*set_light)(struct light_device_t* dev,
            struct light_state_t const* state);
};

/**
 * Every device data structure must begin with hw_device_t
 * followed by module specific public methods and attributes.
 */
struct sensors_poll_device_t {
    struct hw_device_t common;
    int (*activate)(struct sensors_poll_device_t *dev,
            int handle, int enabled);

    int (*setDelay)(struct sensors_poll_device_t *dev,
            int handle, int64_t ns);

    int (*poll)(struct sensors_poll_device_t *dev,
            sensors_event_t* data, int count);
};
At this point, the analysis of the three core data structures of HAL is completed. Hardware manufacturers must follow HAL specification and naming to realize abstract hardware module structure hw_module_t and abstract hardware device structure hw_device_t. And in the hardware module method structure hw_module_methods_t provides an open function to get hw_device_t. Let's take a look at how HAL obtains hardware modules and hardware devices, and how it loads and parses the corresponding dynamic shared library.
Module implementation method
The HAL framework of Android uses the general "321 architecture", that is, three structures, two constants and one function. All hardware abstraction modules follow 321 architecture and expand their own functions on this basis. The three structures have been analyzed above. Next, let's look at the next two constants (HAL_MODULE_INFO_SYM value is also defined in hardware.h above):
/**
* Name of the hal_module_info
*/
#define HAL_MODULE_INFO_SYM HMI
/**
* Name of the hal_module_info as a string
*/
#define HAL_MODULE_INFO_SYM_AS_STR "HMI"
Finally, look at "a function": in hardware C file has a key public API - hw_get_module, whose function is based on module_id to find and register the corresponding hardware object, and then load the so file of the corresponding HAL layer driver module:

First give a diagram to summarize the hardware C. the process of obtaining Module and Device structure objects of HAL as a whole defined in the file:

The following takes the lights module as an example for analysis. Its source file location: (Android 5.1 source code):
/frameworks/base/services/core/java/com/android/server/lights/
/frameworks/base/services/core/jni/com_android_server_lights_LightsService.cpp
/hardware/libhardware/include/hardware/lights.h
General process of accessing equipment:
app--->frameworks--->hardware--->kernel drive
(1) frameworks obtains the module corresponding to HAL through jni calling hw_get_module(). In lights The ID of the lights module is defined in H:
#define LIGHTS_HARDWARE_MODULE_ID "lights"
(2) calling hw_ge_module() in the i nit_native method of source code frameworks/base/services/core/jni/com_android_server_LightsService.cpp in version 5.1 of Android, the code is as follows:
static jint init_native(JNIEnv *env, jobject clazz)
{
    int err;
    hw_module_t* module;
    Devices* devices;
    devices = (Devices*)malloc(sizeof(Devices));
    err = hw_get_module(LIGHTS_HARDWARE_MODULE_ID, (hw_module_t const**)&module);
    if (err == 0) {
        devices->lights[LIGHT_INDEX_BACKLIGHT]
                = get_device(module, LIGHT_ID_BACKLIGHT);
    //.................................................
}
(3) The hw_get_module function known above is implemented in hardware.c:
int hw_get_module(const char *id, const struct hw_module_t **module)
{
   return hw_get_module_by_class(id, NULL, module);
}
(4) Let's see how hw_get_module_by_class is implemented:
/** Base path of the hal modules */
#define HAL_LIBRARY_PATH1 "/system/lib/hw"
#define HAL_LIBRARY_PATH2 "/vendor/lib/hw"

/**
 * There are a set of variant filename for modules. The form of the filename
 * is "<MODULE_ID>.variant.so" so for the led module the Dream variants
 * of base "ro.product.board", "ro.board.platform" and "ro.arch" would be:
 *
 * led.trout.so
 * led.msm7k.so
 * led.ARMV6.so
 * led.default.so
 */

static const char *variant_keys[] = {
    "ro.hardware",  /* This goes first so that it can pick up a different
                       file on the emulator. */
    "ro.product.board",
    "ro.board.platform",
    "ro.arch"
};

static const int HAL_VARIANT_KEYS_COUNT =
    (sizeof(variant_keys)/sizeof(variant_keys[0]));

int hw_get_module_by_class(const char *class_id, const char *inst,
                           const struct hw_module_t **module)
{
    int i = 0;
    char prop[PATH_MAX] = {0};
    char path[PATH_MAX] = {0};
    char name[PATH_MAX] = {0};
    char prop_name[PATH_MAX] = {0};

    //Generate module name based on id, where inst is NULL
    if (inst)
        snprintf(name, PATH_MAX, "%s.%s", class_id, inst);
    else
        strlcpy(name, class_id, PATH_MAX);

    /*
     * Here we rely on the fact that calling dlopen multiple times on
     * the same .so will simply increment a refcount (and not load
     * a new copy of the library).
     * We also assume that dlopen() is thread-safe.
     */

    /* First try a property specific to the class and possibly instance */
    //First, query the specific property name to get the variant value
    snprintf(prop_name, sizeof(prop_name), "ro.hardware.%s", name);
    if (property_get(prop_name, prop, NULL) > 0) {
        //Check whether the target module shared library exists
        if (hw_module_exists(path, sizeof(path), name, prop) == 0) {
            goto found; //Yes, I found it
        }
    }

    /* Loop through the configuration variants looking for a module */
    //Query variant one by one_ The name of the attribute defined by the keys array
    for (i=0 ; i<HAL_VARIANT_KEYS_COUNT; i++) {
        if (property_get(variant_keys[i], prop, NULL) == 0) {
            continue;
        }
        //Check whether the target module shared library exists
        if (hw_module_exists(path, sizeof(path), name, prop) == 0) {
            goto found;
        }
    }
    //Not found, try a shared library with default variant name of default
    /* Nothing found, try the default */
    if (hw_module_exists(path, sizeof(path), name, "default") == 0) {
        goto found;
    }

    return -ENOENT;

found:
    /* load the module, if this fails, we're doomed, and we should not try
     * to load a different variant. */
    return load(class_id, path, module); //Perform the work of loading and parsing shared libraries
}
As you can see, in HW_ get_ module_ by_ In the class function:
- First, according to class_id generates module name. Here is hw_ get_ id passed in from module function;
- Then through property_get variable_ The system attribute defined in key. If the attribute is defined in the system, a module name will be obtained The name of a so composed of attribute names;
- Then go to / system/lib/hw and / vendor/lib/hw to check whether the so exists. If so, call the load function to open it So file;
- If not, traverse the variant_ Get the attribute value from the attribute name defined in the keys array, get the name of the target module library, and check whether it exists;
- If the module shared library is not found according to the attribute value, try to check whether the default library exists. If it still does not exist, an error is returned;
- If the target shared library is found in any of the above attempts, path is the file path of the target shared library, and load is called to perform the real work of loading the library.
(5) Let's look at the implementation of the load function:
/**
 * Load the file defined by the variant and if successful
 * return the dlopen handle and the hmi.
 * @return 0 = success, !0 = failure.
 */
static int load(const char *id,
        const char *path,
        const struct hw_module_t **pHmi)
{
    int status = -EINVAL;
    void *handle = NULL;
    struct hw_module_t *hmi = NULL;

    /*
     * load the symbols resolving undefined symbols before
     * dlopen returns. Since RTLD_GLOBAL is not or'd in with
     * RTLD_NOW the external symbols will not be global
     */
    //Use dlopen to open the target shared library defined by path and get the handle of the library file
    handle = dlopen(path, RTLD_NOW);
    if (handle == NULL) {
        //Error, get error information through dlerror
        char const *err_str = dlerror();
        ALOGE("load: module=%s\n%s", path, err_str?err_str:"unknown");
        status = -EINVAL;
        goto done;
    }

    /* Get the address of the struct hal_module_info. */
    const char *sym = HAL_MODULE_INFO_SYM_AS_STR; //"HMI"
    //Use dlsym to find the address with the symbol "HMI", which should be hw_module_t the address of the structure; And assigned to HMI
    hmi = (struct hw_module_t *)dlsym(handle, sym);
    if (hmi == NULL) {
        ALOGE("load: couldn't find symbol %s", sym);
        status = -EINVAL;
        goto done;
    }

    /* Check that the id matches */
    //Check whether the module id matches
    if (strcmp(id, hmi->id) != 0) {
        ALOGE("load: id=%s != hmi->id=%s", id, hmi->id);
        status = -EINVAL;
        goto done;
    }
    //Handle to save shared library file
    hmi->dso = handle;

    /* success */
    status = 0;

    done:
    if (status != 0) {
        hmi = NULL;
        if (handle != NULL) {
            dlclose(handle);
            handle = NULL;
        }
    } else {
        ALOGV("loaded HAL id=%s path=%s hmi=%p handle=%p",
                id, path, *pHmi, handle);
    }
    //Return the obtained HW_ module_ Pointer to the T structure
    *pHmi = hmi;
    return status;
}
The main work of the load function is to open the target module shared library through dlopen. After successful opening, use dlsym to get the address with the symbol name "HMI". The HMI here should be module defined HW_ module_ The name of the T structure. In this way, the HW corresponding to the module is obtained_ module_ Pointer to t.
At this point, we finally get the HW representing the hardware module_ module_ T pointer. With this pointer, you can operate the hardware module. The process of how HAL finds and loads the module shared library is analyzed, and finally the HW of the module is obtained through dlopen and dlsym_ module_ T pointer, you can do whatever you want.
(6) The codes associated with HAL and frameworks are as follows:
public class LightsService extends SystemService {
    //...
    private void setLightLocked(int color, int mode, int onMS, int offMS, int brightnessMode) {
        if (color != mColor || mode != mMode || onMS != mOnMS || offMS != mOffMS) {
            if (DEBUG) Slog.v(TAG, "setLight #" + mId + ": color=#"
                    + Integer.toHexString(color));
            mColor = color;
            mMode = mode;
            mOnMS = onMS;
            mOffMS = offMS;
            Trace.traceBegin(Trace.TRACE_TAG_POWER, "setLight(" + mId + ", " + color + ")");
            try {
                setLight_native(mNativePointer, mId, color, mode, onMS, offMS, brightnessMode);
            } finally {
                Trace.traceEnd(Trace.TRACE_TAG_POWER);
            }
        }
    }
    public LightsService(Context context) {
        super(context);
        mNativePointer = init_native();
        //...
    }
    private static native long init_native();//The HW of HAL layer is called here_ get_ module
    private static native void finalize_native(long ptr);
    static native void setLight_native(long ptr, int light, int color, int mode,
            int onMS, int offMS, int brightnessMode);//Access hardware
    private long mNativePointer;//Save the handle returned by hal
}
GPS HAL loading
After analyzing the framework and mechanism of HAL, let's take the loading process of GPS HAL as an example to string the above knowledge. We start with HW in the framework layer_ get_ Module function is used as the entry point for preliminary disassembly and analysis.
1. The entry function for loading GPS HAL is defined in frameworks/base/services/core/jni/com_android_server_location_GpsLocationProvider.cpp:
static void android_location_GpsLocationProvider_class_init_native(JNIEnv* env, jclass clazz) {
   // skip unrelate code
    hw_module_t* module;
   //Get HW of GPS module_ module_ T pointer
    err = hw_get_module(GPS_HARDWARE_MODULE_ID, (hw_module_t const**)&module);
    if (err == 0) {
        hw_device_t* device;
        //Call the open function to get the HW of the GPS device_ device_ T pointer
        err = module->methods->open(module, GPS_HARDWARE_MODULE_ID, &device);
        if (err == 0) {
            //Strong conversion of pointer to gps_device_t type
            gps_device_t* gps_device = (gps_device_t *)device;
            //Get the inteface interface of the GPS module, and you can operate the GPS device through the sGpsInterface
            sGpsInterface = gps_device->get_gps_interface(gps_device);
        }
    }
Where GPS_ HARDWARE_ MODULE_ The ID is defined in hardware / libhardware / include / hardware / GPS In H:
/**
 * The id of this module
 */
#define GPS_HARDWARE_MODULE_ID "gps"
2. Call hw_get_module gets the HW of the GPS module_ module_ T pointer, saved in module variable; Let's take a look at the HW of the GPS module_ module_ What does t look like. With hardware/qcom/gps/loc_api/libloc_api_50001/gps.c as an example:
struct hw_module_t HAL_MODULE_INFO_SYM = {
    .tag = HARDWARE_MODULE_TAG,
    .module_api_version = 1,
    .hal_api_version = 0,
    .id = GPS_HARDWARE_MODULE_ID,
    .name = "loc_api GPS Module",
    .author = "Qualcomm USA, Inc.",
    .methods = &gps_module_methods, //Custom function pointer, here is to get hw_device_t's entrance
};
3. Then call HW customized by GPS module_ module_ open function in methods of t to get hw_device_t pointer. In the above code, we can see the HW of the GPS module_ module_ The value of the methods member of T is gps_module_methods, which is defined as follows:
static struct hw_module_methods_t gps_module_methods = {
    .open = open_gps
};
4. Let's see_ What does the GPS function do:
static int open_gps(const struct hw_module_t* module, char const* name,
        struct hw_device_t** device)
{
    //For gps_device_t allocate memory space
    struct gps_device_t *dev = (struct gps_device_t *) malloc(sizeof(struct gps_device_t));

    if(dev == NULL)
        return -1;

    memset(dev, 0, sizeof(*dev));
    //For GPS_ device_ Assignment of common member variable of T
    dev->common.tag = HARDWARE_DEVICE_TAG;
    dev->common.version = 0;
    dev->common.module = (struct hw_module_t*)module;
    //All interface s of GPS module can be obtained through the following function
    dev->get_gps_interface = gps__get_gps_interface;
    //gps_device_t pointer forced to hw_device_t pointer, assigned to device
    *device = (struct hw_device_t*)dev;
    return 0;
}
We see open_gps created gps_device_t structure. After initialization, convert it to hw_device_t. So module - > methods - > open is actually gps_device_t structure pointer. Here we can understand it as gps_device_t is hw_ device_ It is normal to use the subclass of T and return the subclass object as the parent object. Why can we understand this? Take a look at GPS_ device_ You can see what t looks like. The code location is hardware / libhardware / include / hardware / GPS h:
struct gps_device_t {
    struct hw_device_t common;

    /**
     * Set the provided lights to the provided values.
     *
     * Returns: 0 on succes, error code on failure.
     */
    const GpsInterface* (*get_gps_interface)(struct gps_device_t* dev);
};
As you can see, the first member is hw named common_ device_ Variable of type T; So it can be understood as gps_device_t inherits hw_device_t.
5. Get the HW of GPS_ device_ Tturn the pointer back to gps_devcie_t pointer, and then call get_ defined by GPS device. gps_ Interface interface to obtain the GpsInterface structure pointer that stores the GPS interface. In open_gps, get_ gps_ The interface is assigned gps__get_gps_interface function pointer, whose main work is to return the GpsInterface structure pointer of GPS module. GpsInterface is defined in hardware / libhardware / include / hardware / GPS h:
/** Represents the standard GPS interface. */
typedef struct {
    /** set to sizeof(GpsInterface) */
    size_t          size;
    /**
     * Opens the interface and provides the callback routines
     * to the implementation of this interface.
     */
    int   (*init)( GpsCallbacks* callbacks );

    /** Starts navigating. */
    int   (*start)( void );

    /** Stops navigating. */
    int   (*stop)( void );

    /** Closes the interface. */
    void  (*cleanup)( void );

    /** Injects the current time. */
    int   (*inject_time)(GpsUtcTime time, int64_t timeReference,
                         int uncertainty);

    /** Injects current location from another location provider
     *  (typically cell ID).
     *  latitude and longitude are measured in degrees
     *  expected accuracy is measured in meters
     */
    int  (*inject_location)(double latitude, double longitude, float accuracy);

    /**
     * Specifies that the next call to start will not use the
     * information defined in the flags. GPS_DELETE_ALL is passed for
     * a cold start.
     */
    void  (*delete_aiding_data)(GpsAidingData flags);

    /**
     * min_interval represents the time between fixes in milliseconds.
     * preferred_accuracy represents the requested fix accuracy in meters.
     * preferred_time represents the requested time to first fix in milliseconds.
     *
     * 'mode' parameter should be one of GPS_POSITION_MODE_MS_BASE
     * or GPS_POSITION_MODE_STANDALONE.
     * It is allowed by the platform (and it is recommended) to fallback to
     * GPS_POSITION_MODE_MS_BASE if GPS_POSITION_MODE_MS_ASSISTED is passed in, and
     * GPS_POSITION_MODE_MS_BASED is supported.
     */
    int   (*set_position_mode)(GpsPositionMode mode, GpsPositionRecurrence recurrence,
            uint32_t min_interval, uint32_t preferred_accuracy, uint32_t preferred_time);

    /** Get a pointer to extension information. */
    const void* (*get_extension)(const char* name);
} GpsInterface;
6. GpsInterface defines the basic standard interfaces for operating GPS modules. Once you get the GpsInterface, you can operate GPS through these interfaces and finally deal with hardware. A specific GPS module will initialize the interface in the GpsInterface to its platform related specific implementation. For example, hardware/qcom/gps/loc_api/libloc_api_50001/loc.cpp:
// Defines the GpsInterface in gps.h
static const GpsInterface sLocEngInterface =
{
   sizeof(GpsInterface),
   loc_init,
   loc_start,
   loc_stop,
   loc_cleanup,
   loc_inject_time,
   loc_inject_location,
   loc_delete_aiding_data,
   loc_set_position_mode,
   loc_get_extension
};
Here, the loading process of the whole GPS HAL is over, and then the GPS module can be operated through the GpsInterface.
HAL simple example
Next, manually implement a HAL service to provide an addition function. The project structure is as follows:

1. First, create hello. Com in the hardware/libhardware/include/hardware directory H documents:
#include <sys/cdefs.h>
#include <sys/types.h>
#include <hardware/hardware.h>
//HAL module name
#define HELLO_HARDWARE_MODULE_ID "hello"
//HAL version number
#define HELLO_MODULE_API_VERSION_1_0 HARDWARE_MODULE_API_VERSION(0, 1)
//Device name
#define HARDWARE_HELLO "hello"

//Custom HAL module structure
typedef struct hello_module {
    struct hw_module_t common;
} hello_module_t;

//Custom HAL device structure
typedef struct hello_device {
    struct hw_device_t common;
    //Additive function
    int (*additionTest)(const struct hello_device *dev,int a,int b,int* total);
} hello_device_t;

//Provides a function to an external call to open the device
static inline int _hello_open(const struct hw_module_t *module,
        hello_device_t **device) {
    return module->methods->open(module, HARDWARE_HELLO,
            (struct hw_device_t **) device);
}
We can see in hello Two structs are customized in H, which inherit HW respectively_ module_ T and hw_device_t and the first variable satisfies the above rules. In addition, the first parameter of the function defined in the device structure must also be the device structure.
2. Then create a hello folder in the hardware/libhardware/modules / directory, which contains a hello C and Android BP, let's look at hello C) documents:
#define LOG_TAG "HelloHal"

#include <malloc.h>
#include <stdint.h>
#include <string.h>

#include <log/log.h>

#include <hardware/hello.h>
#include <hardware/hardware.h>

//Implementation of addition function
static int additionTest(const struct hello_device *dev,int a,int b,int *total)
{
	if(!dev){
		return -1;
	}
    *total = a + b;
    return 0;
}

//Close device function
static int hello_close(hw_device_t *dev)
{
    if (dev) {
        free(dev);
        return 0;
    } else {
        return -1;
    }
}
//Open device function
static int hello_open(const hw_module_t* module,const char __unused *id,
                            hw_device_t** device)
{
    if (device == NULL) {
        ALOGE("NULL device on open");
        return -1;
    }

    hello_device_t *dev = malloc(sizeof(hello_device_t));
    memset(dev, 0, sizeof(hello_device_t));

    dev->common.tag = HARDWARE_DEVICE_TAG;
    dev->common.version = HELLO_MODULE_API_VERSION_1_0;
    dev->common.module = (struct hw_module_t*) module;
    dev->common.close = hello_close;
    dev->additionTest = additionTest;

    *device = &(dev->common);
    return 0;
}

static struct hw_module_methods_t hello_module_methods = {
    .open = hello_open,
};
//Export symbol HAL_MODULE_INFO_SYM, pointing to custom module
hello_module_t HAL_MODULE_INFO_SYM = {
    .common = {
        .tag                = HARDWARE_MODULE_TAG,
        .module_api_version = HELLO_MODULE_API_VERSION_1_0,
        .hal_api_version    = HARDWARE_HAL_API_VERSION,
        .id                 = HELLO_HARDWARE_MODULE_ID,
        .name               = "Demo Hello HAL",
        .author             = "dongjiao.tang@tcl.com",
        .methods            = &hello_module_methods,
    },
};
As we said earlier, to use the customized HAL module externally, you need to export the symbol HAL_MODULE_INFO_SYM, the most important exported module structure is actually tag, id and methods. Tag must be defined as HARDWARE_MODULE_TAG and id are in hello The module name defined in H, and the methods point to hello_module_methods address, hello_module_methods points to the structure hw_module_methods_t. The open function pointer in it is used to open the device under the module, and it points to hello_open function.
hello_ The open function is also very simple, which is to create a hello_device_t structure, which is the device structure under our custom HAL module, and then assign a value to this structure. The addition function additionTest defined by us assigns a value to the function pointer of the device structure, which can be used externally, because this HAL module exports the symbol HAL_MODULE_INFO_SYM, so we can find the HAL module through the module id. after having the module, we can call its hello_ The open function opens the device, hello_open receives three parameters. Module represents the HAL module, and id represents the device under the module to be opened. The last parameter is a secondary pointer. In fact, it is the address of our user-defined device structure pointer. You can assign a value to the device structure by passing an address.
3. In this way, the simplest HAL module is defined. It only provides an addition function for Android BP is as follows (finally compiled into a shared lib Library):
cc_library_shared {
    name: "hello.default",
    relative_install_path: "hw",
    proprietary: true,
    srcs: ["hello.c"],
    header_libs: ["libhardware_headers"],
    shared_libs: ["liblog"],
}
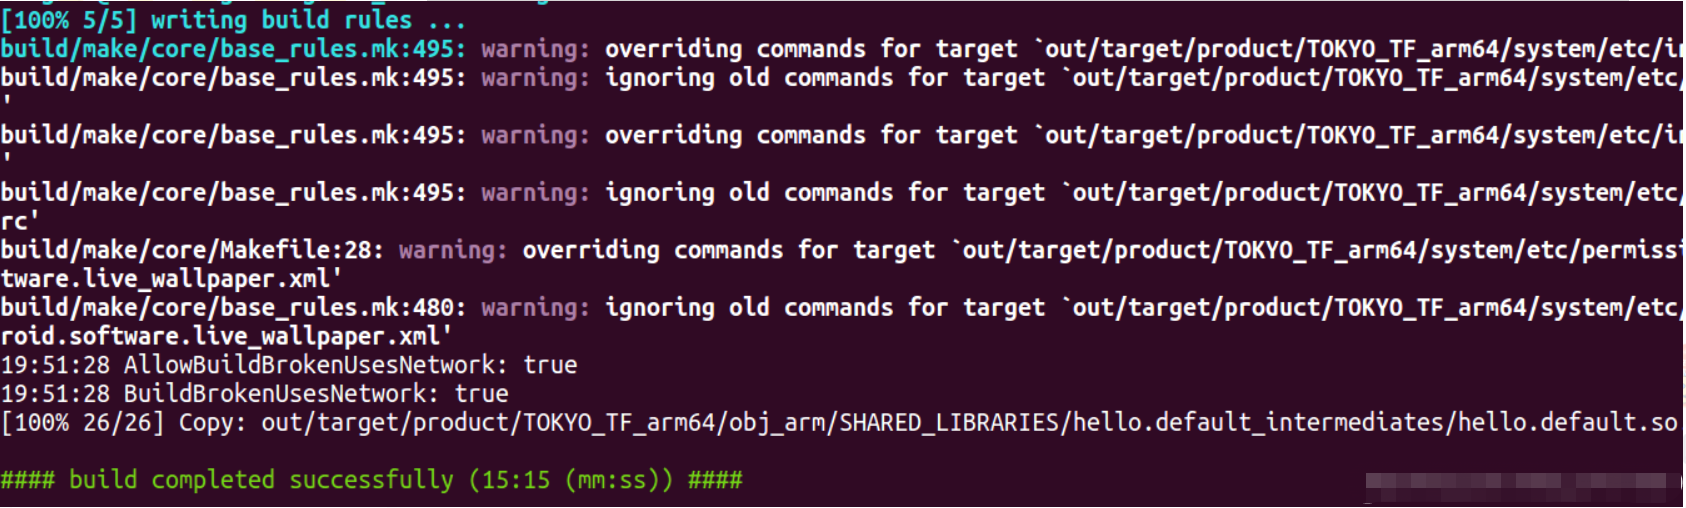
4. We execute the following command in the root directory to compile:
mmm hardware/libhardware/modules/hello/
After the compilation is successful, a hello default. So shared lib Library:
5. We push the so library into the mobile phone / system/lib64 path, and then we need to write a simple test program to test it. We will create a test directory under the HAL module directory and a hellotest under the test directory CPP test files and an android BP file, hellotest The CPP source code is as follows:
#include <hardware/hardware.h>
#include <hardware/hello.h>
#include <log/log.h>
#define TAG "HelloHal"
int main(){
    hello_device_t* hello_device = NULL;

    const hello_module_t * module = NULL;

    int ret = hw_get_module(HELLO_HARDWARE_MODULE_ID,(const struct hw_module_t**)&module);

    if (!ret) {
        ret = _hello_open((const struct hw_module_t*)module,&hello_device);
    }


    if (ret < 0) {
          ALOGD("get hello-hal failed.......");
          return -1;
    }

    int total = 0;
    hello_device->additionTest(hello_device,3,5,&total);
    ALOGD("success start hello-hal....total = %d",total);
    return 0;
}
Through hardware C HW provided_ get_ Module function, pass the module name, get the corresponding HAL module, and then call our custom_ hello_ The open function opens the device through the obtained module. After obtaining the device, we call the addition function defined in the device structure.
6,Android.bp is defined as follows:
cc_binary {
    name: "hello_hal",
    srcs: ["HelloTest.cpp"],
    shared_libs: [
        "liblog",
        "libhardware",
    ],
}
The test will be compiled into a binary executable file hello_hal :
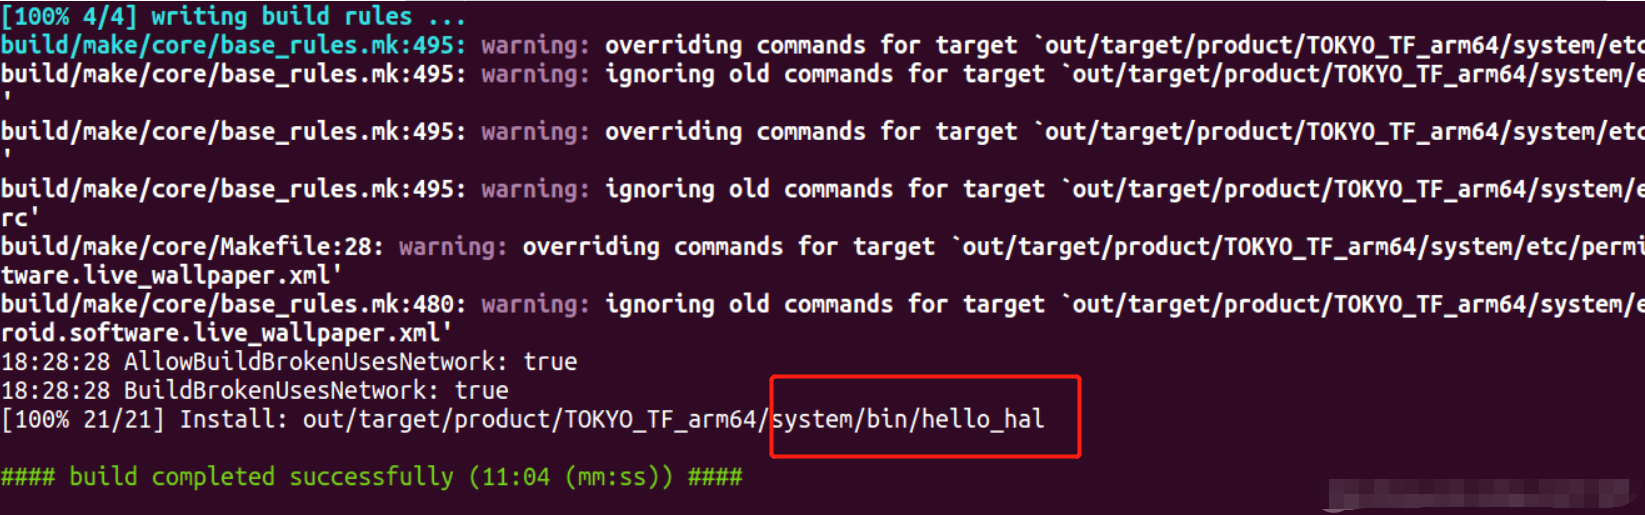
7. We push the executable file into the system/bin directory of the mobile phone, and then execute:
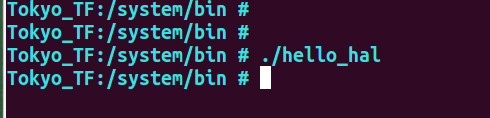
8. You can see that the log has been successfully printed:

So far, our simplest HAL has been implemented. This HAL does not design the underlying driver. In actual development, we can define functions in the device structure to access the underlying hardware.
In fact, the access scenario of HAL service is often not the above binary client files, but to access HAL from the native layer through HIDL, or the application layer APK accesses the framework layer through AIDL, and the framework layer accesses the native layer through JNI, so as to open up the whole development framework from the application layer to the HAL layer. See the following column: https://blog.csdn.net/qq_34211365/category_9903135.html .
HAL development process
[official description]
In Android 8.0 and later, the lower level layers have been rewritten to adopt a more modular new architecture. Devices equipped with Android 8.0 or higher must support HAL written in HIDL language. Some exceptions are listed below. These HALS can be bound HALS or straight through HALS. Android 11 also supports HAL written using AIDL. All AIDL HAL S are bound.
- Bound HAL: HAL represented by HAL interface definition language (HIDL) or Android interface definition language (AIDL). These HALS replace the traditional HAL and old HAL used in earlier Android versions. In bound HAL, the Android framework communicates with HAL through Binder interprocess communication (IPC) calls. All devices equipped with Android 8.0 or later must only support bound HAL.
- Straight through HAL: traditional HAL or old HAL encapsulated in HIDL. These HALS encapsulate the existing HALS and can be used in binding mode and same process mode. Devices upgraded to Android 8.0 can use straight through HALS.
Reference and interpretation: Analysis of Android P HIDL service binding mode and through mode (original).
Old HAL
The old hal refers to the hal before Android 8.0. At this time, the hal mainly realizes the standardization of code. However, from the perspective of operation mode, the hal at this time is a so library one by one. The communication with the framework is carried out through dlopen. In essence, hal and the framework run in one process. This means that when the relevant APIs in the framework change with the Android version update, hal must be modified and recompiled, and this process needs to be completed by the manufacturer, which is time-consuming and laborious, making it very difficult for many old devices to update the Android version.
Therefore, Android 8.0 implements the modular Project Treble architecture, which completely decouples the things belonging to the manufacturer from the things belonging to the Android framework. The contents belonging to the framework are located in the / system partition, while the contents belonging to the manufacturer are moved to the / vendor partition, and the implementation of HAL has undergone earth shaking changes
Project Treble
Since Android 8.0, Android has introduced the Treble mechanism, mainly to solve the problem of troublesome upgrade between current Android versions. Some vendors adapted by OEM are separated from some system parts upgraded by google for Android framework. Once a version of vendor information is adapted, when subsequent versions are upgraded, the system can be upgraded directly, This will not bring too much workload to OEM manufacturers. Upgrading the latest functions directly can solve the problem of messy Android versions on the market.
Under the ideal Project Treble architecture, the Framework process does not need to use dlopen to load the manufacturer's shared library as above, but uses binder for ipc communication, The Framework and HAL run in different processes (of course, this also means that HAL should run as a process and wait for calls from the Framework). First, Treble mechanism has two modes in the Vendor partition:
- One is compiled into so library for the process and application of System partition to load and call directly. They are in the same process. This is called through HAL(passthrough) mode;
- The other is to compile directly into a daemon runnable service, and then the process of the System partition is called through the IPC communication mode of HwBinder. The two processes are in two independent processes, which is called the bound Hal (bound) mode.
The general frame diagram is as follows:
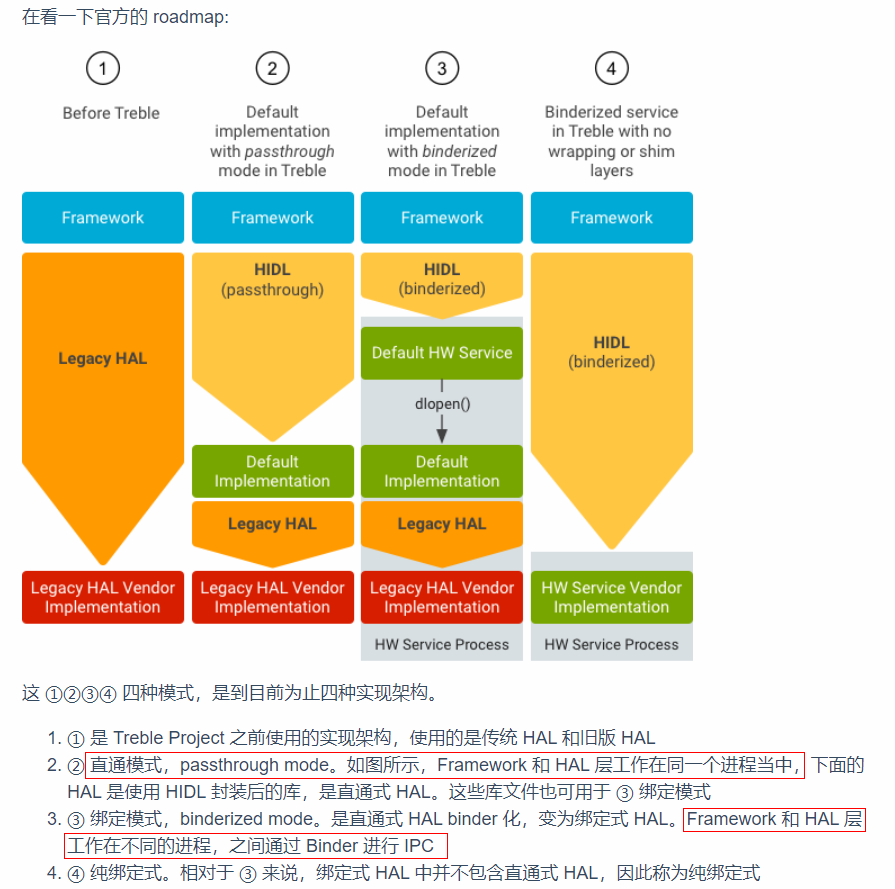
- For devices before Android 8.0, corresponding to figure 1;
- For upgrading from the previous device to Android 8.0, corresponding to Fig. 2 and Fig. 3;
- For devices developed directly based on Android 8.0, the corresponding figure 4.
The above figure can also summarize the development process of HAL:
- Legacy Hal: HAL before Android 8.0 is compiled into so, and then dynamically linked to each framework service;
- Passthrough Hal: this mode is compatible with the old HAL. The old HAL implementation is still provided in the form of dynamic library, but the binder service links the dynamic library HAL implementation, that is, the binder service passes hw_get_module links the implementation of the old HAL, while the client indirectly realizes the interaction with the old HAL by communicating with the binder service IPC;
- Bound HAL: HAL and user call are in different processes. HAL is written as a binder service, and user interfaces such as frameworks are used as binder client s to realize cross process interface calls through IPC mechanism. This is Google's ultimate design goal.
Finally, add the partition of Android image:

summary
This article refers to: