Note: This article defines the operation of adding corresponding logic before and after function execution as MOCK.
1. Introduction
When communicating with QA classmates one day, I found that QA classmates have the need to stop the method for a period of time when calling for a method. I was curious about the functionality of this part, so I decided to do some in-depth understanding of the principles and try to find a way that users can modify the original code as little as possible to meet the corresponding MOCK requirements.
Overall perception can be divided into three levels:
-
Hardcoded
-
Add Configuration
-
No modification required
2. Ideas
By mock ing, pausing, and anomaly simulating methods, guessing without knowing their principles, and thinking about their specific implementation principles, the simplest implementation models are, on the whole, two:
2.1 Simple ideas
Assume the following functions exist
public Object targetMethod(){
	System.out.println("Function");
}
If you want to pause a period of time after the function executes, return a specific mock value, or throw a specific exception, consider modifying the corresponding function content:
public Object targetMethod(){
      //Join here Sleep return or throw logic
    System.out.println("Function");
}
Or use a proxy-like method to proxy the corresponding function:
public Object proxy(){
    //implement Sleep return or throw logic
      return targetMethod();
}
public Object targetMethod(){
    System.out.println("Function");
}
2.2 Slightly mature thinking
On the basis of simple thinking, we can see that there are two overall implementation schemes for similar pause, mock and exception functions:
-
proxy pattern
-
Deep modification of internal functions
On the basis of these two ideas, we start with the agent mode (mainly the agent uses more and is more familiar with it)
2.2.1 Dynamic Proxy
When it comes to proxy, the two most commonly thought terms are static proxy and dynamic proxy, but they are not detailed. Static proxy mode needs a lot of hard coding, so it can be completely ignored.
For dynamic proxies, begin to consider the most representative CGLIB for investigation.
The following code is a typical example of a dynamic proxy using CGLIB (the proxy function is HelloInterface.sayHelllo):
public class DynamicProxy implements InvocationHandler {

    private Object target;

    public DynamicProxy(Object object) {
        this.target = object;
    }

    private void before() {
        System.out.println("before");
    }

    private void after() {
        System.out.println("after");
    }

    @Override
    public Object invoke(Object proxy, Method method, Object[] args) throws Throwable {
        Object res = null;
        before();
        try {
            res = method.invoke(target, args);
        } catch (Throwable e) {
            throw e.getCause();
        }
        after();
        return res;
    }
    public static void main(String[] args) throws IOException {
        try {
            SayHello sayHello = new SayHello();
            DynamicProxy dynamicProxy = new DynamicProxy(sayHello);
            HelloInterface helloInterface = (HelloInterface) Proxy.newProxyInstance(Thread.currentThread().getContextClassLoader(), sayHello.getClass().getInterfaces(), dynamicProxy);
            helloInterface.sayHello();
        } catch (Throwable e) {
            e.printStackTrace();
        }
    }
}
As you can see from the code above, for a dynamic proxy of CGLIB, it needs to be hard-coded in the original code and initialized in a specific way when the object is initialized.Therefore, if you use CGLIB to complete MOCK, you need the highest level of awareness of the corresponding code, to the extent of hard coding.
2.2.2 AspectJ
Since proxy cannot complete a MOCK without modifying the code, we discard proxy and consider modifying the method's internal code.
Based on this idea, we turned our attention to AspectJ.
When using AspectJ, you need to define functions before and after method execution:
@Aspect
public class AspectJFrame {
    private Object before() {
        System.out.println("before");
        return new Object();
    }

    private Object after() {
        System.out.println("after");
        return new Object();
    }

    @Around("aroundPoint()")
    public Object doMock(ProceedingJoinPoint joinPoint) {
        Object object=null;
        before();
        try {
            object = joinPoint.proceed();
        } catch (Throwable throwable) {
            throwable.printStackTrace();
        }
        after();
        return object;
    }
}
And specify the corresponding tangent point and the corresponding wrapping function through aop.xml
<aspectj>
    <aspects>
        <aspect name="com.test.framework.AspectJFrame">
            <before method="" pointcut=""/>
        </aspect>
    </aspects>
</aspectj>
However, based on the above implementation, the original project needs to be invaded, which mainly contains two parts:
-
Increase aop.xml under META-INF path
-
jar package with corresponding tangent definition
The implementation of MOCK in hard-coded cases can be accomplished through aspectj, but this implementation is limited by Aspectj itself. The function code of MOCK has been added to the corresponding function at compile time and can be added at run time at the latest.There are two main drawbacks to this approach:
-
Cannot execute new MOCK for running java without restarting
-
The MOCK function code is embedded in the target function and cannot be uninstalled, which may pose a stability risk.
3. Introduction of java agent
Since all the above mentioned technologies are difficult to support the need to complete the MOCK function without any modifications to the original project, after consulting the materials, the focus is on java agent technology.
3.1 What is a java agent?
java agent is essentially understood as a plug-in, which is a carefully provided jar package that is loaded through JVMTI (JVM Tool Interface) and ultimately modified by JPLISAgent (Java Programming Language Instrumentation Services Agent).
The main functions of java agent technology are as follows:
-
You can intercept and modify the byte code before loading the java file
-
You can change the byte code of a loaded class at run time
-
There are other niche features
-
Get all classes that have been loaded
-
Get all the classes that have been initialized
-
Get the size of an object
-
Add a jar to the bootstrap classpath to be loaded by the bootstrap class loader as a high priority
-
Add a jar to the classpath for AppClassloard to load
-
Set prefixes for some native methods, mainly by matching rules when looking for native methods
-
3.2 java Instrumentation API
The Java Instrumentation API is the main way to modify the byte code of a class through java agent technology.The following describes how to use the Java Instrumentation API for byte code modification.
3.2.1 Implementation of agent Startup Method
Java Agent supports loading at target JVM startup and loading at target JVM runtime. These two different loading modes use different entry functions. If you need to load Agent at the same time as target JVM startup, you can choose to implement the following:
[1] public static void premain(String agentArgs, Instrumentation inst);
[2] public static void premain(String agentArgs);
The JVM will first look for [1], and then [2] if [1] is not found.If you want to load Agent s at the target JVM runtime, you need to implement the following:
[1] public static void agentmain(String agentArgs, Instrumentation inst);
[2] public static void agentmain(String agentArgs);
The first parameter of these two sets of methods, AgentArgs, is a program parameter that is passed along with'- javaagent'. If this string represents multiple parameters, you need to parse them yourself.inst is an object of Instrumentation type and is automatically passed in by the JVM. We can use this parameter for class enhancements and other operations.
3.2.2 Specify Main-Class
Agents need to be packaged into a jar package specifying "Premain-Class" or "Agent-Class" in the aniFest property and Can-Redefine-Classes and Can-Retransform-Classes as required:
Manifest-Version: 1.0
preMain-Class: com.test.AgentClass
Archiver-Version: Plexus Archiver
Agent-Class: com.test.AgentClass
Can-Redefine-Classes: true
Can-Retransform-Classes: true
Created-By: Apache Maven 3.3.9
Build-Jdk: 1.8.0_112
3.2.3 agent loading
-
Load at startup
-
Startup parameter increment - javaagent:[path], where path is the jar package path of the corresponding agent
-
-
Loading in Run
-
Load using com.sun.tools.attach.VirtualMachine
-
try {
  String jvmPid = Targeted pid;
  logger.info("Attaching to target JVM with PID: " + jvmPid);
  VirtualMachine jvm = VirtualMachine.attach(jvmPid);
  jvm.loadAgent(agentFilePath);//agentFilePath by agent Path
  jvm.detach();
  logger.info("Attached to target JVM and loaded Java agent successfully");
} catch (Exception e) {
  throw new RuntimeException(e);
}
3.2.4 Instrument
Instrument is a class library provided by JVM that modifies loaded classes and is designed to support the stuffing services written in the Java language.It needs to depend on the Attach API mechanism of the JVMTI.Prior to JDK 1.6, instrumentation only worked when the JVM started loading classes, whereas after JDK 1.6, instrumentation supported modifications to class definitions at runtime.To use instrument's class modification capabilities, we need to implement the ClassFileTransformer interface it provides and define a class file converter.The transform() method in the interface is called when the class file is loaded, whereas in the transform method, we can override or replace the incoming byte code with ASM or Javassist above, generate a new array of byte codes, and return.
First, you can define the following class converters:
public class TestTransformer implements ClassFileTransformer {
      //Target class name,  .Separate
      private String targetClassName;
    //Target class name,  /Separate
    private String targetVMClassName;
    private String targetMethodName;


    public TestTransformer(String className,String methodName){
        this.targetVMClassName = new String(className).replaceAll("\\.","\\/");
        this.targetMethodName = methodName;
        this.targetClassName=className;
    }
    //This function is executed when the class is loaded, with parameters classfileBuffer For class raw byte code, the return value is the target byte code. className by/Separate
    public byte[] transform(ClassLoader loader, String className, Class<?> classBeingRedefined, ProtectionDomain protectionDomain, byte[] classfileBuffer) throws IllegalClassFormatException {
          //Determine if the class name is the target class name
        if(!className.equals(targetVMClassName)){
            return classfileBuffer;
        }
        try {
            ClassPool classPool = ClassPool.getDefault();
            CtClass cls = classPool.get(this.targetClassName);
            CtMethod ctMethod = cls.getDeclaredMethod(this.targetMethodName);
            ctMethod.insertBefore("{ System.out.println(\"start\"); }");
            ctMethod.insertAfter("{ System.out.println(\"end\"); }");
            return cls.toBytecode();
        } catch (Exception e) {

        }
        return classfileBuffer;
    }
}
Once the class converter is defined, you need to add the defined class converter to the corresponding instrmentation and reload the classes using retransformClasses for the classes that have already been loaded:
public class AgentDemo {

    private static String className = "hello.GreetingController";
    private static String methodName = "getDomain";

    public static void agentmain(String args, Instrumentation instrumentation) {

        try {
            List<Class> needRetransFormClasses = new LinkedList<>();
            Class[] loadedClass = instrumentation.getAllLoadedClasses();
            for (int i = 0; i < loadedClass.length; i++) {
                if (loadedClass[i].getName().equals(className)) {
                    needRetransFormClasses.add(loadedClass[i]);
                }
            }

            instrumentation.addTransformer(new TestTransformer(className, methodName));
            instrumentation.retransformClasses(needRetransFormClasses.toArray(new Class[0]));
        } catch (Exception e) {

        }
    }

    public static void premain(String args, Instrumentation instrumentation) {
        instrumentation.addTransformer(new TestTransformer(className, methodName));
    }


}
As you can see from the code in the diagram above, the main method implements two, agentmain and premain, where
-
premain
-
TransFormer for defining classes before class loading at startup, updating the byte code of corresponding classes when class loading
-
-
agentmain
-
A two-step procedure for modifying the byte code of a class at run time
-
TransFormer for Registered Classes
-
Call retransformClasses function to reload classes
-
-
4. Brief description of java agent principle
4.1 Modify at startup

Modification at startup is mainly the Agent_OnLoad method that executes the native function at jvm startup. When the method executes, perform the following steps:
-
Create InstrumentationImpl object
-
Listen for ClassFileLoadHook events
-
Calls the loadClassAndCallPremain method of InstrumentationImpl, in which the premain method of the Premain-Class class specified in MANIFEST.MF in javaagent is called
4.2 Runtime modifications
Runtime modification mainly requests the target JVM to load the corresponding agent through the attach mechanism of the jvm, and executes the Agent_OnAttach method of the native function. When the method executes, perform the following steps:
-
Create InstrumentationImpl object
-
Listen for ClassFileLoadHook events
-
Call the loadClassAndCallAgentmain method of InstrumentationImpl, in which the agent main method of the Agentmain-Class class specified in MANIFEST.MF in javaagent is called
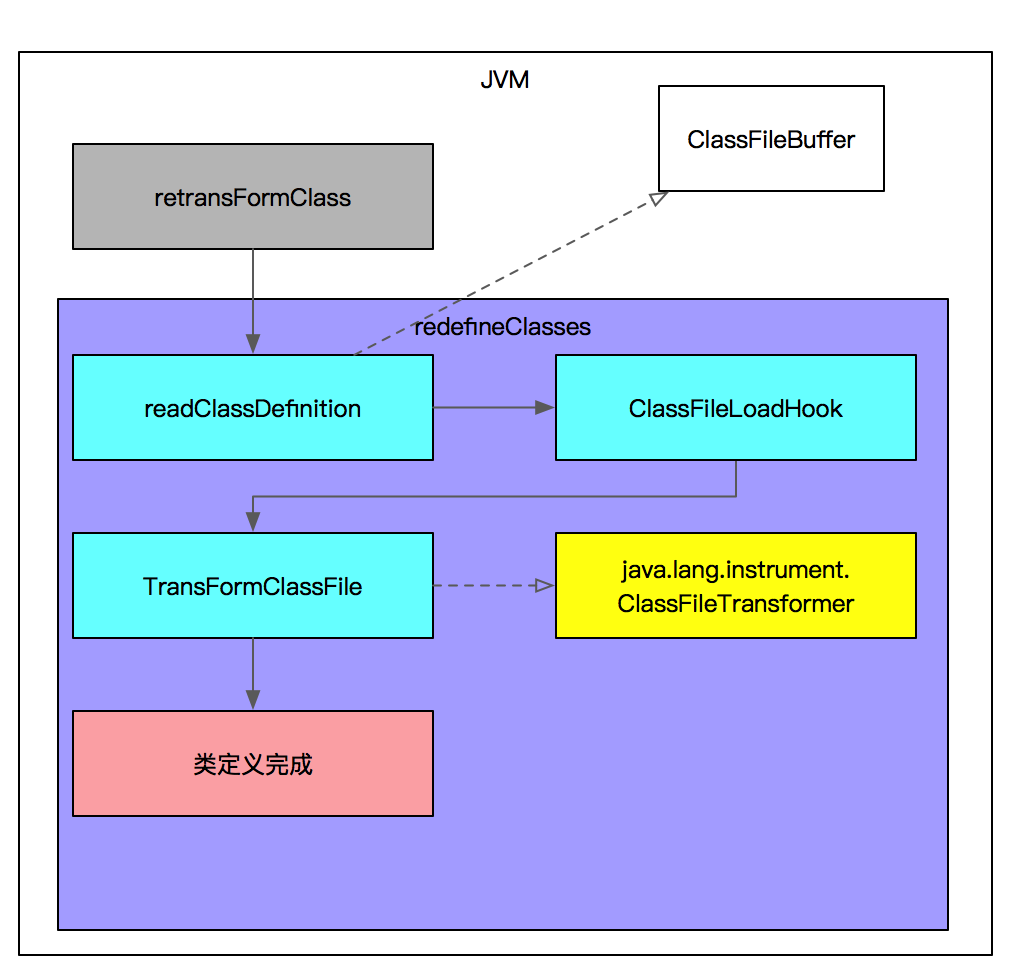
4.3 ClassFileLoadHook and TransFormClassFile
In sections 4.1 and 4.2, you can see that two parts of the overall process are common:
-
ClassFileLoadHook
-
TranFormClassFile
ClassFileLoadHook is a jvmti event, which is a core event of the instrument agent, called mainly when reading the byte code file callback and calling the TransFormClassFile function internally.
The main function of TransFormClassFile is to call the tranform method of java.lang.instrument.ClassFileTransformer, which is implemented by the developer and registered through the instrument's addTransformer method.
From the above description, you can see that when a byte code file is loaded, a ClassFileLoadHook event is triggered, which calls TransFormClassFile to complete the overall byte code modification via instrument's addTransformer registration method.
For a loaded class, you need to call the retransformClass function, then through the redefineClasses function, call the ClassFileLoadHook event if the class corresponding to the byte code file follows the ClassFileLoadHook event after reading the loaded byte code file.Subsequent processes are consistent with byte code substitution during class loading.
4.4 When do runtime replacements occur?
After the class is loaded, the corresponding function you want to replace may be executing, so when do you want to replace the class byte code?
Since runtime class byte code substitution relies on redefineClasses, you can see the definition of this method:
jvmtiError
JvmtiEnv::RedefineClasses(jint class_count, const jvmtiClassDefinition* class_definitions) {
//TODO: add locking
  VM_RedefineClasses op(class_count, class_definitions, jvmti_class_load_kind_redefine);
  VMThread::execute(&op);
  return (op.check_error());
} /* end RedefineClasses */
The overall execution depends on VMThread, which is a single native thread generated at the time of virtual machine creation that can spawn other threads.At the same time, the main role of this thread is to maintain a vm operation queue, which handles vm operations submitted by other threads, such as executing GC.
When VmThread performs a vm operation, it first determines if the operation needs to be performed under safepoint.If you need to execute under safepoint and the current system is not under safepoint, call the SafepointSynchronize method to drive all threads into safepoint and execute the vm operation.Wake up all threads after execution.If this operation does not need to be under safepoint, or if the current system is already under safepoint, you can perform it directly.Therefore, under the vm operation of safepoint, only the vm thread can execute specific logic, and all other threads will enter and be suspended until this operation is completed.
Therefore, when byte code substitution is performed, it needs to be performed under safepoint, thus triggering stop-the-world as a whole.
99. Reference Documents
http://lovestblog.cn/blog/2015/09/14/javaagent/
https://tech.meituan.com/2019/09/05/java-bytecode-enhancement.html
https://tech.meituan.com/2019/11/07/java-dynamic-debugging-technology.html
http://www.throwable.club/2019/06/29/java-understand-instrument-first/