Micro front end development (Vue)
1, Overview of micro front end
1. What is a micro front end?
In order to solve the limitations of change and expansion caused by a large piece of back-end services, micro service architecture has emerged. However, the more and more important front-end engineering is also facing the same problem. It is natural to think of applying (copying) the idea of micro services to the front-end, so there is the concept of "micro frontends". That is, an architecture style composed of multiple front-end applications delivered independently. Specifically, the front-end application is decomposed into smaller and simpler pieces that can be developed, tested and deployed independently, but it is still a cohesive single product in the eyes of users.
Our common background projects are usually as follows:
If our project needs to develop a new function and another project has developed this function, we want to reuse it directly.
Note: what we need is the content of the function page of other people's projects, and we don't need the top navigation and menu of other people's projects.
A stupid way is to directly copy the code of the page of other people's project. However, in case that other people are not developed by vue, or the vue version and UI library are different, and the operations (route interception, authentication, etc.) before other people's page is loaded, we need to copy it. The more important problem is that other people's code is updated, How do we synchronize updates. Even when other projects adopt other technology stacks, how to integrate? Obviously copying code won't work.
By analogy with the concept of front-end components, we can regard each separated sub application as an application level component, and each application level component is dedicated to a specific business function (such as commodity management, order management, etc.). This actually talks about the principle of micro front-end splitting: taking business functions as the basic unit. After splitting, the structure of the whole system has also changed:
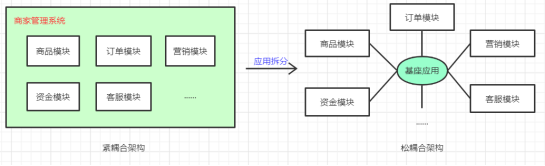
As shown in the figure above, the front-end architecture of traditional large-scale single page applications is on the left. All modules are in one application, and the application itself is responsible for routing management, which is the way of application routing distribution; On the right is the system architecture in the base mode. Each sub application is not related to each other and runs on different services separately. The base application selects which application to load into the page according to the routing, which is the way to route and distribute applications. This method greatly reduces the coupling of each module, and the main problem to be solved in the micro front end is how to split and organize these sub applications.
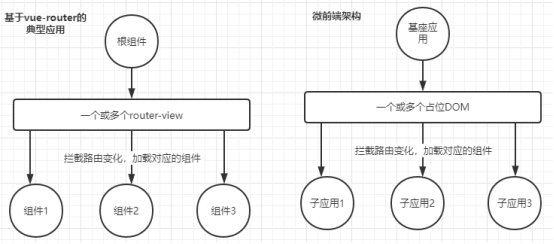
Typical Vue router based Vue applications are very similar to this architecture:
2. Problems of Big Mac project
- More and more code, slower and slower packaging, troublesome deployment and upgrading, and more consideration needs to be given to the upgrading of some plug-ins and the modification of public components, which can easily affect the whole body.
- The project is too large, with more participants, code specifications are difficult to manage, and code conflicts are frequent.
- Products have complete functions, but customers often only need some of them. After stripping unnecessary codes, you need to make versions independently and maintain them independently to increase labor costs.
The birth of micro front-end is also to solve the above problems:
- Reuse (embed) other people's project pages, but other people's projects run on their own environment.
- Big Mac applications are divided into small projects. These small projects are developed and deployed independently and can be freely combined for sale.
Benefits of using micro front end:
- Independent of the technology stack, each sub project can freely choose the framework and formulate its own development specifications.
- Rapid packaging, independent deployment, no mutual influence and simple upgrade.
- It can easily reuse the existing functional modules to avoid repeated development.
2, Common micro front end solutions
At present, the mainstream micro front-end solutions include the following:
- iframe
- The base mode is mainly based on routing distribution. qiankun and single spa are based on this mode
- Combinatorial integration, that is, build components separately and load them on demand, similar to the form of npm package
- EMP, mainly based on Webpack5 Module Federation
- Web Components
Iframe: it is a traditional micro front-end solution. It is implemented based on iframe tag, with low technical difficulty, good isolation and compatibility, but poor performance and use experience. It is mostly used to integrate third-party systems;
Base mode: mainly based on route distribution, that is, a base application monitors routes and loads different applications according to routing rules to realize decoupling between applications;
Combinatorial integration: package and publish components separately, and then combine them at build or run time.
EMP: Based on Webpack5 Module Federation, a decentralized micro front-end implementation scheme, which can not only isolate applications, but also easily realize resource sharing and communication between applications.
Web Components: it is an official component-based scheme. It realizes the micro front end by encapsulating components to a higher degree. However, at present, the compatibility is not good enough and has not been popularized.
Generally speaking, iframe is mainly used for third-party systems that are simple and have low performance requirements; At present, combined integration is mainly used for front-end component, not micro front-end; Pedestal mode, EMP and Web Components are the mainstream micro front-end solutions.
At present, there are two most commonly used solutions for micro front-end: iframe # solution and # base mode solution.
1. iframe scheme
iframe is very familiar to everyone. It is easy to use and provides natural js/css isolation. It also brings inconvenience to data transmission. Some data cannot be shared (mainly local storage, global variables and public plug-ins). When the two projects have different sources (cross domain), data transmission needs to rely on {postMessage}.
iframe} has many holes, but most of them have solutions:
1. Page loading problem
iframe , and the main page share the connection pool, and the browser has restrictions on the connection of the same domain, so it will affect the parallel loading of the page and block the , onload , event. You need to reload every click. Although you can use display:none as the cache, too much page cache will cause the computer to jam. (cannot be resolved)
2. Layout problem
iframe} must be given a specified height or it will collapse.
Solution: the sub project calculates the height in real time and sends it to the main page through {postMessage}, and the main page dynamically sets the} iframe} height. In some cases, there will be multiple scroll bars, resulting in poor user experience.
3. Pop up window and mask layer problems
The pop-up window can only be vertically and horizontally centered within the "iframe" range, but cannot be vertically and horizontally centered on the whole page.
Solution 1: it is solved synchronously with the frame page message, and the pop-up message is sent to the main page. The main page pops up, which greatly changes the original project and affects the use of the original project.
Solution 2: change the style of pop-up window: hide the mask layer and change the position of pop-up window.
4. The # div # in iframe # cannot be full screen
The full screen of pop-up window refers to the full screen in the visual area of the browser. This full screen refers to the full user screen.
In the full screen scheme, the native method uses element Requestfullscreen(), plug-in: Vue fullscreen. When the page is in "iframe", the full screen will report an error, and the "dom" structure is disordered.
Solution: set the "allow="fullscreen "attribute of iframe tag
5. Browser forward / backward problem
Iframe , and the main page share a browsing history, and iframe , will affect the forward and backward of the page. Most of the time, iframe# multiple redirects will cause the forward and backward functions of the browser to fail to work normally. And the iframe page refresh will reset (for example, jump from the list page to the details page, and then refresh, and return to the list page), because the address bar of the browser has not changed, and the iframe src has not changed.
6. iframe} loading failure is difficult to handle
Non homologous iframe , does not support , oneror , events in Firefox and , chorme , respectively.
Solution 1: in the onload event, judge whether the title of the page is 404 or 500
Solution 2: use {try catch} to solve this problem. An exception will be thrown when trying to get {contentDocument}.
2. Base mode scheme
The pedestal mode scheme is represented by single spa and qiankun. Here I choose qiankun.
qiankun , is an open source framework of ant financial services, which is based on , single spa ,. On the basis of "single spa", it realizes out of the box. Except for some necessary modifications, the subproject can be easily accessed with few changes.
qiankun framework official website: https://qiankun.umijs.org/zh/.
There are two common methods for the entry file of micro front-end sub projects: JS entry # and HTML entry. Pure , single spa , uses , JS entry, while , qiankun , supports both , JS entry and , HTML entry.
JS entry # has strict requirements:
(1) package # css # into # js #
(2) remove chunk vendors js,
(3) remove the {hash} value of the file name
(4) place the entry file (app.js) of # single spa # mode in # index HTML} directory, other files remain unchanged because you want to intercept} app JS as publicPath.
It is recommended to use , HTML entry, which is as simple as , iframe , but the user experience is much better than , iframe ,. ABCD request to sub project index After HTML , it will first use the , js/css , related tags that are regularly matched into it, and then replace them. It needs to load , js , run by itself, and then remove , html/head/body , and other tags. The rest will be inserted into the container of the sub project as it is.
2, Micro front end scheme practice
Taking the "big data analysis" project as an example, the unique needs of customers, such as "electronic waybill" and "data filling" are separately extracted as independent sub projects.
The transformation of big data analysis project is the main application base, and the address of code warehouse is: http://192.168.1.102/zouqiongjun/big-data-web.git.
Customer defined requirements are separately used as sub application projects. Code warehouse address: http://192.168.1.102/zouqiongjun/zibo-custom-web.git.
1. Code structure of each application project
Sass base web: the main warehouse, which is mainly used to store some batch operation scripts for aggregate management of the warehouse, one click compilation and one click deployment.
The warehouse code structure is shown in the figure below:
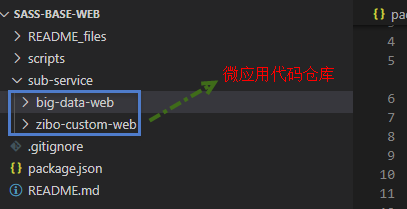
Big data Web: the main application of big data analysis
Zibo custom Web: customer defined requirements, micro application warehouse
The sub application can run independently, but the current sub application is directly nested in the main content area of the main application, so the left menu navigation is not provided separately for the time being. This function can be extended and supplemented if necessary in the future.
2. Main application big data web transformation
Three steps are required to transform an ordinary project into a "qiankun" main application base:
(1) create a micro application container - used to host micro applications and render and display micro applications;
(2) register micro application - set micro application activation conditions, micro application address, etc;
(3) start {qiankun;
Note: since the routing of big data web main application adopts hash mode, the routing of sub applications should also adopt hash mode.
1.1 installation
$ yarn add qiankun # Or npm i qiankun -S
1.2. Register micro application in main application
In order to use keepAlive cache, we load micro applications manually.
After the micro application information is registered, once the "url" of the browser changes, the "qiankun" matching logic will be automatically triggered, and all micro applications on the "activeRule" rule matching will be inserted into the specified "container", and the life cycle hooks exposed by the micro application will be called in turn.
In the views directory, create a new appvuehash Vue, as the container of sub application, the code is as follows:
<template>
<div class="zibo-custom-web">
     <div id="zibo-custom-web" class="app-view-box"></div>
</div>
</template>
<script>
export default {};
</script>
<style lang="scss" scoped>
.zibo-custom-web{
  position: relative;
}
</style>
The id attribute should be unique, and the content of the final sub application will be mounted here.
ContainerOther.vue code modification:
  <!-- Host view layer -->
        <div class="avue-view-contain" v-show="!isSearch">
          <keep-alive>
            <router-view
              class="avue-view keep-alive"
              v-if="$route.meta.keepAlive && isActiveRoute"
              v-show="!showAppVueHash"
            />
          </keep-alive>
          <router-view
            class="avue-view"
            v-if="!$route.meta.keepAlive && isActiveRoute"
            v-show="!showAppVueHash"
          />
          <AppVueHash v-show="showAppVueHash" />
        </div>
js code:
import router from "@/router/router";
import store from "@/store";
import AppVueHash from "@/views/AppVueHash.vue";
import { loadMicroApp } from "qiankun";
//Subproject routing prefix
const isChildRoute = path => website.childRoute.some(item => path.startsWith(item));
const apps = [
  {
    name: "/zibo-custom-web",
    entry: window.configs.VUE_APP_ZIBO_CUSTOM_URL,
    container: "#zibo-custom-web",
    props: { data: { store, router } },
    sandbox: {
      strictStyleIsolation: true // Open style isolation
    }
  }
];
//Control micro application manual loading
    ctrlMicroApp(path){
       if (isChildRoute(path)) {
        this.showAppVueHash = true;
        this.$nextTick(() => {
          //Manual loading
          if(!this.mounted){
            this.loadApps = apps.map(item => loadMicroApp(item))
            this.mounted=true;
          }
        });
      } else {
        this.showAppVueHash = false;
      }
The value of the container attribute here must be the same as appvuehash The id values in the Vue component are consistent.
Determine whether it is a sub application according to the url address. If it is a sub application, load it manually. Otherwise, hide the sub application container and load only the router view of the main application.
Manually load micro apps when ContainerOther loads for the first time or route changes:
mounted() {
    this.init();
    setTheme(this.themeName);
    this.ctrlMicroApp(this.$route.path)
  },
  watch: {
    $route(val) {
      this.ctrlMicroApp(val.path);
},
    tagList(newVal,oldVal){
      let starts='';
      const childRoute = website.childRoute;
      childRoute.forEach((n,i)=>{
        if(i<childRoute.length-1){
          starts+=`^${n}|`;
        }else{
          starts+=`^${n}`;
        }
      })
      const patt = new RegExp(`${starts}`);
      //There was a sub application tab before
      const before = oldVal.some(item=>{
        return patt.test(item.value);
      });
      //There are sub application tabs
      const now = newVal.some(item=>{
        return patt.test(item.value);
      });
      if(before && !now){
        this.mounted=false;
        this.loadApps.forEach(app=>{
          app.unmount();
        })
      }
    }
Listen to the tab changes. When closing the tab, you need to uninstall the sub application.
3. qiankun sub project Zibo custom web
- Add the file , public path. In the , src , directory js:
if (window.__POWERED_BY_QIANKUN__) {
    // eslint-disable-next-line no-undef
    __webpack_public_path__ = window.__INJECTED_PUBLIC_PATH_BY_QIANKUN__;
  }
- Modify index HTML #app is a container for item initialization. Do not use #app to avoid conflicts with other items. It is recommended to write in small hump
<div id="appVueHash"></div>
- Modify the entry file main js:
// -----------Sub application micro front end start-------------------
let router = null;
let instance = null;

function render({ data = {} , container } = {}) {
  router = new VueRouter({
    routes,
  });
  instance = new Vue({
    router,
    store,
    data(){
      return {
        parentRouter: data.router,
        parentVuex: data.store,
      }
    },
    render: h => h(App),
  }).$mount(container ? container.querySelector('#appVueHash') : '#appVueHash');
}
if (!window.__POWERED_BY_QIANKUN__) {
  render();
}
//Test global variable contamination
console.log('window.a',window.a)
export async function bootstrap() {
  console.log('vue app bootstraped');
}
export async function mount(props) {
  console.log('props from main framework', props.data);
  render(props);
}
export async function unmount() {
  instance.$destroy();
  instance.$el.innerHTML = "";
  instance = null;
  router = null;
}
// -----------Sub application micro front end-------------------
The main changes are the introduction and modification of the "publicPath" file and the "export" life cycle.
Note:
- The 'publicPath' value of webpack can only be modified in the entry file. The reason why it is written to a file separately and introduced at the beginning of the entry file is that this can be used by all the following codes.
- The route file needs to export the route data instead of the instantiated route object, and the hook function of the route also needs to be moved to the entry file.
- In the # mount # life cycle, you can get the data passed by the parent project. router # is used to jump to the route of the main project / other sub projects. store # is the instantiated # Vuex of the parent project (you can also pass other data).
- Modify packaging configuration {Vue config. js:
const { name } = require("./package");
module.exports = {
  outputDir: "../sass-base-web/cicd-config/test/zibo-custom-web",
  devServer: {
    port: 9010,
    // Turn off the host check so that the micro application can be fetch ed
    disableHostCheck: true,
    // Configure the cross domain request header to solve the cross domain problem of the development environment
    headers: {
      "Access-Control-Allow-Origin": "*",
    },
    proxy: {
      "/api": {
        //Local service interface address
        target: "http://192.168.10.112:10067", //cas
        ws: true,
        pathRewrite: {
          "^/api": "/",
        },
      },
    },
  },
   // The following configuration can fix some font file loading path problems
  chainWebpack: (config) => {
    //Package file ignored
    config.externals({
      vue: "Vue",
      "vue-router": "VueRouter",
      vuex: "Vuex",
      axios: "axios",
      "element-ui": "ELEMENT",
    });
    config
      .plugin('html')
      .tap(args => {
        args[0].name = name;
        return args
      });
    config.module
      .rule("fonts")
      .test(/.(ttf|otf|eot|woff|woff2)$/)
      .use("url-loader")
      .loader("url-loader")
      .tap((options) => ({ name: "/fonts/[name].[hash:8].[ext]" }))
      .end();
  },
  // Custom webpack configuration
  configureWebpack: {
    output: {
      library: `${name}-[name]`, // The package name of the micro application, which is consistent with the micro application name registered in the main application
      libraryTarget: "umd", // Package sub applications into umd library format
      jsonpFunction: `webpackJsonp_${name}`, //After the webpack is packaged, the key s saved in the window are different from each sub application
    },
  },
};
There are mainly two configurations here. One is to allow cross domain, and the other is packaged in umd format. Why package it in umd format? This is to let , qiankun , get its , export , life cycle function.
Note: this , name , defaults to , package JSON , can be customized, as long as it is consistent with the , name , when the parent project is registered.
vue.config.js
outputDir: "../sass-base-web/cicd-config/test/zibo-custom-web",
Here, after compiling my sub application project, I will package the package file under Zibo custom web in sass base web project.
- Route dynamic loading
It is necessary to add a prefix to all routes of the subproject. If the route jump of the subproject previously used , path , also needs to be modified, and it is not necessary to jump with , name ,.
avue-router.js:
 const oRouter = {
          path: "/zibo-custom-web",
          name: "RouterView",
          component(resolve) {
            require(["@/components/RouterView.vue"], resolve);
          },

          children: [
            {
              path: path,
              component(resolve) {
                require([`../${component}.vue`], resolve);
              },
              name: name,
              meta: meta,
            },
          ],
        };
        aRouter.push(oRouter);
4. State management, communication between main application and micro application
qiankun initGlobalState: defines the global state and returns the communication method. It is recommended to use it in the main application, and the micro application obtains the communication method through "props";
onGlobalStateChange: monitors the global state in the current application, and a {callback is triggered when there is a change;
setGlobalState: set the global state according to the first level attribute. Only the existing first level attribute can be modified in the micro application; In other words, you can only modify the pre-defined attributes, and the attributes added later are invalid.
Official example: publish subscribe design pattern:
Main application:
import { initGlobalState, MicroAppStateActions } from 'qiankun';
// Initialize state
const actions: MicroAppStateActions = initGlobalState(state);

actions.onGlobalStateChange((state, prev) => {
  // state: status after change; prev status before change
  console.log(state, prev);
});
actions.setGlobalState(state);
actions.offGlobalStateChange();
Subapplications:
// Obtain the communication method from the life cycle mount and use it in the same way as the master
export function mount(props) {
    props.onGlobalStateChange((state, prev) => {
      // state: status after change; prev status before change
      console.log(state, prev);
    });
    props.setGlobalState(state);
  }
If both the main application and the sub application are vue technology stacks, data can be transferred to the sub application in the sub application, such as store.
props: { data: { store, router } },
5. Independent warehouse and aggregation management between applications
In the actual development, the project is stored in the company's warehouse. Taking gitLab as an example, when there are more sub applications and all of them are placed under one warehouse, it becomes very bloated and huge, which greatly increases the maintenance cost and development efficiency;
We can use the "sh" script. Initially, we only need to clone the main warehouse code, and then use the "sh" script to pull all sub application codes with one click.
Here, I will separately create a main warehouse project sass base web for compilation and packaging. The warehouse address is: http://192.168.1.102/zouqiongjun/sass-base-web.git.
Under the project root directory, create a new script / clone all Sh# file, as follows:
# Sub service gitLab address
SUB_SERVICE_GIT=('http://192.168.1.102/zouqiongjun/big-data-web.git' 'http://192.168.1.102/zouqiongjun/zibo-custom-web.git')
SUB_SERVICE_NAME=('big-data-web' 'zibo-custom-web')

# Sub service
if [ ! -d "sub-service" ]; then
  echo 'establish sub-service catalogue...'
  mkdir sub-service
fi
echo 'get into sub-service catalogue...'
cd sub-service

# Traversal clone microservice
for i in ${!SUB_SERVICE_NAME[@]}
do
  if [ ! -d ${SUB_SERVICE_NAME[$i]} ]; then
    echo 'Clone microservice project'${SUB_SERVICE_NAME[$i]}
    git clone ${SUB_SERVICE_GIT[$i]}
  fi
done

echo 'End of script...'
# Clone complete
When we start the main project, if we want to use the functions of all sub applications, sub applications need to be started one by one, which is very inconvenient for both development and compilation.
Considering that npm packaging in China may fail due to network reasons, npm can use the domestic Taobao image.
Execute the command: npm config set registry https://registry.npm.taobao.org .
In this main warehouse project, we only need to install an NPM run all plug-in.
Run: yarn add NPM run all - D or npm i -D.
There is only one package under this project JSON file, which is used to configure compilation and packaging commands. The code is as follows:
{
  "name": "sass-big-data-web",
  "version": "1.0.0",
  "description": "`qiankun`To achieve`vue`Front end microservices of technology stack",
  "main": "index.js",
  "scripts": {
    "clone:all": "bash ./scripts/clone-all.sh",
    "install:zibo": "cd ./sub-service/zibo-custom-web && npm install",
    "install:main": "cd ./sub-service/big-data-web && npm install",
    "install-all": "npm-run-all install:*",
    "start:zibo": "cd ./sub-service/zibo-custom-web && npm run serve ",",
    "start:main": "cd ./sub-service/big-data-web && npm run serve",
    "start-all": "npm-run-all --parallel start:*",
    "serve-all": "npm-run-all --parallel start:*",
    "build:zibo": "cd ./sub-service/zibo-custom-web && npm run build",
    "build:main": "cd ./sub-service/big-data-web && npm run build",
    "build-all": "npm-run-all --parallel build:*"
  },
  "repository": {
    "type": "git",
    "url": "http://192.168.1.102/zouqiongjun/sass-big-data-web.git"
  },
  "keywords": [],
  "author": "",
  "license": "ISC",
  "devDependencies": {
    "npm-run-all": "^4.1.5"
  }
}
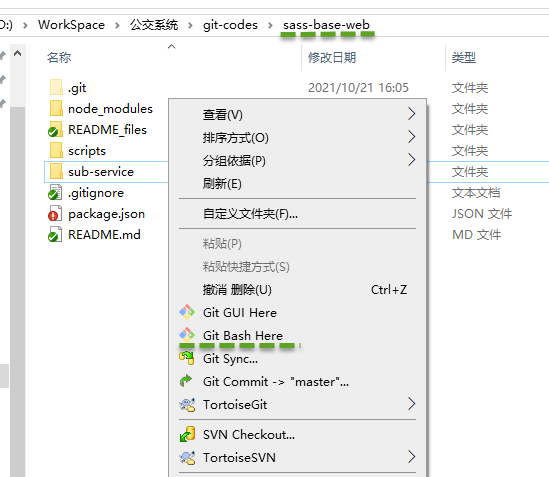
To execute yarn clone:all, you need to use bash, jump to the sass base web directory, and right-click the mouse to open the Git bash window, as shown in the following figure:
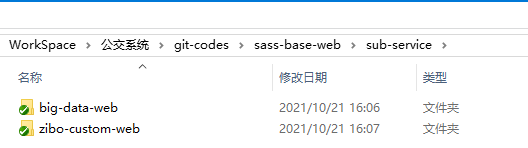
In this way, when we drag the code of each code warehouse to the sub service directory, as shown in the following figure:
After the code pull is completed, the next step is to download the dependency and operation of each project.
Run NPM run serve all to automatically execute package The command configured in JSON will eventually execute the following three execution commands:
    "start:zibo": "cd ../zibo-custom-web && npm run serve ",
    "start:main": "cd ../big-data-web && npm run serve",
In this way, we don't need to run each project individually.
Overall running steps: the first step is "clone" the main application, and then execute "yarn clone: all -- > yarn install all -- > yarn start all" successively to run the whole project.
Build all: you can compile the entire project.
Sub service directory and add it to gitignore, because in the sass base web project, we only need to configure, compile and package. We don't really need to submit the code of all sub applications to the sass base web project. Each sub application has its own private warehouse.
6. Some precautions for sub project development
(1) all resources (pictures / audio and video, etc.) should be placed in the "src" directory, not in "public" or "static". Resources placed in the {src} directory will be processed by} webpack and can be uniformly injected into} publicPath. Otherwise, 404 will appear in the main project.
(2) avoid {css} pollution. css scoped in component style is required.
(3) for events bound to , body, document , etc., please clear them in the , unmount , cycle
(4) use {position: fixed with caution
In the parent project, this positioning may not be accurate and should be avoided as far as possible. There is a need for positioning relative to the browser window. You can use {position: sticky, but there will be compatibility problems (IE does not support it).
See the official website for frequently asked questions: https://qiankun.umijs.org/zh/faq
7. Deployment
1. Regular deployment
Both main applications and micro applications are developed and deployed independently, that is, they belong to different warehouses and services.
Scenario: main application and micro application are deployed to the same server (same IP and port)
If the number of servers is limited or cannot cross domain, the main application and micro application need to be deployed together. The common practice is that the main application is deployed in the primary directory and the micro application is deployed in the secondary / tertiary directory.
If you want to deploy a micro application in a non root directory, you need to do two things before packaging the micro application:
- You must configure , publicPath , during the construction of , webpack , as the directory name. For more information, see the official description of , webpack , and the official description of , vue-cli3 ,.
- The micro application of history routing needs to be set with the value of {base as the directory name, which is used for independent access.
After deployment, pay attention to three points:
- activeRule} cannot be the same as the real access path of the micro application, otherwise the refresh of the main application page will directly become the micro application page.
- The real access path of the micro application is the "entry" of the micro application, and the "entry" can be a relative path.
- The last / entry path of the micro application cannot be omitted. Otherwise, the public path will be set incorrectly. For example, the access path of the subitem is http://localhost:8080/app1 , then "entry" is http://localhost:8080/app1/.
Configure the forwarding of the # nginx # port to the directory. It is necessary to open the child to the outside world, use the corresponding port, and put the compiled utilization file into the corresponding configuration directory.
Jump to sass base web directory and execute NPM run build all. All commands starting with build: will be executed automatically:
    "build:zibo": "cd ../zibo-custom-web && npm run build",
    "build:control": "cd ../control-center && npm run build",
    "build:main": "cd ../big-data-web && npm run build",
    "build-all": "npm-run-all --parallel build:*"
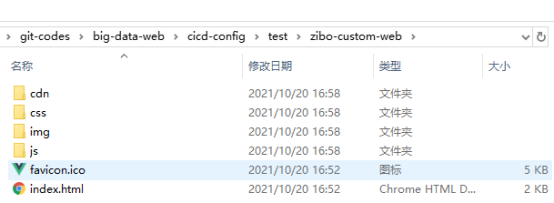
The Zibo custom web directory structure is shown in the following figure:
Here, the sub application and the main application are deployed on the same server, and the IP and port are the same. nginx does not need additional settings.
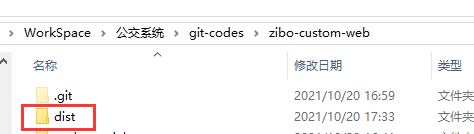
If the sub application and the main application are deployed on the same server, but the ports are different, you need to modify Vue config. outputDir in JS is the path to store the compiled code. This is not configured. By default, the code will be compiled and packaged to the current root directory, and a dist directory will be generated to store the compiled code, as shown in the following figure:
Modify nginx Conf configuration:
 #gzip  on;
      upstream gateway { server 192.168.31.136:32067;}
     # Main application
        server {
        listen   32043;
        server_name  web;
        root  /dist;
        # Turn off port redirection
        # port_in_redirect off;
        #charset koi8-r;
        access_log /var/log/nginx/nginx.log;

        location / {
        proxy_set_header Host $http_host;
        proxy_set_header X-Real-IP $remote_addr;
        proxy_set_header REMOTE-HOST $remote_addr;
        proxy_set_header X-Forwarded-For $proxy_add_x_forwarded_for;
        }

        location ^~/api/ {
            proxy_read_timeout 600s;
            proxy_set_header Host $host;
            proxy_set_header X-Real-IP $remote_addr;
            proxy_set_header X-Forwarded-For $proxy_add_x_forwarded_for;
            proxy_buffering off;
            rewrite ^/api/(.*)$ /$1 break;
            proxy_pass http://gateway;
            }
        }

   # Sub application
    server {
        listen   9010;
        server_name  cus_web;
        # Sub application compiled code path
        root  /zibo-custom-web;
        # Allow cross domain
        add_header Access-Control-Allow-Origin *;
        # Turn off port redirection
        # port_in_redirect off;
        # charset koi8-r;
        access_log /var/log/nginx/nginx.log;
        location ^~/zibo-custom-web/ {
        proxy_set_header Host $http_host;
        proxy_set_header X-Real-IP $remote_addr;
        proxy_set_header REMOTE-HOST $remote_addr;
        proxy_set_header X-Forwarded-For $proxy_add_x_forwarded_for;
        }

        location ^~/api/ {
            proxy_read_timeout 600s;
            proxy_set_header Host $host;
            proxy_set_header X-Real-IP $remote_addr;
            proxy_set_header X-Forwarded-For $proxy_add_x_forwarded_for;
            proxy_buffering off;
            rewrite ^/api/(.*)$ /$1 break;
            proxy_pass http://gateway;
            }
    }
2. docker nginx} configuration
The # nginx # here is mainly used for port directory forwarding and configuring the main application to access the cross domain problem of sub applications.
Configure and deploy {nginx using} docker:
# docker-compose.yml
version: '3.1'
services:
  nginx:
    restart: always
    image: nginx
    container_name: nginx
    ports:
      - 8888:80
      - 8889:8889
      - 7100:7100
      - 7101:7101
    volumes:
      - /app/volumes/nginx/nginx.conf:/etc/nginx/nginx.conf
      - /app/volumes/nginx/html:/usr/share/nginx/html
      - /app/micro/portal:/app/micro/portal
      - /app/micro/app1:/app/micro/app1
      - /app/micro/app2:/app/micro/app2
Put the compiled main application and sub application into the corresponding data volume mounting directory, such as main application / app/micro/portal.
Similarly, you also need to set the configured nginx Put the conf file in the specified data volume mount directory and start it with {docker compose up - D}.
nginx# port directory forwarding configuration:
# nginx.conf
user  nginx;
worker_processes  1;
error_log  /var/log/nginx/error.log warn;
pid        /var/run/nginx.pid;

events {
    worker_connections  1024;}
http {
    include       /etc/nginx/mime.types;
    default_type  application/octet-stream;
    log_format  main  '$remote_addr - $remote_user [$time_local] "$request" '
                      '$status $body_bytes_sent "$http_referer" '
                      '"$http_user_agent" "$http_x_forwarded_for"';

    access_log  /var/log/nginx/access.log  main;

    sendfile        on;
    #tcp_nopush     on;
    keepalive_timeout  65;

    #gzip  on;
    include /etc/nginx/conf.d/*.conf;
    server {
      listen    8889;
      server_name 192.168.2.192;
      location / {
        root /app/micro/portal;
        index index.html;
        try_files $uri $uri/ /index.html;
      }
    }
    server {
      listen    7100;
      server_name 192.168.2.192;

      # Configure cross domain access. Here is a wildcard. If the production environment is strict, you can specify the main application 192.168.2.192:8889
      add_header Access-Control-Allow-Origin *;
      add_header Access-Control-Allow-Methods 'GET, POST, OPTIONS';
      add_header Access-Control-Allow-Headers 'DNT,X-Mx-ReqToken,Keep-Alive,User-Agent,X-Requested-With,If-Modified-Since,Cache-Control,Content-Type,Authorization';
      location / {
        root /app/micro/app1;
        index index.html;
        try_files $uri $uri/ /index.html;
      }
    }
    server {
      listen    7101;
      server_name 192.168.2.192;

      # Configure cross domain access. Here is a wildcard. If the production environment is strict, you can specify the main application 192.168.2.192:8889
      add_header Access-Control-Allow-Origin *;
      add_header Access-Control-Allow-Methods 'GET, POST, OPTIONS';
      add_header Access-Control-Allow-Headers 'DNT,X-Mx-ReqToken,Keep-Alive,User-Agent,X-Requested-With,If-Modified-Since,Cache-Control,Content-Type,Authorization';

      location / {
        root /app/micro/app2;
        index index.html;
        try_files $uri $uri/ /index.html;
      }
    }}
To deploy to production, you need to modify big data web / public / util / config Vue in JS_ APP_ ZIBO_ CUSTOM_ URL configuration item:
(function() {
  window.configs = {
    VUE_APP_CASLOGINURL: "http://192.168.1.99:32080/cas", //cas login address
    VUE_APP_REDIRECTURL: "http://192.168.51.61:8888 / big data / ", / / front end deployment address
    VUE_APP_SOCKET: "ws://192.168.31.136:32061", //websocket address'
    VUE_APP_AMAPURLPREFIX: "https://webapi.amap.com ", / / Gaode map address
    VUE_APP_ZIBO_CUSTOM_URL:"http://localhost:9010 ", / / custom micro app address
    //================================================

    VUE_APP_AMAPKEY: "xxxxxx" //Gaode key
  };
})();
Here is config JS is external to the configuration file and does not need to be compiled.
8. Summary
Although the qiankun framework supports each sub application to use different technical frameworks, the sub applications need to be modified accordingly, and various unpredictable errors always appear from time to time in other technology stacks. Once there is a problem, we need to modify the code. Therefore, if they are all vue technology stacks, it is recommended to use qiankun as the micro front end.
If the project of a third-party company is accessed, we need to consider whether to use iframe as appropriate because their code is not under our control.
References: Practice and summary of qiankun micro front end scheme
| Blog address: | http://www.cnblogs.com/jiekzou/ |