
1, Background: why does the page get stuck?
1.1 long waiting time (performance)
- The package / third-party script of the project itself is relatively large.
- JavaScript execution blocks page loading.
- Pictures are large and numerous.
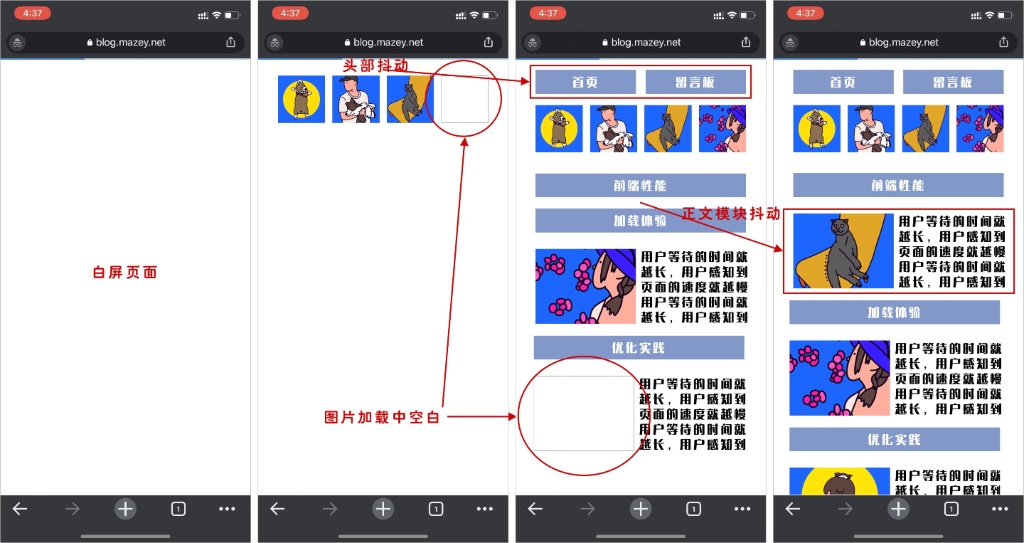
Especially for the white screen time in the first screen resource loading, the longer the user waits, and the slower the user perceives the page. Richard Larson of MIT pointed out in his speech that "human beings overestimate passive waiting by 36%."( https://mazey.cn/t/em ). This means that users feel that the waiting time is much longer than that recorded by the development tool.
1.2 look card (experience)
The page structure is constantly adjusted and incoherent. Jitter pages is too laggy for users to feel very stuck.
2, Optimize performance
2.1 build shrink packs and load on demand
2.1.1 NPM
Firstly, analyze the NPM package and size used in the project through Webpack plug-in Webpack bundle analyzer.
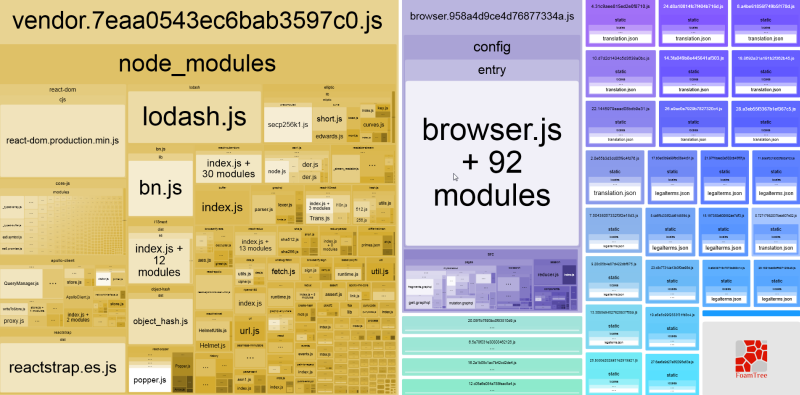
Combined with the project, we can analyze which packages can be removed and which packages can have better substitutes.
| name | Volume size (Parsed) | explain | priority | Confidence index |
|---|---|---|---|---|
| mint-ui | 96.05KB | At present, all components are introduced and need to be loaded on demand | high | ⭐️⭐️⭐️⭐️ |
| moment | 95.51KB | Timestamp formatted library, because it cannot be loaded on demand, the target is to replace it with date FNS that can be loaded on demand | high | ⭐️⭐️⭐️⭐️ |
| quill | 213.31KB | Rich Text Editor | in | ⭐️⭐️⭐️ |
| whatwg-fetch | 9.25KB | The gasket of the native fetch already has axios and needs to be unified | low | ⭐️ |
| ua-device | 148.48KB | Use Navigator instead | in | ⭐️⭐️⭐️⭐️⭐️ |
| assets | 546.11KB | Most of the small volume pictures of the whole project need to be replaced by link introduction or loaded as needed in modules | high | ⭐️⭐️⭐️⭐️⭐️ |
Then remove or replace useless packages and on-demand loading of some packages in the project.
Mint UI on demand loading example:
import { Swipe, SwipeItem, Progress, Navbar, TabItem, TabContainer, TabContainerItem, Lazyload } from 'mint-ui';

Vue.use(Lazyload);
Vue.component(Swipe.name, Swipe);
Vue.component(SwipeItem.name, SwipeItem);
Vue.component(Progress.name, Progress);
Vue.component(Navbar.name, Navbar);
Vue.component(TabItem.name, TabItem);
Vue.component(TabContainer.name, TabContainer);
Vue.component(TabContainerItem.name, TabContainerItem);
2.1. 2 outer chain
The external chain that does not affect the main logic of the page is often not very stable. It must be loaded on demand after the first screen is loaded.
Example:
// Load other resources
if (canLoad()) {
    let s = document.createElement("script");
    s.onload = () => {
        // ...
    };
    s.setAttribute(
        "src",
        "https://example.mazey.net/sdk.js"
    );
    document.body.appendChild(s);
}
2.2 reduce picture volume
2.2. 1 size adjustment
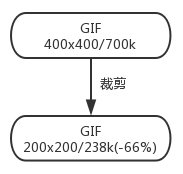
Generally speaking, the larger the size, the higher the picture quality, the larger the volume; Accordingly, the size and volume of the picture will be reduced, but the quality will also become worse. Here, we need to find a balance between performance and experience according to the product requirements.
Take a GIF diagram with a size of 400x400 as an example. After the size is changed to 200x200, the volume is reduced from 700k to 238k (- 66%).
2.2.2 GIF to WebM
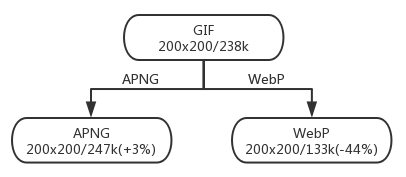
GIF is a format that has existed for 20 years. Of course, its compatibility is the best, but its volume and quality have no advantages over other popular formats. At present, APNG and WebP are the common presentation formats of dynamic graph.
- APNG(Animated Portable Network Graphics)
Png based (Portable Network Graphics) is an animation format extended by the format. It increases the support for animation images and adds the support for 24 bit images and 8-bit Alpha transparency, which means that animation will have better quality. Its birth purpose is to replace the old GIF format, but it has not been officially recognized by PNG organization. APNG is recognized by Mozilla community It was first supported in Mozilla Firefox in 2008. In 2017, Google Chrome began to support APNG. Up to now, only Microsoft's IE and Edge do not support APMG in mainstream browsers. - WebP
Originally released by Google in 2010, the goal is to reduce the file size, but achieve the same image quality as JPEG format, hoping to reduce the sending time of image files on the network. WebP has two modes: static and dynamic. Dynamic WebP (Animated WebP) supports lossy and lossless compression, ICC Color configuration, XMP interpretation data, Alpha transparent channel. At present, only Google Chrome and Opera support WebP in mainstream browsers.
With one GIF diagram For example, after the format is converted to WebP, the volume is reduced from 238k to 133k (- 44%).
But the volume of 133k is still very large, which is difficult to accept. As an animation effect, as long as the video is played circularly, it can achieve the same effect as GIF. Then I tried the mainstream MP4 and WebM.
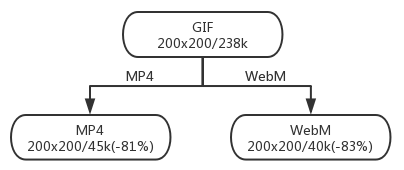
After converting to WebM (also the video format of Google home), the volume is reduced from 238k to 40k (- 83%). In the process of use, add circular playback, remove controls and render after loading to achieve the same visual effect as GIF.
Example:
<video autoplay muted name="media" loop poster="https://test.mazey.net/poster.jpg"
>
    <source src="https://test.mazey.net/source.webm" type="video/webm"
    >
</video>
2.2.3 PNG/JPG compression
Before uploading the picture, compress it with a tool (for example: https://tinypng.com/ ), normally there will be 50 ~ 80% reduction.

2.2.4 PNG/JPG to WebP
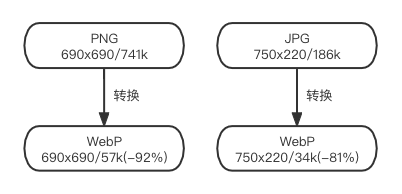
After PNG/JPG is converted to WebP, the picture volume is reduced by 4-7 times.
2.2.5 SVG compression
Many vector editors export SVG files with a lot of redundant information.
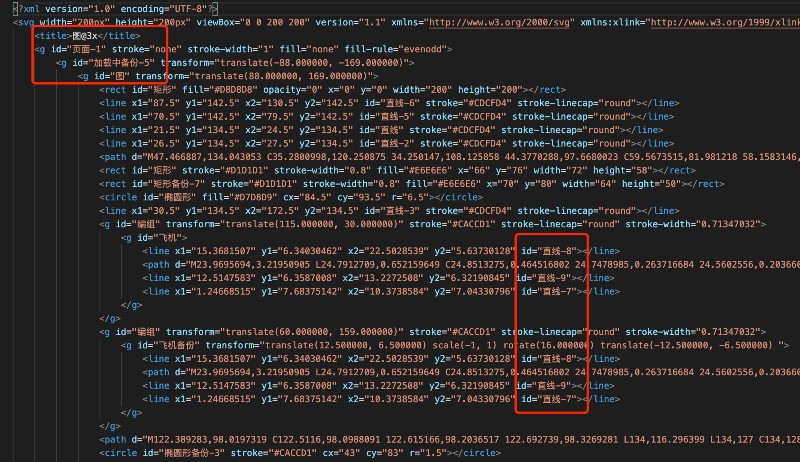
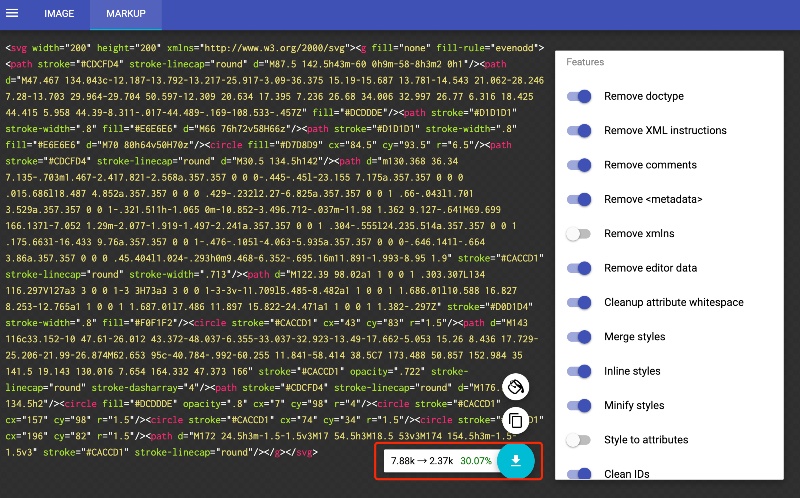
after SVGO After compression, the volume of such tools tends to be reduced by about 30%.
Webpack can be used in projects svgo-loader Automatic compression.
module.exports = {
  ...,
  module: {
    rules: [
      {
        test: /\.svg$/,
        use: [
          {
            loader: 'file-loader'
          },
          {
            loader: 'svgo-loader',
          }
        ]
      }
    ]
  }}
2.3 delayed buried point reporting
Buried point reporting on a large number of services will block the loading of pictures. Ensure that the reporting is performed after the first screen rendering is completed.
2.4 pre connect domain name
There are many domain names of various resources used in the page. You can use pre connect to resolve DNS, TLS protocol and TCP handshake in advance, so as to save the network request time when loading resources later.
<link href="https://cdn.domain.com" rel="preconnect">
2.5 disable favicon ICO (Webview scenario)
When the browser loads a page, if you do not specify {icon, it will request} favicon. In the root directory by default ICO files, as H5 pages embedded in mobile phones, often do not need to display icons. In order to save this request, you can disable favicon by adding < link rel = "icon" href = "data:; Base64, =" > in < head > ICO network request. After all, under weak network conditions, a network request is equivalent to 500ms.
2.6 start Gzip/Brotli compression
2.6.1 Gzip
Gzip is a file format for file compression and decompression. Originally the file compression of UNIX system, it has gradually become the most popular data compression format on the Web. It is based on Deflate algorithm , the file can be losslessly compressed to a smaller size. For plain text files, the volume can be reduced by about 60%, so as to achieve faster network transmission, especially for mobile terminals. The current mainstream browsers generally support Gzip, which means that the server can automatically use Gzip to compress the file before sending the file, and the browser can decompress the file when receiving the file.

2.6.2 Brotli
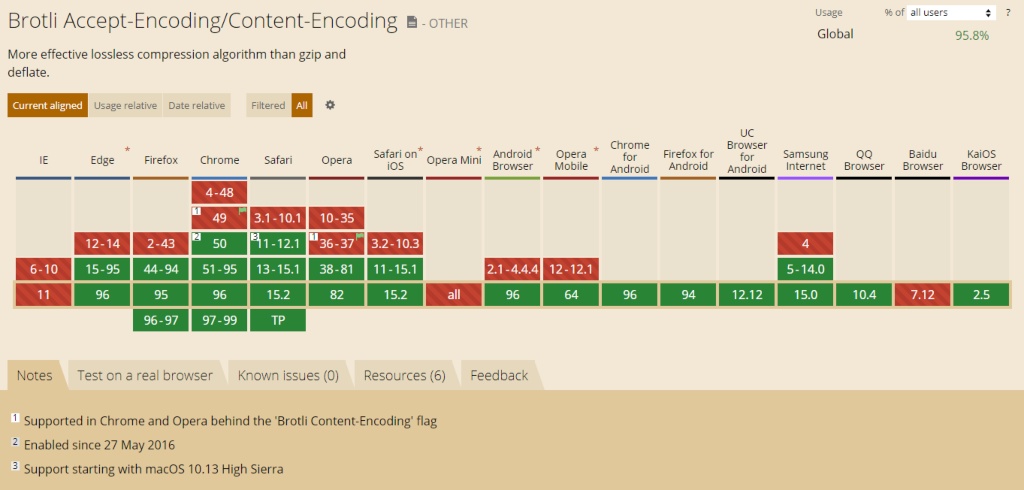
Google believes that the time of Internet users is precious and their time should not be consumed in long web page loading. Therefore, in September 2015, Google launched a lossless compression algorithm Brotli , with particular emphasis on HTTP compression. Brotli carries out data compression through variant LZ77 algorithm, Huffman coding and second-order text modeling. Compared with other compression algorithms, it has higher compression efficiency. For common Web resource content, brotli's performance is 17-25% higher than Gzip.
Except IE, Opera Mini and Baidu browsers, all mainstream browsers have supported Brotli.
3, Optimize experience
3.1 skeleton diagram
Add a skeleton diagram in the page loading. The skeleton diagram is generated according to the basic structure of the page. Compared with the pure white screen, the experience is better.

Example:
<body>
    <!--Skeleton diagram-->
    <svg></svg>
    <!--content-->
    <div id="container"></div>
</body>
3.2 image bitmap / lazy loading
When the picture is loaded, set the bitmap to remind the user that the picture will be loaded here, so as not to be very abrupt.
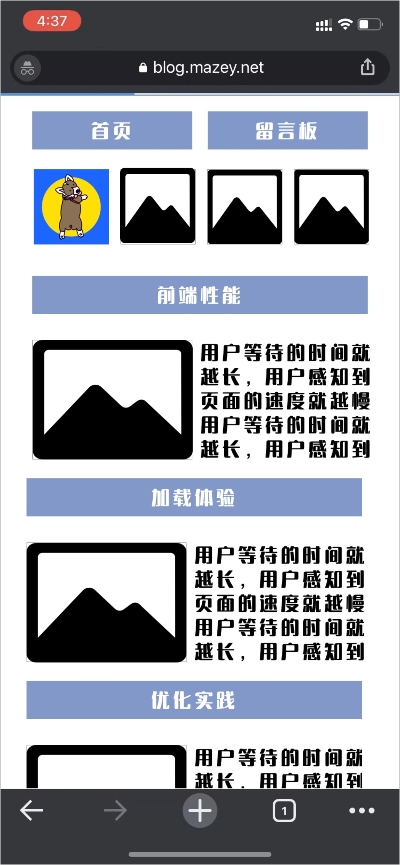
Example of coordination v-lazy} implementation:
img[lazy=loading] {
    background-size: contain;
    background-image: url(...) ;
}
Lazy loading example:
const imageSrc = '...';
const imgLoad = new Image();
imgLoad.onload = () => {
    // Analog setting picture src
    setImageSrc(imageSrc);
};
imgLoad.src = imageSrc;
3.3 page anti shake
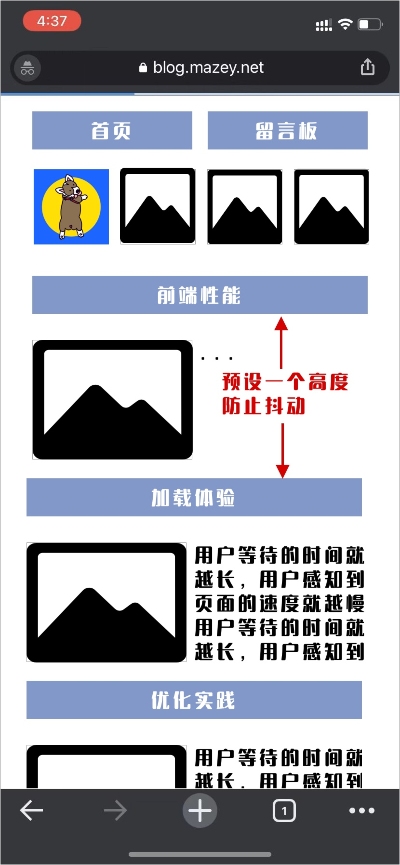
The small icon occupying the first screen is directly transferred to Base64, and the height of the necessary module is set to avoid the jitter of the whole page.
Appendix A PWA
Desktop PWA application:
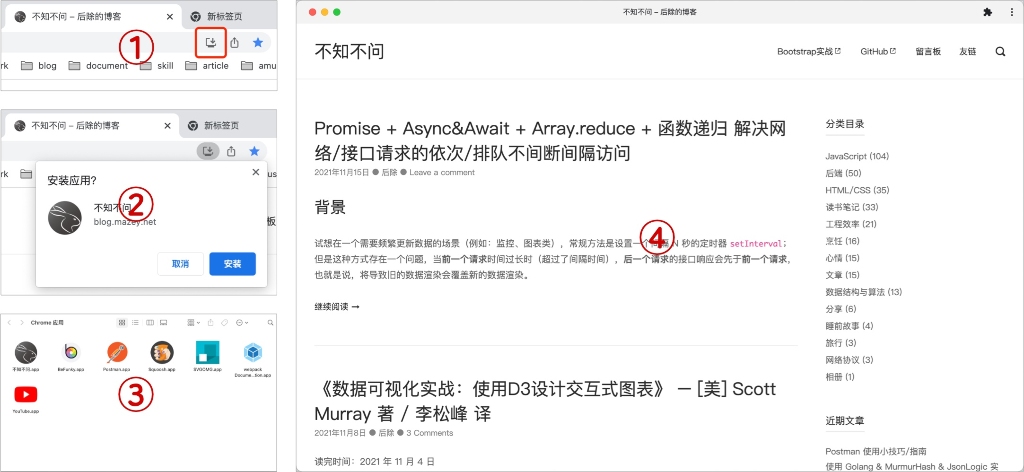
Add mobile terminal to desktop:

A.1 what is PWA
PWA (Progressive Web App - Progressive Web App) Is a concept proposed by Google Chrome in 2015. PWA does not specifically refer to a certain technology, but a Web App that applies multiple technologies to improve the user experience. Its core technologies include Web App Manifest,Service Worker,Web Push User experience is the core of PWA.
The main features of PWA are as follows:
- Reliable - it can be loaded and displayed instantly even when the network is unstable or even disconnected.
- User experience - fast response, with smooth transition animation and user operation feedback.
- User stickiness - like Native App, it can be added to the desktop, can accept offline notifications, and has an immersive user experience.
PWA itself emphasizes progressive Progressive can be understood from two perspectives. Firstly, PWA is still evolving, and standards such as Service Worker, Web App Manifest and Device API will make great progress every year; secondly, the design of the standard is downward compatible and less invasive, and the cost for developers to use new features is very small. They only need to add new features on the original site to make the user experience of the site gradually improve Progressive enhancement. Relevant technical baseline: What makes a good Progressive Web App?.
- The site requires HTTPS.
- The page needs to be responsive and have a good browsing experience on both tablet and mobile devices.
- All URL s have content display when the network is disconnected, and the browser default page will not be displayed.
- Wep App Manifest needs to be supported and can be Add to desktop.
- Even in the 3G network, the page loading is faster and the interactive time is shorter.
- It can be displayed normally in mainstream browsers.
- The animation should be smooth and have user operation feedback.
- Each page has a separate URL.
A.2 case study
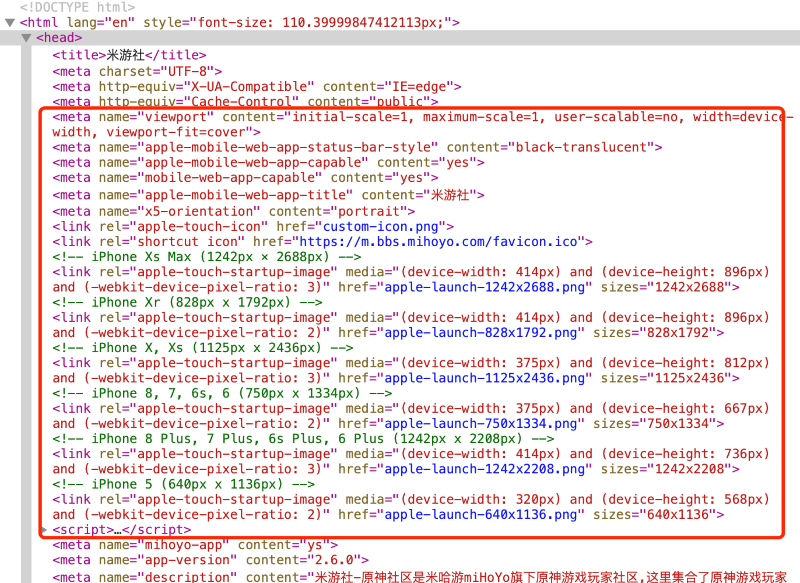
A.2.1 MIHA Tour - Collapse 3

Access address: https://bbs.mihoyo.com/bh3/
PWA: it only supports adding to the desktop on the IOS side.
A.2.2. AliExpress

Access address: https://m.aliexpress.com/
PWA: use Google Workbox (CDN)
- Support adding to the desktop, manifest.
- Support caching, Service Worker.
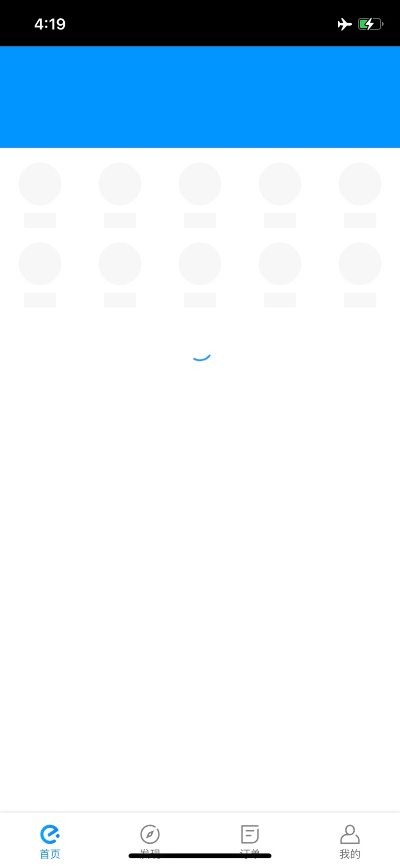
A.2. Are you hungry
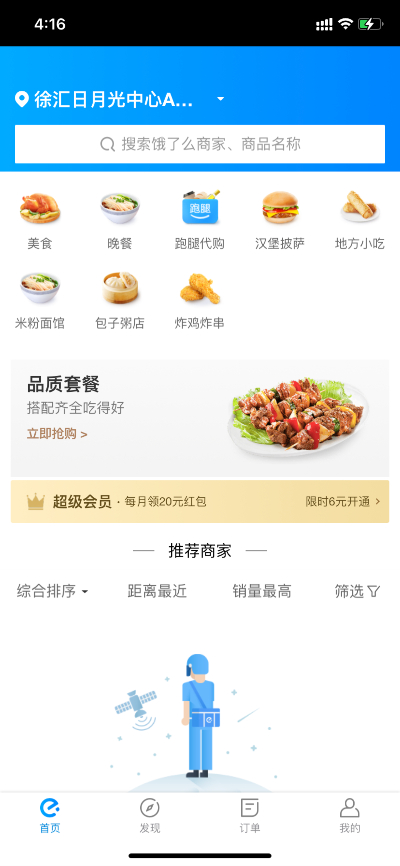
Access address: https://h5.ele.me/msite/#pwa=true
PWA: self research- PWA's practical experience in hungry
- Support adding to the desktop, manifest.
- Support caching and offline access, Service Worker.
A.2.4 Instagram
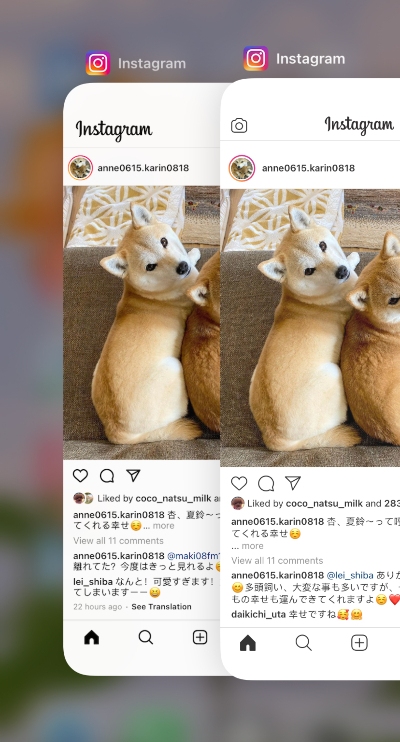
Native application on the left, PWA on the right

Access address: https://www.instagram.com/
PWA: using Google Workbox
- Support adding to the desktop, manifest.
- Support caching, Service Worker.
A.2.5 Twitter
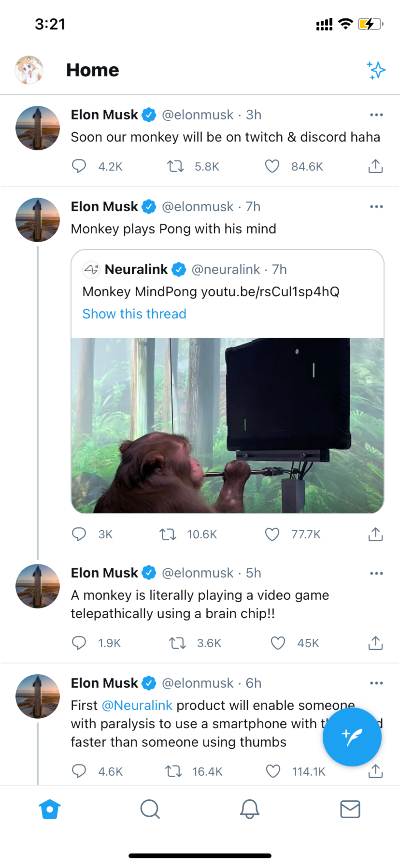
Access address: https://mobile.twitter.com/home
PWA: Twitter self research- How we built Twitter Lite
- Support adding to the desktop, manifest.
- Support caching and offline access, Service Worker.
In addition to normal static resources, Twitter also caches the home page.
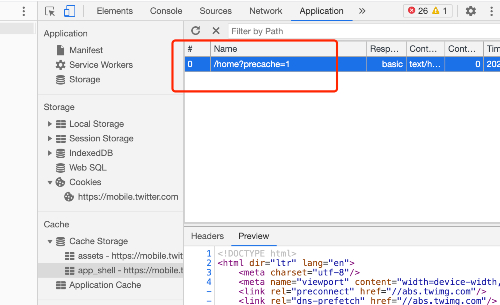
Offline has a good user experience, rather than displaying the default browser page.

A.3. Technical selection (Service Worker)
A.3.1 build a Service Worker using Google Workbox
A.3.1.1 what is Workbox
Workbox is a set of libraries that can help developers write service workers through CacheStorage API cache resources. When using the Service Worker and cachestorage APIs together, you can control how the resources (HTML, CSS, JS, images, etc.) used on the website are requested from the network or cache, and even allow the cached content to be returned offline.
A.3.1.2 how to use Workbox
Workbox consists of many NPM modules. First install it from NPM, and then import the modules required by the project Service Worker. One of the main features of workbox is its routing and caching policy module.
Routing and caching policy
Workbox allows different caching policies to manage the caching of HTTP requests. First, determine whether the request being processed meets the conditions. If so, apply a caching policy to it. Matching is done through a callback function that returns a true value. The cache policy can be a predefined policy of workbox, or you can create your own policy. The following is a basic Service Worker using routing and caching.
import { registerRoute } from 'workbox-routing';
import {
  NetworkFirst,
  StaleWhileRevalidate,
  CacheFirst,
} from 'workbox-strategies';

// Used for filtering matches based on status code, header, or both
import { CacheableResponsePlugin } from 'workbox-cacheable-response';
// Used to limit entries in cache, remove entries after a certain period of time
import { ExpirationPlugin } from 'workbox-expiration';

// Cache page navigations (html) with a Network First strategy
registerRoute(
  // Check to see if the request is a navigation to a new page
  ({ request }) => request.mode === 'navigate',
  // Use a Network First caching strategy
  new NetworkFirst({
    // Put all cached files in a cache named 'pages'
    cacheName: 'pages',
    plugins: [
      // Ensure that only requests that result in a 200 status are cached
      new CacheableResponsePlugin({
        statuses: [200],
      }),
    ],
  }),
);

// Cache CSS, JS, and Web Worker requests with a Stale While Revalidate strategy
registerRoute(
  // Check to see if the request's destination is style for stylesheets, script for JavaScript, or worker for web worker
  ({ request }) =>
    request.destination === 'style' ||
    request.destination === 'script' ||
    request.destination === 'worker',
  // Use a Stale While Revalidate caching strategy
  new StaleWhileRevalidate({
    // Put all cached files in a cache named 'assets'
    cacheName: 'assets',
    plugins: [
      // Ensure that only requests that result in a 200 status are cached
      new CacheableResponsePlugin({
        statuses: [200],
      }),
    ],
  }),
);

// Cache images with a Cache First strategy
registerRoute(
  // Check to see if the request's destination is style for an image
  ({ request }) => request.destination === 'image',
  // Use a Cache First caching strategy
  new CacheFirst({
    // Put all cached files in a cache named 'images'
    cacheName: 'images',
    plugins: [
      // Ensure that only requests that result in a 200 status are cached
      new CacheableResponsePlugin({
        statuses: [200],
      }),
      // Don't cache more than 50 items, and expire them after 30 days
      new ExpirationPlugin({
        maxEntries: 50,
        maxAgeSeconds: 60 * 60 * 24 * 30, // 30 Days
      }),
    ],
  }),
);
This Service Worker uses a network first policy to cache navigation requests (for new HTML pages). When its status code is 200, this policy stores the cached pages in a cache called pages Stale While Revalidate strategy Cache CSS, JavaScript and Web Worker, and store the cached resources in a cache called assets. The cache priority strategy is adopted to cache images. The cached images are stored in a cache called images, which expires in 30 days, and only 50 images are allowed at a time.
Pre cache
In addition to caching when making requests (runtime caching), Workbox also supports pre caching, that is, caching resources when installing Service Worker. There are many resources that are very suitable for pre caching: the starting URL of Web applications, offline fallback pages, and key JavaScript and CSS files.
Use a plug-in (webpack or rollup) that supports pre cache manifest injection to use pre cache in the new Service Worker.
import { precacheAndRoute } from 'workbox-precaching';

// Use with precache injection
precacheAndRoute(self.__WB_MANIFEST);
This Service Worker will pre cache the file at installation time and replace self__ WB_ Manifest, which contains the resources injected into the Service Worker at build time.
Offline fallback
A common pattern that makes Web applications feel more robust when working offline is to provide a back page instead of displaying the browser's default error page. With Workbox routing and pre caching, you can set this mode in a few lines of code.
import { precacheAndRoute, matchPrecache } from 'workbox-precaching';
import { setCatchHandler } from 'workbox-routing';

// Ensure your build step is configured to include /offline.html as part of your precache manifest.
precacheAndRoute(self.__WB_MANIFEST);

// Catch routing errors, like if the user is offline
setCatchHandler(async ({ event }) => {
  // Return the precached offline page if a document is being requested
  if (event.request.destination === 'document') {
    return matchPrecache('/offline.html');
  }

  return Response.error();
});
If the user is offline, the content of the cached offline page is returned instead of generating a browser error.
With Workbox, you can use the power of Service Worker to improve performance and provide your site with an excellent user experience independent of the network.
A.3.2. Self developed Service Worker
The self-developed Service Worker is more flexible and controllable, but the R & D cost is high because various compatibility needs to be considered.
A.4 technical practice (Service Worker)
A.4.1 using CLI
To install Workbox:
npm install workbox-cli -D

npx workbox --help
Configure workbox config according to the boot js:
npx workbox wizard
Generate the Service Worker program according to the configuration:
npx workbox generateSW workbox-config.js
Since the actual static resources are mounted on the CDN, you need to Modify the prefix of the pre rendered asset.

Workbox CLI - generateSW - Configuration
// A transformation that prepended the origin of a CDN for any URL starting with '/assets/' could be implemented as:

const cdnTransform = async (manifestEntries) => {
  const manifest = manifestEntries.map(entry => {
    const cdnOrigin = 'https://example.com';
    if (entry.url.startsWith('/assets/')) {
      entry.url = cdnOrigin + entry.url;
    }
    return entry;
  });
  return {manifest, warnings: []};
};
More cache configurations are available Official documents.
A.4.2. Using Webpack
Installation:
npm install workbox-webpack-plugin --save-dev
Webpack configuration:
// Inside of webpack.config.js:
const WorkboxPlugin = require('workbox-webpack-plugin');
// Version info...
const id = `${page}-v${version}`;

module.exports = {
  // Other webpack config...

  plugins: [
    // Other plugins...

    // WIKI https://developers.google.com/web/tools/workbox/reference-docs/latest/module-workbox-webpack-plugin.GenerateSW#GenerateSW
    new WorkboxPlugin.GenerateSW({
        cacheId: `${id}-gsw`,
        // Do not precache images
        exclude: [/\.(?:png|jpg|jpeg|svg)$/, 'service-wroker.js'], // Page need refresh twice.
        // target dir
        swDest: `../dist/${page}/service-worker.js`,
        skipWaiting: true,
        clientsClaim: true,
        // Define runtime caching rules.
        // WIKI https://developers.google.com/web/tools/workbox/reference-docs/latest/module-workbox-build#.RuntimeCachingEntry
        // Example https://gist.github.com/jeffposnick/fc761c06856fa10dbf93e62ce7c4bd57
        runtimeCaching: [
          // icon images
          {
            // Match any request that ends with .png, .jpg, .jpeg or .svg.
            urlPattern: /^https:\/\/cdn.example.com\/platform/, // /\.(?:png|jpg|jpeg|svg)$/,
            // Apply a cache-first strategy.
            handler: 'CacheFirst',
            options: {
              // Use a custom cache name.
              cacheName: `${id}-icon-images`,
              // Only cache 50 images, and expire them after 30 days
              expiration: {
                maxEntries: 50
              },
              // Ensure that only requests that result in a 200 status are cached
              cacheableResponse: {
                statuses: [0, 200]
              }
            }
          },
          // note images & others
          {
            // Match any request that ends with .png, .jpg, .jpeg or .svg.
            urlPattern: /^https:\/\/image.example.com/, // /\.(?:png|jpg|jpeg|svg)$/,
            // Apply a cache-first strategy.
            handler: 'CacheFirst',
            options: {
              // Use a custom cache name.
              cacheName: `${id}-note-images`,
              // Only cache 50 images, and expire them after 30 days
              expiration: {
                maxEntries: 50,
                maxAgeSeconds: 60 * 60 * 24 * 30 // 30 Days
              },
              // Ensure that only requests that result in a 200 status are cached
              cacheableResponse: {
                statuses: [0, 200]
              }
            }
          }
        ]
      });
  ]
};
Trigger Service Work in the page:
<script>
// Check that service workers are supported
if ('serviceWorker' in navigator) {
  // Use the window load event to keep the page load performant
  window.addEventListener('load', () => {
    navigator.serviceWorker.register('/service-worker.js');
  });
}
</script>
A.5 add to desktop scheme
A.5.1 manifest.json configuration
{
  "name": "I don't know",
  "short_name": "I don't know",
  "description": "yyds",
  "start_url": "/?entry_mode=standalone",
  "display": "standalone",
  "orientation": "portrait",
  "background_color": "#F3F3F3",
  "theme_color": "#F3F3F3",
  "icons": [
    {
      "src": "https://mazey.cn/fav/logo-dark-circle-32x32.png",
      "sizes": "32x32",
      "type": "image/png"
    },
    {
      "src": "https://mazey.cn/fav/logo-dark-circle-144x144.png",
      "sizes": "144x144",
      "type": "image/png"
    },
    {
      "src": "https://mazey.cn/fav/logo-dark-circle-152x152.png",
      "sizes": "152x152",
      "type": "image/png"
    },
    {
      "src": "https://mazey.cn/fav/logo-dark-circle-180x180.png",
      "sizes": "180x180",
      "type": "image/png"
    },
    {
      "src": "https://mazey.cn/fav/logo-dark-circle-192x192.png",
      "sizes": "192x192",
      "type": "image/png"
    },
    {
      "src": "https://mazey.cn/fav/logo-dark-circle-512x512.png",
      "sizes": "512x512",
      "type": "image/png"
    }
  ],
  "scope": "/"
}
A.5. 2 < head > configuration
Configure the open screen picture, status bar, etc. for the website.
<!--Mazey's favicon begin-->
<link rel="shortcut icon" type="image/png" href="https://mazey.cn/fav/logo-dark-circle-transparent-144x144.png">
<link rel="icon" type="image/png" sizes="32x32" href="https://mazey.cn/fav/logo-dark-circle-transparent-32x32.png">
<link rel="apple-touch-icon" sizes="144x144" href="https://mazey.cn/fav/logo-dark-circle-144x144.png">
<link rel="apple-touch-icon" sizes="152x152" href="https://mazey.cn/fav/logo-dark-circle-152x152.png">
<link rel="apple-touch-icon" sizes="180x180" href="https://mazey.cn/fav/logo-dark-circle-180x180.png">
<link rel="apple-touch-icon" sizes="192x192" href="https://mazey.cn/fav/logo-dark-circle-192x192.png">
<link rel="apple-touch-icon" sizes="512x512" href="https://mazey.cn/fav/logo-dark-circle-512x512.png">
<!--Mazey's favicon end-->
<!--Mazey's pwa manifest.json-->
<link rel="manifest" href="/wp-content/themes/polestar/manifest.json">
<!-- Startup logo  - begin -->
<!-- iPhone Xs Max (1242px × 2688px) -->
<link rel="apple-touch-startup-image" media="(device-width: 414px) and (device-height: 896px) and (-webkit-device-pixel-ratio: 3)" href="https://i.mazey.net/asset/read/cat-lovers-1242x2688.jpg" sizes="1242x2688">
<!-- iPhone Xr (828px x 1792px) -->
<link rel="apple-touch-startup-image" media="(device-width: 414px) and (device-height: 896px) and (-webkit-device-pixel-ratio: 2)" href="https://i.mazey.net/asset/read/cat-lovers-828x1792.jpg" sizes="828x1792">
<!-- iPhone X, Xs (1125px x 2436px) -->
<link rel="apple-touch-startup-image" media="(device-width: 375px) and (device-height: 812px) and (-webkit-device-pixel-ratio: 3)" href="https://i.mazey.net/asset/read/cat-lovers-1125x2436.jpg" sizes="1125x2436">
<!-- iPhone 8, 7, 6s, 6 (750px x 1334px) -->
<link rel="apple-touch-startup-image" media="(device-width: 375px) and (device-height: 667px) and (-webkit-device-pixel-ratio: 2)" href="https://i.mazey.net/asset/read/cat-lovers-750x1334.jpg" sizes="750x1334">
<!-- iPhone 8 Plus, 7 Plus, 6s Plus, 6 Plus (1242px x 2208px) -->
<link rel="apple-touch-startup-image" media="(device-width: 414px) and (device-height: 736px) and (-webkit-device-pixel-ratio: 3)" href="https://i.mazey.net/asset/read/cat-lovers-1242x2208.jpg" sizes="1242x2208">
<!-- iPhone 5 (640px x 1136px) -->
<link rel="apple-touch-startup-image" media="(device-width: 320px) and (device-height: 568px) and (-webkit-device-pixel-ratio: 2)" href="https://i.mazey.net/asset/read/cat-lovers-640x1136.jpg" sizes="640x1136">
<!-- Startup logo  - end -->
<!-- Touch Bar Site icons displayed in the area -->
<link rel="mask-icon" href="https://mazey.cn/fav/logo-dark-circle.svg" color="#F3F3F3">
<!-- Theme color = manifest.json theme_color -->
<meta name="theme-color" content="#F3F3F3">
<meta name="apple-mobile-web-app-capable" content="yes">
<!-- Status bar color default/black/black-translucent -->
<meta name="apple-mobile-web-app-status-bar-style" content="black-translucent">
<!-- Application name -->
<meta name="apple-mobile-web-app-title" content="I don't know">
<!-- stay Windows 8 On, we can fix the website on the start screen and support personalized custom color blocks icon And background pictures. This label is used to define the background image of the color block. The color block diagram should be 144*144 Pixel png Format picture, transparent background. -->
<meta name="msapplication-TileImage" content="https://mazey.cn/fav/logo-dark-circle-transparent-144x144.png">
<!-- Same as the previous metadata msapplication-TileImage Similarly, this function is used to set color values and personalize custom color patches (magnets) icon -->
<meta name="msapplication-TileColor" content="#F3F3F3">
Summary of open screen picture size:
| Screen size | multiple | Picture size |
|---|---|---|
| 1024x1366(512x683) | x2 | 2048x2732 |
| 834x1194(417x597) | x2 | 1668x2388 |
| 768x1024(384x512) | x2 | 1536x2048 |
| 834x1112(417x556) | x2 | 1668x2224 |
| 810x1080 | x2 | 1620x2160 |
| 428x926(214x463) | x3 | 1284x2778 |
| 390x844 | x3 | 1170x2532 |
| 375x812 | x3 | 1125x2436 |
| 414x896 | x3 | 1242x2688 |
| 414x896 | x2 | 828x1792 |
| 414x736 | x3 | 1242x2208 |
| 375x667 | x2 | 750x1334 |
| 320x568 | x2 | 640x1136 |
Appendix B client cache support
After the page is loaded for the first time, the client caches the resources. After each load, it directly reads the cache without network request, and then compares the requested version with the online version. If there is an update, it caches again for the next access, which greatly shortens the white screen time. The disadvantage is that it lags behind the online version forever.
Appendix C client offline package support
In order to solve the problem of client cache lag, offline package is a way to download page resources in advance. The disadvantage is that it takes up more traffic for users, and the advantage is that it can realize the real page "second on".

Appendix D optimizing backend interface data
The first screen dynamic rendering is subject to the data returned by the back-end interface. If the interface has problems such as large volume, front and rear dependencies, large number and coupling, the first screen rendering is often slow because of waiting for data. The solution is to pull up the back end to sort out what data is needed for the first screen, and use an interface to transmit the first screen data to the front end.
Appendix E optimizing memory usage
In the Performance field of the browser console, you can record every detail of the entire page life cycle, including a large number of descriptions of the memory occupation of the JavaScript stack.
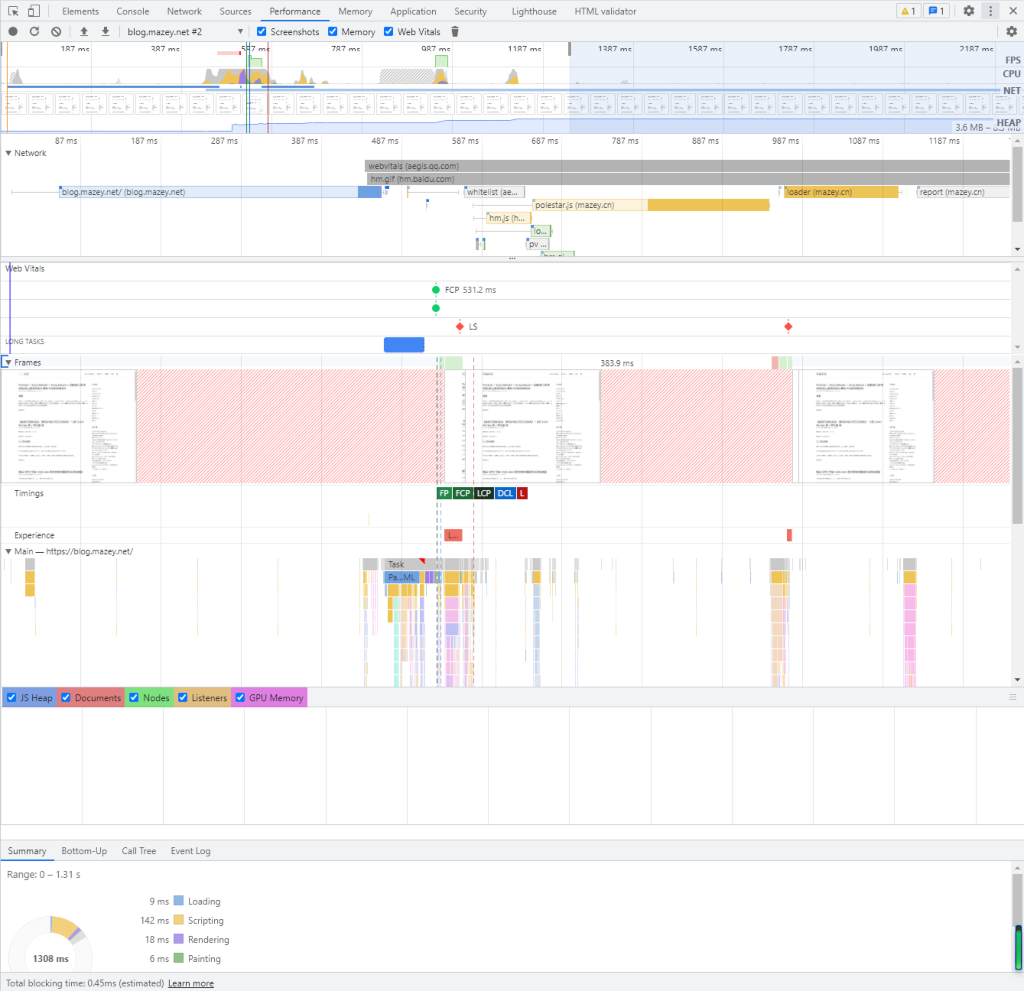
E.1 CPU memory
CPU memory is attached to the CPU, and is almost universally two DIMMs wide (128b), and is a multi-drop bus (so requires more power and conditioning to drive, even at lower clocks.) Of course, we generally expect to be able to configure CPU memory by snapping in different DIMMs, so the CPU's memory controller is far more complicated and flexible.
JavaScript's occupation of memory is affected by the code. If you cache and calculate a large amount of data, process a large amount of strings and other space consuming behaviors at runtime, the memory will soar at an extremely high speed, and in extreme cases, the application hosting the web page will flash back.
E.2 GPU video memory
GPU memory is attached to the GPU, and is a wider interface, with shorter paths and a point-to-point connection. As a consequence, it generally runs at higher speed (clock) than CPU memory.
It's common for GPU memory to deliver several hundred GB/s to the GPU; for a CPU, it's in the mid tens of GB/s. (There are higher-end CPUs with very wide interfaces that are around 100 GB/s.)
The internal design of both kinds of memory is very similar.
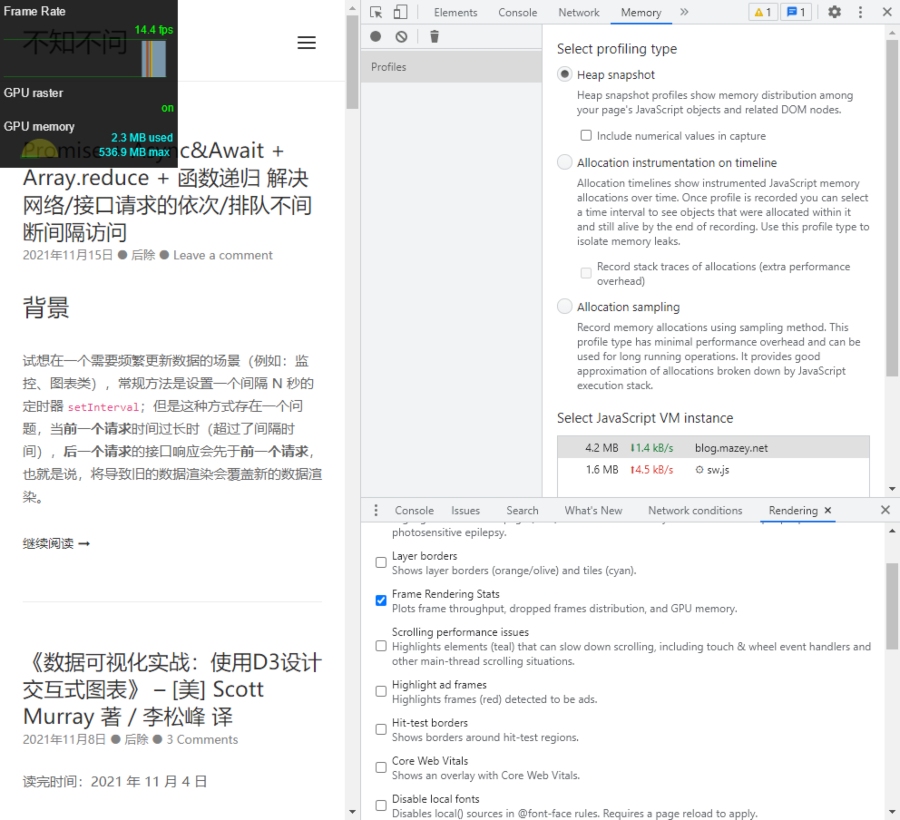
According to my self-test, this part of memory is greatly affected by screen size and frame number. If it is animation or high-precision picture rendering, the memory will float upward.
Appendix F pre rendering
For dynamically rendered pages, the first screen needs to wait for JavaScript loading to complete before rendering. The longer you wait for JavaScript loading, the longer the white screen. In the CI/CD phase, the traditional SSR process is executed once, and the dynamically generated index HTML overwrites the original "empty" index HTML, which optimizes the first screen loading experience, saves the steps of skeleton screen, and improves the loading speed. use prerender-spa-plugin Pre rendered pages can be easily configured and are now widely used in React/Vue projects.
reference resources
- Resource Hints – What is Preload, Prefetch, and Preconnect?
- Progressive Web application (PWA) | MDN
- What is the difference between GPU memory and CPU memory?
- Use the memory performance analyzer to view the memory usage of the application
Copyright notice
All original articles of this blog are copyrighted by the author. Reprint must include this statement, keep this article complete, and indicate the author in the form of hyperlink Post Division And the original address of this article: https://blog.mazey.net/2548.html
(end)