catalogue
1.1 processing of drawing data
1.2 common graph neural network data sets
2. Establishment of spatial map convolution neural network
2.2 implementation of edge revolution
3. Self mapping neural network data set
3.1 create a graph dataset that can be completely put into memory
3.2 creating data sets that cannot be completely put into memory
5. Establishment of heterogeneous map
6. Establishment of heterogeneous graph neural network
6.1 transform simple graph neural network into heterogeneous graph neural network
6.2 using heterogeneous graph neural network in PyG
8. Common convolution layers included in pyg
1. Problems such as connection timeout occur when downloading datasets using Planetoid
2. When building data, 'OMP:...' appears Question of
I Use of PyG
PyG (PyTorch geometry) is a graph neural network framework based on PyTorch. It is recommended to understand the use of PyTorch before learning PyG. Otherwise, you can't understand it. You can see my experience about the use of PyTorch
Use of PyTorch 12.0 review articles
PyG includes data set processing in graph neural network training, multi GPU training, multiple classical graph neural network models, multiple commonly used graph neural network training data sets, and supports self built data sets, mainly including the following modules
- torch_geometric: main module
- torch_geometric.nn: build neural network layer
- torch_geometric.data: representation of graph structure data
- torch_geometric.loader: load dataset
- torch_geometric.datasets: common graph neural network datasets
- torch_geometric.transforms: data transformation
- torch_geometric.utils: common tools
- torch_ geometric. Graph Gym: a common graph neural network model
- torch_geometric.profile: training of supervision model
1. Overall introduction
Introduce the use of PyG through some examples, and have some understanding first.
(
You can see mine
How to implement a graph convolution neural network with PyG and train it on Cora data set
Let's have a general understanding first
)
1.1 processing of drawing data
Torch for PyG_ geometric. data. Data saves the data of the graph structure. The imported data (this data refers to the specific data you imported, not the previous torch_geometric.data) will contain the following attributes in PyG
- data.x: The attribute information of the graph node. For example, each user in the social network is a node. This x can represent the attribute information of the user. The dimension is [num_nodes,num_node_features]
- data. edge_ Index: node connection information in coo format. The type is torch Long, the dimension is [2,num_edges] (it specifically contains two lists, and the number at the corresponding position of each list indicates that there is an edge connection between the corresponding nodes)
- data.edge_attr: attribute information of edges in the graph, dimension [num_edges,num_edge_features]
- data.y: For label information, the dimensions are different according to the specific task. If it is a classification task on the node, the dimension is [num_edges, number of categories]. If it is a classification task on the whole graph, the dimension is [1, number of categories]
- data.pos: node location information (generally used for visualization of graph structure data)
In addition to the above properties, we can also use data Face custom attributes.
Let's see how to use PyG to represent the following figure
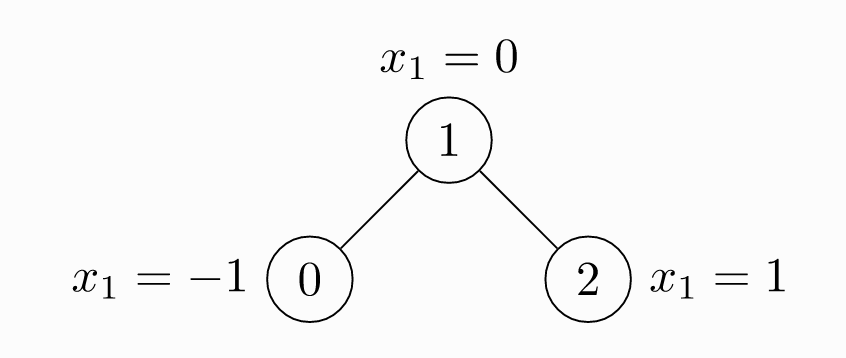
import torch
from torch_geometric.data import Data

# Edge connection information
# Note that the edges of an undirected graph are defined twice
edge_index = torch.tensor(
    [
        # This indicates that nodes 0 and 1 are connected because they are undirected graphs
        # Then 1 and 0 are also connected
        # Look up and down
        [0, 1, 1, 2],
        [1, 0, 2, 1],
    ],
    # Specify data type
    dtype=torch.long
)
# Attribute information of node
x = torch.tensor(
    [
        # Three nodes
        # The attribute vector dimension of each node is 1
        [-1],
        [0],
        [1],
    ]
)
# Data instantiated as a graph structure
data = Data(x=x, edge_index=edge_index)
# View graph data
print(data)
# What information does the graph data contain
print(data.keys)
# View node attribute information
print(data['x'])
# Number of nodes
print(data.num_nodes)
# Number of sides
print(data.num_edges)
# Dimension of node attribute vector
print(data.num_node_features)
# Are there isolated nodes in the diagram
print(data.has_isolated_nodes())
# Is there a ring in the figure
print(data.has_self_loops())
# Is it a directed graph
print(data.is_directed())
1.2 common graph neural network data sets
PyG contains some common graph depth learning public data sets, such as
- Planetoid dataset (Cora, Citeseer, Pubmed)
- Some come from http://graphkernels.cs.tu-dortmund.de Common graph neural network classification data set
- QM7,QM9
- 3D point cloud dataset, such as FAUST, ModelNet10, etc
Next, take the ENZYMES dataset (including 600 graphs, each graph is divided into 6 categories and the classification of graph level) as an example of how to use PyG's public dataset
from torch_geometric.datasets import TUDataset

# Import dataset
dataset = TUDataset(
    # Specifies the storage location of the dataset
    # If there is no corresponding dataset at the specified location
    # PyG will download automatically
    root='../data/ENZYMES',
    # Dataset to use
    name='ENZYMES',
)
# Length of data set
print(len(dataset))
# Number of categories in the dataset
print(dataset.num_classes)
# Dimension of node attribute vector in dataset
print(dataset.num_node_features)
# 600 graphs. We can choose which graph to use according to the index
data = dataset[0]
print(data)
# Randomly disrupt data sets
dataset = dataset.shuffle()
1.3 how to load a dataset
In real graph neural network training, we usually load part of the dataset into memory to train graph neural network, which is called a batch. Then how does PyG load a batch? PyG will divide it into the batch size we specify according to our dataset
for instance
from torch_geometric.loader import DataLoader
from torch_geometric.datasets import TUDataset


# data set
dataset = TUDataset(
    root='../data/ENZYMES',
    name='ENZYMES',
    use_node_attr=True,
)
# Create dataset loader
# Load 32 data into memory at a time
loader = DataLoader(
    # Dataset to load
    dataset=dataset,
    # ENZYMES contains 600 diagrams
    # Load 32 at a time
    batch_size=32,
    # Whether to randomly disrupt the data after each addition (which can increase the generalization of the model)
    shuffle=True
)
for batch in loader:
    print(batch)
    print(batch.num_graphs)
2. Establishment of spatial map convolution neural network
Spatial graph convolution (note that the word "convolution" in graph neural network is obtained in the generalized sense of "feature extraction", which is different from the convolution kernel calculation in convolution neural network) can be regarded as a process of information transmission and fusion between adjacent nodes, and the calculation formula can be generalized as

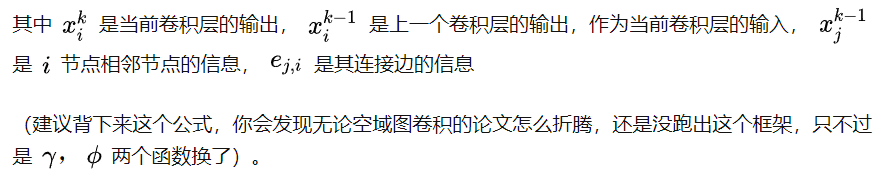
PyG uses MessagePassing to implement the above calculation process. Next, take two classical graph neural network papers as examples to introduce the use of MessagePassing.
https://arxiv.org/abs/1609.02907arxiv.org/abs/1609.02907
Dynamic Graph CNN for Learning on Point Cloudsarxiv.org/abs/1801.07829
2.1 implementation of GCN
In the first paper, the convolution formula proposed by the author is


from abc import ABC

import torch
from torch_geometric.nn import MessagePassing
from torch_geometric.utils import add_self_loops, degree


# Define GCN spatial graph convolution neural network
class GCNConv(MessagePassing, ABC):
    # Network initialization
    def __init__(self, in_channels, out_channels):
        """
        :param in_channels: Dimension of node attribute vector
        :param out_channels: After graph convolution, the feature of the node represents the dimension
        """
        # Define gamma function as summation function, aggr='add '
        super(GCNConv, self).__init__(aggr='add')
        # Define the innermost linear transformation
        # The implementation is a linear layer
        self.linear_change = torch.nn.Linear(in_channels, out_channels)

    # Define information aggregation function
    def message(self, x_j, norm):
        # Regularization
        # norm.view(-1,1) turns norm into a column vector
        # x_j is the characteristic representation matrix of nodes
        return norm.view(-1, 1) * x_j

    # Forward transfer, graph convolution
    def forward(self, x, edge_index):
        """
        :param x:The dimension of the node in the figure is[Number of nodes,Number of adjacent dimensions of node attribute]
        :param edge_index: Connection information of edges in the graph,Dimension is[2,Number of sides]
        :return:
        """
        # Add node to its own ring
        # Because the node contains itself when gathering the information of adjacent nodes at the back
        # add_self_loops will be in the edge_ In the connection information table on the index side,
        # Add information like [i,i]
        # Represents a ring from a node to itself
        # The function returns [connection information of the edge, attribute information on the edge]
        edge_index, _ = add_self_loops(edge_index, num_nodes=x.size(0))
        # Linear transformation
        x = self.linear_change(x)
        # Computational regularization
        row, col = edge_index
        # Gets the degree of the node
        deg = degree(col, x.size(0), dtype=x.dtype)
        # Regularization formula
        deg_inv_sqrt = deg.pow(-0.5)
        # Set the unknown value to 0 to avoid errors in the following calculation
        deg_inv_sqrt[deg_inv_sqrt == float('inf')] = 0
        # Regularization part
        norm = deg_inv_sqrt[row] * deg_inv_sqrt[col]
        # Information transmission and integration
        # propagate will automatically call self Message function and pass parameters to it
        return self.propagate(edge_index, x=x, norm=norm)


# Test the graph convolution neural network we just defined
if __name__ == '__main__':
    # Instantiate a graph convolution neural network
    # It is assumed that the dimension of the node attribute vector of the graph is 16 and the dimension of the node feature representation vector accumulated by the graph volume is 32
    conv = GCNConv(16, 32)
    # Randomly generate a node attribute vector
    # 5 nodes, and the attribute vector is 16 dimensions
    x = torch.randn(5, 16)
    # Randomly generated edge connection information
    # Suppose there are 3 sides
    edge_index = [
        [0, 1, 1, 2, 1, 3],
        [1, 0, 2, 1, 3, 1]
    ]
    edge_index = torch.tensor(edge_index, dtype=torch.long)
    # Perform graph convolution
    output = conv(x, edge_index)
    # Output the characteristic representation matrix after convolution
    print(output.data)
2.2 implementation of edge revolution
In the second paper, the convolution formula proposed by the author is


import torch
from torch.nn import Sequential as Seq
from torch.nn import Linear, ReLU
from torch_geometric.nn import MessagePassing


# Define EdgeConv graph convolution neural network
class EdgeConv(MessagePassing):
    # Initialization graph convolution neural network
    def __init__(self, in_channels, out_channels):
        # The gamma function is defined as the maximum function
        super().__init__(aggr='max')
        # A feedforward neural network is defined
        self.mlp = Seq(
            # In the linear layer, the input after the information aggregation function is 2*in_channels
            Linear(2 * in_channels, out_channels),
            # Activation function
            ReLU(),
            # Output layer
            Linear(out_channels, out_channels)
        )

    # Define information aggregation function
    def message(self, x_i, x_j):
        tmp = torch.cat([x_i, x_j - x_i], dim=1)
        # The dimension of tmp after cat is [number of sides, 2*in_channels]
        return self.mlp(tmp)

    # Forward transfer, graph convolution
    def forward(self, x, edge_index):
        # x is the node attribute vector matrix
        # edge_index is the connection information of the edge
        # Carry out information transmission and fusion
        return self.propagate(edge_index, x=x)
3. Self mapping neural network data set
PyG divides the self built dataset into two folders - raw_dir,processed_dir. row_dir is the original data set, processed_dir is the data set after PyG processing
There are three filtering methods for data set PyG -- transform and pre_transform,pre_filter.
- Transform: read data and transform it
- pre_transform: transform the entire data set, and then store the transformed data. pre_filter is the same
PyG divides data sets into two types
- torch_geometric.data.InMemoryDataset: a data set that can be completely put into memory
- torch_geometric.data.Dataset: cannot be completely put into memory
3.1 create a graph dataset that can be completely put into memory
Do four things:
- Implement torch_geometric.data.InMemoryDataset.raw_file_names(): Tell PyG where to put the dataset
- Implement torch_geometric.data.InMemoryDataset.processed_file_names(): Tell PyG where to put the data set after processing
- Implement torch_geometric.data.InMemoryDataset.download(): Tell PyG where to get the data set
- Implement torch_geometric.data.InMemoryDataset.process(): Tell PyG how to process your dataset
A common template is like this
import torch
from torch_geometric.data import InMemoryDataset, download_url


# General template for implementing In Memory Dataset
class MyDataset(InMemoryDataset):
    # initialization
    def __init__(self, root, transfrom=None, pre_transform=None):
        # Root is the root directory of the dataset
        super(MyDataset, self).__init__(root, transfrom, pre_transform)
        # Load dataset
        self.data, self.slices = torch.load(self.processed_paths[0])

    def raw_file_names(self) -> Union[str, List[str], Tuple]:
        return ['file_1', 'file_2', ...]

    def processed_file_names(self) -> Union[str, List[str], Tuple]:
        return ['data.pt']

    def download(self):
        # Download dataset to raw_dir folder
        download_url(url, self.raw_dir)

    def process(self):
        data_list = [...]
        # Data filtering
        if self.pre_filter is not None:
            data_list = [data for data in data_list if self.pre_filter(data)]
        if self.pre_transform is not None:
            data_list = [self.pre_transform(data) for data in data_list]
        # self.collate combines all data to speed up storage
        # Data is the combined data
        # slices is a segmentation method that tells PyG how to restore data to the original data
        data, slices = self.collate(data_list)
        # Save data
        torch.save((data, slices), self.processed_paths[0])
3.2 creating data sets that cannot be completely put into memory
This is similar to the Dataset in PyTorch. On the basis of the above things, you need to
- Implement torch_geometric.data.Dataset.len(): Tell PyG how big the dataset is
- Implement torch_geometric.data.Dataset.get(): tells PyG how to get a data from the dataset
The general template is
import os.path as osp
import torch
from torch_geometric.data import Dataset, download_url


class MyDataset(Dataset):
    # initialization
    def __init__(self, root, transform=None, pre_transform=None):
        super(MyDataset, self).__init__(root, transform, pre_transform)

    def raw_file_names(self) -> Union[str, List[str], Tuple]:
        return ['file_1', 'file_2', ...]

    def processed_file_names(self) -> Union[str, List[str], Tuple]:
        return ['data_1.pt', ...]

    def download(self):
        path = download_url(url, self.raw_dir)

    def process(self):
        i = 0
        for raw_path in self.raw_paths:
            # Read data
            data = Data(...)
            # Filter dataset
            if self.pre_filter is not None and not self.pre_filter(data):
                pass
            if self.pre_transform is not None:
                data = self.pre_transform(data)
            # Save data
            torch.save(data, osp.join(self.processed_dir, 'data_{}.pt'.format(i)))
            i += 1

    def len(self):
        return len(self.processed_file_names)

    def get(self,idx):
        data = torch.load(osp.join(self.processed_dir, 'data_{}.pt'.format(idx)))
        return data
4. Batch processing
It comes from the idea of batch processing in traditional deep learning --- batch data, then combine each batch of data into a group, and then train them in groups. The amount of data in each group is called batch_size. PyG divides the graph data set into multiple groups for training
PyG will automatically help us set the graph dataset according to the batch defined by us_ Size segmentation, and then merge the data in each batch.
If we want to control how PyG combines data in a batch, we need to rewrite the torch ourselves_ geometric. data. Data.__ inc__ ()
Give two concrete examples
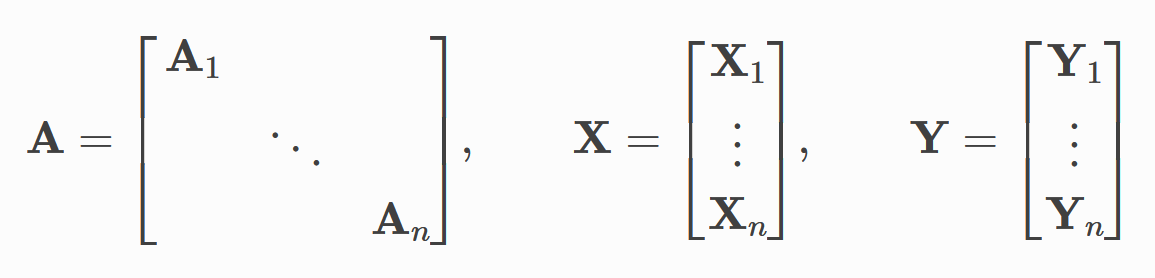
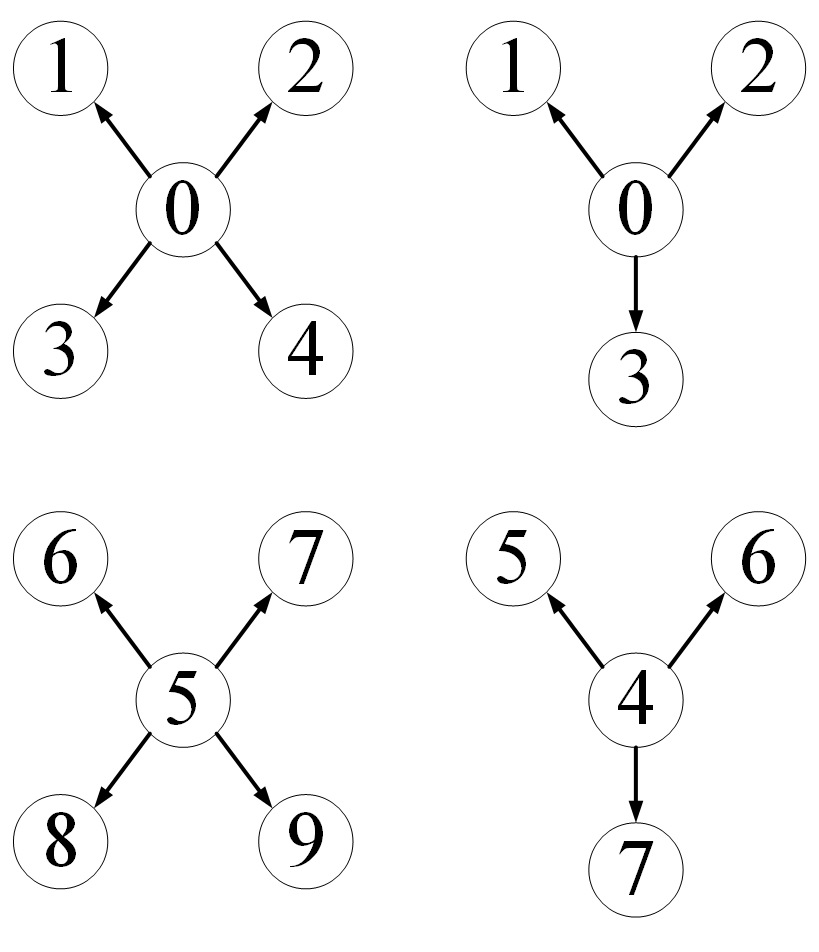
Suppose that each data in our dataset (note that each data) contains two graphs, and each data is like this
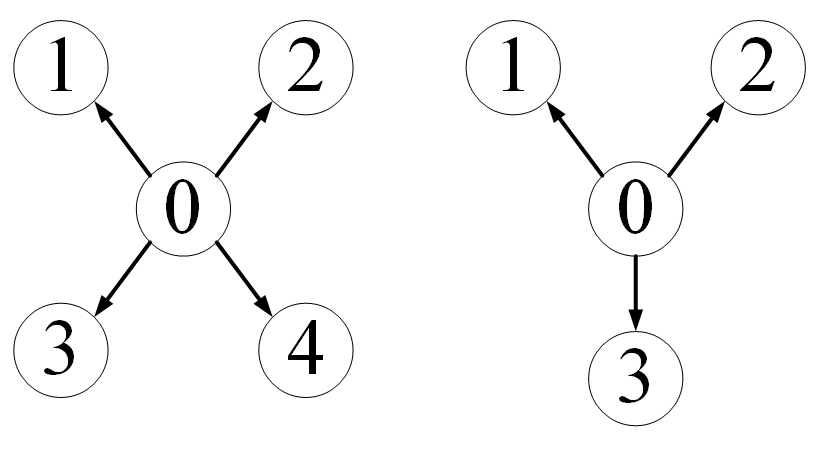
For this kind of data set, how to control PyG to merge multiple data into one batch_ For example, batch_size=2 means that every two data in the data set form a group to form a graph. The data in each batch is like this
from typing import Any
import torch
from torch_geometric.data import Data
from torch_geometric.loader import DataLoader
# Define graph data
class PairData(Data):
def __init__(self, edge_index_s=None, x_s=None, edge_index_t=None, x_t=None):
# Each data contains two graphs s,t
"""
:param edge_index_s: chart s Connection relationship of
:param x_s: chart s Node attribute matrix
:param edge_index_t: chart t Connection relationship of
:param x_t: chart t Node attribute matrix
"""
super(PairData, self).__init__()
self.edge_index_s = edge_index_s
self.x_s = x_s
self.edge_index_t = edge_index_t
self.x_t = x_t
def __inc__(self, key: str, value: Any, *args, **kwargs) -> Any:
# If you want to merge figure s
# Then tell PyG the number of nodes of graph s
if key == 'edge_index_s':
return self.x_s.size(0)
# If you are merging a graph t
# Then tell PyG the number of nodes of graph t
if key == 'edge_index_t':
return self.x_t.size(0)
# Default in other cases
else:
return super().__inc__(key, value, *args, **kwargs)
# Let's verify the merge method we defined above
# Definition diagram s
edge_index_s = torch.tensor([
[0, 0, 0, 0],
[1, 2, 3, 4],
])
x_s = torch.randn(5, 16)
# Definition diagram t
edge_index_t = torch.tensor([
[0, 0, 0],
[1, 2, 3],
])
x_t = torch.randn(4, 16) # 4 nodes.
# Verify that the simple definition dataset contains two data sets
data = PairData(edge_index_s, x_s, edge_index_t, x_t)
data_list = [data, data]
# batch_size=2
# follow_batch description node information
loader = DataLoader(data_list, batch_size=2, follow_batch=['x_s', 'x_t'])
# Verify whether PyG effectively combines the data of a batch in the way we define
batch = next(iter(loader))
# View data merged into one batch
print(batch)
# View s in batch (this is the combination of s in two original data as one)
print(batch.edge_index_s)
# View t in batch
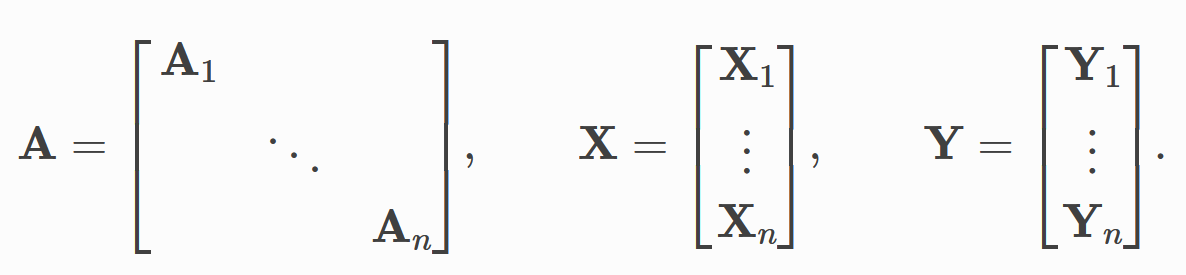
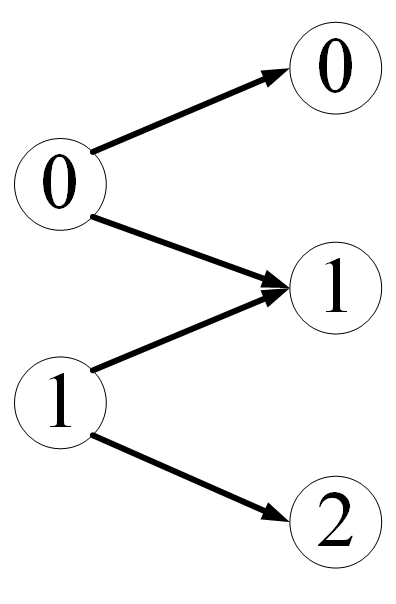
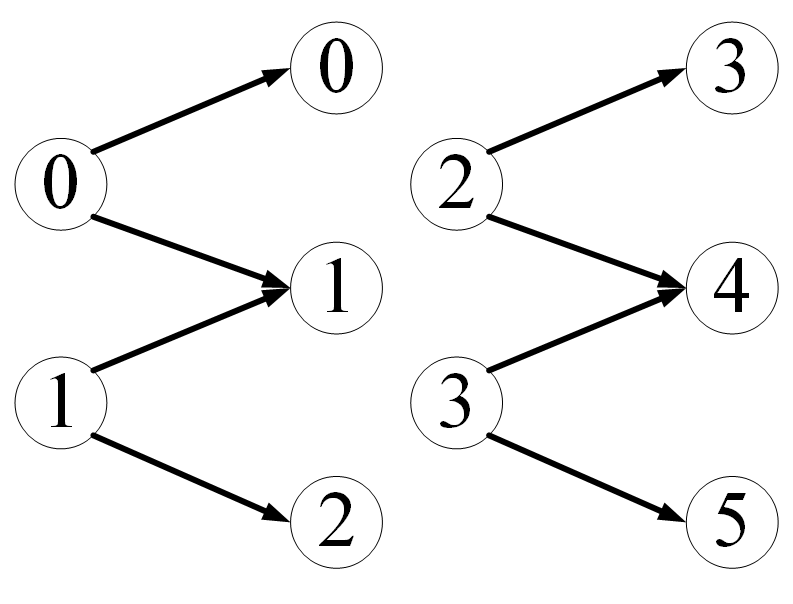
print(batch.edge_index_t)Take another example of a bipartite graph. Suppose that each data in our dataset is a bipartite graph, like this
Or batch_size=2, we want to control PyG so that the data becomes
import torch
from torch_geometric.data import Data
from torch_geometric.loader import DataLoader


# Define bipartite graph structure
class BipartiteData(Data):
    def __init__(self, edge_index=None, x_s=None, x_t=None):
        super().__init__()
        # Contains a set of edges
        # Two groups of nodes
        self.edge_index = edge_index
        self.x_s = x_s
        self.x_t = x_t

    # Define how each batch is merged
    def __inc__(self, key, value, *args, **kwargs):
        # If you want to merge the edge connection information of two graphs
        if key == 'edge_index':
            # The left side (the first row of edge connection information) is merged according to the number of nodes in the first group
            # The right side (the second row of edge connection information) is merged according to the number of nodes in the second group
            return torch.tensor([[self.x_s.size(0)], [self.x_t.size(0)]])
        else:
            return super().__inc__(key, value, *args, **kwargs)


edge_index = torch.tensor([
    [0, 0, 1, 1],
    [0, 1, 1, 2],
])
x_s = torch.randn(2, 16)
x_t = torch.randn(3, 16)
data = BipartiteData(edge_index, x_s, x_t)
data_list = [data, data]
loader = DataLoader(data_list, batch_size=2)
batch = next(iter(loader))
print(batch)
print(batch.edge_index)
5. Establishment of heterogeneous map
The graph discussed earlier can be classified as a simple graph - containing only one type of node and one type of edge.
However, in reality, we need to deal with many types of nodes and many types of edges between these nodes, which requires the concept of heterogeneous graph. In heterogeneous graph, different types of edges describe different relationships between different types of nodes. The task of heterogeneous graph neural network is to learn the characteristic representation of nodes or the whole heterogeneous graph on this graph structure. Heterogeneity map is accurately defined as follows:

Next, a movie scoring dataset MovieLens is used to illustrate how to construct a heterogeneous graph.
MovieLens contains the ratings of 600 users for movies. We use this data set to build a bipartite graph, including two types of nodes: movies and users, and one type of edge (containing multiple types of nodes, so it can be regarded as a heterogeneous graph)
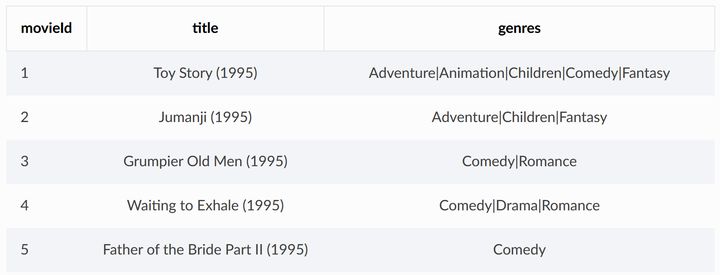
Movies in MovieLens The CSV file describes the information of the movie, including the unique ID of the movie in the dataset, the movie name, and the type of movie
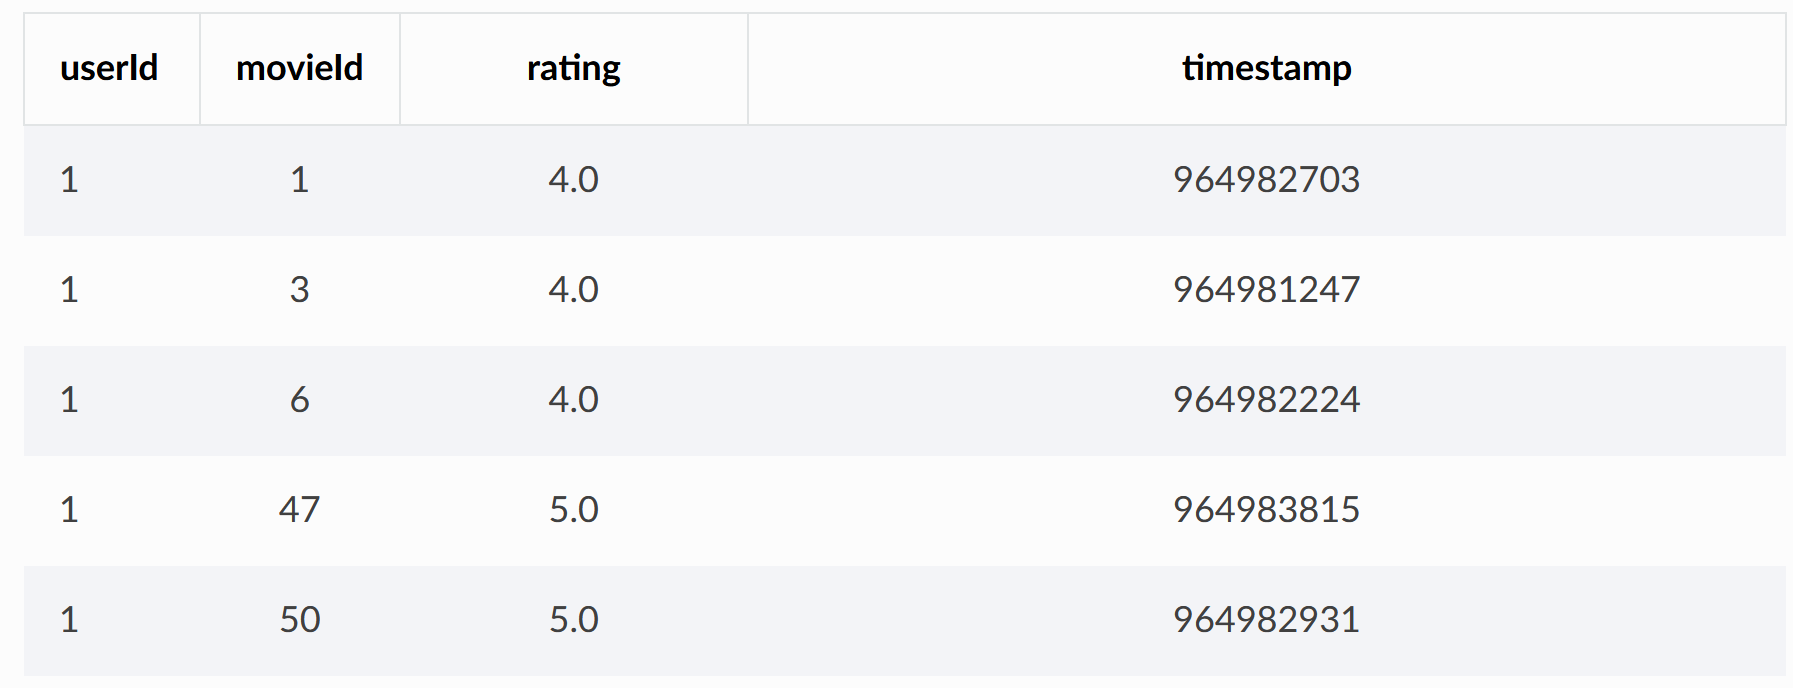
ratings.csv contains user ratings for movies
Next, the bipartite graph data set is established according to the two csv
import os.path as osp

import torch
import pandas as pd
from sentence_transformers import SentenceTransformer

from torch_geometric.data import HeteroData, download_url, extract_zip
from torch_geometric.transforms import ToUndirected, RandomLinkSplit

# Data set download address
url = 'https://files.grouplens.org/datasets/movielens/ml-latest-small.zip'
# Data set storage path
root = osp.join(osp.dirname(osp.realpath(__file__)), '../data/MovieLens')
# Download and unzip the dataset
extract_zip(download_url(url, root), root)
# Get movies csv,ratings.csv file
movie_path = osp.join(root, 'ml-latest-small', 'movies.csv')
rating_path = osp.join(root, 'ml-latest-small', 'ratings.csv')
# Viewing datasets with pandas
print(pd.read_csv(movie_path).head())
print(pd.read_csv(rating_path).head())


# Put the movie name in that column
# Using the embedding model, each movie name is represented by a vector (Embedding)
class SequenceEncoder(object):
    # initialization
    # Specify the embedded model we use
    # And equipment used
    def __init__(self, model_name='all-MiniLM-L6-v2', device=None):
        # Equipment used
        self.device = device
        # Embedded model name used
        self.model = SentenceTransformer(model_name, device=device)

    # The embedded model does not participate in the training of subsequent graph neural networks
    @torch.no_grad()
    def __call__(self, df):
        x = self.model.encode(
            # Value to embed
            df.values,
            # Display processing progress
            show_progress_bar=True,
            # Tensor converted to PyTorch
            convert_to_tensor=True,
            # Equipment used
            device=self.device
        )
        return x.cpu()


# Embed the movie type column
class GenresEncoder(object):

    # Separator
    def __init__(self, sep='|'):
        self.sep = sep

    def __call__(self, df):
        # Split all movie types
        # The logic of the last two for is:
        # for col in df.values takes the value of each row
        # for g in col.split(self.sep) splits the extracted value with the specified separator
        # set(g) converts the split result into a set to remove duplication
        genres = set(g for col in df.values for g in col.split(self.sep))
        # Number the movie type
        mapping = {genre: i for i, genre in enumerate(genres)}
        # The type of film is expressed in the form of multi hot
        x = torch.zeros(len(df), len(mapping))
        for i, col in enumerate(df.values):
            for genre in col.split(self.sep):
                x[i, mapping[genre]] = 1
        return x


# Read the information from the CSV file and create the node information in the bipartite graph
def load_node_csv(path, index_col, encoders=None, **kwargs):
    """
    :param path: CSV File path
    :param index_col: The index column in the file, that is, the column where the node is located
    :param encoders:Node embedder
    :param kwargs:
    :return:
    """
    df = pd.read_csv(path, index_col=index_col, **kwargs)
    # The index is represented by a number
    mapping = {index: i for i, index in enumerate(df.index.unique())}
    # Node attribute vector matrix
    x = None
    # If the embedder is not empty
    if encoders is not None:
        # Embed the corresponding columns
        # Get embedded vector representation
        xs = [encoder(df[col]) for col, encoder in encoders.items()]
        x = torch.cat(xs, dim=-1)

    return x, mapping


# Get node information
# Process movies CSV table to convert the 'movie name' and 'movie type' columns into the representation of embedded vectors
movie_x, movie_mapping = load_node_csv(
    movie_path, index_col='movieId', encoders={
        # Movie list embedder
        'title': SequenceEncoder(),
        # Embedder for movie type columns
        'genres': GenresEncoder()
    })
# Processing rates CSV table, the user ID is represented by the tensor in PyTorch
user_x, user_mapping = load_node_csv(rating_path, index_col='userId')
# Establish heterogeneous graph (here is a bipartite graph)
# HeteroData() is a built-in data structure in PyG that represents heterogeneous graphs
data = HeteroData()
# Add information of different types of nodes
# Add user information. The user has no attribute vector
# Just tell PyG how many user nodes there are
data['user'].num_nodes = len(user_mapping)
# Tell PyG the attribute vector matrix of the movie, and PyG will infer the number of movie nodes according to x
data['movie'].x = movie_x
print(data)


# Establish information between users and movies
# Convert the user's rating of the movie into a tensor in PyTorch
# Facilitate subsequent model training
class IdentityEncoder(object):

    def __init__(self, dtype=None):
        self.dtype = dtype

    def __call__(self, df):
        return torch.from_numpy(df.values).view(-1, 1).to(self.dtype)


# Establish the connection information of bipartite graph edges
def load_edge_csv(path, src_index_col, src_mapping, dst_index_col, dst_mapping,
                  encoders=None, **kwargs):
    """
    :param path: CSV Path to table
    :param src_index_col: The left node of bipartite graph comes from CSV Which column of the table, such as'user_id'This column
    :param src_mapping:take user_id Map to node number, as we defined earlier user_mapping
    :param dst_index_col:Similarly, the movie node on the right of the bipartite graph
    :param dst_mapping:
    :param encoders:Edge inserter
    :param kwargs:
    :return:
    """
    df = pd.read_csv(path, **kwargs)
    # Establish connection information
    src = [src_mapping[index] for index in df[src_index_col]]
    dst = [dst_mapping[index] for index in df[dst_index_col]]
    # Note here, edge_index dimension is [2, number of sides]
    edge_index = torch.tensor([src, dst])
    # Attribute information of edges
    edge_attr = None
    # If the embedder is not empty
    if encoders is not None:
        edge_attrs = [encoder(df[col]) for col, encoder in encoders.items()]
        edge_attr = torch.cat(edge_attrs, dim=-1)

    return edge_index, edge_attr


# Get the edge information of bipartite graph
edge_index, edge_label = load_edge_csv(
    rating_path,
    # On the left of the bipartite graph is the user
    src_index_col='userId',
    src_mapping=user_mapping,
    # On the right is the movie
    dst_index_col='movieId',
    dst_mapping=movie_mapping,
    encoders={'rating': IdentityEncoder(dtype=torch.long)},
)
# Name the edges in the bipartite graph ('user ',' rates', 'movie')
data['user', 'rates', 'movie'].edge_index = edge_index
data['user', 'rates', 'movie'].edge_label = edge_label
print(data)

# At this point, our heterogeneous graph (here is a bipartite graph) data set is constructed
# Next, it is further transformed into a data set that can be trained
# Convert to undirected graph
data = ToUndirected()(data)
# Delete the attribute information of the opposite side because there is no scoring data for the user
del data['movie', 'rev_rates', 'user'].edge_label

# The data set is divided into training set, test set and verification set according to a certain proportion
transform = RandomLinkSplit(
    num_val=0.05,
    num_test=0.1,
    # Negative sampling ratio
    # No negative sampling, all input for training
    neg_sampling_ratio=0.0,
    # Tell PyG the connection of edges
    edge_types=[('user', 'rates', 'movie')],
    rev_edge_types=[('movie', 'rev_rates', 'user')],
)
# Split dataset
train_data, val_data, test_data = transform(data)
print(train_data)
print(val_data)
print(test_data)
6. Establishment of heterogeneous graph neural network
Take OGB dataset as an example
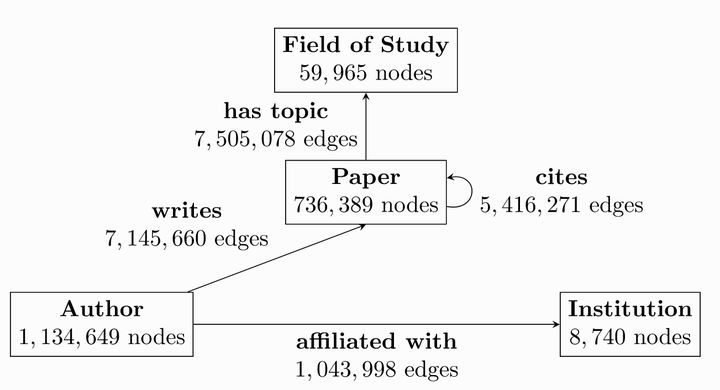
There are four types of nodes in the OGB dataset
- author
- paper
- institution
- field of study
4 types of edges
- Writes: the connection between author and paper
- Affiliated with: the connection between author and institution
- Cites: relationship between paper and paper
- Has topic: relationship between paper and field of study
The task on the OGB dataset is to predict the location of the paper in the whole relationship network
Let's see how to represent this heterogeneous graph
from torch_geometric.data import HeteroData

# HeteroData is a heterograph data structure of PyG
data = HeteroData()
# Add node information
data['paper'].x = ...
data['author'].x = ...
data['institution'].x = ...
data['field_of_study'].x = ...
# Add edge connection information
data['paper', 'cites', 'paper'].edge_index = ...
data['author', 'writes', 'paper'].edge_index = ...
data['author', 'affiliated_with', 'institution'].edge_index = ...
data['author', 'has_topic', 'institution'].edge_index = ...
# Add attribute information for edges
data['paper', 'cites', 'paper'].edge_attr = ...
data['author', 'writes', 'paper'].edge_attr = ...
data['author', 'affiliated_with', 'institution'].edge_attr = ...
data['paper', 'has_topic', 'field_of_study'].edge_attr = ...
In this way, the above heterograph is established, and we can input it into a heterograph neural network
# Heterogeneous graph neural network
model = HeteroGNN(...)
# Obtain the output of heterogeneous graph neural network
# Note that the input of heterogeneous graph neural network is_ dict
output = model(data.x_dict, data.edge_index_dict, data.edge_attr_dict)
If PyG contains the heterogeneous map you want to use, you can import it directly in this way
from torch_geometric.datasets import OGB_MAG

# Import dataset
dataset = OGB_MAG(
    root='../data',
    # Pretreatment mode
    # Convert to vector
    preprocess='metapath2vec',
)
print(dataset[0])
The following describes the functions commonly used in HeteroData
#Gets a node or edge in a heterogeneous graph
paper_node_data=data['paper']
cites_edge_data=data['paper','cites','paper']
#If the connection node set of edges or the naming of edges is unique, it can also be written like this
#Get edges using connection endpoints
cites_edge_data=data['paper','paper']
#Get using the name of the edge
cites_edge_data=data['cites']
#Add a new attribute to the node
data['paper'].year=...
#Delete some attributes of the node
def data['field_of_study']
#Get all types of information in heterogeneous graph through metadata
node_types,edge_types=data.metadata()
#All types of nodes
print(node_types)
#All types of edges
print(edge_types)
#Judging some properties of heterogeneous graphs
print(data.has_isolated_nodes())
#If the dimensions of different types of information match, the heterogeneous graph can also be fused into a simple graph
homogeneous_data=data.to_homogeneous()
import torch_geometric.transforms as T
#Transform heterogeneous graphs
#Become an undirected graph
data=T.ToUndirected()(data)
#Ring added to itself
data=T.AddSelfLoops()(data)
The following describes how to establish heterogeneous graph neural network
6.1 transform simple graph neural network into heterogeneous graph neural network
PyG can be accessed via torch_geometric.nn.to_hetero(), or torch_geometric.nn.to_hetero_with_bases() transforms a simple graph neural network into a heterogeneous graph
import torch
import torch_geometric.transforms as T
from torch_geometric.datasets import OGB_MAG
from torch_geometric.nn import SAGEConv, to_hetero

#Import dataset
data = OGB_MAG(
    root='./data',
    preprocess='metapath2vec',
    transform=T.ToUndirected())[0]

#Define an ordinary graph neural network
class GNN(torch.nn.Module):
    def __init__(self, hidden_channels, out_channels):
        super().__init__()
        self.conv1 = SAGEConv((-1, -1), hidden_channels)
        self.conv2 = SAGEConv((-1, -1), out_channels)

    def forward(self, x, edge_index):
        x = self.conv1(x, edge_index).relu()
        x = self.conv2(x, edge_index)
        return x

#Instantiate our defined graph neural network
model = GNN(hidden_channels=64, out_channels=dataset.num_classes)
#Convert it to heterogeneous graph form
model = to_hetero(model, data.metadata(), aggr='sum')
PyG to_ Here's how hetero works
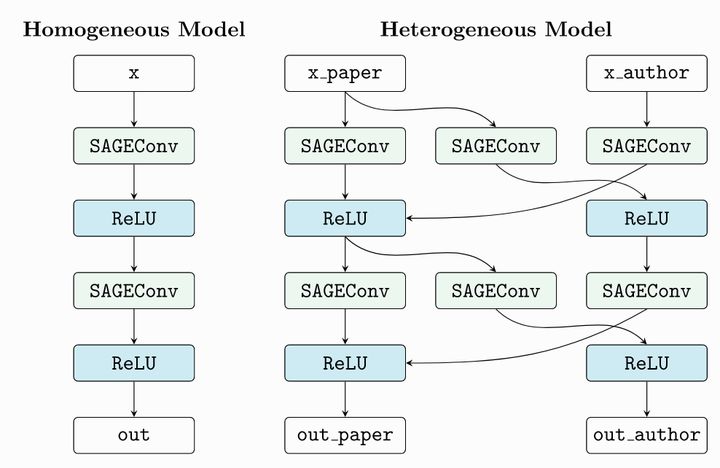
According to our heterogeneous graph data structure, it automatically copies the layer structure in the simple graph neural network structure defined by us, and adds the information transmission path.
torch_geometric.nn.conv.HeteroConv convolution layer also plays a similar function
from torch_geometric.nn import HeteroConv, GCNConv, SAGEConv, GATConv, Linear

class HeteroGNN(torch.nn.Module):
    def __init__(self, hidden_channels, out_channels, num_layers):
        super().__init__()

        self.convs = torch.nn.ModuleList()
        #Define map volume layer
        for _ in range(num_layers):
            #The outermost uses HeteroConv to convert the inner convolution layer into a heterogeneous graph version
            conv = HeteroConv(
                #Convolution layer to convert
                {
                ('paper', 'cites', 'paper'): GCNConv(-1, hidden_channels),
                ('author', 'writes', 'paper'): GATConv((-1, -1), hidden_channels),
                ('author', 'affiliated_with', 'institution'): SAGEConv((-1, -1), hidden_channels),
                },
                aggr='sum')
            self.convs.append(conv)

        self.lin = Linear(hidden_channels, out_channels)

    def forward(self, x_dict, edge_index_dict):
        for conv in self.convs:
            x_dict = conv(x_dict, edge_index_dict)
            x_dict = {key: x.relu() for key, x in x_dict.items()}
        return self.lin(x_dict['author'])

model = HeteroGNN(hidden_channels=64, out_channels=dataset.num_classes,
                  num_layers=2)
6.2 using heterogeneous graph neural network in PyG
7. Use of graphgym
GraphGym is further encapsulated on the basis of PyG. The experiment of graph neural network can be carried out in a parametric way. See the details
(I think I'd better build it myself without packaging)
8. Common convolution layers included in pyg
PyG contains multiple convolution layers in classical graph neural network papers

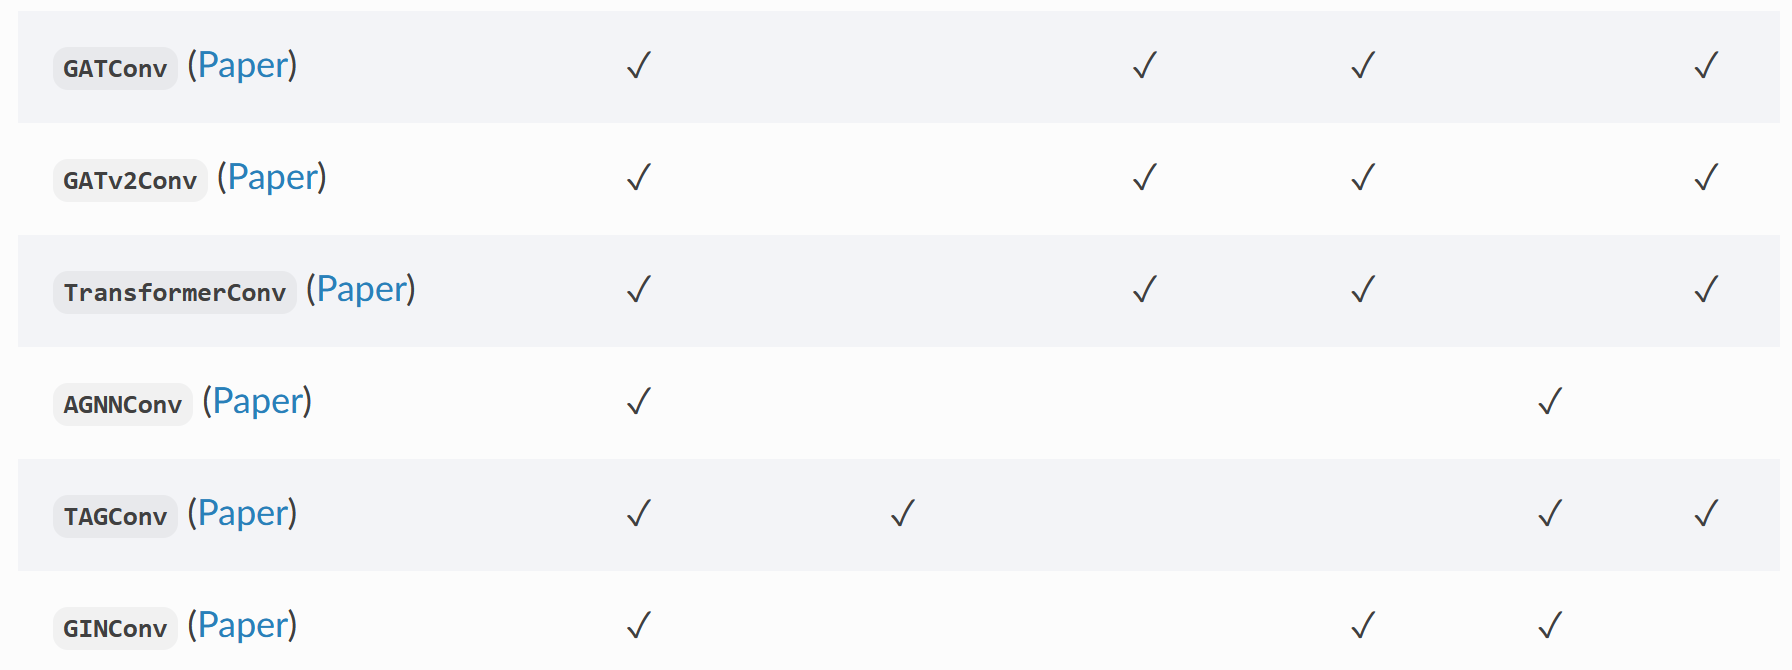

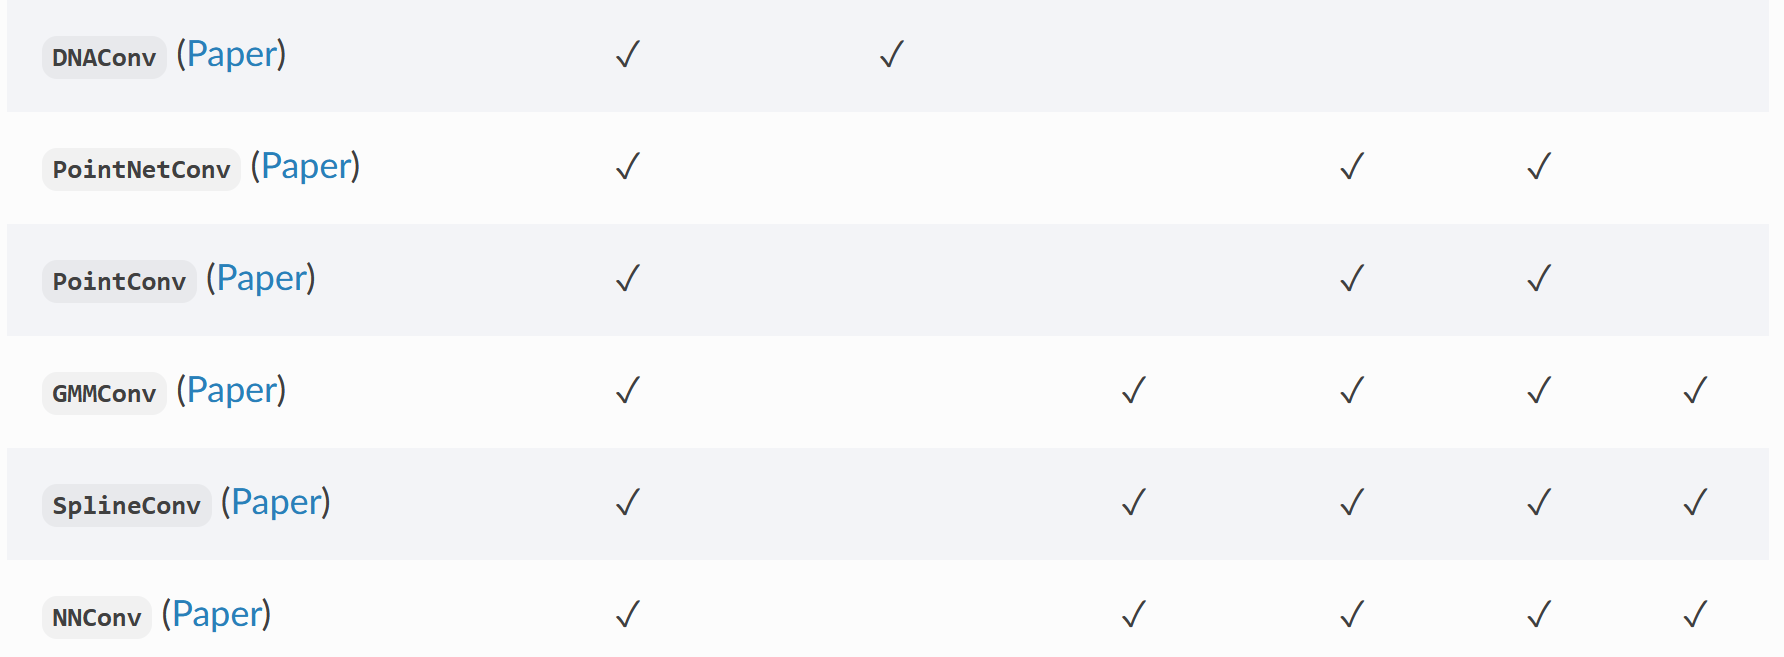
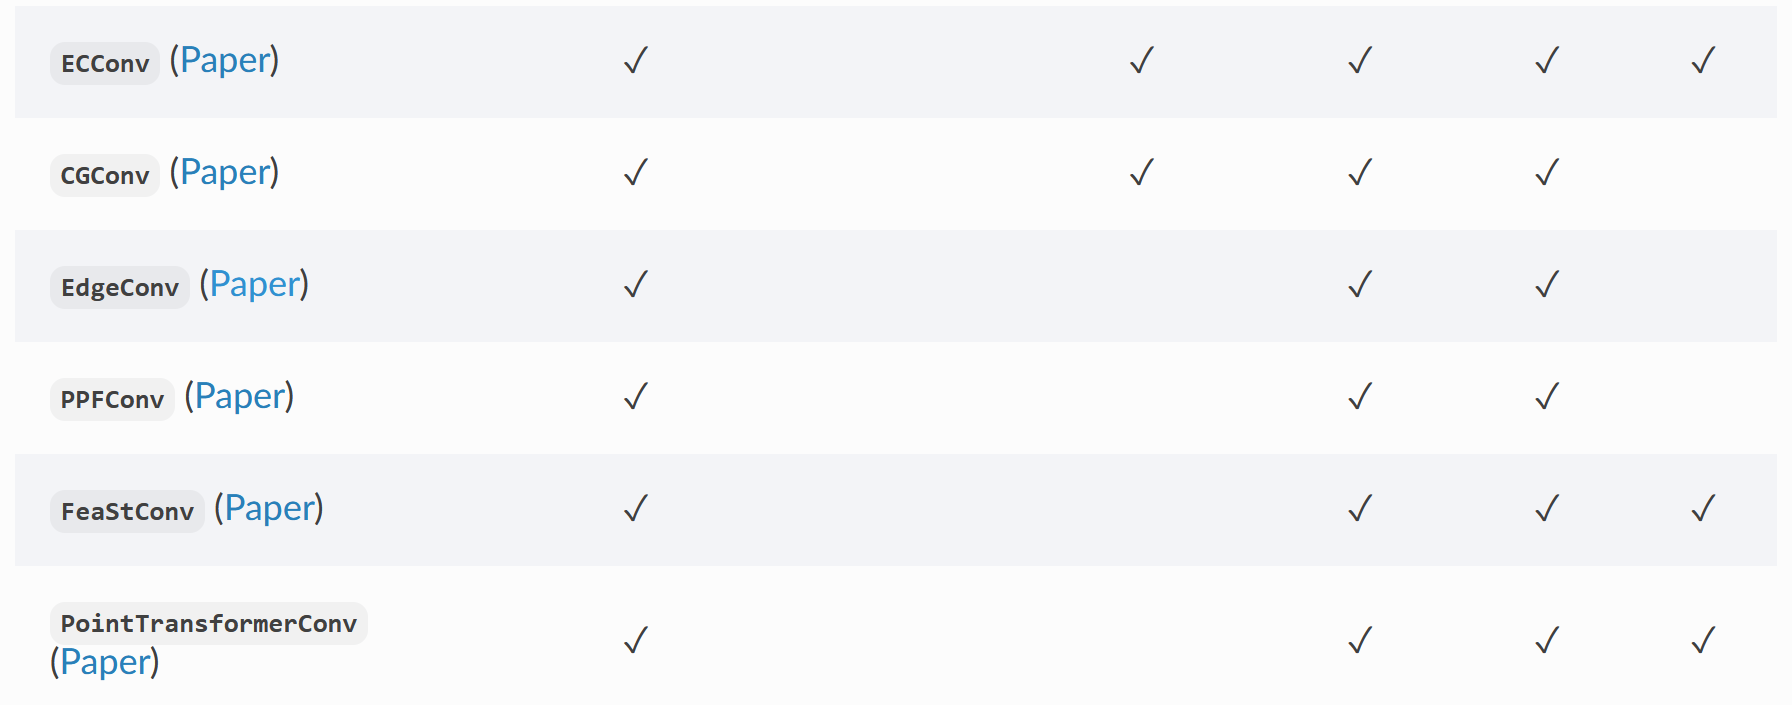
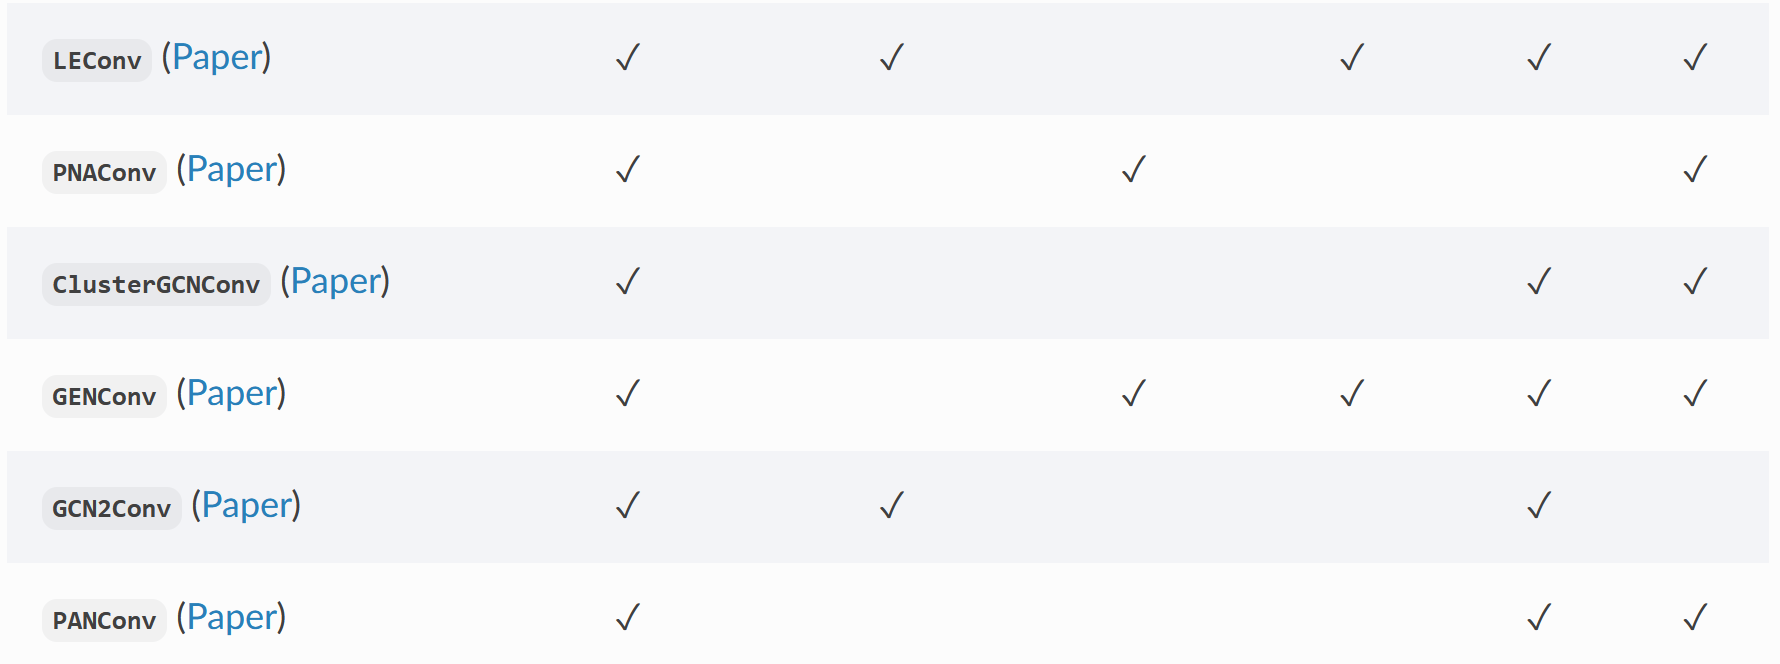
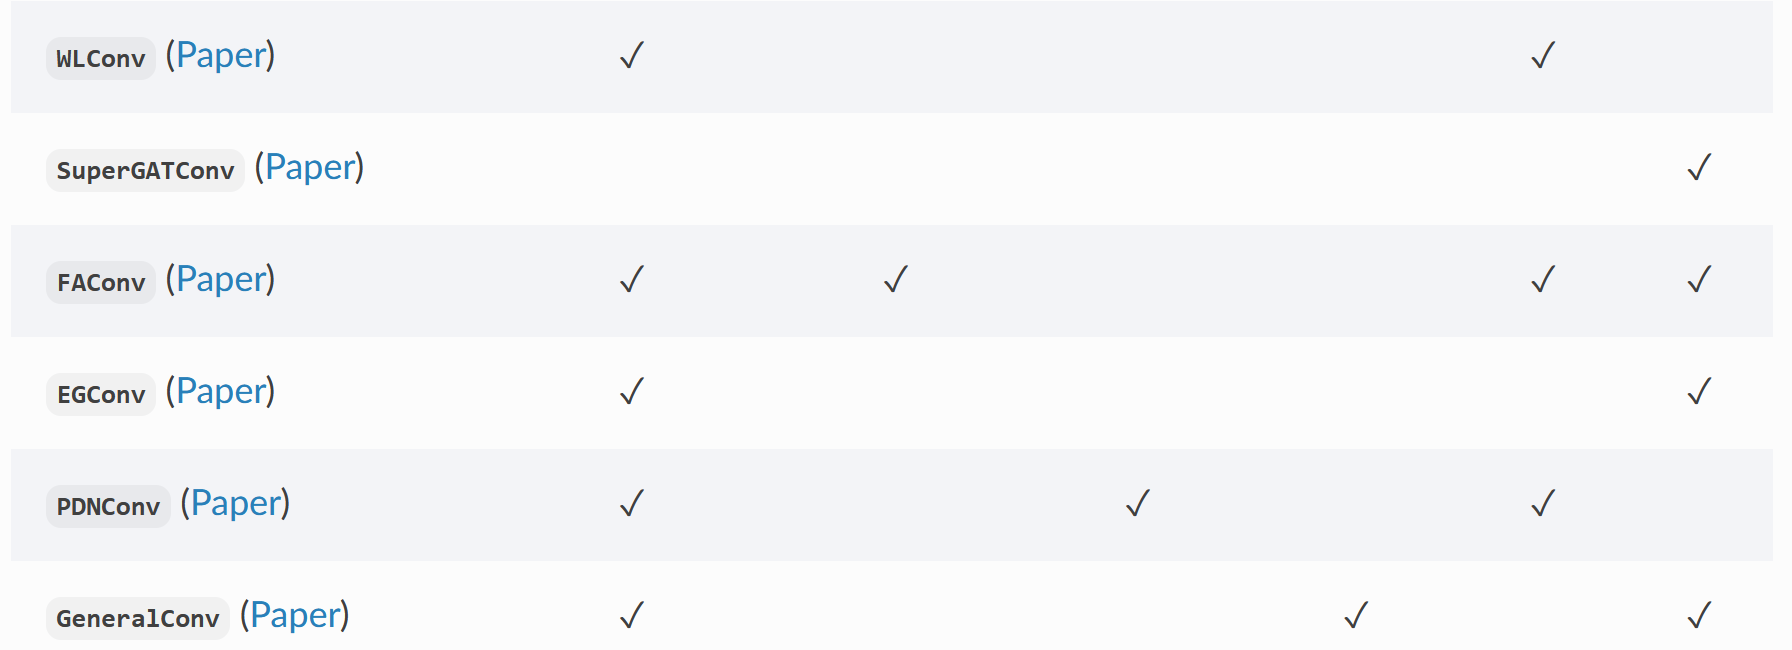
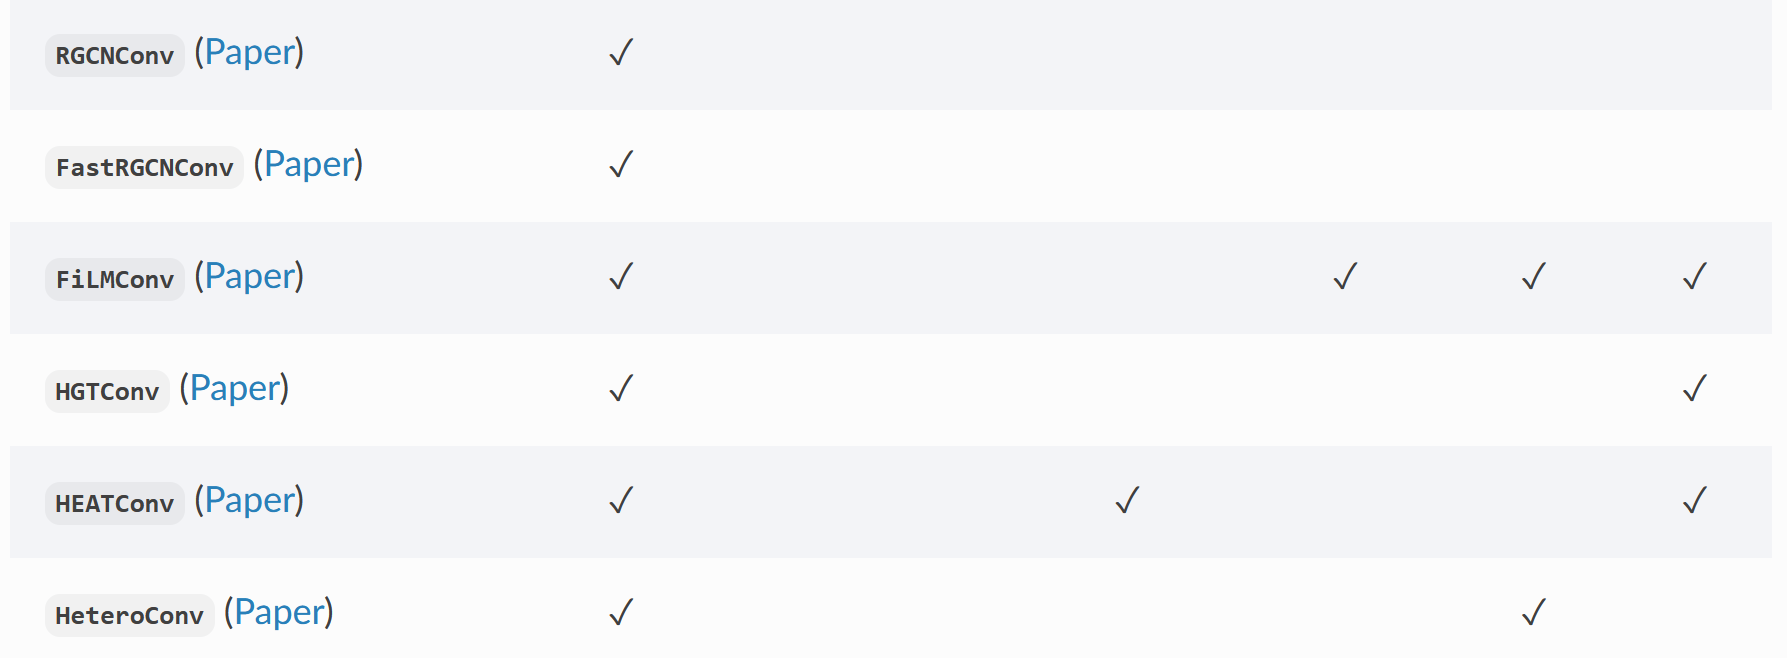


Part of the paper and source code of the convolution layer can be seen in my
II PyG stepping pit
1. Problems such as connection timeout occur when downloading datasets using Planetoid
: due to the slow connection of github, click the source file of Planetoid, find the first url attribute and set it to
url='https://gitee.com/jiajiewu/planetoid/raw/master/data'
Change to Chinese website
2. When building data, 'OMP:...' appears Question of
Add at the beginning of the code:
import os
os.environ['KMP_DUPLICATE_LIB_OK'] = 'TRUE'
(problems encountered when using PyG will be continuously updated)
Reprint
Figure neural network framework - use of pytorch geometry (pyg) and stepping on pits - knowledge