through the description in the previous sections, I believe that the little partner has a more detailed understanding of the application of PyQt. It is estimated that there is no problem in completing a simple application now. Is that enough? Of course not, leaving aside the complex layout, because this part is implemented by the Qt Dedigner plug-in explained later. We also need to understand PyQt advanced interface controls
1, Table and tree structure
the problem solved by tables and trees is how to regularly present more data in a control. PyQt provides two control classes to solve this problem, one of which is the control class of table structure; The other is the control class of tree structure.
1. Forms
under normal circumstances, an application needs to interact with a batch of data (such as arrays and lists), and then output this information in the form of tables. At this time, qtableview class is used. In qtableview, the user-defined data model can be used to display the content, and the data source can be bound through setModel.
1. Code example
import sys
from PyQt5.QtCore import *
from PyQt5.QtWidgets import *
from PyQt5.QtGui import *

class Table(QWidget):
    def __init__(self):
        super().__init__()
        self.setWindowTitle('QTableView Example of table view')
        self.resize(500,300)
        self.model=QStandardItemModel(4,4)
        self.model.setHorizontalHeaderLabels(['Title 1','Title 2','Title 3','Title 4'])
        for row in range(4):
            for column in range(4):
                item=QStandardItem('row %s,column %s'%(row,column))
                self.model.setItem(row,column,item)

        self.tableView=QTableView()
        self.tableView.setModel(self.model)

        layout=QVBoxLayout()
        layout.addWidget(self.tableView)
        self.setLayout(layout)

if __name__ == '__main__':

    app=QApplication(sys.argv)
    table=Table()
    table.show()
    app.exec_()
2. Code analysis:
self.model=QStandardItemModel(4,4)
set data hierarchy, 4 rows and 4 columns
self.model.setHorizontalHeaderLabels(['Title 1','Title 2','Title 3','Title 4'])
set the text content of four headers in the horizontal direction
item=QStandardItem('row %s,column %s'%(row,column))
self.model.setItem(row,column,item)
set the text value of each position
self.tableView=QTableView()
self.tableView.setModel(self.model)
instantiate the table view and set the model as a user-defined model
3. Supplementary description of attribute parameters
| Attribute method | explain |
|---|---|
| setHorizontalHeaderLabels() | Sets the horizontal label of the QTableWidget table control |
| setVerticalHeaderLabels() | Sets the vertical label of the QTableWidget table control |
| setItem(int ,int ,QTableWidgetItem) | Add values (row number, column number, value) to each cell control of the QTableWidget table control |
| setEditTriggers(EditTriggers triggers) | Set whether the table can be edited. Parameter: qabstractitemview NoEditTriggers; QAbstractItemView.CurrentChanged; QAbstractItemView.DoubleClicked; QAbstractItemView.SelectedClicked; QAbstractItemView.EditKeyPressed; QAbstractItemView.AnyKeyPressed; QAbstractItemView.AllEditTriggers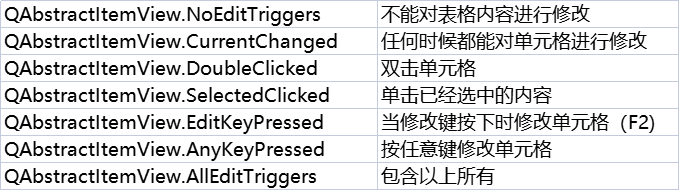 |
| setSelectionBehavior | Sets the selection behavior of the table. parameter |
| setShowGrid() | Set the display of the grid. The default is True |
| setSpan(int row,int column,int rowSpanCount,int columnSpanCount) | To merge cells, change the row and column of the cell, and the number of rows and columns of rowSpancount to be merged |
the above properties are of the QTableView component, and its child control QTableWidget has more properties and more detailed settings.
2. Tree structure
1. User defined tree structure
QTreeWidget class implements a tree structure, which is mainly used for the display of similar directories.
import sys
from PyQt5.QtWidgets import *
from PyQt5.QtGui import QIcon, QBrush, QColor
from PyQt5.QtCore import Qt

class TreeWidgetDemo(QMainWindow):
    def __init__(self, parent=None):
        super(TreeWidgetDemo, self).__init__(parent)
        self.setWindowTitle('TreeWidget example')

        self.tree=QTreeWidget()
        #Set the number of columns
        self.tree.setColumnCount(2)
        #Sets the title of the tree control header
        self.tree.setHeaderLabels(['Key','Value'])

        #Set root node
        root=QTreeWidgetItem(self.tree)
        root.setText(0,'Root')# The first parameter specifies the column and the second parameter specifies the value

        # Sets the background color of the root node
        brush_red=QBrush(Qt.red)
        root.setBackground(0,brush_red)
        brush_blue=QBrush(Qt.blue)
        root.setBackground(1,brush_blue)

        #Sets the width of the column of the tree control
        self.tree.setColumnWidth(0,150)

        #Set child node 1
        child1=QTreeWidgetItem()
        child1.setText(0,'child1')
        child1.setText(1,'ios')

        #Optimization 1 sets the state of the node
        child1.setCheckState(0,Qt.Checked)
        root.addChild(child1)

        #Set child node 2
        child2=QTreeWidgetItem(root)
        child2.setText(0,'child2')
        child2.setText(1,'')

        #Set child node 3
        child3=QTreeWidgetItem(child2)
        child3.setText(0,'child3')
        child3.setText(1,'android')

        #Load all properties and child controls of the root node
        self.tree.addTopLevelItem(root)
        # Add response event to node
        self.tree.clicked.connect(self.onClicked)
        #Expand all nodes
        self.tree.expandAll()
        self.setCentralWidget(self.tree)

    def onClicked(self,qmodeLindex):
        item=self.tree.currentItem()
        print('Key=%s,value=%s'%(item.text(0),item.text(1)))

if __name__ == '__main__':
    app = QApplication(sys.argv)
    tree = TreeWidgetDemo()
    tree.show()
    app.exec_()
2. System customization mode
import sys
from PyQt5.QtWidgets import *
from PyQt5.QtGui import *

if __name__ == '__main__':
    app=QApplication(sys.argv)
#     Mode provided by window system
    model=QDirModel()
#     Create a QTreeView control
    tree=QTreeView()
    #Add mode to control
    tree.setModel(model)
    tree.setWindowTitle('QTreeView example')
    tree.resize(640,480)
    tree.show()
    app.exec_()
tree.setRootIndex(model.index(r'C:\Users\admin\Desktop'))
the path can be specified through the above code. If not specified, it is the whole system path of running the code.
2, QStackedWidget component
QStackedWidget is a stack window control, which can fill some widgets, but only one widget can be displayed at the same time. QStackedWidget uses QStackedLayout layout.
import sys
from PyQt5.QtGui import *
from PyQt5.QtCore import *
from PyQt5.QtWidgets import *

class StackedExample(QWidget):
    def __init__(self):
        super(StackedExample, self).__init__()
        #Set the initial position and size of the window
        self.setGeometry(300,50,10,10)
        self.setWindowTitle('StackedWidget example')

        self.leftlist=QListWidget()
        self.leftlist.insertItem(0,'contact information')
        self.leftlist.insertItem(1,'personal information')
        self.leftlist.insertItem(2,'Educational level')

        #Create three gizmos and QStackedWidget objects, and bind the three controls to QStackedWidget objects
        self.stack1=QWidget()
        self.stack2=QWidget()
        self.stack3=QWidget()
        self.stack=QStackedWidget(self)

        self.stack.addWidget(self.stack1)
        self.stack.addWidget(self.stack2)
        self.stack.addWidget(self.stack3)

		#Horizontal layout, adding parts to layout
        HBox=QHBoxLayout()
        HBox.addWidget(self.leftlist)
        HBox.addWidget(self.stack)

        self.setLayout(HBox)

        self.leftlist.currentRowChanged.connect(self.display)


        self.stack1UI()
        self.stack2UI()
        self.stack3UI()

    def stack1UI(self):
        layout=QFormLayout()
        layout.addRow('full name',QLineEdit())
        layout.addRow('address',QLineEdit())
        self.stack1.setLayout(layout)

    def stack2UI(self):
        # ABCD form layout, sub horizontal layout
        layout = QFormLayout()
        sex = QHBoxLayout()

        # Add radio button to horizontal layout
        sex.addWidget(QRadioButton('male'))
        sex.addWidget(QRadioButton('female'))

        # Add controls to form layout
        layout.addRow(QLabel('Gender'), sex)
        layout.addRow('birthday', QLineEdit())

        self.stack2.setLayout(layout)

    def stack3UI(self):
        # Horizontal layout
        layout = QHBoxLayout()

        # Add control to layout
        layout.addWidget(QLabel('subject'))
        layout.addWidget(QCheckBox('Physics'))
        layout.addWidget(QCheckBox('High number'))

        self.stack3.setLayout(layout)
    def display(self,i):
        #Sets the index of the currently visible tab
        self.stack.setCurrentIndex(i)
if __name__ == '__main__':
    app=QApplication(sys.argv)
    demo=StackedExample()
    demo.show()
    sys.exit(app.exec_())
        self.leftlist=QListWidget()
        self.leftlist.insertItem(0,'contact information')
        self.leftlist.insertItem(1,'personal information')
        self.leftlist.insertItem(2,'Educational level')
create a list window and add entries.
   def display(self,i):
        #Sets the index of the currently visible tab
        self.stack.setCurrentIndex(i)
associate the currentRowChanged signal of QListWidget with the display() slot function to change the view of stacked controls.
3, QTabWidget
The QTabWidget control provides a tab and a page area. The page of the first tab is displayed by default. You can view the corresponding page by clicking each tab. If there are many input fields displayed in one window, these fields can be split and placed in tabs on different pages. QTabWidget blank is similar to QStackedWidget, which can effectively display the controls in the window.
import sys
from PyQt5.QtCore import *
from PyQt5.QtGui import *
from PyQt5.QtWidgets import *

class TabDemo(QTabWidget):
    def __init__(self,parent=None):
        super(TabDemo, self).__init__(parent)

        #Create 3 tabbed gizmo windows
        self.tab1=QWidget()
        self.tab2=QWidget()
        self.tab3=QWidget()

        #Add three tabs to the top-level window
        self.addTab(self.tab1, "Tab 1")
        self.addTab(self.tab2, "Tab 2")
        self.addTab(self.tab3, "Tab 3")
        self.setGeometry(100,100,400,300)

        #Customized content for each tab
        self.tab1UI()
        self.tab2UI()
        self.tab3UI()

    def tab1UI(self):
        #Table Layout
        layout=QFormLayout()
        #Single line text input box for adding name and address
        layout.addRow('full name',QLineEdit())
        layout.addRow('address',QLineEdit())
        #Set the subtitle and layout of the tab
        self.setTabText(0,'contact information')
        self.tab1.setLayout(layout)

    def tab2UI(self):
        #ABCD form layout, sub horizontal layout
        layout=QFormLayout()
        sex=QHBoxLayout()

        #Add radio button to horizontal layout
        sex.addWidget(QRadioButton('male'))
        sex.addWidget(QRadioButton('female'))

        #Add controls to form layout
        layout.addRow(QLabel('Gender'),sex)
        layout.addRow('birthday',QLineEdit())

        #Set title and layout
        self.setTabText(1,'Personal details')
        self.tab2.setLayout(layout)

    def tab3UI(self):
        #Horizontal layout
        layout=QHBoxLayout()

        #Add control to layout
        layout.addWidget(QLabel('subject'))
        layout.addWidget(QCheckBox('Physics'))
        layout.addWidget(QCheckBox('High number'))

        #Set subtitles and layout
        self.setTabText(2,'Educational level')
        self.tab3.setLayout(layout)


if __name__ == '__main__':
    app=QApplication(sys.argv)
    demo=TabDemo()
    demo.show()
    sys.exit(app.exec_())
4, Multi window mode QMidArea
a typical GUI application may have multiple windows. Tab controls and stack window controls allow one of them to be used at a time. However, many times this method is not very useful because the views of other windows are hidden. So there is QMdiArea.
import sys
from PyQt5.QtWidgets import *
from PyQt5.QtCore import *
from PyQt5.QtGui import *

class MainWindow(QMainWindow):
    count=0
    def __init__(self,parent=None):
        super(MainWindow, self).__init__(parent)
        #Instantiate the Qmidarea area
        self.mdi=QMdiArea()
        #Set as intermediate control
        self.setCentralWidget(self.mdi)

        #Instantiate menu bar
        bar=self.menuBar()
        #Add main menu
        file=bar.addMenu('File')
        #Add submenu
        file.addAction('New')
        file.addAction('cascade')
        file.addAction('Tiled')

        #Click QAction to bind the customized slot function (pass the value [QAction])
        file.triggered[QAction].connect(self.windowaction)
        #Set the title of the main window
        self.setWindowTitle("MDI demo")
    def windowaction(self,q):
        if q.text()=='New':
            #Add a sub window
            MainWindow.count=MainWindow.count+1

            #Instantiate multi document interface object
            sub=QMdiSubWindow()
            #Add internal controls to sub
            sub.setWidget(QTextEdit())
            #Set the title of the new sub window
            sub.setWindowTitle('subWindow'+str(MainWindow.count))

            #Add sub window to Mdi area
            self.mdi.addSubWindow(sub)
            #Sub window display
            sub.show()
        if q.text()=='cascade':
            #cascadeSubWindows(): arrange sub windows to be cascaded in Mdi area
            self.mdi.cascadeSubWindows()
        if q.text()=='Tiled':
            #tileSubWindow(): arrange the sub windows to be tiled in the Mdi area
            self.mdi.tileSubWindow()
if __name__ == '__main__':
    app=QApplication(sys.argv)
    demo=MainWindow()
    demo.show()
    sys.exit(app.exec_())
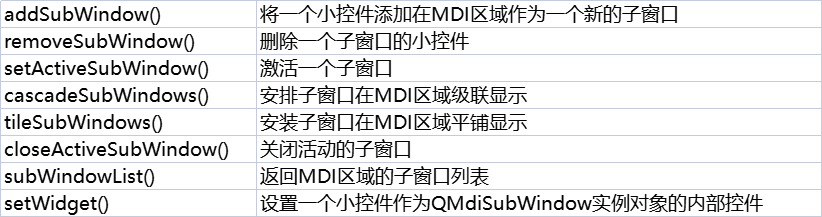
Its more attributes are as follows:
5, Window docking QDockWidget
QDockWidget is a window control that can be docked in QMainWindow. It can be kept floating or attached to the main window as a child window at a specified position. The main window object of QMainWindow class retains an area for docking the window, which is around the center of the control.
import sys
from PyQt5.QtCore import *
from PyQt5.QtGui import *
from PyQt5.QtWidgets import *

class DockDemo(QMainWindow):
    def __init__(self,parent=None):
        super(DockDemo, self).__init__(parent)
        #Set horizontal layout
        layout=QHBoxLayout()
        #Instantiate menu bar
        bar=self.menuBar()
        #Create the main menu file and add submenus to it
        file=bar.addMenu('File')
        file.addAction('New')
        file.addAction('Save')
        file.addAction('quit')

        #Create QDockWidget window (title, own window)
        self.items=QDockWidget('Dockable',self)

        #Instantiate the list window and add several entries
        self.listWidget=QListWidget()
        self.listWidget.addItem('Item1')
        self.listWidget.addItem('Item2')
        self.listWidget.addItem('Item3')
        self.listWidget.addItem('Item4')

        #Set QWidget in the window area and add list control
        self.items.setWidget(self.listWidget)

        #Set whether the dock window can float, True, run floating outside, automatically separate from the main interface, False, float in the main window by default, and can be separated manually
        self.items.setFloating(False)

        #Set QTextEdit as the central gizmo
        self.setCentralWidget(QTextEdit())
        #Place the window to the right of the central gizmo
        self.addDockWidget(Qt.RightDockWidgetArea,self.items)

        self.setLayout(layout)
        self.setWindowTitle('Dock example')
if __name__ == '__main__':
    app=QApplication(sys.argv)
    demo=DockDemo()
    demo.show()
    sys.exit(app.exec_())
6, Call other application QAxWidget
import sys
from PyQt5.QAxContainer import QAxWidget
from PyQt5.QtWidgets import QWidget, QVBoxLayout, QApplication, QPushButton, QFileDialog
from PyQt5.QtCore import Qt


class Window(QWidget):

    def __init__(self, *args, **kwargs):
        super(Window, self).__init__(*args, **kwargs)
        self.setFixedSize(900, 600)
        layout = QVBoxLayout(self)
        self.axWidget = QAxWidget("ObjectName", self)
        layout.addWidget(self.axWidget)
        layout.addWidget(QPushButton('open word', self, clicked=self.onOpenWord))
        self.axWidget.setControl("{8856F961-340A-11D0-A96B-00C04FD705A2}")
#         self.axWidget.setFocusPolicy(Qt.FocusPolicy.StrongFocus)
        self.axWidget.setProperty("DisplayAlerts", False)
        self.axWidget.setProperty("DisplayScrollBars", True)
        self.axWidget.dynamicCall("Navigate(const QString&)", "https://map.baidu.com/@13523265.31,3641114.64,12z")

    def onOpenWord(self):
        path, _ = QFileDialog.getOpenFileName(self, 'Please select Word file', '', 'word(*.docx *.doc)')
        if not path:
            return
        # Do not show form
#         self.axWidget.resetControl()
        self.axWidget.setControl(path)
        self.axWidget.dynamicCall('SetVisible (bool Visible)', 'false')
#         self.axWidget.setProperty('DisplayAlerts', False)


if __name__ == '__main__':
    app = QApplication(sys.argv)
    w = Window()
    w.show()
    app.exec()
7, QWebEngineView
PyQt5 uses the QWebEngineView control to display HTML pages. The old version of QWebView class is no longer maintained, because QWebEngineView uses the CHromium kernel to bring users a better experience.
the QWebEngineView control uses the load() function to load a web page. In fact, it uses the HTTP Get method to load a web page. This control can load local web pages or external web pages. Its core code is as follows
from PyQt5 import QtCore, QtGui, QtWidgets
from PyQt5.QtWidgets import *

class Ui_MainWindow(object):
    def setupUi(self, MainWindow):
        MainWindow.setObjectName("MainWindow")
        MainWindow.resize(800, 600)
        self.centralwidget = QtWidgets.QWidget(MainWindow)
        self.centralwidget.setObjectName("centralwidget")
        self.horizontalLayout = QtWidgets.QHBoxLayout(self.centralwidget)
        self.horizontalLayout.setObjectName("horizontalLayout")
        self.webEngineView = QtWebEngineWidgets.QWebEngineView(self.centralwidget)
        self.webEngineView.setUrl(QtCore.QUrl("https://www.baidu.com/"))
        self.webEngineView.setZoomFactor(1.0)
        self.webEngineView.setObjectName("webEngineView")
        self.horizontalLayout.addWidget(self.webEngineView)
        MainWindow.setCentralWidget(self.centralwidget)
        self.menubar = QtWidgets.QMenuBar(MainWindow)
        self.menubar.setGeometry(QtCore.QRect(0, 0, 800, 23))
        self.menubar.setObjectName("menubar")
        MainWindow.setMenuBar(self.menubar)
        self.statusbar = QtWidgets.QStatusBar(MainWindow)
        self.statusbar.setObjectName("statusbar")
        MainWindow.setStatusBar(self.statusbar)

        self.retranslateUi(MainWindow)
        QtCore.QMetaObject.connectSlotsByName(MainWindow)

    def retranslateUi(self, MainWindow):
        _translate = QtCore.QCoreApplication.translate
        MainWindow.setWindowTitle(_translate("MainWindow", "MainWindow"))

from PyQt5 import QtWebEngineWidgets


class Example(QMainWindow, Ui_MainWindow):

    def __init__(self):
        super().__init__()
        self.setupUi(self)


if __name__ == '__main__':
    app = QtWidgets.QApplication([])
    win = Example()
    win.show()
    app.exit(app.exec_())
there is a problem with the above code, that is, it is impossible to click in the loaded web page. Therefore, it is said on the Internet that QtWebEngineWidgets should be reconstructed. The code is as follows:
import sys
import os
import datetime
from PyQt5.QtWidgets import *
from PyQt5.QtCore import *
from PyQt5.QtWebEngineWidgets import QWebEngineView,QWebEngineSettings
################################################
#######Create main window
################################################
class MainWindow(QMainWindow):
    def __init__(self, *args, **kwargs):
        super().__init__(*args, **kwargs)
        self.setWindowTitle('My Browser')
        self.showMaximized() # maximize window
#         self.setWindowFlags(Qt.FramelessWindowHint) # Window structure format. There is no close button above here

        #####Create tabwidget
        self.tabWidget = QTabWidget()
        self.tabWidget.setTabShape(0)# Set the style of the label. 0 represents a circular label and 1 represents a triangle
        self.tabWidget.setDocumentMode(True) # In document mode, pictures will be displayed normally when opened
        self.tabWidget.setMovable(True)# tab window movable
        self.tabWidget.setTabsClosable(True)# Open tab window close button
        self.tabWidget.tabCloseRequested.connect(self.close_Tab)
        self.setCentralWidget(self.tabWidget)

        ####First tab
        self.webview = WebEngineView(self)   #self is required, which is to pass the main window to the browser as a parameter
        self.webview.load(QUrl("http://www.baidu.com"))
        self.create_tab(self.webview)


    #Create tab
    def create_tab(self,webview):
        self.tab = QWidget()
        self.tabWidget.addTab(self.tab, "New tab")
        self.tabWidget.setCurrentWidget(self.tab)
        #####
        self.Layout = QHBoxLayout(self.tab)
        self.Layout.setContentsMargins(0, 0, 0, 0)
        self.Layout.addWidget(webview)


    #Close tab
    def close_Tab(self,index):
        if self.tabWidget.count()>1:
            self.tabWidget.removeTab(index)
        else:
            self.close()   # When there is only one tab, close the main window


################################################
#######Create browser
################################################
class WebEngineView(QWebEngineView):

    def __init__(self,mainwindow,parent=None):
        super(WebEngineView, self).__init__(parent)
        self.mainwindow = mainwindow
        ##############
        self.settings().setAttribute(QWebEngineSettings.PluginsEnabled, True)      #Support video playback
        self.page().windowCloseRequested.connect(self.on_windowCloseRequested)     #Page close request
        self.page().profile().downloadRequested.connect(self.on_downloadRequested) #Page download request


    #  Support page close request
    def on_windowCloseRequested(self):
        the_index = self.mainwindow.tabWidget.currentIndex()
        self.mainwindow.tabWidget.removeTab(the_index)


    #  Support page download button
    def on_downloadRequested(self,downloadItem):
        if  downloadItem.isFinished()==False and downloadItem.state()==0:
            ###Generate file storage address
            the_filename = downloadItem.url().fileName()
            if len(the_filename) == 0 or "." not in the_filename:
                cur_time = datetime.datetime.now().strftime('%Y%m%d%H%M%S')
                the_filename = "Download File" + cur_time + ".xls"
            the_sourceFile = os.path.join(os.getcwd(), the_filename)

            ###Download File
            # downloadItem.setSavePageFormat(QWebEngineDownloadItem.CompleteHtmlSaveFormat)
            downloadItem.setPath(the_sourceFile)
            downloadItem.accept()
            downloadItem.finished.connect(self.on_downloadfinished)


    #  Download end trigger function
    def on_downloadfinished(self):
        js_string = '''
        alert("Download succeeded. Please go to the same directory of the software to find the downloaded file!");
        '''
        self.page().runJavaScript(js_string)


    # Override createwindow()
    def createWindow(self, QWebEnginePage_WebWindowType):
        new_webview = WebEngineView(self.mainwindow)

        self.mainwindow.create_tab(new_webview)

        return new_webview


################################################
#######Program introduction
################################################
if __name__ == "__main__":
    app = QApplication(sys.argv)
    QCoreApplication.setAttribute(Qt.AA_UseSoftwareOpenGL)   #This sentence solves the error warning: ERROR:gl_context_wgl.cc(78)] Could not share GL contexts.
    the_mainwindow = MainWindow()
    the_mainwindow.show()
    app.exec_()
Now that I've explained it, I'm estimated to have an understanding of the more advanced application of PyQt. It's being updated continuously
👊🙈 ...