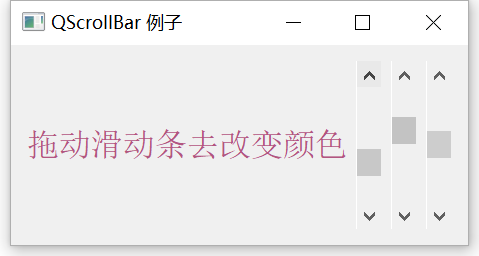
Load more controls
QTabWidget
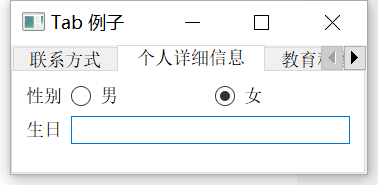
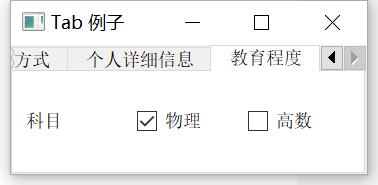
The QTabWidget control provides a tab and a page area. By default, the page of the first tab is displayed. You can view the corresponding page by clicking each tab. If there are many input fields displayed in one window, these fields can be split and placed in tabs on different pages.
common method
| addTab() | Adds a control to the Tab of a Tab control |
| insertTab() | Inserts the Tab of a Tab control into the specified location |
| removeTab() | Deletes the Tab control based on the specified index |
| setCurrentIndex() | Sets the index of the currently visible tab |
| setCurrentWidget() | Sets the currently visible page |
| setTabBar() | Set gizmos for tab bar |
| setTabPosition() | Set the location of the tab: QTabWidget.North, displayed at the top of the page QTabWidget.South, displayed at the bottom of the page QTabWidget.West, displayed on the left side of the page QTabWidget.East, displayed on the right side of the page |
| setTabText() | Define the display values of the Tab |
Common signal
Current changed: this signal is transmitted when switching the current page
Code example
import sys
from PyQt5.QtCore import *
from PyQt5.QtGui import *
from PyQt5.QtWidgets import *


class TabDemo(QTabWidget):
    def __init__(self, parent=None):
        super(TabDemo, self).__init__(parent)
        self.tab1 = QWidget()
        self.tab2 = QWidget()
        self.tab3 = QWidget()
        self.addTab(self.tab1, "Tab 1")
        self.addTab(self.tab2, "Tab 2")
        self.addTab(self.tab3, "Tab 3")
        self.tab1UI()
        self.tab2UI()
        self.tab3UI()
        self.setWindowTitle("Tab example")

    def tab1UI(self):
        layout = QFormLayout()
        layout.addRow("full name", QLineEdit())
        layout.addRow("address", QLineEdit())
        self.setTabText(0, "contact information")
        self.tab1.setLayout(layout)

    def tab2UI(self):
        layout = QFormLayout()
        sex = QHBoxLayout()
        sex.addWidget(QRadioButton("male"))
        sex.addWidget(QRadioButton("female"))
        layout.addRow(QLabel("Gender"), sex)
        layout.addRow("birthday", QLineEdit())
        self.setTabText(1, "Personal details")
        self.tab2.setLayout(layout)

    def tab3UI(self):
        layout = QHBoxLayout()
        layout.addWidget(QLabel("subject"))
        layout.addWidget(QCheckBox("Physics"))
        layout.addWidget(QCheckBox("High number"))
        self.setTabText(2, "Education level")
        self.tab3.setLayout(layout)


if __name__ == '__main__':
    app = QApplication(sys.argv)
    demo = TabDemo()
    demo.show()
    sys.exit(app.exec_())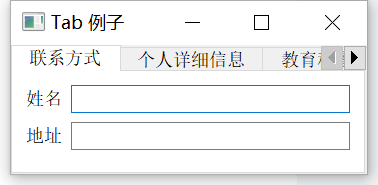
QStackedWidget
QStackedWidget is a stack window control that can fill in some widgets, but only one widget can be displayed at the same time. QStackedWidget uses QStackedLayout layout. QStackedWidget control is similar to QTabWidget, which can effectively display the controls in the window.
Code example
import sys
from PyQt5.QtCore import *
from PyQt5.QtGui import *
from PyQt5.QtWidgets import *


class StackedExample(QWidget):
    def __init__(self):
        super(StackedExample, self).__init__()
        self.setGeometry(300, 50, 10, 10)
        self.setWindowTitle('StackedWidget example')

        self.leftlist = QListWidget()
        self.leftlist.insertItem(0, 'contact information')
        self.leftlist.insertItem(1, 'personal information')
        self.leftlist.insertItem(2, 'Education level')
        self.stack1 = QWidget()
        self.stack2 = QWidget()
        self.stack3 = QWidget()
        self.stack1UI()
        self.stack2UI()
        self.stack3UI()
        self.Stack = QStackedWidget(self)
        self.Stack.addWidget(self.stack1)
        self.Stack.addWidget(self.stack2)
        self.Stack.addWidget(self.stack3)
        hbox = QHBoxLayout(self)
        hbox.addWidget(self.leftlist)
        hbox.addWidget(self.Stack)
        self.setLayout(hbox)
        # Associate the currentRowChanged signal of QListWidget with the display() slot function to change the view of stacked controls
        self.leftlist.currentRowChanged.connect(self.display)

    def stack1UI(self):
        layout = QFormLayout()
        layout.addRow("full name", QLineEdit())
        layout.addRow("address", QLineEdit())
        self.stack1.setLayout(layout)

    def stack2UI(self):
        layout = QFormLayout()
        sex = QHBoxLayout()
        sex.addWidget(QRadioButton("male"))
        sex.addWidget(QRadioButton("female"))
        layout.addRow(QLabel("Gender"), sex)
        layout.addRow("birthday", QLineEdit())
        self.stack2.setLayout(layout)

    def stack3UI(self):
        layout = QHBoxLayout()
        layout.addWidget(QLabel("subject"))
        layout.addWidget(QCheckBox("Physics"))
        layout.addWidget(QCheckBox("High number"))
        self.stack3.setLayout(layout)

    def display(self, i):
        self.Stack.setCurrentIndex(i)


if __name__ == '__main__':
    app = QApplication(sys.argv)
    demo = StackedExample()
    demo.show()
sys.exit(app.exec_()) 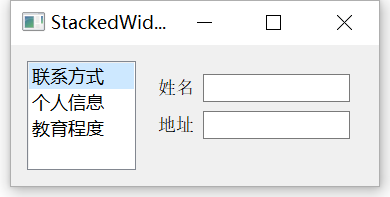
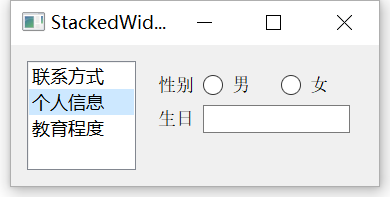
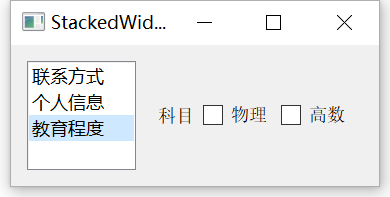
QDockWidget
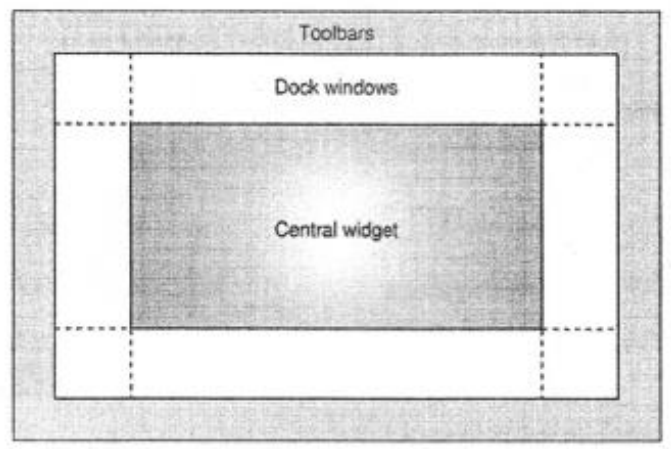
QDockWidget is a window control that can be docked in QMainWindow. It can remain floating or be attached to the main window as a child window at a specified position. The main window object of QMainWindow class retains an area for docking the window, which is around the center of the control, as shown in the following figure.
common method
| setWidget() | Set QWidget in Dock window area |
| setFloating() | Set whether the Dock window can float. If it is set to True, it means it can float |
| setAllowedAreas() | Set the area where the window can dock: LeftDockWidgetArea, left docking area RightDockWidgetArea, right docking area TopDockWidgetArea, top docking area BottomDockWidgetArea, bottom docking area NoDockWidgetArea, do not display widgets |
| setFeatures() | Set the functional properties of the docked window: DockWidgetClosable, which can be closed DockWidgetMovable, movable DockWidgetFloatable, floatable DockWidgetVerticalTitleBar, which displays a vertical tab bar on the left AlIDockWidgetFeatures, which has all the functions of the first three properties NoDockWidgetFeatures cannot be closed, moved or floated |
Code example
import sys
from PyQt5.QtCore import *
from PyQt5.QtGui import *
from PyQt5.QtWidgets import *


class DockDemo(QMainWindow):
    def __init__(self, parent=None):
        super(DockDemo, self).__init__(parent)
        layout = QHBoxLayout()
        bar = self.menuBar()
        file = bar.addMenu("File")
        file.addAction("New")
        file.addAction("save")
        file.addAction("quit")
        # Create dockable window items
        self.items = QDockWidget("Dockable", self)
        self.listWidget = QListWidget()
        self.listWidget.addItem("item1")
        self.listWidget.addItem("item2")
        self.listWidget.addItem("item3")
        self.items.setWidget(self.listWidget)
        self.items.setFloating(False)
        # Central gizmo QTextEdit
        self.setCentralWidget(QTextEdit())
        # Dock the window to the right
        self.addDockWidget(Qt.RightDockWidgetArea, self.items)
        self.setLayout(layout)
        self.setWindowTitle("Dock example")


if __name__ == '__main__':
    app = QApplication(sys.argv)
    demo = DockDemo()
    demo.show()
    sys.exit(app.exec_())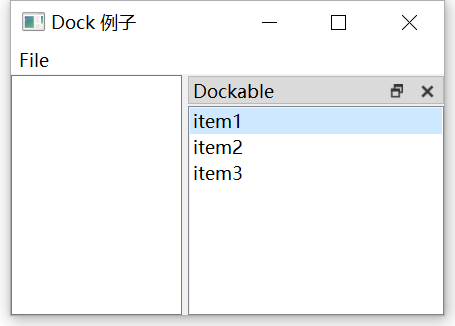
Multi document interface
A typical GUI application may have multiple windows. Tab controls and stack window controls allow one of them to be used at a time. However, many times this method is not very useful because the views of other windows are hidden.
One way to display multiple windows at the same time is to create multiple independent windows, which are called SDI(Single Document Interface). Each window can have its own menu system, toolbar, etc. This requires more memory resources.
MDI (Multiple Document Interface) applications occupy less memory resources. All child windows can be placed in the main window container. This container control is called QMdiArea.
The QMidArea control usually occupies the central position of the QMainWindow object. The child window in this area is an instance of the QMdiSubWindow class. Any QWidget can be set as the internal control of the child window object, and the child windows are cascaded and arranged in the MDI area.
Common methods in QMdiArea class and QMdiSubWindow class
| addSubWindow() | Add a widget to the MDI area as a new child window |
| removeSubWindow() | Delete gizmos in a child window |
| setActiveSubWindow() | Activate a child window |
| cascadeSubWindows() | Arrange the sub windows to be cascaded in the MDI area |
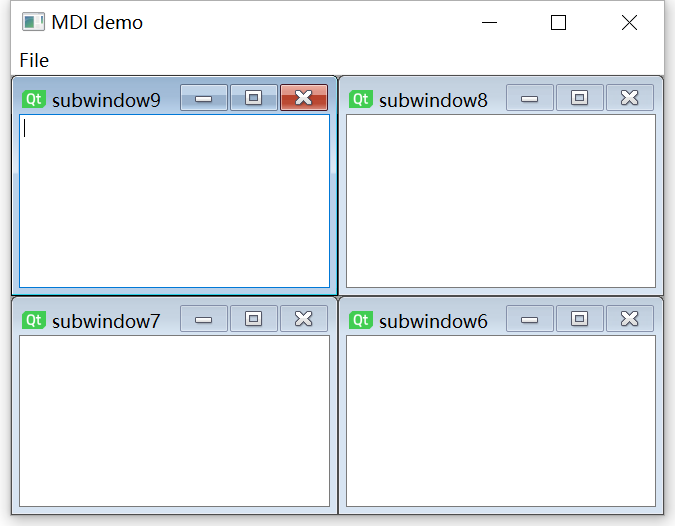
| tileSubWindows() | Arrange child windows to be tiled in the MDI area |
| closeActiveSubWindow() | Close the active child window |
| subWindowList() | Returns the list of child windows in the MDI area |
| setWidget() | Set a widget as the internal control of the qmdisuubwindow instance object |
Code example
import sys
from PyQt5.QtCore import *
from PyQt5.QtGui import *
from PyQt5.QtWidgets import *


class MainWindow(QMainWindow):
    count = 0

    def __init__(self, parent=None):
        super(MainWindow, self).__init__(parent)
        self.mdi = QMdiArea()
        self.setCentralWidget(self.mdi)
        bar = self.menuBar()
        file = bar.addMenu("File")
        file.addAction("New")
        file.addAction("cascade")
        file.addAction("Tiled")
        file.triggered[QAction].connect(self.windowaction)
        self.setWindowTitle("MDI demo")

    def windowaction(self, q):
        print("triggered")

        if q.text() == "New":
            MainWindow.count = MainWindow.count + 1
            sub = QMdiSubWindow()
            sub.setWidget(QTextEdit())
            sub.setWindowTitle("subwindow" + str(MainWindow.count))
			# Add new MDI
            self.mdi.addSubWindow(sub)
            sub.show()
        if q.text() == "cascade":
            # Cascade display sub window
            self.mdi.cascadeSubWindows()
        if q.text() == "Tiled":
            # Tile sub windows
            self.mdi.tileSubWindows()


if __name__ == '__main__':
    app = QApplication(sys.argv)
    demo = MainWindow()
    demo.show()
    sys.exit(app.exec_())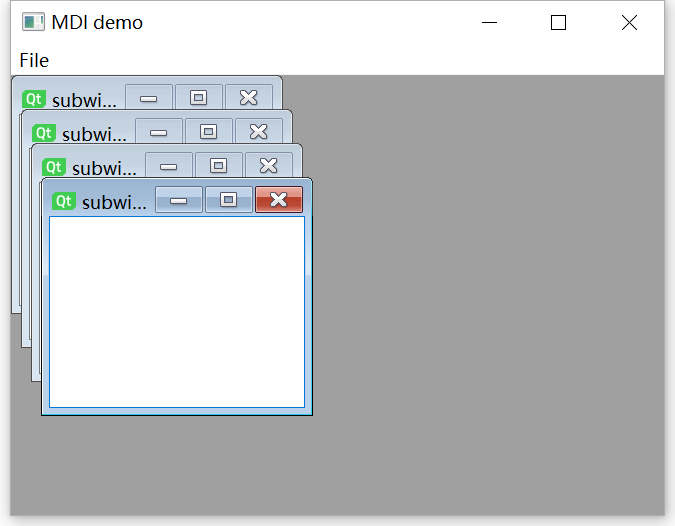
QScrollBar
Provide horizontal or vertical scroll bars, which can expand the effective loading area of the current window and load more controls.
Common signal
| valueChanged | This signal is transmitted when the value of the slider changes |
| sliderMoved | This signal is emitted when the user drags the slider |
Code example
import sys
from PyQt5.QtCore import *
from PyQt5.QtGui import *
from PyQt5.QtWidgets import *


class Example(QWidget):
    def __init__(self):
        super(Example, self).__init__()
        self.initUI()

    def initUI(self):
        hbox = QHBoxLayout()
        self.l1 = QLabel("Drag the slider to change the color")
        self.l1.setFont(QFont("Arial", 16))
        hbox.addWidget(self.l1)
        self.s1 = QScrollBar()
        self.s1.setMaximum(255)
        self.s1.sliderMoved.connect(self.sliderval)
        self.s2 = QScrollBar()
        self.s2.setMaximum(255)
        self.s2.sliderMoved.connect(self.sliderval)
        self.s3 = QScrollBar()
        self.s3.setMaximum(255)
        self.s3.sliderMoved.connect(self.sliderval)
        hbox.addWidget(self.s1)
        hbox.addWidget(self.s2)
        hbox.addWidget(self.s3)
        self.setGeometry(300, 300, 300, 200)
        self.setWindowTitle('QScrollBar example')
        self.setLayout(hbox)

    def sliderval(self):
        print(self.s1.value(), self.s2.value(), self.s3.value())
        palette = QPalette()
        c = QColor(self.s1.value(), self.s2.value(), self.s3.value(), 255)
        palette.setColor(QPalette.Foreground, c)
        self.l1.setPalette(palette)


if __name__ == '__main__':
    app = QApplication(sys.argv)
    demo = Example()
    demo.show()
    sys.exit(app.exec_())