1, Get weather data
There are two ways to obtain weather data using Python: 1. Obtain the HTML page of the weather forecast website by crawling, and then parse the content of the HTML page by XPath or beautiful soup; 2. Through the API provided by the weather forecast website, the structured data can be obtained directly, eliminating the step of parsing HTML pages.
This example uses the API provided by China weather website. The address of China Weather official website is: http://www.weather.com.cn . The Requests library is used to obtain weather data. It is an HTTP library written in Python language based on urllib. It needs to be installed with pip command.
pip install requests
The Requests library contains a method called JSON. When the requested address returns data in JSON format, you can use this method directly instead of using the JSON Library in the Python standard library.
2, Get weather forecast API s for different cities
The request address is: http://www.weather.com.cn/data/sk/ City code. html, some city codes: Beijing 101010100, Shanghai 101020100. The complete city code can be found on the Internet( Codes of cities across the country).
The return parameters are shown in the following table.
| name | describe |
|---|---|
| weatherinfo | weatherInfo message root node |
| city | Chinese name of city |
| cityid | City ID |
| temp | temperature |
| WD | wind direction |
| WS | wind power |
| SD | humidity |
| WSE | wind power |
| time | Release time |
| rain | Rain or not, 1: rain, 0: no rain |
| isRadar | Whether there is a radar map, 1: there is a radar map, 0: there is no radar map |
| Radar | Radar map number, radar map address: http://www.weather.com.cn/html/radar/ Radar chart no.shtml |
Test code:
import requests


if __name__ == "__main__":
    rep = requests.get("http://www.weather.com.cn/data/sk/101020100.html")
    rep.encoding = "utf-8"

    print("Result: %s" % rep.json())
    print("City: %s" % rep.json()["weatherinfo"]["city"])
    print("Wind Direction: %s" % rep.json()["weatherinfo"]["WD"])
    print("Temperature: %s" % rep.json()["weatherinfo"]["temp"] + " °C")
    print("Wind Strength: %s" % rep.json()["weatherinfo"]["WS"])
    print("Humidity: %s" % rep.json()["weatherinfo"]["SD"])
Output results:
Result: {'weatherinfo': {'city': 'Shanghai', 'cityid': '101020100', 'temp': '23.5', 'WD': 'northeasterly wind', 'WS': 'Less than level 3', 'SD': '80%', 'AP': '1006.4hPa', 'njd': '2903', 'WSE': '<3', 'time': '17:00', 'sm': '1.1', 'isRadar': '1', 'Radar': 'JC_RADAR_AZ9210_JB'}}
City: Shanghai
Wind Direction: northeasterly wind
Temperature: 23.5 °C
Wind Strength: Less than level 3
Humidity: 80%
The business logic code for querying weather was debugged successfully.
3, Interface implementation
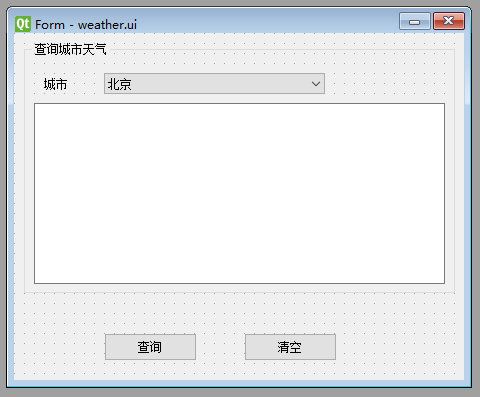
Use Qt Designer to design the weather forecast window, as shown in the following figure:
WeatherWin.ui Code:
<?xml version="1.0" encoding="UTF-8"?>
<ui version="4.0">
 <class>Form</class>
 <widget class="QWidget" name="Form">
  <property name="geometry">
   <rect>
    <x>0</x>
    <y>0</y>
    <width>450</width>
    <height>347</height>
   </rect>
  </property>
  <property name="windowTitle">
   <string>Form</string>
  </property>
  <widget class="QGroupBox" name="groupBox">
   <property name="geometry">
    <rect>
     <x>10</x>
     <y>10</y>
     <width>431</width>
     <height>251</height>
    </rect>
   </property>
   <property name="title">
    <string>Query City Weather</string>
   </property>
   <widget class="QComboBox" name="weatherComboBox">
    <property name="geometry">
     <rect>
      <x>80</x>
      <y>30</y>
      <width>221</width>
      <height>21</height>
     </rect>
    </property>
    <item>
     <property name="text">
      <string>Beijing</string>
     </property>
    </item>
    <item>
     <property name="text">
      <string>Tianjin</string>
     </property>
    </item>
    <item>
     <property name="text">
      <string>Shanghai</string>
     </property>
    </item>
   </widget>
   <widget class="QTextEdit" name="resultText">
    <property name="geometry">
     <rect>
      <x>10</x>
      <y>60</y>
      <width>411</width>
      <height>181</height>
     </rect>
    </property>
   </widget>
   <widget class="QLabel" name="label">
    <property name="geometry">
     <rect>
      <x>20</x>
      <y>30</y>
      <width>72</width>
      <height>21</height>
     </rect>
    </property>
    <property name="text">
     <string>city</string>
    </property>
   </widget>
  </widget>
  <widget class="QPushButton" name="queryBtn">
   <property name="geometry">
    <rect>
     <x>90</x>
     <y>300</y>
     <width>93</width>
     <height>28</height>
    </rect>
   </property>
   <property name="text">
    <string>query</string>
   </property>
  </widget>
  <widget class="QPushButton" name="clearBtn">
   <property name="geometry">
    <rect>
     <x>230</x>
     <y>300</y>
     <width>93</width>
     <height>28</height>
    </rect>
   </property>
   <property name="text">
    <string>empty</string>
   </property>
  </widget>
 </widget>
 <resources/>
 <connections>
  <connection>
   <sender>clearBtn</sender>
   <signal>clicked()</signal>
   <receiver>Form</receiver>
   <slot>clearResult()</slot>
   <hints>
    <hint type="sourcelabel">
     <x>270</x>
     <y>314</y>
    </hint>
    <hint type="destinationlabel">
     <x>363</x>
     <y>288</y>
    </hint>
   </hints>
  </connection>
  <connection>
   <sender>queryBtn</sender>
   <signal>clicked()</signal>
   <receiver>Form</receiver>
   <slot>queryWeather()</slot>
   <hints>
    <hint type="sourcelabel">
     <x>161</x>
     <y>313</y>
    </hint>
    <hint type="destinationlabel">
     <x>64</x>
     <y>286</y>
    </hint>
   </hints>
  </connection>
 </connections>
 <slots>
  <slot>clearResult()</slot>
  <slot>queryWeather()</slot>
 </slots>
</ui>
The control description is shown in the following table:

4, Convert interface files to. py files
Use the pyuic5 command to convert the interface file into a. Py file. The converted Python file name is WeatherWin.py.
pyuic5 -o WeatherWin.py WeatherWin.ui
The complete code of WeatherWin.py after conversion is as follows:
# -*- coding: utf-8 -*-

# Form implementation generated from reading ui file 'weather.ui'
#
# Created by: PyQt5 UI code generator 5.15.4
#
# WARNING: Any manual changes made to this file will be lost when pyuic5 is
# run again.  Do not edit this file unless you know what you are doing.


from PyQt5 import QtCore, QtGui, QtWidgets


class Ui_Form(object):
    def setupUi(self, Form):
        Form.setObjectName("Form")
        Form.resize(450, 347)
        self.groupBox = QtWidgets.QGroupBox(Form)
        self.groupBox.setGeometry(QtCore.QRect(10, 10, 431, 251))
        self.groupBox.setObjectName("groupBox")
        self.weatherComboBox = QtWidgets.QComboBox(self.groupBox)
        self.weatherComboBox.setGeometry(QtCore.QRect(80, 30, 221, 21))
        self.weatherComboBox.setObjectName("weatherComboBox")
        self.weatherComboBox.addItem("")
        self.weatherComboBox.addItem("")
        self.weatherComboBox.addItem("")
        self.resultText = QtWidgets.QTextEdit(self.groupBox)
        self.resultText.setGeometry(QtCore.QRect(10, 60, 411, 181))
        self.resultText.setObjectName("resultText")
        self.label = QtWidgets.QLabel(self.groupBox)
        self.label.setGeometry(QtCore.QRect(20, 30, 72, 21))
        self.label.setObjectName("label")
        self.queryBtn = QtWidgets.QPushButton(Form)
        self.queryBtn.setGeometry(QtCore.QRect(90, 300, 93, 28))
        self.queryBtn.setObjectName("queryBtn")
        self.clearBtn = QtWidgets.QPushButton(Form)
        self.clearBtn.setGeometry(QtCore.QRect(230, 300, 93, 28))
        self.clearBtn.setObjectName("clearBtn")

        self.retranslateUi(Form)
        self.clearBtn.clicked.connect(Form.clearResult)
        self.queryBtn.clicked.connect(Form.queryWeather)
        QtCore.QMetaObject.connectSlotsByName(Form)

    def retranslateUi(self, Form):
        _translate = QtCore.QCoreApplication.translate
        Form.setWindowTitle(_translate("Form", "Form"))
        self.groupBox.setTitle(_translate("Form", "Query City Weather"))
        self.weatherComboBox.setItemText(0, _translate("Form", "Beijing"))
        self.weatherComboBox.setItemText(1, _translate("Form", "Tianjin"))
        self.weatherComboBox.setItemText(2, _translate("Form", "Shanghai"))
        self.label.setText(_translate("Form", "city"))
        self.queryBtn.setText(_translate("Form", "query"))
        self.clearBtn.setText(_translate("Form", "empty"))
5, Calling the main window class
In the main window class MainWindow, call the interface class Ui_Form, and add the business logic code to query the weather in the main window class, so that the interface display and business logic are separated.
# -*- coding: utf-8 -*-

import sys
from PyQt5.QtWidgets import QApplication , QMainWindow
from WeatherWin import Ui_Form
import requests

class MainWindow(QMainWindow ):
	def __init__(self, parent=None):
		super(MainWindow, self).__init__(parent)
		self.ui = Ui_Form()
		self.ui.setupUi(self)

	def queryWeather(self):
		print('* queryWeather  ')
		cityName = self.ui.weatherComboBox.currentText()
		cityCode = self.transCityName(cityName)

		rep = requests.get('http://www.weather.com.cn/data/sk/' + cityCode + '.html')
		rep.encoding = 'utf-8'
		print( rep.json() )

		msg1 = 'city: %s' % rep.json()['weatherinfo']['city'] + '\n'
		msg2 = 'wind direction: %s' % rep.json()['weatherinfo']['WD'] + '\n'
		msg3 = 'temperature: %s' % rep.json()['weatherinfo']['temp'] + ' degree' + '\n'
		msg4 = 'wind power: %s' % rep.json()['weatherinfo']['WS'] + '\n'
		msg5 = 'humidity: %s' % rep.json()['weatherinfo']['SD'] + '\n'
		result = msg1 + msg2 + msg3 + msg4 + msg5
		self.ui.resultText.setText(result)

	def transCityName(self ,cityName):
		cityCode = ''
		if cityName == 'Beijing' :
			cityCode = '101010100'
		elif cityName == 'Tianjin' :
			cityCode = '101030100'
		elif cityName == 'Shanghai' :
			cityCode = '101020100'

		return cityCode

	def clearResult(self):
		print('* clearResult  ')
		self.ui.resultText.clear()

if __name__=="__main__":
	app = QApplication(sys.argv)
	win = MainWindow()
	win.show()
	sys.exit(app.exec_())
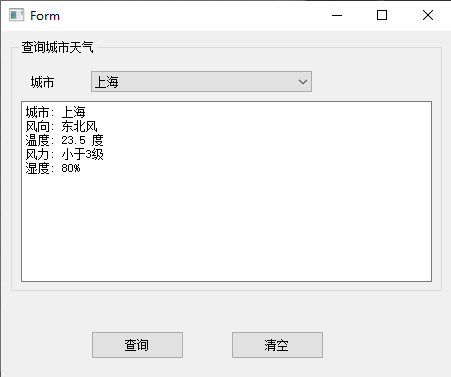
Run the script, and the display effect is shown in the following figure.