Step 1: create and run the project
The first time you use Django, you have to take care of some initial settings. That is, you need to automatically generate some to build Django
The code of the project.
From the command line cd, go to the directory where you want to store the code, and run the following command:
django-admin startproject BookManage
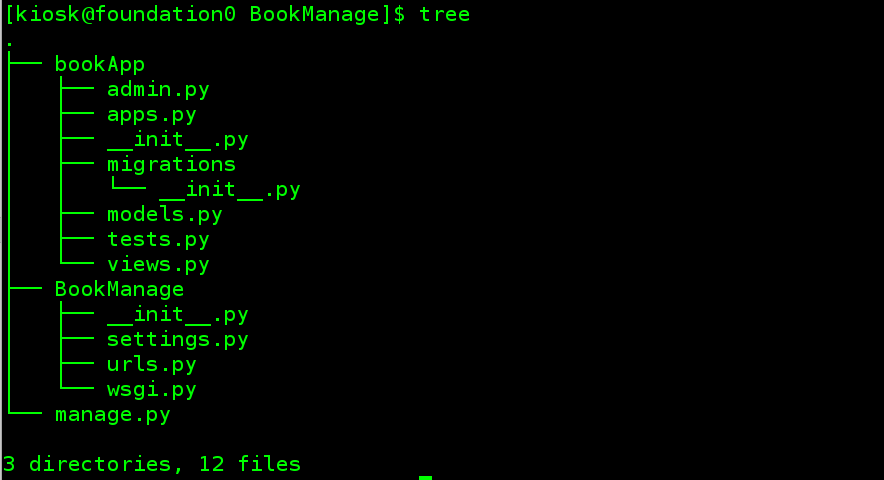
Enter the project directory. The directory structure is as follows:

Catalog Description:
manage.py: a command line tool that allows you to interact with Django projects in a variety of ways
Inner Directory: the real Python package of the project
__ init__.py: an empty file that tells Python that this directory should be treated as a Python package
settings.py: project configuration
urls.py: URL declaration of the project
wsgi.py: project WSGI compatible Web server portal
Step 2: application creation and use
(1) Create the first application
Django comes with a utility that automatically generates the basic directory structure of the application, so you can focus on writing code instead of
Is to create a directory.
One or more applications can be created in a project, and each application performs a business process
Commands to create an application:
python3 manage.py startapp bookApp
The application directory structure is shown in the following figure:

(2) write the first view function
Open the file bookapp / views Py and put the following Python code:
from django.shortcuts import render
# Create your views here.
from django.http import HttpResponse
def index(request):
return HttpResponse("Library management system")
(3) Routing rules
Create a URLconf in the bookApp directory and a URL named URLs py .
# bookApp/urls.py
from django.conf.urls import url
from . import views
urlpatterns = [
# When the user accesses the home page of the bookApp application, execute the view function index to obtain the url address according to the name in reverse;
url(r'^$', views.index, name='index'),
]
According to the configuration file BookManage/settings, the main file for route lookup is BookManage / URLs Py, so in this file
Add a url rule:
# BookManage/urls.py
from django.conf.urls import url
from django.contrib import admin
from django.urls import path, include
urlpatterns = [
path('admin/', admin.site.urls),
# When the url address accessed by the user starts with book, please visit bookapp URLs matches the url configuration file and performs the corresponding operation
 View function for.
url(r'^book/', include('bookApp.urls')),
]
The include() function allows references to other URLconfs.
(4) Effect display
Start the server
python3 manage.py runserver

Visit url address: http:// 127.0.0.1:8000/book / if you see the content of the home page, the library management system will succeed

Step 3: database model of the project
(1). Database creation
MariaDB [(none)]> create database BookManage charset=utf8;
(2). Connecting to MySQL database configuration
In settings Py file, set the database through the DATABASES item
The databases supported by Django include sqlite, mysql and other mainstream databases
Django uses * * SQLite * * database by default
Django database settings reference document
Where ENGINE is set to be used by the database backend. The built-in database backend includes:
'django.db.backends.postgresql'
'django.db.backends.mysql'
'django.db.backends.sqlite3'
'django.db.backends.oracle'
In BookManage / settings Py file, set the database through the DATABASES item:
# .......
# sqlite database before annotation;
# DATABASES = {
#
'default': {
#
'ENGINE': 'django.db.backends.sqlite3',
#
'NAME': os.path.join(BASE_DIR, 'db.sqlite3'),
#
}
# }
# Add a new Mysql database connection;
DATABASES = {
'default': {
'ENGINE': 'django.db.backends.mysql',
'NAME': 'BookManage',
'USER': 'root',
'PASSWORD': 'westos',
'HOST': 'localhost',
'PORT': '3306',
}
}
# .......
be careful: Django use MySQL The database needs to be installed PyMySQL ,Skip if already installed.
pip install pymysql
Open BookManage/__init__.py, write the following code to import pymysql:
import pymysql
# MySQL DB only supports Python 2. *, 3.0 is not supported yet PyMySQL can be used instead.
pymysql.install_as_MySQLdb()
(2). Create database model
This example completes the maintenance of "book hero" information and needs to store two kinds of data: Book and hero
Book table structure design: Table Name: Book
Book Name: title
Book release time: pub_date
Hero table structure design: Table Name: Hero
Hero name: name
Hero gender: Gender
Hero profile: hcontent
Book: hbook
The book hero relationship is one to many
# bookApp/models.py
from django.db import models
# Create your models here.class Book(models.Model):
# Define attribute: the default primary key auto increment id field cannot be written
title = models.CharField(max_length=20)
pub_date = models.DateTimeField()
# Define default output format
def __str__(self):
return "%d" % self.title
# Customize the corresponding table name. The default table name is bookApp_book
class Meta:
db_table = "books"
class Hero(models.Model):
name = models.CharField(max_length=20)
gender = models.BooleanField()
content = models.CharField(max_length=100)
Book = models.ForeignKey('Book', on_delete=False)
def __str__(self):
return "%s" % self.name
# Customize the corresponding table name. The default table name is bookApp_hero
class Meta:
db_table = "heros"
(3). Generate database tables
Activate the model: edit settings Py file to add the application to installed_ In apps
# BookManage/settings.py
# Application definition
INSTALLED_APPS = [
# ....... Omitted here
'django.contrib.staticfiles',
# Newly added app
'bookApp',
]
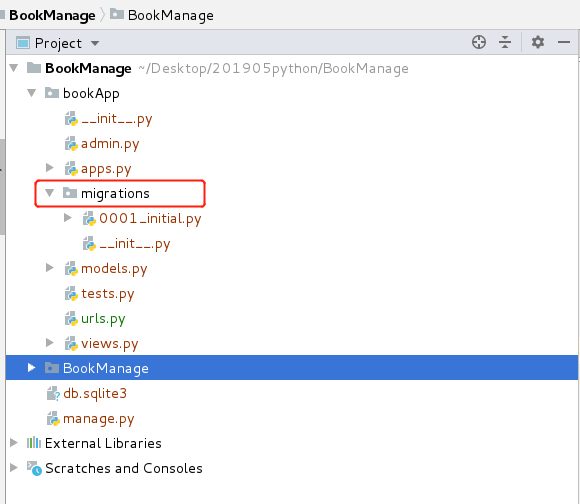
Generate migration file: generate sql statements according to model classes
python manage.py makemigrations
The resulting migration files are as follows:

Execute migration: execute sql statements to generate data tables
python manage.py migrate
Check whether the database table is created successfully in the database?
$ mysql -uroot -pwestos
MariaDB [(none)]> use BookManage
MariaDB [BookManage]> show tables;
MariaDB [BookManage]> desc books;
+----------+-------------+------+-----+---------+----------------+
| Field
| Type
| Null | Key | Default | Extra
|
+----------+-------------+------+-----+---------+----------------+
| id | int(11)
| title | varchar(20) | NO
| pub_date | datetime
| NO
| NO
| PRI | NULL | auto_increment |
| | NULL | |
| | NULL | |
+----------+-------------+------+-----+---------+----------------+
MariaDB [BookManage]> desc heros;
+---------+--------------+------+-----+---------+----------------+
| Field
| Type
| Null | Key | Default | Extra
|
+---------+--------------+------+-----+---------+----------------+
| id | int(11) | NO | PRI | NULL | auto_increment |
| name | varchar(20) | NO | | NULL | |
| gender | tinyint(1) | NO | | NULL | |
| content | varchar(100) | NO | | NULL | |
| Book_id | int(11) | MUL | NULL | |
| NO
+---------+--------------+------+-----+---------+----------------+
5 rows in set (0.00 sec)
(4). Basic operation of database model
Now go to the interactive Python shell and use the free API provided by Django
python manage.py shell
Import required packages:
from bookApp.models import Hero, Book
Query all book information:
Book.objects.all()
New book information:
from datetime import datetime
book = Book(title="Legend of Shooting Heroes", pub_date=datetime(year=1990,month=1,day=10))
book.save()
Find book information:
book = Book.objects.get(pk=1)
book.id
book.title
book.pub_date
Modify book information:
book.title = "Tianlong Babu"
book.save()
Delete book information:
book.delete()
Add associated objects
# Creation of books
book = Book(title="The story of relying on heaven to kill Dragons", pub_date=datetime(year=1990,month=1,day=10))
book.save()
# Creation of characters
info1 = "The fourth generation leader of Emei,Kill the nun's disciple for the leader of Emei sect first,She was very popular with abbess and treated her>Favor plus,Jiang e
 The treasure of meipai town "moth eyebrow Nine Yang skill" was passed to her,One of Zhang Wuji's suitors."
info2 = "Formerly mintmore,Ruyang King(Chahan Temur, a general of the imperial court)My daughter,Title "Princess Shaomin",>Zhao Min is her Han
 name,It comes from her title "Princess Shaomin"."
hero1 = Hero(name="Zhou Zhiruo", gender=False, info=info1)
hero2 = Hero(name="Zhao Min", gender=False, info=info2)
hero1.Book=book
hero2.Book=book
hero1.save()
hero2.save()
Get Association set: returns all the hero s of the current book object
book.hero_set.all()
There is a Hero, and there must be a Book object, which provides the data to create the association:
book.hero_set.create(name="zhang wuji",
gender=True,
content="Zhang Cuishan, the second generation of "Zhang Wuxia" of Wudang sect, and Yin Susu, the leader of Ziwei Hall of Tianying sect")