1, Foreword
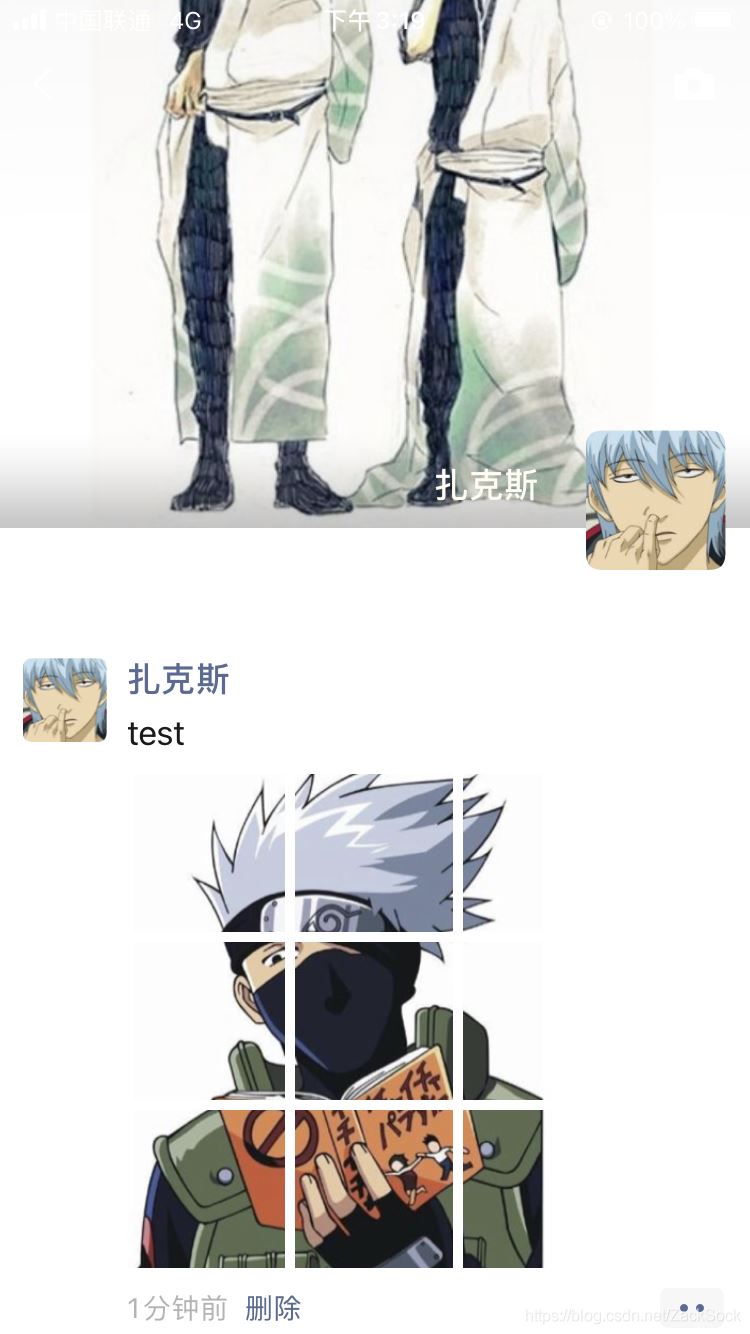
You should have seen in the circle of friends that a picture is displayed in the form of nine squares. The effect is roughly as follows:
To achieve the above effect is very simple, we only need to intercept nine areas of the image. Today we will take you to use Python to realize the generation of Jiugong grid pictures. Before starting, we need to install the pilot module as follows:
`pip install pillow`
|
Let's take a look at some simple image operations.
2, Picture basic operation
Today, we will use three operations: reading pictures, saving pictures and intercepting pictures. Let's take a look at them respectively.
2.1 reading pictures
In the pilot, the image sub module is most commonly used. The operation of reading pictures is through image Open function. Image. The open function will return a picture object. Let's take a look at the specific code:
`from` `PIL` `import` `Image`

`# Read picture`

`img` `=` `Image.``open``(``'lbxx.jpg'``)`

 |

Pillow Module is PIL Modular python3Version, so we use the following statement when importing the module:

|

1

 |

`from` `PIL` `import` `Image`

 |
Later, we can operate the img object to operate the picture.
2.2 capture pictures
In the Image object, there is a crop method that can be used to cut the picture. It receives a box parameter indicating the area to be intercepted. The parameter is a tuple, and the element contents are the x and y coordinates of the upper left corner and the x and y coordinates of the lower right corner. The coordinate system in the picture takes the upper left corner as the origin, as shown in the figure:
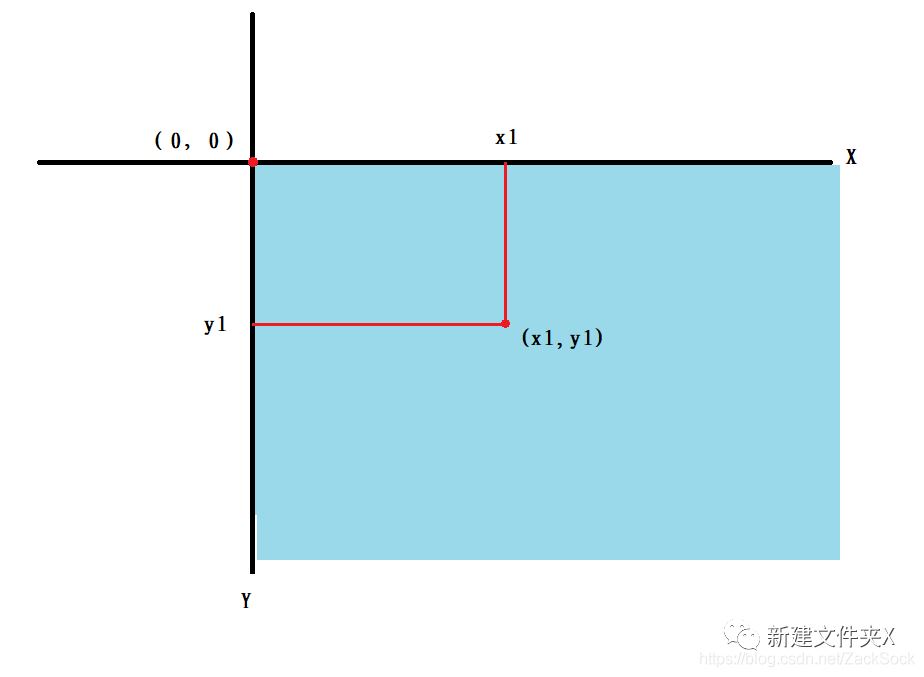
If we need to capture the following areas of the picture:

Then our parameters should be as follows:
|
`img.crop((x1, y1, x2, y2))`
|
Let's take a look at the specific code:
`from` `PIL` `import` `Image`

`# Read picture`

`img` `=` `Image.``open``(``'lbxx.jpg'``)`

`# (0, 0, 300, 300) area of the intercepted picture`

`box` `=` `img.crop((``0``,` `0``,` `300``,` `300``))`

`# Show intercepted area`

`box.show()`

 |
2.3 saving pictures
The operation of saving pictures is very simple. We just need to call img's save method. Let's look at the code directly:
`from` `PIL` `import` `Image`

`img` `=` `Image.``open``(``'lbxx.jpg'``)`

`box` `=` `img.crop((``0``,` `0``,` `300``,` `300``))`

`# Save picture`

`box.save(``'1.jpg'``)`

 |
We can directly call the save method and pass in the saved path.
3, Generate Jiugong grid picture
Knowing the above operation, the following operation is nothing more than intercepting nine areas of the picture and saving it. The specific codes are as follows:
`from` `PIL` `import` `Image`

`# Read picture`

`im` `=` `Image.``open``(``'lbxx.jpg '``)`

`# Divide the width and height by 3 to obtain the size of the cropped single picture`

`width` `=` `im.size[``0``]``/``/``3`

`height` `=` `im.size[``1``]``/``/``3`

`# Coordinates of the upper left corner of the crop picture`

`start_x` `=` `0`

`start_y` `=` `0`

`# Used to name an image`

`im_name` `=` `1`

`# Loop crop picture`

`for` `i` `in` `range``(``3``):`

`for` `j` `in` `range``(``3``):`

`# Crop the picture and save it`

`crop` `=` `im.crop((start_x, start_y, start_x``+``width, start_y``+``height))`

`crop.save(``'imgs/'` `+` `str``(im_name)` `+` `'.jpg'``)`

`# Move the x axis of the upper left coordinate to the right`

`start_x` `+``=` `width`

`im_name` `+``=` `1`

`# When the first line is cropped, x continue to crop from 0`

`start_x` `=` `0`

`# Crop second line`

`start_y` `+``=` `height`

 |
We first create an imgs directory, and then run the program to see the intercepted pictures under imgs.

However, there is still some inconvenience in the above code, that is, we need to manually create the imgs directory. We can use the os module to help us automatically create and change directories. The modified code is as follows:
`import` `os`

`from` `PIL` `import` `Image`

`# Read picture`

`im` `=` `Image.``open``(``'1kkx.jpg'``)`

`# Divide the width and height by 3 to obtain the size of the cropped single picture`

`width` `=` `im.size[``0``]``/``/``3`

`height` `=` `im.size[``1``]``/``/``3`

`# Coordinates of the upper left corner of the crop picture`

`start_x` `=` `0`

`start_y` `=` `0`

`# Used to name an image`

`im_name` `=` `1`

`# Loop crop picture`

`for` `i` `in` `range``(``3``):`

`for` `j` `in` `range``(``3``):`

`# Crop the picture and save it`

`crop` `=` `im.crop((start_x, start_y, start_x``+``width, start_y``+``height))`

`# Determine whether the folder exists`

`if` `not` `os.path.exists(``'imgs'``):`

`os.mkdir(``'imgs'``)`

`crop.save(``'imgs/'` `+` `str``(im_name)` `+` `'.jpg'``)`

`# Move the x axis of the upper left coordinate to the right`

`start_x` `+``=` `width`

`im_name` `+``=` `1`

`# When the first line is cropped, x continue to crop from 0`

`start_x` `=` `0`

`# Crop second line`

`start_y` `+``=` `height`

 |
We made a simple judgment on how to decide whether to create a folder or not. The final effect is the same.
This is the end of this article about the sample code of Python generating Jiugong lattice pictures. For more information about Python generating Jiugong lattice pictures, please search the previous articles or continue to browse the relevant articles below. I hope you will support the introduction to Python tutorials in the future!
How to receive python benefits:
1. Like + comment (check "forward at the same time")
2. Pay attention to Xiaobian. And reply to keyword [19] by private letter
(be sure to send a private message ~ click my avatar to see the private message button)