Python Flask extended learning
- 1, Traditional form verification learning
- 2, Use the flask WTF extension to validate the form
- 3, Python operation database
- 4, Operate the database using flask Sqlalchemy (ORM)
1, Traditional form verification learning
Learning reference: W3School Flash official documents
Imagine a scenario where we need to implement a simple login function. The user needs to enter the account, password and confirm the password. The server background verifies whether the account password is reasonable. If it is reasonable, the login is successful and the login is prompted! If it fails, it will flash a message to tell the user what went wrong
1.1 writing front-end forms
<html lang="en">
<head>
<meta charset="UTF-8">
<title>Titletitle>
head>
<body>
<form method="post">
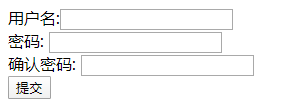
<label>user name: label><input type="text" name="username"/><br>
<label>password: label><input type="password" name="password" /><br>
<label>Confirm password: label><input type="password" name="password2"/> <br>
<input type="submit" value="Submit"> <br>
form>
html>The results are as follows:
1.2 writing Python background logic processing
Implement a simple login logic processing 1. The route requires two logical processing methods: get and post to judge the request 2. Get the parameters of the request (the request function is provided in flash) 3. Judge whether the parameter is filled in and whether the password is the same (parameter verification) 4. If the judgment is OK, a success is returned
If something goes wrong, return the problem to the viewer
from flask import Flask
from flask import render_template,request,flash
app = Flask(__name__)
'''
The message flashes and sends content to the web page
Passing messages to templates
flash (Encryption required) secret_key
The template needs to traverse messages
'''
app.secret_key = "ali" # Set a secret_key to use the message flash function
@app.route("/", methods=['GET','POST'])
def index():
# Request is a request object - > get request method, data
#1. Judge the request mode
if request.method == 'POST':
#2. Get request parameters
username = request.form.get('username')
password = request.form.get('password')
password2 = request.form.get ('password2')
print(username,password,password2)
# 3. Verify
if not all([username,password,password2]):
print('Incomplete parameters')
# Coding problem plus a u
flash(u"Incomplete parameters")
elif password != password2:
print("Inconsistent passwords")
flash(u"Inconsistent passwords")
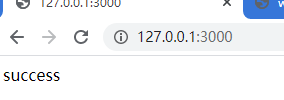
else:
return "success"
return render_template("index.html")
if __name__ == '__main__':
app.run(host="127.0.0.1",debug=True,port=3000)We need to use the function of message flashing to send information to the front end, so the front end code needs to be modified and the following jinjia2 statement is added under from
    {# Use traversal to get the flashing message  #}
    {% for message in get_flashed_messages(): %}
        {{ message }}
    {%  endfor  %}
1.3 operation effect
- Direct submission

- The two passwords are inconsistent
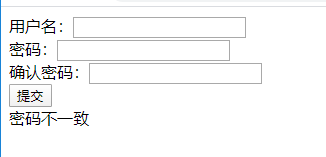
- Validation succeeded
After writing so much, in fact, these are all the contents learned earlier. Today, let's learn how to use flame WTF to generate the expression effect we need
2, Use the flask WTF extension to validate the form
To create a form using witf, you need to complete the following steps
- Install flash WTF: PIP install flash WTF
- Customize a form class
- Then render to HTML
- Supplementary verification
- Validation requires importing validation functions
2.1 define form validation classes
For the convenience of demonstration, I define the form class in the same file
# Fields required to import custom forms
from wtforms import StringField, PasswordField, SubmitField
# Import form validation provided by wtf extension
from wtforms.validators import DataRequired, EqualTo

class LoginForm(FlaskForm):
	# Each field is defined here. StringField is used to represent the string field, PasswordField represents the password field, and SubmitField represents the submission field
	# validators means data validation, DataRequired validation is not empty, and EqualTo verifies whether the data is equal
    username = StringField(u"user name", validators=[DataRequired()])
    password = PasswordField(u"password", validators=[DataRequired()])
    password2 = PasswordField(u"Confirm password", validators=[DataRequired(), EqualTo("password", "Inconsistent passwords")]) # Same as the first comparison
    submit = SubmitField(u"Submit")
2.2 compiling front-end interface
second.html
<html lang="en">
<head>
<meta charset="UTF-8">
<title>wtf verification title>
head>
<body>
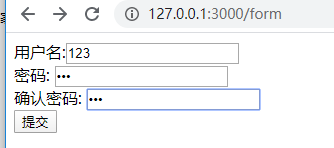
<form method="post">
{{ form.csrf_token() }}
{{ form.username.label }}:{{ form.username }} <br>
{{ form.password.label }}: {{ form.password }} <br>
{{ form.password2.label }}: {{ form.password2 }} <br>
{{ form.submit }}
form>
body>
html>2.3 flash background processing
@app.route('/form', methods=['POST','GET'])
def login():
login_form = LoginForm()
if request.method == 'POST':
username = request.form.get ('username')
password = request.form.get ('password')
password2 = request.form.get ('password2')
# To verify parameters, wtf can implement all verifications in one sentence
# The lack of CRSF token will lead to failure, and things need to be in csrf
if login_form.validate_on_submit():
print(username, password)
return 'success'
else:
flash("Parameter error")
# Transfer value to template
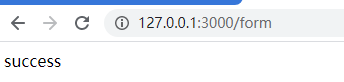
return render_template('second.html',form=login_form)2.4 verification
3, Python operation database
As a back-end language, Python can also operate databases. This operation has taken mysql as an example
If you don't know mysql yet, you can read this article first: List of common MySQL commands
There are many libraries for Python to operate mysql. I choose to use pymysql to demonstrate
3.1 installing pymysql
It should be able to be installed. I installed it using the default environment of the virtual environment

Install using the default source: pip install pymysql If the speed is too slow, you can use another method: pip3 install pymysql -i https://pypi.douban.com/simple
3.2 configuration database information
The following two methods can be used
import pymysql

config = {
    "host":"127.0.0.1",
    "user":"root",
    "password":"Your database password",
    "database":"bank"
}

# Mode 1
db = pymysql.connect(**config)

# Mode II
db = pymysql.connect("localhost","root","Database password","db_name")
3.3 simple database operation
import pymysql

config = {
    "host":"127.0.0.1",
    "user":"root",
    "password":"root",
    "database":"bank"
}

# Connect to database
db = pymysql.connect(**config)

# Create a cursor object
cursor = db.cursor()

# Writing SQL statements
s = "select * from student"; # Because the query does not need to commit transactions, we can obtain data directly

# Get query data
cursor.execute("select * from student") # Execute query statement
data = cursor.fetchall()

# Multiple data obtained is a tuple, so you need to print the data circularly
for i in data:
    print(i)

# If you still want to insert data, you can do so
cursor.execute(f"insert into student values({39},'gorit',{18},{97})")
db.commit() # The data has changed, so the transaction needs to be committed
That's all for the basic operations of pymysql. As long as the sql statement is well written, you can use pymysql to implement it, and the efficiency is higher than the ORM below
4, Operate the database using flask Sqlalchemy (ORM)
- We need to use the flame Sqlalchemy extension, so we need to install it: PIP install flame Sqlalchemy
- The premise is that the mysql database is installed
- We will use the pymysql engine to operate the database, so this should also be installed: pip install pymysql
4.1 create entity class (create table)
- Create a Test_sql.py file (create entity classes and generate corresponding tables with this extension)
- Create a Test_sql_config.cfg configuration file (Flask property configuration file)
- Create an operate_new_sql.py file (test ORM)
#!/usr/bin/python
# -*- coding: utf-8 --
#@File: Test_sql.py
#@author: Gorit
#@contact: gorit@qq.com
#@time: 2020/4/4 17:50

from  flask_sqlalchemy import SQLAlchemy
from flask import Flask

app = Flask(__name__)
app.config.from_pyfile ("Test_sql_config.cfg") # Write some necessary configurations into the configuration file

db = SQLAlchemy(app) # Instantiate the database, which will be used in ORM testing

# Create student table
class Student(db.Model):
    tablename = "student"
    # Primary key
    id = db.Column(db.Integer, primary_key = True) # Primary key
    name =db.Column(db.String(64), nullable=False) # Student name, nullable, can it be blank
    gender = db.Column(db.Enum("male","female"), nullable=False) # Enumeration. Only the specified data can be used. It is not empty
    phone = db.Column(db.String(11)) # Mobile phone number can be empty

# Create Curriculum
class Course(db.Model):
    tablename = "course"
    id = db.Column(db.Integer, primary_key = True) # Primary key
    name = db.Column(db.String(64), nullable=False) # Course name is not empty
    # teacher_id = db.Column()

# Create teacher table
class Teacher(db.Model):
    tablename = "teacher"
    id = db.Column(db.Integer, primary_key = True) # Primary key
    name = db.Column(db.String(64), nullable=False) # Student name, nullable, can it be blank
    gender = db.Column(db.Enum("male","female"), nullable=False) # Enumeration. Only the specified data can be used. It is not empty
    phone = db.Column(db.String(11)) # Mobile phone number can be empty

# Create grade sheet
# class Grade(db.Model):
#     tablename = "grade"
#     id = db.Column(db.Integer, primary_key = True) # Primary key
#     course_id =
#     grade =
#     student =

if __name__ == '__main__':
    db.create_all()
Why should I pull out the configuration file separately? If I don't, I have to use app.config ['xxxxx '] = xxxx one by one in the file of flash. It will be very troublesome, so I put all these contents into the method file
JSON_AS_ASCII = False # When returning json data, turn off converting to Classl code
DEBUG = True # Debug mode on
SECRET_KEY = "sb_3306o233"  # Use the message to flash the content that must be configured

# Database configuration
SQLALCHEMY_DATABASE_URI = "mysql+pymysql://root:root@localhost:3306/bank?charset=utf8 "# here + pymysql uses its engine to operate pymysql. The rest are account, password, service URI + port, database, character set, etc
SQLALCHEMY_COMMIT_ON_TEARDOWN= False # Database configuration
SQLALCHEMY_TRACK_MODIFICATIONS = True # Database configuration
4.2 single table operation - add data
The following database operations are completed in the operate_new_sql.py file
#!/usr/bin/python
# -*- coding: utf-8 --
#@File: operate_new_sql.py
#@author: Gorit
#@contact: gorit@qq.com
#@time: 2020/4/4 20:07

# Operation database
from Test_sql import db, Student

# db is the instantiated database operation object, and Student is a table


# ==================Single table addition
# Create student object
# After creation, the id will increase automatically
s = Student(name="666", gender="female", phone="13324436542")
s1 = Student(name="xxx", gender="female", phone="13324426542")
s2 = Student(name="xxx", gender="male", phone="18324426542")
# The first statement (add one data at a time)
# db.session.add(s)
# db.session.commit()

# Statement 2 (adding multiple pieces of data at one time)
db.session.add_all([s1,s2,s])
db.session.commit()
4.3 single standard operation - query data
# =========================Single standard check

# get the first query, which queries a single query
# stu = Student.query.get(1) # The id is put in. Querying according to the primary key is very limited
# print(stu.name, stu.gender, stu.phone) # stu is a student class object, so the object will be printed directly

# all() query all
# stu1 = Student.query.all()
# for i in stu1:
#     print (i.name, i.gender, i.phone)

# filter() query by criteria
# stu = Student.query.filter(Student.id <=5)
# stu = Student.query.filter(Student.name = = "Zhang San")
# stu = Student.query.filter(Student.gender = = "female")
# for i in stu:
#     print (i.name, i.gender, i.phone)

# filter_by() is similar to sql query first() to query the first
# stu = Student.query.filter_by(name = "Zhang San")
# stu = Student.query.filter_by(name = "Zhang San"). all() print object
# stu = Student.query.filter_by(name = "Zhang San"). first()
# print(stu)
As can be seen from the above, we can only do simple queries. If we are more advanced, group queries and sub queries may be difficult to implement, so we'd better learn sql statements well, hhhhhh
4.4 single table operation - modify data
What we receive here is the number of modified data
# ===========================Single table modification
# First kind
# Modify a piece of data
count = Student.query.filter(Student.name == "Zhang San").update({"name":"Zhang Yi"})
print(count) # Returns how many pieces of data have been modified
db.session.commit()
print(stu.name, stu.gender, stu.phone)

# Second
stu = Student.query.filter(Student.gender == "male").update({"gender":"female"})
print(stu) # The result is an integer
db.session.commit()

# Batch modification
stu1 = Student.query.filter(Student.gender == "female").all()
for i in stu1:
     i.gender = "male"
     db.session.add(i)
db.session.commit()
4.5 single table operation - delete data
Delete the queried data
# Single table deletion
stu = Student.query.filter(Student.gender == "female").delete()
print(stu) # Return 0
db.session.commit()
4.6 summary
Addition, deletion and viewing of single table data 1. Add data add and commit 2. No commit is required for query 3. commit if necessary 4. commit is also required for delete
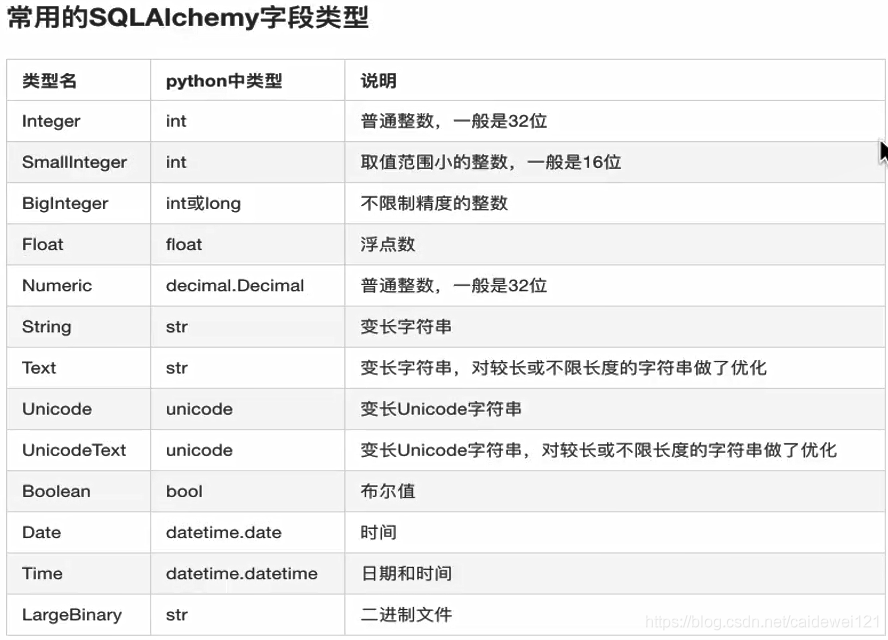
5, Common fields in flask Sqlalchemy
5.1 field type
5.2 column selection
