Python is not the mainstream development language in the area of block chains or digital currency.But if your goal is to study the principles of block chain technology, or if you need to simulate a block chain network on your own notebook and do some research experiments, such as completing your own graduation design project or scientific research project, then Python is appropriate.In this tutorial, we will learn how to develop a multinode block chain network from scratch using Python, and develop a de-centralized data sharing application based on this simulated block chain network.
Links to related tutorials: Block Chain Graduation Thesis | Taifang | Bitcoin | EOS | Tendermint | Hyperledger Fabric | Omni/USDT | Ripple
The complete source code for this tutorial can be downloaded here: https://github.com/ezpod/python-blockchain-sim
1. Python simulation block chain: save transactions in batches with blocks
First, we need to save the data in JSON format into the block chain.JSON is a common cross-language data exchange format, such as the JSON representation of a blog that looks like this:
{
  "author": "some_author_name",
  "content": "Some thoughts that author wants to share",
  "timestamp": "The time at which the content was created"
}
In the area of block chains, we often use transactions instead of the data mentioned above.Therefore, to avoid confusion and consistency, in this tutorial we will use the term transaction to represent the data to be stored in the block chain.
Transactions are packaged in blocks, which can contain one or more transactions.Blocks containing transactions are periodically generated and joined to the block chain.Because there are many blocks, each block should have a unique ID.Here is our Block class definition code for the Python simulation block chain:
class Block:
    def __init__(self, index, transactions, timestamp):
        """
        Constructor for the `Block` class.
        :param index: Unique ID of the block.
        :param transactions: List of transactions.
        :param timestamp: Time of generation of the block.
        """
        self.index = index
        self.transactions = transactions
        self.timestamp = timestamp
2. Python block chain simulation: adding tamper-resistant digital fingerprints to blocks
One feature of block chains is that transactions stored in blocks cannot be tampered with. To achieve this feature, it is necessary to be able to detect the tampering of block data first.To do this, we need to use Hash functions in cryptography.
A hash function converts any size of input data to a fixed size of output data, which is the hash of the data, and different input data (basically) results in different output data, so the output hash can be used as the identification of the input data.An ideal hash function has the following characteristics:
- Should be easy to calculate
- Should be deterministic, always generating the same hash for the same input data
- Should be uniform randomness, a slight change in the input data will also result in a significant change in the output hash
So we can guarantee:
- It is basically impossible to guess from the hash what the input data is, the only way is to try all possible combinations
- If you know both input and output, you can verify that the hash is correct by simply recalculating it
Obviously, deriving hashes from input data is simple, but deriving input data from hashes is almost impossible. This asymmetric value is the key to block chains to obtain the desired tamper resistance.
There are currently many popular hash functions, the following is a Python example using the SHA-256 hash function:
>>> from hashlib import sha256
>>> data = b"Some variable length data"
>>> sha256(data).hexdigest()
'b919fbbcae38e2bdaebb6c04ed4098e5c70563d2dc51e085f784c058ff208516'
>>> sha256(data).hexdigest() # no matter how many times you run it, the result is going to be the same 256 character string
'b919fbbcae38e2bdaebb6c04ed4098e5c70563d2dc51e085f784c058ff208516'
>>>  data = b"Some variable length data2" # Added one character at the end.
'9fcaab521baf8e83f07512a7de7a0f567f6eef2688e8b9490694ada0a3ddeec8'
Notice in the example above that a slight change in the input data results in a completely different hash!
In the Python simulation block chain project of the tutorial, we will save the block hash as a field of the block and use it as a Digital Fingerprint, or Signature, of the block data.
Here is the Python implementation code for calculating the block hash:
from hashlib import sha256
import json

def compute_hash(block):
    """
    Returns the hash of the block instance by first converting it
    into JSON string.
    """
    block_string = json.dumps(self.__dict__, sort_keys=True)
    return sha256(block_string.encode()).hexdigest()
Note: In most digital cryptographic currency implementations, each transaction in a block also needs to compute a hash and use a tree structure (merkle tree) to compute the root hash of a set of transactions.However, this is not necessary for block chains, so this feature is ignored for the time being.
3. Python simulation block chains: linking blocks one by one
Okay, now that we have a Python implementation of the block class Block, let's see how to implement the block chain structure with Ptyhon.
Block chains are collections of blocks, and we can use Python lists to hold all the blocks.This is not enough, however, because data can also be tampered with if someone deliberately replaces a new block in the collection with an earlier one.
We need a way to ensure that modifications to earlier blocks will invalidate the entire block chain.Bitcoins are used by letting the hash of the back block depend on the earlier block.To link blocks together, we need to add a new field to the block structure to hold the hash of the previous block: previous_hash.
Okay, what if each block is linked to the previous block through the previous_hash field?In the area of block chains, the first block, called the Genesis Block, can be manually generated or used with some specific logic.Now let's add the previous_hash field to the Block class and implement the block chain structure definition. Here's what the Blockchain class does
Python implementation code:
from hashlib import sha256
import json
import time


class Block:
    def__init__(self, index, transactions, timestamp, previous_hash):
        """
        Constructor for the `Block` class.
        :param index:         Unique ID of the block.
        :param transactions:  List of transactions.
        :param timestamp:     Time of generation of the block.
        :param previous_hash: Hash of the previous block in the chain which this block is part of.
        """
        self.index = index
        self.transactions = transactions
        self.timestamp = timestamp
        self.previous_hash = previous_hash # Adding the previous hash field

    def compute_hash(self):
        """
        Returns the hash of the block instance by first converting it
        into JSON string.
        """
        block_string = json.dumps(self.__dict__, sort_keys=True) # The string equivalent also considers the previous_hash field now
        return sha256(block_string.encode()).hexdigest()

class Blockchain:

    def __init__(self):
        """
        Constructor for the `Blockchain` class.
        """
        self.chain = []
        self.create_genesis_block()

    def create_genesis_block(self):
        """
        A function to generate genesis block and appends it to
        the chain. The block has index 0, previous_hash as 0, and
        a valid hash.
        """
        genesis_block = Block(0, [], time.time(), "0")
        genesis_block.hash = genesis_block.compute_hash()
        self.chain.append(genesis_block)

    @property
    def last_block(self):
        """
        A quick pythonic way to retrieve the most recent block in the chain. Note that
        the chain will always consist of at least one block (i.e., genesis block)
        """
        return self.chain[-1]
Now, if any of the earlier blocks are modified, then:
- The hash of this earlier block will change
- This will result in inconsistencies with previous_hash field records for the subsequent block
- Since the input data for calculating the block hash contains the contents of the previous_hash field, the hash for the next block will also change
Ultimately, the entire chain from the replaced block is invalid, and the only way to fix this problem is to recalculate the entire chain.
4. Python simulation block chain: implementing workload proof algorithm
But there is one more problem.If we modify the previous block, and if recalculating the other blocks behind is very simple, tampering with the block chain is not a problem.To avoid this problem, we can use the asymmetry of the hash function mentioned earlier to make block hash calculation more difficult and random.What we need to do is accept only block hashes that meet certain constraints.Now let's add a constraint that requires at least n zeros at the beginning of the block hash, where n is a positive integer.
We know that the block hash will not change unless the content of the block data is changed, and of course we do not want to modify the existing data.So what should we do?It's simple!Let's just add some more data that we can modify at will.So we need to add a new field nonce to the Block class. We can change the value of this field to get different block hashes until the specified constraint is met, and the nonce value is proof of our workload.
This process is a simplified version of the hashcash algorithm used by Bitcoin.The number of leading zeros specified in the constraint determines the difficulty of our workload proof algorithm: the more leading zeros there are, the harder it is to find a suitable nonce.
At the same time, due to the asymmetry of hash functions, the workload proved not easy to calculate, but easy to verify.
Here is the Python implementation code for the workload proof algorithm (PoW:Proof of Work):
class Blockchain:
    # difficulty of PoW algorithm
    difficulty = 2

    """
    Previous code contd..
    """

    def proof_of_work(self, block):
        """
        Function that tries different values of the nonce to get a hash
        that satisfies our difficulty criteria.
        """
        block.nonce = 0

        computed_hash = block.compute_hash()
        while not computed_hash.startswith('0' * Blockchain.difficulty):
            block.nonce += 1
            computed_hash = block.compute_hash()

        return computed_hash
It should be pointed out that there is no simple logic to quickly find nonce values that meet the constraints, so only violent calculations can be performed.
5. Python simulation block chain: adding blocks to block chain
To add blocks to the block chain, we first need to verify that:
- The data in the block has not been tampered with and the workload provided has proved to be correct
- The order of transactions is correct, and the previous_hash field points to the hash of the latest block in our chain
Now let's look at the Python implementation code that chains blocks up:
class Blockchain:
    """
    Previous code contd..
    """

    def add_block(self, block, proof):
        """
        A function that adds the block to the chain after verification.
        Verification includes:
        * Checking if the proof is valid.
        * The previous_hash referred in the block and the hash of a latest block
          in the chain match.
        """
        previous_hash = self.last_block.hash

        if previous_hash != block.previous_hash:
            return False

        if not Blockchain.is_valid_proof(block, proof):
            return False

        block.hash = proof
        self.chain.append(block)
        return True

    def is_valid_proof(self, block, block_hash):
        """
        Check if block_hash is valid hash of block and satisfies
        the difficulty criteria.
        """
        return (block_hash.startswith('0' * Blockchain.difficulty) and
                block_hash == block.compute_hash())
6. Python simulation block chain: mining
The transaction begins with a pool of unacknowledged transactions.The process of putting unrecognized transactions into blocks and calculating workload certificates is known as mining.Once we have found a nonce that meets the specified constraint, we can say we have dug a block with more than one chain.
In most digitally encrypted currencies, including bitcoins, miners are rewarded with an encrypted currency in return for the effort they put into proving their computational effort.Here is the Python implementation code for our mining function:
class Blockchain:

    def __init__(self):
        self.unconfirmed_transactions = [] # data yet to get into blockchain
        self.chain = []
        self.create_genesis_block()

    """
    Previous code contd...
    """

    def add_new_transaction(self, transaction):
        self.unconfirmed_transactions.append(transaction)

    def mine(self):
        """
        This function serves as an interface to add the pending
        transactions to the blockchain by adding them to the block
        and figuring out proof of work.
        """
        if not self.unconfirmed_transactions:
            return False

        last_block = self.last_block

        new_block = Block(index=last_block.index + 1,
                          transactions=self.unconfirmed_transactions,
                          timestamp=time.time(),
                          previous_hash=last_block.hash)

        proof = self.proof_of_work(new_block)
        self.add_block(new_block, proof)
        self.unconfirmed_transactions = []
        return new_block.index
Okay, we're almost done with this Python emulation block chain project!
7. Python emulation block chain: adding API interfaces to nodes
Now it's time to add API interfaces to our emulated block chain nodes so that applications can use these APIs to develop specific applications.We'll use Flask, the popular Python microframework, to create the REST API.If you've used other web frameworks before, the code below should not be difficult to understand, and don't worry if you haven't been exposed to them. Here's a great one Flask Tutorial:
from flask import Flask, request
import requests

# Initialize flask application
app =  Flask(__name__)

# Initialize a blockchain object.
blockchain = Blockchain()
We need an access end node that can submit new transactions so that our applications can use this API to add new data to the block chain.The following is the Python implementation code for the node's/new_transaction access end node:
# Flask's way of declaring end-points
@app.route('/new_transaction', methods=['POST'])
def new_transaction():
    tx_data = request.get_json()
    required_fields = ["author", "content"]

    for field in required_fields:
        if not tx_data.get(field):
            return "Invalid transaction data", 404

    tx_data["timestamp"] = time.time()

    blockchain.add_new_transaction(tx_data)

    return "Success", 201
Another end node/chain can return data from the block chain.Our application will use this API to query the data to display.Here is the Python implementation code for this end node:
@app.route('/chain', methods=['GET'])
def get_chain():
    chain_data = []
    for block in blockchain.chain:
        chain_data.append(block.__dict__)
    return json.dumps({"length": len(chain_data),
                       "chain": chain_data})
Mining is CPU intensive, so instead of letting the nodes keep mining, we provide an access end node/min to provide on-demand mining services.Here is the Python implementation code:
@app.route('/mine', methods=['GET'])
def mine_unconfirmed_transactions():
    result = blockchain.mine()
    if not result:
        return "No transactions to mine"
    return "Block #{} is mined.".format(result)

@app.route('/pending_tx')
def get_pending_tx():
    return json.dumps(blockchain.unconfirmed_transactions)
These REST access end nodes can be used to manipulate our block chain, such as submitting transactions and then confirming them through mining.
8. Python Block Chain Simulation: Achieving Longest Chain Consensus and Decentralization
So far, the simulation block chain that we have implemented from zero using Python is running on one computer.Even though we've used hashes to link blocks back and forth and applied workload proof constraints, we can't trust just a single node.We need to implement distributed data storage and we need multiple nodes to maintain the block chain.So in order to move from a single node to a P2P network, let's start with
Create a mechanism for nodes on your network to understand each other.
First, define a new access end node/register_node to register the new node in the network.Here is the Python implementation code:
# Contains the host addresses of other participating members of the network
peers = set()

# Endpoint to add new peers to the network
@app.route('/register_node', methods=['POST'])
def register_new_peers():
    # The host address to the peer node
    node_address = request.get_json()["node_address"]
    if not node_address:
        return "Invalid data", 400

    # Add the node to the peer list
    peers.add(node_address)

    # Return the blockchain to the newly registered node so that it can sync
    return get_chain()

@app.route('/register_with', methods=['POST'])
def register_with_existing_node():
    """
    Internally calls the `register_node` endpoint to
    register current node with the remote node specified in the
    request, and sync the blockchain as well with the remote node.
    """
    node_address = request.get_json()["node_address"]
    if not node_address:
        return "Invalid data", 400

    data = {"node_address": request.host_url}
    headers = {'Content-Type': "application/json"}

    # Make a request to register with remote node and obtain information
    response = requests.post(node_address + "/register_node",
                             data=json.dumps(data), headers=headers)

    if response.status_code == 200:
        global blockchain
        global peers
        # update chain and the peers
        chain_dump = response.json()['chain']
        blockchain = create_chain_from_dump(chain_dump)
        peers.update(response.json()['peers'])
        return "Registration successful", 200
    else:
        # if something goes wrong, pass it on to the API response
        return response.content, response.status_code


def create_chain_from_dump(chain_dump):
    blockchain = Blockchain()
    for idx, block_data in enumerate(chain_dump):
        block = Block(block_data["index"],
                      block_data["transactions"],
                      block_data["timestamp"],
                      block_data["previous_hash"])
        proof = block_data['hash']
        if idx > 0:
            added = blockchain.add_block(block, proof)
            if not added:
                raise Exception("The chain dump is tampered!!")
        else:  # the block is a genesis block, no verification needed
            blockchain.chain.append(block)
    return blockchain
Newly joined nodes can be registered by calling the register_with_existing_node method with the/register_with endpoint end node.This helps to solve the following problems:
- Require remote nodes to add a new entry to their known neighbors
- Initialize block chains on new nodes using data from remote nodes
- If a node is offline halfway, it can resynchronize the block chain from the network
However, when there are multiple block chain nodes, a problem needs to be solved: block chains on different nodes may be different from each other, whether intentional or unintentional (such as network latency).In this case, an agreement needs to be reached between nodes on the version of the block chain in order to maintain consistency across the system.In other words, we need to reach a consensus.
When block chains on different nodes are differentiated, a simple consensus algorithm is to select the longest valid chain.The rationality behind this approach is that the longest chain contains the largest number of proven calculations that have been put into work.The following is the Python implementation code for the Longest Chain Consensus algorithm:
class Blockchain
    """
    previous code continued...
    """
    def check_chain_validity(cls, chain):
        """
        A helper method to check if the entire blockchain is valid.
        """
        result = True
        previous_hash = "0"

        # Iterate through every block
        for block in chain:
            block_hash = block.hash
            # remove the hash field to recompute the hash again
            # using `compute_hash` method.
            delattr(block, "hash")

            if not cls.is_valid_proof(block, block.hash) or \
                    previous_hash != block.previous_hash:
                result = False
                break

            block.hash, previous_hash = block_hash, block_hash

        return result

def consensus():
    """
    Our simple consensus algorithm. If a longer valid chain is
    found, our chain is replaced with it.
    """
    global blockchain

    longest_chain = None
    current_len = len(blockchain.chain)

    for node in peers:
        response = requests.get('{}/chain'.format(node))
        length = response.json()['length']
        chain = response.json()['chain']
        if length > current_len and blockchain.check_chain_validity(chain):
              # Longer valid chain found!
            current_len = length
            longest_chain = chain

    if longest_chain:
        blockchain = longest_chain
        return True

    return False
Now, we need to provide a Python method for nodes to broadcast this message to other nodes when they dig out blocks so that each participant in our network of simulated block chains can update their local block chains and then dig the next block.It is easy to receive a block broadcast node to verify the workload proof, and then add the received block to its own local chain.
The following is the Python implementation code for the node's/add_block access end node:
# endpoint to add a block mined by someone else to
# the node's chain. The node first verifies the block
# and then adds it to the chain.
@app.route('/add_block', methods=['POST'])
def verify_and_add_block():
    block_data = request.get_json()
    block = Block(block_data["index"],
                  block_data["transactions"],
                  block_data["timestamp"],
                  block_data["previous_hash"])

    proof = block_data['hash']
    added = blockchain.add_block(block, proof)

    if not added:
        return "The block was discarded by the node", 400

    return "Block added to the chain", 201


def announce_new_block(block):
    """
    A function to announce to the network once a block has been mined.
    Other blocks can simply verify the proof of work and add it to their
    respective chains.
    """
    for peer in peers:
        url = "{}add_block".format(peer)
        requests.post(url, data=json.dumps(block.__dict__, sort_keys=True))
The announce_new_block method should be called when the block is dug out so that other nodes can update their locally saved copies of the block chain:
@app.route('/mine', methods=['GET'])
def mine_unconfirmed_transactions():
    result = blockchain.mine()
    if not result:
        return "No transactions to mine"
    else:
        # Making sure we have the longest chain before announcing to the network
        chain_length = len(blockchain.chain)
        consensus()
        if chain_length == len(blockchain.chain):
            # announce the recently mined block to the network
            announce_new_block(blockchain.last_block)
        return "Block #{} is mined.".format(blockchain.last_block.index
9. Python Emulation Block Chain: Developing Decentralized Applications
Okay, now our node software for simulating block chains has been developed.Now you need to develop an application's user interface.We use the Jinja2 template to render the page and some CSS to make it look nice.
Our applications need to connect to a node in this network of simulated block chains to get data or submit new data.Here is the Python code for the initialization part of the application:
import datetime
import json

import requests
from flask import render_template, redirect, request

from app import app

# Node in the blockchain network that our application will communicate with
# to fetch and add data.
CONNECTED_NODE_ADDRESS = "http://127.0.0.1:8000"

posts = []
The fetch_posts method uses the node's/chain end node to get data, parse data, and save it locally:
def fetch_posts():
    """
    Function to fetch the chain from a blockchain node, parse the
    data, and store it locally.
    """
    get_chain_address = "{}/chain".format(CONNECTED_NODE_ADDRESS)
    response = requests.get(get_chain_address)
    if response.status_code == 200:
        content = []
        chain = json.loads(response.content)
        for block in chain["chain"]:
            for tx in block["transactions"]:
                tx["index"] = block["index"]
                tx["hash"] = block["previous_hash"]
                content.append(tx)

        global posts
        posts = sorted(content,
                       key=lambda k: k['timestamp'],
                       reverse=True)
The application uses an HTML form to receive user input and then adds transactions to the unacknowledged transaction pool of the connected node using a POST request.The transaction is then confirmed by our simulation block chain network and eventually read again when the web page is refreshed:
@app.route('/submit', methods=['POST'])
def submit_textarea():
    """
    Endpoint to create a new transaction via our application
    """
    post_content = request.form["content"]
    author = request.form["author"]

    post_object = {
        'author': author,
        'content': post_content,
    }

    # Submit a transaction
    new_tx_address = "{}/new_transaction".format(CONNECTED_NODE_ADDRESS)
10. Python simulation block chain: how to run applications
It is finally completed.You can view this on github Python simulation block chain Complete source code.
First clone the project repository:
$ git clone https://github.com/ezpod/python-blockchain-sim.git
Install the necessary Python project dependencies:
$ cd python_blockchain_app
$ pip install -r requirements.txt
Start our simulation block chain node:
$ export FLASK_APP=node_server.py
$ flask run --port 8000
Now one of our simulation block chain node instances is started and listening on port 8000.
Open another terminal to run our de-centralized application:
$ python run_app.py
Now that the application is started, you can access it from this web address: http://localhost:5000.
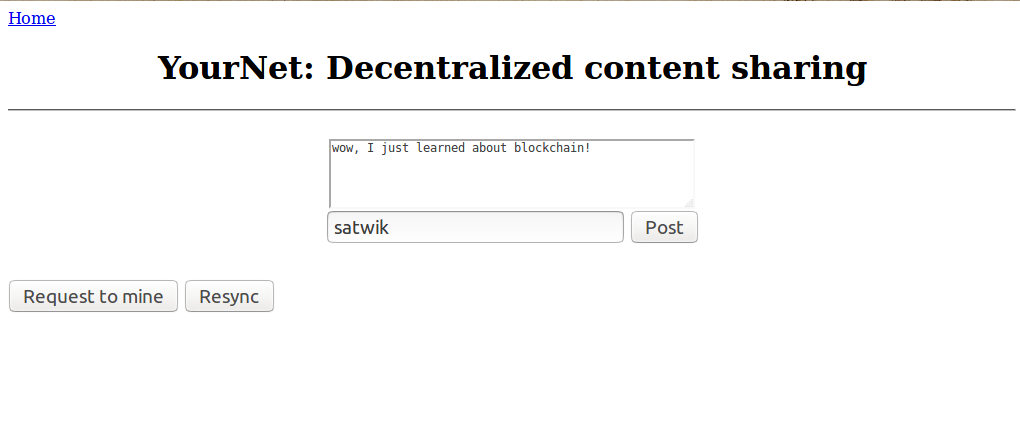
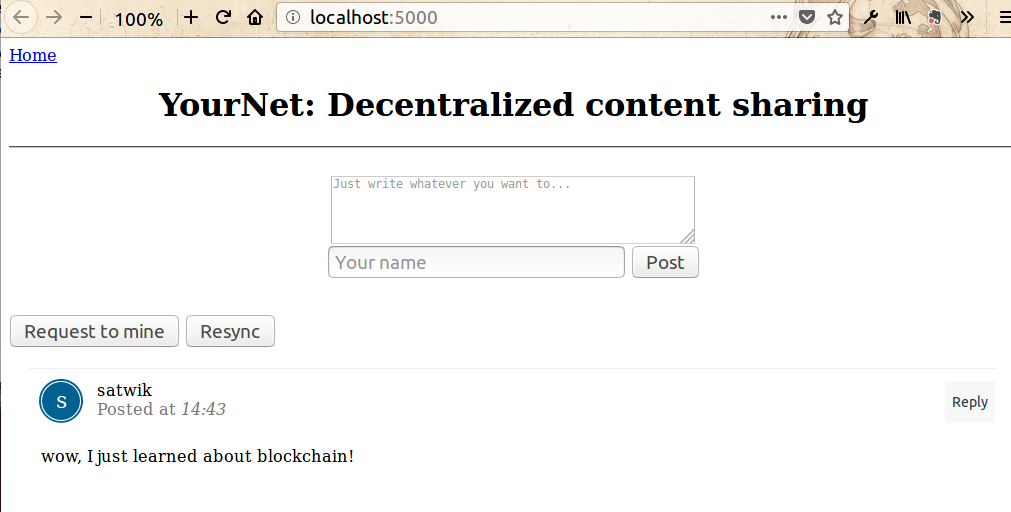
The following diagram shows how to submit content to our simulation block chain using the web interface:
The following diagram shows how to start node mining using the web interface:

The following diagram shows how to resynchronize block chain data using the web interface:
11. Python simulation block chain: running multiple nodes
To run an emulated block chain network with multiple nodes, register_with/end nodes can be used to register new nodes in the network.
Below is a multi-node example scenario where we started three simulation nodes listening on ports 8000, 8001, and 8002:
# already running
$ flask run --port 8000 &
# spinning up new nodes
$ flask run --port 8001 &
$ flask run --port 8002 &
You can use the following cURL requests to register two new nodes listening on ports 8001 and 8002:
$ curl -X POST \
  http://127.0.0.1:8001/register_with \
  -H 'Content-Type: application/json' \
  -d '{"node_address": "http://127.0.0.1:8000"}'

$ curl -X POST \
  http://127.0.0.1:8002/register_with \
  -H 'Content-Type: application/json' \
  -d '{"node_address": "http://127.0.0.1:8000"}'
This lets the nodes listening on port 8000 know that there are also 8001 and 8002 listening nodes, and vice versa.The newly added node will also synchronize block chain data from the original network node so that the new node can participate in subsequent mining processes.
To modify the block chain nodes for front-end application synchronization, you can modify the CONNECTED_NODE_ADDRESS field in the views.py file.
Once you've done that, you can run the application (python run_app.py) and create transactions through the web interface.When you dig, all nodes in the network update their local block chains.You can also use cURL s or Postman to view block chains using/chain end nodes.For example:
$ curl -X GET http://localhost:8001/chain
$ curl -X GET http://localhost:8002/chain
12. Python Emulated Block Chain: How to Validate Transactions
You may notice another flaw in our simulation block chain-based de-centralization application: anyone can submit anything at any time.One solution to this problem is to use asymmetric key technology to create user accounts.Each new user needs a public key (corresponding account name) and a private key to submit data in our application.Private keys are used to create signatures for data, while public keys are used to verify signatures for data. Here is how they work:
- Each new transaction submitted is signed with the user's private key.This signature is added to the transaction data along with the user information
- During the verification phase, when mining, we can use public keys and signatures to verify that the sender and signature generated in the data match and that the message has been modified.
13. Python Block Chain Simulation: Tutorial Summary
In this tutorial, we learned the basic concept of a public chain and implemented a simulation block chain and Flask application based on it using Python.If you have completed the entire tutorial, you are confident that you should use Python to implement a block chain from scratch, develop your own de-centralized application based on this simulated block chain, or do some research experiments using this simulated block chain network.The block chain implementation in the tutorial is not as complex as bitcoins or Taifang, but it is believed to help understand the core issues and solutions of block chain technology.
Original Link: Python Emulated Block Chain-Smart Network