1. Introduction to flash
Flash can be used for web development
Install as
pip install flask
2. Brief description of flash
1. Print helloworld on the page
app=Flask is in fixed mode
@app. The route ('/') decorator generates the main web page and executes the following functions of the decorator
app.run() runs and starts the service
from  flask  import Flask
app = Flask(__name__)

@app.route("/")
def index():
   	return "hell world!"

if __name__ == '__main__':
    app.run()
2. Add other pages
@app. The route ("/ next") decorator generates a new corresponding linked web page and executes the following functions of the decorator
Now there are two websites
http://127.0.0.1:5000/ And http://127.0.0.1:5000/next/
After the function is run, you can enter browse in the browser
from  flask  import Flask
app = Flask(__name__)

@app.route("/")
def index():
   	return "hell world!"

@app.route("/next")
def newpage():
    return "I'm a web page"
if __name__ == '__main__':
    app.run()
3. Take the html file as the template and display it on the web page (outgoing data from the web page)
Render is used here_ The template function needs to be imported,
And this function can only be used/ templates, so to create a new templates folder in the root directory, the html files to be applied in the future must be put here.
The first is to create html files, which can be ready-made or generated by yourself.
If you generate it yourself, you need to create an empty html file and input it in the vscode interface! Add the tab key to quickly generate the following template
<!DOCTYPE html>
<html lang="en">
<head>
    <meta charset="UTF-8">
    <meta http-equiv="X-UA-Compatible" content="IE=edge">
    <meta name="viewport" content="width=device-width, initial-scale=1.0">
    <title>Document</title>
</head>
<body>

</body>
</html>
Now only change the things displayed on the page, that is, the content in the body.
The corresponding function can be seen in the comments inside. It mainly realizes the transfer of variables, single variables or lists.
<!DOCTYPE html>
<html lang="en">
<head>
    <meta charset="UTF-8">
    <meta http-equiv="X-UA-Compatible" content="IE=edge">
    <meta name="viewport" content="width=device-width, initial-scale=1.0">
    <title>Document</title>
</head>
<body>
    <!-- Output string  br Wrap for-->
    hello,world!<br/>
    <!-- Output hyperlink -->
    <a href="www.baidu.com">This is a hyperlink</a><br/>
    <!-- Output a variable-->
    {{a}} <br/>
    <!-- hr Draw a horizontal line for-->
    <hr/>
    <!-- Output entire list-->
    {{lster}}<br/>
    <!-- for First three of the loop output list-->
    {% for item in lster[:3]%}
        change{{'One:'+item}}<br/>
    {%endfor%}
    <!-- input-->
    <hr/>
</body>
</html>
Just in render_ In the template function, for '1 The variables in the HTML 'file can be assigned, but the name should be right.
For example, 1 The a variable of {{a}} in HTML must correspond to a in a = in the function
from  flask  import Flask,render_template,request
app = Flask(__name__)
@app.route("/")
def index():
    s ='I'm a variable'
    lst = ['Variable 1','Variable 2','Variable 3','Variable 4','Variable 5']
    return render_template('1.html',a = s,lster = lst)
if __name__ == '__main__':
    app.run()
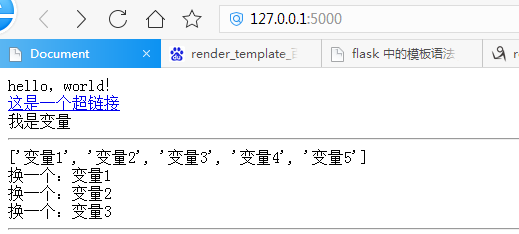
Display interface after web page running
4. Incoming data from web pages (ibid.)
What needs to be said here is the difference between post and get
post is not to display the requested content at the url location
get displays the requested content at the url
Therefore, post is used to input the account and password
Now enter the account password and click OK to go to the / login page, then read the incoming data and judge whether it is correct. If it is correct, directly display the string on the page, and if not, return to the main page.
Here, the data passed into the form is through request form. The data obtained by the get function can be read correctly as long as it corresponds to the name in the html.
from  flask  import Flask,render_template,request
app = Flask(__name__)

@app.route("/")
def index():
    return render_template('1.html')

@app.route("/login",methods=['post'])  #Because the account and password should not be displayed on the browser, the post method should be used instead of the get method
def login():
    #Accept user name and password
    uername = request.form.get('username')
    pwd = request.form.get('pwd')
    if uername=='abc' and pwd =='123':return 'The account and password are correct'
    else: return render_template('1.html', msg = "Login failed!")

if __name__ == '__main__':
    app.run()
1.html file
<!DOCTYPE html>
<html lang="en">
<head>
    <meta charset="UTF-8">
    <meta http-equiv="X-UA-Compatible" content="IE=edge">
    <meta name="viewport" content="width=device-width, initial-scale=1.0">
    <title>Document</title>
</head>
<body>
    <form action="/login" method="post">
        account number<input type="text" name="username">
        password<input type="password" name="pwd">
        <input type="submit" value="Sign in"><br/>
        {{msg}}<br/>
    </form>
</body>
</html>
3. Summary
Let's have a brief understanding of some contents of flash. Tomorrow we will learn some contents about flash data integration and display.