pymssql module usage guide
Preface
Recently, in learning python, I found that there seems to be no detailed description of pymssql, so I learned the official documents once, and filed the important parts for myself to consult later.
pymssql is a tool library (package) python uses to connect Microsoft SQL Server. It consists of two modules:
- pymssql: Compliance with DB-API 1 Normative interfaces
- _ mssql: better performance and easier to use
Since version 2.1.x, the implementation of the whole library is based on FreeTDS 2 db-lib component.
The architecture of pymssql is as follows: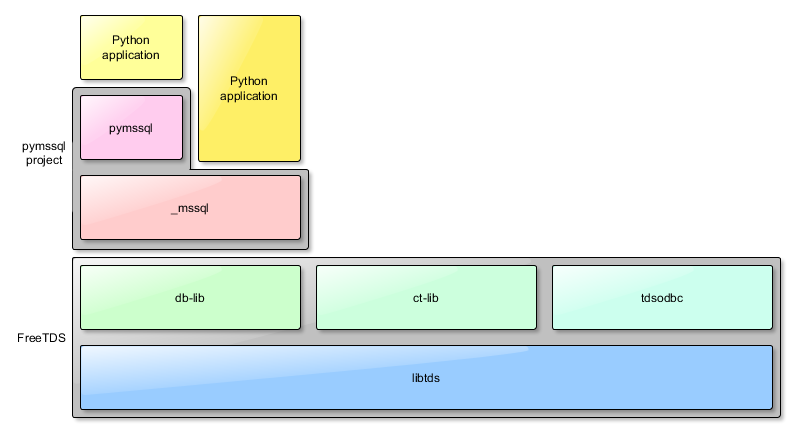
Installation under Windows is simple. Download and install a relatively new version of python, specifically:
- Python 2.x: more than 2.7
- Python 3.x: more than 3.3
Then open the command line:
pip install pymssql
Then it's installed automatically, as if the support libraries after FreeTDS will automatically help.
Also note that for later use, you need to install Microsoft SQL Server, more than 2005 version.
Using pymssql module
The following sample program is based on official examples and has made some modifications, mainly by deleting some code and adding a lot of comments.
Basic usage process
pymssql is very simple to use, basically the following steps
- Create a link: Use connect() to create a connection and get the Connection object
- Interaction: Get the Cursor object of the Connection object and then interact with the database using various methods of the Cursor object
- Close links
This chapter assumes that you have configured your environment and have a database called tempdb in your local database, with a user name sa and password 123456.
The following program gives a simple example of the above steps and creates a test database.
import pymssql
#sql Server name, where (127.0.0.1) is the local database IP
serverName = '127.0.0.1'
#Login username and password
userName = 'sa'
passWord = '123456'
#Create a connection and get cursor
conn = pymssql.connect(serverName , userName , passWord, "tempdb")
cursor = conn.cursor()
# Create test table persons with fields: ID, name, salesrep
cursor.execute("""
IF OBJECT_ID('persons', 'U') IS NOT NULL
    DROP TABLE persons
CREATE TABLE persons (
    id INT NOT NULL,
    name VARCHAR(100),
    salesrep VARCHAR(100),
    PRIMARY KEY(id)
)
""")
# Insert three test data
cursor.executemany(
    "INSERT INTO persons VALUES (%d, %s, %s)",
    [(1, 'John Smith', 'John Doe'),
     (2, 'Jane Doe', 'Joe Dog'),
     (3, 'Mike T.', 'Sarah H.')])
# If autocommit is not set to True at connection time, commit() must be invoked actively to save the changes.
conn.commit()
# Query record
cursor.execute('SELECT * FROM persons WHERE salesrep=%s', 'John Doe')
# Get a record
row = cursor.fetchone()
# Cyclic printing of records (there is only one, so only one is printed)
while row:
    print("ID=%d, Name=%s" % (row[0], row[1]))
    row = cursor.fetchone()
# Remember to close the connection when it's used up to release resources
conn.close()
The following steps are explained separately in more detail
Create connection
Because this article is about the pymssql module (there is also a _mssql module mentioned above), import pymssql.
To create a connection, you need to call the pymssql.connect() method, which returns a Connection object.
User Authentication Logon
Perhaps more commonly used is the login mode of user name + password used in the above program:
conn = pymssql.connect(serverName , userName , passWord, "tempdb")
Equivalent to:
conn = pymssql.connect(server = serverName , user = userName , password = passWord, database = "tempdb")
The second way is to use keywords to pass parameters in any order (well, that's the basics of python).
Windows Identity Authentication Logon
Windows authentication is a good way to log on to the database on your computer. Because no account password is required:
conn = pymssql.connect(server = serverName , database = "tempdb")
Simply put, as long as you don't fill in your account password, you will automatically log in with Windows authentication.
Several other common options
- database(str): The default database is specified and, if not required, it can be omitted from the above example. But in that case, you have to add "USE tempdb..." at the beginning of your SQL statement. "Well, sql server uses a lot and should know what's going on.
- as_dict(bool): If set to True, the following query result returns a dictionary with the keyword as the column name of the query result; otherwise (default) it returns a list.
- autocommit(bool): The default is False, so if you change the table, you need to call commit manually to submit the operation.
- port(str): Specify the TCP port of the server and use the default if you haven't changed it.
Other options are detailed in the documentation.
Interactive operation
After the connection is successfully established, the interaction with the database is mainly through the Cursor object:
cursor = conn.cursor()
Submit sql commands
As shown in the example above, sql instructions are executed through the execute series of methods:
cursor.execute('sql Sentence')
Calling stored procedures
If you want to call a stored procedure, use the callproc method of the Cursor object
# Create a stored procedure
cursor.execute("""
CREATE PROCEDURE FindPerson
     @name VARCHAR(100)
 AS BEGIN
     SELECT * FROM persons WHERE name = @name
END
""")
# Call the stored procedure above
cursor.callproc('FindPerson', ('Jane Doe',))
Submit revision
If the data is modified and autocommit is not set to True at the time of connection, commit needs to be called manually to commit the changes.
conn.commit()
Get results
If an sql statement with a return value is executed, the result can be obtained through the fetch series of Cursor objects, which defaults to tuple type:
# Number of records in the query persons table
cursor.execute("SELECT COUNT(*) FROM persons")
# The result is 3
cnt = cursor.fetchone()[0]
If multiple records are returned, all results can be traversed like this:
cursor.execute('SELECT * FROM persons')
# Traversing through all data in the output persons table
row = cursor.fetchone()
while row:
    print("ID=%d, Name=%s" % (row[0], row[1]))
    row = cursor.fetchone()
Or:
# The sql statement here is not exactly the same as the previous example, just to illustrate other uses of execute
cursor.execute('SELECT * FROM persons WHERE salesrep=%s', 'John Doe')
for row in cursor:
    print('row = %r' % (row,))
If as_dict is specified as True, the returned result becomes a dictionary type, so that the result can be accessed by column names:
# In addition to specifying when establishing a connection, you can also specify as_dict=True here
cursor = conn.cursor(as_dict=True)

cursor.execute('SELECT * FROM persons')
for row in cursor:
    print("ID=%d, Name=%s" % (row['id'], row['name']))
In addition, you can use fetchmany and fetchall to get the specified number or all the results at once.
Notes for Cursor Objects
A link can only have one Cursor object in the query state at any time, because the underlying TDS protocol does not have a Client-side Cursor, which requires the Client to complete the last query before making the next query. So if you want to do two queries on one connection at the same time, there may be a variety of surprises. Maybe you need to pay special attention to this when using multi-threading and other ways:
c1 = conn.cursor()
c1.execute('SELECT * FROM persons')

c2 = conn.cursor()
c2.execute('SELECT * FROM persons WHERE salesrep=%s', 'John Doe')

print( "all persons" )
print( c1.fetchall() )  # Show the results of c2!

print( "John Doe" )
print( c2.fetchall() )  # There is no result because it has been output from the previous one.
There are two solutions:
- In addition, build a link, each link can have a query in progress, so that multiple queries can be synchronized.
- Use fetchall to get all the results of the previous query before making the next query:
c1.execute('SELECT ...')
c1_list = c1.fetchall()

c2.execute('SELECT ...')
c2_list = c2.fetchall()
Close links
When the operation is completed, the close method should be called to close the link and release the resource:
conn.close()
You can use the with statement to process Connection and cursor objects, so you don't need to close them manually:
with pymssql.connect(server, user, password, "tempdb") as conn:
    with conn.cursor(as_dict=True) as cursor:
        cursor.execute('SELECT * FROM persons WHERE salesrep=%s', 'John Doe')
        for row in cursor:
            print("ID=%d, Name=%s" % (row['id'], row['name']))
File
If you want to know more about this module, please move on:
https://blog.csdn.net/lin_strong/article/details/82880806
Reference
[1] http://www.pymssql.org/en/stable/intro.html
-
Python DB-API is a specification that defines a series of necessary objects and data stock fetching methods in order to provide a consistent access interface for a variety of underlying database systems and a variety of database interface programs. ↩︎
-
FreeTDS is a library, which implements accessing Microsoft SQL Server and Sybase databases under Windows, Unix and Linux systems. It is an open source implementation of TDS (Table and Column Data Flow) protocol. ↩︎