Timing and Mail
At this stage, we hope to add two more practical functions to the general crawler program:
The first is the timing function, that is, the program can automatically crawl data according to the time we set; the second is the notification function, that is, the program can automatically send the crawled data results to our mailbox in the form of mail.
These two functions allow the crawler to report to us regularly.
Imagine if you are a holder of a stock (or bitcoin) and you want to get the daily price data of a stock (or bitcoin) in time so that you can sell or buy it in time. It's extremely inefficient to start a crawler every day.
At this point, if your crawler program has regular and email functions, can automatically crawl daily data, and only when the price reaches a certain price you set, you can be informed that you can take action, usually do not disturb you, is it cool?
Not only that, if you have a concert you really want to see, but it's sold out when it goes on sale. The crawler program with regular and email functions can also help you to brush your tickets diligently. When you have a spare ticket, it's good to inform you to buy the tickets immediately. The same is true for train tickets.
These two functions can not only help you get the real-time data, but also help you get periodic data.
For example, your company sends weekly reports to the official website every week, and your department is responsible for downloading the weekly reports, sorting out the relevant information, and then passing it on to the Department members. If you have a program with timing and notification functions, you can wait for the program to crawl down the updated weekly report information and send it to your email automatically every week.
According to the usual rules, the process of implementing a project is as follows:
Clear goals
Our choice is to automatically crawl the daily weather and send weather data and clothing tips to your mailbox at regular intervals.
The reason for choosing this relatively simple reptile project is that the weather changes every day, so after learning this, you can receive weather information in the morning without accident. In this way, experience the function of the procedure first-hand.
Analysis process
Generally speaking, the program can be divided into three functional blocks: [crawler]+ [mail]+ [timing]
For the crawler part, we are familiar with it; for the notification part, we choose to use email to notify, we will use smtplib, email library to achieve this requirement; for the timing function, we have a schedule, which is convenient and easy to use.
These three functions correspond to three pieces of code, which can be written separately and assembled to achieve our project objectives.
For those who have learnt to send email in Python Basic Course, if you are familiar with this part of the knowledge, you can choose to skip when you talk about the email part later. However, it is suggested that you review it briefly.
Reptile
In Baidu search for weather, the first web site popped up is:
http://www.weather.com.cn/weather/101280601.shtml
import requests
from bs4 import BeautifulSoup

headers={'user-agent':'Mozilla/5.0 (Macintosh; Intel Mac OS X 10_13_6) AppleWebKit/537.36 (KHTML, like Gecko) Chrome/71.0.3578.98 Safari/537.36'}
url='http://www.weather.com.cn/weather/101280601.shtml'
res=requests.get(url,headers=headers)
print(res.text)
print(res.status_code)
Running results return 200, proving that the status is normal, and then look at the source code of the Web page, sliding to see:
Wait a minute. Something strange seems to have happened. (o) Oh, it's scrambling, which means there's a coding problem.
Fortunately, we know how to deal with encoding at level 0, just use the response.encoding attribute. OK, then we click on the "right-click" on the web page - "View the source code of the web page", a new tab will pop up, and then search for charset to see the encoding.
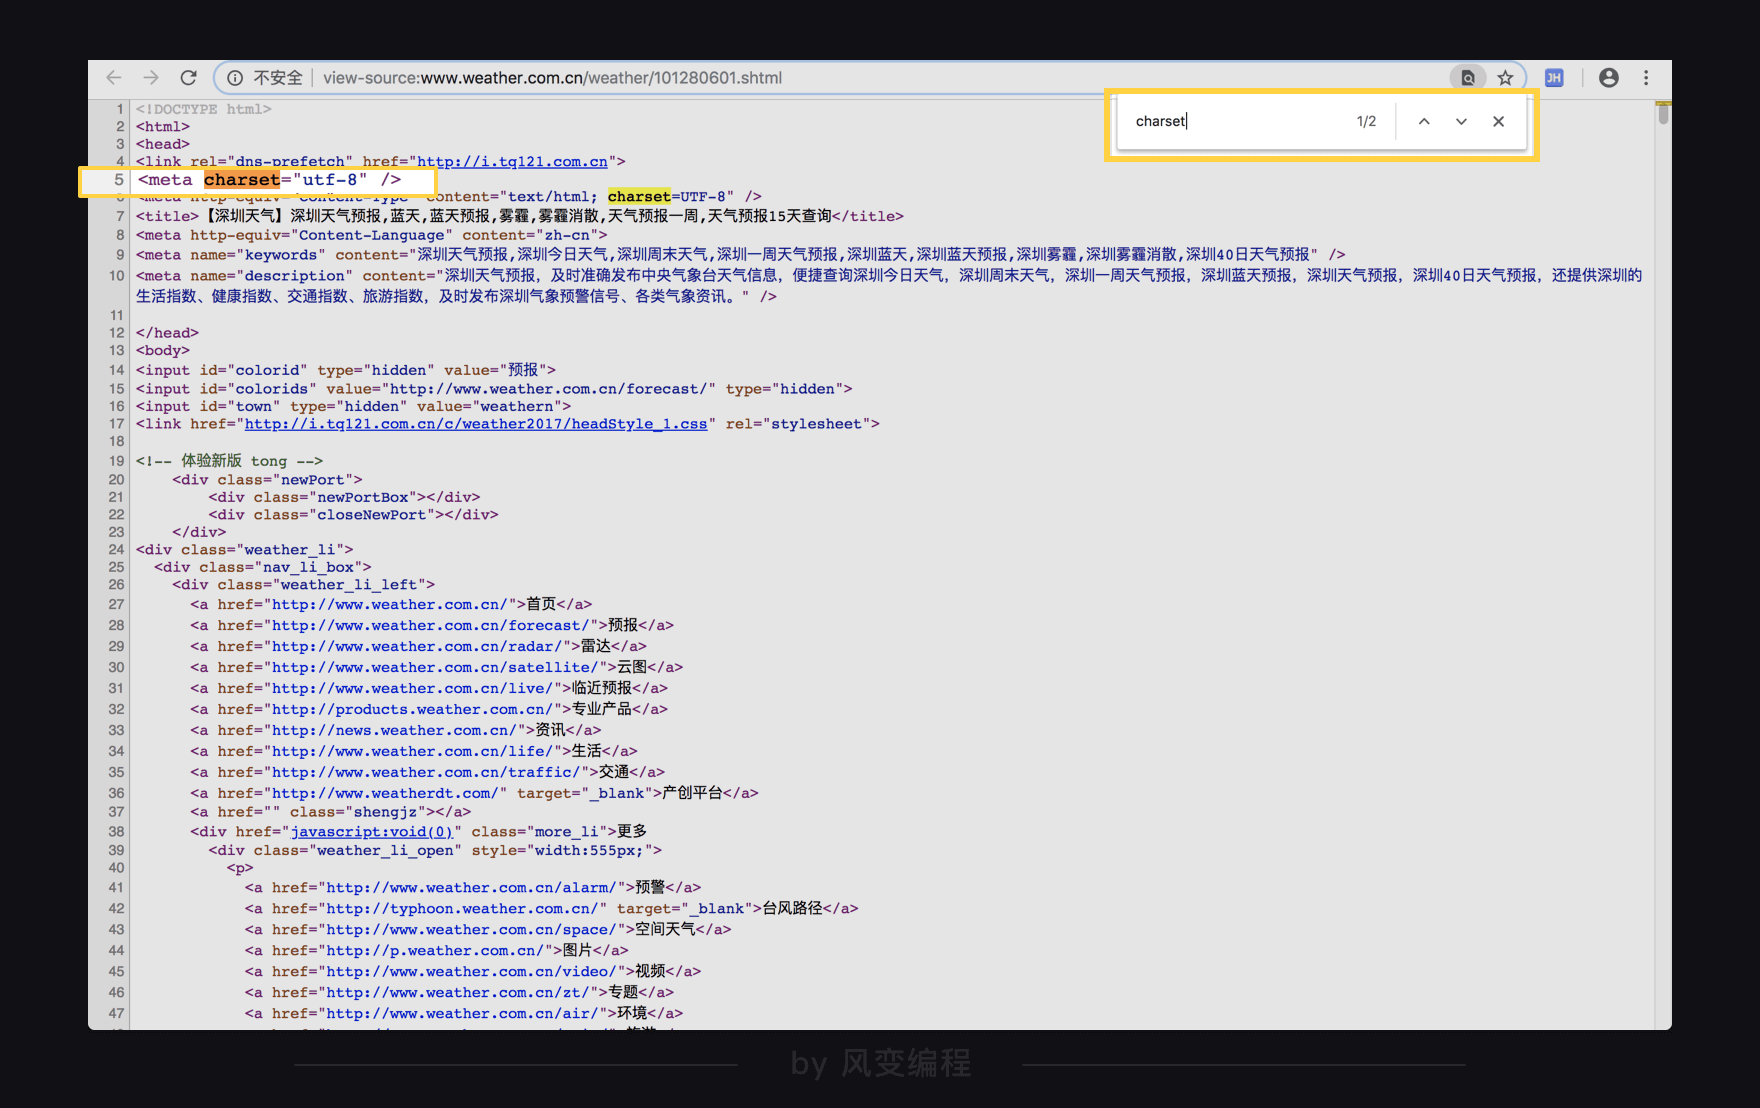
So just use response.encoding to translate the encoding.
import requests
from bs4 import BeautifulSoup

headers={'user-agent':'Mozilla/5.0 (Macintosh; Intel Mac OS X 10_13_6) AppleWebKit/537.36 (KHTML, like Gecko) Chrome/71.0.3578.98 Safari/537.36'}
url='http://www.weather.com.cn/weather/101280601.shtml'
res=requests.get(url,headers=headers)
res.encoding='utf-8'
print(res.text)
print(res.status_code)
Next, you can parse and extract data using the Beautiful Soup module
import requests
from bs4 import BeautifulSoup

headers={'user-agent':'Mozilla/5.0 (Macintosh; Intel Mac OS X 10_13_6) AppleWebKit/537.36 (KHTML, like Gecko) Chrome/71.0.3578.98 Safari/537.36'}
url='http://www.weather.com.cn/weather/101280601.shtml'
res=requests.get(url,headers=headers)
res.encoding='utf-8'
html=res.text
soup=BeautifulSoup(html,'html.parser')
items=soup.find('ul',class_='t clearfix').find_all('li')
for item in items:
    print(item.find('h1').text+':',end='\t')
    print(item.find(class_='wea').text,end='\t')
    print(item.find(class_='tem').text)
To get into the study of the mail function, let's first imitate the operation of the computer when we send the mail.
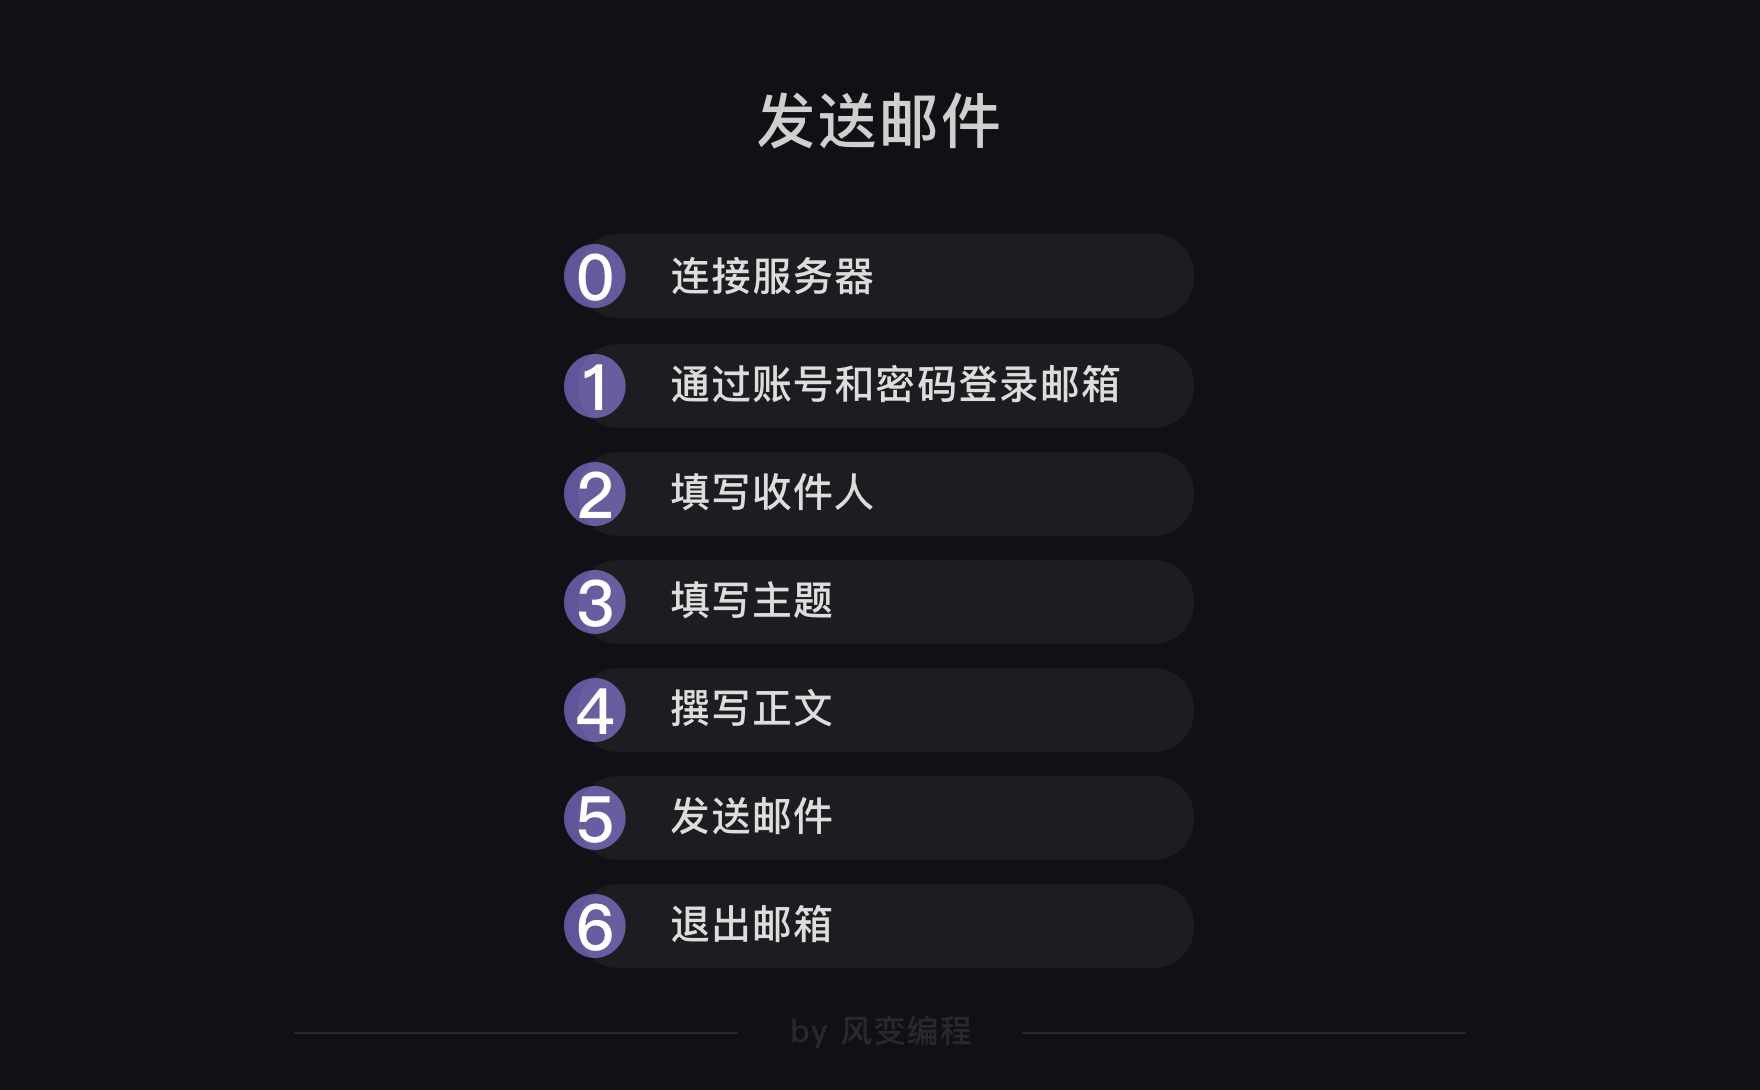
Our code logic will follow the figure above, and two libraries, smtplib and email, will be used.
Take qq mailbox as an example. Let's start with Step 0: Connecting servers.
The smtplib library is needed to connect to the server. Why is it called? In fact, SMTP represents a simple mail transfer protocol, which is equivalent to a convention for sending mail between computers.
Okay, let's see how to use the smtplib library to connect to the server.
import smtplib
#smtplib is a built-in library for python, so you don't need to install it with pip
mailhost='smtp.qq.com'
#Assign the server address of the qq mailbox to the variable mailhost. The address needs to be in string format.
qqmail = smtplib.SMTP()
#Instantiate an object of SMTP class in a smtplib module, so that the methods and attributes of the SMTP object can be obtained.
qqmail.connect(mailhost,25)
#Connect to the server, the first parameter is the server address, and the second parameter is the SMTP port number.
The first line of code is the introduction library, and the second line is the server address of the qq mailbox, which can be found through the search engine.
At the moment, we are using qq mailbox, so search the smtp server address of qq mailbox. If you want to use Netease mailbox later, you can also search the smtp server address of Netease mailbox.
Line 5 instantiates an SMTP object in smtplib.
Line 7 connects the server with the connect() method of the SMTP object. The first parameter is the server address obtained, and the second parameter is the SMTP port number - 25.
Port number selection is not unique, but 25 is the simplest and most basic port number, so we fill in 25.
Connecting to the server is over. Now look at steps 1 and 2: login to the mailbox through your account and password; fill in the recipient.
Look at the code for login mailbox (new code for behavior 11):
import smtplib
#smtplib is a built-in library for python, so you don't need to install it with pip
mailhost='smtp.qq.com'
#Assign the qq mailbox server address to the variable mailhost
qqmail = smtplib.SMTP()
#Instantiate an object of SMTP class in a smtplib module, so that the methods and attributes of the SMTP object can be obtained.
qqmail.connect(mailhost,25)
#Connect to the server, the first parameter is the server address, and the second parameter is the SMTP port number.
#All of the above are code to connect to the server

account = input('Please enter your email address:')
#Get mailbox account
password = input('Please enter your password:')
#Get the mailbox password
qqmail.login(account,password)
#Log in to the mailbox. The first parameter is the mailbox account, and the second parameter is the mailbox password.

receiver=input('Please enter the recipient's mailbox:')
#Get the recipient's mailbox
Explain the new code added from line 11: Line 11 uses input() to get the mailbox account. Line 12 uses input() to get your mailbox password, but note that this is not your usual password to log in to your mailbox!
This password requires us to get it here: please open https://mail.qq.com/, and log in to your mailbox. Then click the Settings button at the top, select Account Settings, and drop to that location.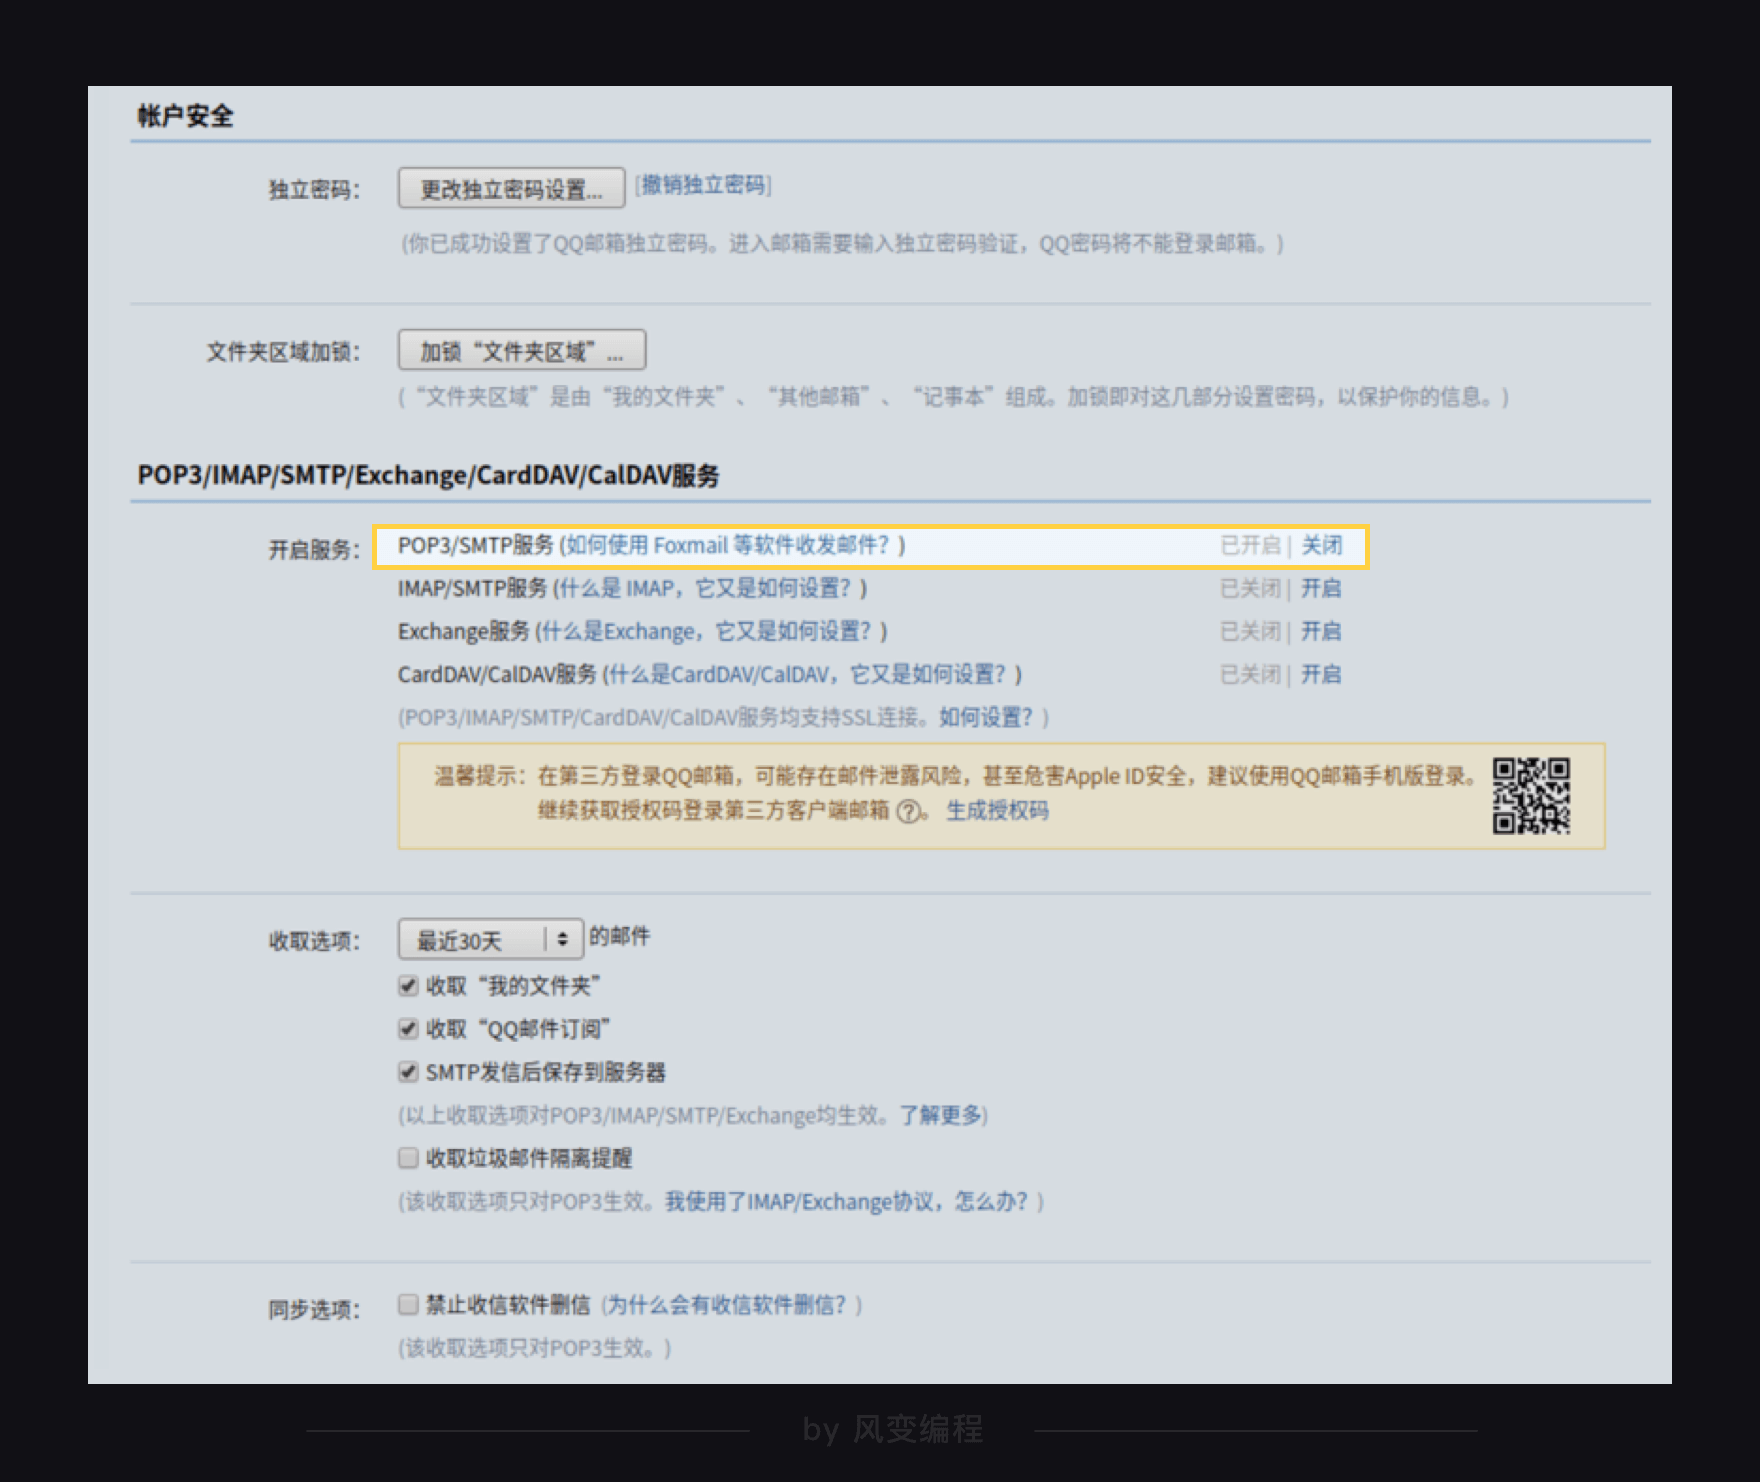
As above, turn on the first SMTP service. At this time, QQ mailbox will provide you with an authorization code, pay attention to protect your authorization code: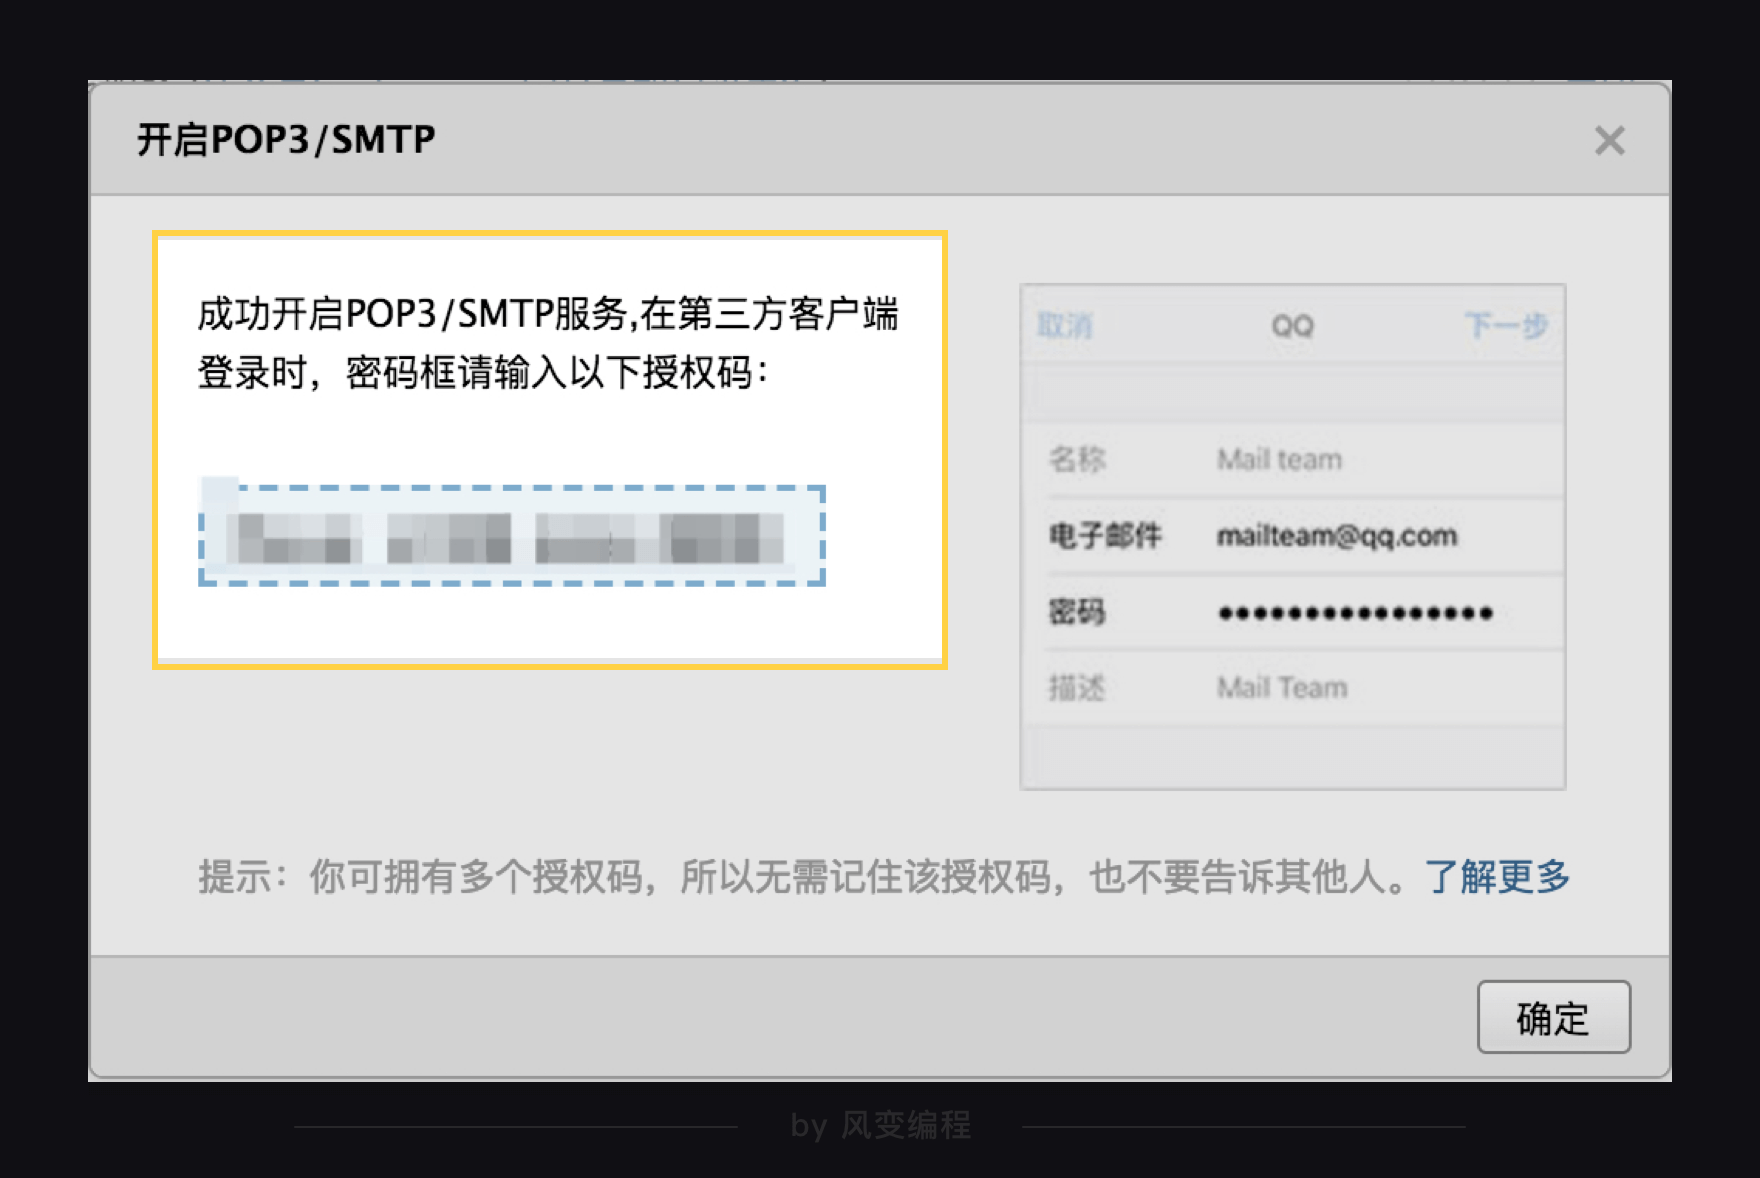
Next, when you log in to your mailbox using the SMTP service, you can enter this authorization code to log in as a password.
Then look at line 18 above, which is to get the recipient's mailbox. There's not much to say.
So far, steps 1 and 2 have been completed.
Continue with Step 3 and Step 4: Fill in the topic and write the text, where you need to use the email library.
from email.mime.text import MIMEText
from email.header import Header
#Introducing Header and MIMETEX modules
content=input('Please enter the body of the mail:')
#Enter the body of your email
message = MIMEText(content, 'plain', 'utf-8')
#Instantiate a MIMEText mail object, which needs to write in three parameters: mail body, text format and coding.
subject = input('Please enter your email subject:')
#Getting mail topics with input()
message['Subject'] = Header(subject, 'utf-8')
#On the right side of the equals sign, a Header header object is instantiated, which needs to write two parameters, mail topic and encoding, and then assign to the variable message['Subject'] on the left side of the equals sign.
Explain: Lines 1 and 2 introduce the MIMEText module and Header module in the email library.
Line 4 uses the input() function to get the body of the mail, and line 6 instantiates a MIMEText mail object, so we construct a plain text mail.
This MIMEText object has three parameters, one is the mail body; the other is the text format, which is generally set to plain plain text format; and the last is the encoding, which is set to utf-8, because UTF-8 is the most popular universal code.
Let's go on to line 8 and get the mail topic with the input() function. Line 10 is more important. Let's explain it carefully: message ['Subject'] = Header(subject,'utf-8').
On the right side of the equal sign is the instantiation of a Header header object, which needs to write two parameters, the mail subject and the encoding.
The message ['Subject'] variable on the left side of the equal sign is a ['b'] code form, which looks particularly like a dictionary's expression based on key values, but here message is an object of MIMEText class, not a dictionary. What does message ['Subject'] mean?
In fact, dictionaries and classes have similarities in structure. See the following picture: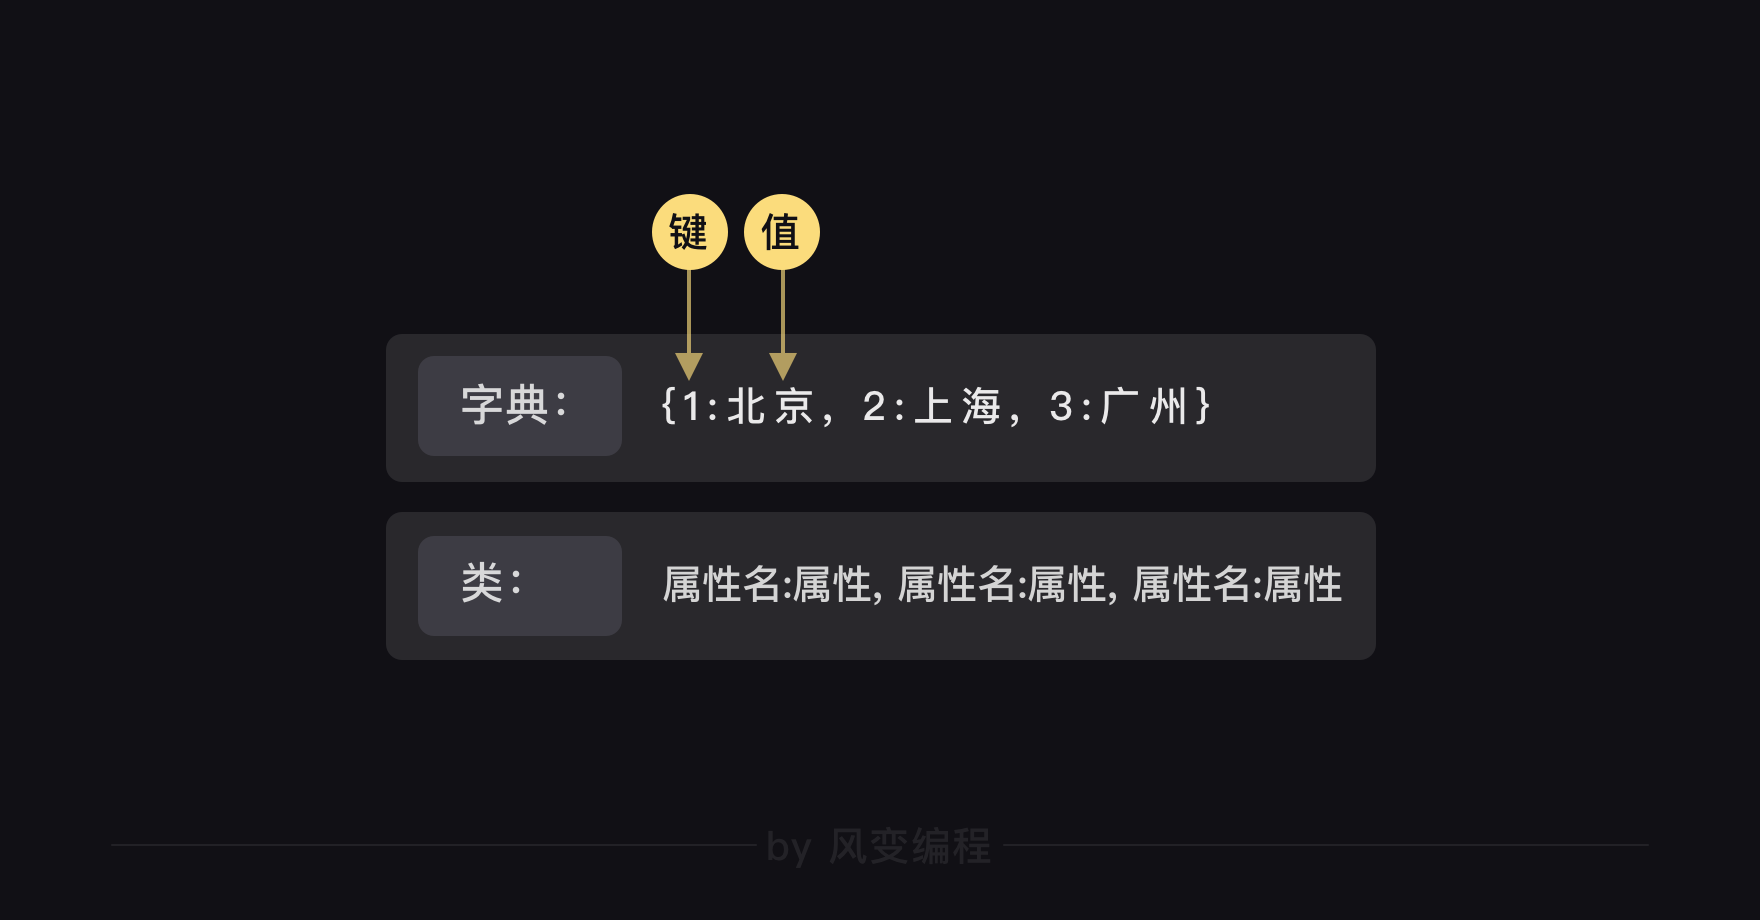
The elements in the dictionary are one-to-one correspondence between keys and values, while the attributes in classes are one-to-one correspondence. We can get the corresponding value according to the keys in the dictionary. Similarly, we can also get the attribute according to the attribute name in the class.
So message ['Subject'] represents the attribute name of the Subject in the MIMEText class.
It should be noted that not every class can access its properties in this way, because the MIMEText class implements this function.
So message ['Subject'] = Header(subject,'utf-8') is assigning a value to message ['Subject'].
Well, by now, we can understand how to fill in the topic and write the text.
Next comes the last two steps: sending mail and exiting the mailbox.
Look at the code (from line 33):
import smtplib
#smtplib is a built-in library for python, so you don't need to install it with pip
mailhost='smtp.qq.com'
#Assign the qq mailbox server address to the variable mailhost
qqmail = smtplib.SMTP()
#Instantiate an object of SMTP class in a smtplib module, so that the methods and attributes of the SMTP object can be obtained.
qqmail.connect(mailhost,25)
#Connect to the server, the first parameter is the server address, and the second parameter is the SMTP port number.
#All of the above are code to connect to the server

account = input('Please enter your email address:')
#Get mailbox account
password = input('Please enter your password:')
#Get the mailbox password
qqmail.login(account,password)
#Log in to the mailbox. The first parameter is the mailbox account, and the second parameter is the mailbox password.

receiver=input('Please enter the recipient's mailbox:')
#Get the recipient's mailbox

from email.mime.text import MIMEText
from email.header import Header
#Introducing Header and MIMETEX modules
content=input('Please enter the body of the mail:')
#Enter the body of your email
message = MIMEText(content, 'plain', 'utf-8')
#Instantiate a MIMEText mail object, which needs to write in three parameters: mail body, text format and coding.
subject = input('Please enter your email subject:')
#Getting mail topics with input()
message['Subject'] = Header(subject, 'utf-8')
#On the right side of the equals sign, a Header header object is instantiated, which needs to write two parameters, mail topic and encoding, and then assign to the variable message['Subject'] on the left side of the equals sign.

qqmail.sendmail(sender, receiver, message.as_string())
#Send mail, call the sendmail() method, write three parameters, namely the sender, the recipient, and the text in string format.
qqmail.quit()
#Exit mailbox
Interpretation: Line 33 means calling sendmail() to send mail. There are three parameters in parentheses. The first one is the sender's mailbox address, the first one is the recipient's mailbox address, and the second one is the body, but it must be in string format. So we use the as_string() function to convert it.
However, we hope that after successful sending, we can show "successful mail delivery", and when it fails, we can be prompted "failed mail delivery", which can be achieved by using try statement.
try:
    qqmail.sendmail(sender, receiver, message.as_string())
    print ('Successful mail delivery')
except:
    print ('Mail Delivery Failed')
qqmail.quit()
At this point, the program to send mail is completed, together with a look at the complete code.
import smtplib
from email.mime.text import MIMEText
from email.header import Header
#Introduce smtplib, MIMETex and Header

mailhost='smtp.qq.com'
#Assign the server address of the qq mailbox to the variable mailhost, and the address should be in string format
qqmail = smtplib.SMTP()
#Instantiate an object of SMTP class in a smtplib module so that the method and properties of the SMTP object can be invoked
qqmail.connect(mailhost,25)
#Connect to the server, the first parameter is the server address, and the second parameter is the SMTP port number.
#All of the above are connected servers.

account = input('Please enter your email address:')
#Get the mailbox account in string format
password = input('Please enter your password:')
#Get the mailbox password in string format
qqmail.login(account,password)
#Log in to the mailbox. The first parameter is the mailbox account, and the second parameter is the mailbox password.
#All of the above are login mailboxes.

receiver=input('Please enter the recipient's mailbox:')
#Get the recipient's mailbox.

content=input('Please enter the body of the mail:')
#Enter the body of your message in string format
message = MIMEText(content, 'plain', 'utf-8')
#Instantiate a MIMEText mail object that requires three parameters: mail body, text format, and encoding
subject = input('Please enter your email subject:')
#Enter your mail topic in string format
message['Subject'] = Header(subject, 'utf-8')
#On the right side of the equals sign is the instantiation of a Header header object, which needs to write two parameters, mail topic and encoding, and then assign the variable message['Subject'] to the left side of the equals sign.
#Above, for filling in the subject and text.

try:
    qqmail.sendmail(account, receiver, message.as_string())
    print ('Successful mail delivery')
except:
    print ('Mail Delivery Failed')
qqmail.quit()
#The above are sending mail and exiting mailbox.
More functions (such as sending attachments, etc.) students can take the initiative to learn after class. A kind of
Okay, we can try to sort out the process again.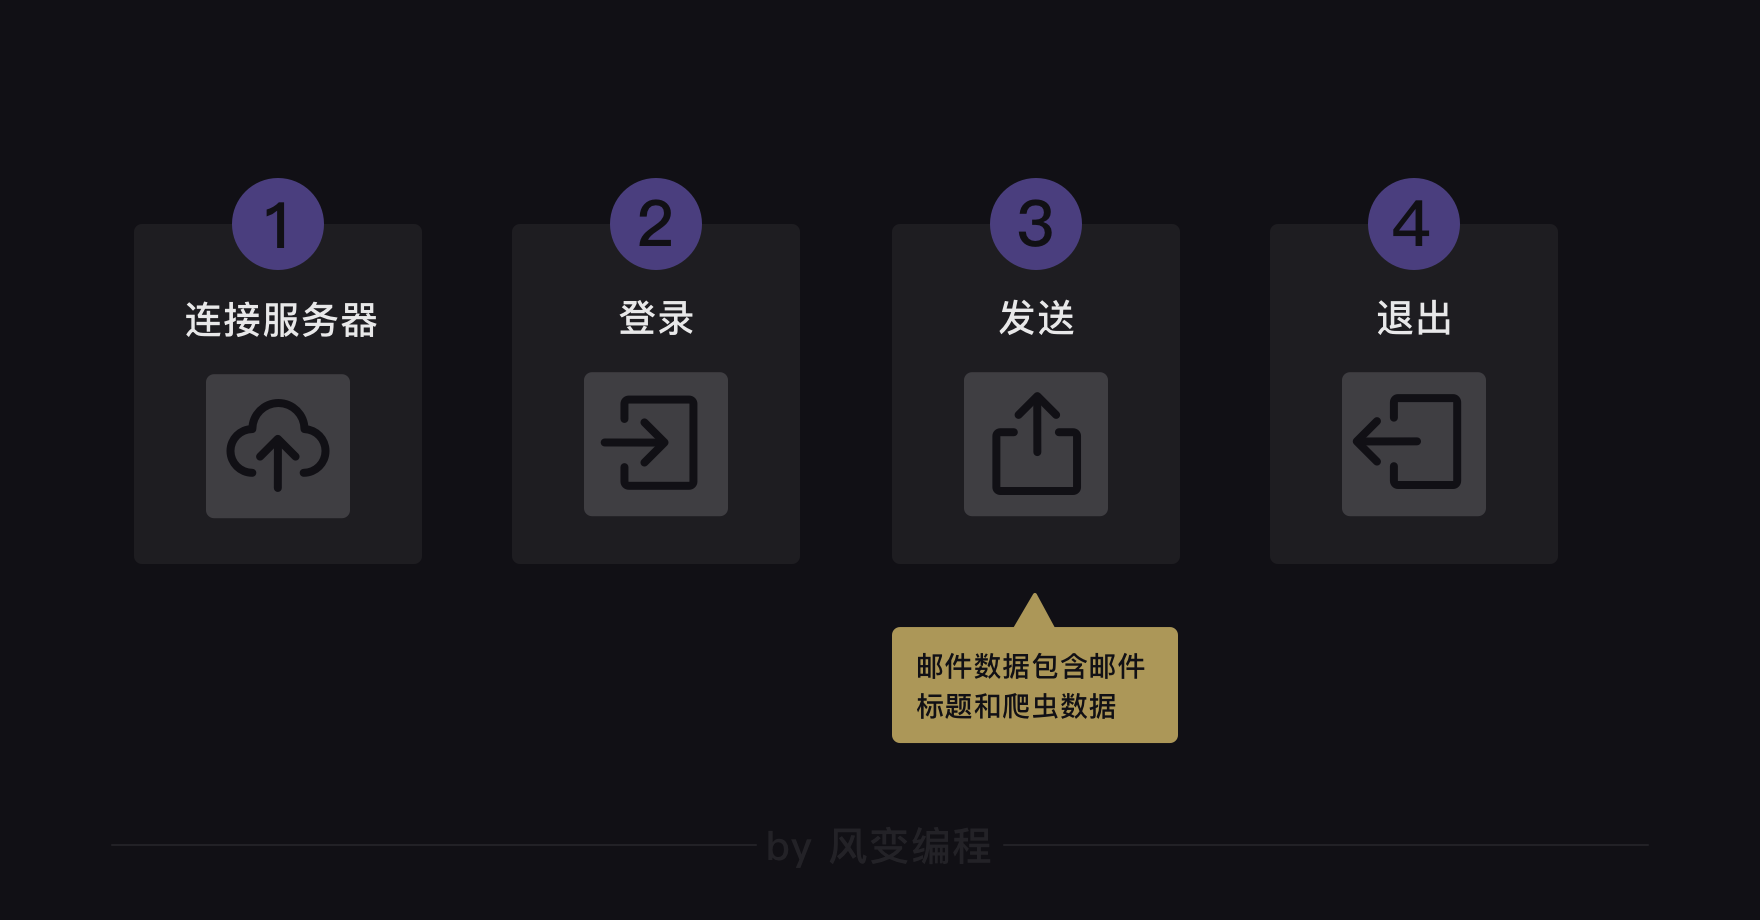
First, connect to the server and login, then send, send the content is mail data. Mail data consists of two parts, one is the subject of the mail, the other is the body of the mail (that is, the data acquired by the crawler).
Of course, the action of sending must fill in the recipient, after sending, you can exit the mailbox.
The smtplib library is mainly responsible for the horizontal connection server, login, send and exit, while the email library is mainly responsible for the mail subject and text.
Okay, now let's see how to achieve the timing function of the crawler.
timing
As for time, Python actually has two built-in standard libraries, time and datetime (we also learned time.sleep() in basic courses).
But here, instead of relying entirely on standard libraries, we are ready to select a third-party library, schedule.
The reason is that standard libraries generally mean the most primitive and basic functions. Many third-party libraries call encapsulated operation functions in standard libraries. For example, schedule is implemented with time and datetime.
For the timing function we need, time and datetime can certainly be implemented, but the operation logic will be relatively complex; and schedule is a direct solution to the timing function, the code is relatively simple, which is why we choose schedule.
This does not mean that time and datetime are worse than schedule, but in this project scenario, we tend to call schedule.
Look at the code right away. The code on the official document is very concise. You can try to read it yourself first.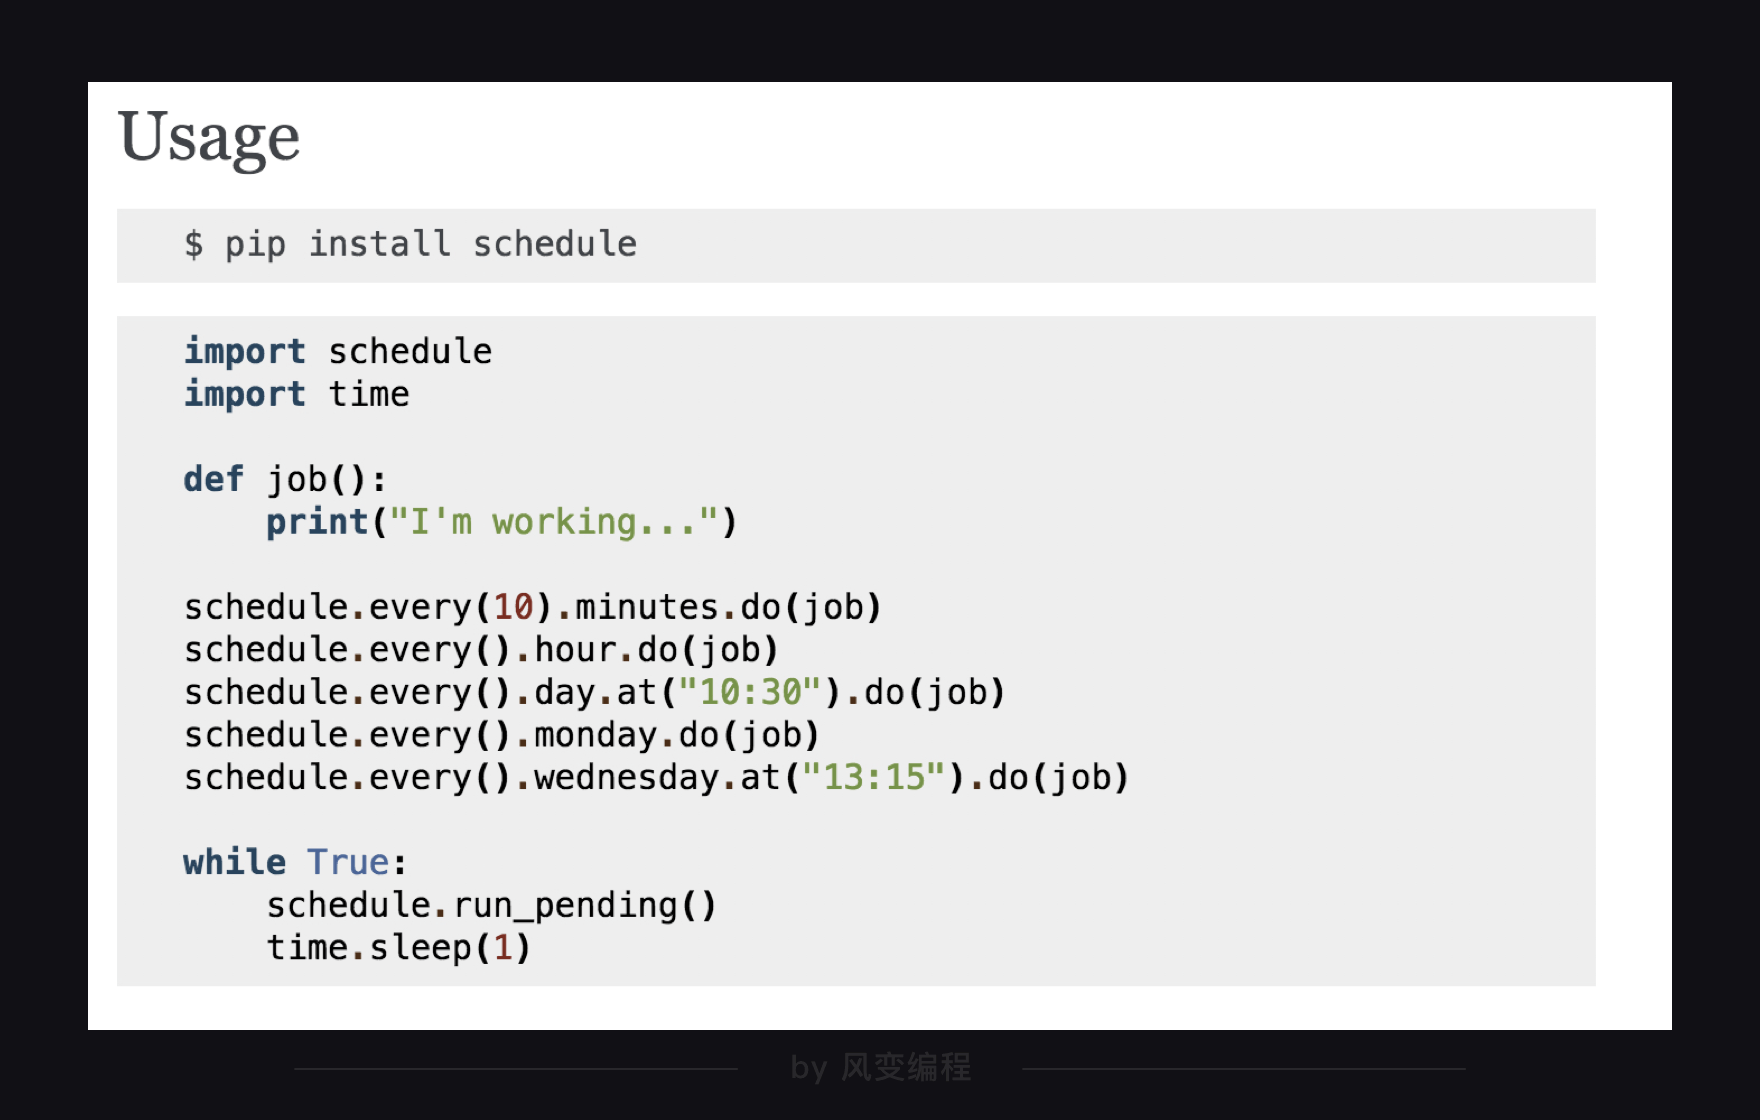
import schedule
import time
#Introducing schedule s and time

def job():
    print("I'm working...")
#Define a function called job whose function is to print'I'm working...'

schedule.every(10).minutes.do(job)       #Deploy tasks that execute job() functions every 10 minutes
schedule.every().hour.do(job)            #Deploy tasks that execute job() functions every * hour
schedule.every().day.at("10:30").do(job) #Tasks deployed to perform job() functions at 10:30 a.m. per day
schedule.every().monday.do(job)          #Deploy the task of executing the job() function every Monday
schedule.every().wednesday.at("13:15").do(job)#Deploy 13:15 execution function tasks every Wednesday

while True:
    schedule.run_pending()
    time.sleep(1)
#13-15 is to check the deployment, if the task is ready, start to carry out the task.
Lines 1 and 2 introduce schedule and time.
Lines 5 and 6 define a function called job(), which prints I'm working... when called.
Lines 9 - 13 are all related time settings, and you can determine them according to your needs.
Lines 15-17 are a while loop that checks the deployment of the task above and starts execution if the task is ready. In line 15, time.sleep(1) lets the program check in seconds. If the check is too fast, it will waste computer resources.
In fact, even if we don't know what the specific code means, we try to use it first, and find that it is successful, and then to study, it is also good.
To show you how schedule s work, let's look at the following code: run the job() function every two seconds.
import schedule
import time
#Introducing schedule and time modules
def job():
    print("I'm working...")
#Define a function called job whose function is to print'I'm working...'
schedule.every(2).seconds.do(job)        #Execute job() function every 2s

while True:
    schedule.run_pending()
    time.sleep(1)
Well, we've got the timing function. That is to say, the second step of the analysis process, we have also completed.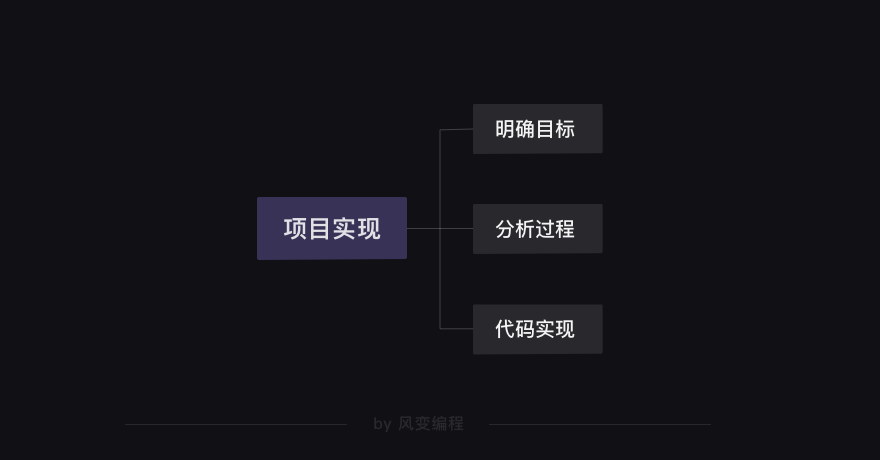
Code assembly
Because just in the analysis process, three procedures have been worked out, so in this part, as long as they are combined.
First, the crawler code is encapsulated as:
import requests
from bs4 import BeautifulSoup

def weather_spider:

    headers={'user-agent':'Mozilla/5.0 (Macintosh; Intel Mac OS X 10_13_6) AppleWebKit/537.36 (KHTML, like Gecko) Chrome/71.0.3578.98 Safari/537.36'}
    url='http://www.weather.com.cn/weather/101280601.shtml'
    res=requests.get(url,headers=headers)
    res.encoding='utf-8'
    html=res.text
    soup=BeautifulSoup(html,'html.parser')
    item=soup.find('ul',class_='t clearfix').find('li')
    weather=item.find(class_='wea').text
    tem=item.find(class_='tem').text
    return weather,tem
Line 3: Define the function called weather_spider(); Line 13: Set the variables returned by the function to be tem and weather. Other codes are consistent with those before encapsulation.
Then there is the mail program. The encapsulated code is as follows:
import smtplib
from email.mime.text import MIMEText
from email.header import Header

account = input('Please enter your email address:')
password = input('Please enter your password:')
receiver = input('Please enter the recipient's mailbox:')

def send_email(tem,weather):
    global account,password,receiver
    mailhost='smtp.qq.com'
    qqmail = smtplib.SMTP()
    qqmail.connect(mailhost,25)
    qqmail.login(account,password)
    content= 'Dear, today's weather is:'+tem+weather
    message = MIMEText(content, 'plain', 'utf-8')
    subject = 'Today's Weather Forecast'
    message['Subject'] = Header(subject, 'utf-8')
    try:
        qqmail.sendmail(account, receiver, message.as_string())
        print ('Successful mail delivery')
    except:
        print ('Mail Delivery Failed')
    qqmail.quit()
Look at lines 5-7: Put all of the data obtained with input() outside the function, because these data are likely to change.
Line 9: The name of the function is defined as send_email(), and two parameters tem and weather are defined. Of course, the temperature information and weather information obtained by the crawler need to be transmitted to the parameters of the function.
Line 10: Define account, password, and receiver as global variables, that is, the data obtained with input().
Line 15: Write the body of the mail as weather data. The other codes are basically the same.
Now there's only the timing function left, which can be combined with the above two programs.
import smtplib
from email.mime.text import MIMEText
from email.header import Header
import requests
from bs4 import BeautifulSoup
import schedule
import time

def weather_spider():

    global tem,weather
    headers={'user-agent':'Mozilla/5.0 (Macintosh; Intel Mac OS X 10_13_6) AppleWebKit/537.36 (KHTML, like Gecko) Chrome/71.0.3578.98 Safari/537.36'}
    url='http://www.weather.com.cn/weather/101280601.shtml'
    res=requests.get(url,headers=headers)
    res.encoding='utf-8'
    html=res.text
    soup=BeautifulSoup(html,'html.parser')
    item=soup.find('ul',class_='t clearfix').find('li')
    weather=item.find(class_='wea').text
    tem=item.find(class_='tem').text
    return tem,weather

account = input('Please enter your email address:')
password = input('Please enter your password:')
receiver=input('Please enter the recipient's mailbox:')

def send_email(tem,weather):
    global account,password,receiver
    mailhost='smtp.qq.com'
    qqmail = smtplib.SMTP()
    qqmail.connect(mailhost,25)
    #Connect to the server.
    qqmail.login(account,password)
    #Log in to the mailbox.
    content='Dear, today's weather is:'+tem+weather
    message = MIMEText(content, 'plain', 'utf-8')
    subject='Today's Weather Forecast'
    message['Subject'] = Header(subject, 'utf-8')

    try:
        qqmail.sendmail(account, receiver, message.as_string())
        print ('Successful mail delivery')
    except:
        print ('Mail Delivery Failed')
    qqmail.quit()

def job():
    print('Start a mission')
    tem,weather = weather_spider()
    send_email(tem,weather)
    print('Mission accomplished')

schedule.every().day.at("07:30").do(job)
while True:
    schedule.run_pending()
    time.sleep(1)
Lines 1-7 put all the introductions at the top of the program; lines 9-11 put the data out of the function; and then lines 13-40, we've all talked about.
Starting with 42 lines, define a function called job(); 43 lines Print'Start a Task'to record and display the start of the task.
Line 44 calls the crawler function weather_spider(), then assigns the return variables tem and weather to the variables tem and weathe in the job() function; line 45 calls the function send_email(), and passes in the parameters.
Line 46 prints "Task Completion" to indicate that this part of the program is running normally.
Lines 48-51 are timed functions that we've seen. We set the weather information to be delivered to the recipient at 7:30 a.m. every morning.
There is a little reminder that if you want to get real weather information tomorrow morning, you need to do two things:
First, let the program run on a local computer rather than on the course system, which destroys the process of the program.
Secondly, keep the program running all the time and the computer running all the time. Because if the program ends or the computer shuts down, the weather information will not be crawled regularly.
In fact, in the real development environment of programmers, programs usually hang on the remote server, because the remote server will not shut down for 24 hours, which can ensure the effectiveness of the timing function. If you want to hang the program on the remote server, you need to do some extra learning on your own.
Okay, that's it. Next step, we will learn a new skill - cooperation. It can double the speed of our code, when you encounter the task of massive data grabbing, it can provide you with powerful help.