Original link: https://www.jianshu.com/p/91844c5bca78
Statement: This article is reproduced from https://www.jianshu.com/p/91844c5bca78 , add directory navigation on the basis of the original author to help you learn and develop more efficiently.
Python Tkinter graphical interface design (detailed tutorial)
Contents of this article
catalogue
Python Tkinter graphical interface design (detailed tutorial)
I Basic understanding of graphical interface design
2.2. 1 common properties of controls
3, Characteristic properties of tkinter common controls
3.1 text input and output related controls
3.9. 2 file selection dialog box
3.9. 3. Color selection dialog box
6, Turn on the camera and display
-
I Basic understanding of graphical interface design
Most of the current popular computer desktop applications are graphical user interface (GUI), that is, the mouse triggers commands on graphical elements such as menus and buttons, and obtains man-machine dialogue information from graphical display containers such as labels and dialog boxes.
Python comes with tkinter module, which is essentially a python programming interface of the popular object-oriented GUI toolkit TK, providing a fast and convenient way to create GUI applications. The basic steps of its graphical programming usually include:○ import tkinter module
○ create GUI root form
○ add human-computer interaction controls and write corresponding functions.
○ wait for the user to trigger the event response in the main event cycle.II Form control layout
2.1. Dataset import
The root form is the root controller of the graphical application and an instance of the underlying control of tkinter. When you import the tkinter module, call the Tk() method to initialize a root form instance root, and set the title text with title() method. You can set the size of the form with the geometry() method (in pixels). Put it in the main loop, and the program will always be running unless the user closes it. Execute the program and a form will be rendered. In the root form of this main loop, continue to render other visual control instances in the, monitor the occurrence of events and execute the corresponding handler. The following is an example of root form rendering:
-
from tkinter import *
root= Tk()
root.title('My first Python forms ')
root.geometry('240x240') # The multiplication sign here is not *, but the lowercase English letter x
root.mainloop()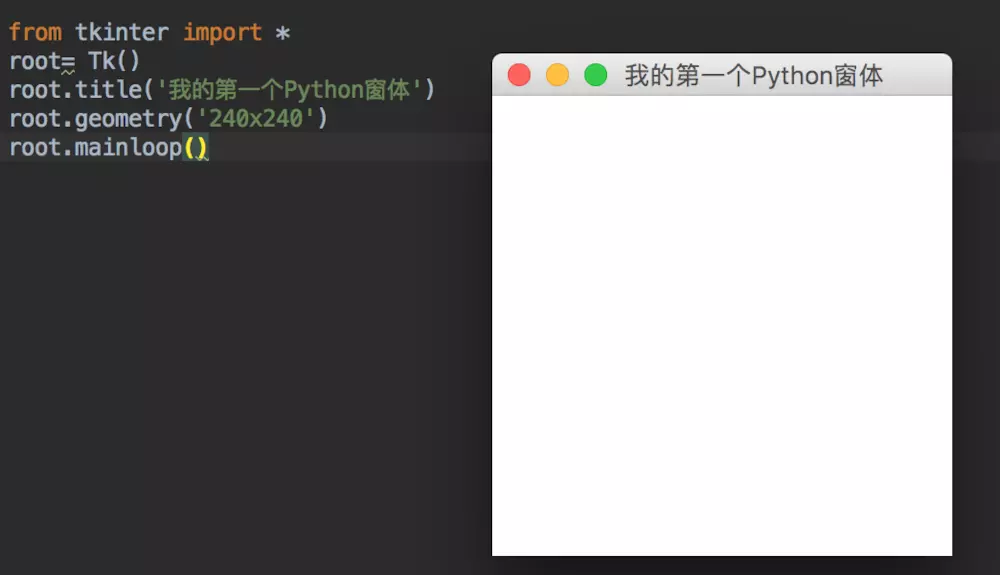
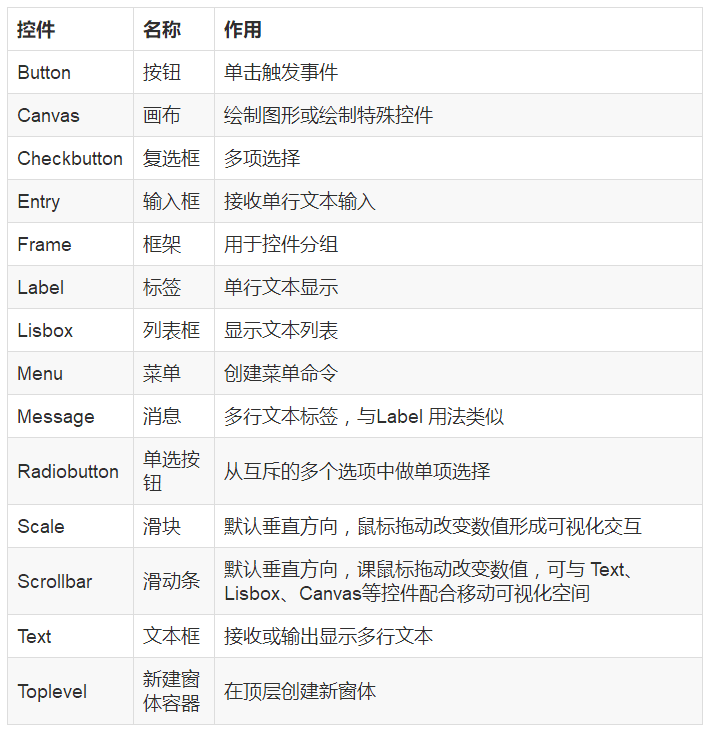
2.2. tkinter common controls
Common controls: there are more than 10 common controls, as follows:
2.2. 1 common properties of controls
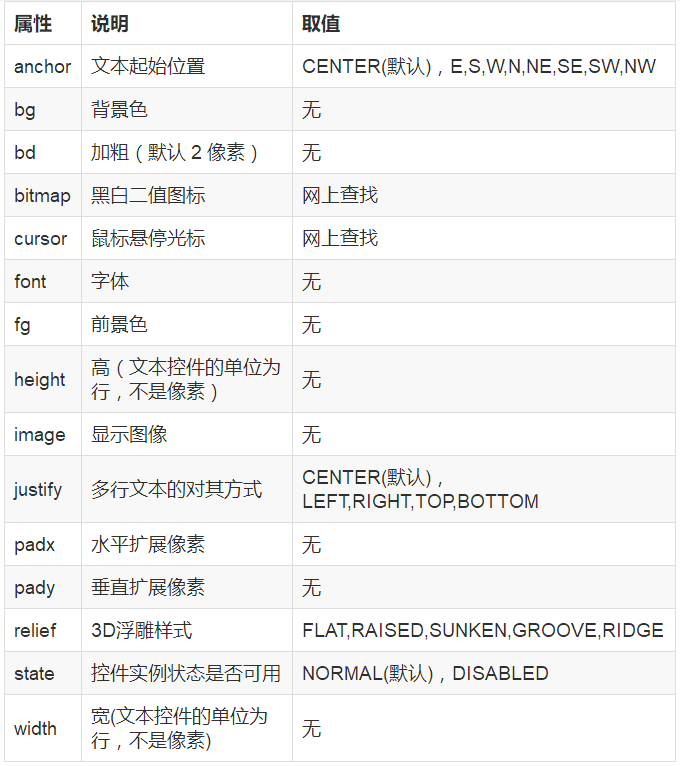
Visual controls rendered on forms usually include common attributes such as size, color, font, relative position, relief style, icon style and hovering cursor shape. Different controls have their own characteristic properties due to their different shapes and functions. Between initializing the root form and the root form main loop, you can instantiate the form control and set its properties. The parent container can be a root form or another container control instance. Common properties of controls are shown in the following table:
Examples of tags and common attributes: -
from  tkinter import *
root = Tk()
lb = Label(root,text='I'm the first label',\
        bg='#d3fbfb',\
        fg='red',\
        font=('Hua Wenxin Wei',32),\
        width=20,\
        height=2,\
        relief=SUNKEN)
lb.pack()
root.mainloop()
The label instance lb is instantiated in the parent container root and has a series of attributes such as text, bg, FG, font, width, height, and relief as shown in the code.
When instantiating a control, the properties of the instance can be enumerated and listed in the form of "property = property value", regardless of order. For example: "text =" I'm the first label "displays the text content of the label," bg = "#d3fbfb" sets the background color to hexadecimal number, RGB color #d3fbfb, and so on. Attribute values are commonly expressed as text.
Of course, if this control instance only needs to be rendered at one time, it can also be instantiated and rendered in layout without naming, for example:Label(root,text='I'm the first label',font='Hua Wenxin Wei').pack()
-
The property relief is the 3D relief style presented by the control, including flat, raised, sunken, groove and ridge.

2.3 control layout
The layout of control usually has three methods: pack(), grid() and place().
For pack and grid, please refer to: https://www.jianshu.com/p/91844c5bca782.3. 1. Place() method
Layout based on the absolute or relative position parameters of the control instance in the parent container. The common layout parameters are as follows:
x. Y: the actual position (in pixels) of the control instance in the horizontal and vertical directions in the root form. Note that the upper left corner of the root form is 0,0, the horizontal right and the vertical down are positive directions.
relx,rely: the relative position of the control instance in the horizontal and vertical starting layout in the root form. That is, the proportional position relative to the width and height of the root form. The value is between 0.0 and 1.0.
height,width: the height and width (in pixels) of the control instance itself.
relheight,relwidth: the proportion of the height and width of the control instance relative to the root form. The value is between 0.0 and 1.0.The interface obtained by using place() method with relx,rely, relheight and relwidth parameters can adapt to the size of the root window. The place() method and the grid() method can be mixed. The following example: use the place() method to arrange messages (multi line labels).
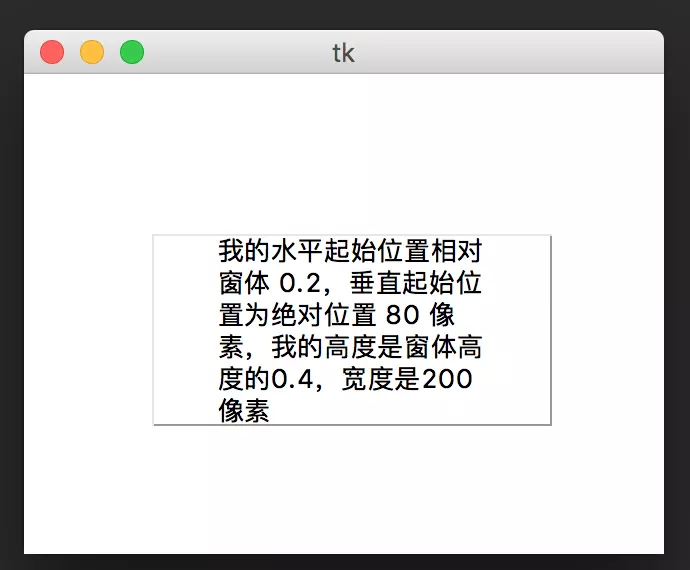
from tkinter import *
root = Tk()
root.geometry('320x240')

msg1 = Message(root,text='''My horizontal start position is relative to form 0.2,The vertical starting position is the absolute position of 80 pixels, and my height is 0 of the window height.4,The width is 200 pixels''',relief=GROOVE)
msg1.place(relx=0.2,y=80,relheight=0.4,width=200)
root.mainloop()
3, Characteristic properties of tkinter common controls
3.1 text input and output related controls
Text input and output controls usually include: Label, Message, Entry and text. In addition to the above common properties, they all have some characteristic properties and functions.
○ 3.1. 1 Label and Message
Except for the difference between single line and multi line, the properties and usage are basically the same, which is used to present text information. It is worth noting that the attribute text is usually used for the fixed text of the instance when it is presented for the first time. If it needs to be changed after the program is executed, one of the following methods can be used: 1. Use the configure() method of the control instance to change the value of the attribute text to change the displayed text; 2. Defining the value of a tkinter internal type variable var=StringVar() can also change the displayed text.
Take the following example: make an electronic clock, use root's after() method to obtain the current time of the system every 1 second, and display it in the label.
Method 1: use the configure() method or config() to implement text change.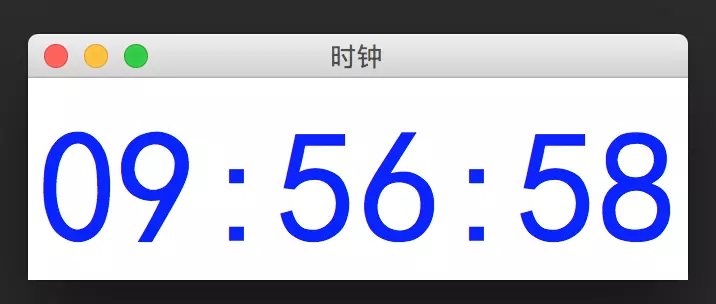
import tkinter
import time

def gettime():
      timestr = time.strftime("%H:%M:%S") # Gets the current time and converts it to a string
      lb.configure(text=timestr)   # Reset label text
      root.after(1000,gettime) # The function gettime is called every 1s to get the time itself

root = tkinter.Tk()
root.title('Clock')

lb = tkinter.Label(root,text='',fg='blue',font=("Blackbody",80))
lb.pack()
gettime()
root.mainloop()
The more common methods are: add_cascade(),add_command() and add_separator() is used to add a menu group, a menu command and a split line respectively.
You can also create a shortcut Menu (also known as context Menu) by using the Menu control. You usually need to right-click the pop-up control instance, bind the mouse right-click response event, and point to a user-defined function that captures the event parameter. In this user-defined function, the trigger positions of the mouse, event.x_root and event.y_root, are passed to the Menu by the post() method.
Example: follow the file and edit menu in the "NOTEPAD" of window to trigger the menu command on the shortcut menu of the main menu and change the text content of the label on the form accordingly. The effects are as follows: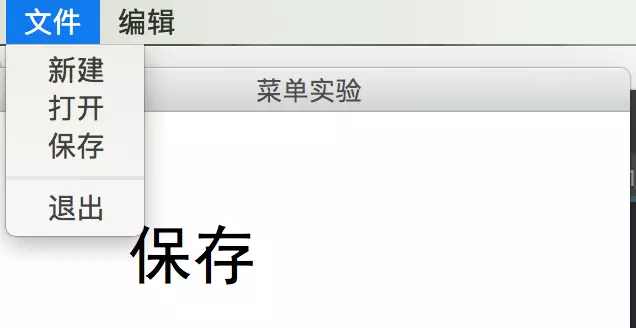
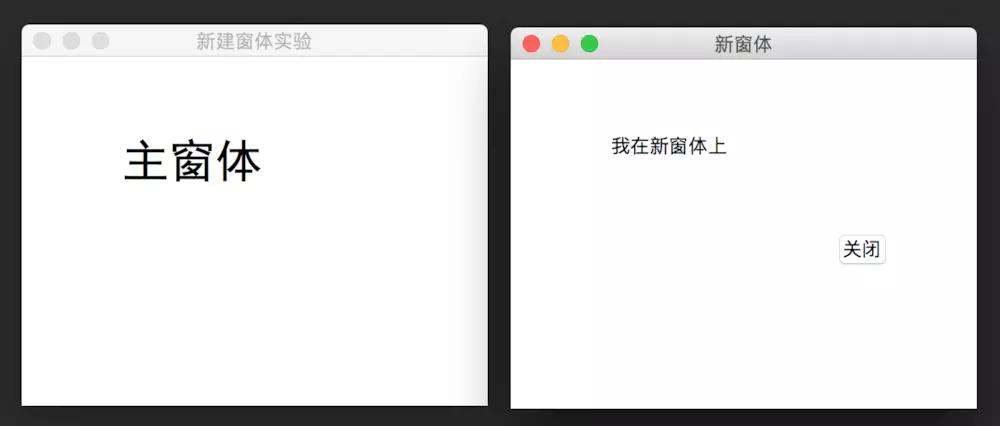
The method to close the running of a form program is usually destory(), not quit(). The sub form created with Toplevel is a Modeless form. Although the sub form is in the front when it is initially built, the control instance on the root form can also be operated.
3.7 menu
-
Method 2: use the textvariable attribute to realize text change
-
import tkinter
import time

def gettime():
      var.set(time.strftime("%H:%M:%S"))   # Get current time
      root.after(1000,gettime)   # The function gettime is called every 1s to get the time itself

root = tkinter.Tk()
root.title('Clock')
var=tkinter.StringVar()

lb = tkinter.Label(root,textvariable=var,fg='blue',font=("Blackbody",80))
lb.pack()
gettime()
root.mainloop()
○ 3.1. 2 Text box (Text)
Common methods for text boxes are as follows:
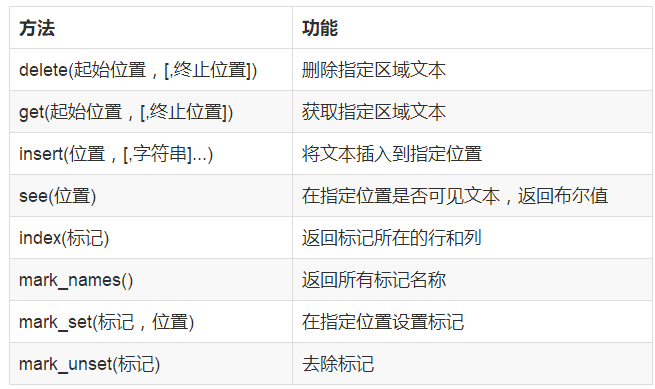
The value of the position in the above table can be integer, floating point number or END (END). For example, 0.0 represents column 0 and row 0
Here is an example: get the time of the current date every 1 second and write it to the text box as follows: in this case, call datetime.now() gets the current date and time, and uses the insert() method to append text from the END of the text box txt each time.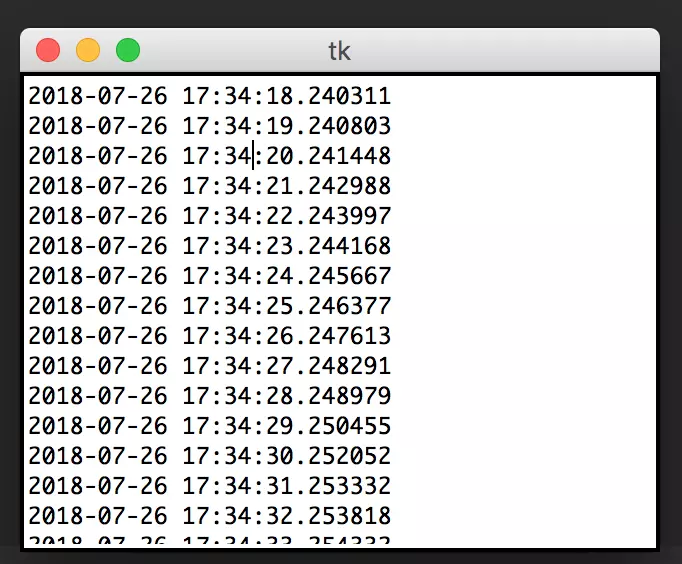
from tkinter import *
import time
import datetime

def gettime():
       s=str(datetime.datetime.now())+'\n'
       txt.insert(END,s)
       root.after(1000,gettime)  # The function gettime is called every 1s to get the time itself

root=Tk()
root.geometry('320x240')
txt=Text(root)
txt.pack()
gettime()
root.mainloop()
○ 3.1. 3 input box (Entry)
It is usually used as a control with a single function to receive single line text input. Although there are many methods to operate the text, it usually uses only the value method get() and delete (start position and end position) to delete the text. For example, empty the input box to delete(0, END).
3.2 button
It is mainly set to trigger the running program in response to the mouse click event. Therefore, in addition to the common properties of the control, the property command is the most important property. Usually, the program to be triggered by the Button is predefined in the form of a function, and then the function can be called in the following two methods. The status of the Button button is: 'normal','active','disabled'
○ call the function directly. The parameter expression is "command = function name". Note that there are no parentheses after the function name, and parameters cannot be passed. As shown in the following command=run1:
○ call functions and pass parameters using anonymous functions. The expression of the parameter is "command=lambda": function name (parameter list). For example: "command=lambda:run2(inp1.get(),inp2.get())".○ look at the following example: 1 The input text from the two input boxes is converted to floating-point value for addition operation. It is required that the calculated result generated by each click of the button is appended to the text box in the form of text, and the original input box is cleared. 2. Button method 1 calls function run1() without passing parameters, and button "method 2" calls function run2(x,y) with lambda to pass parameters at the same time.
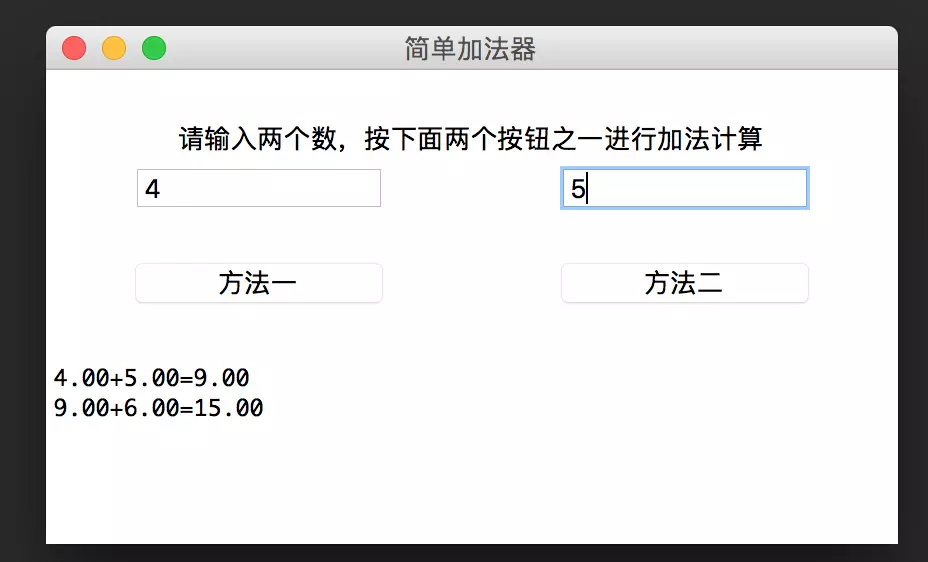
from tkinter import *

def run1():
     a = float(inp1.get())
     b = float(inp2.get())
     s = '%0.2f+%0.2f=%0.2f\n' % (a, b, a + b)
     txt.insert(END, s)   # Append display operation results
     inp1.delete(0, END)  # Clear input
     inp2.delete(0, END)  # Clear input

def run2(x, y):
     a = float(x)
     b = float(y)
     s = '%0.2f+%0.2f=%0.2f\n' % (a, b, a + b)
     txt.insert(END, s)   # Append display operation results
     inp1.delete(0, END)  # Clear input
     inp2.delete(0, END)  # Clear input

root = Tk()
root.geometry('460x240')
root.title('Simple adder')

lb1 = Label(root, text='Please enter two numbers and press one of the following two buttons to add')
lb1.place(relx=0.1, rely=0.1, relwidth=0.8, relheight=0.1)
inp1 = Entry(root)
inp1.place(relx=0.1, rely=0.2, relwidth=0.3, relheight=0.1)
inp2 = Entry(root)
inp2.place(relx=0.6, rely=0.2, relwidth=0.3, relheight=0.1)

# Method - call run1() directly
btn1 = Button(root, text='Method 1', command=run1)
btn1.place(relx=0.1, rely=0.4, relwidth=0.3, relheight=0.1)

# Method 2 calls run2() with lambda parameters
btn2 = Button(root, text='Method 2', command=lambda: run2(inp1.get(), inp2.get()))
btn2.place(relx=0.6, rely=0.4, relwidth=0.3, relheight=0.1)

# From 60% of the vertical top-down position of the form, the text box 40% high relative to the height of the form is laid out
txt = Text(root)
txt.place(rely=0.6, relheight=0.4)

root.mainloop()
3.3 radio buttons
(Radiobutton) is set to respond to the click events of several single options excluded by hometown to trigger the running of custom functions. This control excludes common properties, It also has important properties such as display text, return variable, return value and response function name. The use of response function name "command = function name" is the same as that of Button, and the function name should be parenthesized at the end. The return variable variable variable=var should usually declare the type of variable var=IntVar() or var=StringVar(), In the called function, you can use the var.get() method to obtain the value value of the selected instance. For example:
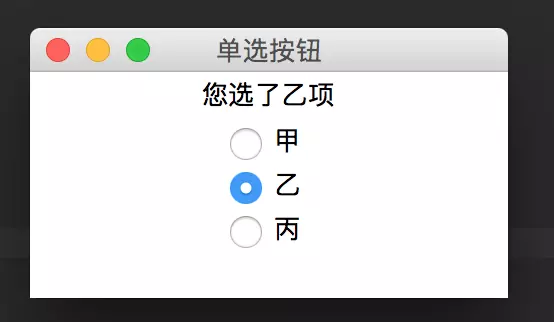
from tkinter import *
def Mysel():
      dic = {0:'nail',1:'B',2:'C'}
      s = "You chose" + dic.get(var.get()) + "term"
      lb.config(text = s)

root = Tk()
root.title('radio button')
lb = Label(root)
lb.pack()

var = IntVar()
rd1 = Radiobutton(root,text="nail",variable=var,value=0,command=Mysel)
rd1.pack()

rd2 = Radiobutton(root,text="B",variable=var,value=1,command=Mysel)
rd2.pack()

rd3 = Radiobutton(root,text="C",variable=var,value=2,command=Mysel)
rd3.pack()

root.mainloop()
3.4 check box
(Checkbutton) is an interactive control to return multiple option values. It usually does not directly trigger the execution of functions. In addition to common properties, the control also has important properties such as display text, return variable, selected return value and unselected default return value. The return variable variable variable=var can usually declare the type of variable var=IntVar() (default) or var=StringVar(), item by item in advance, In the called function, you can call var.get() method to obtain onvalue or offvalue of the selected instance. Check box instances can also be selected, cleared, and deselected using the select(), deselect(), and toggle() methods, respectively.
○ the following example: using the check box, click OK to display the selected results on the label. The effects are as follows:
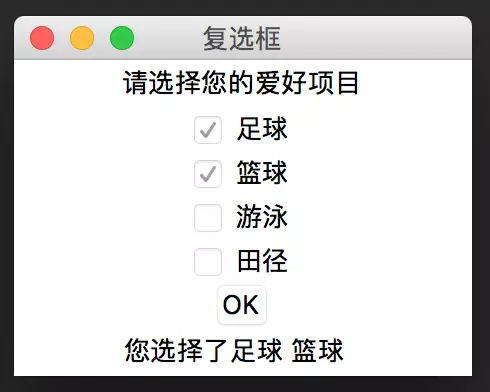
○ method: use the if else branch in the function to realize multiple displayfrom tkinter import * import tkinter def run(): if(CheckVar1.get()==0 and CheckVar2.get()==0 and CheckVar3.get()==0 and CheckVar4.get()==0): s = 'You haven't selected any hobbies yet' else: s1 = "Football" if CheckVar1.get()==1 else "" s2 = "Basketball" if CheckVar2.get() == 1 else "" s3 = "Swimming" if CheckVar3.get() == 1 else "" s4 = "Athletics" if CheckVar4.get() == 1 else "" s = "You have chosen%s %s %s %s" % (s1,s2,s3,s4) lb2.config(text=s) root = tkinter.Tk() root.title('check box') lb1=Label(root,text='Please select your favorite items') lb1.pack() CheckVar1 = IntVar() CheckVar2 = IntVar() CheckVar3 = IntVar() CheckVar4 = IntVar() ch1 = Checkbutton(root,text='Football',variable = CheckVar1,onvalue=1,offvalue=0) ch2 = Checkbutton(root,text='Basketball',variable = CheckVar2,onvalue=1,offvalue=0) ch3 = Checkbutton(root,text='Swimming',variable = CheckVar3,onvalue=1,offvalue=0) ch4 = Checkbutton(root,text='Athletics',variable = CheckVar4,onvalue=1,offvalue=0) ch1.pack() ch2.pack() ch3.pack() ch4.pack() btn = Button(root,text="OK",command=run) btn.pack() lb2 = Label(root,text='') lb2.pack() root.mainloop()3.5 list box and combo box
3.5. 1 list box
(Listbox) allows users to select one or more listed items to form human-computer interaction. The main methods of list box control are shown in the following table:
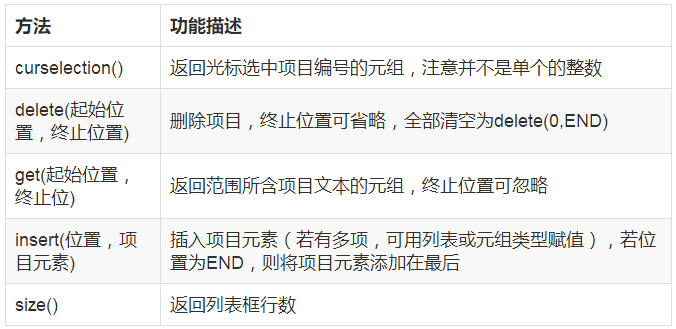
When executing a custom function, you usually use "instance name. surselection()" or "selected" to get the location index of the selected item. Because the list box is essentially the visual presentation of Python's list type data, when the program is implemented, the relevant list data can also be operated directly, and then displayed through the list box, without being constrained by the method of visual control. Take the following example: initialize, add, insert, modify, delete and empty the list box, as follows: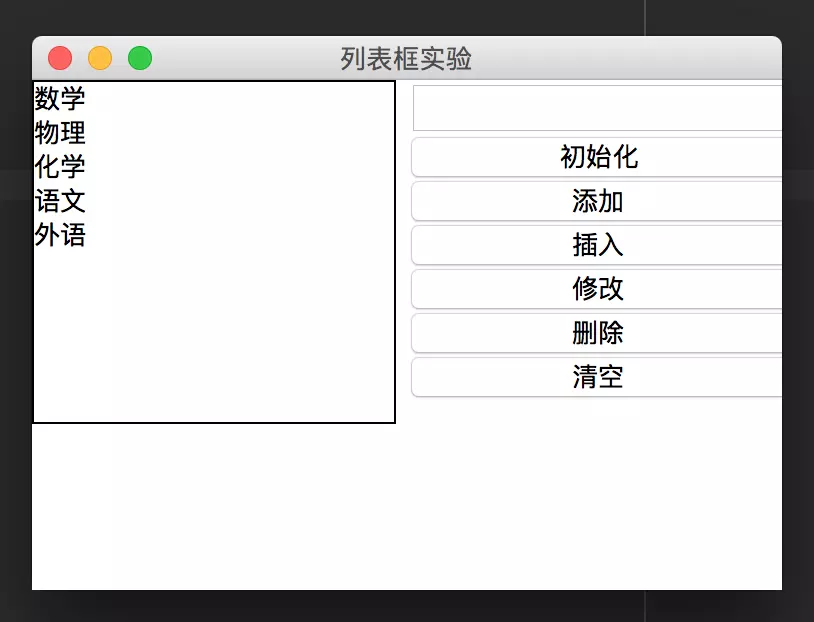
-
from tkinter import *
def ini():
      Lstbox1.delete(0,END)
      list_items = ["mathematics","Physics","Chemistry","language","Foreign Languages"]
      for item in list_items:
           Lstbox1.insert(END,item)

def clear():
      Lstbox1.delete(0,END)

def ins():
      if entry.get() != '':
          if Lstbox1.curselection() == ():
              Lstbox1.insert(Lstbox1.size(),entry.get())
          else:
              Lstbox1.insert(Lstbox1.curselection(),entry.get())

def updt():
      if entry.get() != '' and Lstbox1.curselection() != ():
           selected=Lstbox1.curselection()[0]
           Lstbox1.delete(selected)
           Lstbox1.insert(selected,entry.get())

def delt():
      if Lstbox1.curselection() != ():
           Lstbox1.delete(Lstbox1.curselection())

root = Tk()
root.title('List box experiment')
root.geometry('320x240')

frame1 = Frame(root,relief=RAISED)
frame1.place(relx=0.0)

frame2 = Frame(root,relief=GROOVE)
frame2.place(relx=0.5)

Lstbox1 = Listbox(frame1)
Lstbox1.pack()

entry = Entry(frame2)
entry.pack()

btn1 = Button(frame2,text='initialization',command=ini)
btn1.pack(fill=X)

btn2 = Button(frame2,text='add to',command=ins)
btn2.pack(fill=X)

btn3 = Button(frame2,text='insert',command=ins) # The add and insert functions are essentially the same
btn3.pack(fill=X)

btn4 = Button(frame2,text='modify',command=updt)
btn4.pack(fill=X)

btn5 = Button(frame2,text='delete',command=delt)
btn5.pack(fill=X)

btn6 = Button(frame2,text='empty',command=clear)
btn6.pack(fill=X)

root.mainloop()
3.5. 2 combo box
(Combobox) is essentially a pull-up list box with text box. Its function will also be the visual presentation of Python's list type data, and provide users with single or multiple choices of the listed items to form human-computer interaction. In graphical interface design, because of its flexible interface, it is often more popular than list box. However, this control is not included in tkinter module, but is included in tkinter sub module ttk together with TreeView, Progressbar, Separator and other controls. If you use this control, you should first reference the ttk sub module with the from tkinter import ttk statement, and then create a combo box instance: instance name = combobox (root object, [attribute list])
Specify the variable var=StringVar(), and set the instance property textvariable = var,values = [list...]. The common methods of combo box control are: get the selected option value () and get the selected option index current().
Look at the following example: implement four operation calculators, fill two operands into two text boxes respectively, and trigger the operation by selecting the algorithm in the combo box, as follows: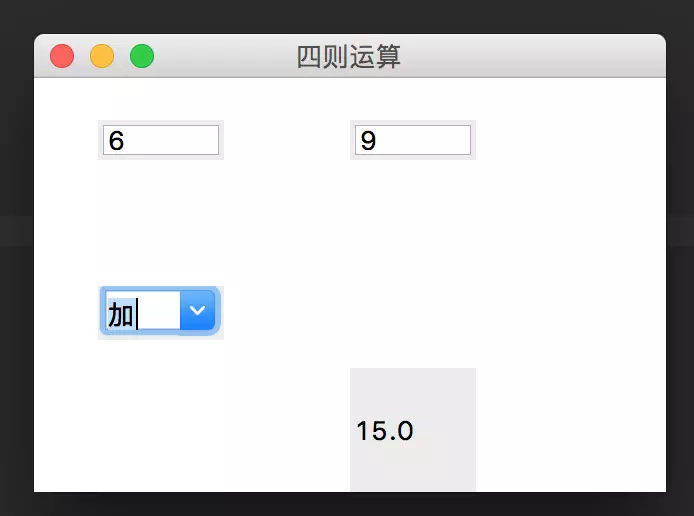
-
from tkinter.ttk import *

def calc(event):
       a = float(t1.get())
       b = float(t2.get())
       dic = {0:a+b,1:a-b,2:a*b,3:a/b}
       c = dic[comb.current()]
       lbl.config(text=str(c))

root = Tk()
root.title('Four arithmetic')
root.geometry('320x240')

t1 = Entry(root)
t1.place(relx=0.1,rely=0.1,relwidth=0.2,relheight=0.1)

t2 = Entry(root)
t2.place(relx=0.5,rely=0.1,relwidth=0.2,relheight=0.1)

var = StringVar()

comb = Combobox(root,textvariable=var,values=['plus','reduce','ride','except',])
comb.place(relx=0.1,rely=0.5,relwidth=0.2)
comb.bind('<<ComboboxSelected>>',calc)

lbl=Label(root,text='result')
lbl.place(relx=0.5,rely=0.7,relwidth=0.2,relheight=0.3)

root.mainloop()
3.6 slider
(Scale) is an interactive control for intuitive numerical input. Its main properties are shown in the following table:
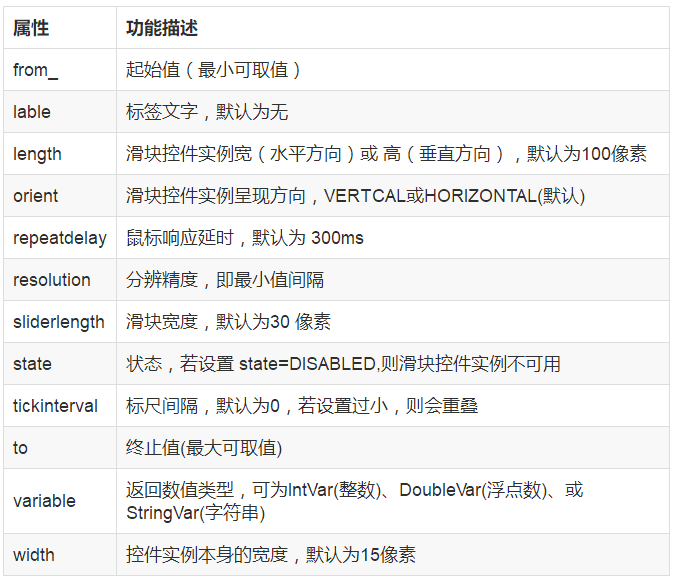
The main methods of slider control instances are relatively simple, including get() and set (value), which are value taking and setting the slider on a specific value respectively. The slider instance can also bind the left mouse button release event < buttoonrelease-1 >, and add the parameter event in the execution function to realize the event response.
For example, a 200 pixel wide horizontal slider is designed on a form, with a value range of 1.0 ~ 5.0, a resolution accuracy of 0.05 and a scale interval of {1. Drag the slider with the mouse and release the mouse to read the slider value and display it on the label. The effects are as follows: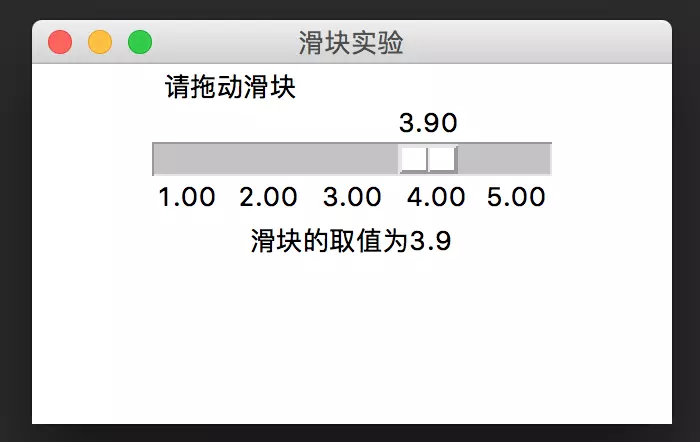
from tkinter import * def show(event): s = 'The value of slider is' + str(var.get()) lb.config(text=s) root = Tk() root.title('Slider experiment') root.geometry('320x180') var=DoubleVar() scl = Scale(root,orient=HORIZONTAL,length=200,from_=1.0,to=5.0,label='Please drag the slider',tickinterval=1,resolution=0.05,variable=var) scl.bind('<ButtonRelease-1>',show) scl.pack() lb = Label(root,text='') lb.pack() root.mainloop() - Return to directory
-
(Menu) is used to visually group a series of commands, so as to facilitate the user to find and trigger the execution of these commands. The Menu instantiated here is mainly Menu, and its general formula is:
Menu instance name=Menu(Root form)
Menu group 1=Menu(Menu instance name)
Menu instance name.add_cascade(<label=Menu group 1 display text>,<menu=Menu group 1>)
Menu group 1.add_command(<label=Command 1 text>,<command=Command 1 function name>)
-
from tkinter import * def new(): s = 'newly build' lb1.config(text=s) def ope(): s = 'open' lb1.config(text=s) def sav(): s = 'preservation' lb1.config(text=s) def cut(): s = 'shear' lb1.config(text=s) def cop(): s = 'copy' lb1.config(text=s) def pas(): s = 'paste' lb1.config(text=s) def popupmenu(event): mainmenu.post(event.x_root,event.y_root) root = Tk() root.title('Menu experiment') root.geometry('320x240') lb1 = Label(root,text='display information',font=('Blackbody',32,'bold')) lb1.place(relx=0.2,rely=0.2) mainmenu = Menu(root) menuFile = Menu(mainmenu) # Menu grouping menuFile mainmenu.add_cascade(label="file",menu=menuFile) menuFile.add_command(label="newly build",command=new) menuFile.add_command(label="open",command=ope) menuFile.add_command(label="preservation",command=sav) menuFile.add_separator() # Split line menuFile.add_command(label="sign out",command=root.destroy) menuEdit = Menu(mainmenu) # Menu grouping menuEdit mainmenu.add_cascade(label="edit",menu=menuEdit) menuEdit.add_command(label="shear",command=cut) menuEdit.add_command(label="copy",command=cop()) menuEdit.add_command(label="paste",command=pas()) root.config(menu=mainmenu) root.bind('Button-3',popupmenu) # Root form binding right-click response event root.mainloop() -
3.8 subform
Using Toplevel, you can create a new sub form displayed in the front. The general formula is: font instance name = Toplevel (root form). The sub form is similar to the root form. You can also set properties such as title and geometry, and lay out other controls on the canvas. The following example: creating a menu on the root form triggers the creation of a new form
3.9 Mode dialog box (Modal)
Compared with the non modal form described above, the pop-up dialog box must answer, and other forms behind it cannot be operated before closing. Common mode dialog boxes include message dialog box, input dialog box, file selection dialog box, color selection dialog box, etc.
3.9. 1 interactive dialog box
(1) . message dialog box: reference Tkinter MessageBox package, you can use the message dialog function. When these functions are executed, the mode message dialog box will pop up and a Boolean value will be displayed according to the user's response. The general formula is:
Message dialog function(<title=Title Text>,<message=message text>,[Other parameters])
Take the following example: click the button to pop up the confirmation cancellation dialog box, and display the user's answer in the label. The effects are as follows: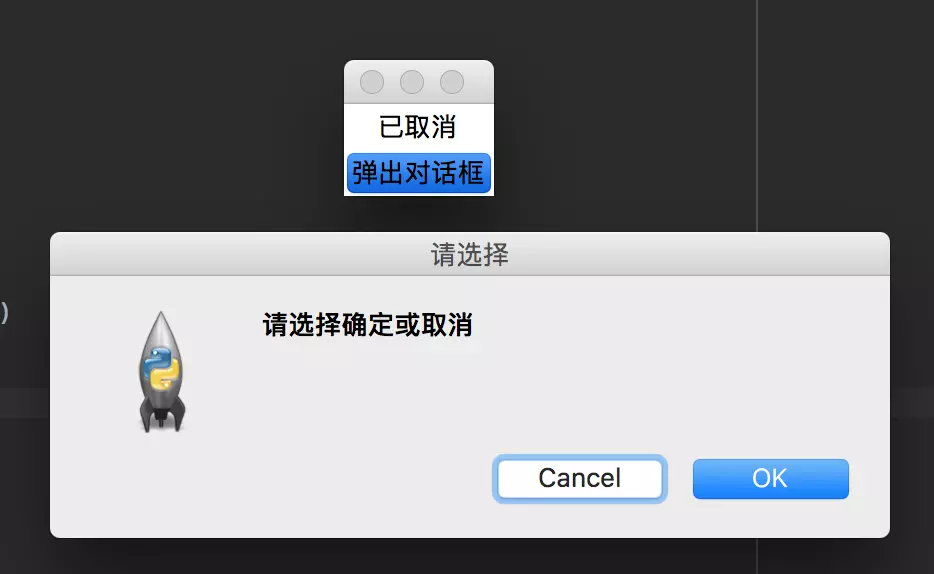
from tkinter import *
import tkinter.messagebox

def xz():
    answer=tkinter.messagebox.askokcancel('Please select','Please select OK or cancel')
    if answer:
        lb.config(text='Confirmed')
    else:
        lb.config(text='Cancelled')

root = Tk()

lb = Label(root,text='')
lb.pack()
btn=Button(root,text='Pop up dialog box',command=xz)
btn.pack()
root.mainloop()
(2) . input dialog box: reference Tkinter Simpledialog package, you can pop up the input dialog box to receive the user's simple input. Three functions, askstring(), askfloat(), and askfloat(), are commonly used in the input dialog box to receive string, integer, and floating-point type inputs respectively.
As the following example: click the button to pop up the input dialog box, and the received text input is displayed on the label of the form. As follows: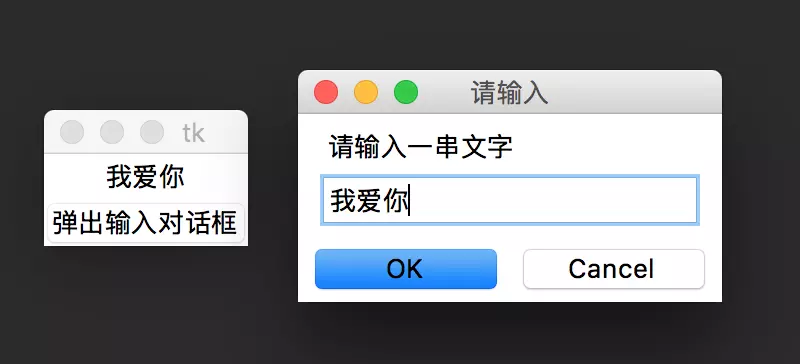
from tkinter.simpledialog import *

def xz():
    s=askstring('Please enter','Please enter a string of text')
    lb.config(text=s)

root = Tk()

lb = Label(root,text='')
lb.pack()
btn=Button(root,text='The input dialog box pops up',command=xz)
btn.pack()
root.mainloop()
3.9. 2 file selection dialog box
Reference Tkinter FileDialog package, a file selection dialog box can pop up, allowing users to intuitively select one or a group of files for further file operations. The commonly used file selection dialog box functions are askopenfilename(), askopenfilenames() and asksaveasfilename(), which are used to further open a file, a group of files and save files respectively. The return value type of the askopenfilename() and asksaveasfilename() functions is the file name string containing the file path, and the return value type of the askopenfilenames() function is tuple.
For example, click the button to pop up the file selection dialog box (open dialog box), and display the file path and file name selected by the user on the label of the form. It is as follows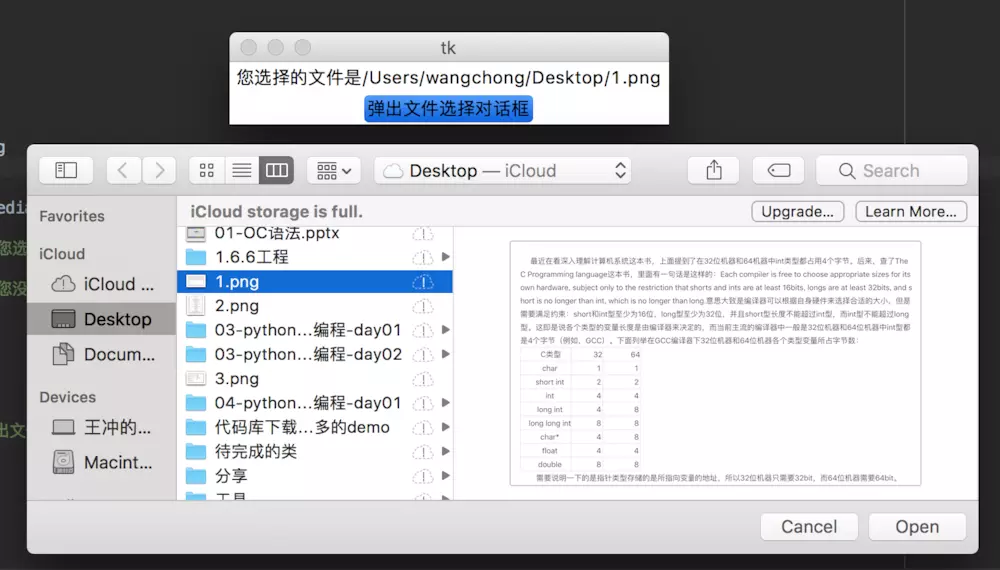
from tkinter import *
import tkinter.filedialog

def xz():
    filename=tkinter.filedialog.askopenfilename()
    if filename != '':
         lb.config(text='The file you selected is'+filename)
    else:
         lb.config(text='You have not selected any files')

root = Tk()

lb = Label(root,text='')
lb.pack()
btn=Button(root,text='The file selection dialog box pops up',command=xz)
btn.pack()
root.mainloop()
3.9. 3. Color selection dialog box
Reference Tkinter Colorchooser package, you can use the askcolor() function to pop up the mode color selection dialog box, so that users can set color attributes personalized. The return form of this function is the tuple type containing RGB decimal floating-point tuple and RGB hexadecimal string, for example: "((135.527343.52734375167.65234375186.7265625)), '#87a7ba'.". Generally, you can convert it to string type, and then intercept the RGB color string represented by hexadecimal number for attribute assignment.
For example, click the button to pop up the color selection dialog box, and set the color selected by the user as the background color of the label on the form, as follows: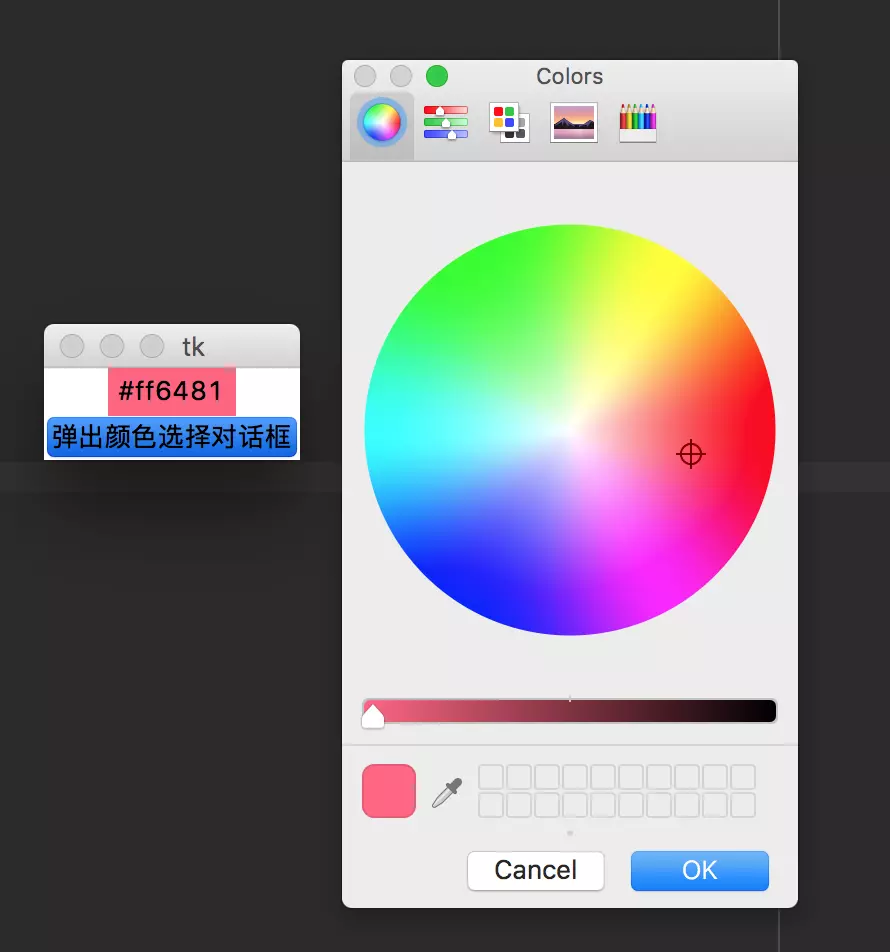
from tkinter import *
import tkinter.colorchooser

def xz():
    color=tkinter.colorchooser.askcolor()
    colorstr=str(color)
    print('Print string%s After cutting off=%s' % (colorstr,colorstr[-9:-2]))
    lb.config(text=colorstr[-9:-2],background=colorstr[-9:-2])

root = Tk()

lb = Label(root,text='Please pay attention to the change of color')
lb.pack()
btn=Button(root,text='The color selection dialog box pops up',command=xz)
btn.pack()
root.mainloop()
4, Event response
tkinter can bind user events with user-defined functions, and respond to trigger the execution of user-defined functions with keyboard or mouse action events. The general formula is:
Control instance.bind(<Event code>,<Function name>)
Among them, the event code is usually defined by the half width less than sign "<" and greater than sign ">", including 2 ~ 3 parts such as events and keys, which are separated by minus signs. See the following table for common event codes: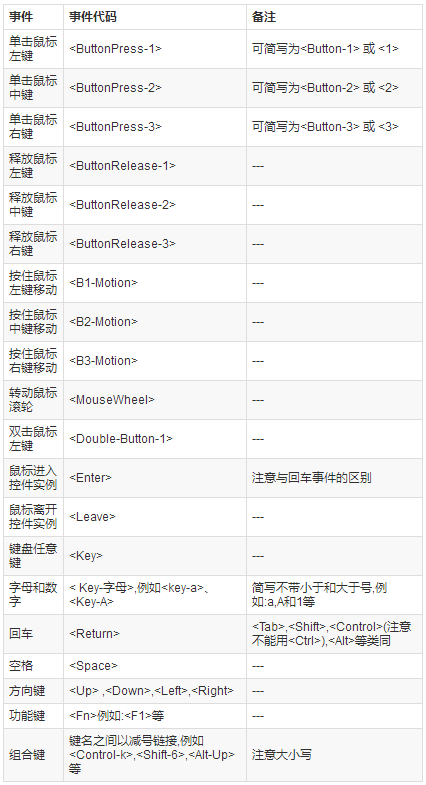
For example, bind the frame control instance frame to the right-click event, and call the custom function myfunc(), which can be expressed as "frame.bind(', myfunc)". Note: there are no parentheses after myfunc. When binding a control instance to a keyboard event and some mouse events where the cursor does not fall on a specific control instance, you also need to set the instance to execute focus_ The set () method obtains the focus to continuously respond to the event. For example: frame focus_set(). If the user-defined function called needs to use the response value of the mouse or keyboard, you can take event as a parameter and obtain it through the attribute of event. The properties of event are shown in the following table: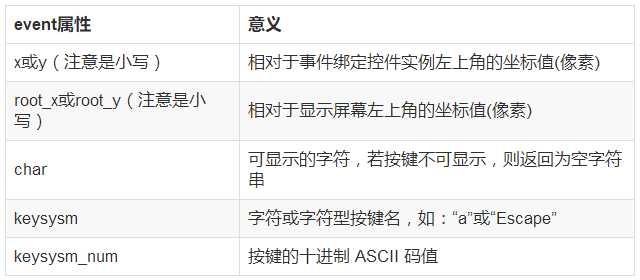
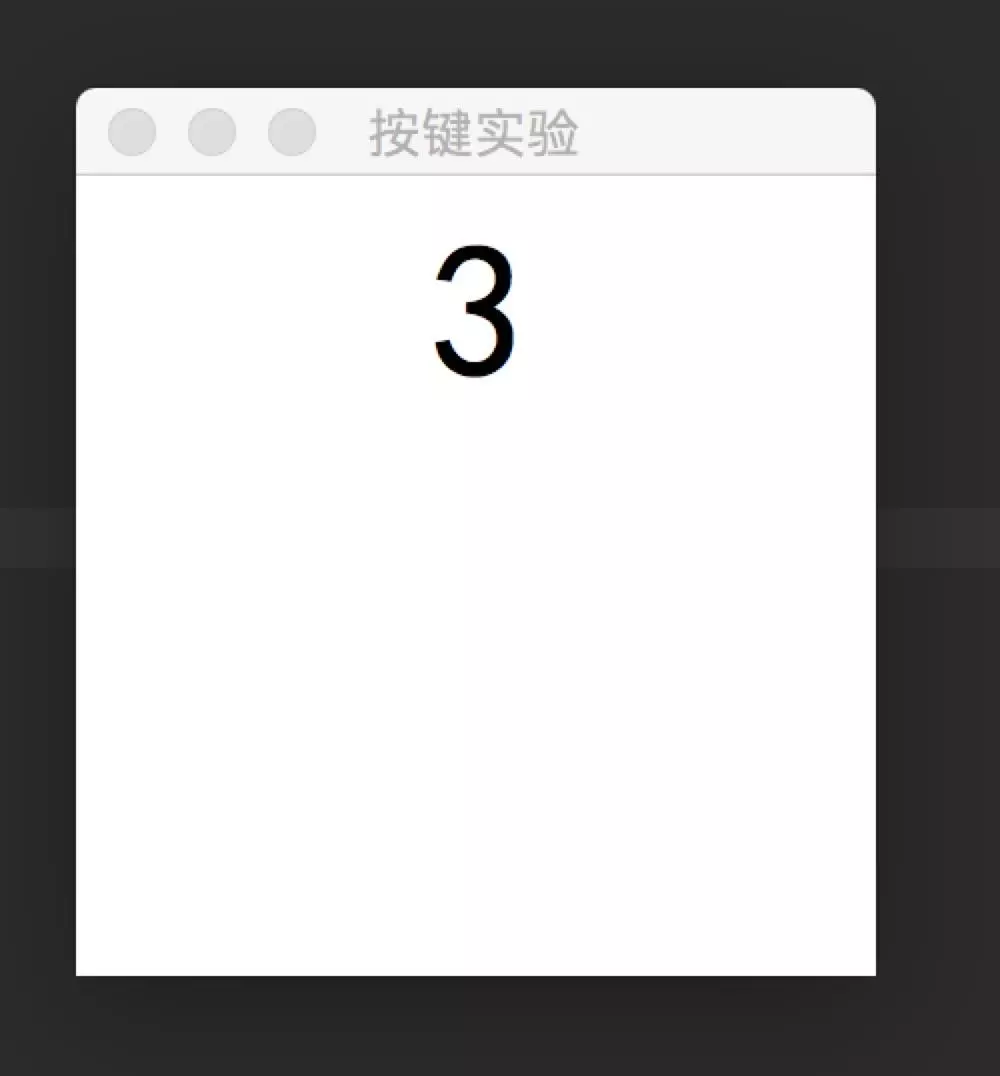
from tkinter import *

def show(event):
s=event.keysym
lb.config(text=s)

root=Tk()
root.title('Key experiment')
root.geometry('200x200')
lb=Label(root,text='Please press the key',font=('Blackbody',48))
lb.bind('<Key>',show)
lb.focus_set()
lb.pack()
root.mainloop()
Supplement:
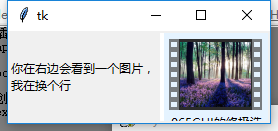
5, Background picture
1. Add background
#Insert file picture
import tkinter as tk

root = tk.Tk()

#Create a label class, [justify]: alignment
textLabel = tk.Label(root,text="You will see a picture on the right,\n I'm changing my line",
justify = tk.LEFT)#Align left
textLabel.pack(side=tk.LEFT)#Auto align, side: orientation


#Create a picture management class
photo = tk.PhotoImage(file="18.png")#file: t picture path
imgLabel = tk.Label(root,image=photo)#Integrate pictures into label classes
imgLabel.pack(side=tk.RIGHT)#Auto align


tk.mainloop()
import tkinter as tk

root = tk.Tk()


#Add background picture
photo = tk.PhotoImage(file="background.png")
theLabel = tk.Label(root,
         text="I am the content,\n Please read",#content
         justify=tk.LEFT,#Alignment
         image=photo,#Add picture
         compound = tk.CENTER,#Key: set as background picture
         font=("Chinese block letters",20),#Font and size
         fg = "white")#Foreground
theLabel.pack()


tk.mainloop()
#Insert file picture
import tkinter as tk

root = tk.Tk()

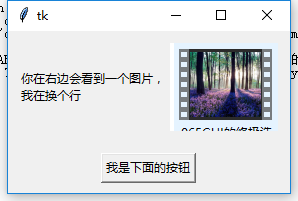
frame1 = tk.Frame(root)#This is the frame above
frame2 = tk.Frame(root)#This is the frame below


var = tk.StringVar()#Class to store text
var.set("You will see a picture on the right,\n I'm changing my line")#Set text

#Create a label class, [justify]: alignment, frame to which [frame] belongs
textLabel = tk.Label(frame1,textvariable=var,
         justify = tk.LEFT)#Display text content
textLabel.pack(side=tk.LEFT)#Auto align, side: orientation


#Create a picture management class
photo = tk.PhotoImage(file="18.png")#file: t picture path
imgLabel = tk.Label(frame1,image=photo)#Integrate pictures into label classes
imgLabel.pack(side=tk.RIGHT)#Auto align


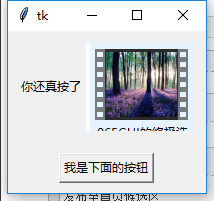
def callback():#Triggered function
  var.set("You did")#Set text

#[frame] frame, text content command: trigger method
theButton = tk.Button(frame2,text="I'm the button below",command=callback)
theButton.pack()#Auto align


frame1.pack(padx=10,pady=10)#Upper frame alignment
frame2.pack(padx=10,pady=10)#Lower frame alignment


tk.mainloop()
6, Turn on the camera and display
effect: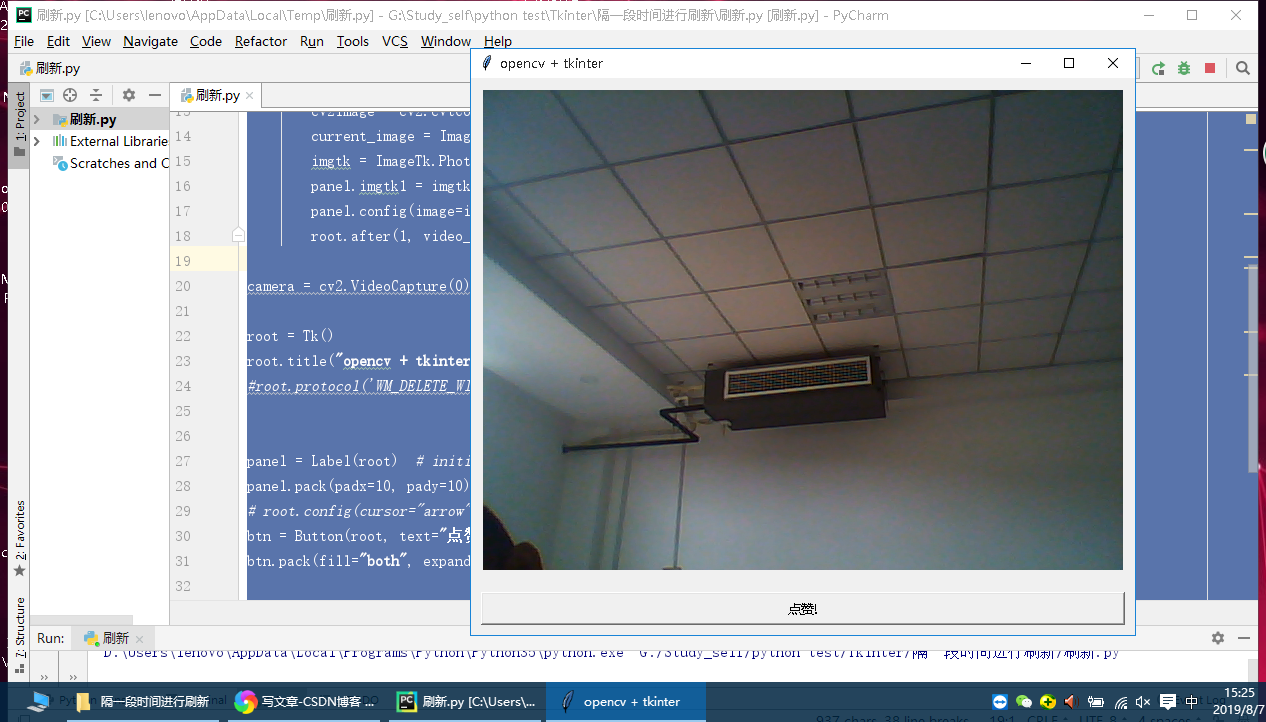
code:
  from tkinter import *
    import cv2
    from PIL import Image,ImageTk


    def take_snapshot():
        print("Someone praised you!")

    def video_loop():
        success, img = camera.read()  # Read photos from camera
        if success:
            cv2.waitKey(100)
            cv2image = cv2.cvtColor(img, cv2.COLOR_BGR2RGBA)#Convert color from BGR to RGBA
            current_image = Image.fromarray(cv2image)#Convert Image to Image object
            imgtk = ImageTk.PhotoImage(image=current_image)
            panel.imgtk1 = imgtk
            panel.config(image=imgtk)
            root.after(1, video_loop)

    camera = cv2.VideoCapture(0)    #camera

    root = Tk()
    root.title("opencv + tkinter")
    #root.protocol('WM_DELETE_WINDOW', detector)


    panel = Label(root)  # initialize image panel
    panel.pack(padx=10, pady=10)
    # root.config(cursor="arrow")
    btn = Button(root, text="give the thumbs-up!", command=take_snapshot)
    btn.pack(fill="both", expand=True, padx=10, pady=10)

    video_loop()

    root.mainloop()
    # When everything is done, turn off the camera and release the occupied resources
    camera.release()
    cv2.destroyAllWindows()
Thank you
https://www.jianshu.com/p/91844c5bca78
https://www.cnblogs.com/banzhen/p/7427201.html
https://blog.csdn.net/a1_a1_a/article/details/79981788