1: Install and create a Django project
1. Install Django package
pip install django
2. Command to create a Django project
Django admin startproject + (file name)
django-admin startproject my_site
3. Run Django file
Note: the command must be in the Django file directory you created, that is, the upper level file directory of manage.py
python manage.py runserver
Remember that the Django project does not have a stop command. It will run all the time. Even if you modify the file, it will automatically save and make changes.
Note: the port number of the service opened by using the above command is 8000. The method to change the port number is:
python manage.py runserver 0.0.0.0:8001
4. Analyze the files automatically created in the Django project that have been created
mysite

  manage.py          #Management program files, start and end, etc.

  my_site
         _init_.py
         settngs.py      #Program configuration file, including modules
         urls.py    #The routing system of the program, that is, the corresponding relationship between the url and the processing function
         wsgi.py   #Specifies the wsgi of the framework
2: Complete the first Django request
1. Create an app (this is a necessary step in the operation of Django project)
The create command is:
django-admin startapp app01
Analyze the file structure and function in the app
app01

    _init_.py package
    admin.py Database background
    app.py   #django is the file that associates the project with the app
    migrations     #Database related
           _init_.py
    model.py #Database operation place
    tests.py  #unit testing
    views.py   #Business logic code
2. Complete the first Django request
(1) Match the route, and the route distributor finds the url address requested by the user
1. When the business function is found, call
2. If you can't find it, report 404
(2) Business function, execute business logic‘
(3) Return data to viewer
To execute the simplest django request, first add a route (urls.py) file in the route distributor file
urls.py Code:
from django.contrib import admin
from django.urls import path
from app01 import views

urlpatterns = [
    path('admin/', admin.site.urls),
    path('login/',views.view_login)
]
Next, send data to the viewer at the view layer
views.py file
from django.shortcuts import render,HttpResponse

# Create your views here.

# For all functions in the views.py file, the parameter of the method must be request
# request means to receive the data returned by the viewer to the server
def view_login(request):

    print("The business has been implemented here")
    print(dir(request))
    return HttpResponse("<h1 style='color:red'>People don't spend time with others</h1>")
3: Transfer an html file to the front end
The first step is to define a route in the urls.py file and create a folder for storing html files
from django.contrib import admin
from django.urls import path
from app01 import views

urlpatterns = [
    path('admin/', admin.site.urls),
    path('test',views.test_view),
    path('loginIn',views.login_view)
]
login.html file
<!DOCTYPE html>
<html lang="en">
<head>
<meta charset="UTF-8">
<title>Registration login interface</title>
</head>
<body>
<div class="container right-panel-active">
<!-- register -->
<div class="container_form container--signup">
<form action="#" class="form" id="form1">
<h2 class="form_title">Sign Up</h2>
<input type="text" placeholder="User" class="input" />
<input type="email" placeholder="Email" class="input" />
<input type="password" placeholder="Password" class="input" />
<button class="btn">Sign Up2</button>
</form>
</div>
<!-- Sign in -->
<div class="container_form container--signin">
<!-- <form action="#" class="form" id="form2">-->
<!-- <h2 class="form_title">Sign In</h2>-->
<!-- <input type="text" placeholder="Useranme" id="username" class="input" />-->
<!--<!– <input type="text" placeholder="Username" id="username" class="input" />–>-->
<!-- <input type="password" placeholder="Password" id="password" class="input" />-->
<!-- <button class="btn" onclick="fff()">Sign In1</button>-->
<!-- </form>-->
<!-- Attention attention attention-->
<form action="/index" class="form">
<h2 class="form_title">Sign In</h2>
<input type="username" placeholder="Useranme" id="username" class="input" />
<!-- <input type="text" placeholder="Username" id="username" class="input" />-->
<input type="password" placeholder="Password" id="password" class="input" />
<button class="btn" >Sign In1</button>
<!-- <button type="submit" onclick="fff()">sign in</button>-->
</form>
</div>
<!-- Floating layer -->
<div class="container_overlay">
<img class="container_overlay_img">
<div class="overlay">
<div class="overlay_panel overlay--left">
<button class="btn" id="signIn">Sign In</button>
</div>
<div class="overlay_panel overlay--right">
<button class="btn" id="signUp">Sign Up</button>
</div>
</div>
</div>
</div>
<!-- background -->
<div class="slidershow">
<div class="slidershow--image" style="background-image: url('https://source.unsplash.com/Snqdjm71Y5s')"></div>
<div class="slidershow--image" style="background-image: url('https://source.unsplash.com/5APj-fzKE-k')"></div>
<div class="slidershow--image" style="background-image: url('https://source.unsplash.com/wnbBH_CGOYQ')"></div>
<div class="slidershow--image" style="background-image: url('https://source.unsplash.com/OkTfw7fXLPk')"></div>
</div>
</body>
</html>
Step 2: focus! a key! a key!
Django framework defines a fixed template in the settings.py file, which is responsible for processing html files
BASE_DIR = Path(__file__).resolve().parent.parent
#BASE_DIR gets the root path of the project
TEMPLATES = [    #Templates, working with html folders
    {
        'BACKEND': 'django.template.backends.django.DjangoTemplates',
        #Please note that the path must use an absolute path, and the relative path will not be found
        'DIRS': [os.path.join(BASE_DIR,"html")],  #Location of the html folder
        'APP_DIRS': True,
        'OPTIONS': {
            'context_processors': [
                'django.template.context_processors.debug',
                'django.template.context_processors.request',
                'django.contrib.auth.context_processors.auth',
                'django.contrib.messages.context_processors.messages',
            ],
        },
    },
]
Step 3: find the html file and open it for reading
Define a function in the views.py file to be named the same as the function called in the urls.py file.
from django.shortcuts import render,HttpResponse

# Create your views here.

# For all functions in the views.py file, the parameter of the method must be request
# request means to receive the data returned by the viewer to the server
def view_login(request):

   return render(request,'login.html')
4: Routine of WEB Development
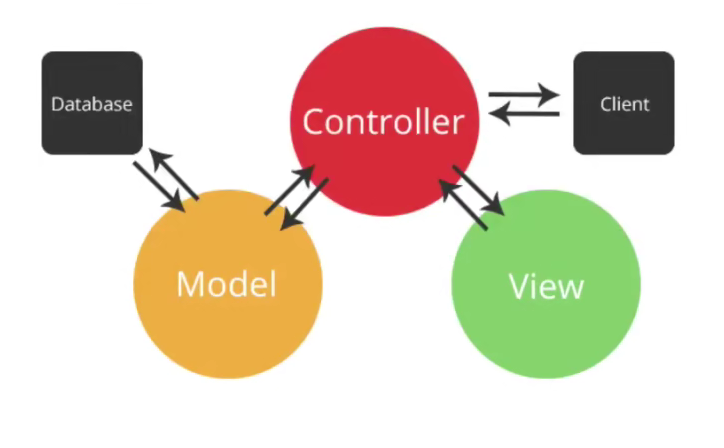
1.MVC
MVC is a pattern that uses MVC (Model View Controller) design to create web applications
- Model generally corresponds to database operation and record access
- View attempts to determine how this presents the data
- The Controller is responsible for handling the part of user interaction. The Controller is responsible for removing data from the attempt, controlling user input, and sending data to the model.
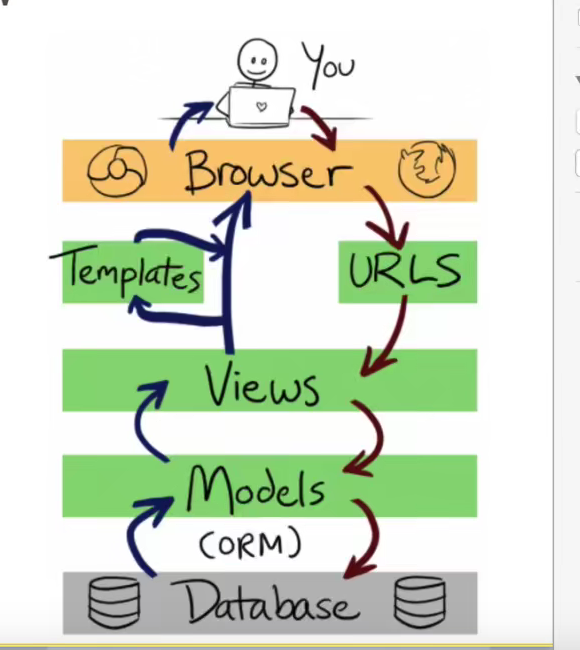
2.MTV
Django is an MTV framework, which does not look very different from the traditional MVC architecture.
Django further decomposes the view in MVC into Django attempt and Django template, and determines "what data to show" and "how to show" respectively. Yes, Django template can be replaced at any time as needed, not limited to the built-in template. As for MVC controller, it is implemented by URLconf of Django framework