So far, we have only processed images. We have established various image classification, detection and segmentation models. We can even generate new images (noise) out of thin air. But the image is still. There is no motion in the still image. Real happiness comes from exercise. That's how video works.
In fact, video is not much more complex than images. Video is actually a set of frames or images played continuously.
In order to get smooth video, we need to play a certain number of frames per second; Otherwise, the video looks disjointed. Most videos processed in our daily life exceed 30 frames per second. In this ratio, a 10 second short video is equivalent to 300 pictures. So many images complicate things.
Despite this complexity, we still have many applications for video processing. Some of these applications are closely related to the image processing applications we have learned. For example, in multi class image classification, we develop a multi classification model to classify images. Now we are dealing with video, and we may also be interested in video classification. Such an application is useful if you want to know what activity is happening in the video, not what objects appear in the image. In this chapter, we will use PyTorch to build a video classification model.
In this chapter, we will introduce the following tutorials:
- Custom dataset
- Define model
- Training model
- Deploy video classification model
Custom dataset
As usual, the first step is to create a dataset. We need a training dataset to train our model and a test or validation dataset to evaluate the model. For this purpose, we will use HMDB : a large human motion database.
HMDB datasets include movies, YouTube and Google Video. This is a fairly large data set (2 GB) with a total of 7000 video clips. There are 51 action classes, each containing at least 101 fragments.
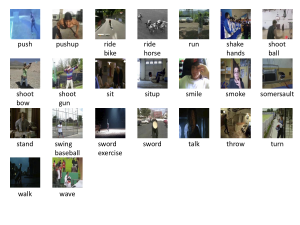
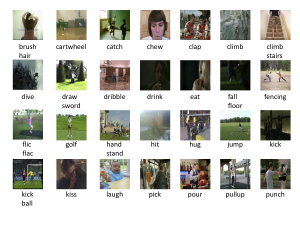
The 51 behaviors are described as follows:
In order to create a dataset for video classification, we will convert video into images. Each video has hundreds of images. It is computationally infeasible to process all frames of a video. For simplicity, we will select 16 frames in each video, which are equally spaced throughout the video. Then, we will define a PyTorch dataset class. Next, we will define PyTorch data loader for two types of deep learning models: recursive neural network (RNN) model and three-dimensional convolutional neural network (3D-CNN) model.
In this tutorial, you will download HMDB datasets, convert video clips to images, and define PyTorch datasets and data loader classes for video classification.
Dataset Download
In this section, we will download the HMDB dataset. The steps to download the database are as follows:
- visit link
- Click the Download menu
- Click HMDB51 to download the dataset.
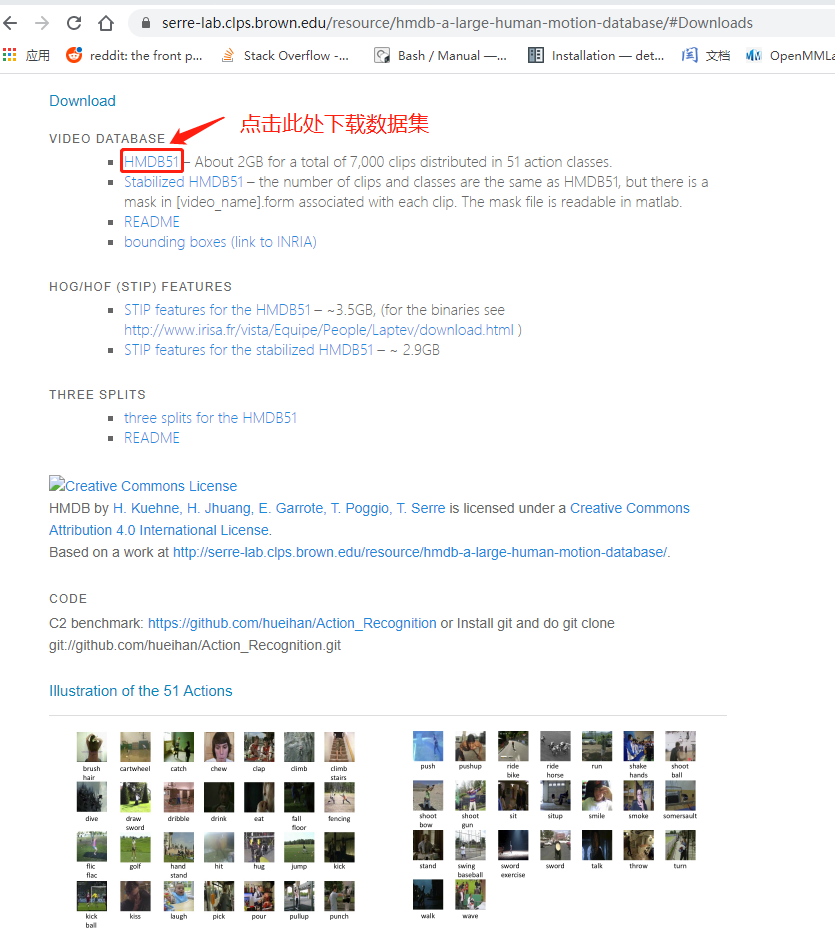
The downloaded file (hmdb51_org.rar) is Rar format compressed file. On Linux machines, you may need to install the unrar program on your computer to extract video. Windows users can use 7-Zip to extract rar files.
Next, hmdb51_org. Extract the rar file to hmdb51_org folder. The folder shall contain 51 subfolders corresponding to 51 categories. In addition, each subfolder should contain at least 101 avi type video file. Try playing a random video from a folder to familiarize yourself with these videos.
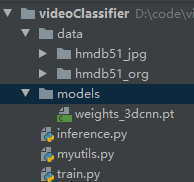
Then, create a folder named data in the same directory as the script and add hmdb51_ Copy the org folder to the data folder.
Entire project file directory:
In the next section, we will convert video into images, and then define data sets and data loader classes.
Data preparation
Let's read the videos and convert them into images. Each video may contain hundreds of images. To simplify, we will select 16 frames in each video, which are equally spaced in the middle of the whole video, and then divide them into jpg format storage.
Before data preparation, we write an auxiliary file myutils py
import os
import torch
import copy
from tqdm import tqdm_notebook
from torchvision.transforms.functional import to_pil_image
import matplotlib.pylab as plt
device=torch.device("cuda:0" if torch.cuda.is_available() else "cpu")
def get_vids(path2ajpgs):
	listOfCats=os.listdir(path2ajpgs)
	ids=[]
	labels=[]
	for catg in listOfCats:
		path2catg=os.path.join(path2ajpgs,catg)
		listOfSubCats=os.listdir(path2catg)
		path2subCats=[os.path.join(path2catg,los) for los in  listOfSubCats]
		ids.extend(path2subCats)
		labels.extend([catg]*len(listOfSubCats))
	return ids,labels,listOfCats

def denormalize(x_, mean, std):
	x = x_.clone()
	for i in range(3):
		x[i] = x[i]*std[i] + mean[i]
	x = to_pil_image(x)
	return x

def train_val(model, params):
	num_epochs=params["num_epochs"]
	loss_func=params["loss_func"]
	opt=params["optimizer"]
	train_dl=params["train_dl"]
	val_dl=params["val_dl"]
	sanity_check=params["sanity_check"]
	lr_scheduler=params["lr_scheduler"]
	path2weights=params["path2weights"]

	loss_history={"train":[],"val":[]}
	metric_history={"train":[],"val":[]}
	best_model_wts=copy.deepcopy(model.state_dict())
	best_loss=float("inf")
	for epoch in range(num_epochs):
		current_lr=get_lr(opt)
		print("Epoch {}/{}, current lr={}".format(epoch, num_epochs-1,current_lr))
		model.train()
		train_loss,train_metric=loss_epoch(model,loss_func,train_dl,sanity_check,opt)
		loss_history["train"].append(train_loss)
		metric_history["train"].append(train_metric)
		model.eval()
		with torch.no_grad():
			val_loss,val_metric=loss_epoch(model,loss_func,val_dl,sanity_check)
		if val_loss<best_loss:
			best_loss=val_loss
			best_model_wts=copy.deepcopy(model.state_dict())
			torch.save(model.state_dict(),path2weights)
			print("Copied best model weights")
		loss_history["val"].append(val_loss)
		metric_history["val"].append(val_metric)
		lr_scheduler.step(val_loss)
		if current_lr!=get_lr(opt):
			print("Loading best model weights")
			model.load_state_dict(best_model_wts)
		print("Train loss:%.6f, dev loss:%.6f, accuracy:%.2f" % (train_loss, val_loss, 100*val_metric))
		print("-"*10)
	model.load_state_dict(best_model_wts)
	return model, loss_history, metric_history

def get_lr(opt):
	for param_group in opt.param_groups:
		return param_group["lr"]

def metrics_batch(output, target):
	pred=output.argmax(dim=1,keepdim=True)
	corrects=pred.eq(target.view_as(pred)).sum().item()
	return corrects
def loss_batch(loss_func, output, target, opt=None):
	loss=loss_func(output, target)
	with torch.no_grad():
		metric_b=metrics_batch(output,target)
	if opt is not None:
		opt.zero_grad()
		loss.backward()
		opt.step()
	return loss.item(), metric_b
def loss_epoch(model, loss_func, dataset_dl, sanity_check=False,opt=None):
	running_loss=0.0
	running_metric=0.0
	len_data=len(dataset_dl.dataset)
	for xb,yb in dataset_dl:
		xb=xb.to(device)
		yb=yb.to(device)
		output=model(xb)
		loss_b,metric_b=loss_batch(loss_func,output,yb,opt)
		running_loss+=loss_b
		if metric_b is not None:
			running_metric+=metric_b
		if sanity_check is True:
			break
	loss=running_loss/float(len_data)
	metric=running_metric/float(len_data)
	return loss, metric
def plot_loss(loss_hist, metric_hist):
	num_epochs=len(loss_hist["train"])
	plt.title("Train-Val Loss")
	plt.plot(range(1,num_epochs+1),loss_hist["train"],label="train")
	plt.plot(range(1,num_epochs+1),loss_hist["val"],label="val")
	plt.ylabel("Loss")
	plt.xlabel("Training Epochs")
	plt.legend()
	plt.show()
	plt.title("Train-Val Accuracy")
	plt.plot(range(1,num_epochs+1),metric_hist["train"],label="train")
	plt.plot(range(1,num_epochs+1),metric_hist["val"],label="val")
	plt.ylabel("Accuracy")
	plt.xlabel("Training Epochs")
	plt.legend()
	plt.show()

from torch import nn
class Resnet18Rnn(nn.Module):
	def __init__(self,params_model):
		super(Resnet18Rnn,self).__init__()
		num_classes=params_model["num_classes"]
		dr_rate=params_model["dr_rate"]
		pretrained=params_model["pretrained"]
		rnn_hidden_size=params_model["rnn_hidden_size"]
		rnn_num_layers=params_model["rnn_num_layers"]
		baseModel=models.resnet18(pretrained=pretrained)
		num_features=baseModel.fc.in_features
		baseModel.fc=Identity()
		self.baseModel=baseModel
		self.dropout=nn.Dropout(dr_rate)
		self.rnn=nn.LSTM(num_features,rnn_hidden_size,rnn_num_layers)
		self.fc1=nn.Linear(rnn_hidden_size, num_classes)
	def forward(self,x):
		b_z,ts,c,h,w=x.shape
		ii=0
		y=self.baseModel((x[:,ii]))
		output,(hn,cn)=self.rnn(y.unsqueeze(1))
		for ii in range(1,ts):
			y=self.baseModel((x[:,ii]))
			out,(hn,cn)=self.rnn(y.unsqueeze(1),(hn,cn))
		out=self.dropout(out[:-1])
		out=self.fc1(out)
		return out
class Identity(nn.Module):
	def __init__(self):
		super(Identity,self).__init__()
	def forward(self,x):
		return x
from torchvision import models
from torch import nn
def get_model(num_classes, model_type="rnn"):
	if model_type=="rnn":
		params_model={
			"num_classes":num_classes,
			"dr_rate":0.1,
			"pretrained":True,
			"rnn_num_layers":1,
			"rnn_hidden_size":100,
			}
		model=Resnet18Rnn(params_model)
	else:
		model=models.video.r3d_18(pretrained=True,progress=False)
		num_features=model.fc.in_features
		model.fc=nn.Linear(num_features,num_classes)
	return model

import cv2
import numpy as np
def get_frames(filename,n_frames=1):
	frames=[]
	v_cap=cv2.VideoCapture(filename)
	v_len=int(v_cap.get(cv2.CAP_PROP_FRAME_COUNT))
	frame_list=np.linspace(0,v_len-1,n_frames+1,dtype=np.int16)
	for fn in range(v_len):
		success, frame=v_cap.read()
		if success is False:
			continue
		if (fn in frame_list):
			frame=cv2.cvtColor(frame, cv2.COLOR_BGR2RGB)
			frames.append(frame)
	v_cap.release()
	return frames,v_len

import torchvision.transforms as transforms
from PIL import Image
def transform_frames(frames, model_type="rnn"):
    if model_type == "rnn":
        h, w = 224, 224
        mean = [0.485, 0.456, 0.406]
        std = [0.229, 0.224, 0.225]
    else:
        h, w = 112, 112
        mean = [0.43216, 0.394666, 0.37645]
        std = [0.22803, 0.22145, 0.216989]
    test_transformer = transforms.Compose([
        transforms.Resize((h, w)),
        transforms.ToTensor(),
        transforms.Normalize(mean, std)])
    frames_tr = []
    for frame in frames:
        frame = Image.fromarray(frame)
        frame_tr = test_transformer(frame)
        frames_tr.append(frame_tr)
    imgs_tensor = torch.stack(frames_tr)
    if model_type == "3dcnn":
        imgs_tensor = torch.transpose(imgs_tensor, 1, 0)
    imgs_tensor = imgs_tensor.unsqueeze(0)
    return imgs_tensor

def store_frames(frames,path2store):
	for ii,frame in enumerate(frames):
		frame=cv2.cvtColor(frame,cv2.COLOR_RGB2BGR)
		path2img=os.path.join(path2store,"frame"+str(ii)+".jpg")
		cv2.imwrite(path2img, frame)
Start data preparation:
#1. Get the directory list of the dataset
import os
path2data="./data"
sub_folder="hmdb51_org"
sub_folder_jpg="hmdb51_jpg"
path2aCatgs=os.path.join(path2data,sub_folder)
listOfCategories=os.listdir(path2aCatgs)
print(listOfCategories,len(listOfCategories))
# ['brush_hair', 'cartwheel', ..., 'wave'] 51
#2. Get the number of sub files of each category
for cat in listOfCategories:
	print("category:",cat)
	path2aCat=os.path.join(path2aCatgs,cat)
	listOfSubs=os.listdir(path2aCat)
	print("number of sub-folders:",len(listOfSubs))
	print("-"*50)
# category: brush_hair
# number of sub-folders: 107
# --------------------------------------------------
# category: cartwheel
# number of sub-folders: 107
# --------------------------------------------------
# ...
#3. Import myutils py
import myutils
#4. Cycle through the video, acquire frames, and store them as jpg files:
extension=".avi"
n_frames=16
for root,dirs,files in os.walk(path2aCatgs,topdown=False):
	for name in files:
		if extension not in name:
			continue
		path2vid=os.path.join(root,name)
		frames,vlen=myutils.get_frames(path2vid,n_frames=n_frames)
		path2store=path2vid.replace(sub_folder,sub_folder_jpg)
		path2store=path2store.replace(extension,"")
		print(path2store)
		os.makedirs(path2store, exist_ok=True)
		myutils.store_frames(frames,path2store)
Split data
In the previous section preparing the data, we converted the video into an image. For each video, we extracted 16 frames. Here, we will divide the data set into training set and test set. myutils. The PY script contains some practical functions required:
#1. Define the data path and import myutils
import os
import imutils
path2data="./data"
sub_folder_jpg="hmdb51_jpg"
path2ajpgs=os.path.join(path2data, sub_folder_jpg)

#2. The frame of each video is stored in a folder with the same name as the video. Call get in myutils_ Vids helper function to obtain a list of video file names and labels:
all_vids, all_labels, catgs=myutils.get_vids(path2ajpgs)
print(len(all_vids), len(all_labels), len(catgs))
# (6766, 6766, 51)
print(all_vids[:3], all_labels[:3],catgs[:3])
# ['./data\\hmdb51_jpg\\brush_hair\\April_09_brush_hair_u_nm_np1_ba_goo_0',
# './data\\hmdb51_jpg\\brush_hair\\April_09_brush_hair_u_nm_np1_ba_goo_1',
# './data\\hmdb51_jpg\\brush_hair\\April_09_brush_hair_u_nm_np1_ba_goo_2']
# ['brush_hair', 'brush_hair', 'brush_hair'] ['brush_hair', 'cartwheel', 'catch']

#3. Define a Python dictionary to store the value of the label
labels_dict={}
ind=0
for uc in catgs:
	labels_dict[uc]=ind
	ind+=1
print(labels_dict)
# {'brush_hair': 0, 'cartwheel': 1, 'catch': 2,..., 'walk': 49, 'wave': 50}
#4. We can see that there are 51 categories in total. To simplify this problem, we will select five action classes and filter the video:
num_classes=5
unique_ids=[id_ for id_, label in zip(all_vids,all_labels) if labels_dict[label]<num_classes]
unique_labels=[label for id_,label in zip(all_vids,all_labels) if labels_dict[label]<num_classes]
print(len(unique_ids),len(unique_labels))
# 555 555
#5. Divide the data set into training data set and test data set
from sklearn.model_selection import StratifiedShuffleSplit
sss=StratifiedShuffleSplit(n_splits=2,test_size=0.1,random_state=0)
train_indx,test_indx=next(sss.split(unique_ids,unique_labels))
train_ids=[unique_ids[ind] for ind in train_indx]
train_labels=[unique_labels[ind] for ind in train_indx]
print(len(train_ids),len(train_labels))

test_ids=[unique_ids[ind] for ind in test_indx]
test_labels=[unique_labels[ind] for ind in test_indx]
print(len(test_ids), len(test_labels))
# 499 499
# 56 56
In the next section, we will define a PyTorch dataset class and instantiate two objects for the training and test datasets.
Define PyTorch dataset
In the previous data segmentation section, we divided the data into training set and test set. Here, we will define a PyTorch dataset class. Then, we will instantiate two objects of the class for the training and test data sets:
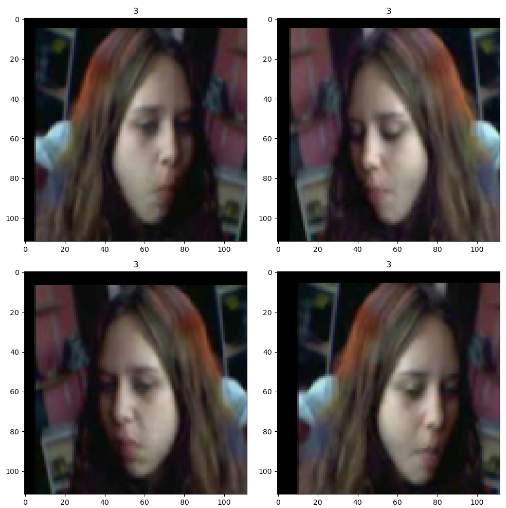
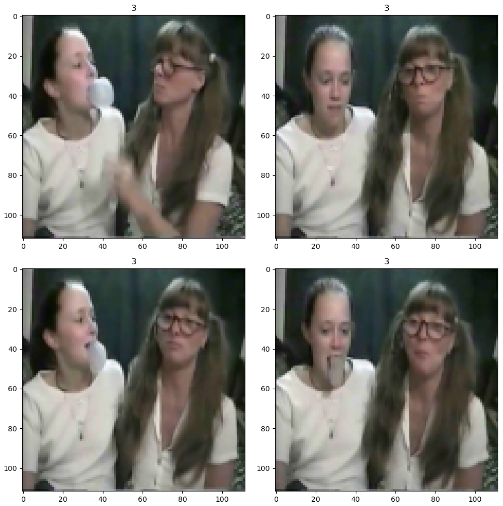
#1. Import the required package
from torch.utils.data import Dataset, DataLoader, Subset
import glob
from PIL import Image
import torch
import numpy as np
import random
np.random.seed(2021)
random.seed(2021)
torch.manual_seed(2021)

#2. Define dataset class
class VideoDataset(Dataset):
	def __init__(self,ids,labels,transform):
		self.transform=transform
		self.ids=ids
		self.labels=labels
	def __len__(self):
		return len(self.ids)
	def __getitem__(self,idx):
		path2imgs=glob.glob(self.ids[idx]+"/*.jpg")
		path2imgs=path2imgs[:timesteps]
		label=labels_dict[self.labels[idx]]
		frames=[]
		for p2i in path2imgs:
			frame=Image.open(p2i)
			frames.append(frame)
		seed=np.random.randint(1e9)
		frames_tr=[]
		for frame in frames:
			random.seed(seed)
			np.random.seed(seed)
			frame=self.transform(frame)
			frames_tr.append(frame)
		if len(frames_tr)>0:
			frames_tr=torch.stack(frames_tr)
		return frames_tr, label
#3. Define transformation parameters
model_type="3dcnn"
# model_type="rnn"  # either-or
timesteps=16
if model_type=="rnn":
	h,w=224,224
	mean=[0.485,0.456,0.406]
	std=[0.229,0.224,0.225]
else:
	h,w=112,112
	mean=[0.43216,0.394666,0.37645]
	std=[0.22803,0.22145,0.216989]

#4. Define the transformation function for the training set
import torchvision.transforms as transforms
train_transformer=transforms.Compose([
					transforms.Resize((h,w)),
					transforms.RandomHorizontalFlip(p=0.5),
					transforms.RandomAffine(degrees=0, translate=(0.1,0.1)),
					transforms.ToTensor(),
					transforms.Normalize(mean,std),
					])
#5. Instantiate dataset class
train_ds=VideoDataset(ids=train_ids,labels=train_labels,transform=train_transformer)
print(len(train_ds))
# 499
#6. Get train_ A data in DS
imgs,label=train_ds[1]
if len(imgs)>0:
	print(imgs.shape,label,torch.min(imgs),torch.max(imgs))
# torch.Size([16, 3, 112, 112]) 3 tensor(-1.8952) tensor(2.8194)

#7. Display some frame data
import matplotlib.pylab as plt
plt.figure(figsize=(10,10))
for ii,img in enumerate(imgs[::4]):
	plt.subplot(2,2,ii+1)
	plt.imshow(myutils.denormalize(img,mean,std))
	plt.title(label)
plt.show()
#8. Define the transformation function for the test set
test_transformer=transforms.Compose([
				transforms.Resize((h,w)),
				transforms.ToTensor(),
				transforms.Normalize(mean,std),
				])
#9. Instantiate the dataset class test_ds
test_ds=VideoDataset(ids=test_ids,labels=test_labels,transform=test_transformer)
print(len(test_ds))
# 56
#10. Get test_ A data in DS
imgs,label=test_ds[1]
print(imgs.shape,label,torch.min(imgs),torch.max(imgs))
# torch.Size([16, 3, 112, 112]) 3 tensor(-1.8952) tensor(2.8736)
#11. Display test_ds some frame data
import matplotlib.pylab as plt
plt.figure(figsize=(10,10))
for ii,img in enumerate(imgs[::4]):
	plt.subplot(2,2,ii+1)
	plt.imshow(myutils.denormalize(img,mean,std))
	plt.title(label)
plt.show()
Define dataset loader
As you know, we extract the small batch data training model from the data loader. According to the model type, we will define two data loader instance objects:
# Scheduled to collapse_ fn_ 3dcnn auxiliary function
def collate_fn_3dcnn(batch):
	imgs_batch,label_batch=list(zip(*batch))
	imgs_batch=[imgs for imgs in imgs_batch if len(imgs)>0]
	label_batch=[torch.tensor(l) for l,imgs in zip(label_batch,imgs_batch) if len(imgs)>0]
	imgs_tensor=torch.stack(imgs_batch)
	imgs_tensor=torch.transpose(imgs_tensor,2,1)
	labels_tensor=torch.stack(label_batch)
	return imgs_tensor,labels_tensor

# Define collate_fn_rnn auxiliary function
def collate_fn_rnn(batch):
	imgs_batch,label_batch=list(zip(*batch))
	imgs_batch=[imgs for imgs in imgs_batch if len(imgs)>0]
	label_batch=[torch.tensor(l) for l, imgs in zip(label_batch,imgs_batch) if len(imgs)>0]
	imgs_tensor=torch.stack(imgs_batch)
	labels_tensor=torch.stack(label_batch)
	return imgs_tensor,labels_tensor


#1. Define data loader
batch_size=16
if model_type=="rnn":
	train_dl=DataLoader(train_ds, batch_size=batch_size,shuffle=True,collate_fn=collate_fn_rnn)
	test_dl=DataLoader(test_ds,batch_size=2*batch_size,shuffle=False,collate_fn=collate_fn_rnn)
else:
	train_dl=DataLoader(train_ds, batch_size=batch_size,shuffle=True,collate_fn=collate_fn_3dcnn)
	test_dl=DataLoader(test_ds,batch_size=2*batch_size,shuffle=False,collate_fn=collate_fn_3dcnn)

#2. Now, set the model type to "3dcnn" and start from train_dl get a small batch of data:
for xb,yb in train_dl:
	print(xb.shape, yb.shape)
	break
# torch.Size([16, 3, 16, 112, 112]) torch.Size([16])
# Repeat the previous steps, but this time use the model_type is set to "rnn". You will see the following output:
# torch.Size([16, 16, 3, 224, 224]) torch.Size([16])
Code parsing:
In the prepare data section, we convert video to images. Because loading video is a time-consuming process, we completed this step in advance. Loading images is much faster than loading videos. In step 1, we get a list of action categories (tag list). As expected, there are 51 action categories (tag categories). In step 2, we get the number of videos in each action category. Not surprisingly, there are more than 100 videos per action category.
In step 3, we imported myutils. This program file contains some auxiliary functions required. To save space, we put some auxiliary functions in myutils Py file. After importing, we use the defined helper function. get_ The frames helper function loads the video from the file name and returns the specified number of frames. store_ The frames helper function takes frames and stores them in a given path. We need to pay attention here. The OpenCV package loads images in BGR format, so we are in get_ CV2 is used in frames auxiliary function Cvtcolor (frame, cv2.color_bgr2rgb) converts an image to RGB. OpenCV uses BGR format when saving images, so we are in store_ CV2 is used in frames auxiliary function Cvtcolor (frame, cv2.color_rgb2bgr) converts images to BGR format.
In step 4, we iterate through the video, obtain 16 frames for each video, and store them as jpg images.
In the data segmentation section, we get the list of video file names and divide them into training set and test set. In step 1, we imported myutils. Let's assume that you have completed the previous steps, and the required image is now stored in hmdb51_jpg folder. In step 2, we call get_vids helper function. Using this helper function, we get a list of video file names. As you may remember, we extracted 16 frames for each video. For each video, the 16 frames are stored in a folder with the same name as the video file name. As we can see, there are 6766 videos and tags. Each video has a text label corresponding to the action (label) of the video. In addition, all is printed_ Vid and all_ Excerpt from the labels list.
In step 3, we defined a Python dictionary to store tags. Because the label is in text format, and for subsequent operations, we need a number to replace the label in text format, so we arbitrarily assign a number to each class. In step 4, in order to simplify the problem, we selected 5 classes from a total of 51 classes. You can increase or decrease the number of classes. As we can see, when we filter videos into five categories, there are 555 videos. This reduces the data size and complexity of the problem. In step 5, we use the structured shufflesplit function in sklearn to decompose the data into training sets and test sets. We set aside 10% for the test. As we can see, after splitting, 499 videos were in the training dataset and 56 videos were in the test dataset.
In the define dataset section, we created a dataset class. In step 1, we imported all the necessary packages and set random seed points for reproducibility. In step 2, we defined the dataset class, VideoDataset. This class has three methods or functions.
_ init__ The inputs to the function are as follows:
- ids: video file name list
- Labels: list of category labels corresponding to ids
- Transform: image transform function
__ getitem__ The inputs to the function are as follows:
- idx: path to the video folder containing 16 jpg images
In this function, we get A list of jpg images, and then load them as PIL images. Then, we transform each image. Note that we want to perform the same type of conversion for all 16 frames of the video. Therefore, we set random seed points every time the transformation is called. This will ensure that all 16 images will undergo the same conversion.
In step 3, we define some parameters required for image conversion. These include h, w for resizing images and mean, std for standardizing images. Note that the parameter settings are different according to different models. You can select 3dcnn or rnn as the model type. Later, we will explain it in detail in the tutorial of defining the model. For the model type "rnn", we adjust the image size to 224 by 224, while for the "3dcnn" model, we adjust the image size to 112 * 112. The reason we do this is that different models have different training configurations.
In step 4, we define the image transformation. Note that in addition to image resizing and normalization, we also use two data enhancement conversion functions: RandomHorizontalFlip and RandomAffine. In step 5, we instantiate an object of the VideoDataset class, train_ds. As expected, there were 555 videos in the training dataset. In step 6, we start from train_ A sample was obtained in DS. This is an exploratory step to ensure that the return tensor format is correct. The returned tensor shape is [timesteps, 3, h, w], where timesteps=16, h and W depend on the model_type.
In step 7, we show some sample frames from the returned tensor. In step 8, we defined the transformation function for the test data set. Here, we do not need to perform data expansion. In step 9, we instantiate the object of the VideoDataset class as test_ds. As expected, the test data set contains 56 videos. In step 10, we start with test_ Obtain a sample from DS. In step 11, we show some sample tensor frames.
In the next section, we will define the model.
Define model
Compared with image classification, video classification is more complex because we need to process multiple images at the same time. You can recall from "binary image classification" and "multi class image classification", we used a two-dimensional convolutional neural network (2D-CNN) Model of. A simple method is to use 2D-CNN model to process one video image at a time, and then average the output. However, this method does not consider the time correlation between frames. Instead, we tend to use a model to process multiple frames of a video to extract temporal correlation. To this end, we will use two different models for video classification tasks.
The first model is based on RNN architecture. The goal of RNN model is to extract the temporal correlation between images by preserving the memory of past images. The model block diagram is as follows:
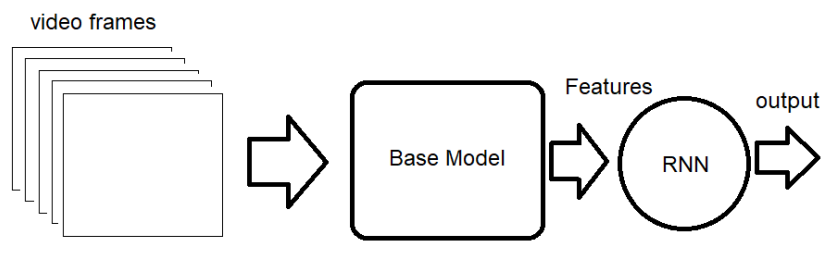
As we can see, video images are input into a basic model to extract high-level features. Then the feature is input to the RNN layer, and the output of the RNN layer is connected to the fully connected layer to obtain the classification output. The input of this model should be the shape of [batch_size, timesteps, 3, height, width], where timesteps=16 is the number of frames per video. We will use a model called ResNet18 pre trained on the ImageNet dataset as the basic model.
The second model is an 18 layer Resnet3D model . Let's call this model 3dcnn. The input of this model should be [batch_size, 3, timesteps, height, width]. This model is built into torchvision models. In the video package. In this tutorial, you will learn how to define two models for video classification.
# Define two models for video classification
#1. Define Resnet8Rnn:
from torch import nn
class Resnet18Rnn(nn.Module):
	def __init__(self,params_model):
		super(Resnet18Rnn,self).__init__()
		num_classes=params_model["num_classes"]
		dr_rate=params_model["dr_rate"]
		pretrained=params_model["pretrained"]
		rnn_hidden_size=params_model["rnn_hidden_size"]
		rnn_num_layers=params_model["rnn_num_layers"]
		baseModel=models.resnet18(pretrained=pretrained)
		num_features=baseModel.fc.in_features
		baseModel.fc=Identity()
		self.baseModel=baseModel
		self.dropout=nn.Dropout(dr_rate)
		self.rnn=nn.LSTM(num_features,rnn_hidden_size,rnn_num_layers)
		self.fc1=nn.Linear(rnn_hidden_size, num_classes)
	def forward(self,x):
		b_z,ts,c,h,w=x.shape
		ii=0
		y=self.baseModel((x[:,ii]))
		output,(hn,cn)=self.rnn(y.unsqueeze(1))
		for ii in range(1,ts):
			y=self.baseModel((x[:,ii]))
			out,(hn,cn)=self.rnn(y.unsqueeze(1),(hn,cn))
		out=self.dropout(out[:-1])
		out=self.fc1(out)
		return out
class Identity(nn.Module):
	def __init__(self):
		super(Identity,self).__init__()
	def forward(self,x):
		return x
#2. Use conditional statements to define any model
from torchvision import models
from torch import nn

if model_type=="rnn":
	params_model={
		"num_classes":num_classes,
		"dr_rate":0.1,
		"pretrained":True,
		"rnn_num_layers":1,
		"rnn_hidden_size":100,
		}
	model=Resnet18Rnn(params_model)
else:
	model=models.video.r3d_18(pretrained=True,progress=False)
	num_features=model.fc.in_features
	model.fc=nn.Linear(num_features,num_classes)
return model
#3. Use some virtual input to test the model
with torch.no_grad():
	if model_type=="rnn":
		x=torch.zeros(1,16,3,h,w)
	else:
		x=torch.zeros(1,3,16,h,w)
	y=model(x)
	print(y.shape)
# torch.Size([1,5])
#4. Move the model to the GPU device
device=torch.device("cuda:0" if torch.cuda.is_available() else "cpu")
model=model.to(device)
#5. Print model
print(model)
# According to model_type, the corresponding model will be printed. The following is the result of printing 3dcnn model:
# VideoResNet(
# (stem): BasicStem(
# (0): Conv3d(3, 64, kernel_size=(3, 7, 7), stride=(1, 2, 2), padding=(1, 3, 3), bias=False)
# (1): BatchNorm3d(64, eps=1e-05, momentum=0.1, affine=True, track_running_stats=True)
# (2): ReLU(inplace=True)
# )
# ...
# The printing results of rnn model are as follows:
# Resnt18Rnn(
# (baseModel): ResNet(
# (conv1): Conv2d(3, 64, kernel_size=(7, 7), stride=(2, 2), padding=(3, 3), bias=False)
# (bn1): BatchNorm2d(64, eps=1e-05, momentum=0.1, affine=True, track_running_stats=True)
# (relu): ReLU(inplace=True)
# (maxpool): MaxPool2d(kernel_size=3, stride=2, padding=1, dilation=1, ceil_mode=False)
# ...
Code parsing:
In step 1, we define the RNN model class, resnet18rnn. We use the Resnet18 model pre trained on the ImageNet dataset as the feature extractor. Then the extracted features are input into RNN layer to extract time correlation. The output of RNN layer is input to the fully connected layer to obtain the classified output. In step 2, we use the if condition to select one of the models. If model_ If the type is set to "RNN", the RNN model is instantiated using the resnet18rnn class; If model_ If the type is set to "3dcnn", the built-in model of PyTorch is used.
In step 3, we tested the defined model to ensure that everything was correct. We pass some virtual inputs to the model and get the desired output. Use this step to debug your model before proceeding to the next step. In step 4, we define a CUDA device and move the model to the CUDA device. In step 5, we printed the model. According to model_ If the type is different, the corresponding model will be printed.
Next, we will train the model
Training model
So far, we have defined datasets, data loaders, and models. You may notice that this process is similar to image classification, except for some changes in data format and model. It is not surprising that we can also use the same loss function and optimizer defined in multi class image classification. In addition, for the training process, we will use the same random gradient descent algorithm. To avoid repetition, we put most of the training scripts in myutils Py file.
Here, you will learn how to train the video classification model.
# 1. Define loss function, optimizer and learning rate plan:
from torch import optim
from torch.optim.lr_scheduler import CosineAnnelingLR, ReduceLROnPlateau
loss_func=nn.CrossEntropyLoss(reduction="sum")
opt=optim.Adam(model.parameters(),lr=3e-5)
# The change of LR in cosine annealing learning rate is periodic, T_max is 1 / 2 of the period; eta_min(float) represents the minimum learning rate, which is 0 by default;
# last_epoch(int) represents the number of previous epoch, which is used to indicate whether the learning rate needs to be adjusted. When last_ When the epoch meets the set interval,
# The learning rate will be adjusted. When - 1, the learning rate is set to the initial value.
# lr_scheduler = CosineAnnealingLR(opt, T_max=20, verbose=True)
lr_scheduler=ReduceLROnPlateau(opt,mode="min",factor=0.5,patience=5,verbose=1)
os.makedirs("./models",exist_ok=True)
#2. Call train in myutils_ Val auxiliary function training model
params_train={
	"num_epochs":20,
	"optimizer":opt,
	"loss_func":loss_func,
	"train_dl":train_dl,
	"val_dl":test_dl,
	"sanity_check":True,
	"lr_scheduler":lr_scheduler,
	"path2weights":"./models/weights_"+model_type+".pt",
}
model,loss_hist,metric_hist=myutils.train_val(model,params_train)
# After running the previous code snippet, the training will begin, and you should see its progress on the screen.
#3. After the training, draw the training progress
myutils.plot_loss(loss_hist, metric_hist)
# The previous clip will show a graph of loss and accuracy.
Once you have finished training the model, you can redo these steps to train other models. You can use model in the create dataset and define data loader sections_ Change the type to "rnn" or "3dcnn" and perform all the steps.
Code parsing:
In step 1, we defined the loss function, optimizer and learning rate plan. We use the same definition as multi class image classification. Please refer to that chapter for details.
In step 2, we call train in myutils_ Val auxiliary function. This function is described in detail in multi class image classification.
In step 3, we call the auxiliary function defined in myutils to draw the training progress.
Deploy video classification model
We have trained two different models. Now it's time to deploy the model in the video. To avoid duplication, we put the required functions in myutils Py file. To deploy the model in a separate script of the training script, we need to instantiate an object of the model class. You can call myutils Get defined in py file_ Model function to achieve this. Then, we load the trained weights into the model.
In this tutorial, you will learn how to deploy our video classification model.
# Let's instantiate an object of the model, load the pre trained weights into the model, and deploy the model into a video:
#1. Load model
import myutils
model_type="rnn"
model=myutils.get_model(model_type=model_type, num_classes=5)
model.eval()
# In the previous code snippet, you can use model_ Set type to "3dcnn" to load the second model.
#2. Import weight
import torch
device=torch.device("cuda:0" if torch.cuda.is_available() else "cpu")
path2weights="./models/weights_"+model_type+".pt"
model.load_state_dict(torch.load(path2weights))
model.to(device)
#3. Get frame data from video
path2video="./data/hmdb51_org/brush_hair/April_09_brush_hair_u_nm_np1_ba_goo_0.avi"
frames,v_len=myutils.get_frames(path2video, n_frames=16)
print(len(frames), vlen)
# (16, 409)
#4. Use the auxiliary function defined in myutils to convert the frame into tensor
imgs_tensor=myutils.transform_frames(frames, model_type)
print(imgs_tensor.shape, torch.min(imgs_tensor),torch.max(imgs_tensor))
# torch.Size([1, 16, 3, 224, 224]) tensor(-2.1179) tensor(2.6400)
#5. Obtain model prediction results
with torch.no_grad():
	out=model(imgs_tensor.to(device)).cpu()
	print(out.shape)
	pred=torch.argmax(out).item()
	print(pred)
# torch.Size([1,5])
# 3
Code parsing:
In step 1, we call myutils Get defined in py file_ Model helper function to instantiate a model object. The inputs to the model are as follows:
- model_type: "rnn" or "3dcnn"
- num_classes: number of categories, here is 5
In step 2, we load the pre trained weights into the model. In step 3, we call myutils Get defined in py file_ Frames auxiliary function to obtain 16 frames of video. In step 4, we show some sample images.
In step 5, we call myutils Transform defined in py file_ Frames function, which converts frames into PyTorch tensors. These transformations are the same as those defined in the creating datasets tutorial in the defining PyTorch datasets section. In step 6, we pass the tensor to the model and get its output.