1, Image augmentation
Definition & Interpretation:
- By making a series of random changes to the training image, similar but different training samples are generated, so as to expand the scale of the training data set.
- Randomly changing the training samples can reduce the dependence of the model on some attributes, so as to improve the generalization ability of the model
2, Common image augmentation methods
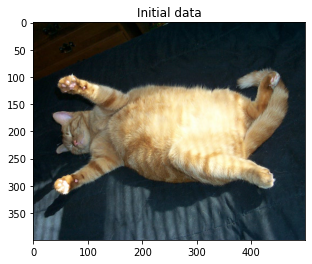
Use the following 400x500 image as an example
%matplotlib inline
import matplotlib.pyplot as plt
import numpy as np
import torch
import torchvision
from d2l import torch as d2l
from torch import nn
from PIL import Image
img = Image.open('./data/cat_dog/cat1.jpg')
plt.figure("cat")
plt.title('Initial data')
plt.imshow(img)
plt.show()
Most image augmentation methods have certain randomness. In order to observe the effect of image enlargement, we define the auxiliary function apply below. This function runs the image augmentation method aug multiple times on the input image img and displays all the results.
def apply(img,aug,num_rows=2,num_cols=4,scale=1.5):
    Y = [aug(img) for _ in range(num_rows*num_cols)]
    d2l.show_images(Y,num_rows,num_cols,scale=scale)
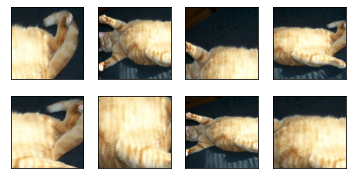
1. Turning and cutting
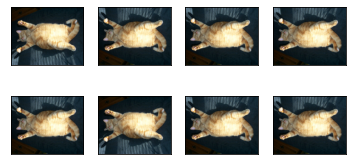
- Flipping images left and right usually does not change the category of objects. This is one of the earliest and most widely used image augmentation methods.
- Flipping images up and down is not as common as flipping left and right images. However, at least for this example image, flipping up and down does not hinder recognition.
- Random reduction] in the example image we used, the cat is in the middle of the image, but not all images are like this. The pooling layer can reduce the sensitivity of the convolution layer to the target position. In addition, we can crop the image randomly to make the object appear in different positions of the image in different proportions. This can also reduce the sensitivity of the model to the target location.
# Flip left and right
apply(img,torchvision.transforms.RandomHorizontalFlip())
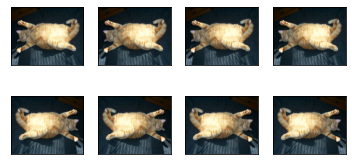
# upside down
apply(img,torchvision.transforms.RandomVerticalFlip())
# Random reduction
shape_aug = torchvision.transforms.RandomResizedCrop(
(200,200),scale=(0.1,1),ratio=(0.5,2),
# (200200) is the size of the picture, scale means randomly cut to the original scale, and ratio is the aspect ratio
)
apply(img,shape_aug)
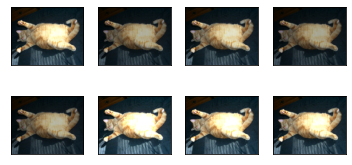
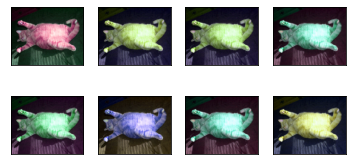
2. Color change
Another augmentation method is to change the color.
We can change four aspects of image color:
- brightness
- contrast ratio
- saturation
- tone
# brightness
apply(img,
      torchvision.transforms.ColorJitter(brightness=0.5,contrast=0,
                                         saturation=0,hue=0))
# contrast ratio
apply(img,
      torchvision.transforms.ColorJitter(brightness=0,contrast=0.5,
                                         saturation=0,hue=0))
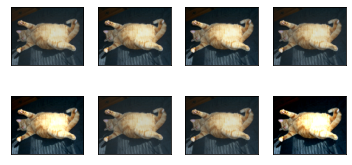
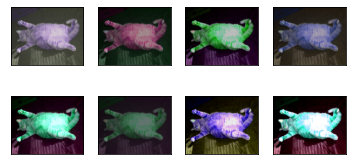
# saturation
apply(img,
      torchvision.transforms.ColorJitter(brightness=0,contrast=0,
                                         saturation=0.5,hue=0))
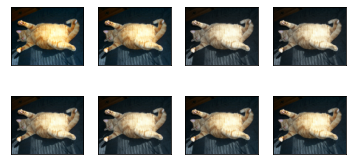
# tone
apply(img,
      torchvision.transforms.ColorJitter(brightness=0,contrast=0,
                                         saturation=0,hue=0.5))
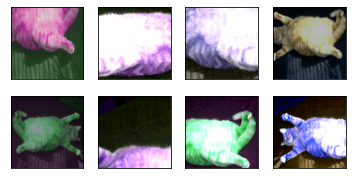
# Mixed use
apply(img,
      torchvision.transforms.ColorJitter(brightness=0.5,contrast=0.5,
                                         saturation=0.5,hue=0.5))
3. Multiple data augmentation methods are used for superposition
augs = torchvision.transforms.Compose(
    [torchvision.transforms.RandomHorizontalFlip(),
     torchvision.transforms.ColorJitter(brightness=0.5,contrast=0.5,saturation=0.5,hue=0.5),
     torchvision.transforms.RandomResizedCrop((200, 200), scale=(0.1, 1), ratio=(0.5, 2))
    ]
)
apply(img,augs)
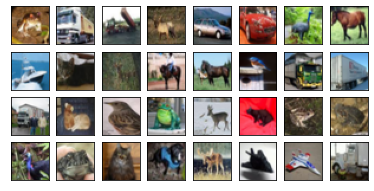
3, Training with image augmentation
# Download CIFA10 dataset test
all_images = torchvision.datasets.CIFAR10(
    train=True,root="./data/",download=True
)
d2l.show_images([all_images[i][0] for i in range(32)] , 4,8,scale=0.8)
# The application is simple to flip left and right, up and down
# The format of the generated data is (batch size, number of channels, height, width)
train_augs = torchvision.transforms.Compose(
[torchvision.transforms.RandomHorizontalFlip(),
#  torchvision.transforms.RandomVerticalFlip(),
 torchvision.transforms.ToTensor()]
)

test_augs = torchvision.transforms.Compose([
# torchvision.transforms.RandomHorizontalFlip(),
#  torchvision.transforms.RandomVerticalFlip(),
 torchvision.transforms.ToTensor()
]
)
# Load data
def load_cifar10(is_train,augs,batch_size):
    dataset = torchvision.datasets.CIFAR10(root="./data/",train=is_train,
                                           transform=augs,download=True)
    dataLoader = torch.utils.data.DataLoader(
        dataset,batch_size=batch_size,shuffle=is_train,num_workers=d2l.get_dataloader_workers()
    )
    return dataLoader
# Multi GPU training and evaluation
def train_batch(net, X, y, loss, trainer, devices):
    if isinstance(X, list):
        # Fine tuning required in BERT (discussed later)
        X = [x.to(devices[0]) for x in X]
    else:
        X = X.to(devices[0])
    y = y.to(devices[0])
    net.train()
    trainer.zero_grad()
    pred = net(X)
    l = loss(pred, y)
    l.sum().backward()
    trainer.step()
    train_loss_sum = l.sum()
    train_acc_sum = d2l.accuracy(pred, y)
    return train_loss_sum, train_acc_sum
def train(net, train_iter, test_iter, loss, trainer, num_epochs,
               devices=d2l.try_all_gpus()):
    timer, num_batches = d2l.Timer(), len(train_iter)
    animator = d2l.Animator(xlabel='epoch', xlim=[1, num_epochs], ylim=[0, 1],
                            legend=['train loss', 'train acc', 'test acc'])
    net = nn.DataParallel(net, device_ids=devices).to(devices[0]) # Multi GPU operation
    for epoch in range(num_epochs):
        # Four dimensions: storage training loss, training accuracy, number of instances and number of features
        metric = d2l.Accumulator(4)
        for i, (features, labels) in enumerate(train_iter):
            timer.start()
            l, acc = train_batch(net, features, labels, loss, trainer,
                                      devices)
            metric.add(l, acc, labels.shape[0], labels.numel())
            timer.stop()
            if (i + 1) % (num_batches // 5) == 0 or i == num_batches - 1:
                animator.add(
                    epoch + (i + 1) / num_batches,
                    (metric[0] / metric[2], metric[1] / metric[3], None))
        test_acc = d2l.evaluate_accuracy_gpu(net, test_iter)
        animator.add(epoch + 1, (None, None, test_acc))
    print(f'loss {metric[0] / metric[2]:.3f}, train acc '
          f'{metric[1] / metric[3]:.3f}, test acc {test_acc:.3f}')
    print(f'{metric[2] * num_epochs / timer.sum():.1f} examples/sec on '
          f'{str(devices)}')
#Using the enhanced data to train the model;
# Obtain all GPU s and use Adam as the optimization algorithm
batch_size, devices, net = 256, d2l.try_all_gpus(), d2l.resnet18(10, 3)

# Model initialization
def init_weights(m):
    if type(m) in [nn.Linear, nn.Conv2d]:
        nn.init.xavier_uniform_(m.weight)

net.apply(init_weights)

def train_with_data_aug(train_augs, test_augs, net, lr=0.001):
    train_iter = load_cifar10(True, train_augs, batch_size)
    test_iter = load_cifar10(False, test_augs, batch_size)
    loss = nn.CrossEntropyLoss(reduction="none")
    trainer = torch.optim.Adam(net.parameters(), lr=lr)
    train(net, train_iter, test_iter, loss, trainer, 10, devices)
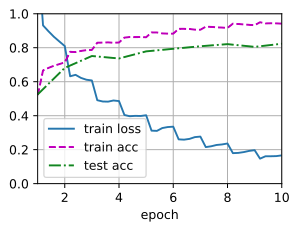
# Data augmentation (flip left and right)
train_with_data_aug(train_augs, test_augs, net)
loss 0.166, train acc 0.942, test acc 0.823
453.4 examples/sec on [device(type='cuda', index=0)]
# No data augmentation
batch_size, devices, net = 256, d2l.try_all_gpus(), d2l.resnet18(10, 3)
def init_weights(m):
    if type(m) in [nn.Linear, nn.Conv2d]:
        nn.init.xavier_uniform_(m.weight)

net.apply(init_weights)
train_with_data_aug(test_augs, test_augs, net)
loss 0.070, train acc 0.975, test acc 0.797
455.5 examples/sec on [device(type='cuda', index=0)]

Comparison of results:
- Using image enhancement, although it is only a simple left-right flip, the prediction accuracy of our model is improved by 3%
- The over fitting of the model has a certain mitigation.
4, Summary
- Image augmentation generates random images based on the existing training data to improve the generalization ability of the model.
- In order to get the exact results in the prediction process, we usually only perform image augmentation on the training samples, and do not use random image augmentation in the prediction process. (training yes, prediction no)
- Deep learning framework provides many different image augmentation methods, which can be applied at the same time. (multiple enhancements are used together)
- Collection of image enhancement methods (these sorting should be enough. If you have any special needs, you can leave a message for discussion):
(1) I know that some authors have summarized 15 enhancement methods and codes written by themselves:
https://zhuanlan.zhihu.com/p/158854758- Flip
- Cutting
- Filtering and sharpening
- vague
- Rotate, translate, cut, scale
- Cut
- color
- brightness
- contrast
- Uniform and Gaussian noise
- Gradient lens deformation
(2) Find some mature code with high star on github:
For example: imgaug https://github.com/aleju/imgaug
(3)augmentor https://github.com/mdbloice/Augmentor