0. Preface
Last article This paper introduces how to derive its own Model class from QAbstractItemModel to realize the data display and editing functions on QTableView. There are some operations related to QTableView. There is no detailed description. This article will talk about the use of QTableView while the iron is hot.
The title of this article contains the word "elegant" because after learning the official documents and before writing this article, I checked the introduction of QTableView in the existing blog and found that most tutorials use QStandardItemModel and QStandardItem to interact with QTableView. I personally think this approach is not elegant (whisper bb) 👻).
We are This article In, QStandardItemModel is mentioned when talking about the relevant Model classes. It provides a Model class that uses controls. The QStandardItem class used is the controls it supports. It's Model, but not completely Model. So why not use the control based QTableWidget directly?
The author believes that QTableView is already a fully encapsulated class. If the Model/View framework is used, it is basically unnecessary to derive its own View class from QTableView except for a few special needs.
In addition, although this article introduces QTableView, the more critical code may still be on the side of the Model class.
If you want to see the source code directly, you can jump to here.
Review of the series:
Qt Model/View learning (1) - what and why?
Qt Model/View learning (2) - QModelIndex index model data
Qt Model/View learning (3) - index a bunch of things. Who is the ItemDataRole?
Qt Model/View learning (4) - implement your own QAbstractTableModel class (support display and modification)
1. View family
Let's start with a UML class diagram to see the family origin of QTableView:
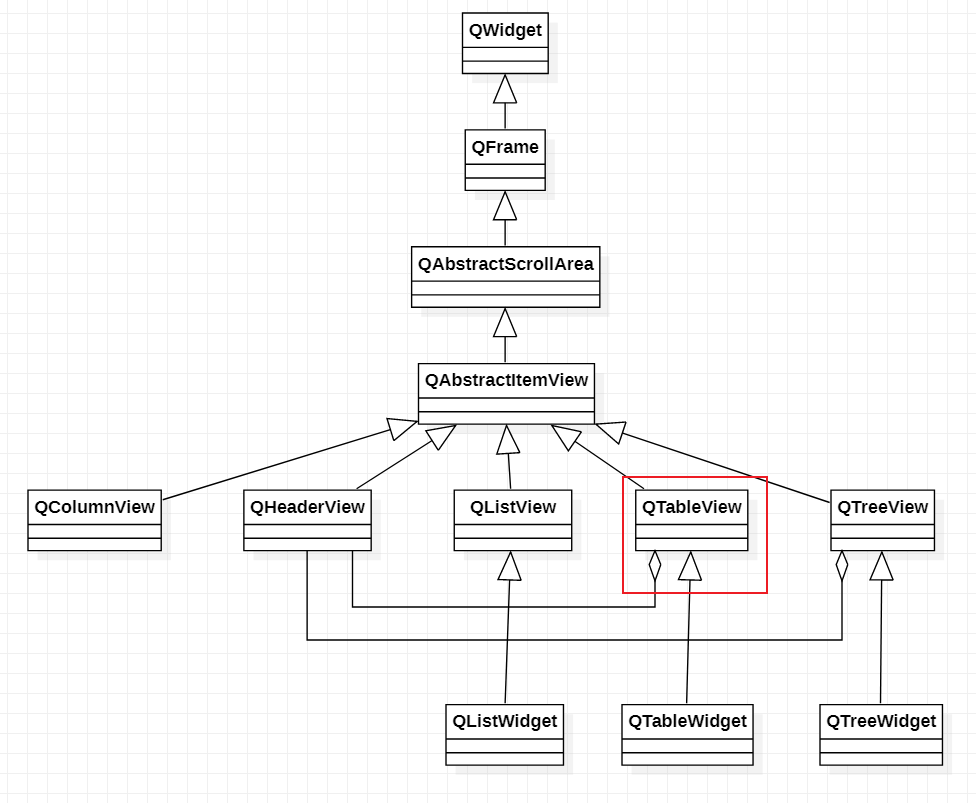
The triangle in the figure represents the generalization relationship and points to the base class. For more information about UML class diagrams, see This article.
Similar to the Model class, the C-bit of the View class is also an Abstract class: QAbstractItemView. It inherits QAbstractScrollArea, indicating that it supports scroll bars.
It derives a series of classes, and the protagonist QTableView is one of them. QTableView also contains QHeaderView, which is the horizontal and vertical title bar object of the table. therefore Last article The idea of hiding the title bar and scroll bar becomes clear: you can find the corresponding object and hide it with hide(), or find the hidden function interface of the corresponding object.
As can also be seen from the figure, various item based controls are derived from the View class.
2. Basic operation
As we know from the previous article, the number of rows and columns, data, alignment, color, etc. displayed by QTableView are determined by the Model class, so there are only these basic operations:
- Table size control inherits QWidget, so there is QWidget::resize() function;
- Table row and column size and visibility control: columnWidth(), setColumnWidth(), setColumnHidden(), isColumnHidden(), etc; Adaptive row / column size: resizeColumnsToContents();
- Table title block operation: obtain the title block with horizontalHeader();
- Table scroll bar operations: horizontalScrollBar(), setHorizontalScrollBar(), setHorizontalScrollBarPolicy();
- Grid display and text omission: setShowGrid(), setWordWrap();
As mentioned above, the function for column is also applicable to row, and the function for horizontal is also applicable to vertical.
For these contents, I would like to know more about them. The introduction here is also very brief. Just like the ASCII code table, it's good to know that it can use escape characters to represent carriage return, ringing, etc. you can check the code table when you really need to use it.
3. Advanced
This part is basically a follow-up to the previous article on custom Model classes. A little review of what we did in the last article:
- Make a pile of sparse data structures (single variable + array + structure);
- Corresponding the data into 4 * 5 tables one by one;
- Display the table content and realize the editing function;
- Slightly changed the appearance of the table to make it look less low (although still...).
To tell you the truth, it's not at all. It's too rigid. It's not like this~

This section derives its own Model class from QAbstractTableModel to implement modifiable dynamic tables.
2.1 data structure design
In this example, QTableView is used to display an editable book list, and the following data structure is designed:
//Attributes of a Book
struct Book
{
    QString name;      // title
    QString publisher;  // press
    QString type;       // category
    double price;       // Price
};
//Header corresponding to attribute (list header)
const QStringList titles = {"title", "press", "category", "Price"};
As an example, book attributes are relatively simple.
It is intended to display an editable table with a variable number of rows. If you also want the number of columns to be variable, you can redesign the data structure by yourself. The difficulty of the derived class code involved is not very different.
2.2 core code
First, according to Last article Our own MyTableModel class is derived from QAbstractTableModel to realize the basic display and modification functions. The header is no longer hidden. The horizontal header adopts the contents of the titles variable in the data, and the vertical header adopts the default number, which is mainly realized by rewriting headerData(). The following are the main codes:
virtual int rowCount(const QModelIndex &/*parent*/ = QModelIndex()) const override
    {
//        Number of books. bookList is a private variable and an array of book information is stored
        return bookList.size();
    }

    virtual int columnCount(const QModelIndex &/*parent*/ = QModelIndex()) const override
    {
//        Number of book attribute values
        return titles.size();
    }

//    The core function, the View class, fetches data from the Model, and the passed in parameters are described in the previous article
    virtual QVariant data(const QModelIndex &index, int role = Qt::DisplayRole) const
    {
        if(!index.isValid() || index.column()>=columnCount() || index.row()>=rowCount()) return QVariant();

        switch(role)
        {
//        For displaying data
        case Qt::DisplayRole:
            switch(index.column())
            {
            case 0: // title
                return bookList[index.row()].name;
                break;
            case 1: // press
                return bookList[index.row()].publisher;
                break;
            case 2: // type
                return bookList[index.row()].type;
                break;
            case 3: // Price
                return bookList[index.row()].price;
                break;

            default:
                return QVariant();
                break;
            }

            break;

    //            Alignment processing
            case Qt::TextAlignmentRole:
                return Qt::AlignCenter;
                break;

//            The rest will not be handled
        default:
            return QVariant();
            break;
        }
    }

    QVariant headerData(int section, Qt::Orientation orientation, int role = Qt::DisplayRole) const
    {
//        Horizontal meter display information
        switch(role)
        {
        case Qt::DisplayRole:
            if(orientation==Qt::Horizontal && section>=0 && section<=columnCount())
                return titles.at(section);
            break;


        default:
            break;
        }


        return QAbstractItemModel::headerData(section, orientation, role);
    }

//    Edit related functions
    virtual Qt::ItemFlags flags(const QModelIndex &index) const override
    {
        return Qt::ItemIsEditable | QAbstractTableModel::flags(index);
    }

//    Modify core functions
    virtual bool setData(const QModelIndex &index, const QVariant &value, int role = Qt::EditRole) override
    {
        if(role != Qt::EditRole || !index.isValid() || index.row()>=rowCount() || index.column()>=columnCount()) return false;

        bool ok = false;
        switch(index.column())
        {
        case 0: // title
            bookList[index.row()].name = value.toString();
            break;

        case 1: // press
            bookList[index.row()].publisher = value.toString();
            break;

        case 2: // type
            bookList[index.row()].type = value.toString();
            break;

        case 3: // Price
        // Simply judge whether it is of double type
            value.toDouble(&ok);
            if(ok) bookList[index.row()].price = value.toDouble(&ok);
            else return false;
            break;

        default:
            return false;
            break;
        }

        emit dataChanged(index, index);
        return true;
    }

private:
//    An array that stores book information
    QVector<Book> bookList;
Then realize the modification function of data rows. According to the Subclassing part of QAbstractTableModel, to add rows, you need to rewrite the insertRows() interface and call the beginInsertRows() function before modifying the data structure, then call the endInsertRows() function immediately after modifying the data. To delete a row, you need to implement the corresponding remove function. The following figure is the description in the official document for reference:
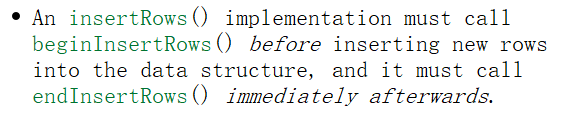

It doesn't seem difficult. It can be realized as follows:
private:
//    Row modification function: adding and deleting multiple rows
    virtual bool insertRows(int row, int count, const QModelIndex &parent = QModelIndex()) override
    {
//        When the starting row row exceeds the limit, it is corrected to be inserted at both ends
        if(row > rowCount()) row = rowCount();
        if(row < 0) row = 0;

//        You need to package the modified part of the code with the begin and end functions
        beginInsertRows(parent, row, row+count-1);

//        Add data
        for(int i = 0; i < count; ++i) bookList.insert(bookList.begin()+row+i, Book());

        endInsertRows();

        emit dataChanged(createIndex(row, 0), createIndex(row+count-1, columnCount()-1));
        return true;
    }

    virtual bool removeRows(int row, int count, const QModelIndex &parent = QModelIndex())
    {
        if(row < 0 || row >= rowCount() || row + count > rowCount()) return false;


//        You need to package the modified part of the code with the begin and end functions
        beginRemoveRows(parent, row, row+count-1);

//        Delete data
        for(int i = 0; i < count; ++i)
        {
            bookList.remove(row);
        }

        endRemoveRows();

        return true;
    }

public:
//    2 simple public interfaces
//    Add last line
    void appendRow()
    {
//    	insertRow is an inline function. It exists after overriding insertRows. Removerrow is also an inline function
        insertRow(rowCount());
    }
//    Delete last row
    void popBack()
    {
        removeRow(rowCount()-1);
    }
Finally, add the following code to the main() function to call our MyTableModel class.
//    view and model linkage
    QTableView *tbl = new QTableView;
    MyBookTableModel model;
    tbl->setModel(&model);

//    Hide scroll bar
    tbl->setHorizontalScrollBarPolicy(Qt::ScrollBarAlwaysOff);
    tbl->setVerticalScrollBarPolicy(Qt::ScrollBarAlwaysOff);


//    Prepare main interface
    QWidget w;

//    2 buttons to change the number of rows and adopt vertical layout
    QVBoxLayout *v = new QVBoxLayout;
    QPushButton *btn1 = new QPushButton("Add a row");
    QPushButton *btn2 = new QPushButton("Delete last line");

    qApp->connect(btn1, &QPushButton::clicked, [&](){
        model.appendRow();
    });
    qApp->connect(btn2, &QPushButton::clicked, [&](){
        model.popBack();
    });

    v->addWidget(btn1);
    v->addWidget(btn2);

//    The layout of the main interface adopts horizontal layout, with the table on the left and the two buttons on the right
    QHBoxLayout *h = new QHBoxLayout;
    h->addWidget(tbl);
    h->addLayout(v);

//    Set the layout of the main interface
    w.setLayout(h);

    w.show();

//    Adaptive column width when content changes
    qApp->connect(&model, &MyBookTableModel::dataChanged,[&](){

        tbl->resizeColumnsToContents();
        int width = 0;
        for(int i = 0; i < model.columnCount(); ++i)
        {
            width += tbl->columnWidth(i);
        }
        width += tbl->verticalHeader()->width();


//        Sets the minimum width of the table
        tbl->setMinimumWidth(width);
//		  Set the main window size to refresh the interface layout
        w.resize(w.minimumWidth(), 300);

    });

//    Add 2 lines at the beginning
    model.appendRow();
    model.appendRow();
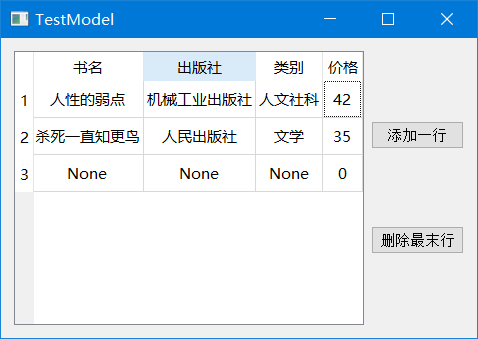
Run to see the effect:

Basically no problem with the display ~ try to modify the content and find no problem. After the content is modified, the interface will adapt to the size, and the addition and deletion of lines are OK.
4. Summary
- QTableView is a class with relatively complete encapsulation. In addition to setting surface work such as size, visibility, grid and text ellipsis, relevant contents can be completed in the Model class; The elegant use of QTableView is the lightweight of View class, and it is enough to focus on the implementation of Model;
- Overriding headerData() can handle horizontal or vertical headers in the Model class, and the processing method is similar to the data() function;
- After the insertRows() and removerrows() functions are implemented by rewriting, the number of rows in the table can be modified, but the code for modifying the data needs to be wrapped in the corresponding begin and end functions;
- Complete engineering code in Download here.
If there are mistakes, please correct them and make common progress~
Did you learn to give up today?