preface
QT provides two classes for drawing. Here is a brief introduction to the differences between them (QPainter and GraphicsView). QPainter means brush in English, and this class is painting on a plane. The picture drawn cannot be changed later. The general place to use is to make some cool controls without making major changes later; QGraphicsView is generally used for graphics management. It can manage a single graph, such as moving, zooming in and out, deleting and adding a real image model.
QGraphicsView generally consists of three parts:
1. GraphicsView: view; Look; view; (personal) opinions; opinion; Attitude; A method of understanding or thinking; Mode; Horizon; sight
2. QGraphicsScene: scene; Scene; Scene; camera lens; (esp when an unpleasant event occurs) place, scene; event; fragment
3. QGraphicsItem: item; A commodity (or article); One, one (News)
It can be understood from the above English translation that GraphicsView is a layer for placing the controls we make, scene is responsible for managing and operating our control layer, and item is our physical control layer;
Experimental purpose
Record the simple use of GraphicsView and sort out your understanding. You may also have a wrong understanding. Welcome to correct it. Let's start the code experiment.
Refactoring the GraphicsView class
In practical use, we generally need to reconstruct several signals of the GraphicsView class to provide us with the signals to operate the layer.
//Mouse movement event: used to obtain the coordinate information of our mouse in real time
void QWGraphicsView::mouseMoveEvent(QMouseEvent *event)
{
    QPoint point=event->pos();          //Coordinates of QGraphicsView
    emit mouseMovePoint(point);         //Send signal
    QGraphicsView::mouseMoveEvent(event);
}
//Left mouse button press event:
void QWGraphicsView::mousePressEvent(QMouseEvent *event)
{
    if (event->button()==Qt::LeftButton)
    {
        QPoint point=event->pos();      //Coordinates of QGraphicsView
        emit mouseClicked(point);       //Send signal
    }
    QGraphicsView::mousePressEvent(event);
}
//Mouse double click event: double click our control to display some information of the control
void QWGraphicsView::mouseDoubleClickEvent(QMouseEvent *event)
{
    if (event->button()==Qt::LeftButton)
    {
        QPoint point=event->pos();      //Coordinates of QGraphicsView
        emit mouseDoubleClick(point);   //Send signal
    }
    QGraphicsView::mouseDoubleClickEvent(event);
}
//Key event: you can set the deletion and movement of graphic operations
void QWGraphicsView::keyPressEvent(QKeyEvent *event)
{
    emit keyPress(event);    // Send signal
    QGraphicsView::keyPressEvent(event);
}
//Zoom in when the roller is far away from the user, and zoom out when the roller rotates in the direction of the user
void QWGraphicsView::wheelEvent(QWheelEvent *event)
{
    if(event->delta() > 0){
            emit MyWheelEvent("add");// Send scroll up signal
    }else{
            emit MyWheelEvent("sub");// Send scroll down signal
    }
}
Create new GraphicsView and QGraphicsScene layers
But after we have reconstructed the above QGraphicsView class, we will start our drawing project production;
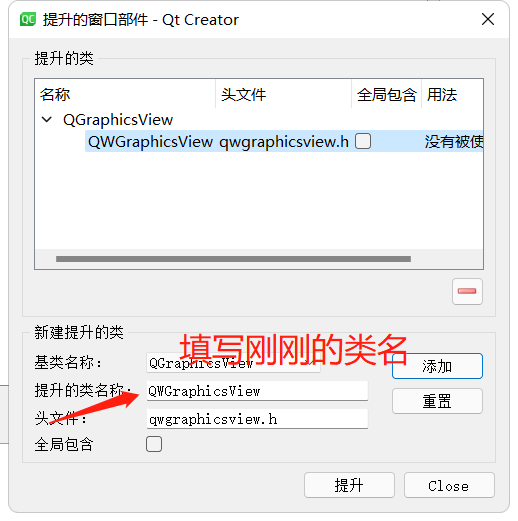
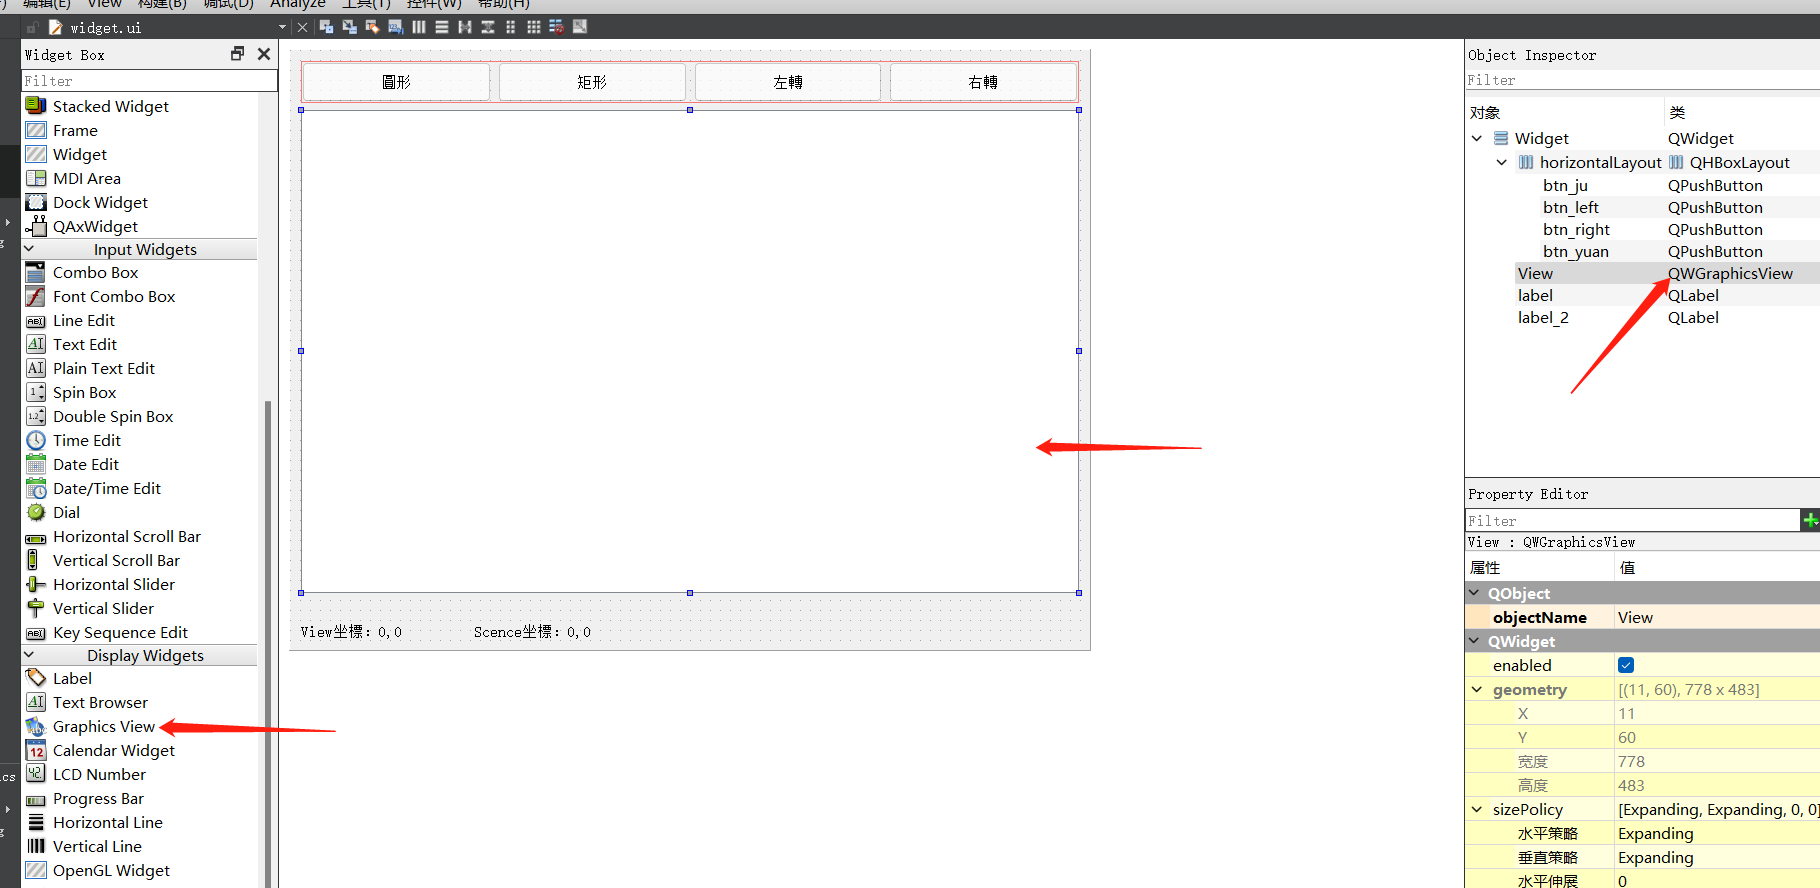 First, we drag a GraphicsView control to our screen, and then promote it to our inherited class;
 Then we start to define the sense layer we need to use and the key that our item needs to store data. Here, the item should use a map type to store data. One key corresponds to one data. Next, I define an enumeration corresponding to the key that stores ID and the data key of Chinese characters, and then I also define two variables, an ItemNum used to store the number of current items, When we create an item, we can use this value as a self addition operation and save it in the key assigned to the ID,
    enum{
        ITEMID = 1, // IDkey
        ITEMDATA	// dataKey
    };
	QGraphicsScene *scene; // item management layer
    int seqNum=0;				// Number of ID S
    int layers;				// Number of layers
Then we set the properties of view and bind our scene layer on the main page
	scene=new QGraphicsScene(-300,-200,600,200); //Create QGraphicsScene
    ui->View->setScene(scene);              //Associated with view
    ui->View->setCursor(Qt::CrossCursor);   //Set mouse
    ui->View->setMouseTracking(true);       //Mouse capture
    ui->View->setDragMode(QGraphicsView::RubberBandDrag); // Set drag mode
Here our layer is built, and now we begin to draw our first item graph
Draw Item graphic control
Draw circle
// You can adjust this property to get different shapes, such as ellipses
    QGraphicsEllipseItem   *item=new QGraphicsEllipseItem(-50,-50,100,60);
    item->setFlags(QGraphicsItem::ItemIsMovable
/*This item supports interactive movement with the mouse. By clicking and dragging an item, the item moves with the mouse cursor. If the project has children, all children are also moved. If the item is part of the selection, all selected items are also moved. This function is provided through the basic implementation of QGraphicsItem's mouse event handler. */
                   | QGraphicsItem::ItemIsSelectable
/*This item supports selection. Enabling this feature enables setSelected() to toggle the selection of items. It also allows you to automatically select items by clicking on them or using the rubber band selection in QGraphicsView when calling QGraphicscene:: setSelectionArea().*/
                   | QGraphicsItem::ItemIsFocusable);
/*This item supports keyboard input focus (that is, it is an input item). Enabling this flag allows items to receive focus, which again allows key events to be passed to QGraphicsItem:: keyPressEvent() and QGraphicsItem:: keyReleaseEvent().*/
// More setting options can be viewed through F1
    item->setBrush(QBrush(Qt::cyan)); // Set brush color
    item->setPos(-50+(qrand() % 100),-50+(qrand() % 100)); // Set the placement position of the item here, and place it randomly at - 50, 50 coordinate points near the central coordinate point
	item->setZValue(++layers);
    item->setData(ITEMID,++seqNum);
    item->setData(ITEMDATA,"circular");

    scene->addItem(item);
    scene->clearSelection();
    item->setSelected(true);
draw rectangle
    QGraphicsRectItem   *item=new QGraphicsRectItem(-50,-25,100,50);
    item->setFlags(QGraphicsItem::ItemIsMovable
                   | QGraphicsItem::ItemIsSelectable
                   | QGraphicsItem::ItemIsFocusable);
    item->setBrush(QBrush(Qt::yellow));
    item->setPos(-50+(qrand() % 100),-50+(qrand() % 100));
	item->setZValue(++layers);
    item->setData(ITEMID,++seqNum);
    item->setData(ITEMDATA,"rectangle");

    scene->addItem(item);
    scene->clearSelection();
    item->setSelected(true);
Draw triangle
    QGraphicsPolygonItem   *item=new QGraphicsPolygonItem;
    QPolygonF   points;
    points.append(QPointF(0,-40));
    points.append(QPointF(60,40));
    points.append(QPointF(-60,40));
    item->setPolygon(points);
    item->setPos(-50+(qrand() % 100),-50+(qrand() % 100));

    item->setFlags(QGraphicsItem::ItemIsMovable
                   | QGraphicsItem::ItemIsSelectable
                   | QGraphicsItem::ItemIsFocusable);
    item->setBrush(QBrush(Qt::magenta));
	item->setZValue(++layers);
    item->setData(ITEMID,++seqNum);
    item->setData(ITEMDATA,"triangle");

    scene->addItem(item);
    scene->clearSelection();
    item->setSelected(true);
Draw text
 //Add text
    QString str=QInputDialog::getText(this,"Enter text","Please enter text");
    if (str.isEmpty())
        return;
    QGraphicsTextItem   *item=new QGraphicsTextItem(str);
    QFont   font=this->font();
    font.setPointSize(20);
    font.setBold(true);
    item->setFont(font);
    item->setFlags(QGraphicsItem::ItemIsMovable
                   | QGraphicsItem::ItemIsSelectable
                   | QGraphicsItem::ItemIsFocusable);
    item->setPos(-50+(qrand() % 100),-50+(qrand() % 100));
    item->setZValue(++layers);
    item->setData(ITEMID,++seqNum);
    item->setData(ITEMDATA,"written words");

    scene->addItem(item);
    scene->clearSelection();
    item->setSelected(true);
draw a straight line
    QGraphicsLineItem   *item=new QGraphicsLineItem(-100,0,100,0);
    item->setFlags(QGraphicsItem::ItemIsMovable
                   | QGraphicsItem::ItemIsSelectable
                   | QGraphicsItem::ItemIsFocusable);

    QPen    pen(Qt::red);
    pen.setWidth(3);
    item->setPen(pen);

    item->setZValue(++frontZ);
    item->setPos(-50+(qrand() % 100),-50+(qrand() % 100));
	item->setZValue(++layers);
    item->setData(ITEMID,++seqNum);
    item->setData(ITEMDATA,"straight line");

    scene->addItem(item);
    scene->clearSelection();
    item->setSelected(true);
After learning the above drawing methods, you can actually do a lot of things. Here are the operations of extending several controls
Combine, scatter, pre and post
combination
The specific implementation method is to introduce a QGraphicsItemGroup class, add the selected control to the group, turn off the selection, focus and function of each individual item, and then add the group to the view for display. Breaking up is to take out all the items in the group and ungroup them.
    int cnt=scene->selectedItems().count();
    if (cnt>1)
    {
       QGraphicsItemGroup* group =new QGraphicsItemGroup; //Create combination
       scene->addItem(group); //Add a combination to the scene

        for (int i=0;i<cnt;i++)
        {
            QGraphicsItem* item=scene->selectedItems().at(0);
            item->setSelected(false); //Clear the selection dashed box
            item->clearFocus();
            group->addToGroup(item); //Add to combination
        }
        group->setFlags(QGraphicsItem::ItemIsMovable
                       | QGraphicsItem::ItemIsSelectable
                       | QGraphicsItem::ItemIsFocusable);

        group->setZValue(++layers);
        scene->clearSelection();
        group->setSelected(true);
     }
Break up
int cnt=scene->selectedItems().count();
    if (cnt==1)
    {
        QGraphicsItemGroup  *group;
        group=(QGraphicsItemGroup*)scene->selectedItems().at(0);
        scene->destroyItemGroup(group);
     }
Control front
Here, we only need to set the current number of layers through the setZValue interface to achieve the effect.
    int cnt=scene->selectedItems().count();
    if (cnt>0)
    {
        QGraphicsItem* item=scene->selectedItems().at(0);//Get the first item selected
        item->setZValue(++layers);
    }
Control post
    int cnt=scene->selectedItems().count();
    if (cnt>0)
    {
        QGraphicsItem* item=scene->selectedItems().at(0);
        item->setZValue(0);
    }
After completing these functions, we combine the mouse, buttons and wheel time in front of us
Binding function event
In this connection signal, I set the selected item and press Delete to delete the selected control. It should be noted that when multiple controls are deleted, when traversing the control, the value in the scene - > selecteditems(). Count() function will change every time the signal comes in, so we delete the selected low at (0) control every time the right is deleted;
Press the key up, down, left and right to move a single item control, which needs to be changed. Here, the coordinate setting interfaces setX and setY of item are used, that is, to set the coordinates of item. Here, the movement of coordinates can be realized by adding and subtracting the xy coordinate information of item. The range of movement can be designed according to your own needs;
The space here is used to set the angle of the item control. Item also provides an angle interface setRotation. Here, the current angle value of item will be obtained, and then the angle can be changed by adding and subtracting.
/* Keyboard key monitoring */
    connect(ui->View,&QWGraphicsView::keyPress,this,[=](QKeyEvent *event){
        do {
            QGraphicsItem   *item;
            int scencSelectCount = scene->selectedItems().count();
            qDebug() << scene->selectedItems().count() <<endl;

            if(Qt::Key_Delete == event->key() && scencSelectCount>=1){
                for (int i = 0;i < scencSelectCount;i++) {
                    item=scene->selectedItems().at(0);//Delete the first one every time
                    scene->removeItem(item);
                }
                break;
            }
            if (scencSelectCount!=1)
                break; //No drawing items are selected, or more than 1 are selected
            item=scene->selectedItems().at(0);
            if(Qt::Key_Left == event->key()){
                item->setX(-1+item->x()); //Shift left
                break;
            }
            if(Qt::Key_Right == event->key()){
                item->setX(1+item->x());//Shift right
                break;
            }
            if(Qt::Key_Up == event->key()){
                item->setY(-1+item->y());//Move up
                break;
            }
            if(Qt::Key_Down == event->key()){
                item->setY(1+item->y());//Move down
                break;
            }
            if(Qt::Key_Space == event->key()){
                item->setRotation(90+item->rotation());//Rotate 90 degrees
                break;
            }
        } while (false);
    });
Here, the mouse scrolling is monitored, but there is only one time for the selected control (judged by selectedItems().count()) to judge the direction of the mouse wheel, and then use the scale parameter provided by item, that is, the size, and then stack it in a percentage way to enlarge and shrink the item.
 /* Mouse wheel event */
    connect(ui->View,&QWGraphicsView::MyWheelEvent,this,[=](QString str){

        if (scene->selectedItems().count()!=1)
            return; //No drawing items are selected, or more than 1 are selected
        QGraphicsItem   *item=scene->selectedItems().at(0);
        if (str == "add"){
            item->setScale(0.1+item->scale());//enlarge
        }else{
            item->setScale(-0.1+item->scale());//narrow
        }
    });
The mouse movement event is monitored here. The data sent by this signal is a QPoint. Its coordinates refer to the coordinate information of our view layer. It takes the upper left as the center point, and the coordinates of our scene are centered on the coordinate axis
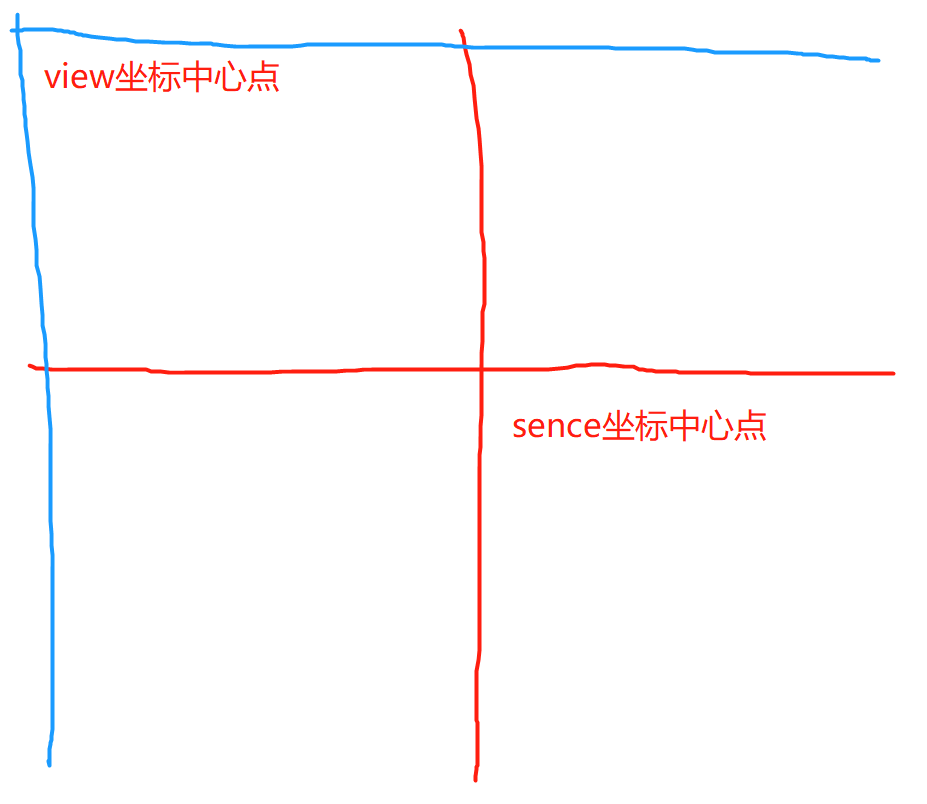 The blue intersection is 0,0 of view and the red intersection is 0,0 of sense;
/* Mouse movement events are used to obtain coordinates */
    connect(ui->View,&QWGraphicsView::mouseMovePoint,this,[=](QPoint point){
        QPointF pointScene=ui->View->mapToScene(point); //Convert to Scene coordinates
        ui->label->setText(QString::asprintf("View Coordinates:%d,%d  Scene Coordinates:%.0f,%.0f",                                           point.x(),point.y(),pointScene.x(),pointScene.y()));
    });
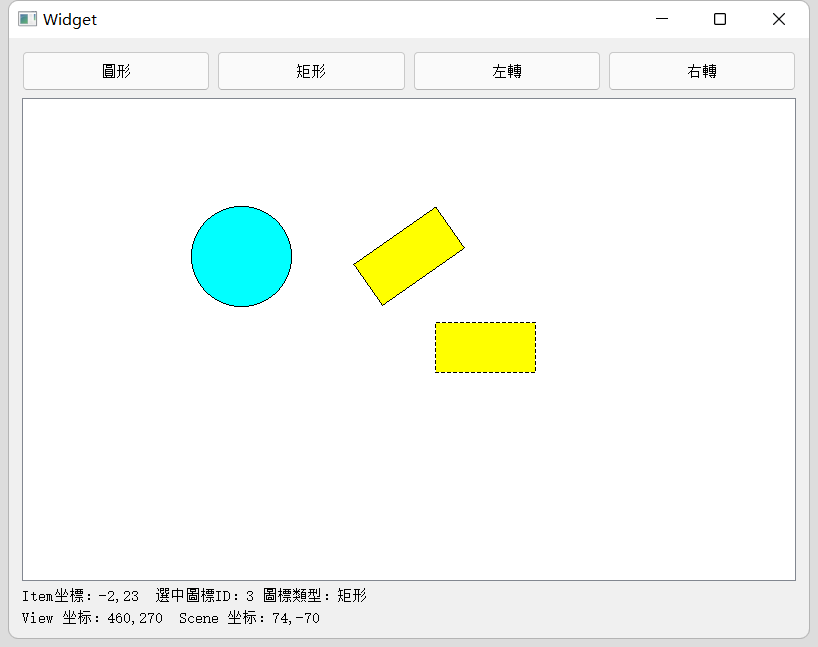
However, when the left mouse button is pressed, a coordinate position is transmitted, and then we convert this coordinate position into the send coordinate, and then the send layer is used to find out whether there is an item control for this coordinate. Here, an empty item is created to accept the return result of this search. If the return is not empty, we can display the coordinate information and icon type of this item, In addition, we set the data attribute for this item, which is also specified according to requirements. If the selected position is empty, we can make a flag. If the draw button is pressed here, we can draw an item.
/* Left click event */
    connect(ui->View,&QWGraphicsView::mouseClicked,this,[=](QPoint point){
        QPointF pointScene=ui->View->mapToScene(point);         //Convert to Scene coordinates

        QGraphicsItem  *item=NULL;
        item=scene->itemAt(pointScene,ui->View->transform());   //Gets the drawing item under the cursor

        if (item != NULL) //There are drawing items
        {
            QPointF pointItem=item->mapFromScene(pointScene);   //Convert to local coordinates of drawing item
            ui->label_2->setText(QString::asprintf("Item Coordinates:%.0f,%.0f  Select Icon ID: %1 Icon type:%2",
                                         pointItem.x(),pointItem.y())
                                        .arg(item->data(ItemId).toString())
                                        .arg(item->data(ItemDesciption).toString()));
        }else if(yuanFlag){ //Judge whether there is a painting flag
            QGraphicsEllipseItem   *item=new QGraphicsEllipseItem(-50,-50,100,100);
            item->setFlags(QGraphicsItem::ItemIsMovable
                           | QGraphicsItem::ItemIsSelectable
                           | QGraphicsItem::ItemIsFocusable);
            item->setBrush(QBrush(Qt::cyan));
            item->setPos((pointScene.x()+10),(pointScene.y()+10));

            item->setData(ITEAID,++seqNum);
            item->setData(ITENDATA,"circular");

            scene->addItem(item);
            scene->clearSelection();
            item->setSelected(true);
            yuanFlag = false;
        }

    });
Double click the signal. The required function is not written here for the time being
/* Mouse double click event */
    connect(ui->View,&QWGraphicsView::mouseDoubleClick,this,[=](){

    });
summary
This article only briefly introduces the basic operation of GraphicsView. Mastering the use of this class can also do a lot of fun and interesting programs. In this era when the Internet is so developed, make good use of the knowledge on the network to enrich yourself, and let the pit you step on make progress together through sharing.
Programming is a long thing. I can't use the tip of the iceberg to measure the height of the iceberg, and I can't use the state of mind of a swallow and a sparrow to describe the ambition of a swan. I just hope to be clean and pursue hard, and I'm willing to find the starry sky for the swallow and finch.
Reference blog:
Difference between QPainter and QGraphicsView
Qt5.9 Graphics View is the simplest way to make drawings
Program example Extraction code: lloh
GraphicsViewDemo Alibaba cloud personal code demo